mcs1056
-
Posts
183 -
Joined
-
Last visited
mcs1056's Achievements
MCM Friend (4/6)
-
My newest irk: Copycat Videos A4Garage and Kenji'sPlasticModels are...well...models of this hobby. There are several others, too. HPIGuy is among those who does a really watchable presentation. All end with admirable results. Lately, though, I've seen some videos where they seem desperate to be the next A4. With much drama, the art of sanding is presented. Black backlighting, stainless "parts presentation" platforms, and often...no glue (some seem like dry fit videos). Taking eight seconds to display their scalpel or paint marker, too. All done in silence, on a spotless work bench, and seemingly lacking the ingenuity and skill of the aforementioned contributors. The ADD bothers me, too. Bouncing from sanding body lines to the engine build, then back to body sanding, followed by wheel assembly...I couldn't watch anymore. OK. I'm done. Plus, there are kids at whom I need to yell to get off my lawn.
-
Well. I'll be honest with ya...that one doesn't really bother me, to tell you the truth.
-
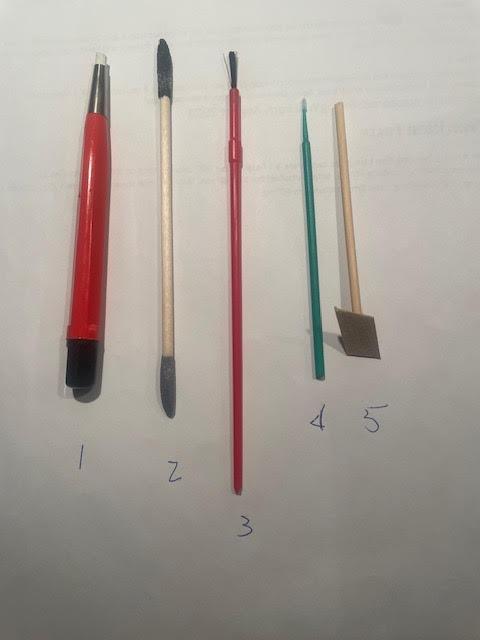
If this isn't solved, and you want to keep the good chrome on the bumper, perhaps one of these will work... 1. A fiberglass abrasive pen. 3 ea. for $7 today on Amazon. Search "Fiberglass Scratch Brush Pen." 2. Abrasive sanding sticks. These are heavy grit. $9.99 today on Amazon. Search "Leriton 60 pcs Sanding Sticks Double End." 3. A fairly fine paint brush. Hold the bumper so the "well" you're trying to strip is level. Brush on some paint stripper. Wash and repeat with whatever you'd use to strip the chrome. 4. A disposable micro-applicator. Same process as (3), above, but much smaller. $11.99 on Amazon. Search "400 Regular Micro Applicators - Disposable Dental Brushes." 5. A stick. I cut a piece of a fingernail sanding stick and glued it to a stirring stick. The one pictured is bigger than you'd need, but you can make custom. I see no need to chuck that bumper. I hope this, or any of the great ideas presented so far, gets you through this.

-
The is a WIDE gap in this request. Perhaps the original poster could clarify. I mentioned elsewhere that I paid WAY too much for a set of custom decals. They also took forever. This drove me to buy an inkjet printer to go with my laser unit. I can now make SOME for myself. However, the decals I had made were definitely custom. I sent pics of an old local milk delivery truck from the 60's. I sent chips of the paint colors I needed duplicated. I sent pics of the individual decals I needed, with scaled sizes indicated. After a long delay, he sent a proof of his interpretation. I replied with my desired corrections, which he implemented. After another long delay, I got my decals...six sets of them. (I don't know if any five [four if I screw up a set] of you here wants to make a Twin Pines Dairy (Detroit) DIVCO delivery truck model, but I have the decals. Whatever you pay, I'll send 1/2 to the guy who made them.) Anyway, the less-long winded version is; If you want custom, get out your wallet, be specific, and be patient. If you want something from an existing kit, ask for that. Someone has them.
-

Quality kits for 6/7 year olds
mcs1056 replied to seanyb505's topic in Model Building Questions and Answers
I have one Revell Star Wars Imperial Patrol Speeder kit (#85-1676), which has two snap-fit models to build. Though they're snap kits, glue can still be used whenever you'd want them to get that practice. They also need no paint, but you could let them do whatever you want there, too. I also have a Polar Lights "Green Hornet - Black Beauty" 1:32 scale kit (#POL994M/12). Though the box indicates Skill 2, it also says it's "perfect for beginners." I don't know how good either kit really is. If you want them, I'll send for free (I'll cover the shipping). Just PM your info. -
That is really cool. A buddy in my youth had one. I couldn't afford one, so I ended up with a single speed, coaster brake Sears "Spyder," which was their version of the Stingray. I did just score a Chicago Stingray Fairlady for $50 (it came with two other Chicago Schwinn 10-speeds). I got it to restore for my "due-in-January" granddaughter. However, she will be years away from riding it. That, plus the banana seat can sell for $200 in its current condition. I mean...I'm gonna love that kid, but $200 for one part???
-
Sometimes, that's the stuff I appreciate most. I hate buying something I can make or modify cheaply. My latest example is refusing to buy the PE bending tools. I made a straight one. and another with concave and convex curves, from a set of door hinges. Zero dollars and some fun on the grinding wheel. Nothing from Dspaie works any better. My paint shaker is sticky tape on a vibrating fingernail sander gizzie I got for $3 at Ollie's, which, by the way, does everything the name brand tools do when used as a sander. Want an "ultrasonic" knife? Sharpen the bit on a $25 dental plaque remover from the jungle store. Hot knife through butter (almost).
-
Any chance the new place will bring the latest posts up to the top of each section? Asking for a friend.
-
First; We live on a lake. Ducks are AWESOME. The geese are OK. It's the swans...the darned swans. These would be the mama brown bears of the waterfowl world. On a kayak? Not on THEIR lake. Have your own private beach (for which you paid thousands of dollars)? Not without MY poop. Have a dog? OK...he's scary, but we pretend were not afraid until he gets close. At least they're mute swans, so we don't have to listen to them. Now; On to my goose story. My brother runs an HVAC shop. Among the things they can do is install heated driveways. Well, before he got one customer to agree, he promised that, if there was any of that white stuff on his drive this winter, he'd personally come to shovel it. December arrives, and my brother gets "The Call." "There's white stuff all over my driveway. Bring your shovel." He arrives to find the driveway covered with white goose and duck poop. See, that drive was now the only warm place in the neighborhood, and where do animals congregate when it's cold? He never made that promise again.
-
So, I got the pictured stuff and also a roll of .1mm and .2mm. All form well. I folded some over a steel ruler to make a channel with no problem. A bit of annealing would make them super easy to fold. Cutting with standard scissors was OK, and this is where annealing would really help. The rolls are about 3/8" wide, which works for anything I can think of so far, and they're approximately "more than I'll ever use" long. In summary; Very happy with this purchase. The only thing lacking is the skill to use them effectively.
-
'F O R D ' hood lettering ?
mcs1056 replied to jdcar32's topic in Model Building Questions and Answers
I saw a video wherein the builder wetted a business card with paint and used that to touch just the tops of the emblems. -
AGREED! How could I live without my sequential turn signals, my interior lights that slowly dim instead of just shutting off, my 30 presets on the radio I don't use (well...who uses the radio?), my infinitely adjustable electric seats (which, by the way, means I'm NEVER happy, because they're infinite and could always be better. I'm happier with the four-position lever/cable combo on my F100), or the 17-inch flat screen I can't use?
-
This is as close as I can get... It hasn't arrived yet, so I don't know if it's viable. For seven bucks, it's worth a shot. Besides, I do have a small welder to make battery packs with this type of strip, so... I'll report back. There may be aome annealing required.
-
My son plans to be a film-maker. I've told him he should make a short with a clone of Oak Island, with the trucks and drills and sorters & stuff. He should have a drone shot from overhead where he begins to zoom out. Then, in the background, you see Bill Murray in a rowboat, paddling up to a tiny island behind the focus island (a lot of the overhead shots in the series do, indeed, show islands in the background). He gets out of the boat and tries to set an anchor on the beach, but hits something. Digging with bare hands, he discovers a treasure chest with the Holy Grail inside, chucks it in his boat, and paddles away.
-
So I carry a very thin wallet. I hate the George Costanza, "receipts from eight years ago" wallets the size of a pillow. Thus, if something is going to cost $5.37, I will present $11.00. I'll just have my $5 and the coins, thank you. OK. Full Disclosure; I think I may really do it to watch the confusion of the cashier's face as they try to figure it out.