Wolfangel
-
Posts
56 -
Joined
-
Last visited
Content Type
Profiles
Forums
Events
Gallery
Everything posted by Wolfangel
-
Revell London Bus
Wolfangel replied to Wolfangel's topic in WIP: Model Trucks: Big Rigs and Heavy Equipment
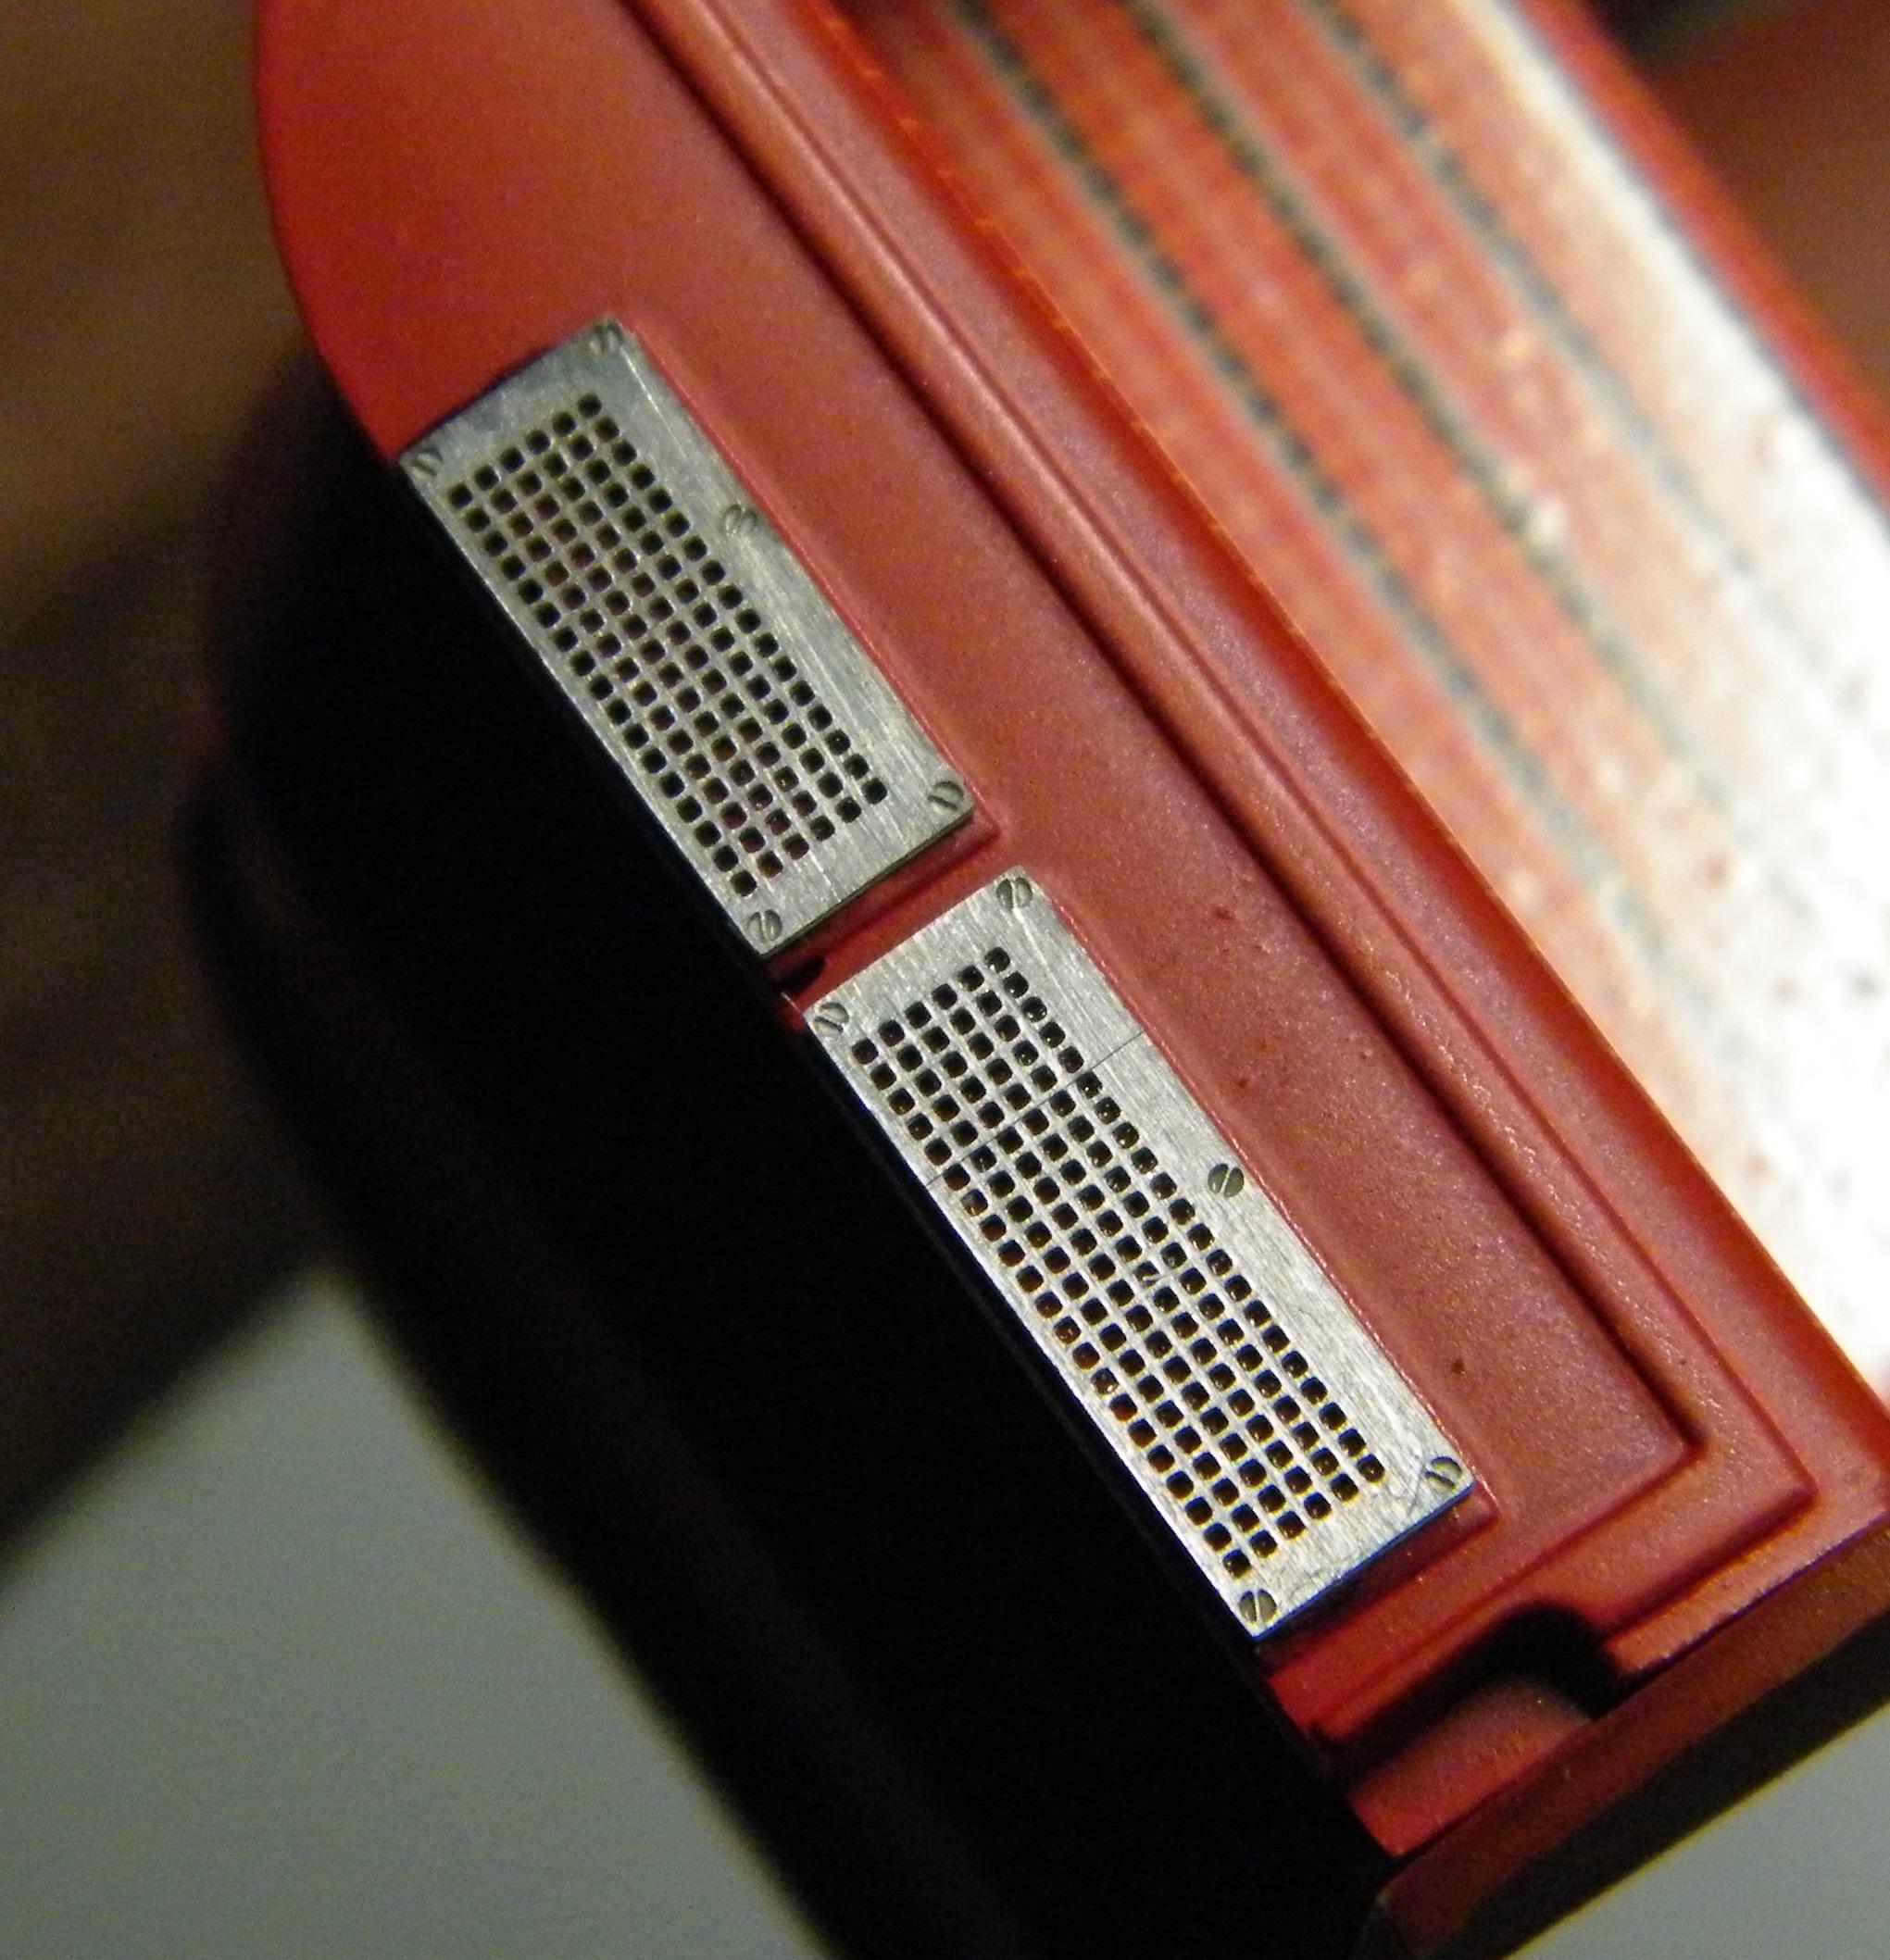
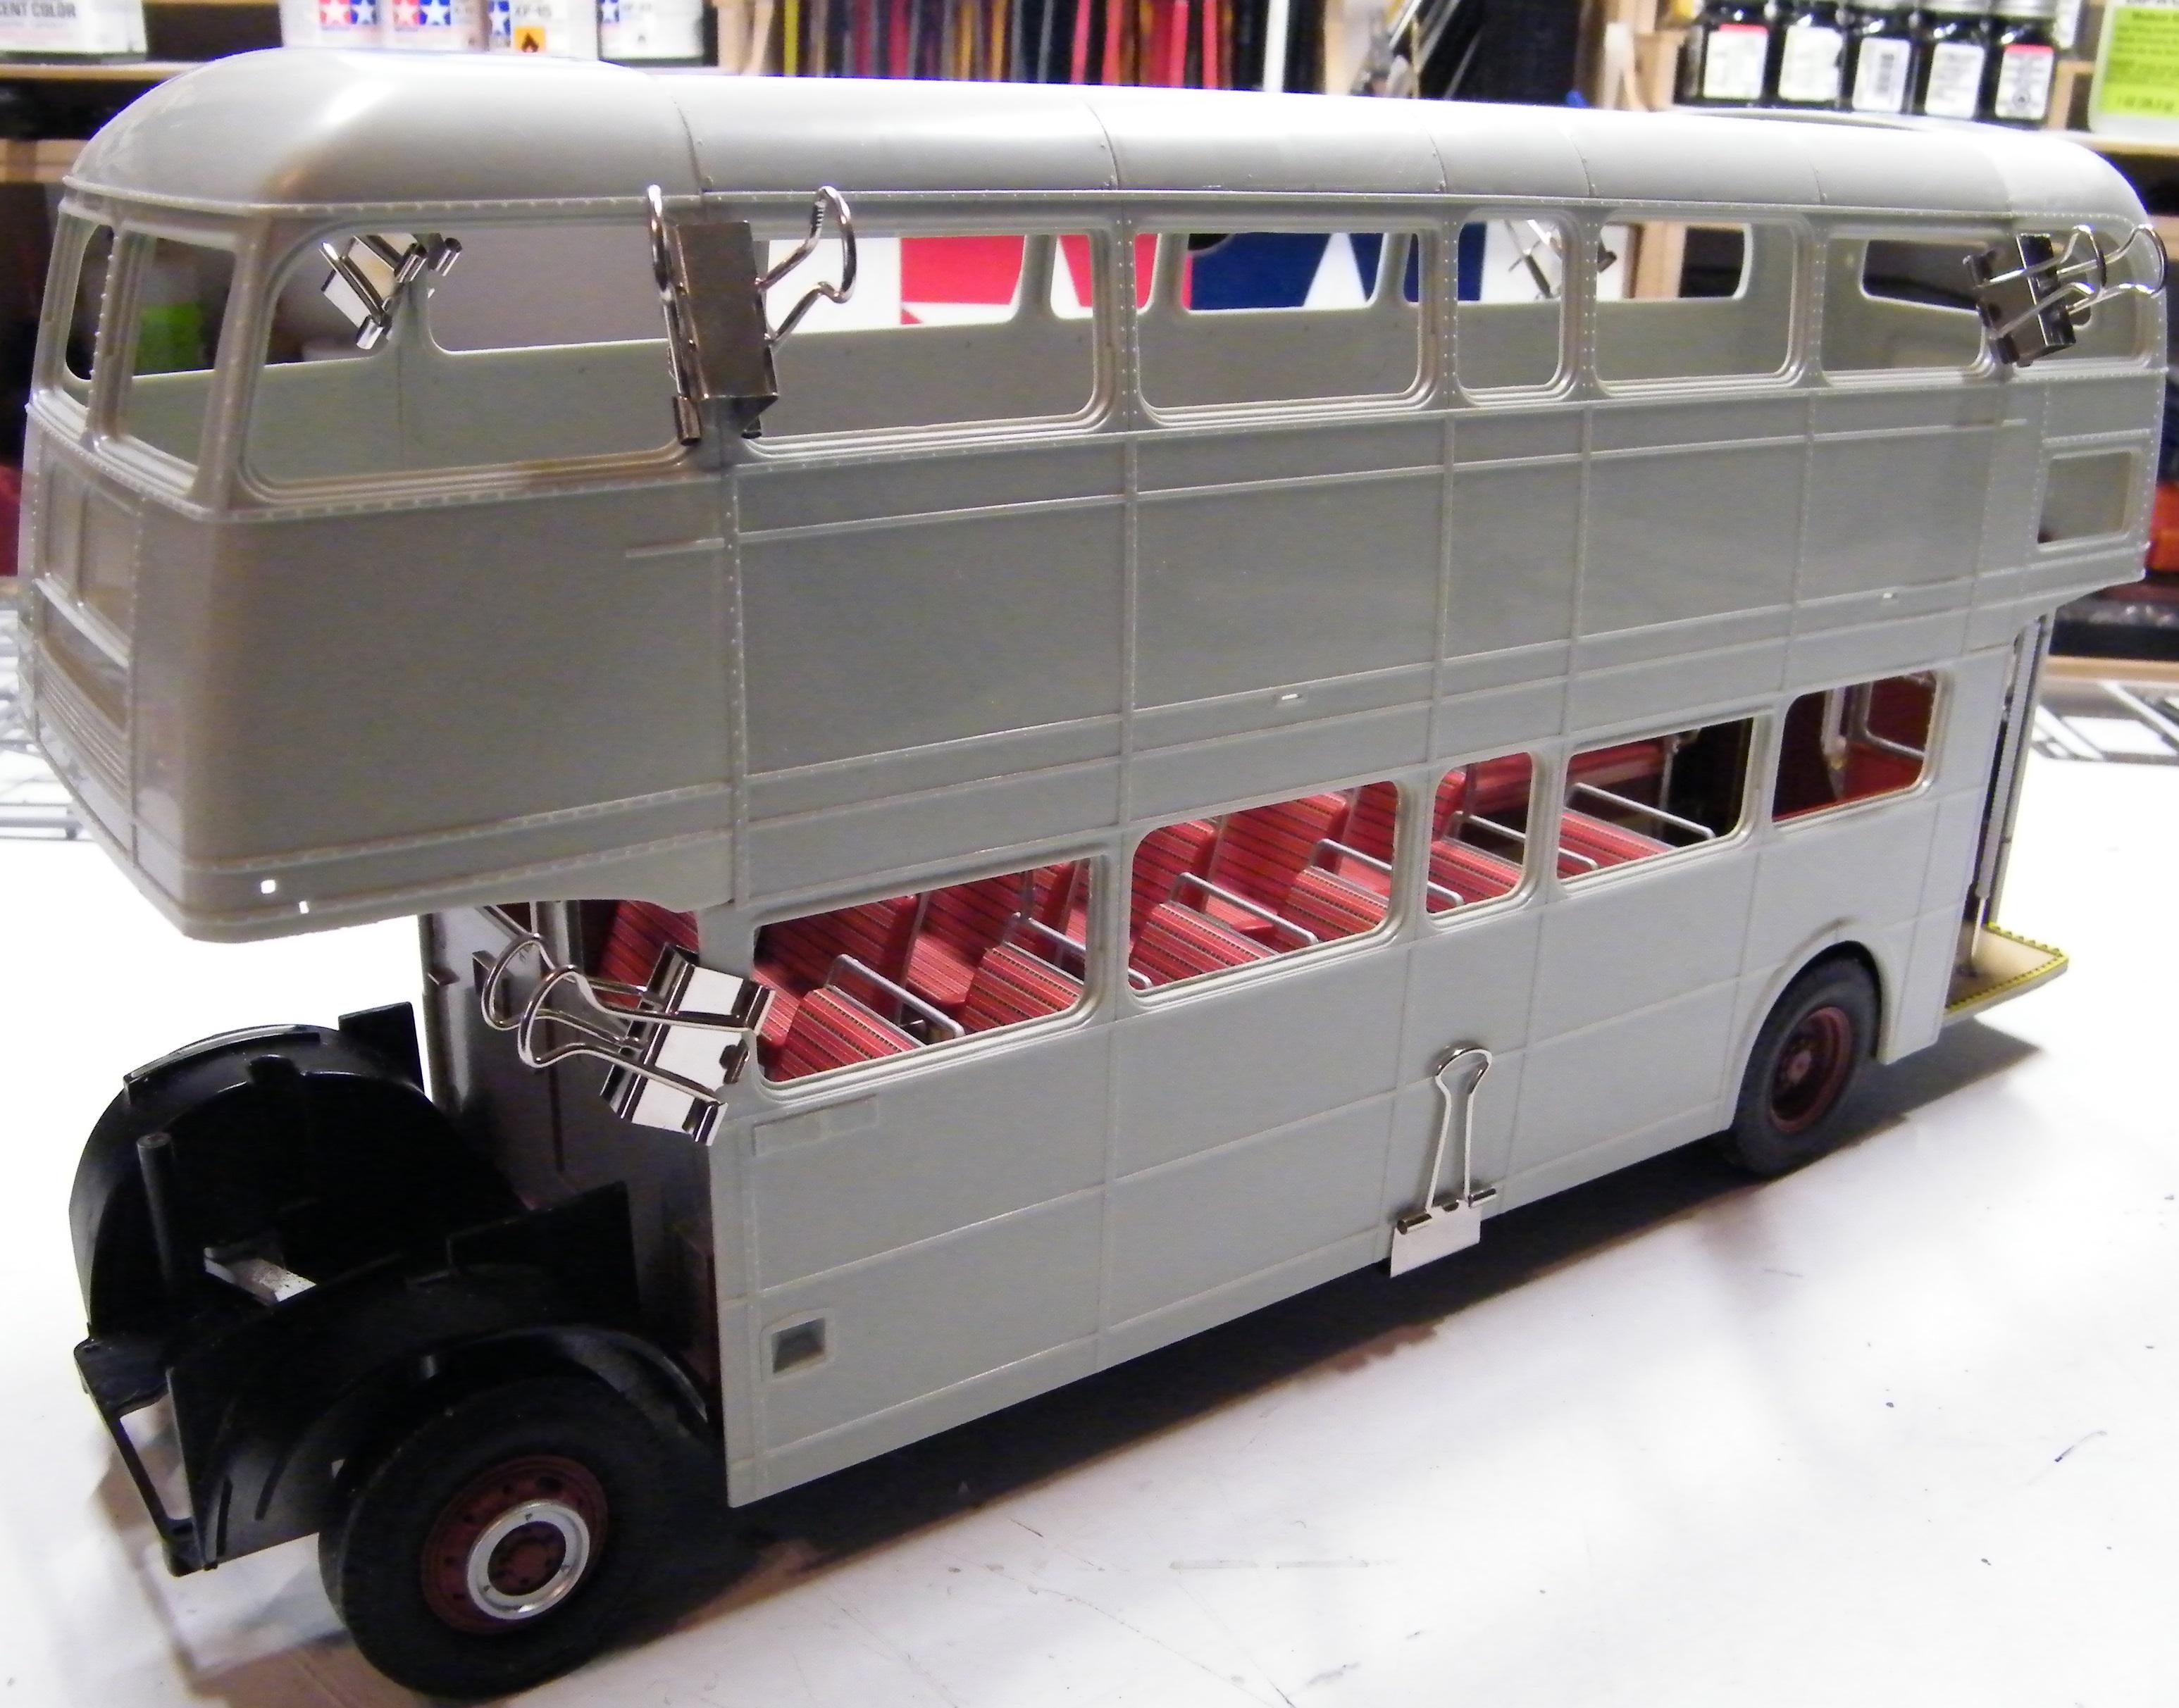
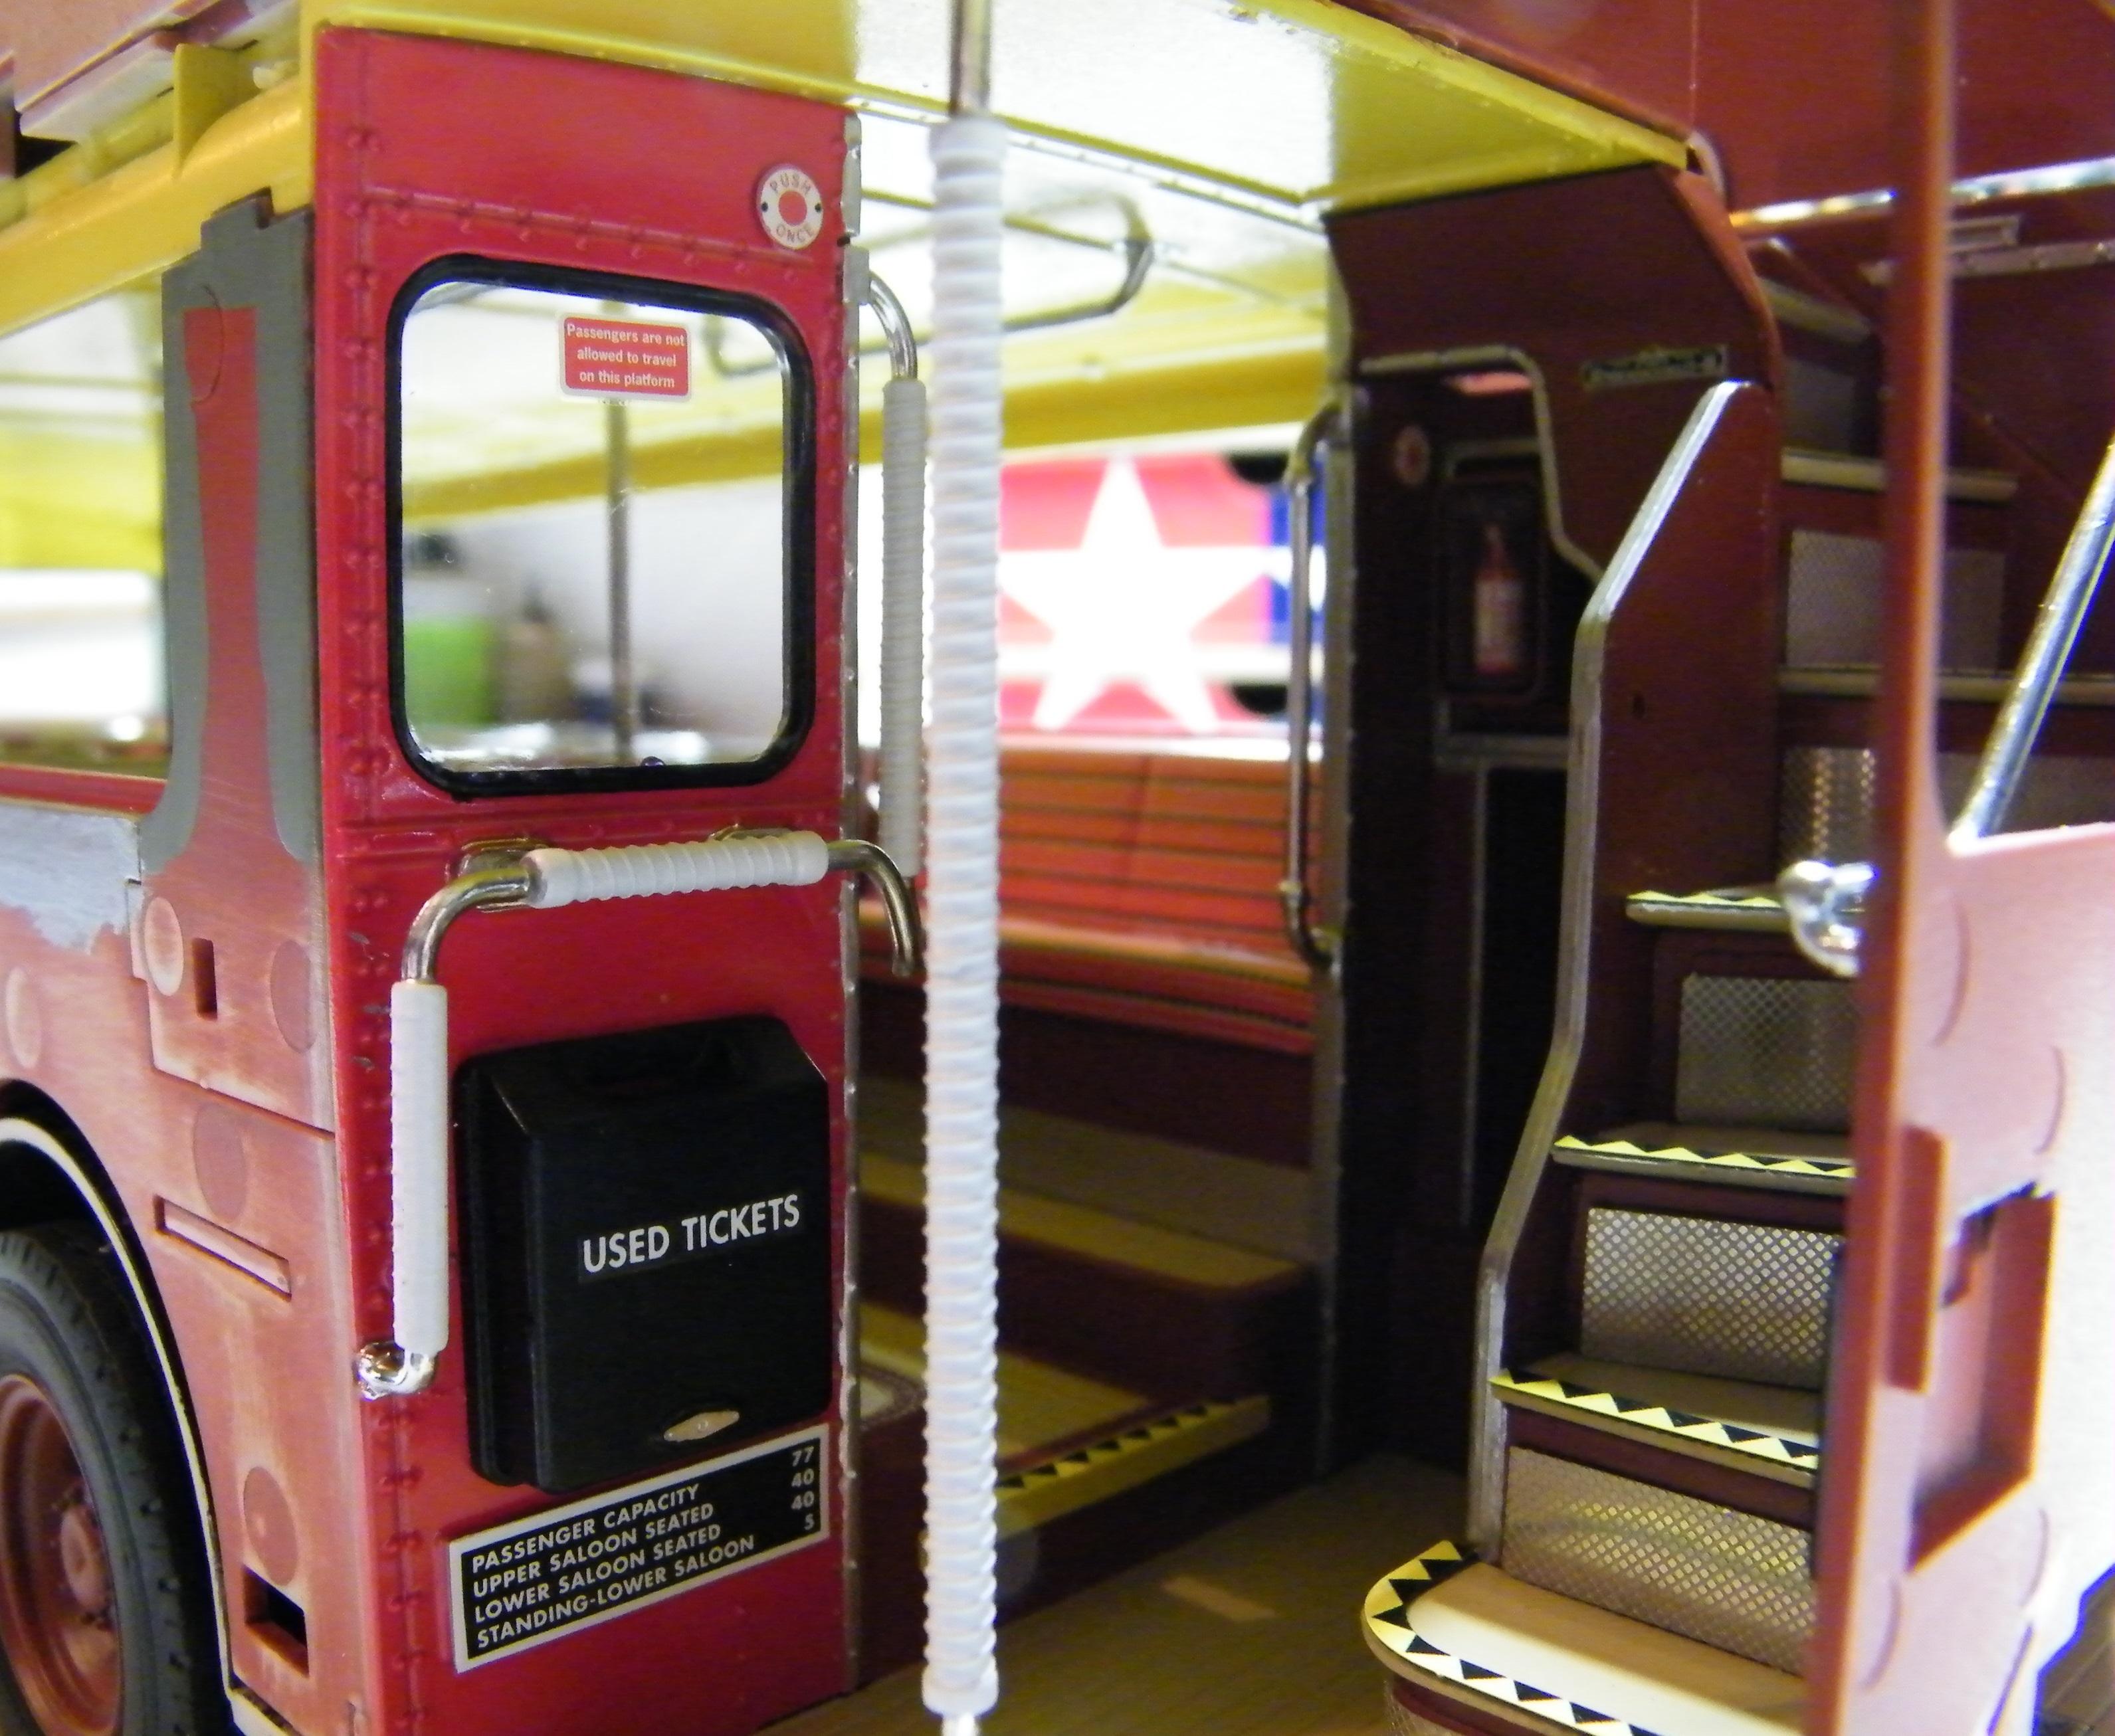
Well.....3 1/2 - 4 hours later.......there is now an upper deck with all the seats. These seemed to fight me a little bit this time...unlike the lower deck. Decals ripped....didn't want to go on right....but...I overcome all that and got them done (maybe I was going crazy from looking at all the plaid and stripes)...lol. I also took pictures of some of the photo-etch that is being used.....heater vents, lower back of the seats, kick panels. This bus has a total of 34 seats to decal and put together. A few years ago I built the Cityliner bus....and it has 60 seats. You combine both of these busses and you have about 23 or 24 model CARS worth of seats....lol. I have used 66 PIECES of photo-etch so far on this thing....and still got more to go. Its moving right along tho. I'm very happy with the results so far.
-
Revell London Bus
Wolfangel replied to Wolfangel's topic in WIP: Model Trucks: Big Rigs and Heavy Equipment
Let the assembly line begin. In case anybody is wondering what all goes into every seat.....here it is. There are 20 seats on the upper floor....19 of those have seat frames and legs...the other seat goes to the back with no frame or legs..........and on the bottom floor there are 14 seats....12 of those have seat frames and legs....the other 2 go to the back on each side with no frames or legs (look at first post)....and 2 decals for EVERY seat. And at the top right of the picture....is the photo-etch rails that go on the back bottom edge of EVERY SEAT. This is basically how much goes into each seat. Another tip: I left the seats and the seat frames on the parts trees. I just cut away all the connection points except for the bottom edge of each one...then cleaned up all the little nubs from the other areas. That way they can be all painted at once. I did the same thing to the seats themselves. Saves a lot of time and you get the same coverage on all seats. The main color I am using is a mica red that has been dull coated to give a vinyl sheen. There ARE right and left hand seats and left and right hand decals....just be careful of that....that is why I have them separated like this. Let the fun begin.....
-
Revell London Bus
Wolfangel replied to Wolfangel's topic in WIP: Model Trucks: Big Rigs and Heavy Equipment
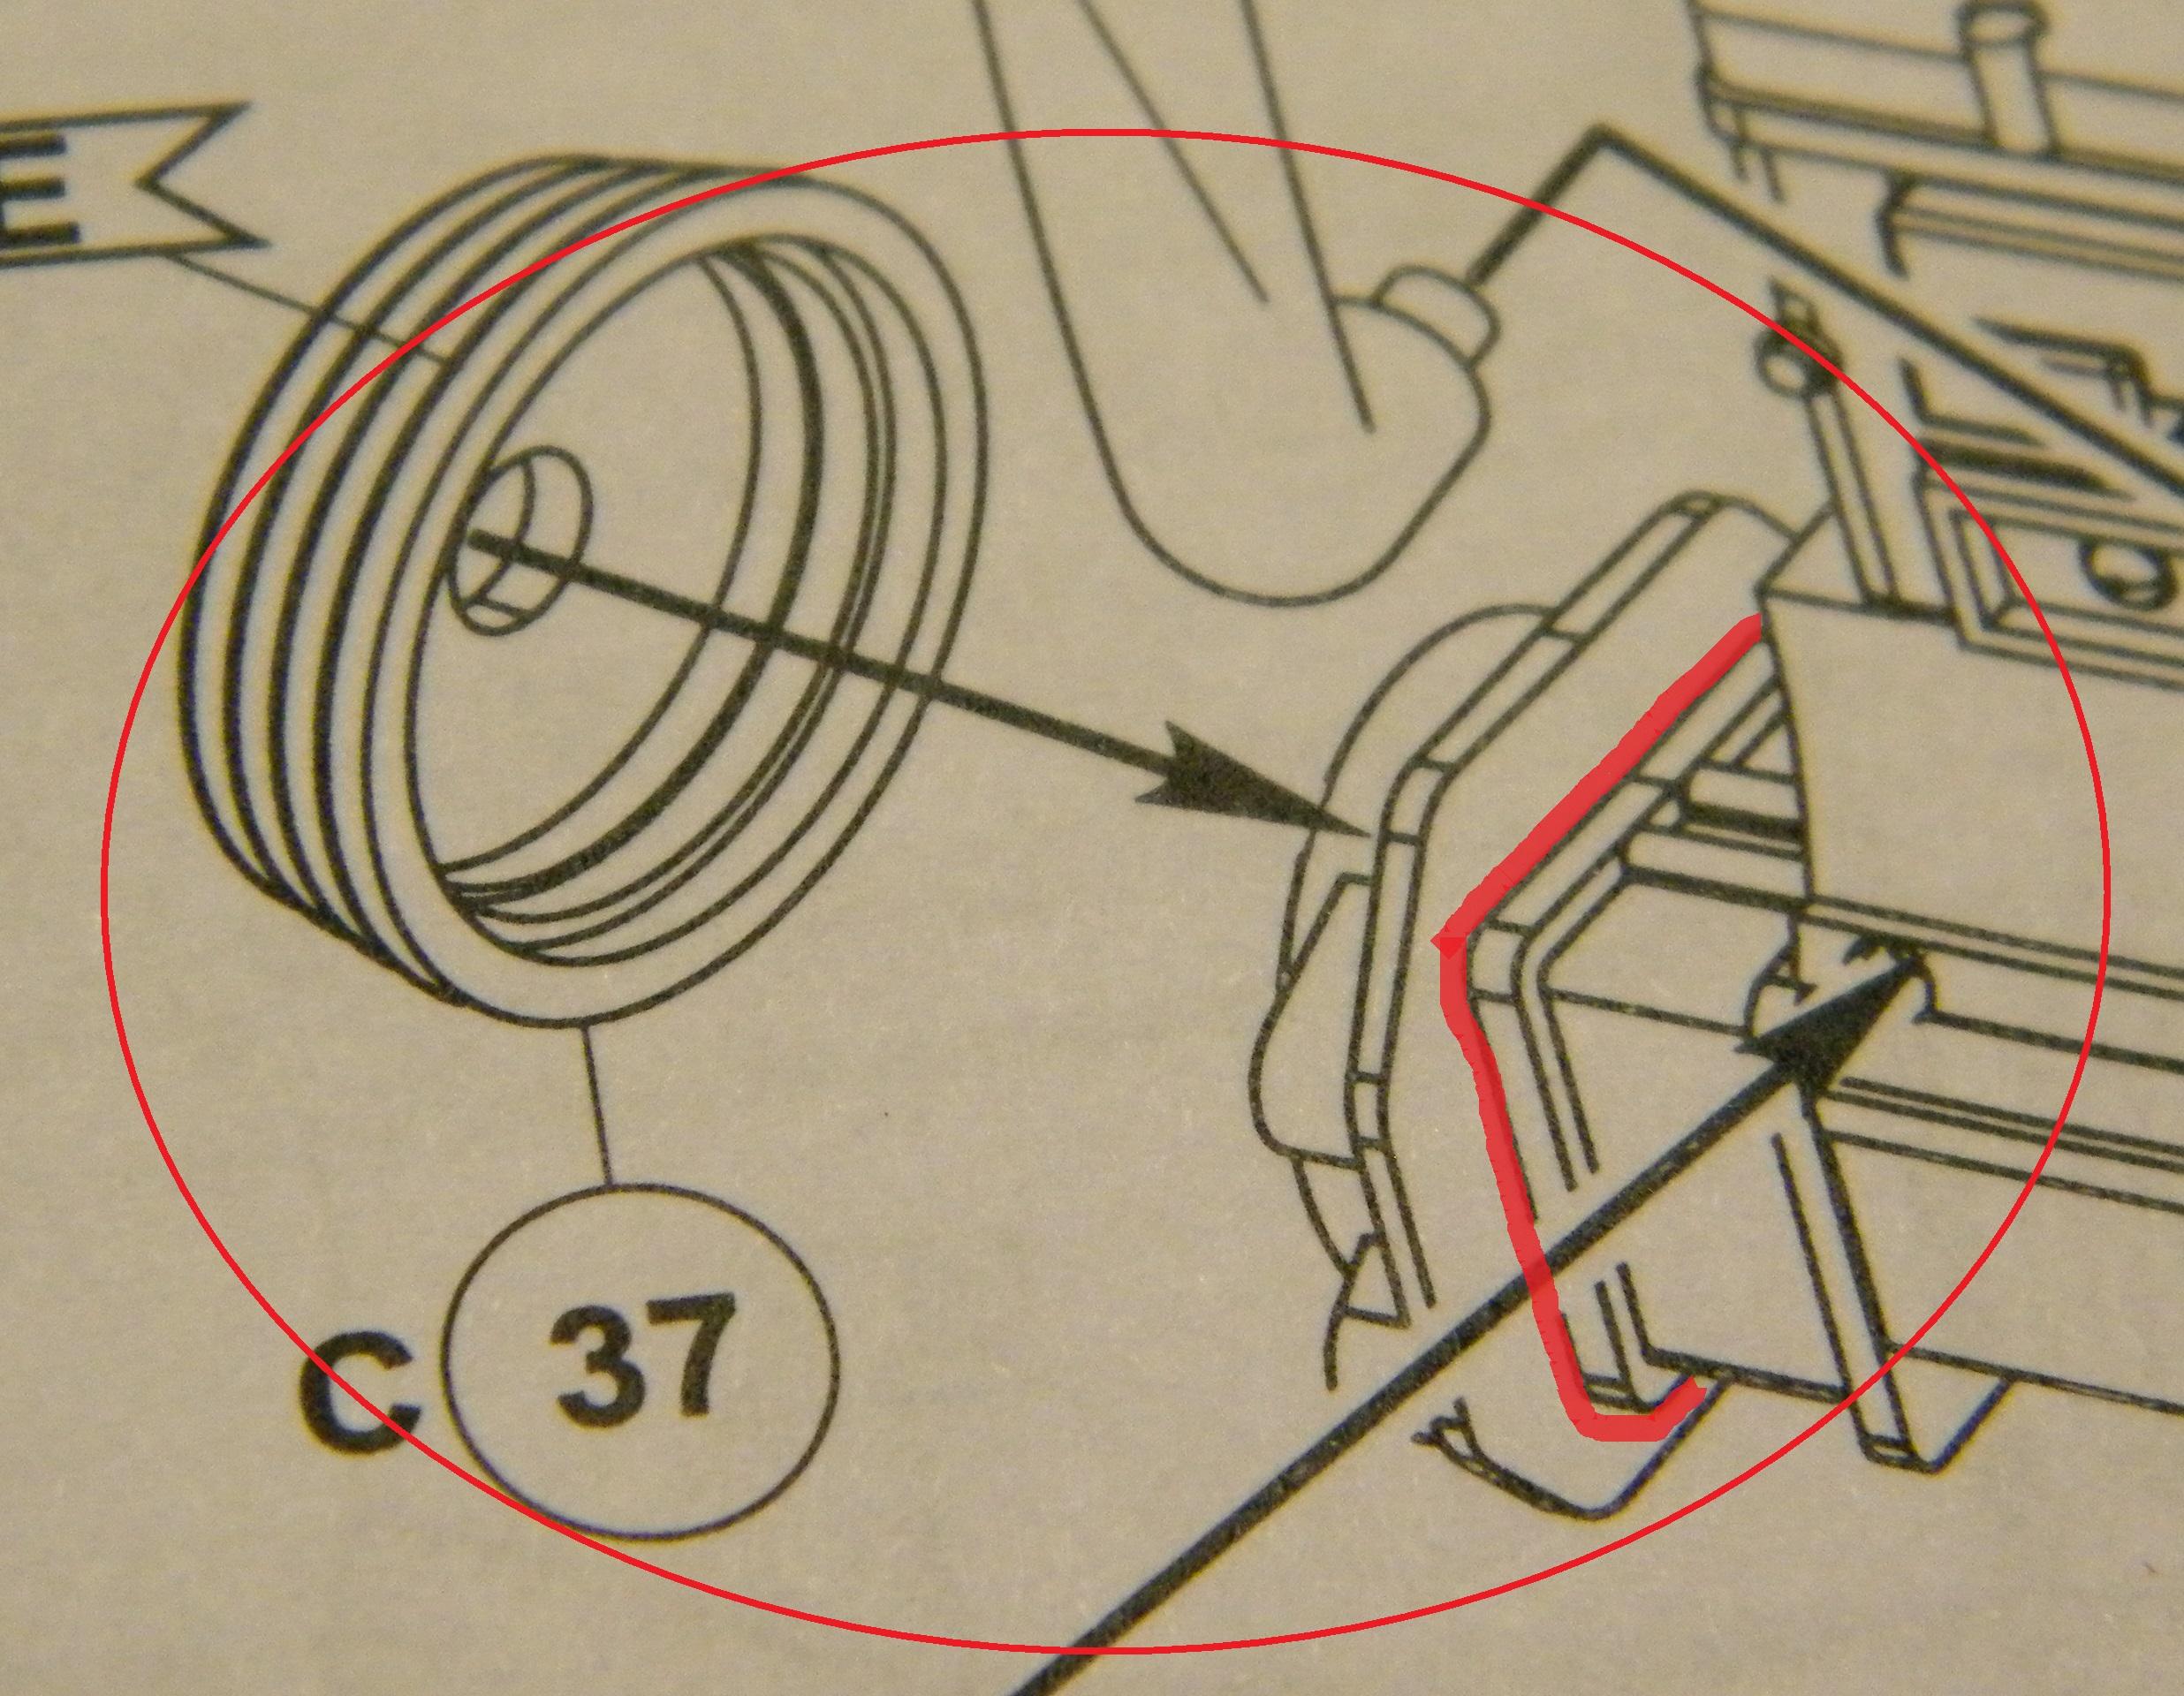
Thanks for that GeeBee...much appreciated. In my look-ups of the busses.....i saw both.....just stuck to the body itself and then others that you could tell where like on some sort of backing board to be attached the body. I will probably just put the decals straight to the body....or I may just put them on some really thin plastic so i can change them out for other signage if I want to....not sure yet. I think the photo-etch radiator really looks impressive. And I got a couple more tips for ya: (mainly my own fault)...but just in case it happens to somebody else. If you put the body all together like I did....and you are going to use the advertisement frames.....do yourself a favor.....and drill all the holes for the frames BEFORE you glue the body together....lol....its not fun trying to drill all those holes when there isn't much room to do it. The other tip would be....be sure you have your motor detailed and painted....and installed BEFORE you glue the bottom floor and front wall on. I did not do that....and I had to cut off the back part of the engine and glue it to the driveshaft, then put in the motor. It wont be seen and even from underneath, it doesn't show that I did it. The picture with the red circle and lines are where I cut the engine. The round piece is separate anyway, but I had to cut at the square flange to get it to fit. Both of these tips were my own fault. I was just moving right along...and yes I do skip around sometimes in my builds....so....just a warning to anybody building this.
-
Revell London Bus
Wolfangel replied to Wolfangel's topic in WIP: Model Trucks: Big Rigs and Heavy Equipment
Well......I have a lot I have to live up to....considering I have a few people watching this that actually live in England (no pressure)....lol. I do have a question tho. The advertisements that is put on the sides of the buses.....is it put on some kind of board or is it just stuck straight to the bus? The kit calls for putting the advertisements straight to the bus....and of course if you do that.....it will conform to all the lines, rivets, etc. I wasn't sure if that was correct or should I attach them to some thin plastic THEN put them on the bus. And as for the bus being clean.....im modeling a "restored/well taken care of bus" I guess you could say. Its just to nice to weather it up and get it dirty....not my building style anyway. -
Revell London Bus
Wolfangel replied to Wolfangel's topic in WIP: Model Trucks: Big Rigs and Heavy Equipment
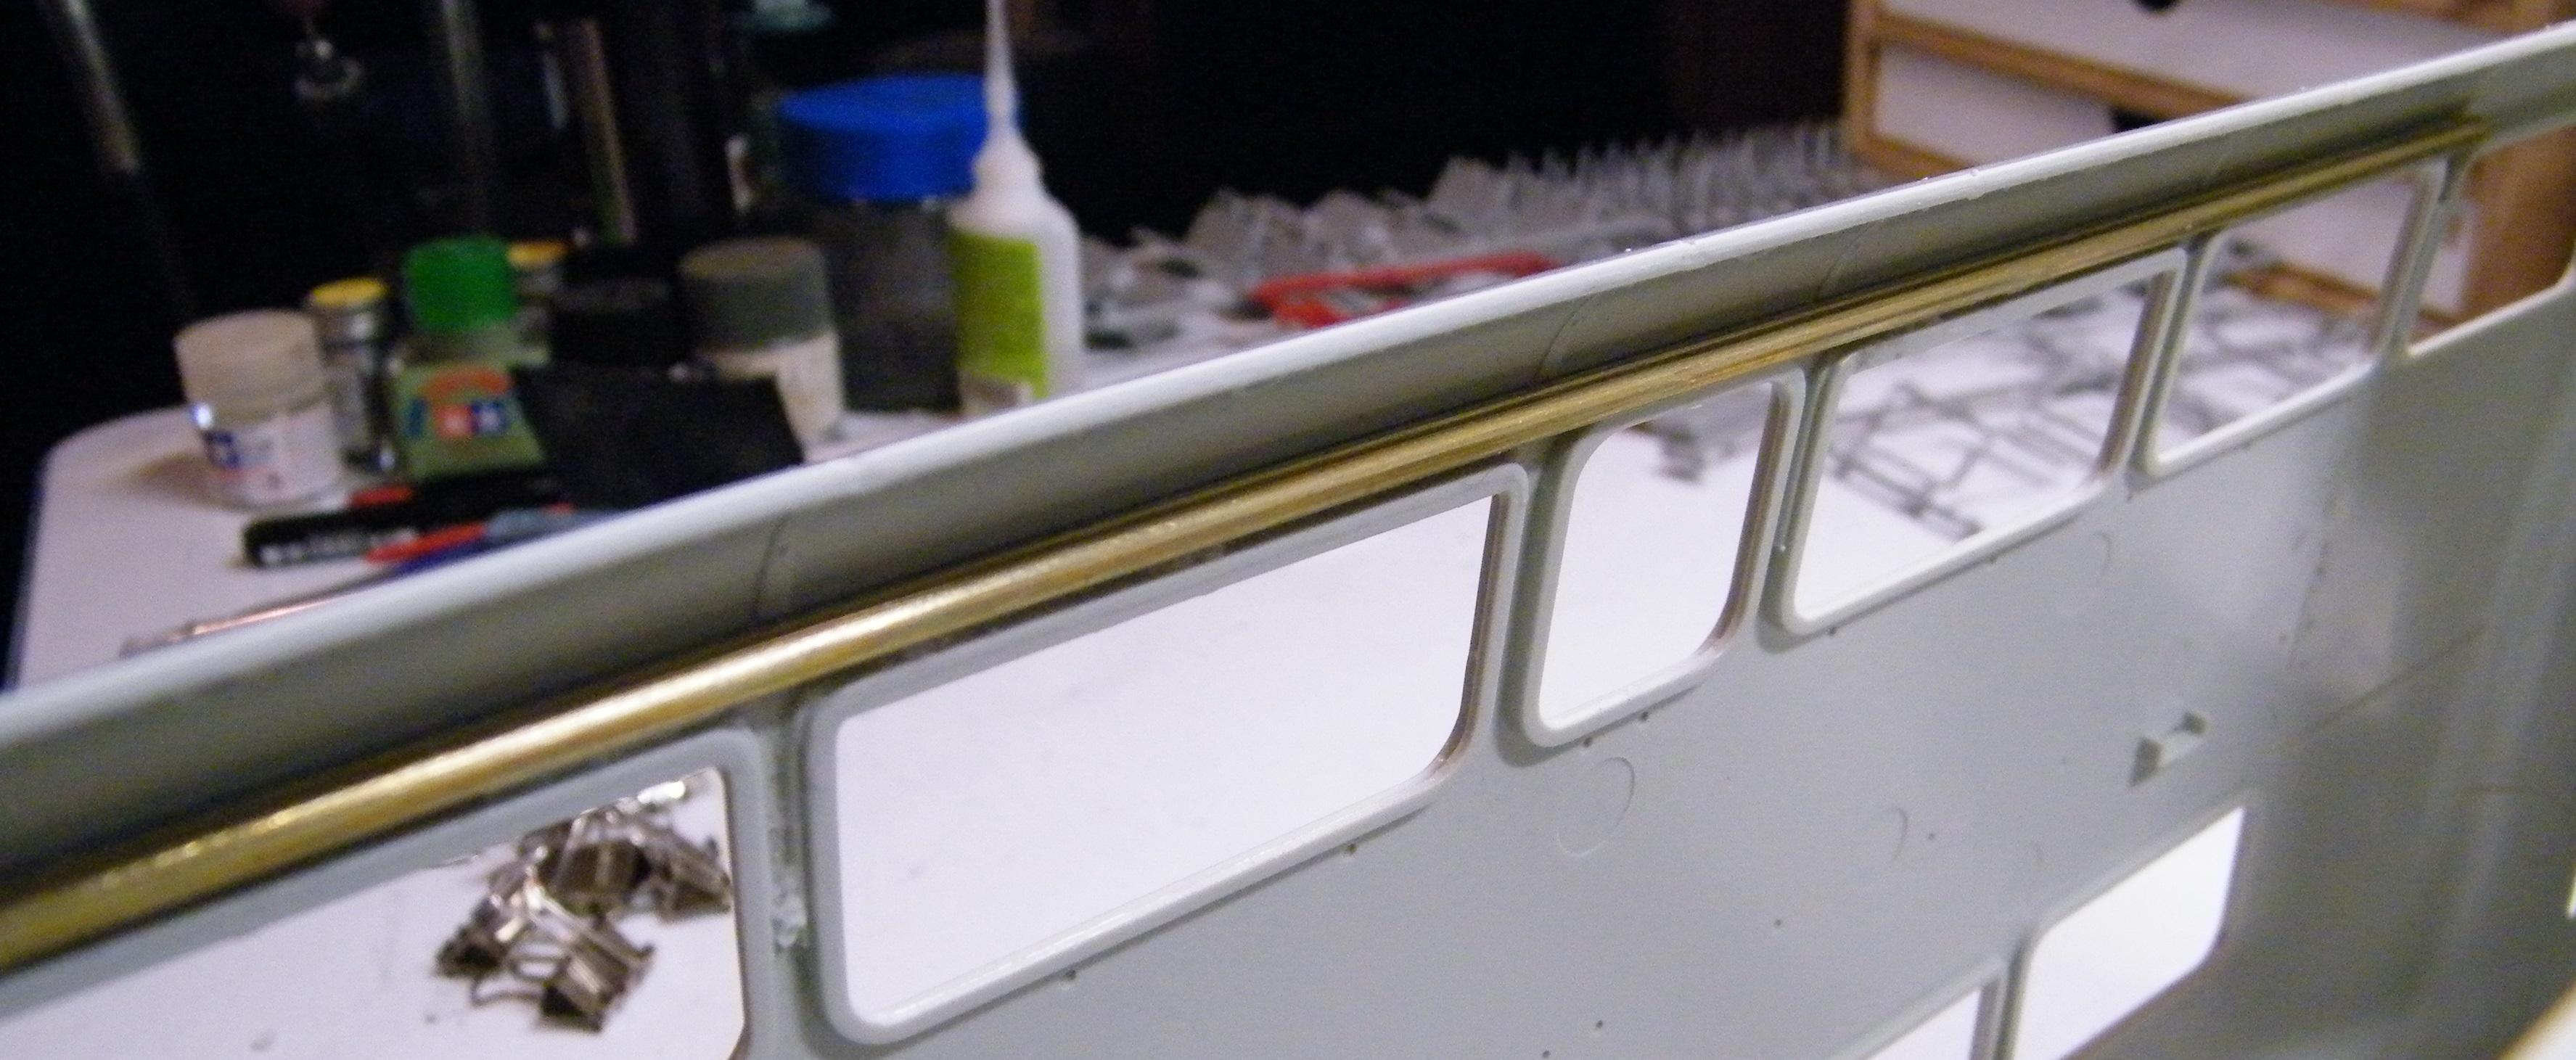
Todays topic is more about hints and tricks rather than an update (could be that to I guess) on the London Bus. I was a little reserved about having a multi-piece body on this bus (8 pieces to be exact)...since any glue mistakes would definitely show. I had found a few websites about gluing most of the body...if not all....together for painting and not showing any glue marks. If you plan on doing this....do this after you have the first floor together....don't have to have the seats in....but definitely have the "walls" up so you can line up the body panels. I use these kind of clamps so I can fold then under the bus so I can make sure its sitting square when I attach the panels. Make sure you clamp, tape, re-clamp if you need to....to make sure everything lines up good. After its all clamped together, I ran Tamiya thin cement along all the attachment points, being careful not to get it on the interior panels of the bus....or you would have glued it there and hard to take back off. As you can see, the body slides right off and stands on its own. Now it can be painted as one piece with no worries about glue seams....just masking will be a bit more involved on the inside....but...that's no biggie. One thing I will also tell ya....when you attach the upper floor....you may want to sand the rear left corner some (CIRCLED RED IN THE PICTURE). The body fits extremely tight in that area....and almost pushes the body panels apart even after gluing. Now that may have been a miscalculation on my part...but I have seen the same problem on other sites about the bus. I also went and glued 3/32 x 0.14 square brass tubing to the tops of the side panels. The top area had a bit of a wave at the top edge, so that is how I fixed it. After its painted, it will like a structural part of the bus. As for the top....I didn't want the whole center section of the top to come off (its made that way from the kit). I plan on showing this model (if they ever start again). So I just followed the inside seams and cut off the radius curves and glued them on permanently. You will still have a top you can still remove, but it will be a smaller section, and the bus will look better from the side. Hope this helps someone planning on building this bus. For the most part, its going together real good. A few hiccups here and there....but....not at all bad.
-
Revell London Bus
Wolfangel replied to Wolfangel's topic in WIP: Model Trucks: Big Rigs and Heavy Equipment
iamsuperdan......here ya go......the link to the PE kits. https://www.spotmodel.com/advanced_search_result.php?keywords=london+bus -
This was a Christmas gift my mom got me in 2019. She knew it wouldn't be started anytime soon....and she wanted to see it done someday...but sadly she passed away in May....so i am building this in memory of her. This is about a weeks worth of work. I have done so much painting and masking to this. I have also about 5 sheets of photo-etch from SPOTMODEL to put on this. I have already used about 45 pieces of photo-etch...and still a long way to go. Let me know what you think.
-
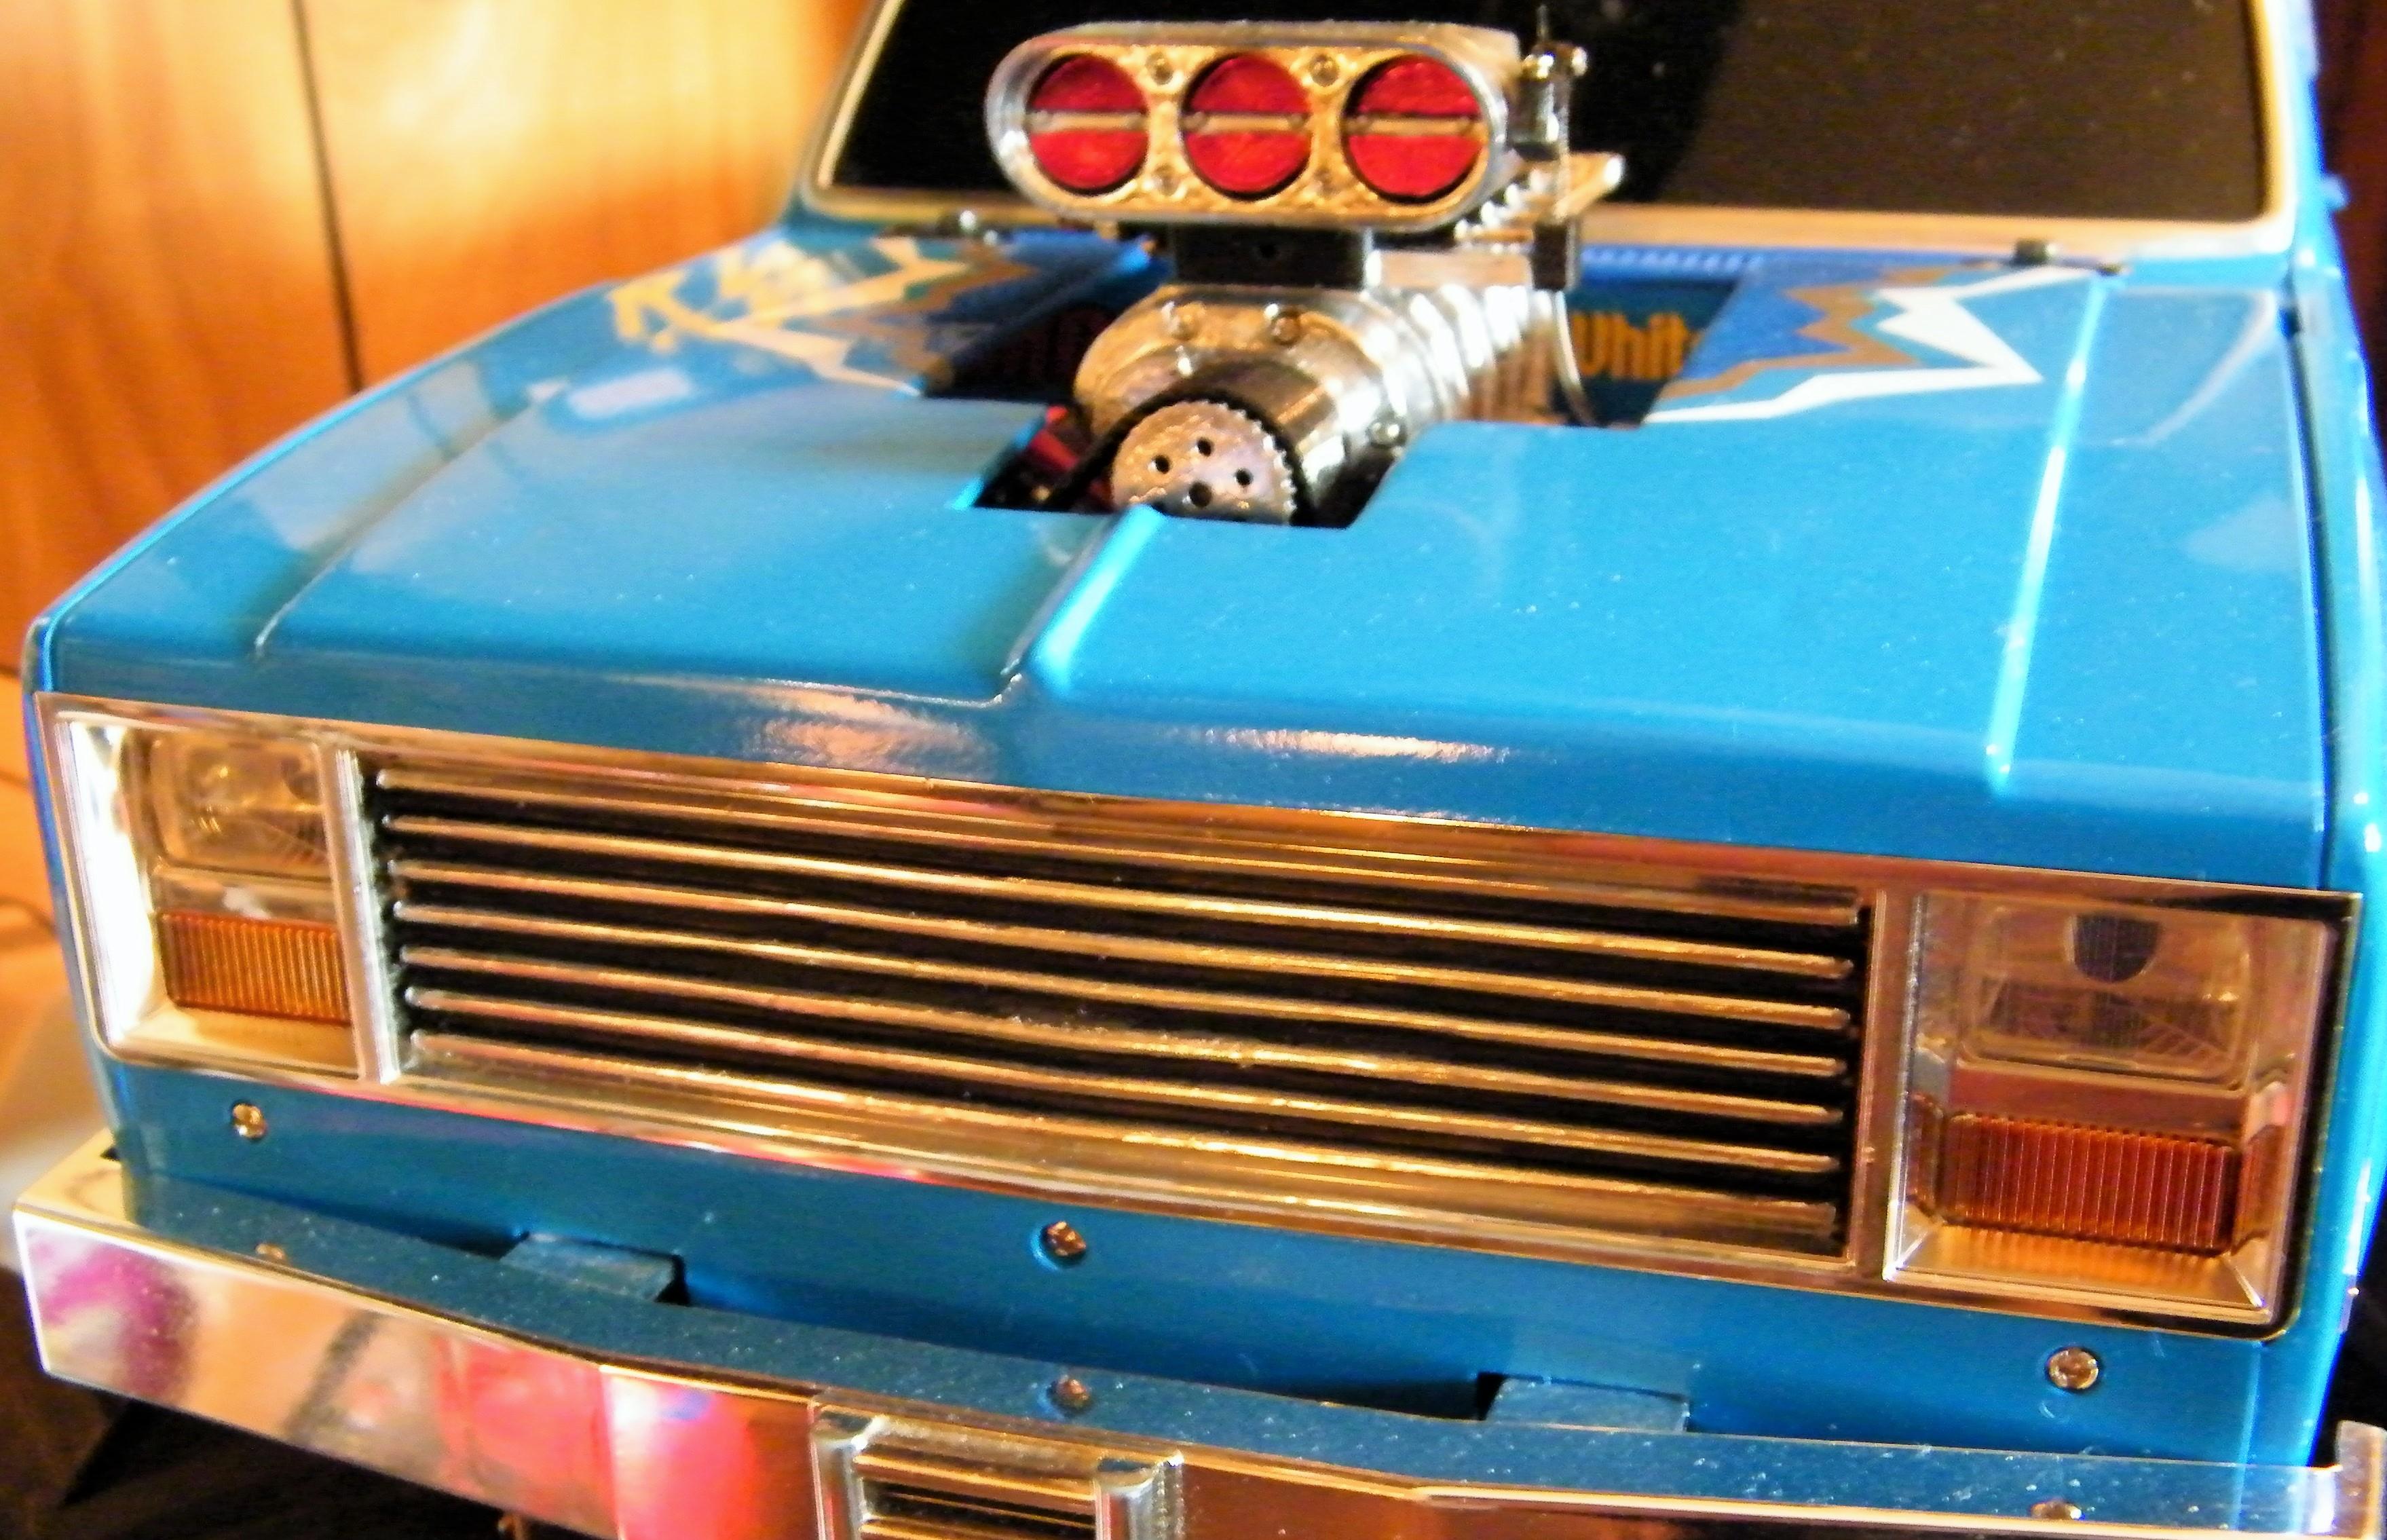
Here is the grille. It is the stock Clodbuster grille. I sanded off the 4x4x4...used my dremel tool to grind away between the bars....then smoothed out the bars and rechromed them with a chrome pen. Maybe not the best job, but alot better looking than having 4x4x4 on there.
-
I tried posting a video of the motor working but it wouldnt show...sorry.
-
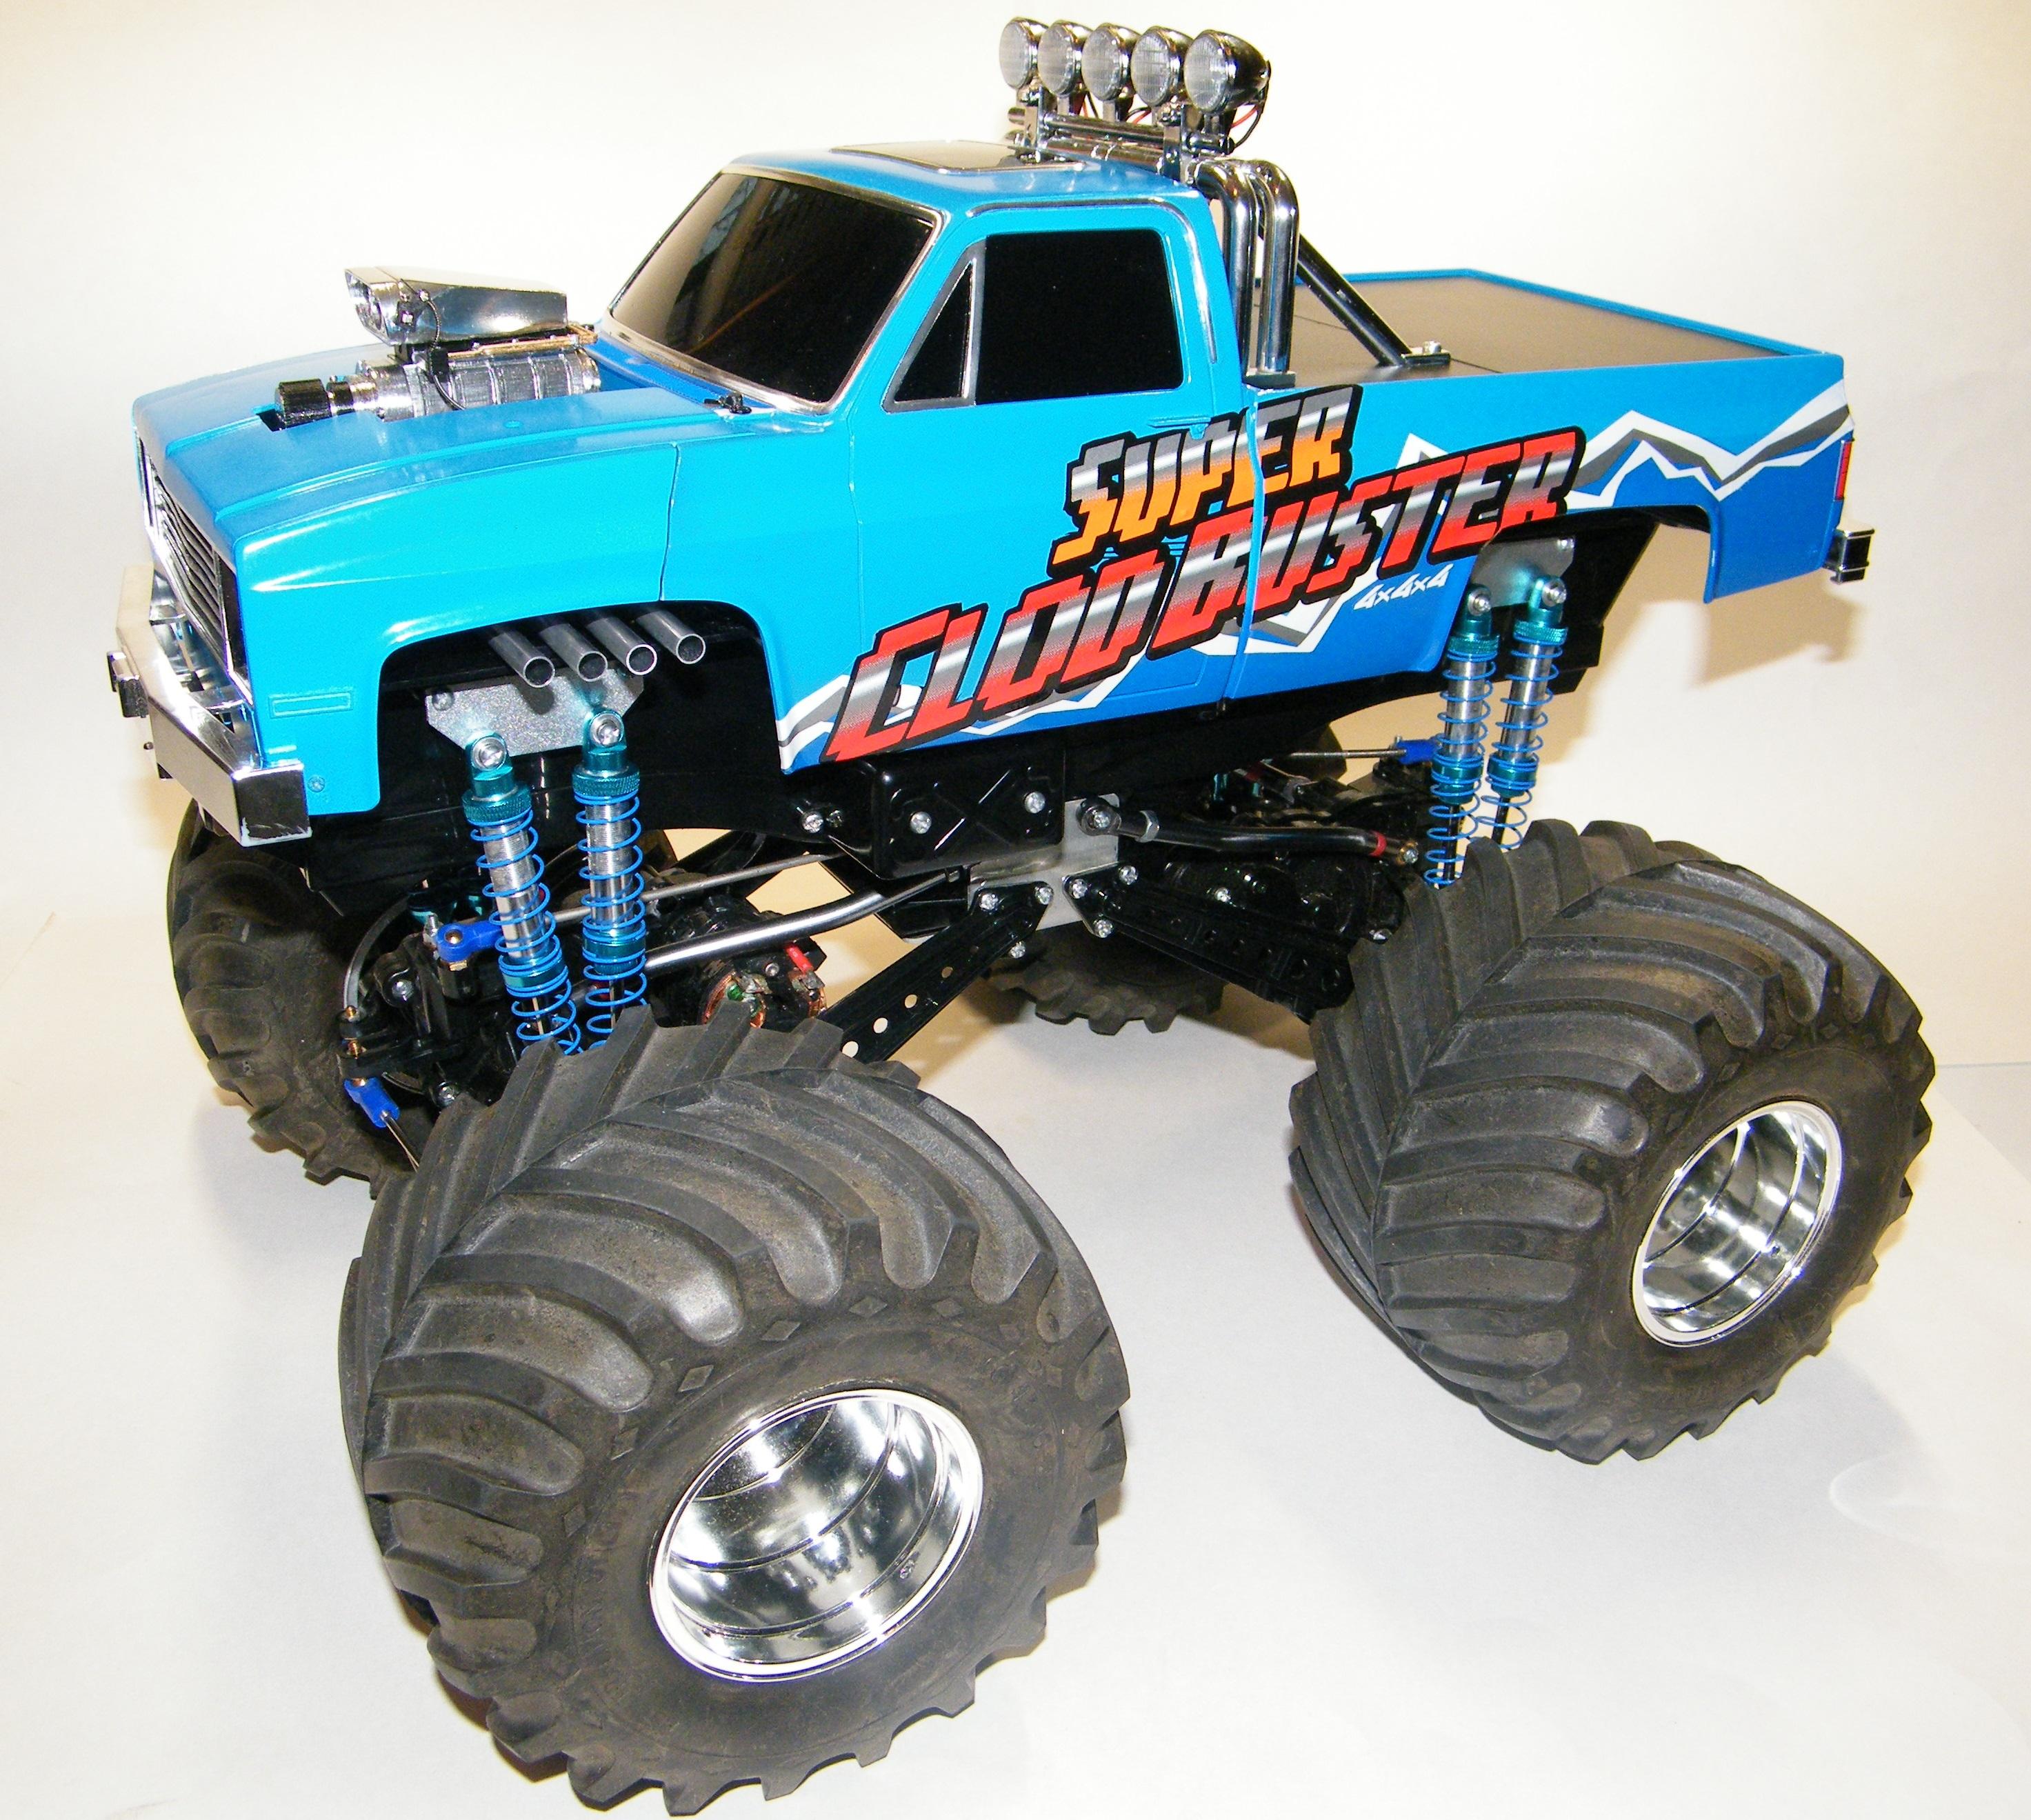
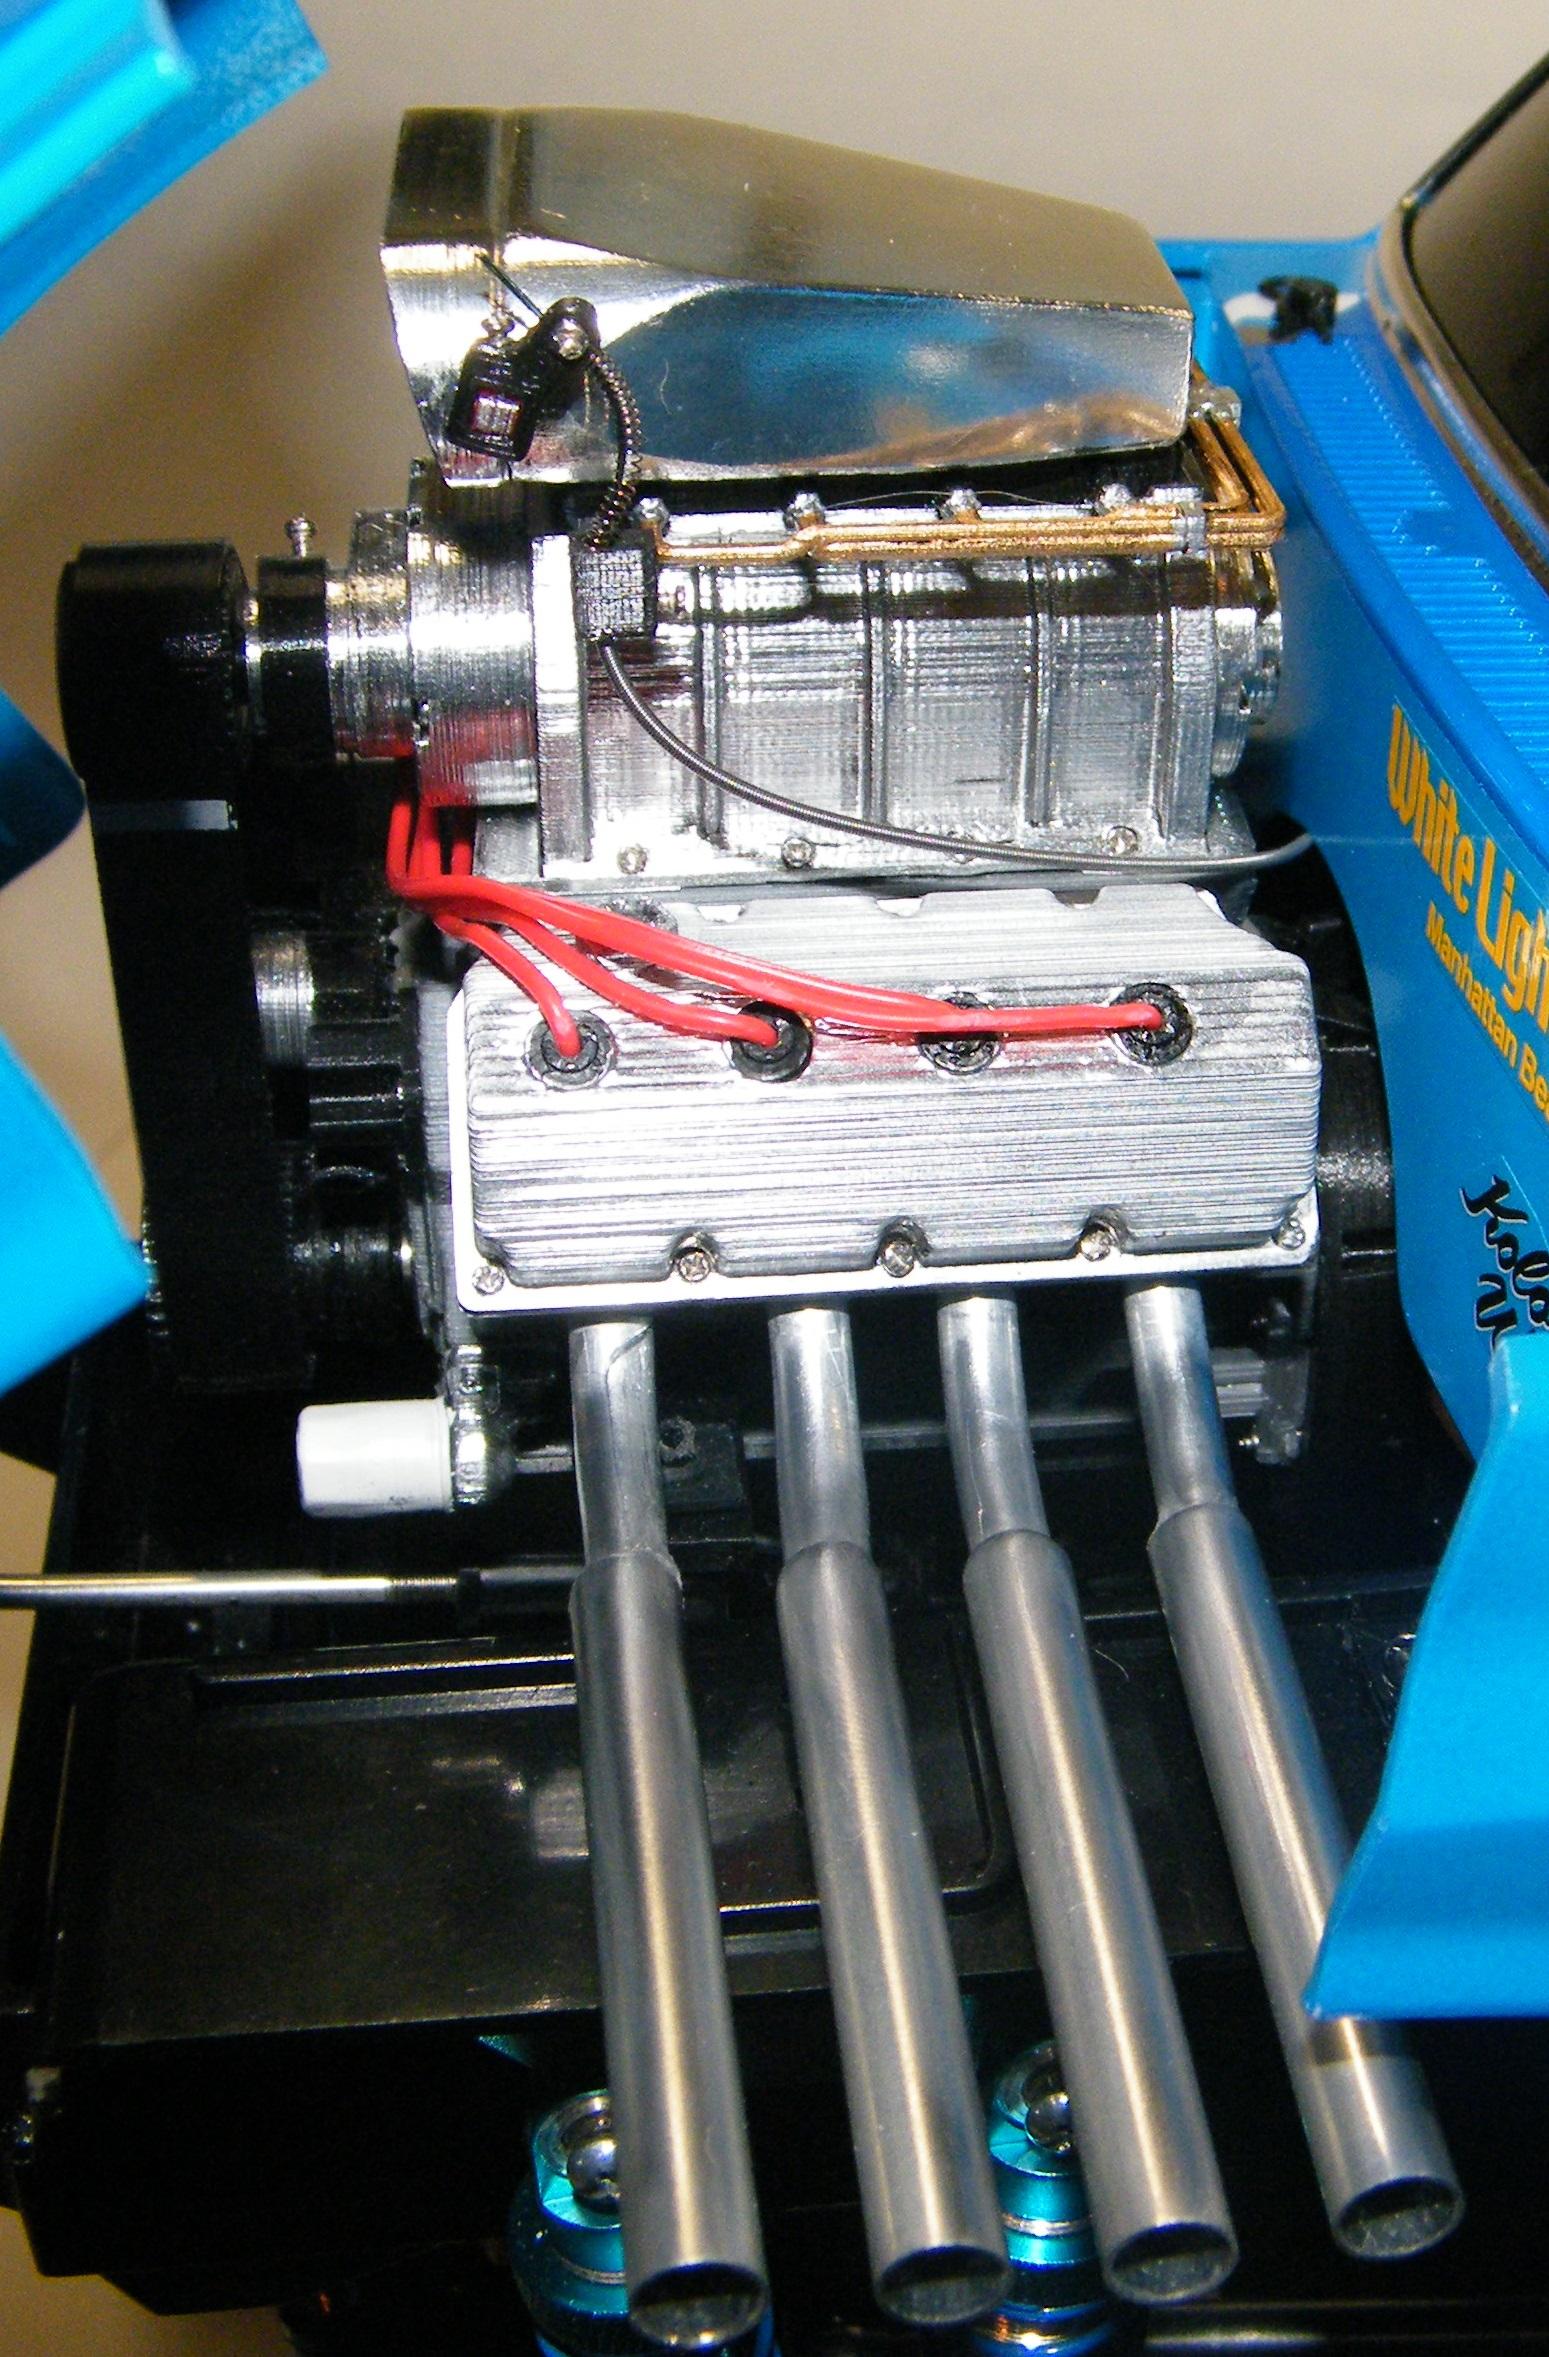
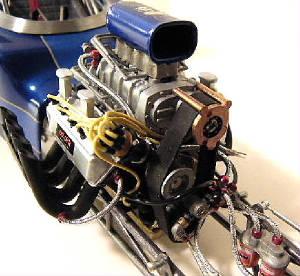
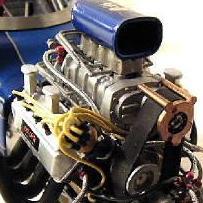
I like the classic look of the Clodbuster, so i modified mine to keep the somewhat original look. Here is mine i finished. I hope this will give ya some inspiration. Here is what is done.....bedcover, lift kit, scratch built lower shock mounts, tilt front end (stock body mounts moved to windshield cowl), working V8, scratch built headers, scratch built firewall, aluminum shocks, scratch built upper links (gets rid of the pieces below the original trailing arms). I also modified the graphics and cut out the "wolverine-ish" looking cartoon guy. And here is the link to the V8 motor................... https://www.darkdragonwing.com/products/1-10-rc-ohv-v8-h/
-
I finished building mine about a month ago. I didnt get the Black Edition, i just got the normal Super Clodbuster edition. I did alot to mine...bedcover, tilt front end, working V8 motor, lifted it up.....it looks pretty good. Those trucks are open to all sorts of modifications. Yours is looking great so far, cant wait to see it done. I can show ya pics, but i didnt want to hijack your thread.
-
never getting built
-
Here is a long overdue update. A lot has happened in my life lately....and I haven't had much time to work on it....but...here it is. Still a long way to go. I got the track running good with the slot cars and the train and also the drag strip up and running good. By the way....the drag cars.....Tyco 440x2.....Lambo and Ferrari.....running at 24 volts. train_and_car.mp4 slot_car_dragstrip.mp4
-
The EXCLUSIVELY '32 Roadster/Cabriolet ONLY thread. Show us what you got!!!
Wolfangel replied to mrm's topic in Model Cars
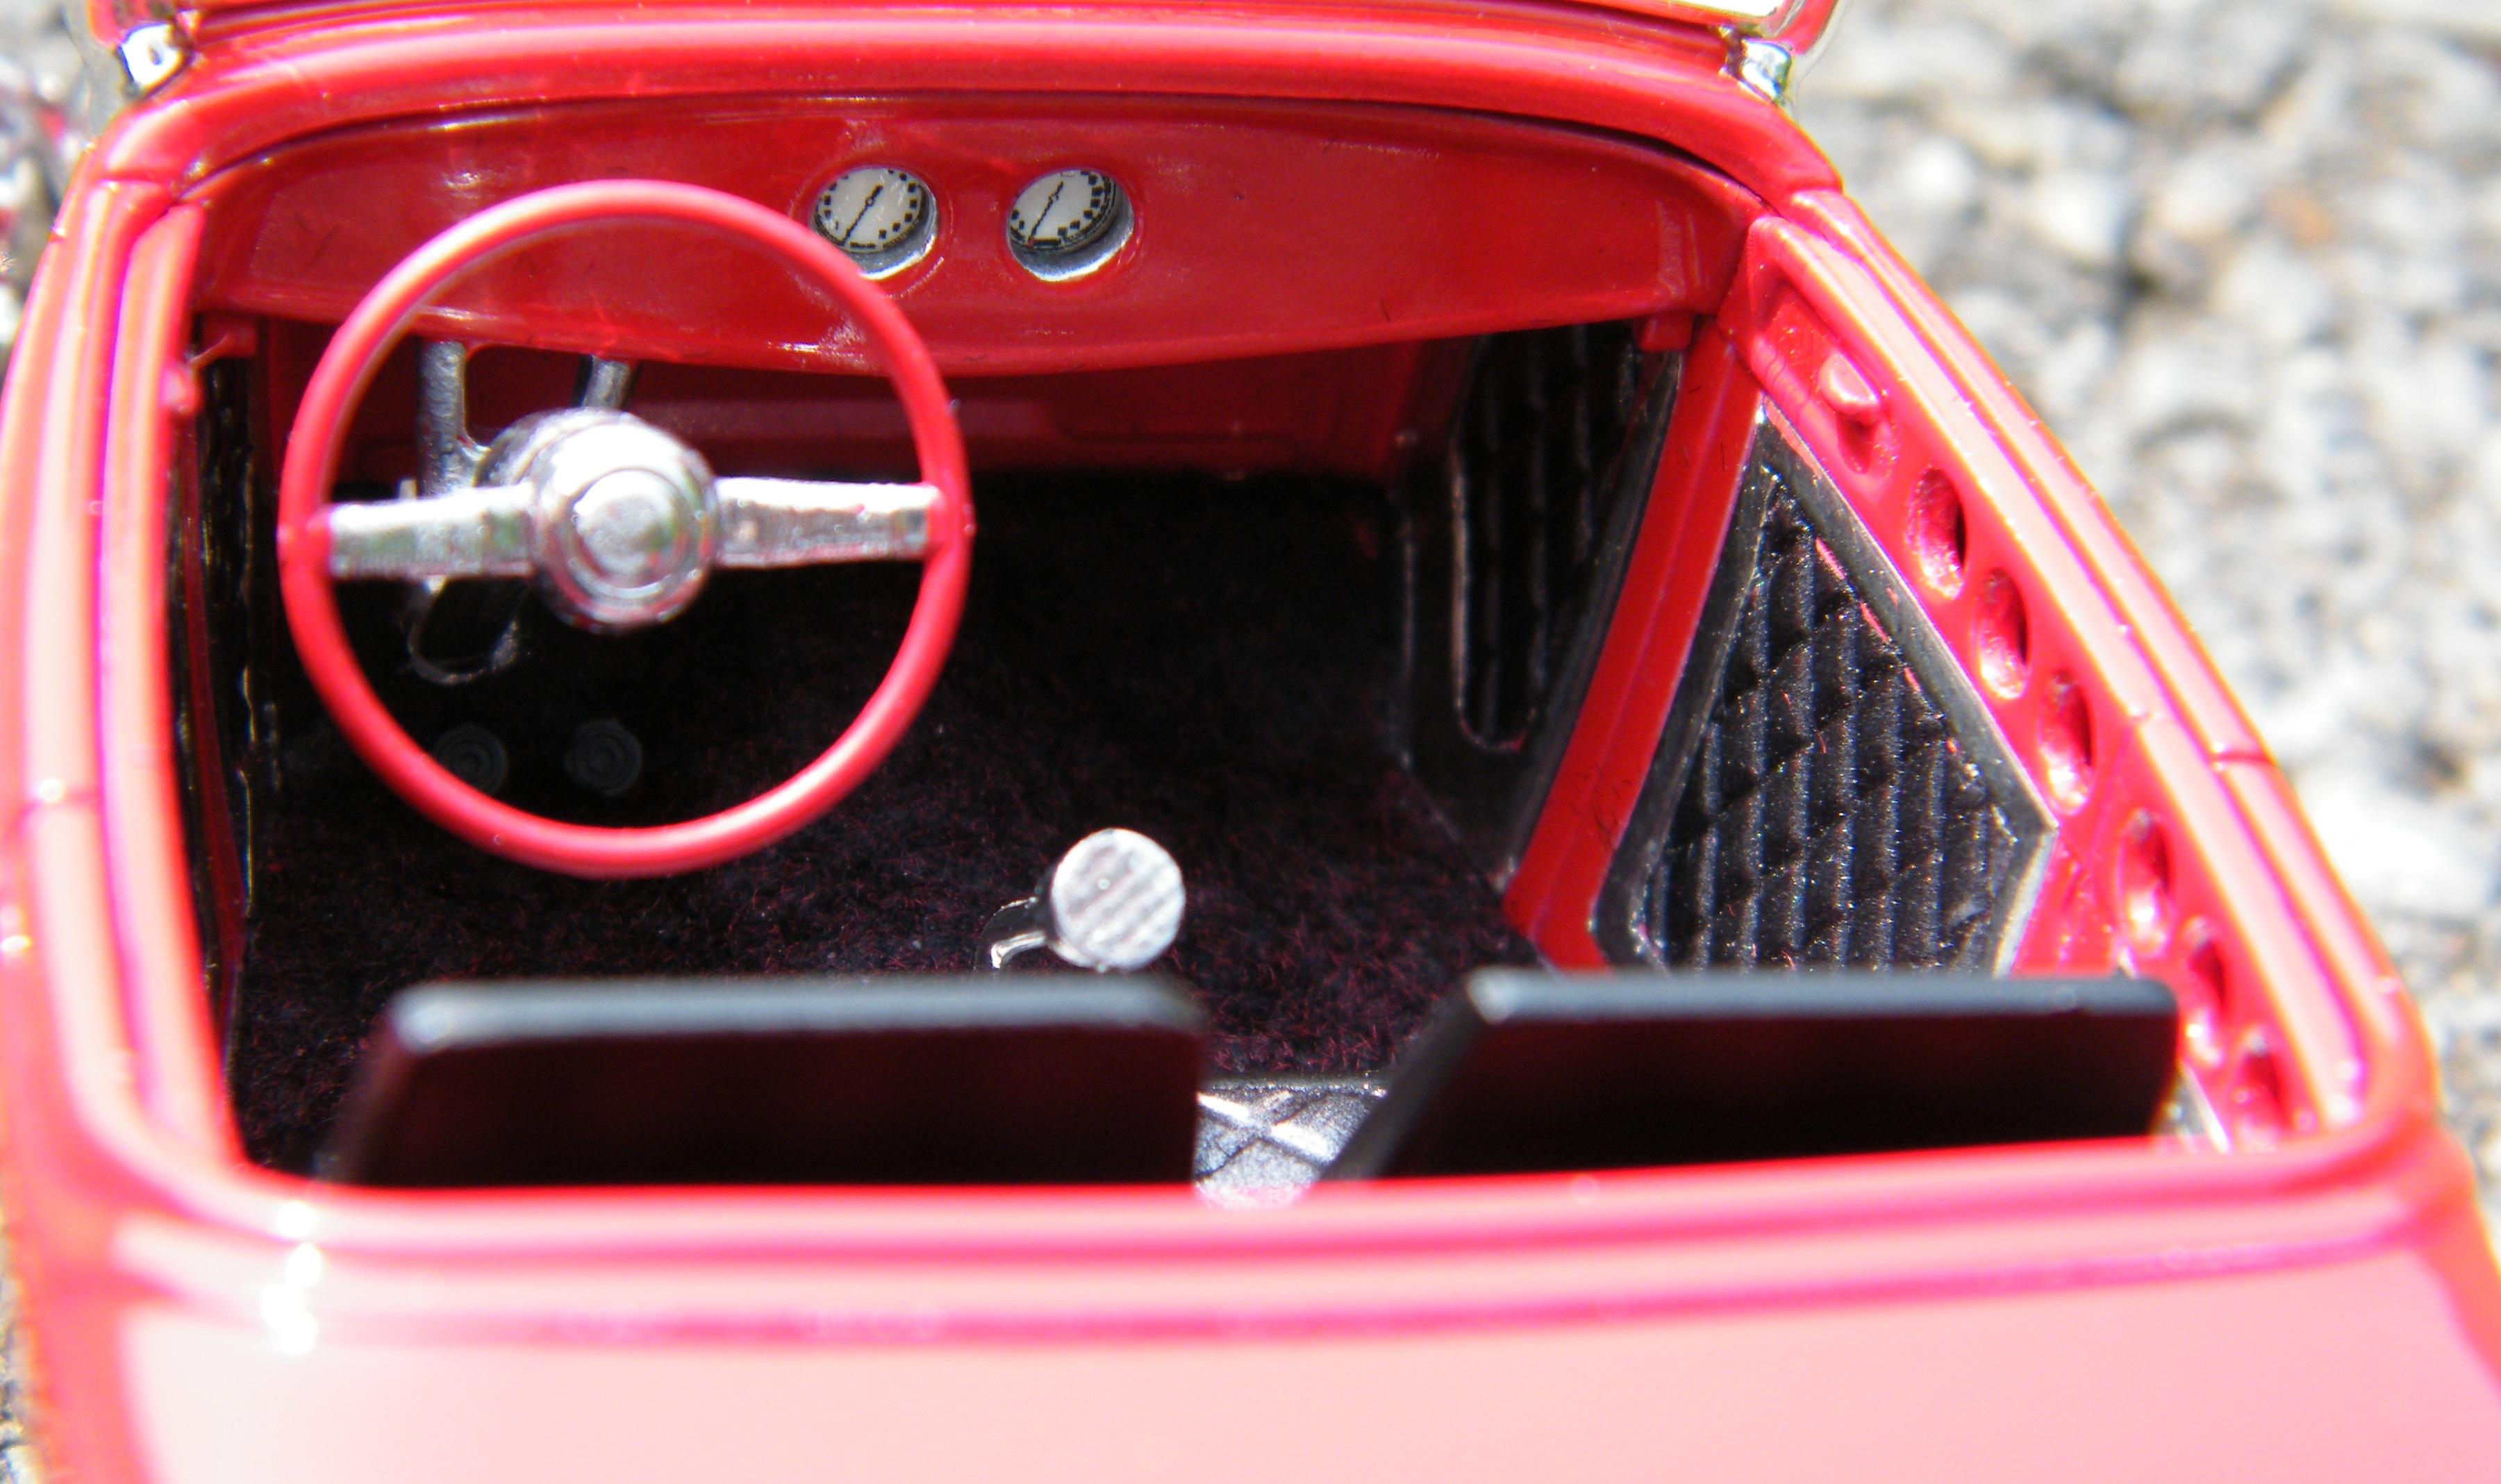
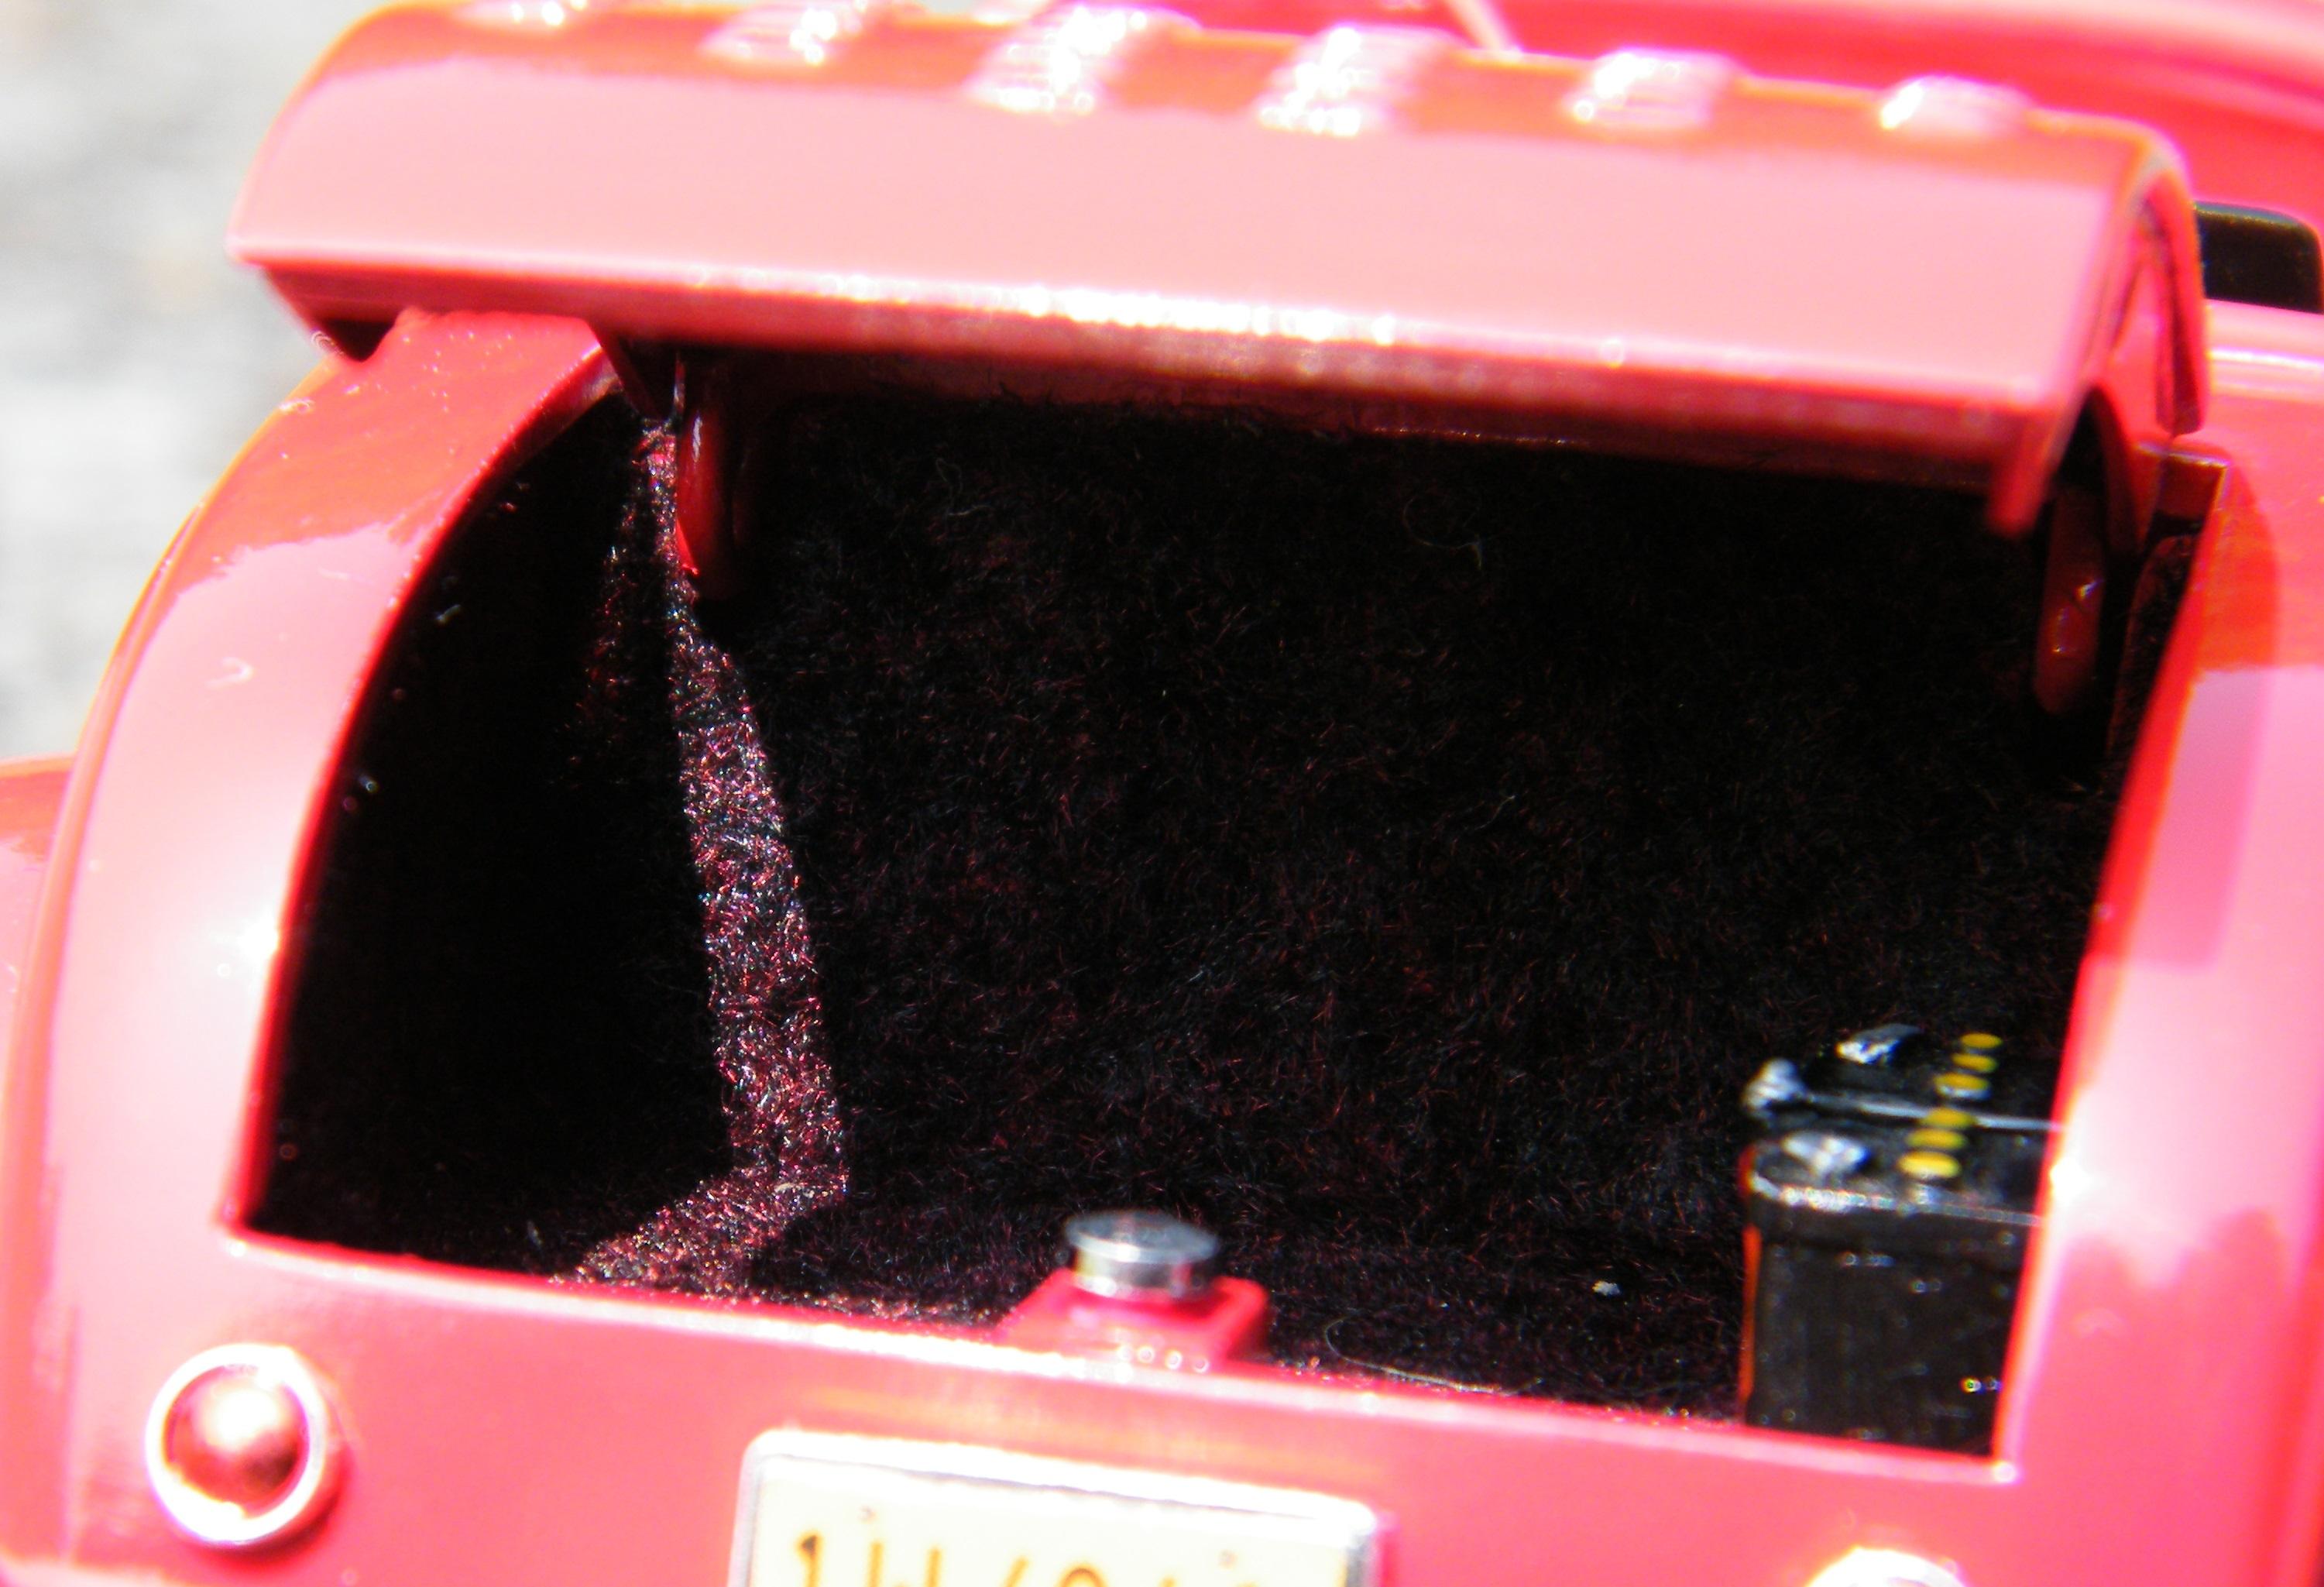
Started out as the Stacy David Rat Roaster. Changed the valve covers, wired, throttle cable and linkage, cut open truck and used louvered trunk from another 32, scratch built inside of trunk and side exhaust, modified dash, aftermarket seats....etc. Lots to list but that is the highlights.
-
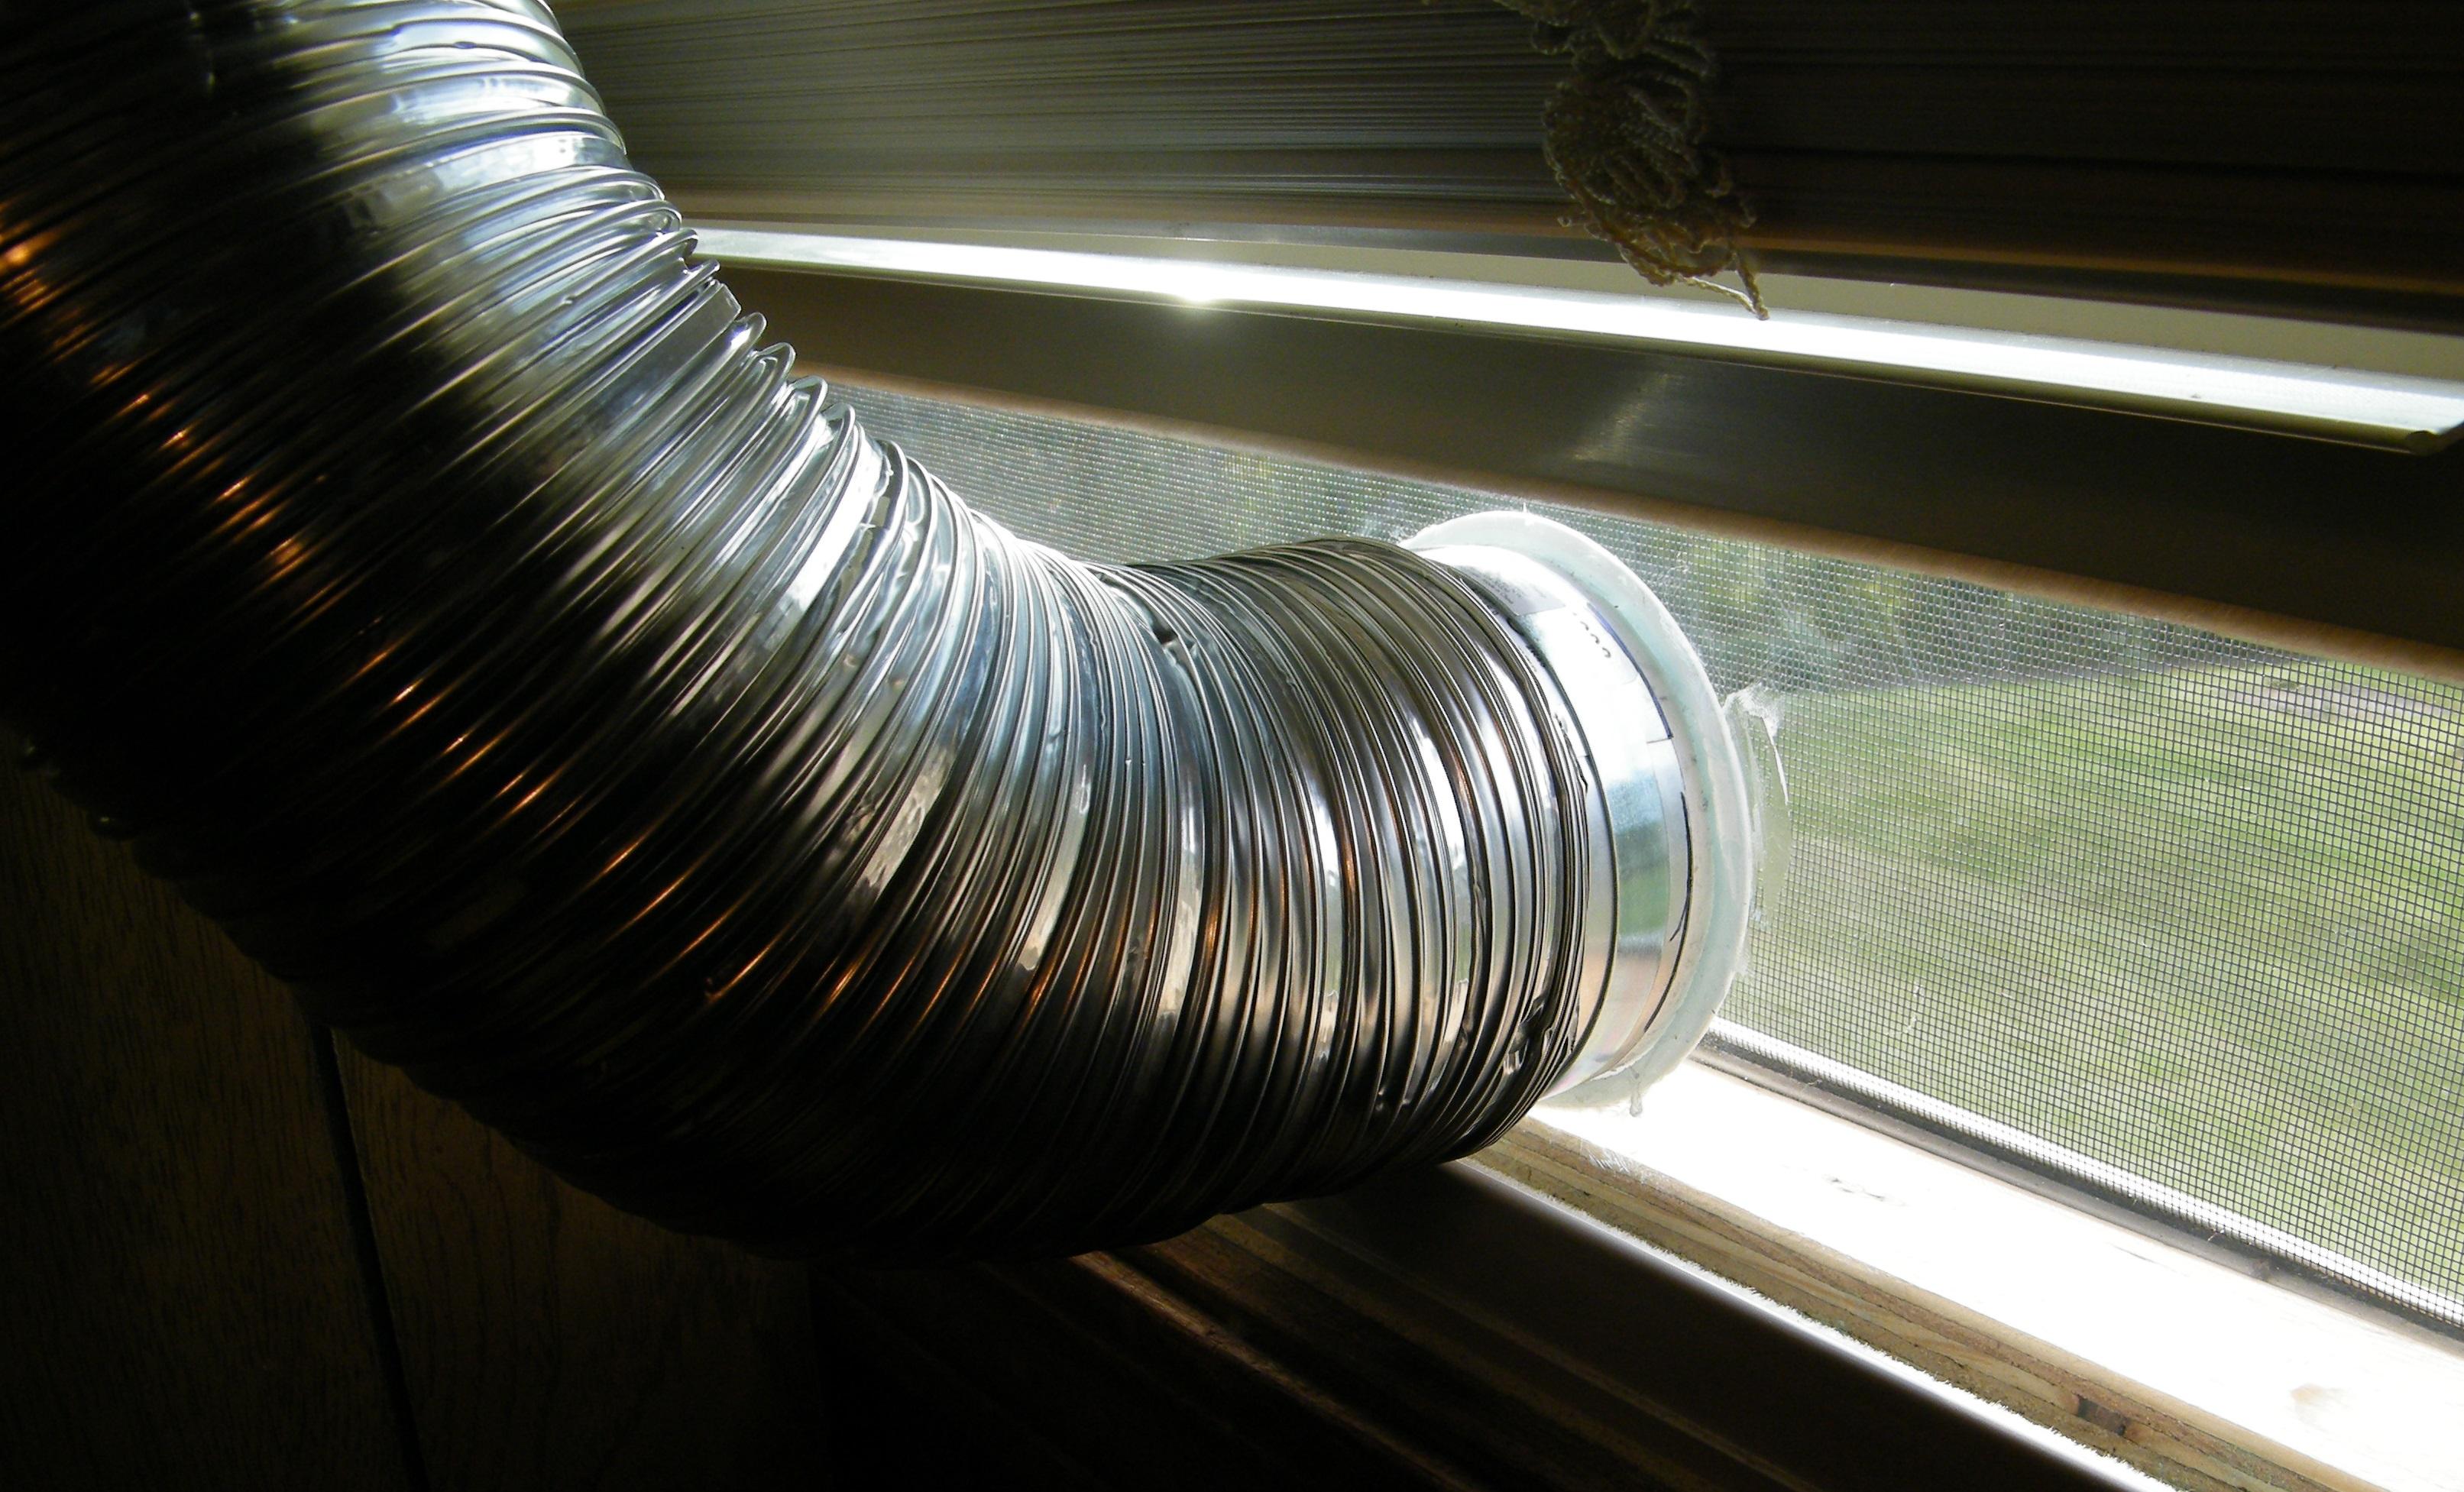
Hey Tom Geiger. Im glad the idea helped you out. That is the reason I used the plexi-glass...I didn't want to sacrifice losing any light. Even tho its not a lot really....it does help. The plexi-glass is only about an inch taller then the vent I used that the hose is connected to.....and of course as wide as the window. That magnetic light at Home Depot is in the lighting department....its about 13 inches or so long and recharges with a USB cord....and it has 3 light settings from sorta dim to full bright (what you see in the picture). It works really great. Good luck with what you do with yours.
-
Heres how I recently redid mine. I have had this spray booth for probably 12 or 13 years, and i placed it on an old cabinet I covered with some paneling to blend in with the room. No fumes come into the room and I am able to paint in any weather conditions. The hose is routed through a piece of thick plexi-glass and the window closes down on it for a good tight seal. Works great. And I have plenty of storage underneath for paint and other items. The light is just a magnetic rechargeable light I bought at Home Depot...it puts out plenty of light.
-
MPC 1/16 Shelby Cobra 427
Wolfangel replied to DougS's topic in Model Building Questions and Answers
PM sent -
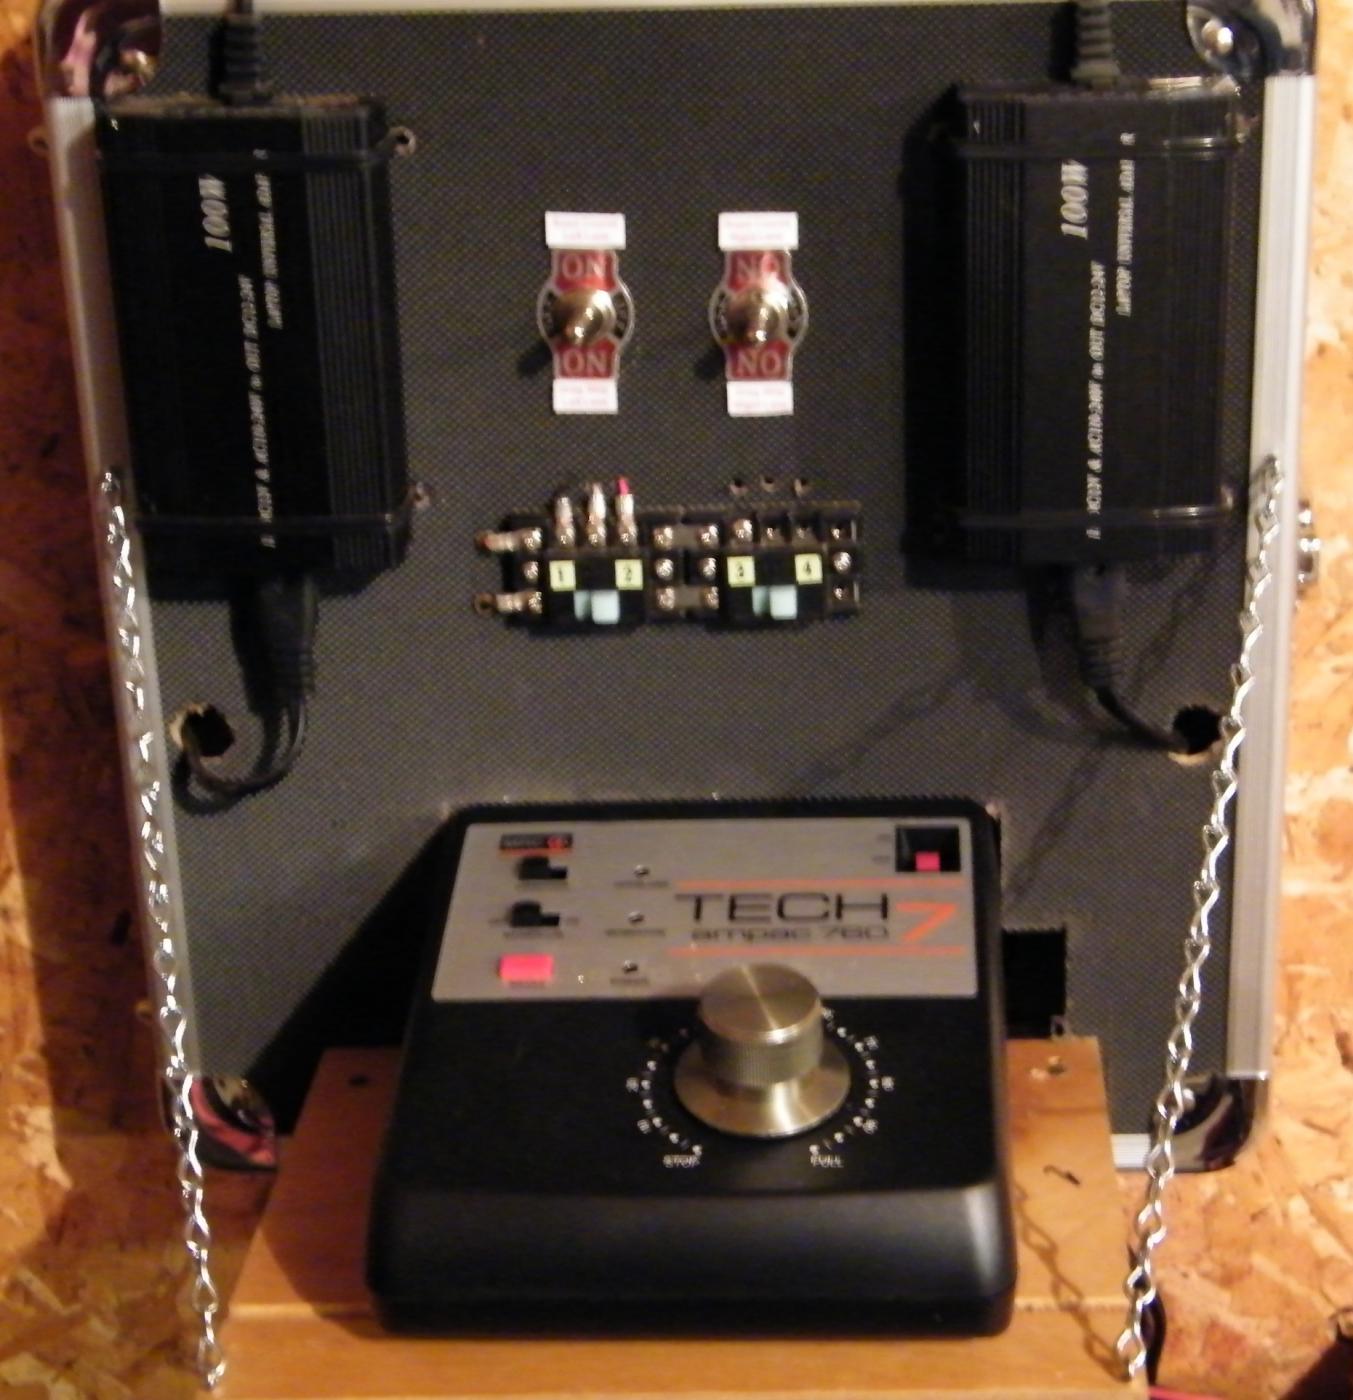
Here is a small update. I had to get rid of the old train controller....it gave up on me. I guess I should have expected it since it was so old. I got a new one tho that performs great. I have also FINALLY finished up all the wiring for the train and the slot car track (along with a schematic of the wiring). It was a nightmare....but im glad its done. And you will also see the 2 new controllers I got for the slot cars.....these perform alot better....bigger size....and they have a sensitivity setting (how much punch it has taking off or out of corners) and a break setting (low means less brakes....high means more breaks and a dead stop...no coasting). Everything is working great. Hopefully will have a video of it all running together soon.
-
And this is my control panel for the slot cars and the train. I have 2 power packs for the cars (1 per lane....both are switchable from 12 volts to 24 volts). The switches in the middle are for choosing either the drag strip or the road course...cant run both at the same time. I did this for 2 reasons.....first of all....when you unfold the drag strip from under the table it makes it harder to reach the cars on the road course....and I only need 2 controllers instead of four....saved me some money. I know the train controller is old school.....but it works great and does what I need it to. I am planning on restoring that and make it look better.
-
Here is another update on my layout. I have finally got the pulley system done to fold it against the wall....that way I can still have full use of my garage when I need it. It works really well and does what it should. The system I use is a series of pulleys with a 110 volt winch mounted at the bottom of the wall (you can see it if you look close enough). When you click on the link to the movie...just click open to see it in action. Its safe....I promise. track movie.MP4
-
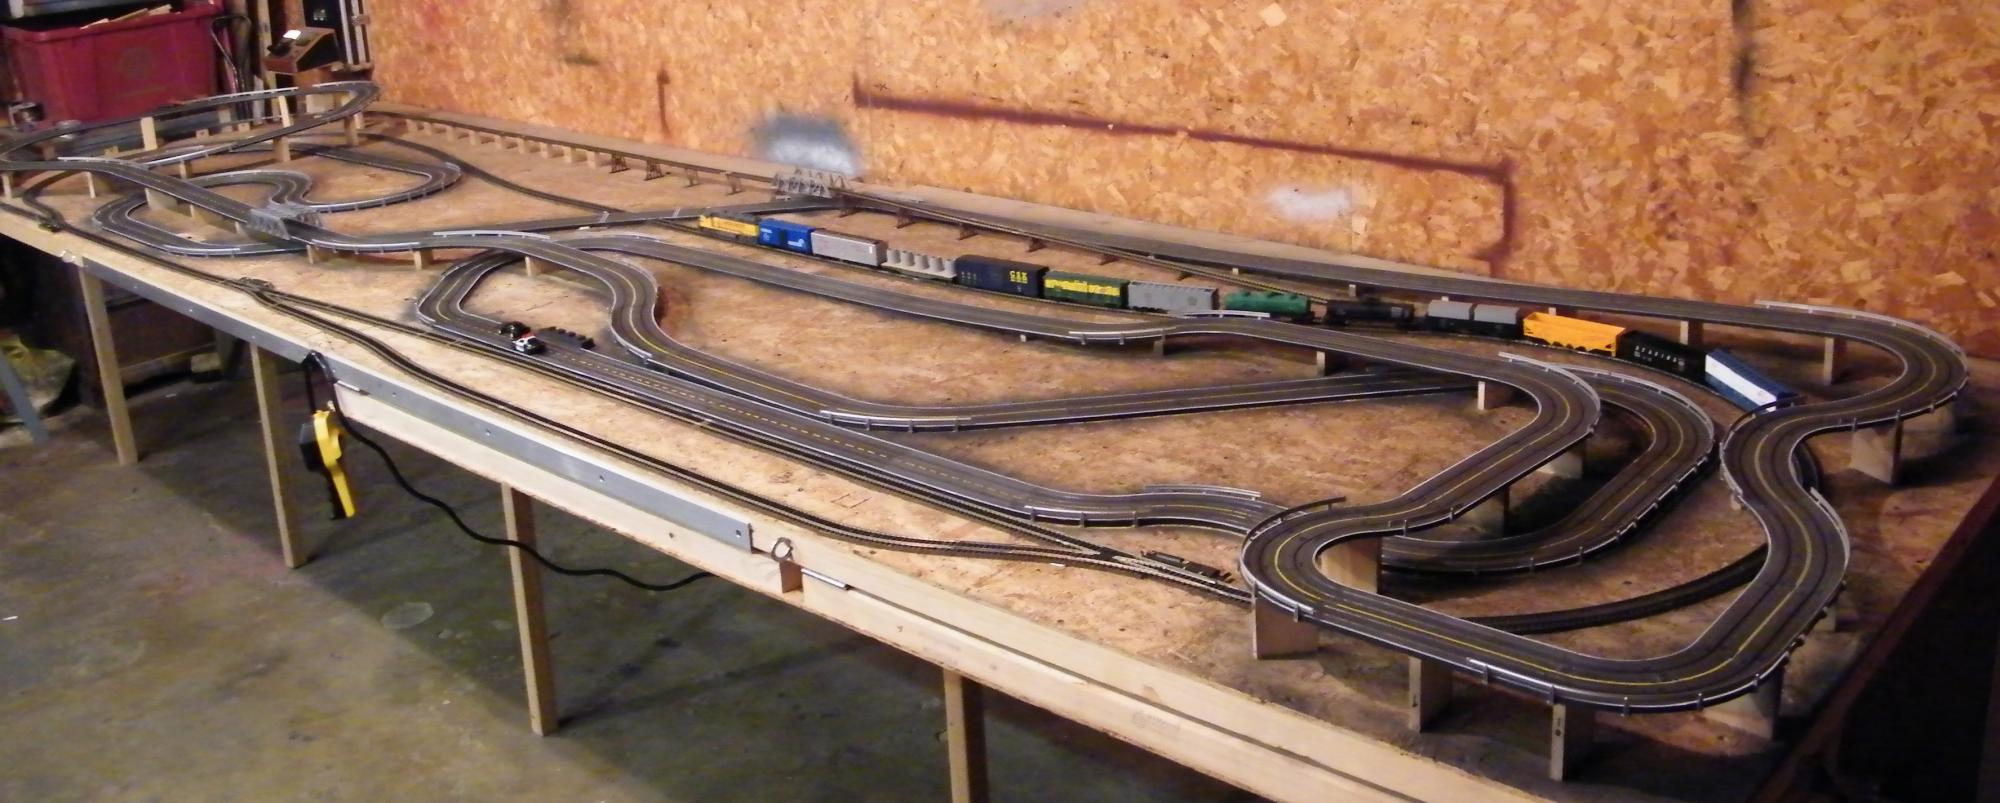
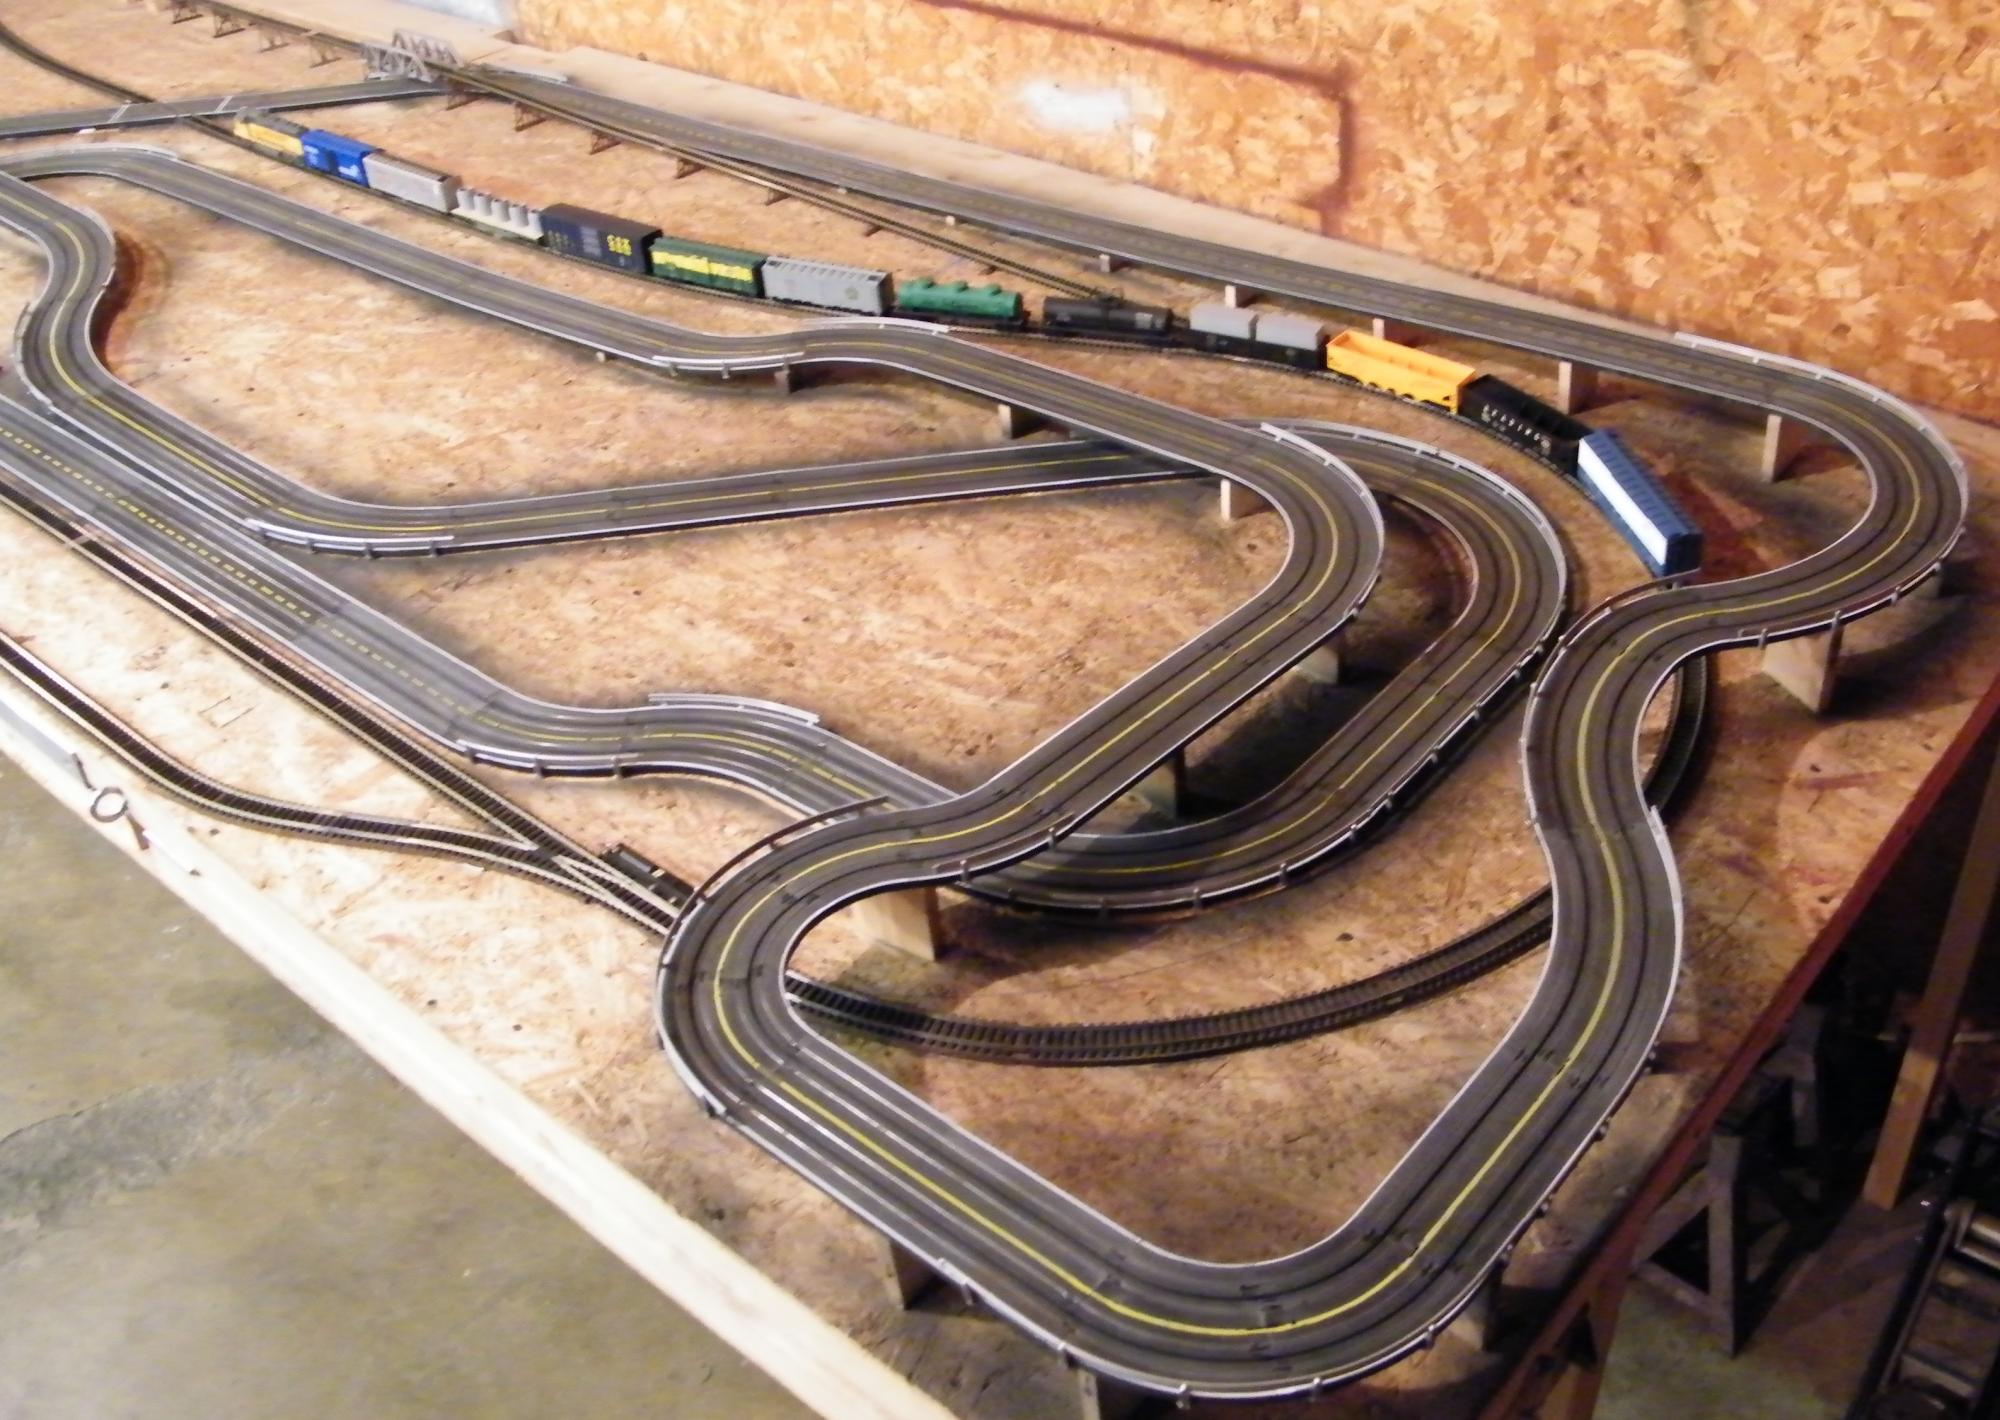
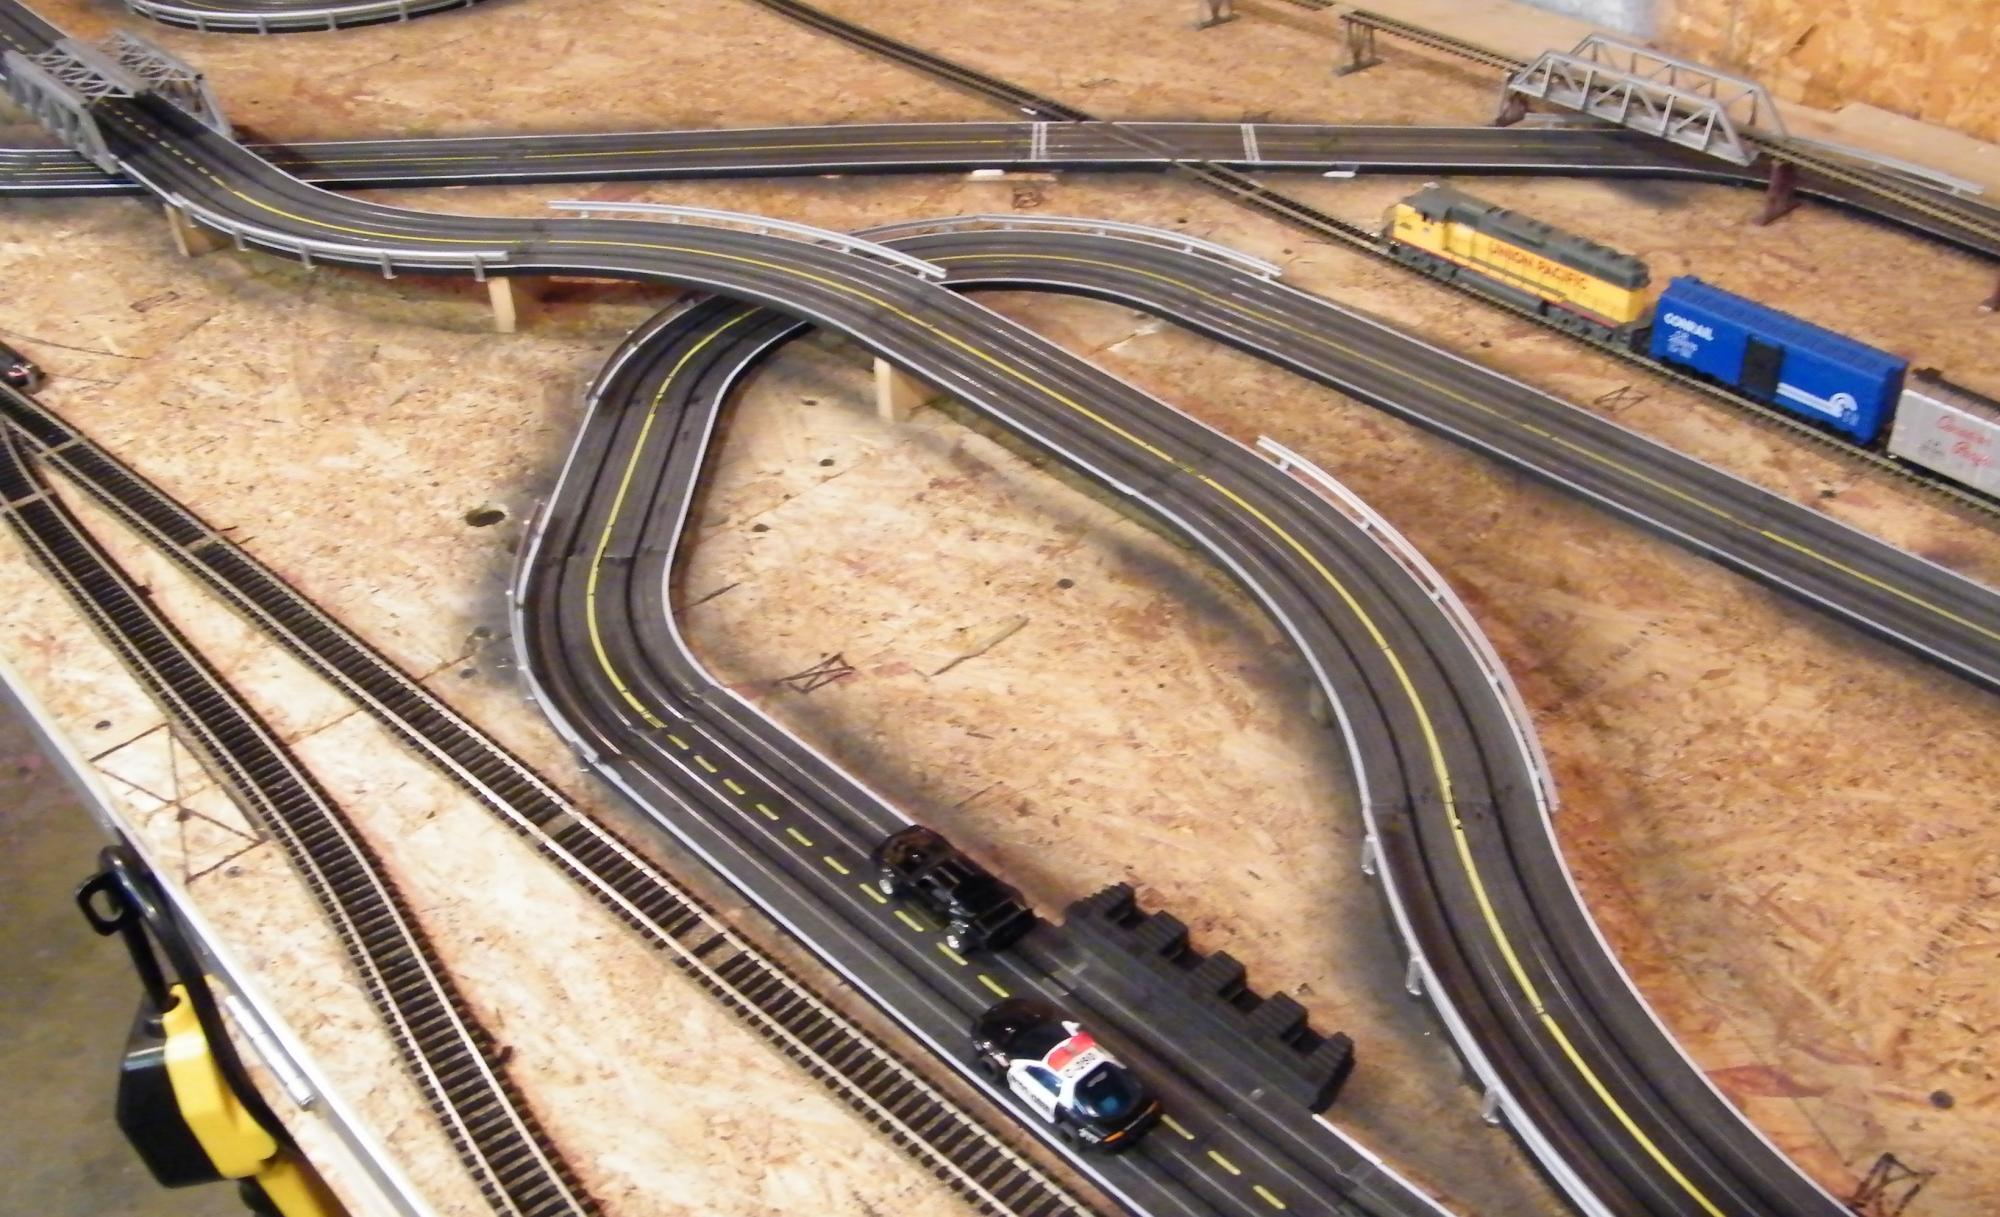
Here is a looooong over due update on my track. Forget all the previous pictures....this IS the final layout. Its been weathered....lines painted....and is now permanent on the table. Let me know what you think of it now. And yes...the train is still there. A lot of people don't seem to like that still (judging from other places I have posted it). Now that the "roadcourse" is done.....I need to get started back on the dragstrip.
-
Here is what i gone tonight on my layout. You can get an idea of the direction im going here. These walls are just the base foundation right now. These will eventually be covered by "rock"...kinda like when they cut through a mountain to put a road. Still a very long way to go...but its looking good. This is on the "mountain pass" end of the layout...tight curves and have to be careful driving through there.
-
I should have mentioned that....I knew somebody would catch it. That is just for a height reference right now. Since the upper track is directly above the lower track....I will be adding like an archway to that area to connect the lower and upper pieces of track. Still alot to do....but its getting there.
-
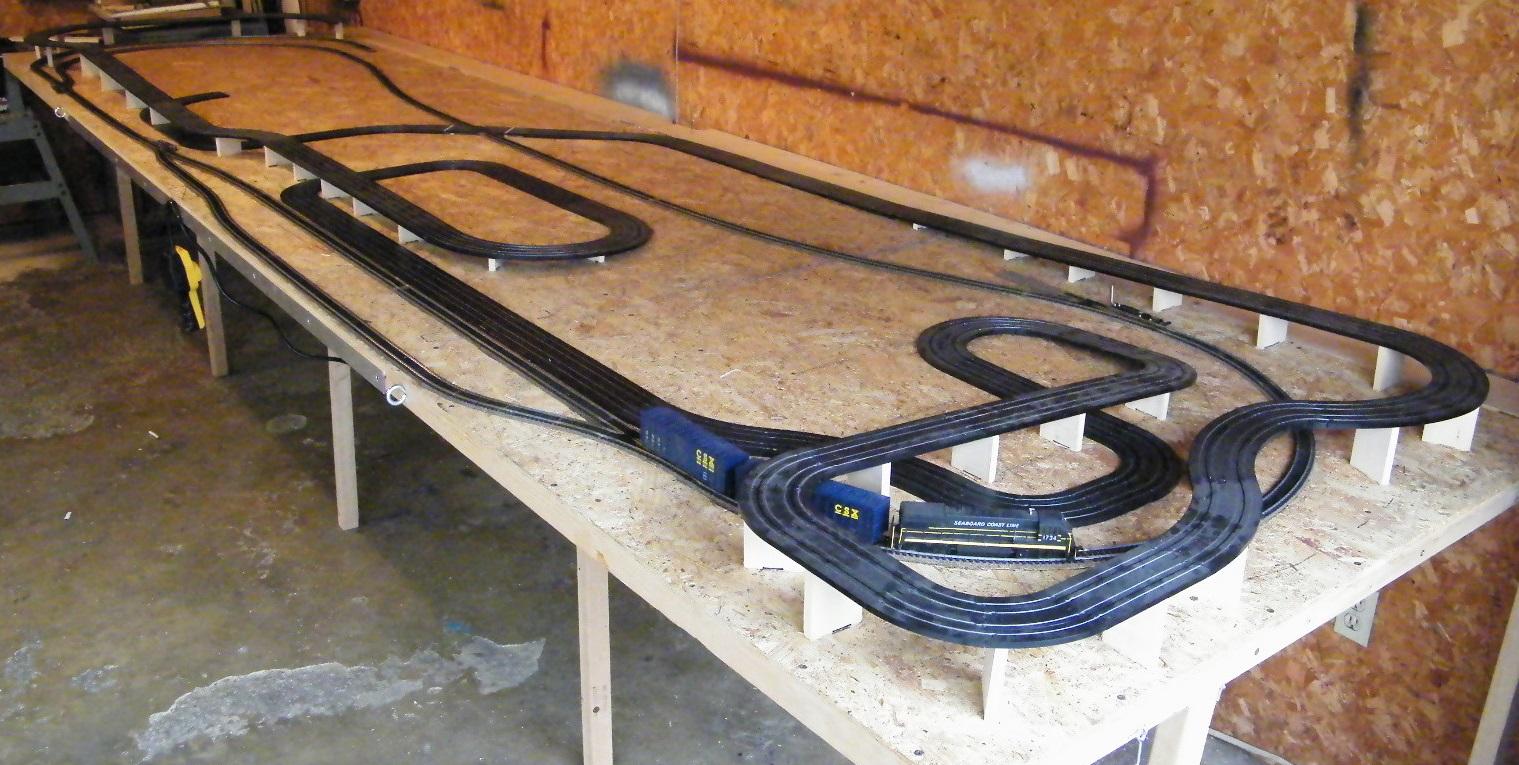
I know its been a looong time since i posted about this track...but with switching jobs...and a few other problems....I wasn't really able to make any progress. As you can see from the first pics I posted...it has changed a lot. I tore the whole thing apart and started over. I just didn't like how it was coming together as a whole. I have added all the supports...made another train crossing for the slot car track. It does still have the drag strip...i just took it off for the time being until i get other things done. I like this design a whole lot better than the first one. I have also built a winch and pulley system to fold it against the wall...as i know it will start getting some serious weight to it. Let me know what you think. Thanks
-
Oh yeah....it will have buildings...trees...people...some of the track will look like mountain passes...so on and so on. I will have bleachers next to the drag strip...guardrails all the way down. Im looking at about a year or more to get it all done. I will be fully decorated with a lot of scenery. Im even going to have working street lights all along the slot car track....good for night racing. And...off the slot car track I will have fake roads.....kinda make it look like turns off an interstate. Still ALOT of planning to do. Not to mention the control box im going to have to control everything. That will be a a wiring nightmare. And get this...I have figured out how to only have 2 controllers all total....for both tracks...WITHOUT unhooking them. I will show more on that later.