Wolfangel
-
Posts
56 -
Joined
-
Last visited
Content Type
Profiles
Forums
Events
Gallery
Everything posted by Wolfangel
-
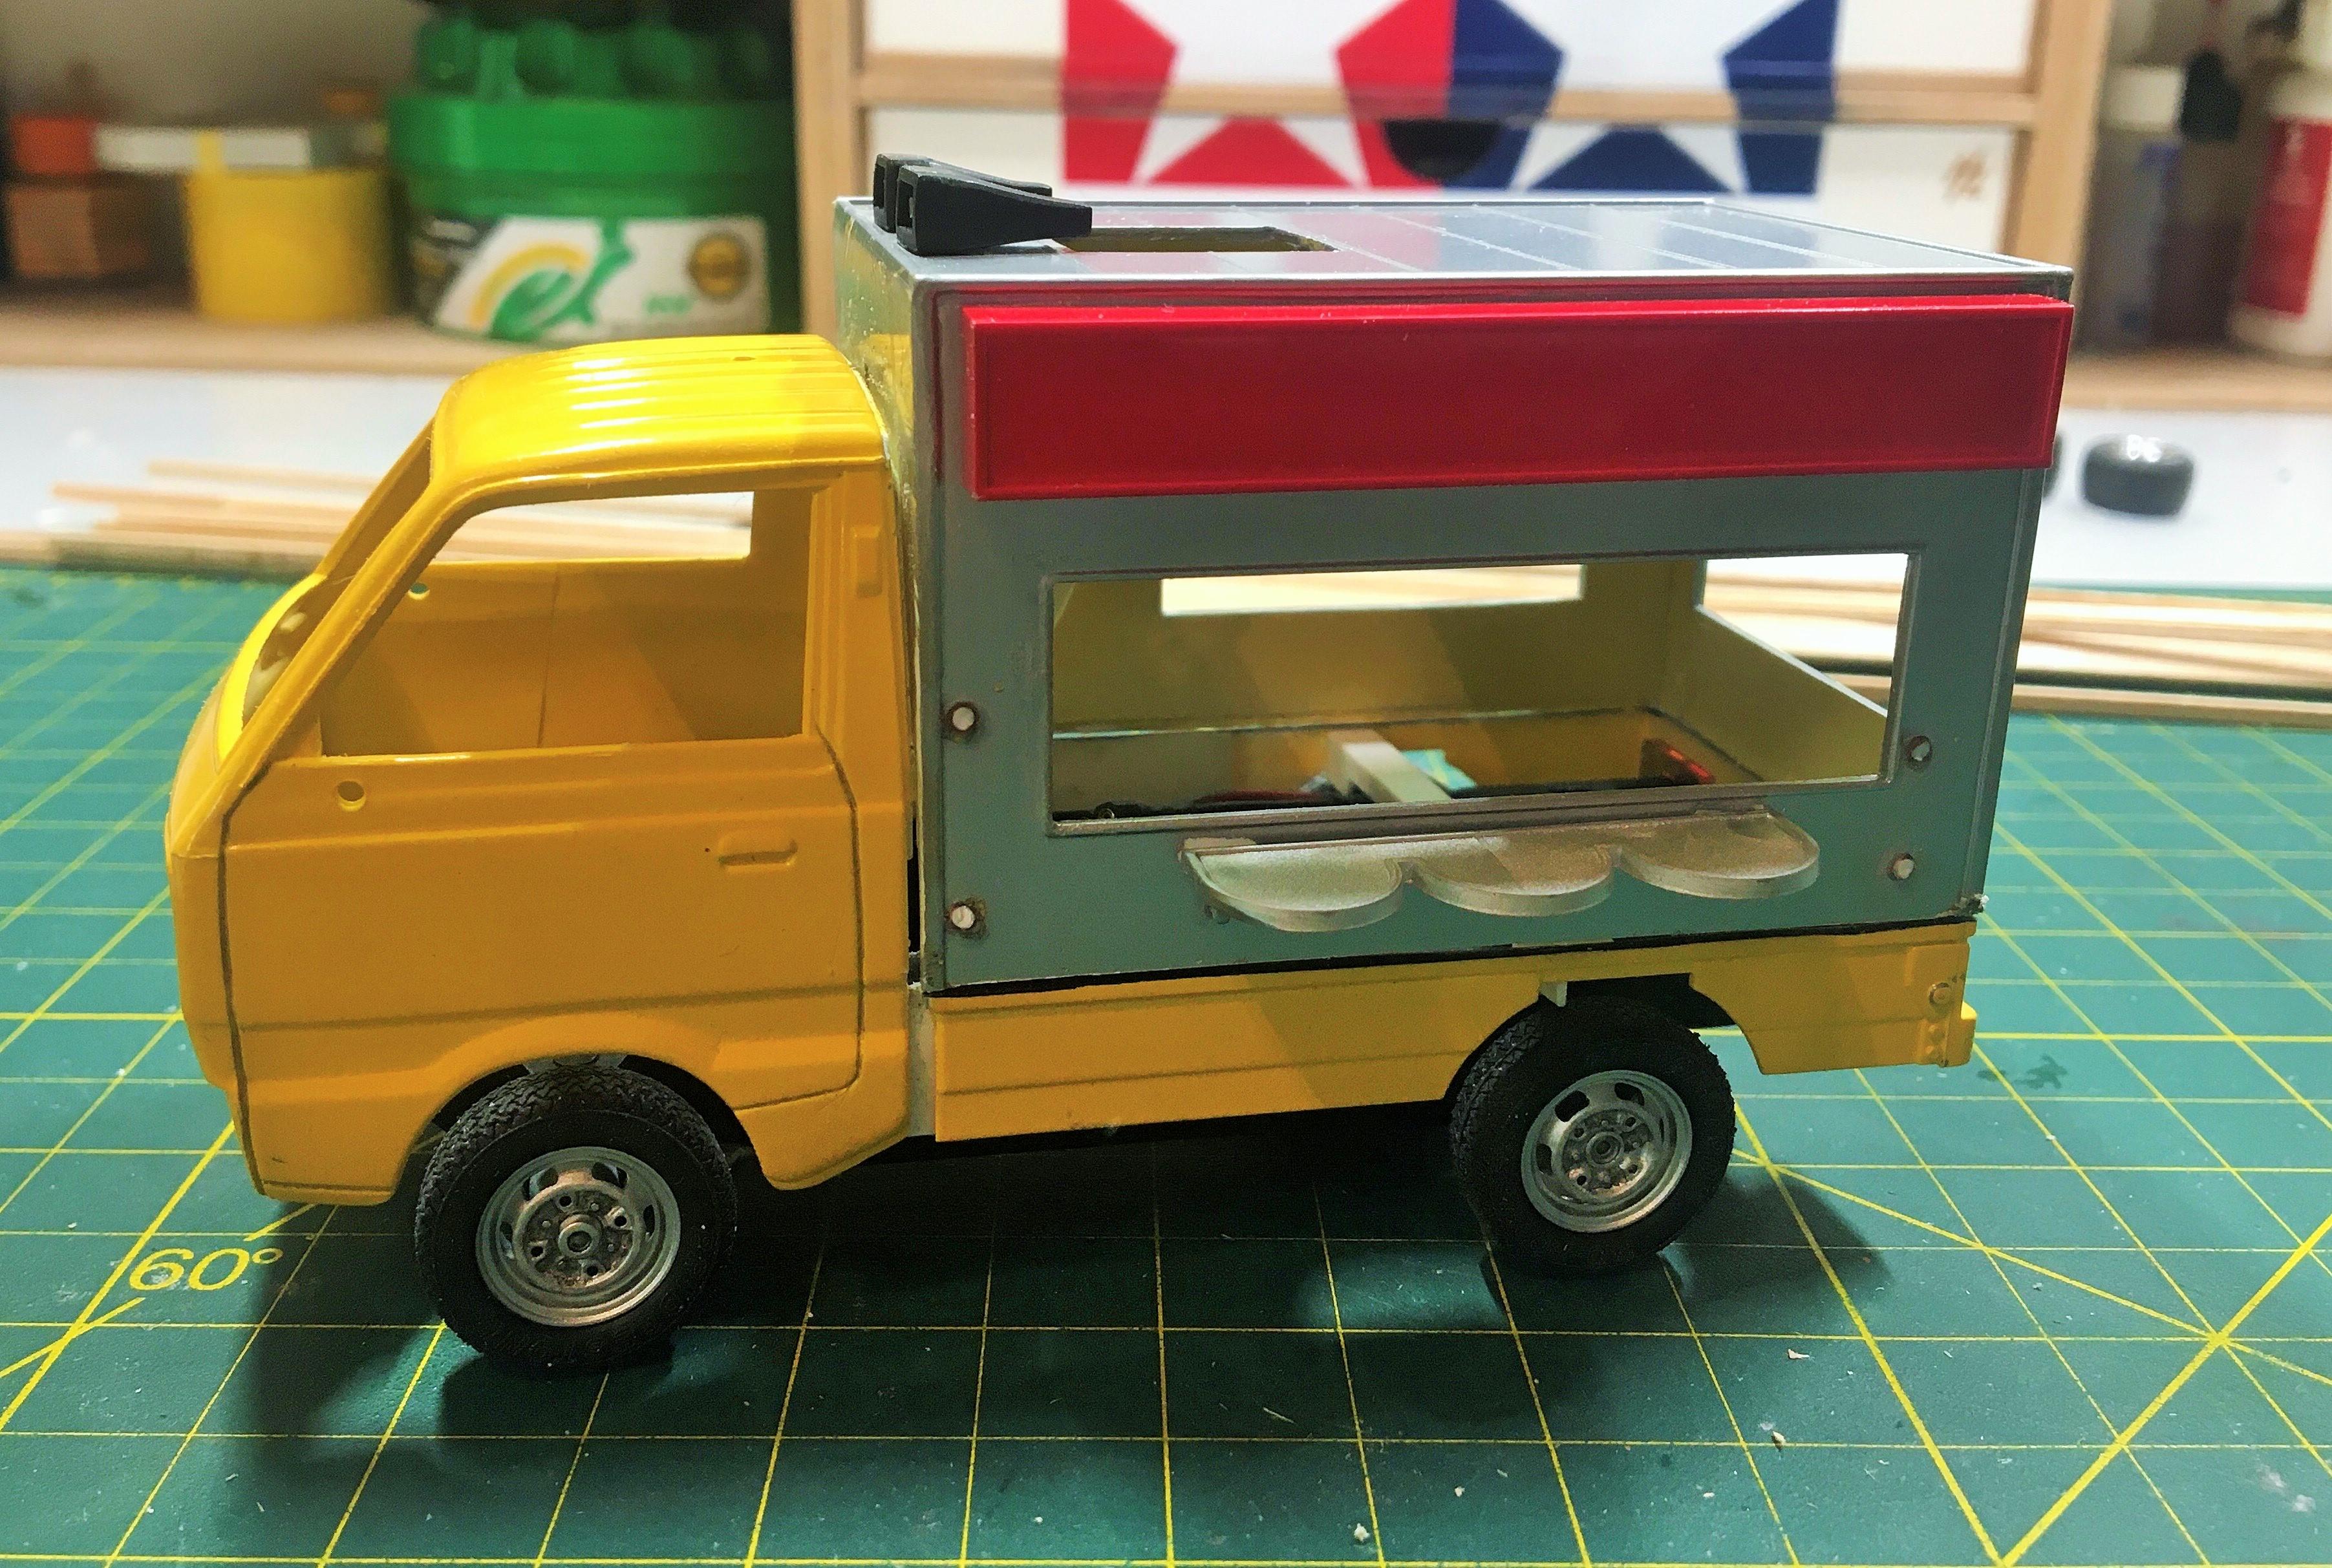
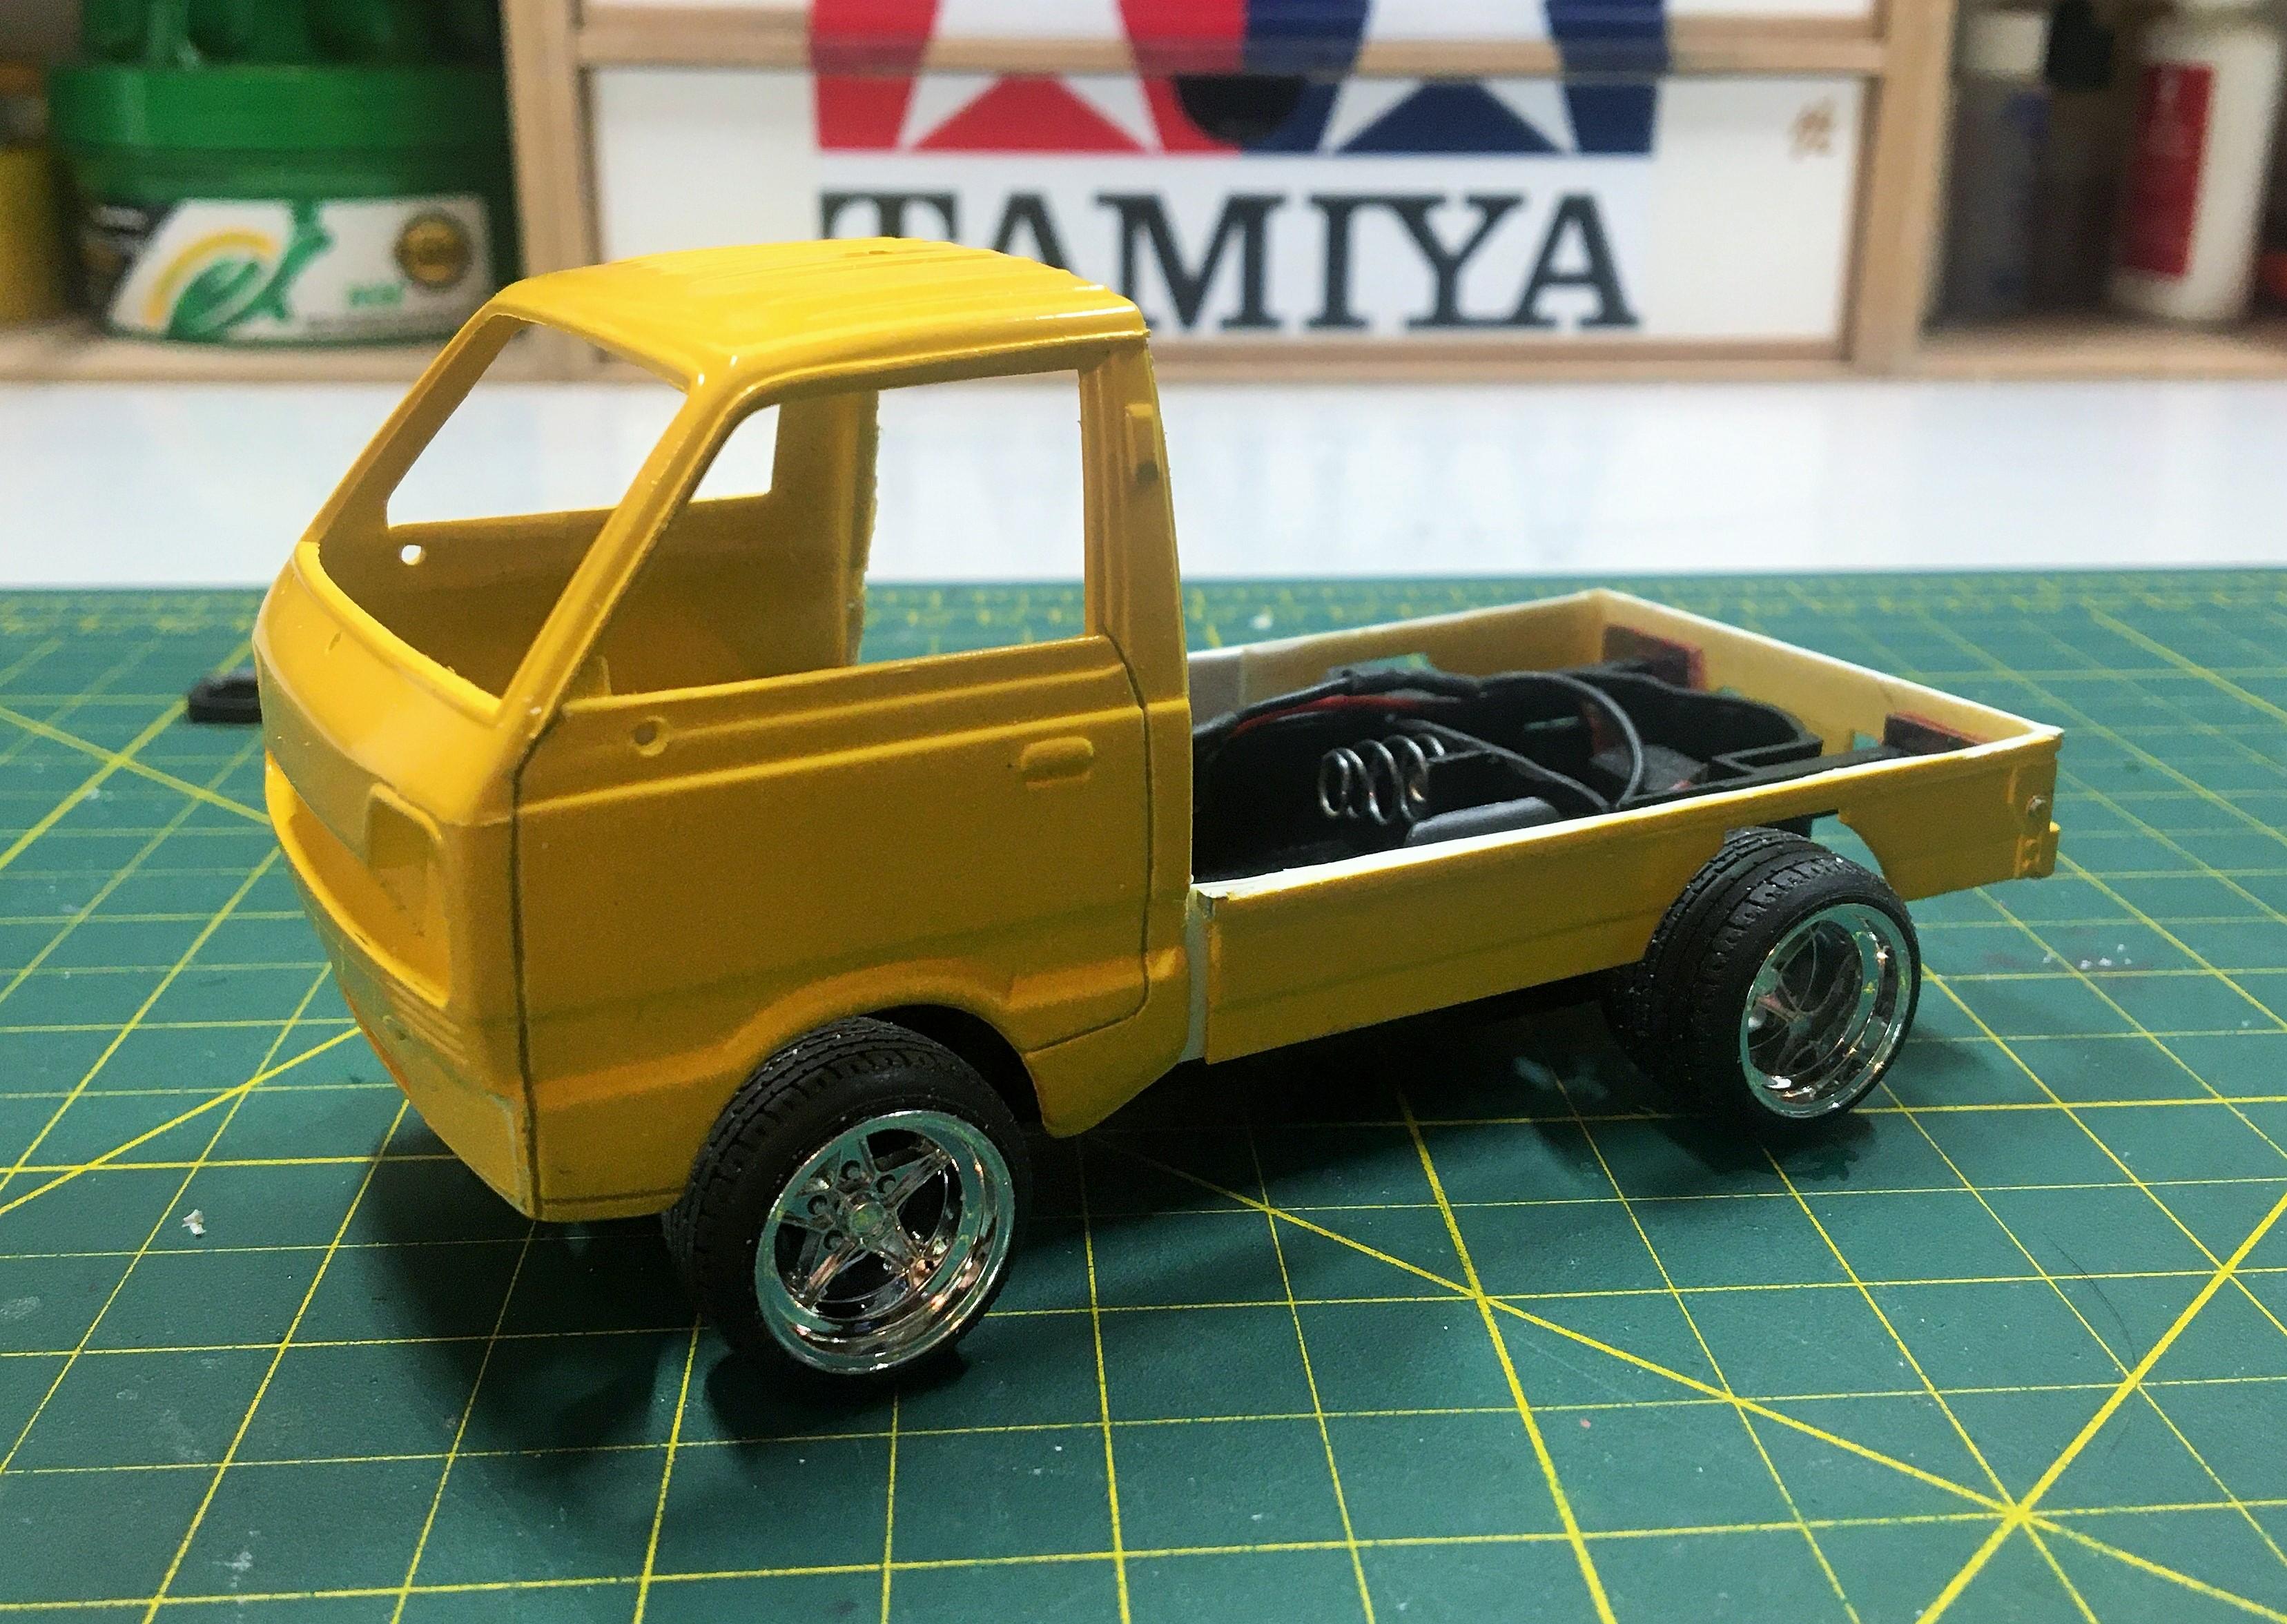
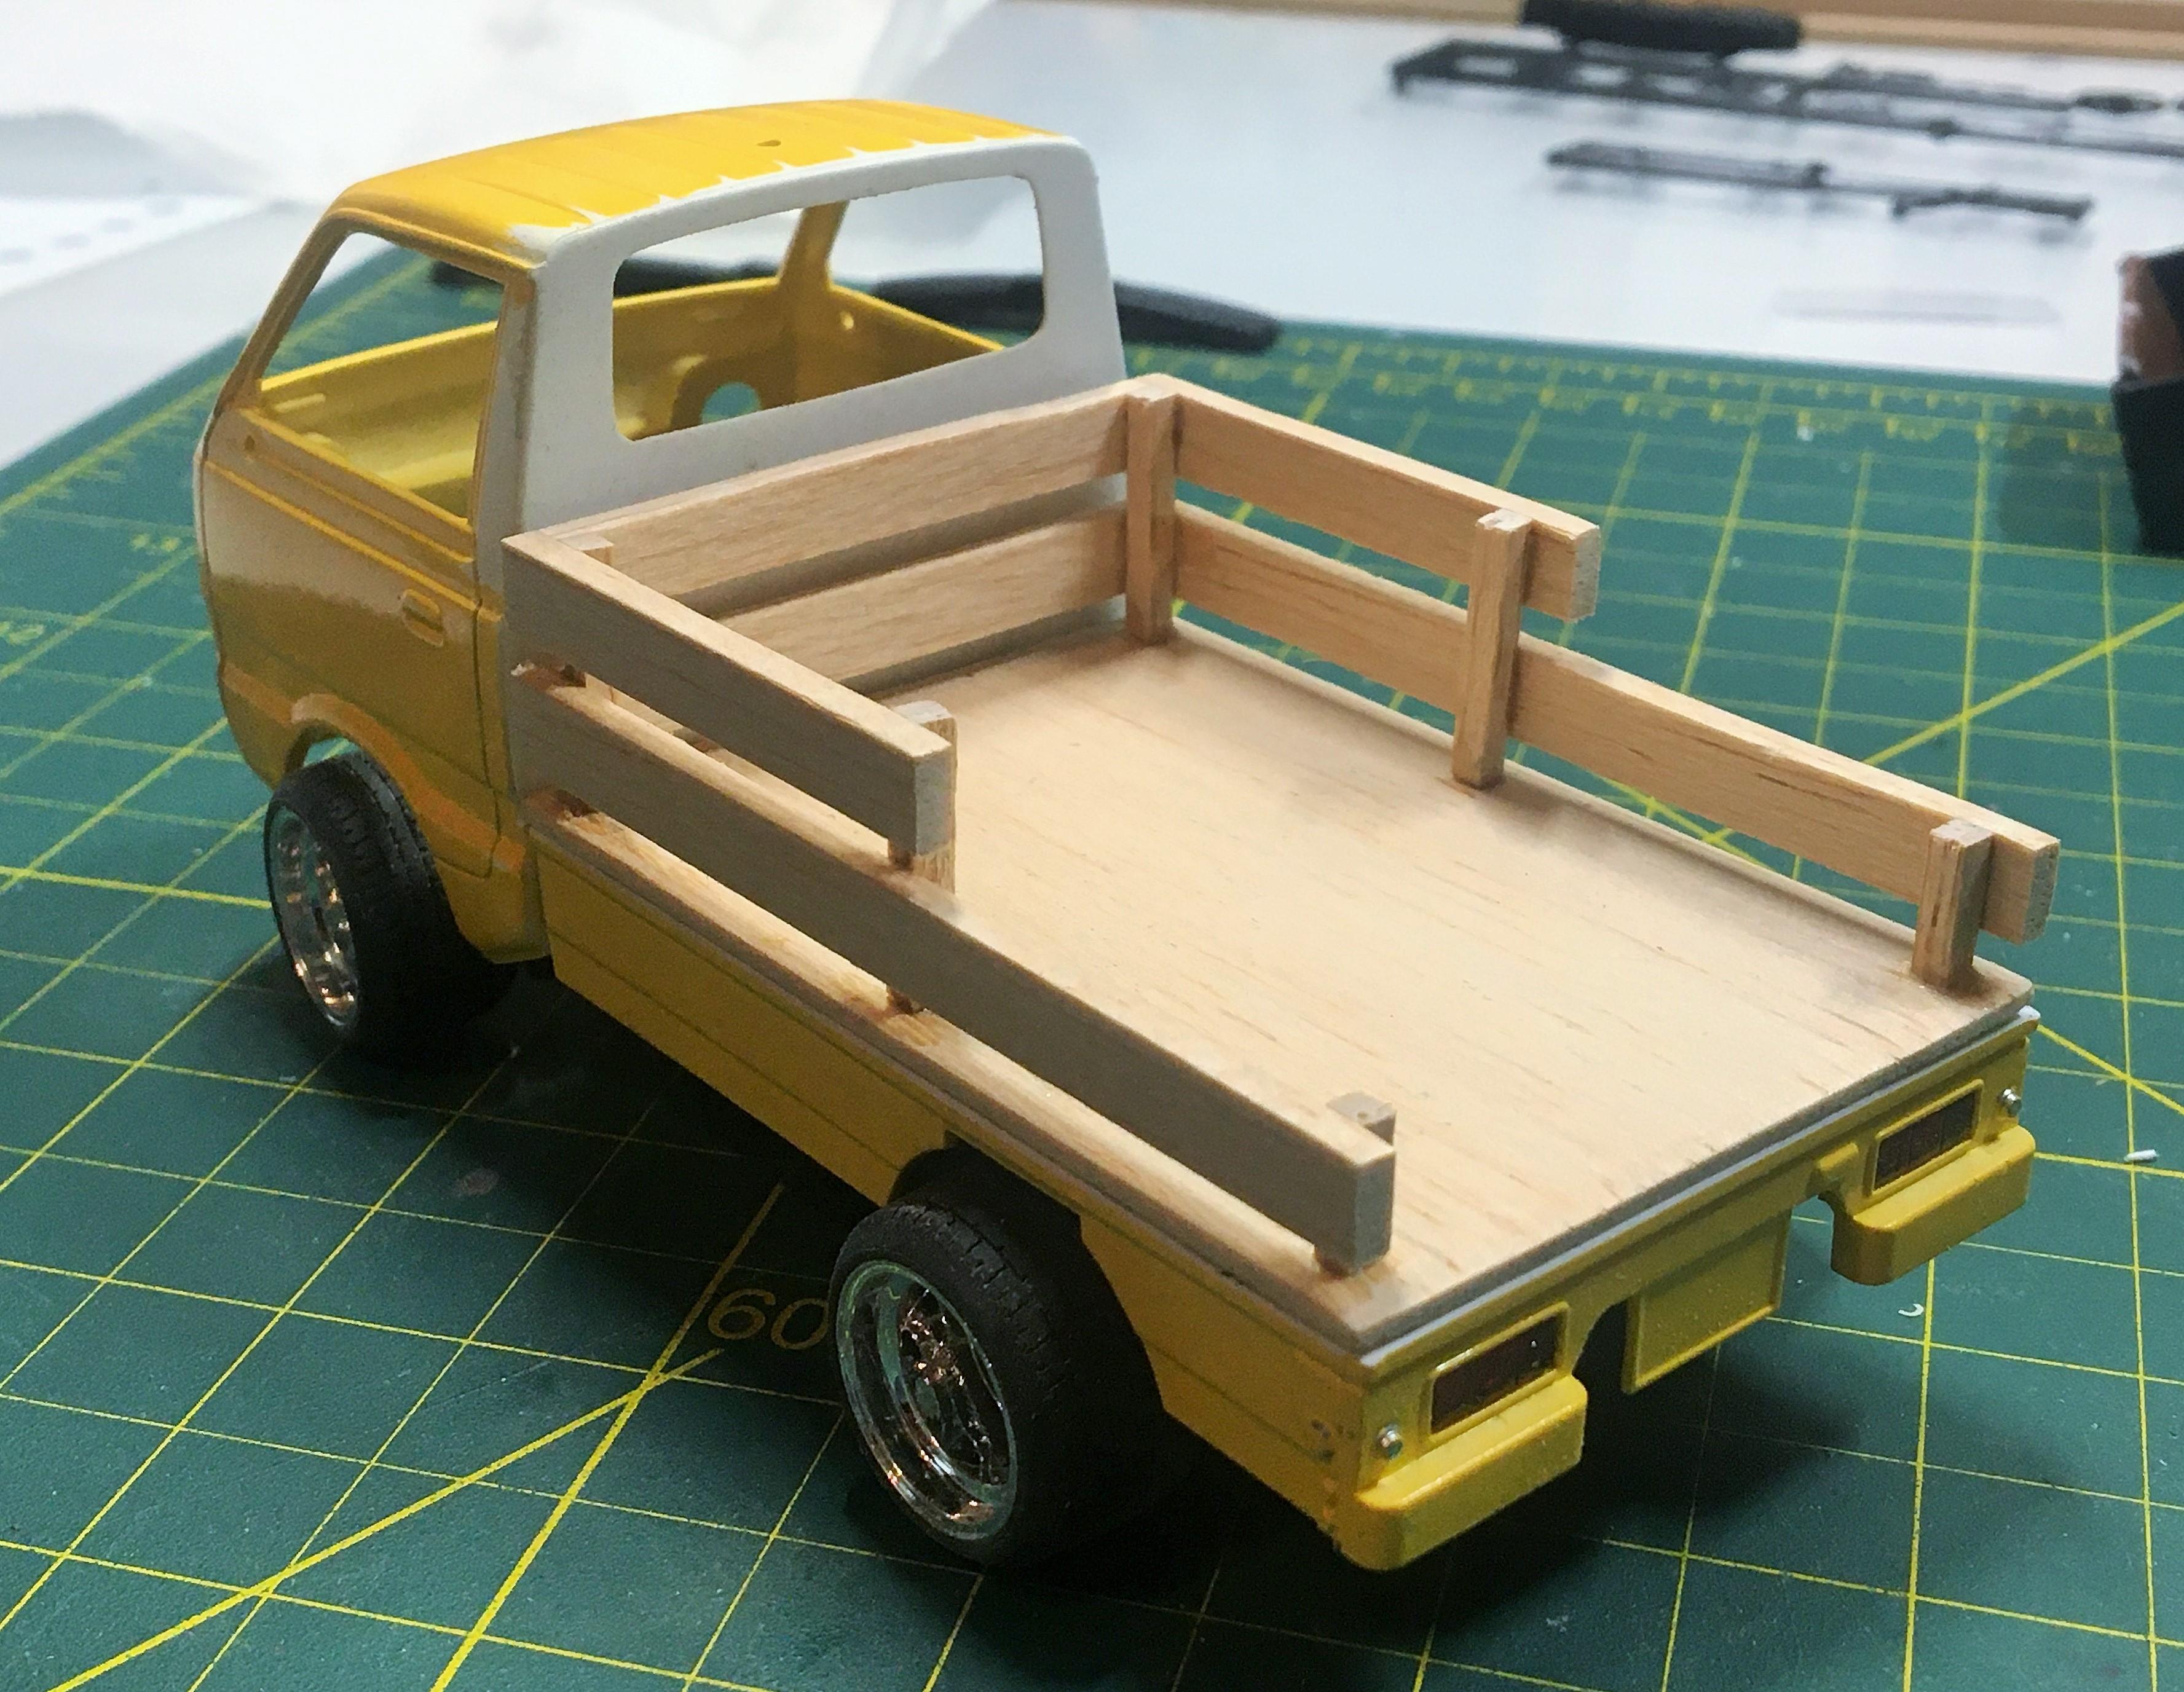
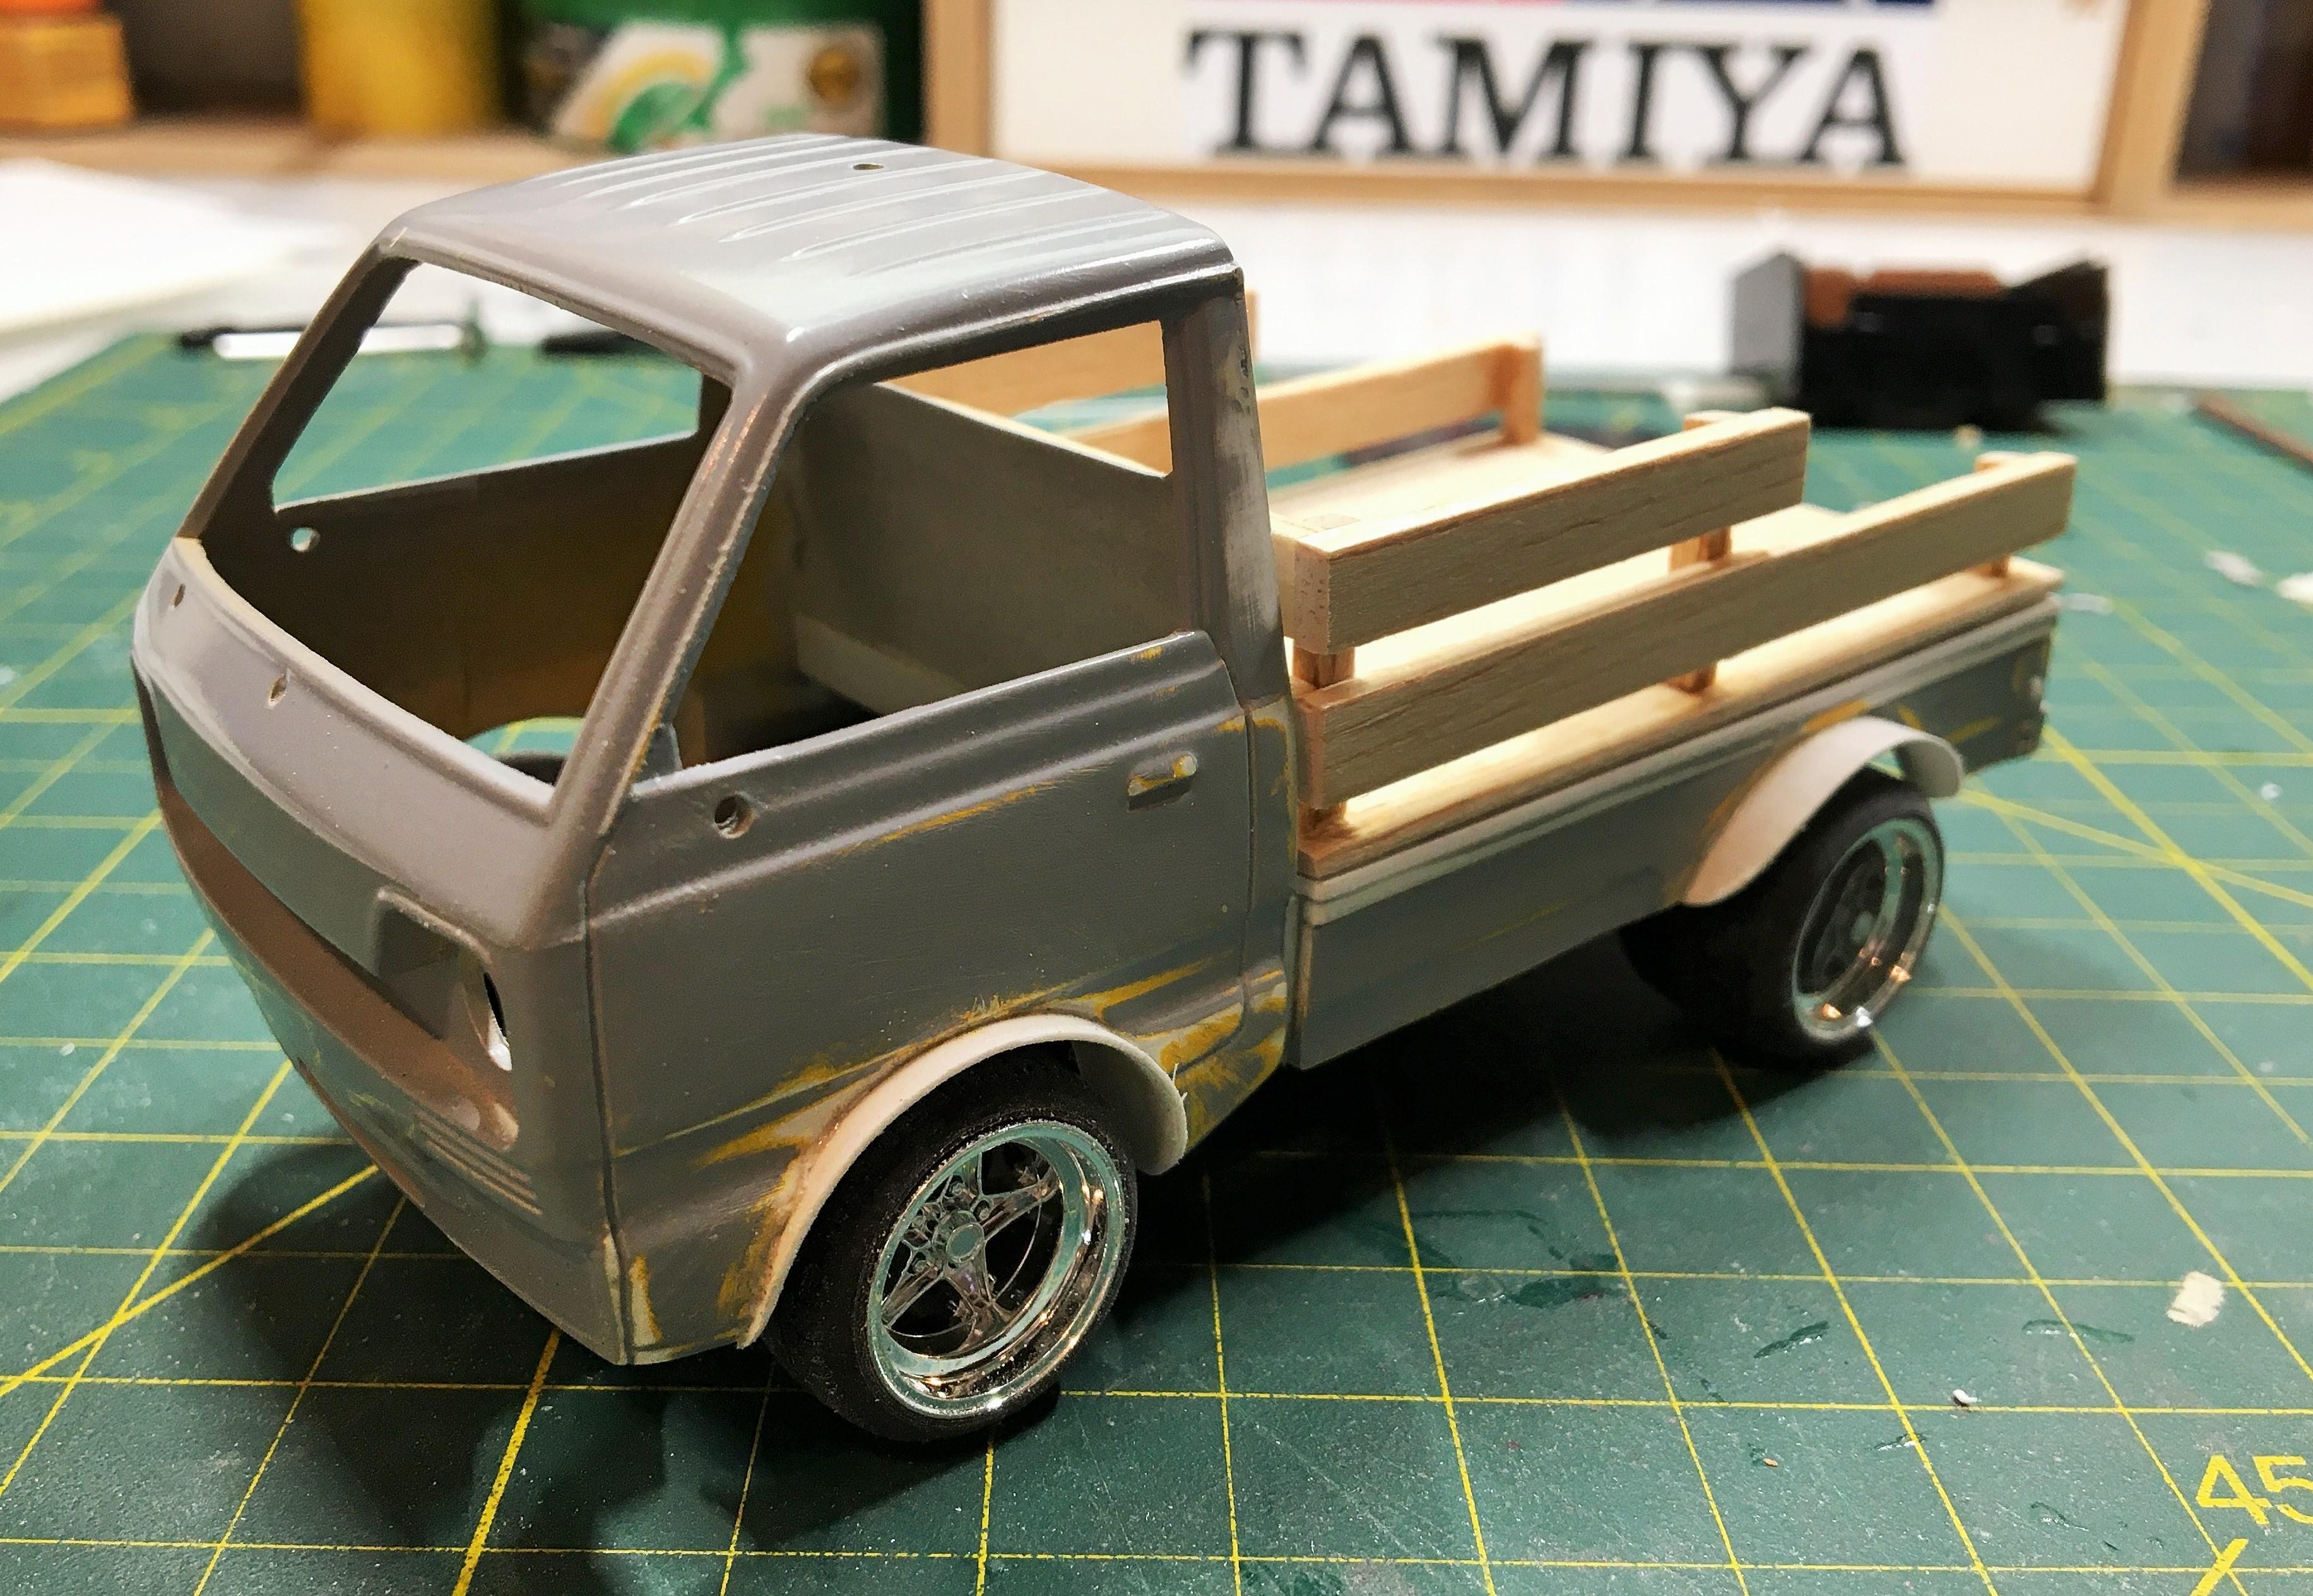
 Here is a fun idea I had. I bought one of the Aoshima food trucks. I originally intended to build it as a food truck....but then I decided to go a whole different route. I had bought some rims, and I wasnt sure what I was going to put them on....then the idea hit me to put them on this. I cut the food truck part off of the body.....fabricated a wooden stake bed out of balsa wood and made a back wall for the cab. I lowered the front just a bit and then added fender flares front and rear. Im not sure on a color yet, but its going to be a cool little truck when its done.
-
Here are the rest of the pictures.......
-
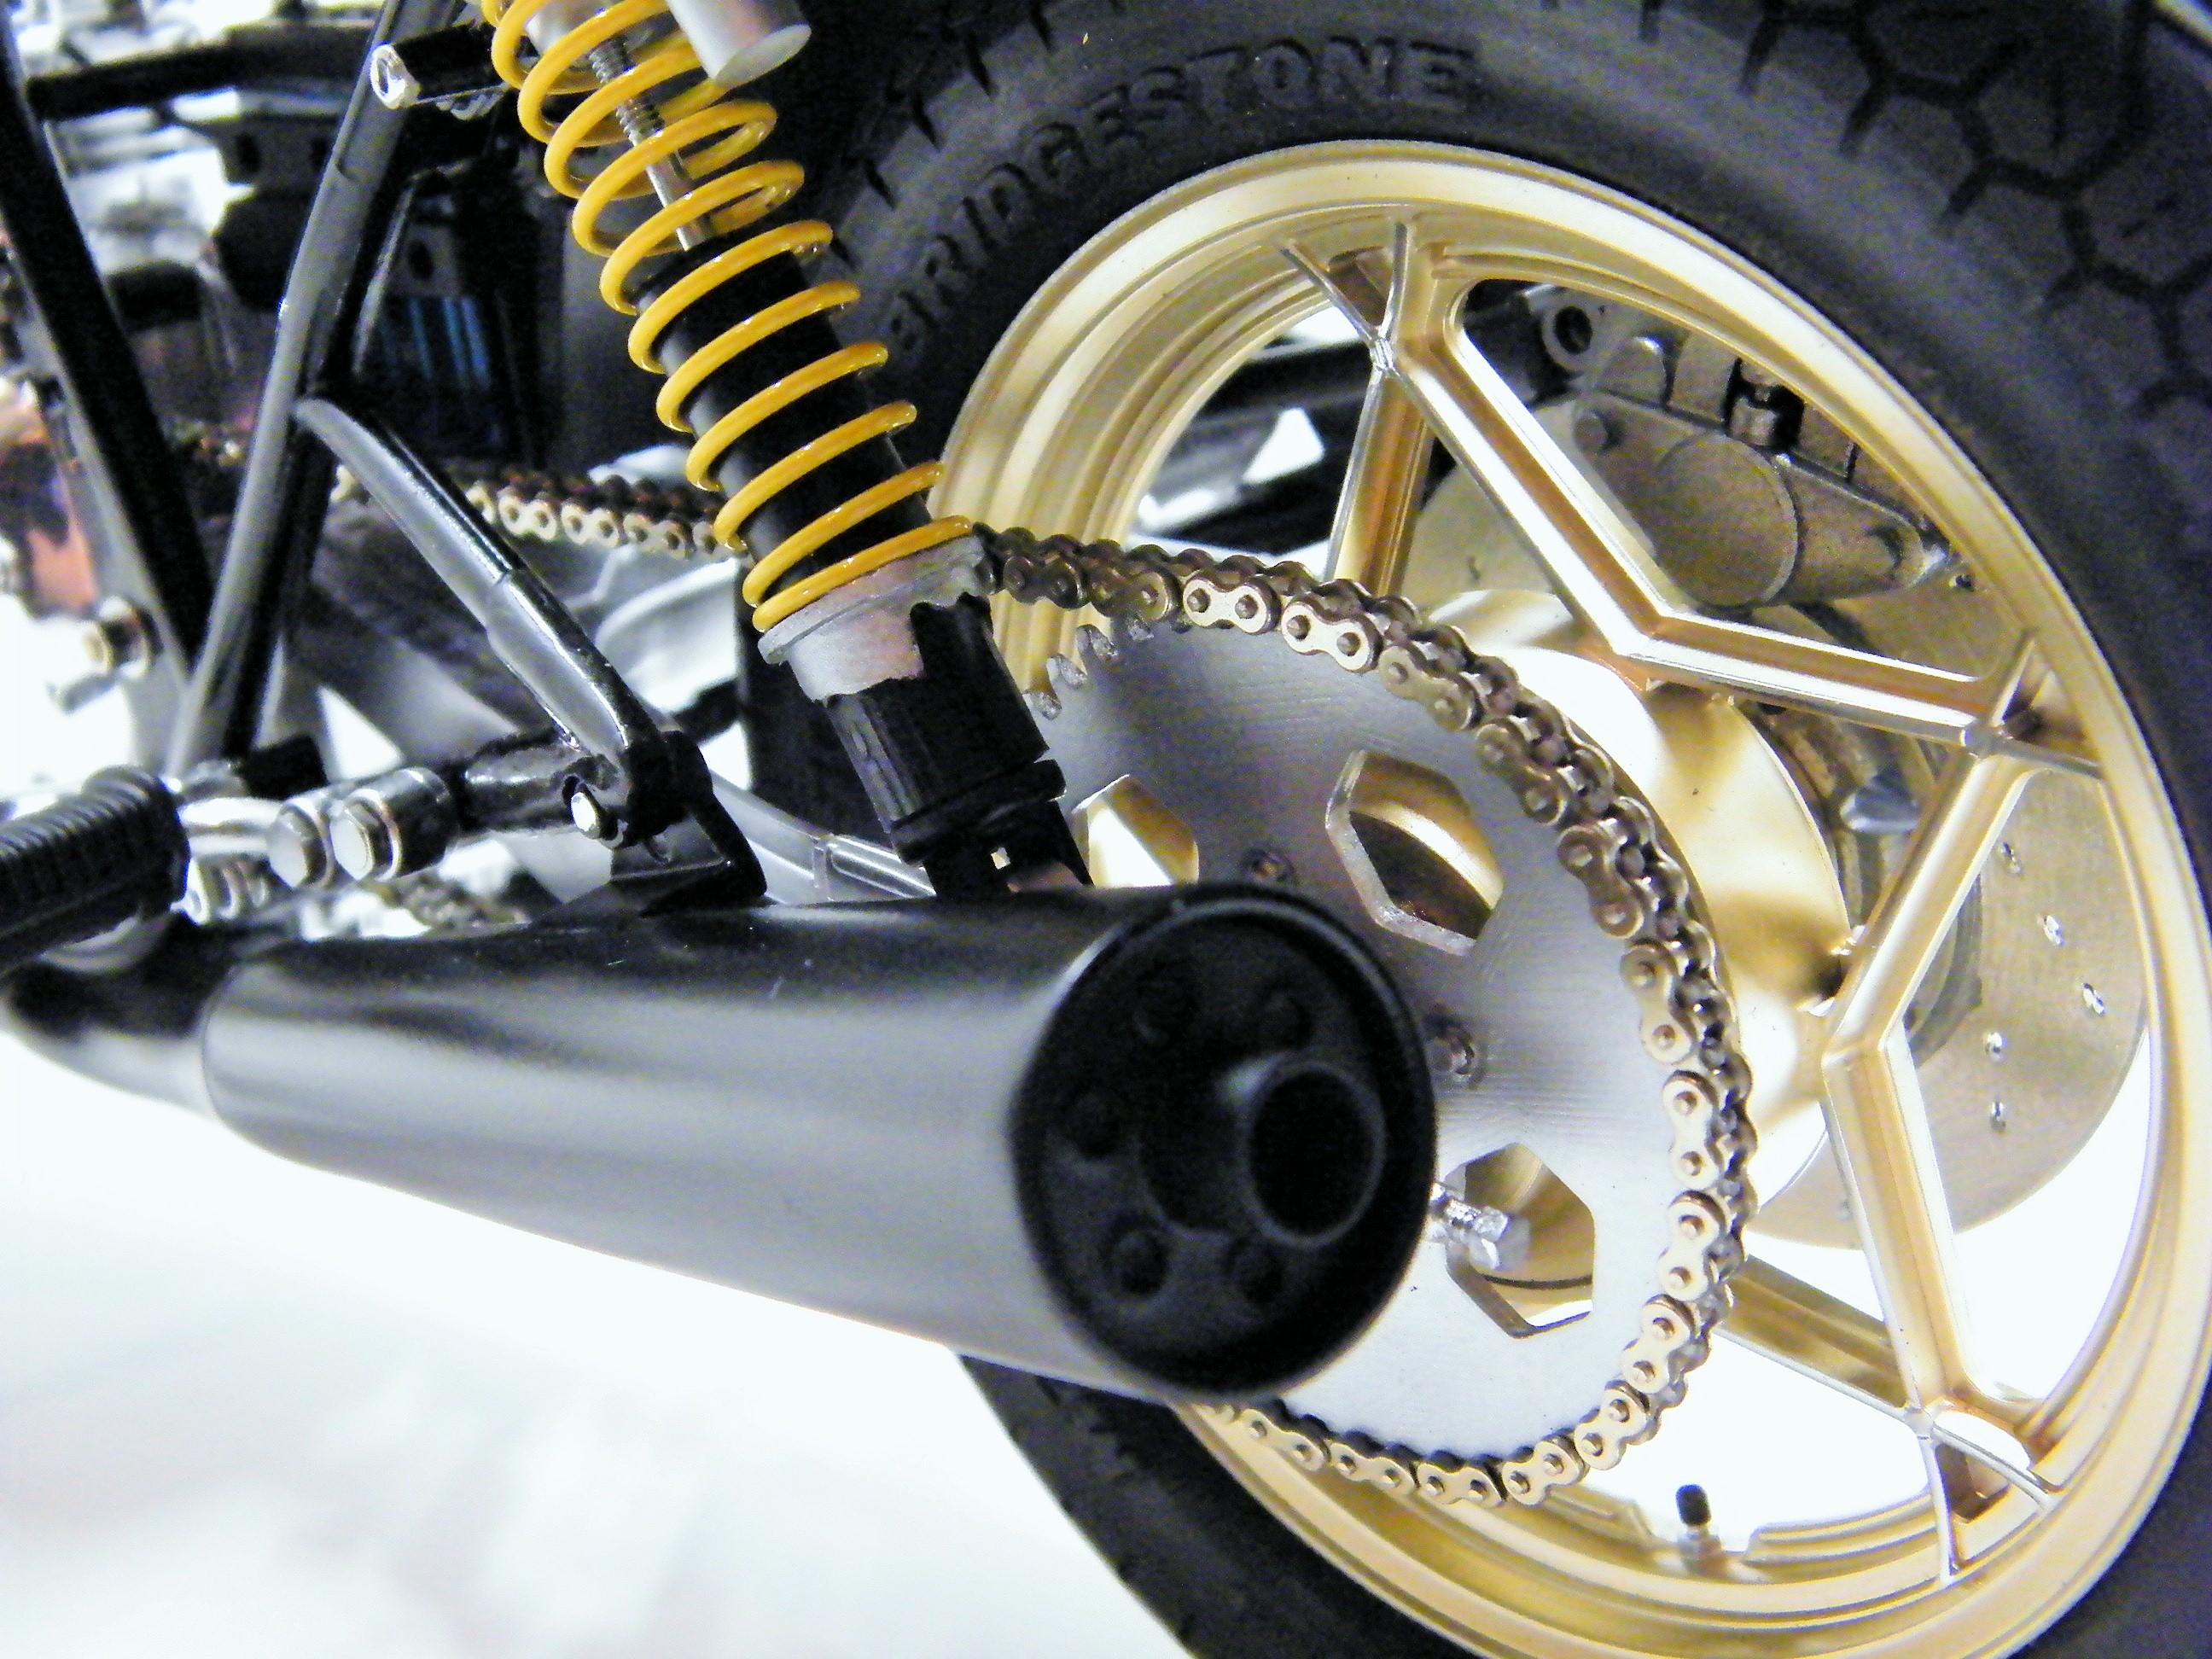
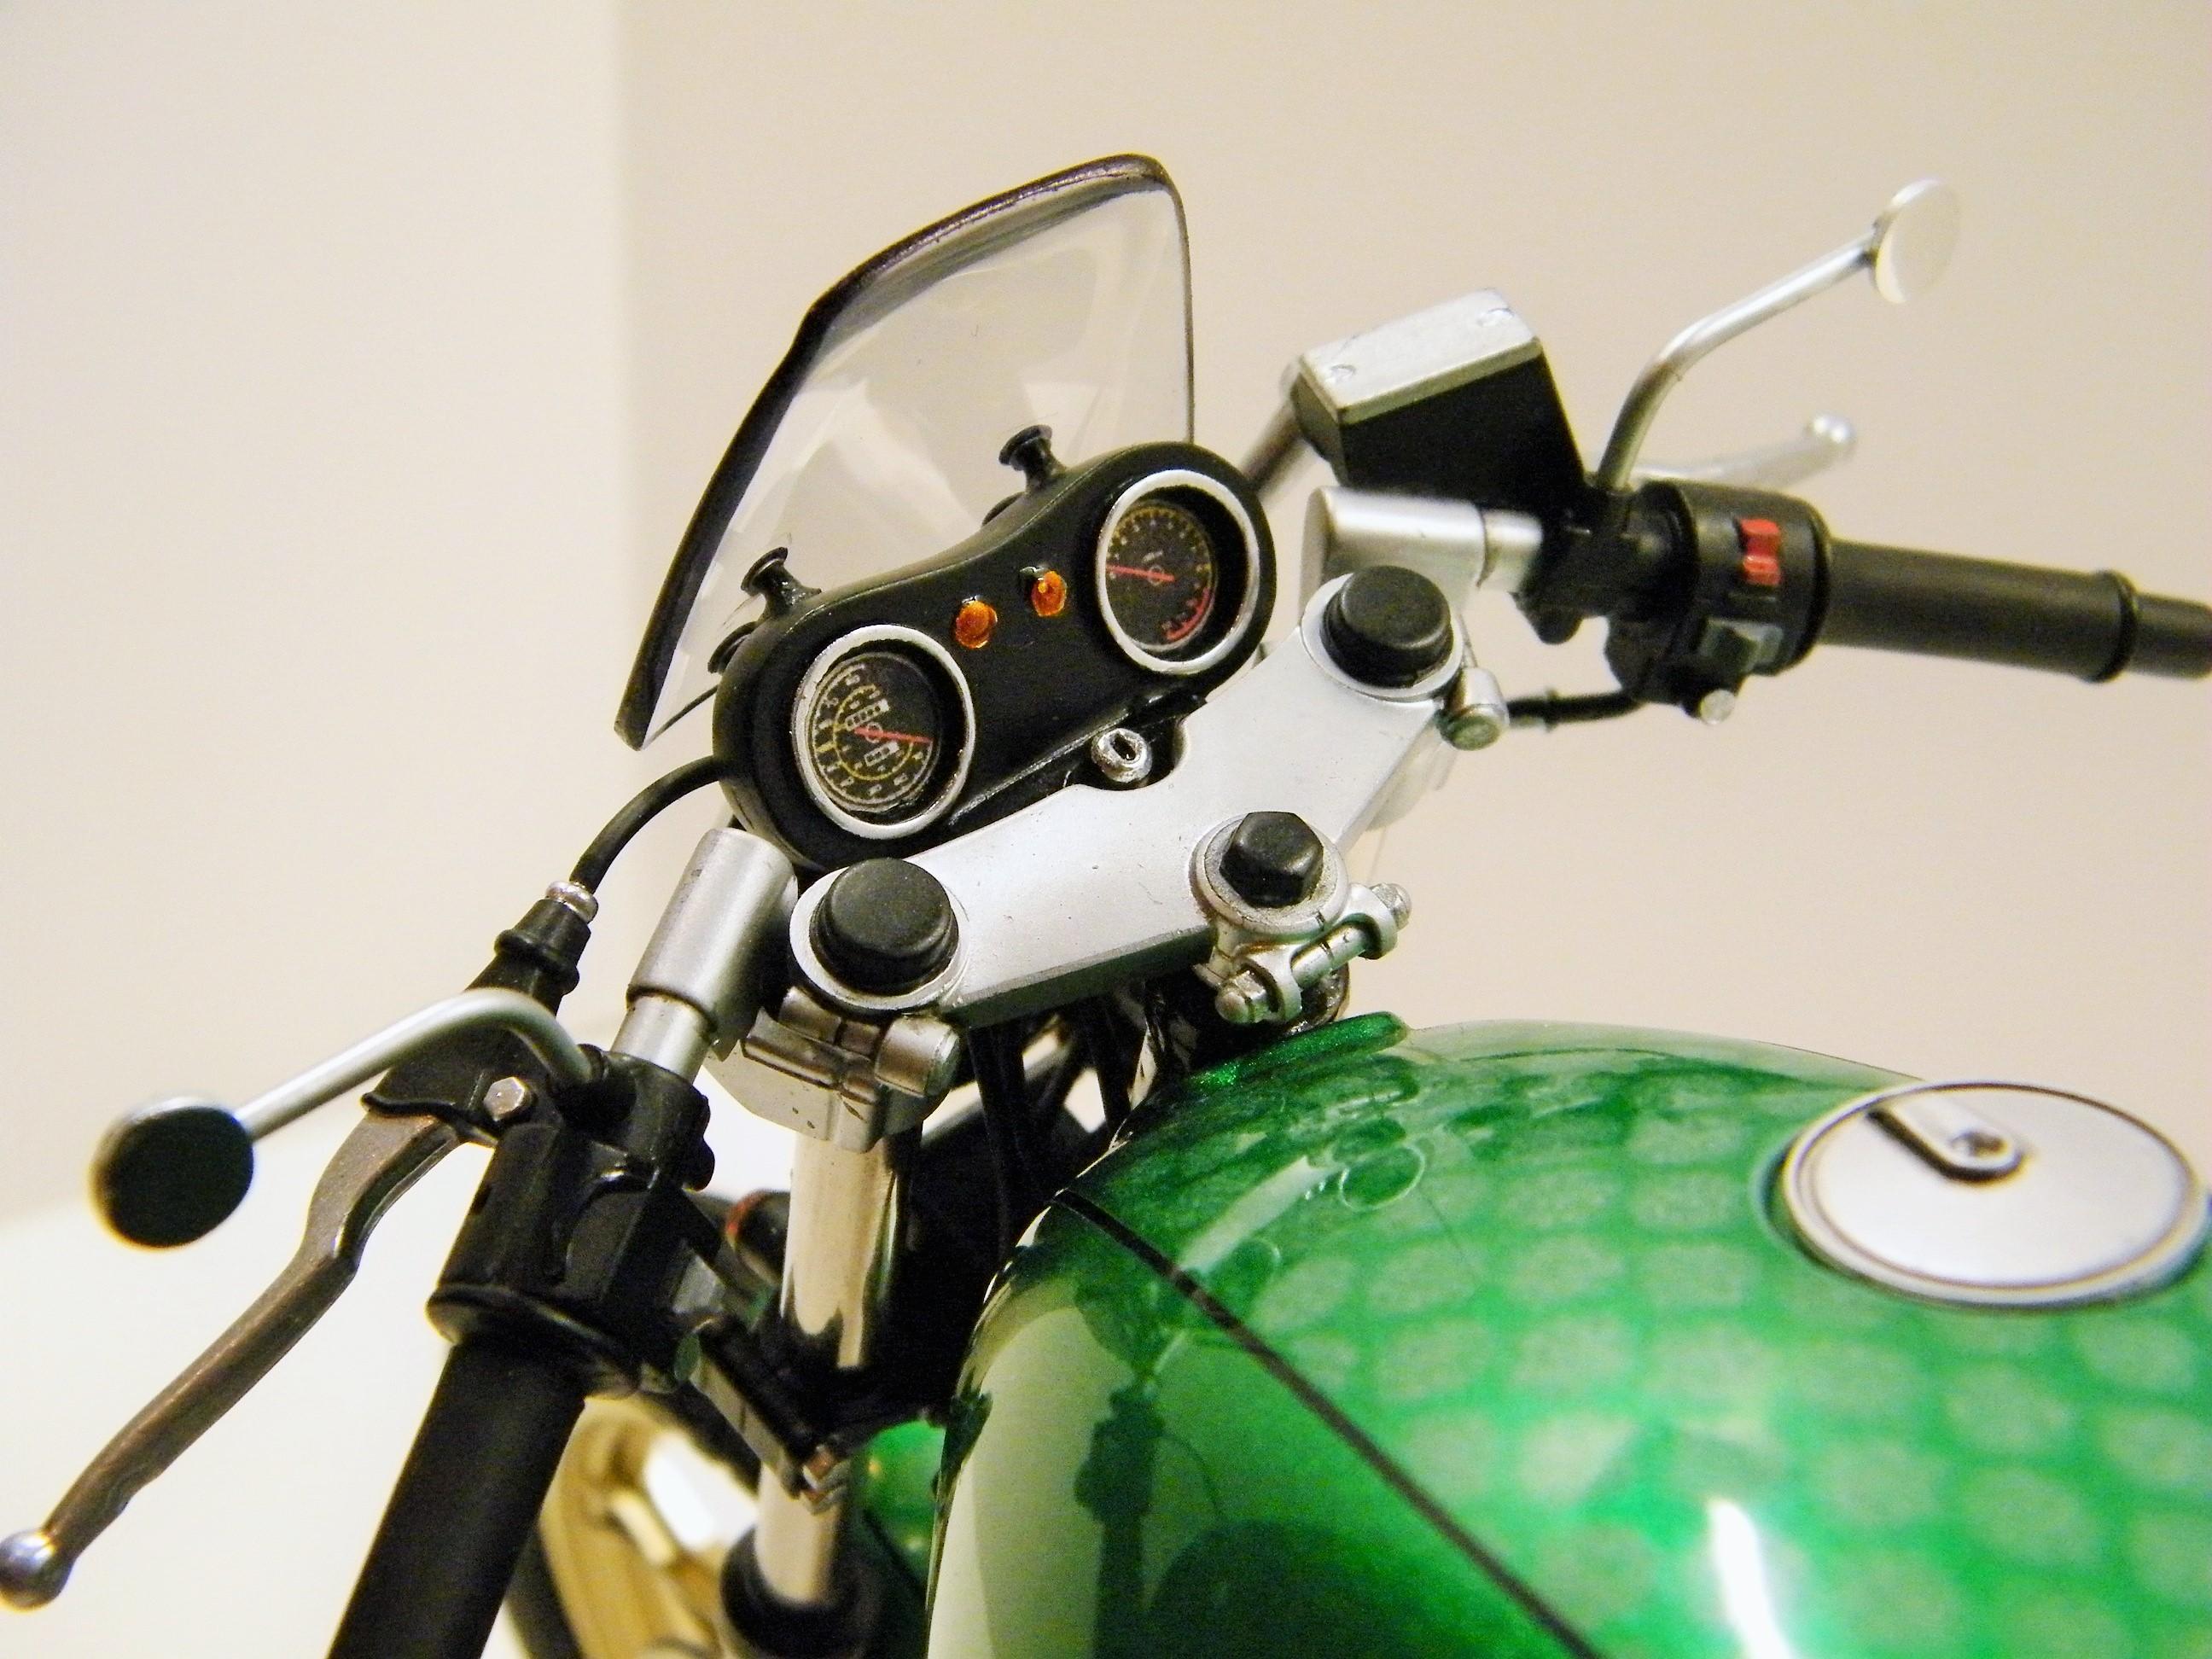
Here is my version of a Suzuki Katana done in a cafe racer style. I have put a picture of what the bike was suppose to look like from the kit. There is a bunch of work done on it. You can read in the WIP folder to see what was done. I made the side panels on the gas tank.....the front fender is the kit fender, but its cut down and turned around backwards......I made the front and rear signals with 1/16 Lamborghini lenses.....rear shock reservoirs were added.....REAL working chain.....scratch built gauge cluster.....scratch built headlight bracket with headlight from 1/8 scale street rod kit.....cut down the kit windshield to make it smaller.....scratch built mirrors.....the 3 black symbols on the gas tank say SUZUKI in Japanese. I am proud of this bike and it actually won its class at its first show this past weekend in Roanoke, VA.
-
The bike is about 15 inches long. Its a pretty big beast. And as for the carbs....I did not know that....to late to change it now, so lets just say they are custom aftermarket carbs....LOL. Here is a small update for today. The front fender is actually the fender that came in the kit.....but I cut it down and turned it around backwards. I got the whole front end on for good this time. All the brake lines are run, the speedometer cable is run, headlight and turn signals are on (lenses are from 1/16 scale Lamborghini) and I got the battery detailed and ready to go in. The gauge cluster is done and the handle bar grips are on and detailed. I also made some external reservoirs on the rear shocks. And I have a pile of parts I did not use on the bike. I didnt expect that big of a pile.....lol. Its getting there....not to much longer to go. Hopefully done in a few days.
-
Made some good progress today. Since I wasnt going to be using the front cowling/body work....I needed to make a bracket to hold the headlight. The headlight is from a 1/8 scale street rod kit. I also scratch built some front and rear turn signals and the brackets for them to. I also scratch built a new smaller gauge cluster which also has the brackets that hold the wind screen (the wind screen is cut down from the original kit piece). Its coming along quite good. Should look good when its all done.
-
This is the Tamiya 1/6 scale Suzuki GSX1100S Katana......and it will look nothing like the box art. I started out by ordering the chain from Tamiya.....and let me tell ya.......its an adventure putting that together. There are 350 pieces in that chain alone. And since I got the chain, I had to 3D print some sprockets for it. Those came out real good and it works really smooth. I then decided to add some velocity stacks to the motor and get rid of the chunky air box.....along with making carburetor butterflies that you can see looking into the stacks. I made the velocity stacks from some wire ferrule connectors I found at Lowes. I have done a few more changes I will post as I go along. This bike will eventually be a cafe racer style bike.....but just using a modern-ish bike. So far so good.
-
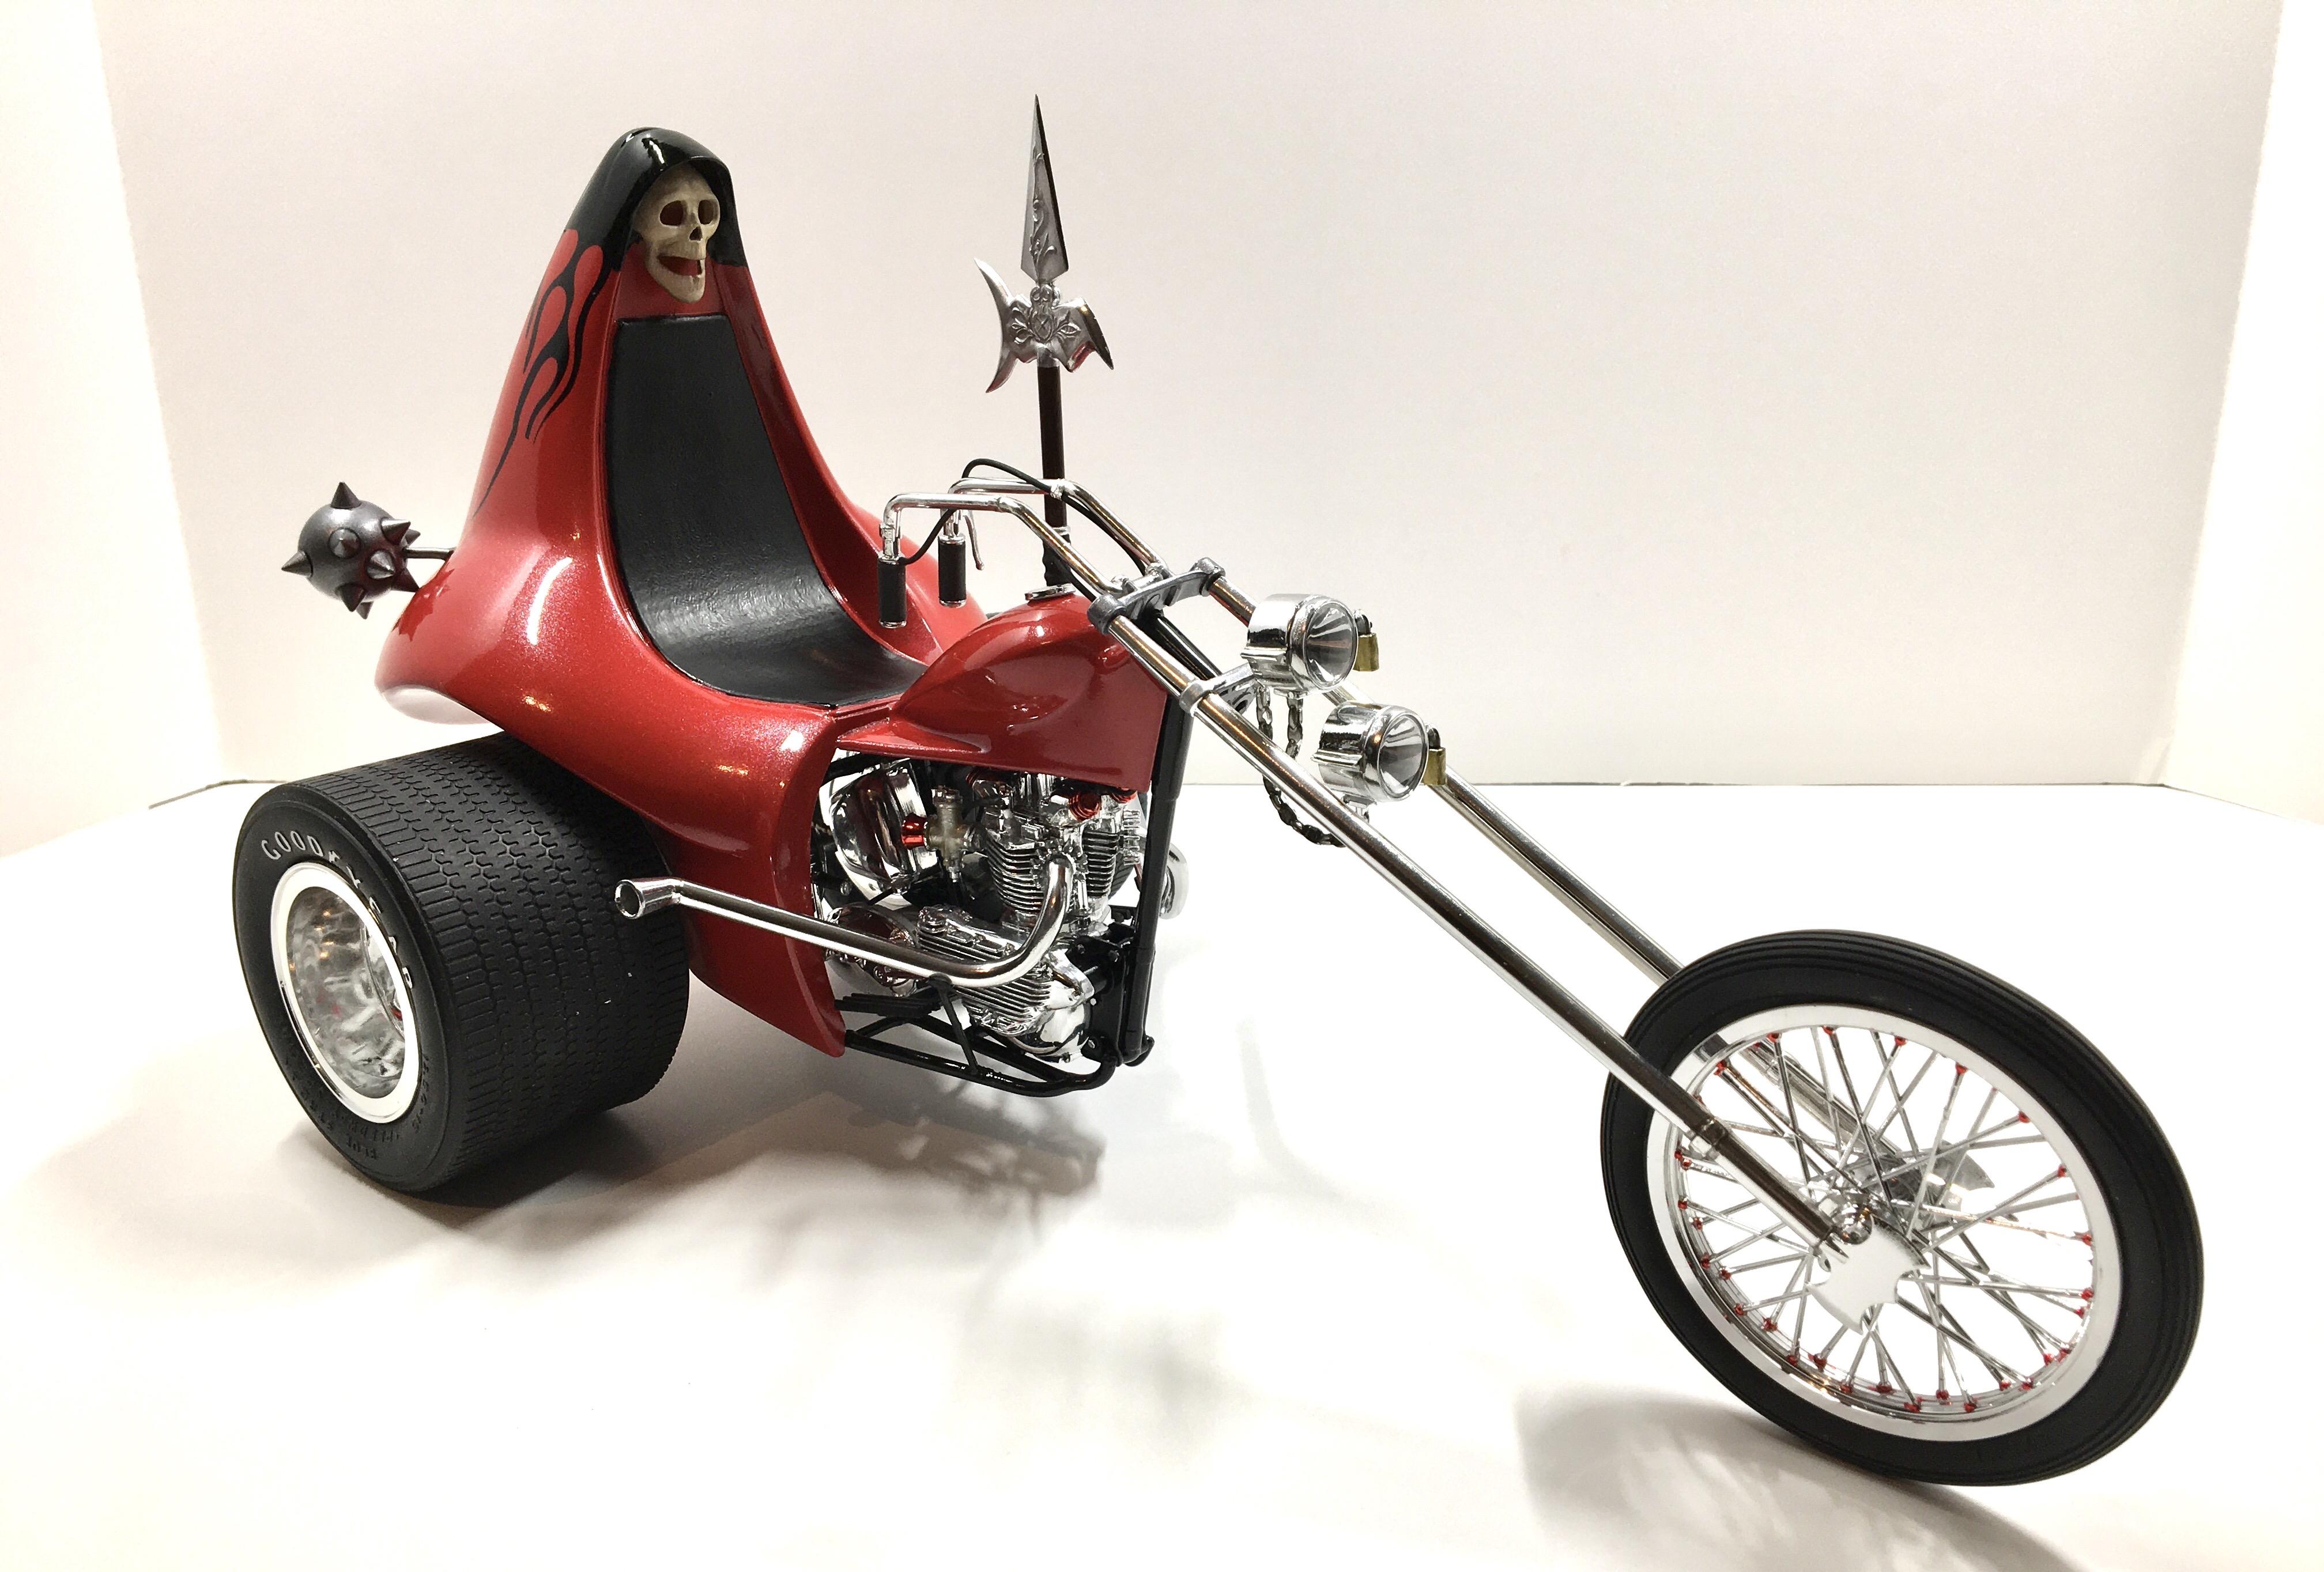
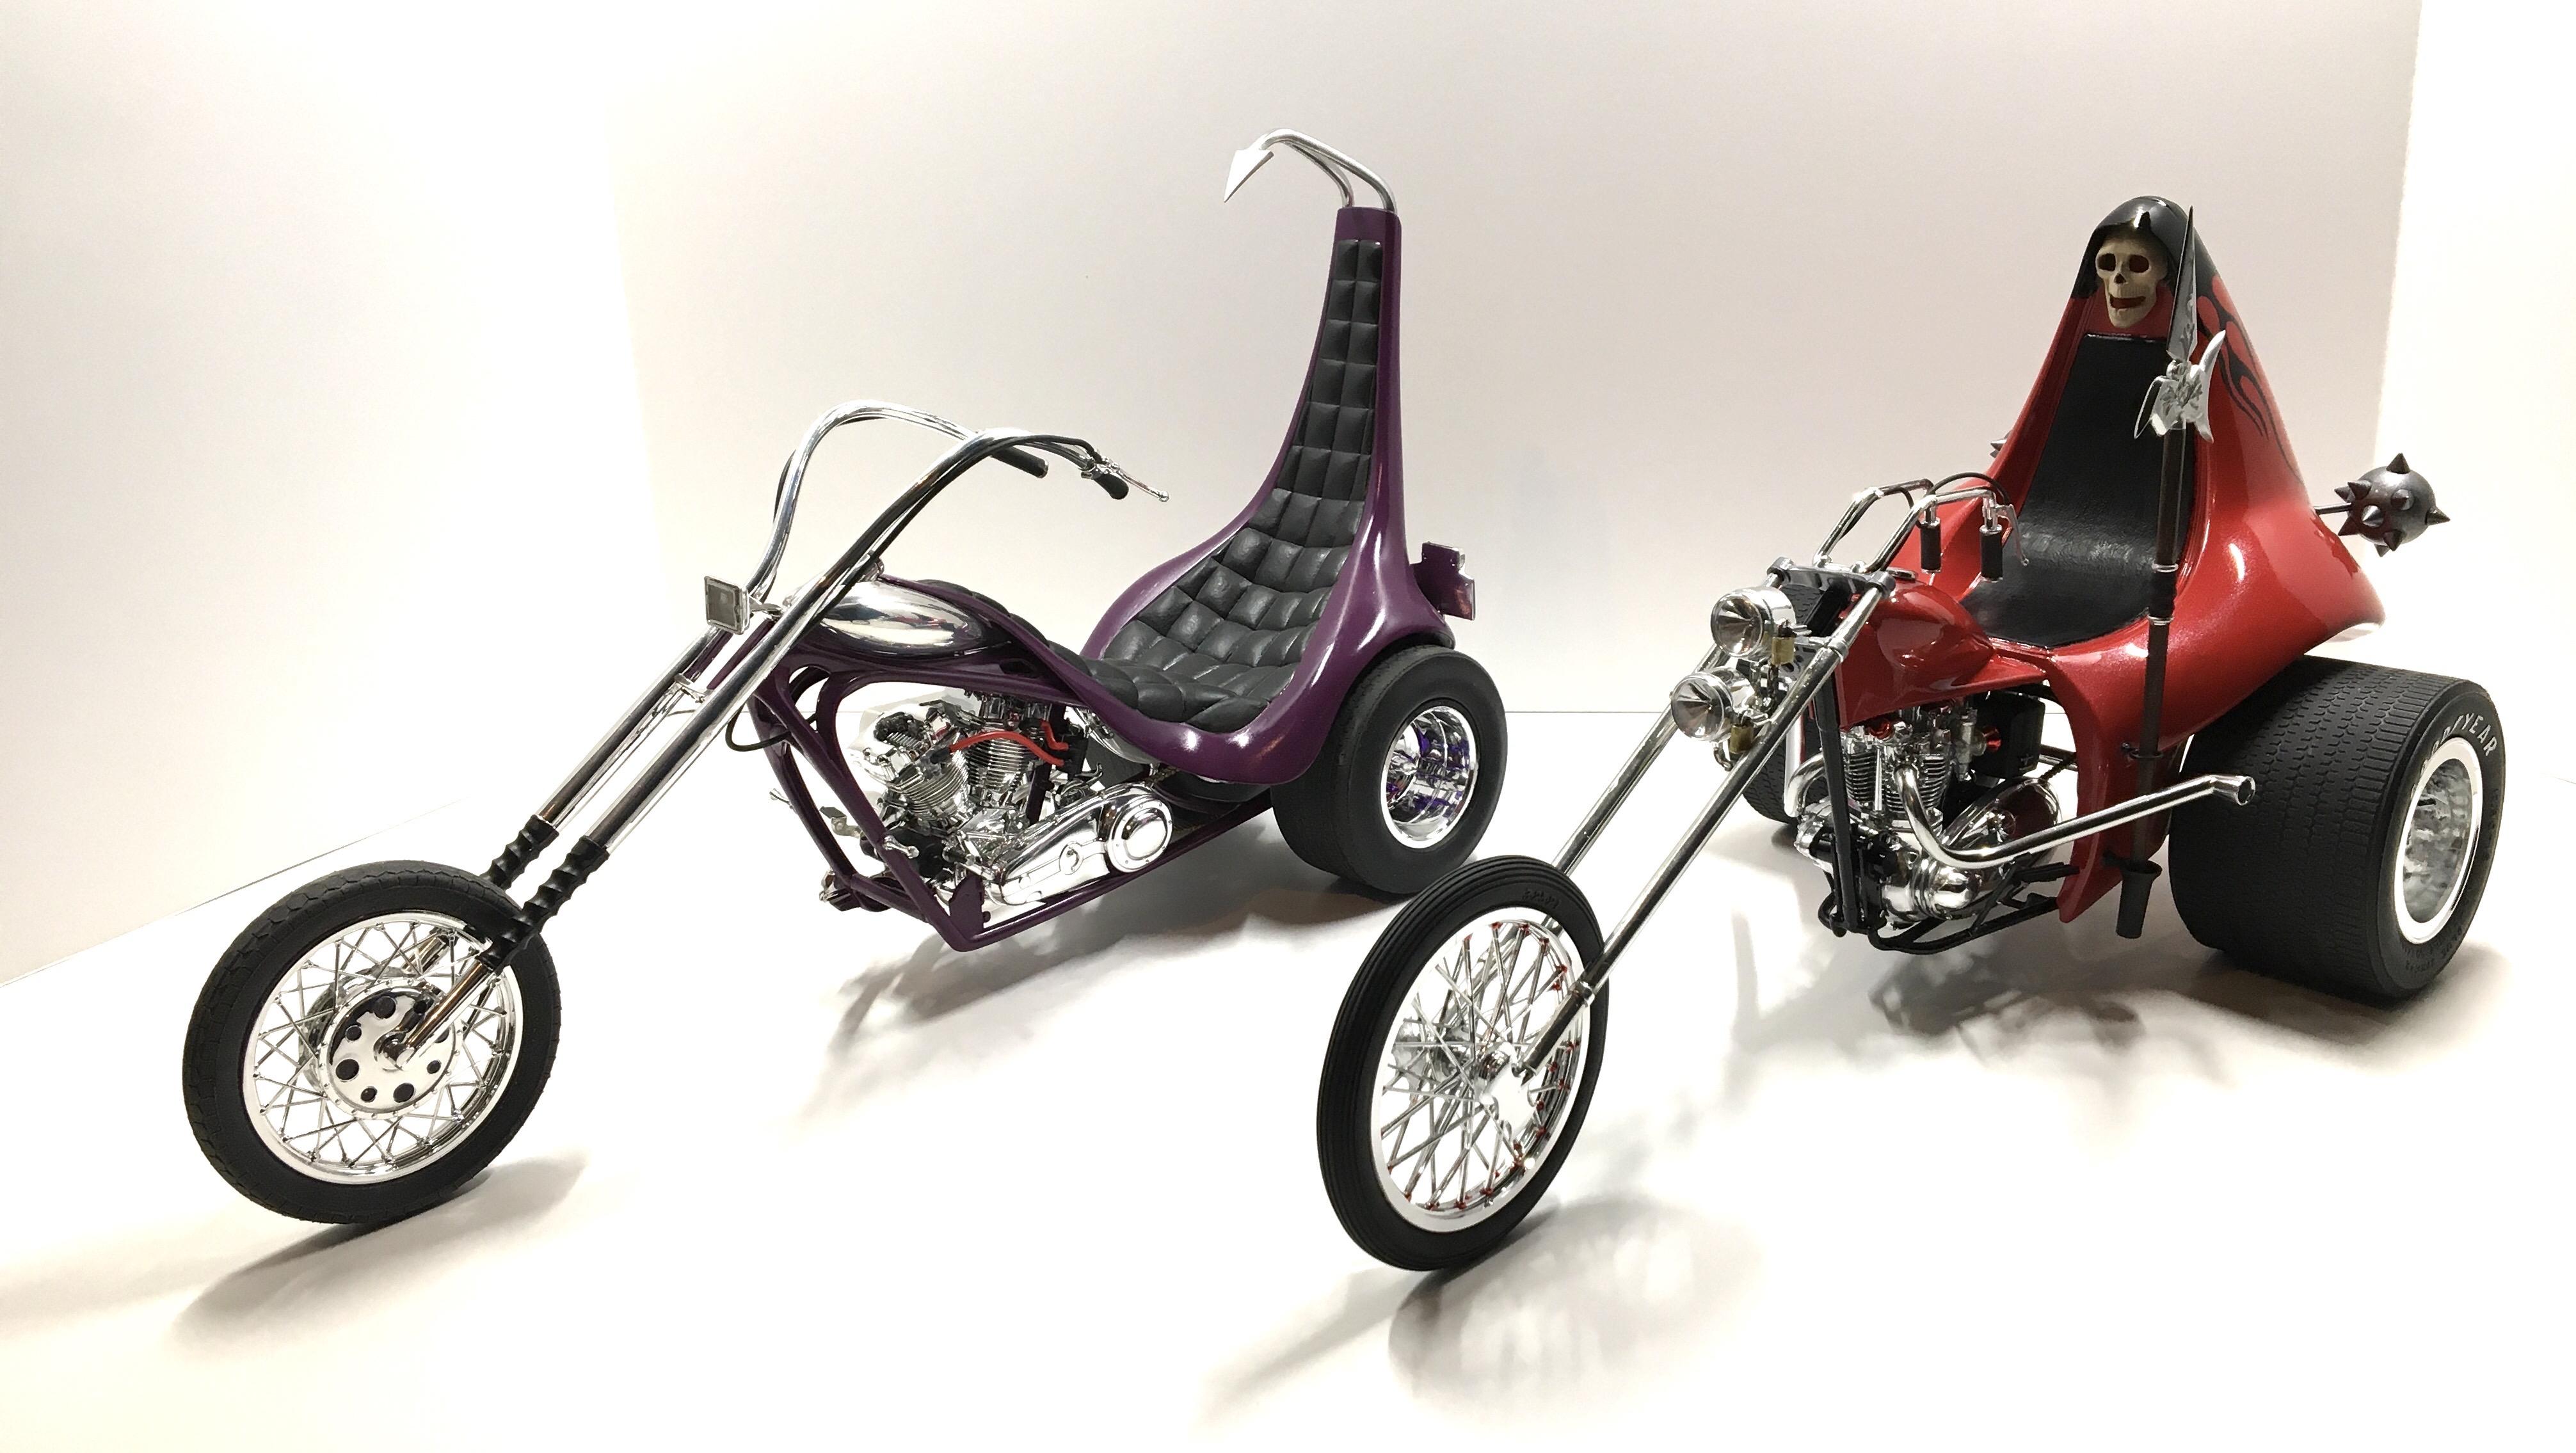
This is my version of the Evil Iron Trike. This model has special meaning. When I was 5 or 6 years old....my mom helped me build this. This is the model that got me started building models......47 years ago. I had to get it when it was reissued. I did change a few things. I cut the exhaust apart.....reconfigured it to the way I wanted.....glued it all back together and smoothed all the cut seams and sprayed them with Revell chrome. I also made the exhaust supports coming off of the frame. I wanted a hot rod style vibe. I then added a strip of plastic above the skull to bring it out further to be more like a cloak. The rest is pretty much the way it should be with a few touches of clear red on some engine parts. The black at the top is a combination of paint and modified kit decals. I painted it Tamiya bright mica red with pearl clear then 4 coats of normal clear over that. I really like how this came out. And it looks really good sitting next to the Tom Daniels King Chopper trike.
-
The top 5 builds that you've done......
Wolfangel replied to JollySipper's topic in The Off-Topic Lounge
My "Top 5"....was hard to pick.
-
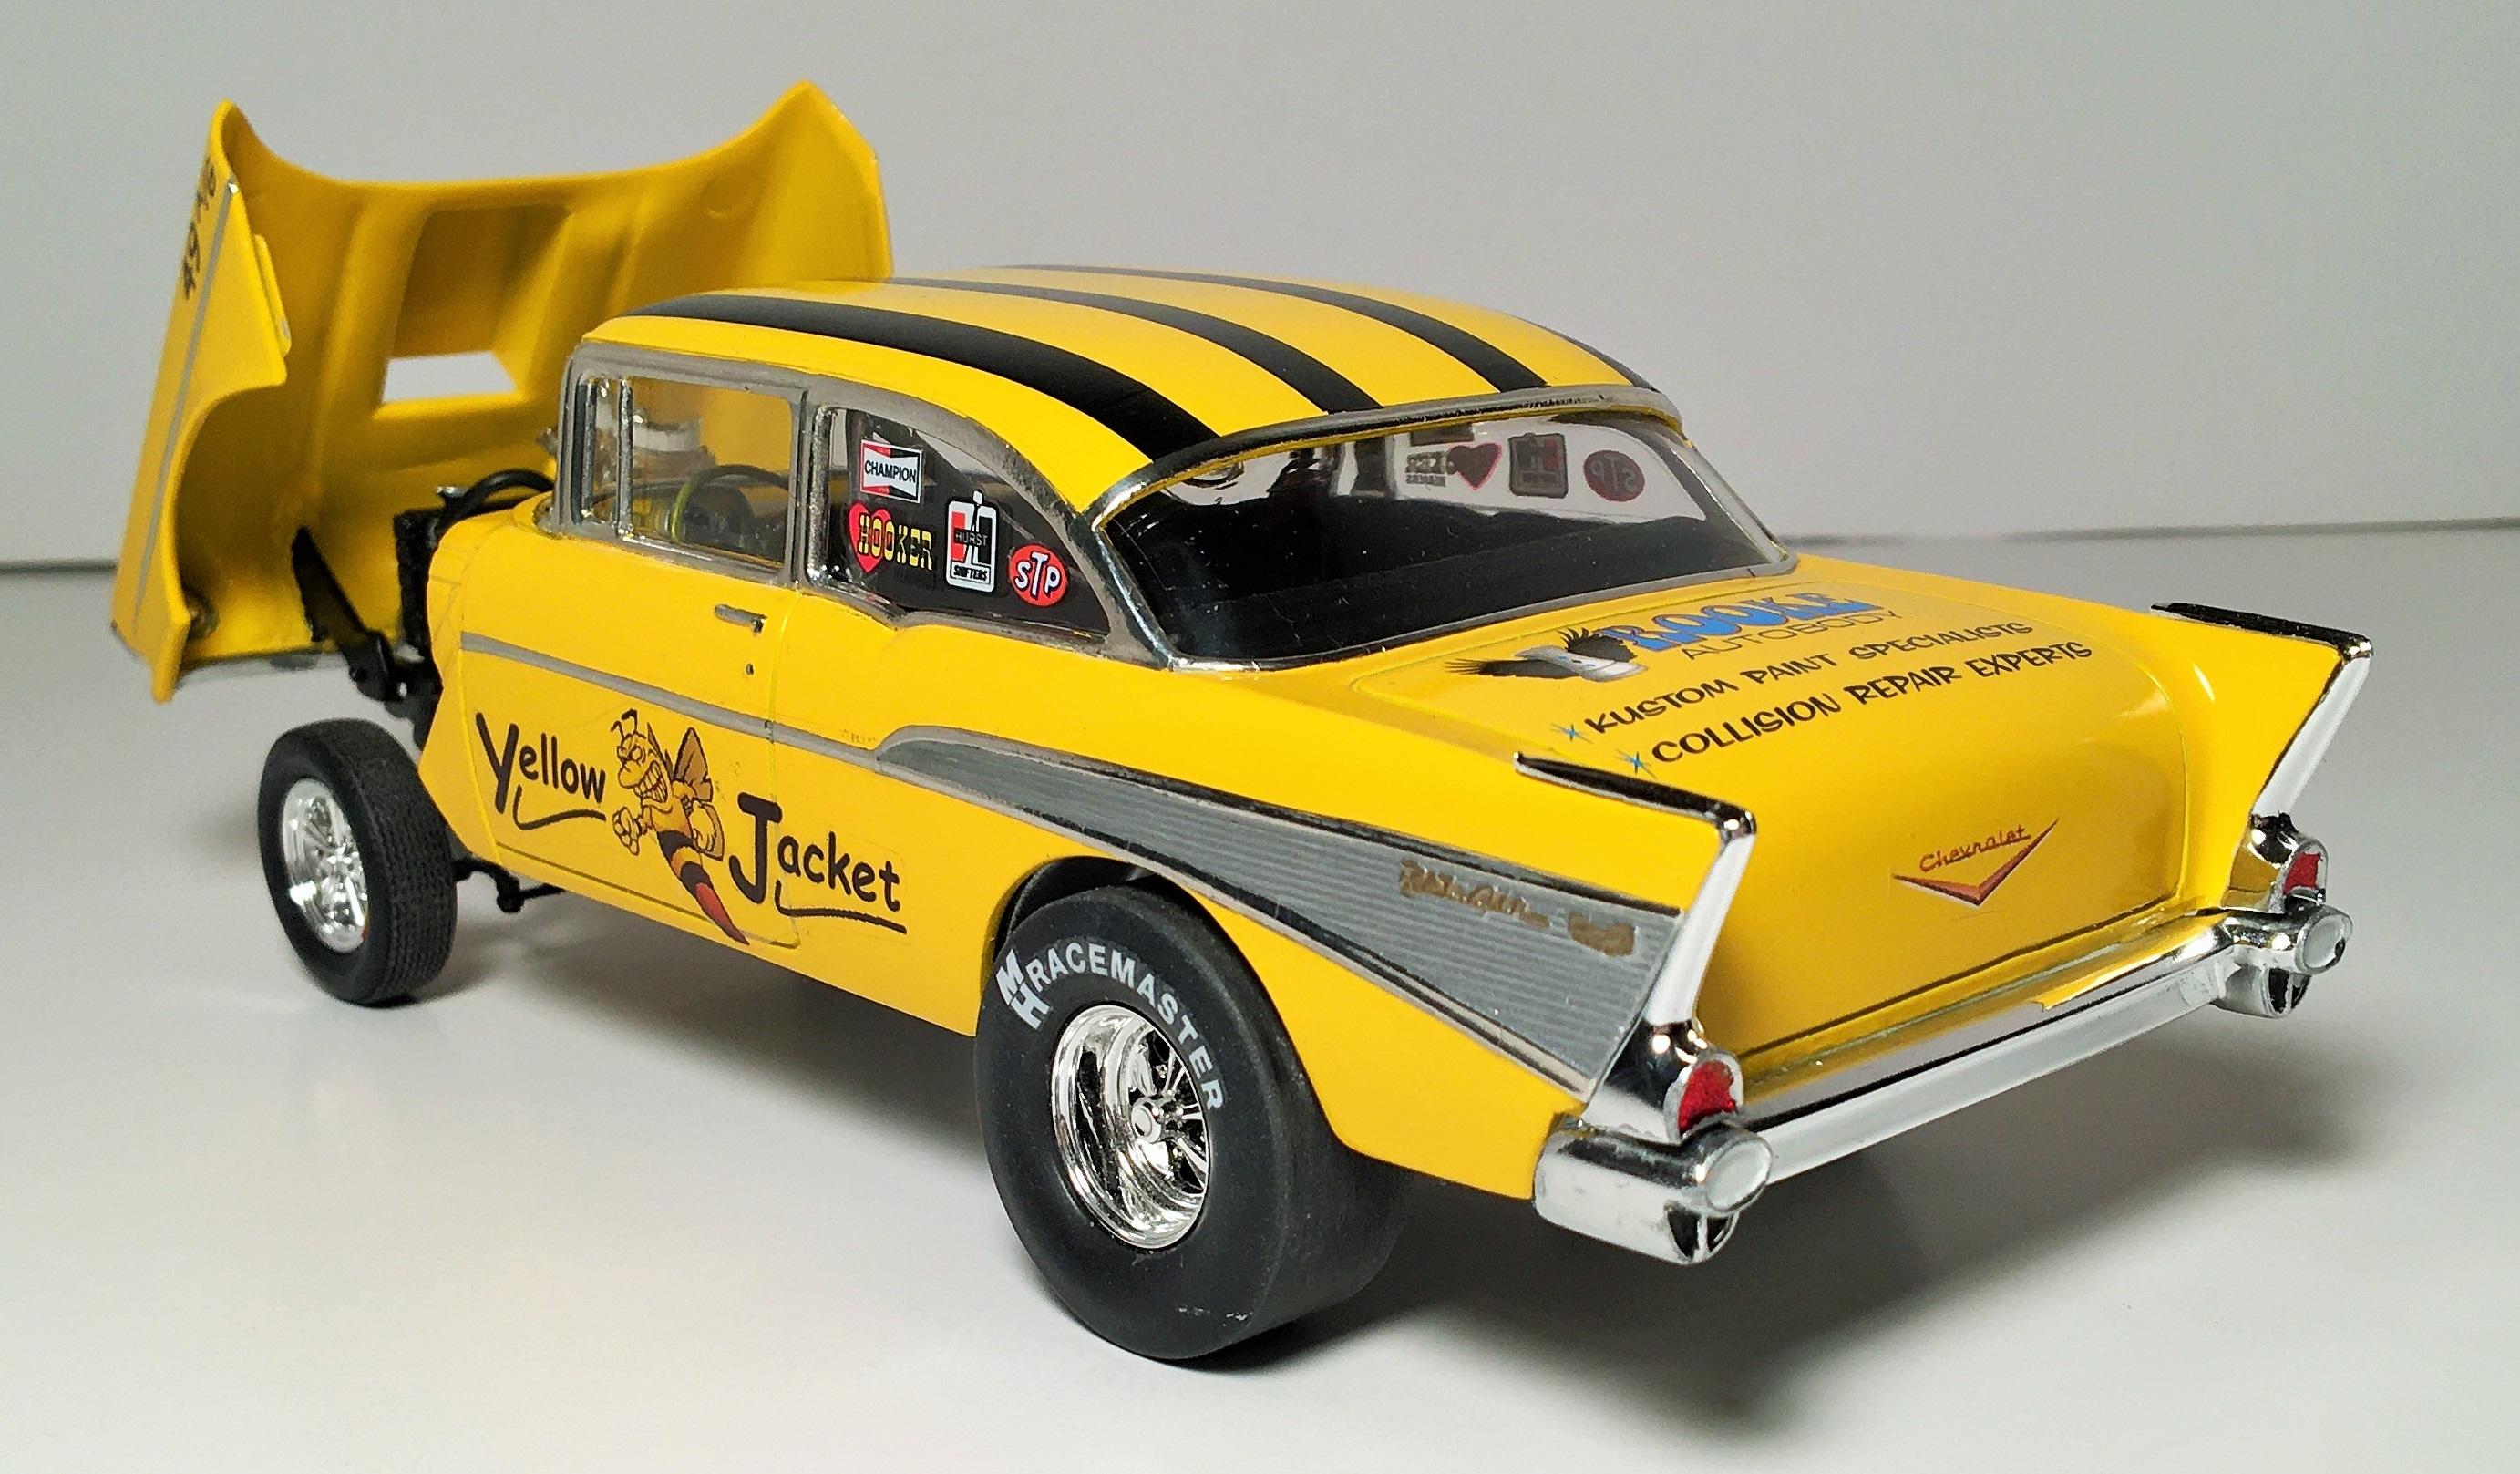
I am real excited to get this issue.....thats my yellow 57 gasser at the bottom. First time making the cover.
-
That looks really good man. I like how that turned out. Details looks great. I think me and you are the only ones that have done this version (in this scale).....at least that I have found.
-
This beast was such a joy to build. This is the most detailed model I have ever done. It went together really smooth. I added a bunch of details that are not furnished in the kit. This is not an exact replica either, as I found different versions online so I kind of took elements from them all. The display base really makes it stand out. I cant wait to show it the first time.
-
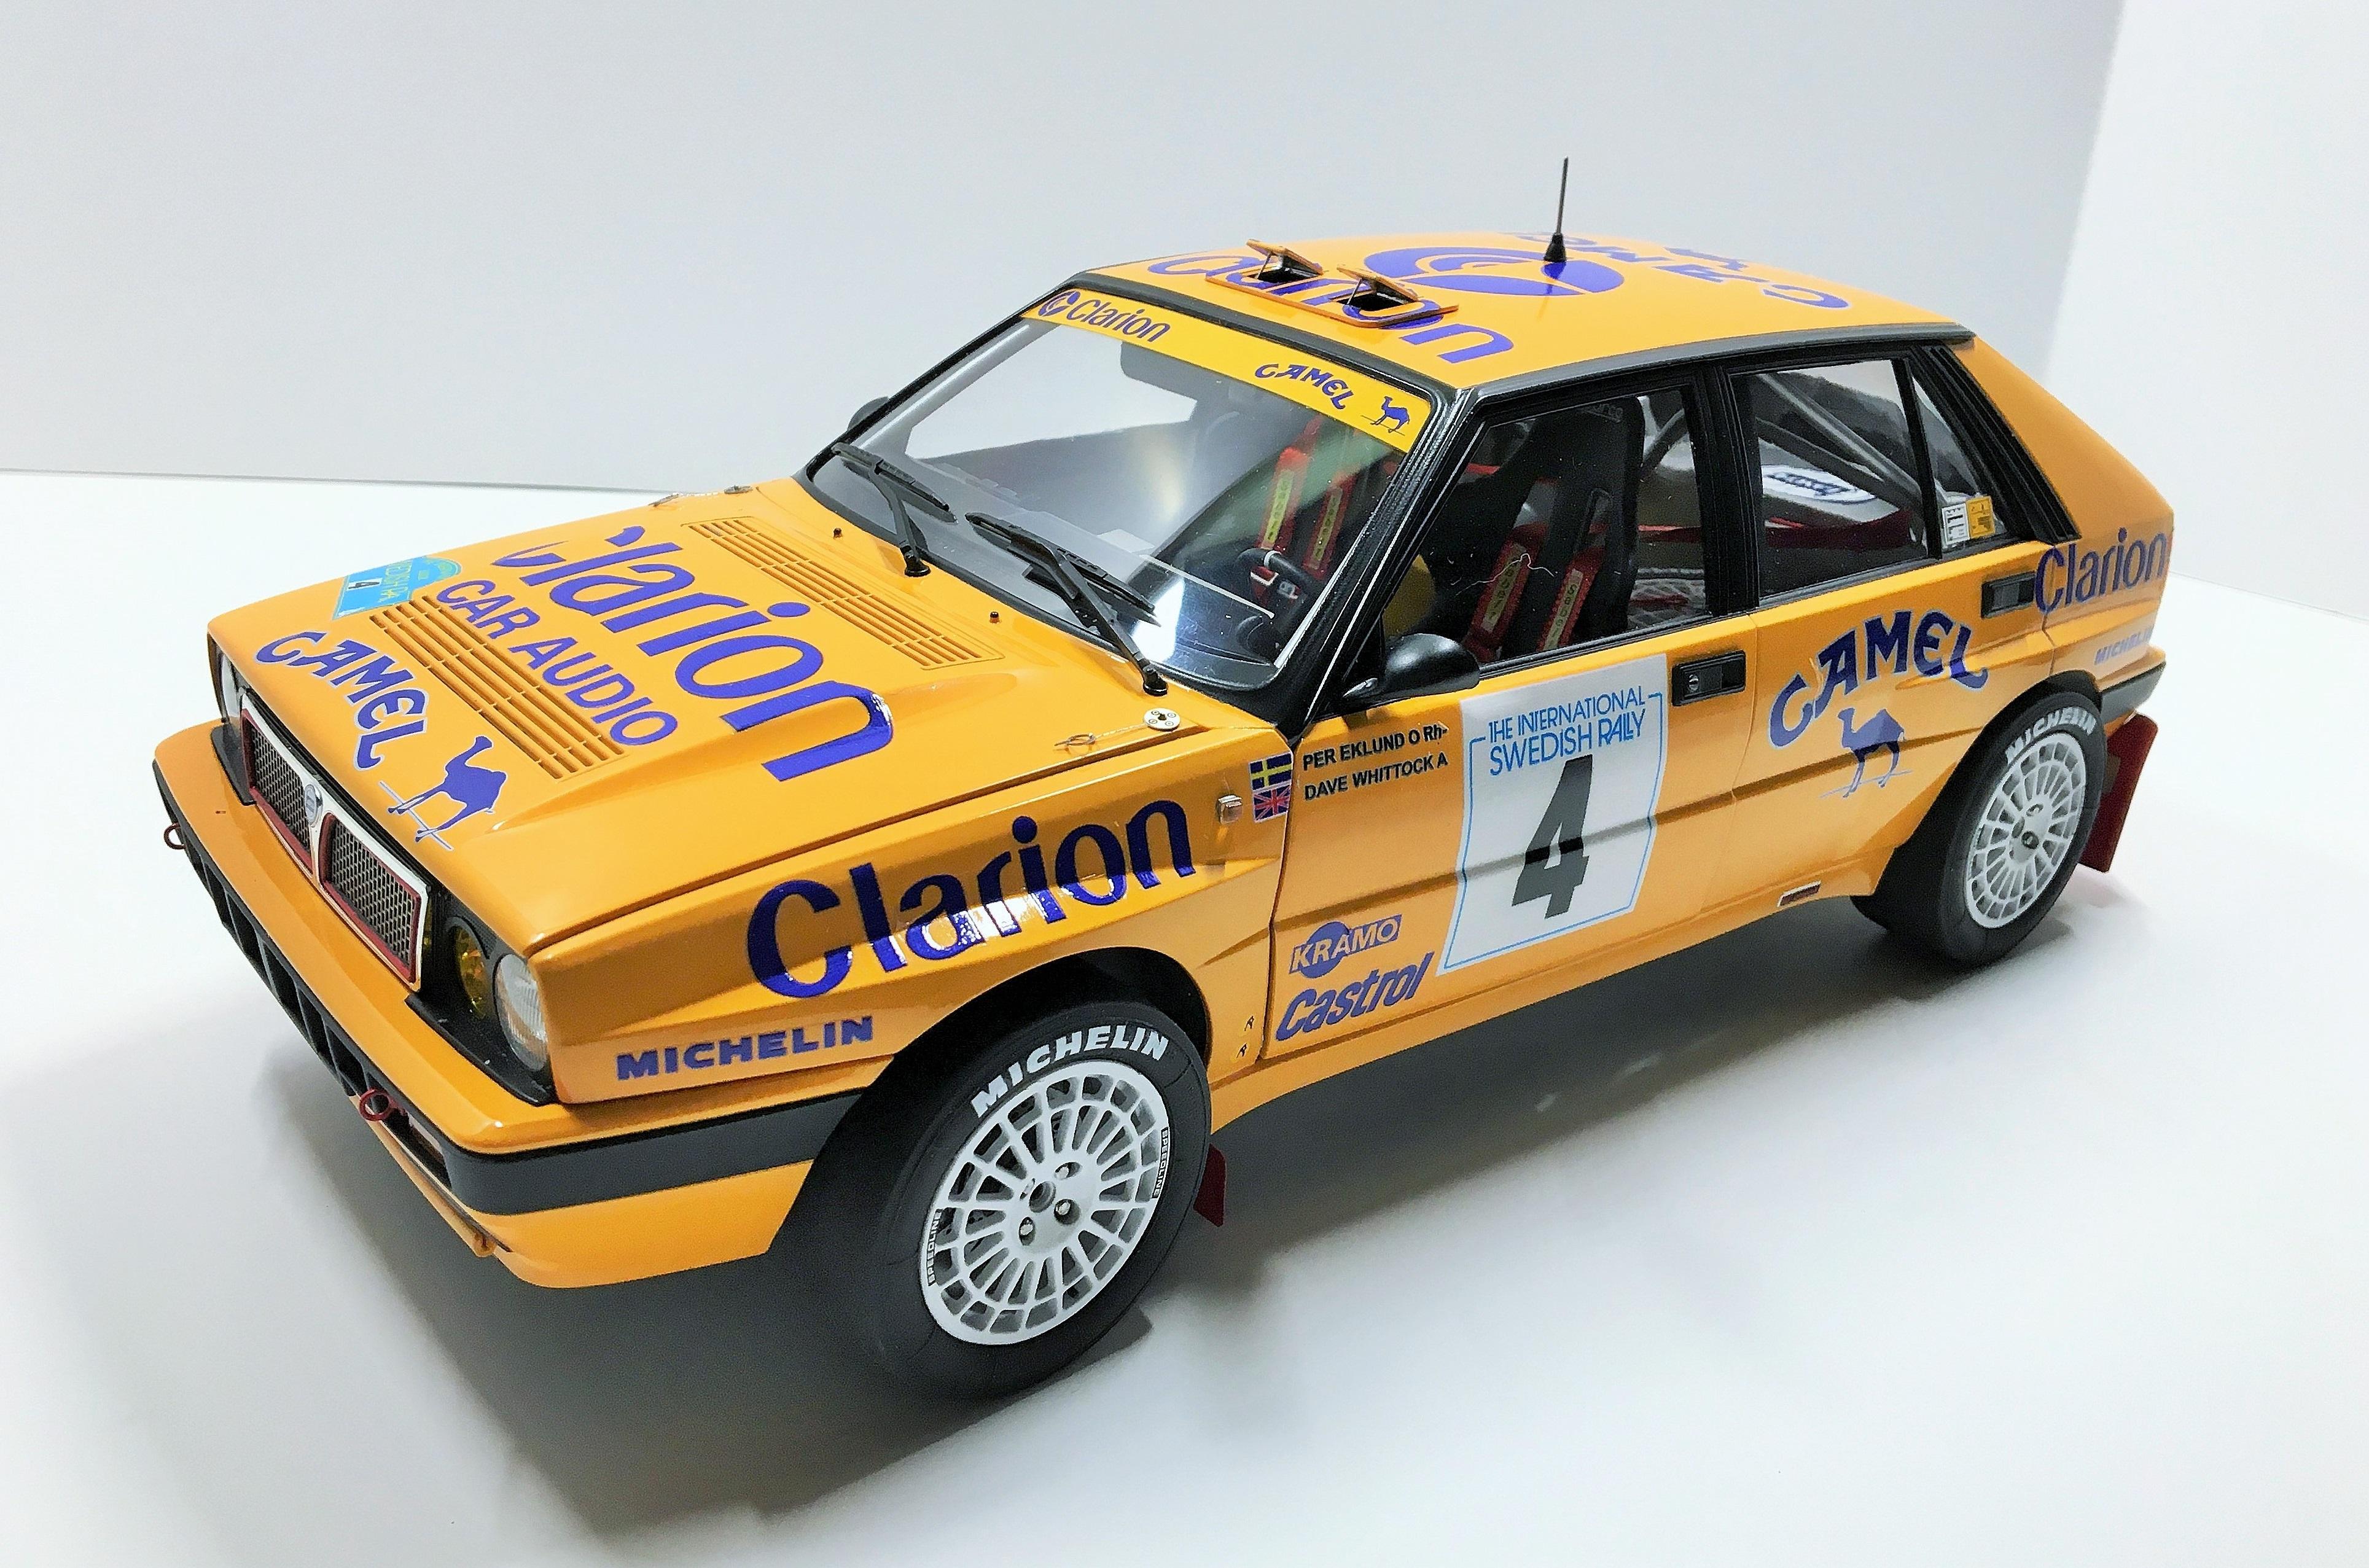
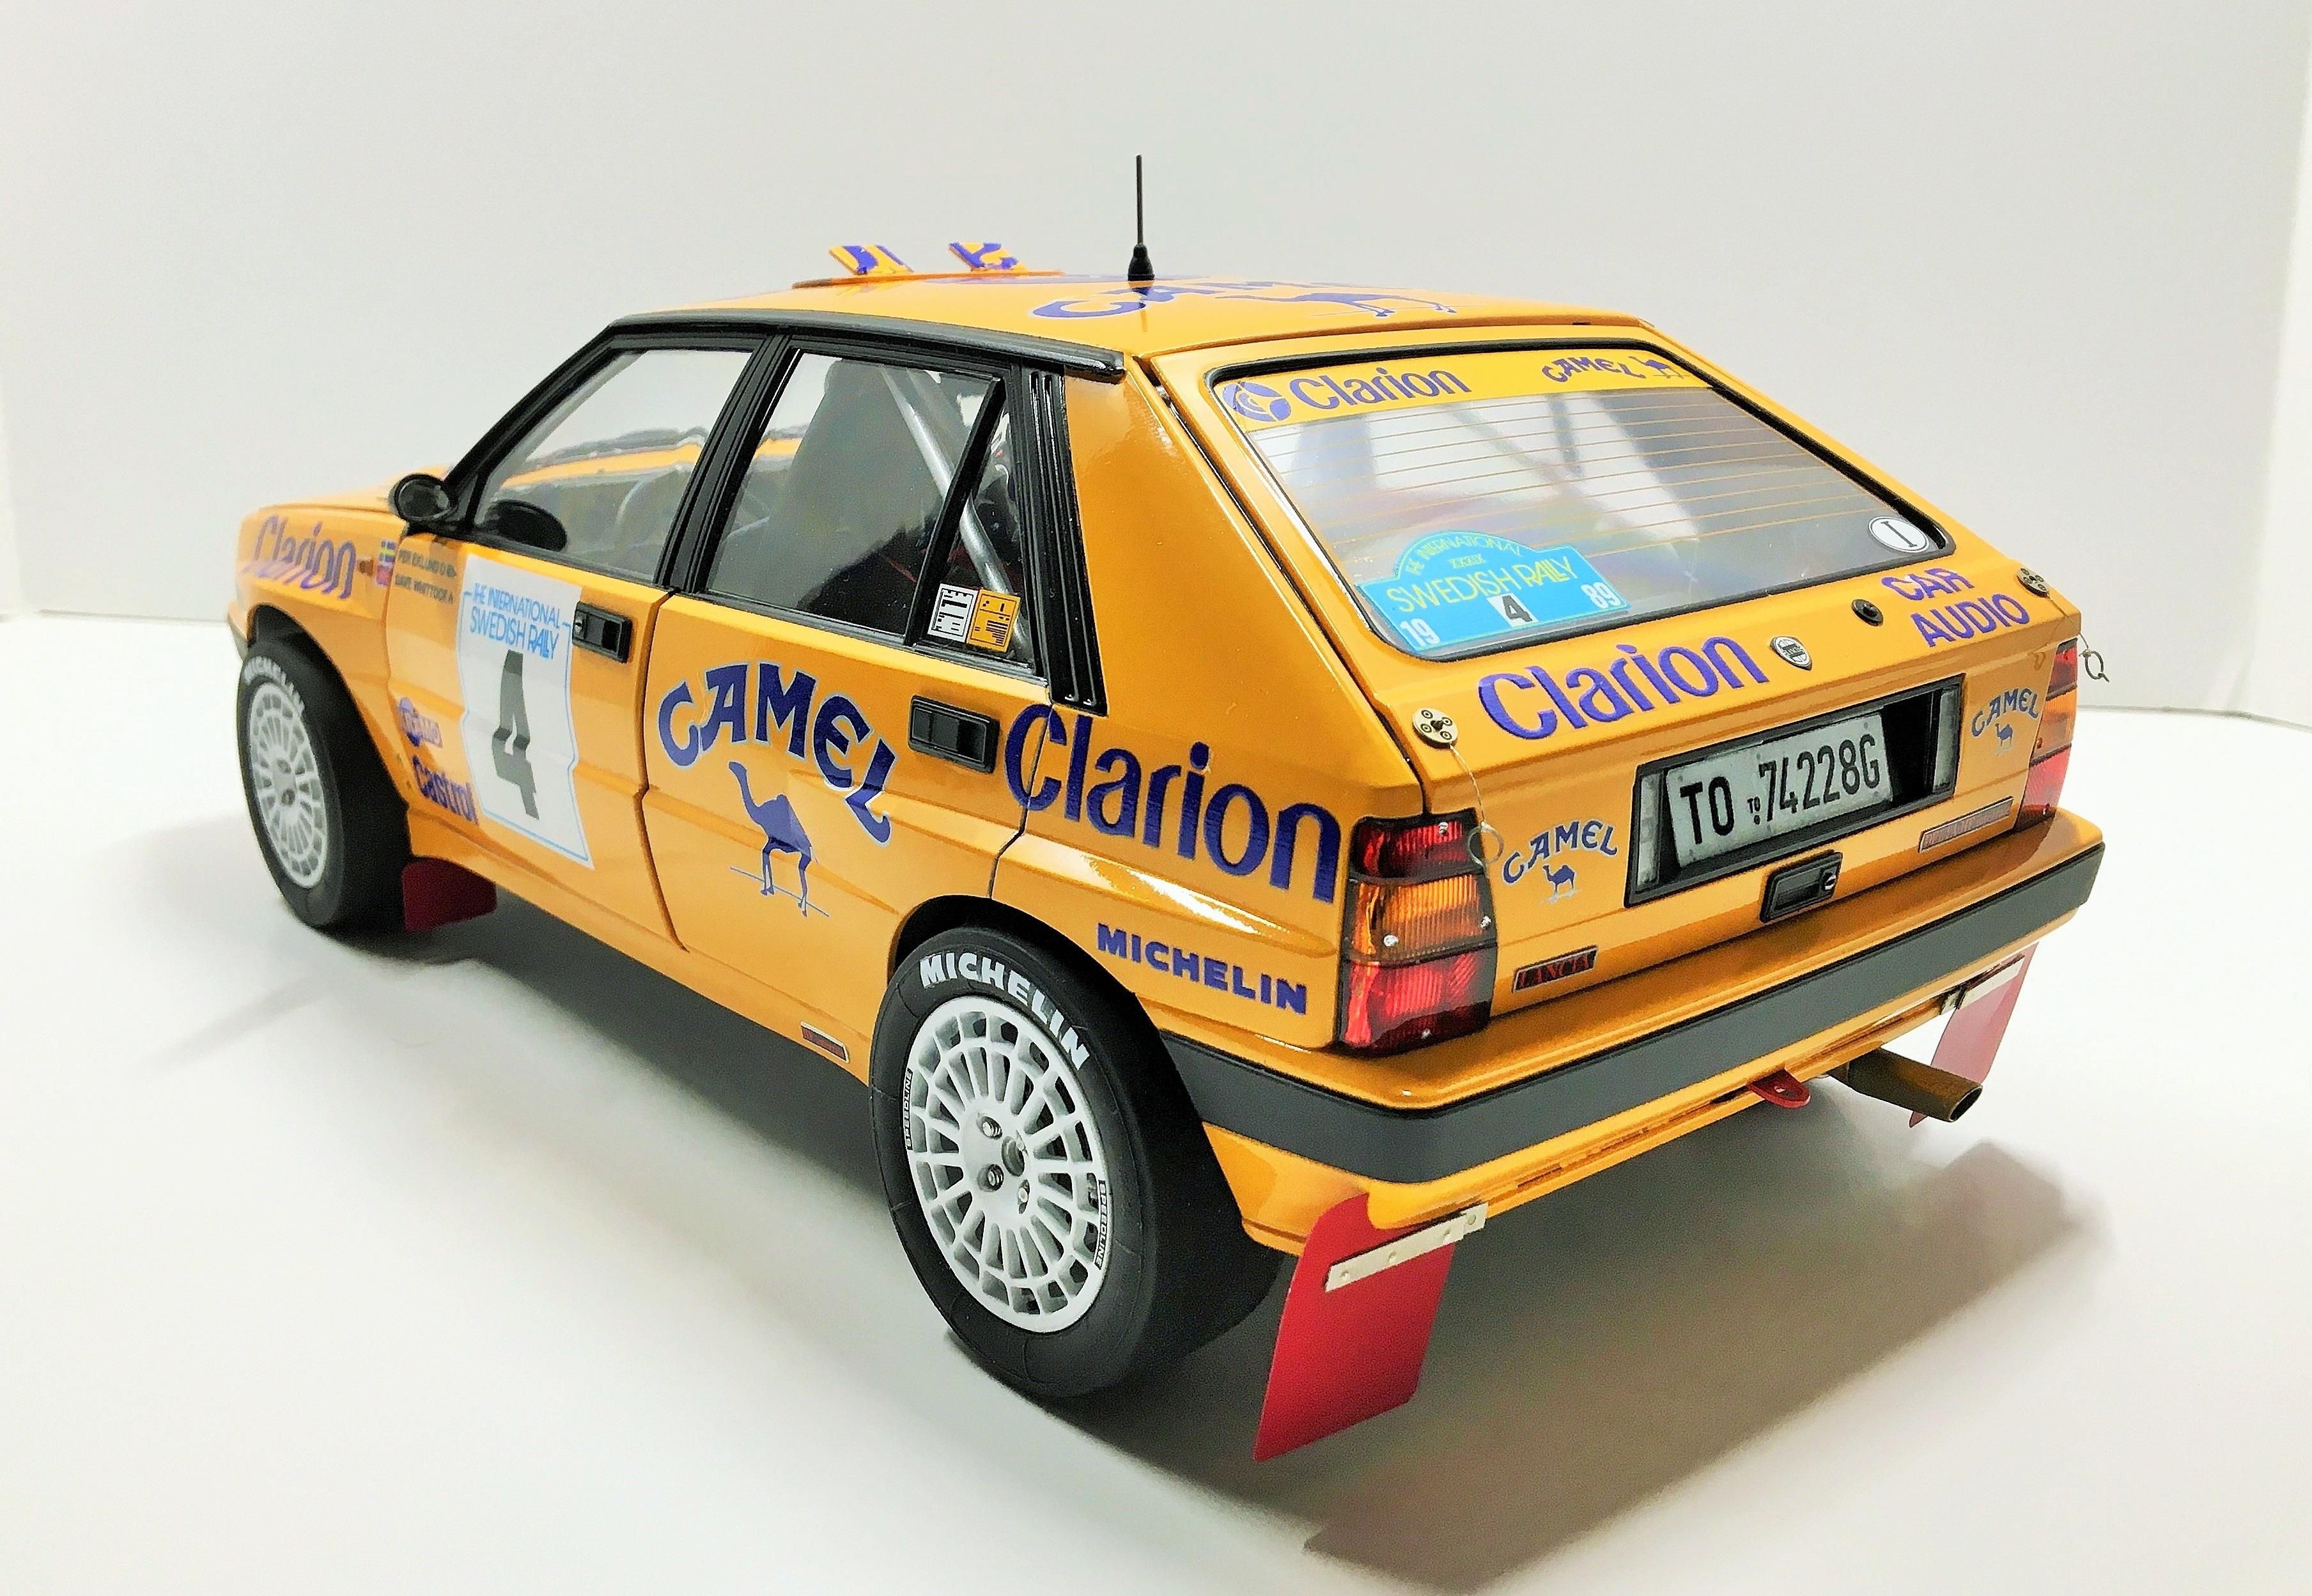
Italeri 1/12 Lancia Delta HF
Wolfangel replied to Wolfangel's topic in WIP: Other Racing: Road Racing, Land Speed Racers
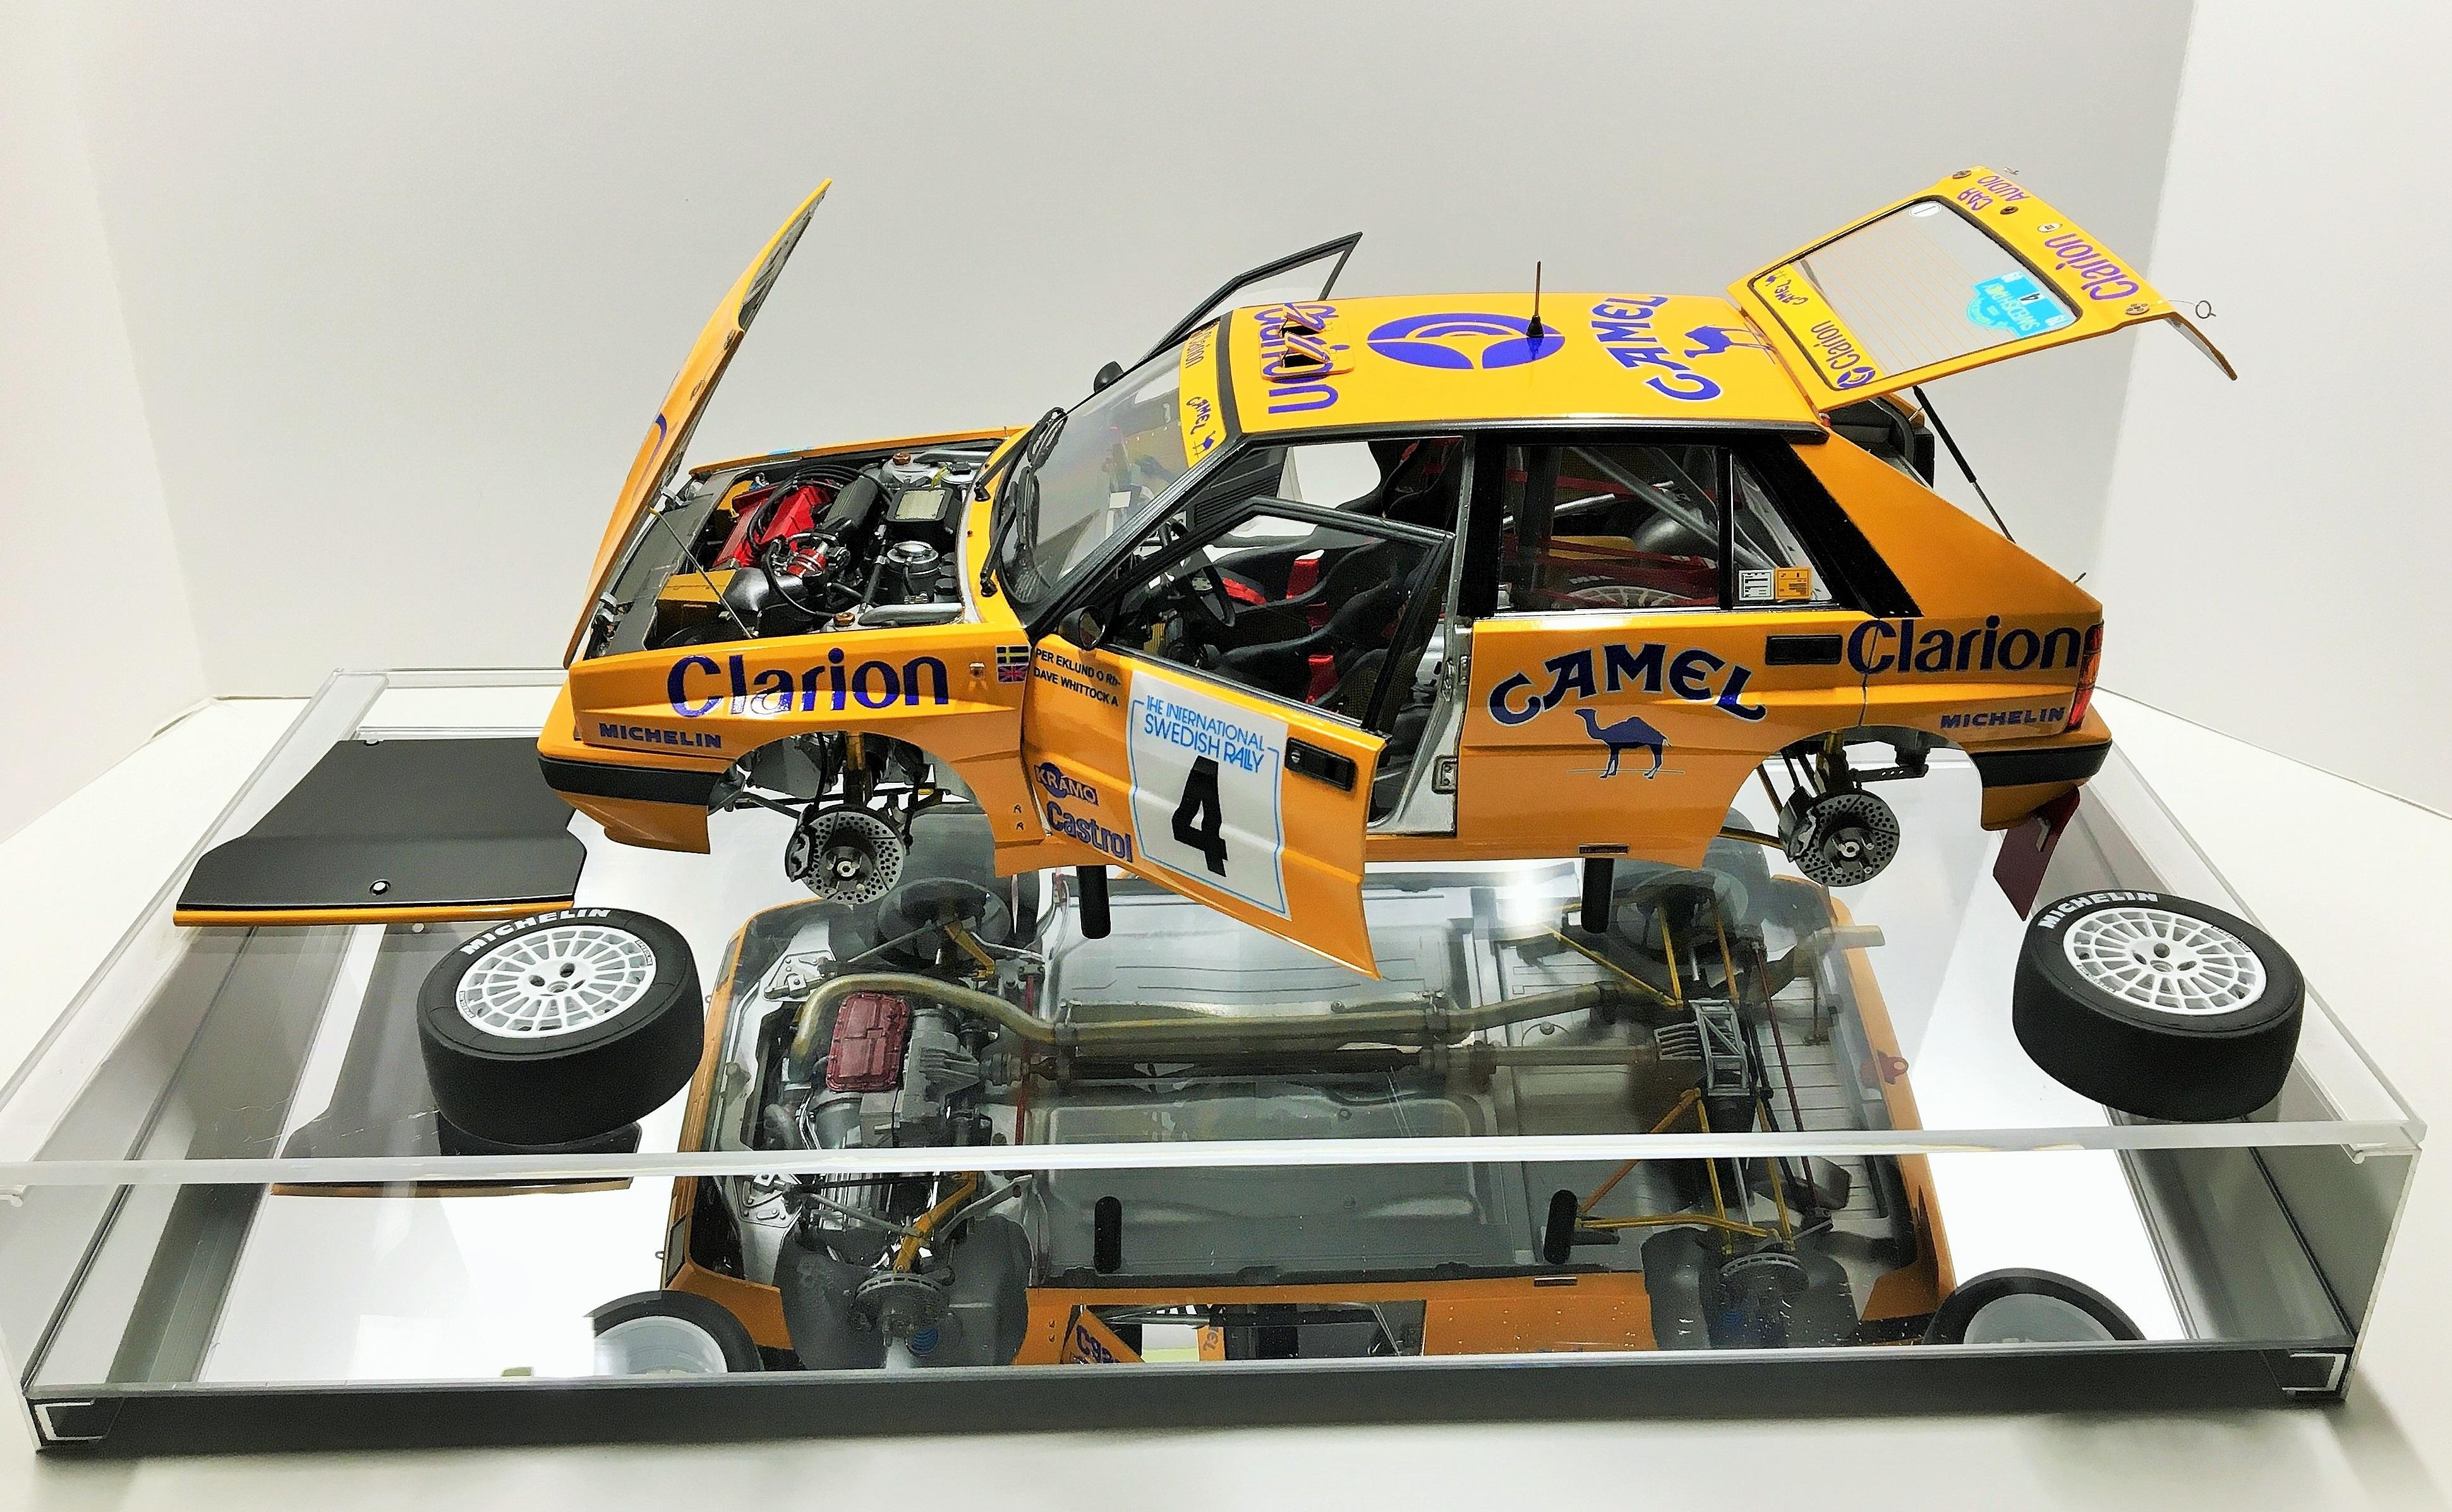
The model is about 12 1/2" long and 5 1/2" wide. -
Italeri 1/12 Lancia Delta HF
Wolfangel replied to Wolfangel's topic in WIP: Other Racing: Road Racing, Land Speed Racers
The resin hood I got fit really good with no gaps.....but...I didnt use it because the motor interferes with it and it wont sit down all the way. As for the nuts and bolts for the wheels....I didnt use them anyway. I installed my own wheel studs and used different bolts to attach the wheels. -
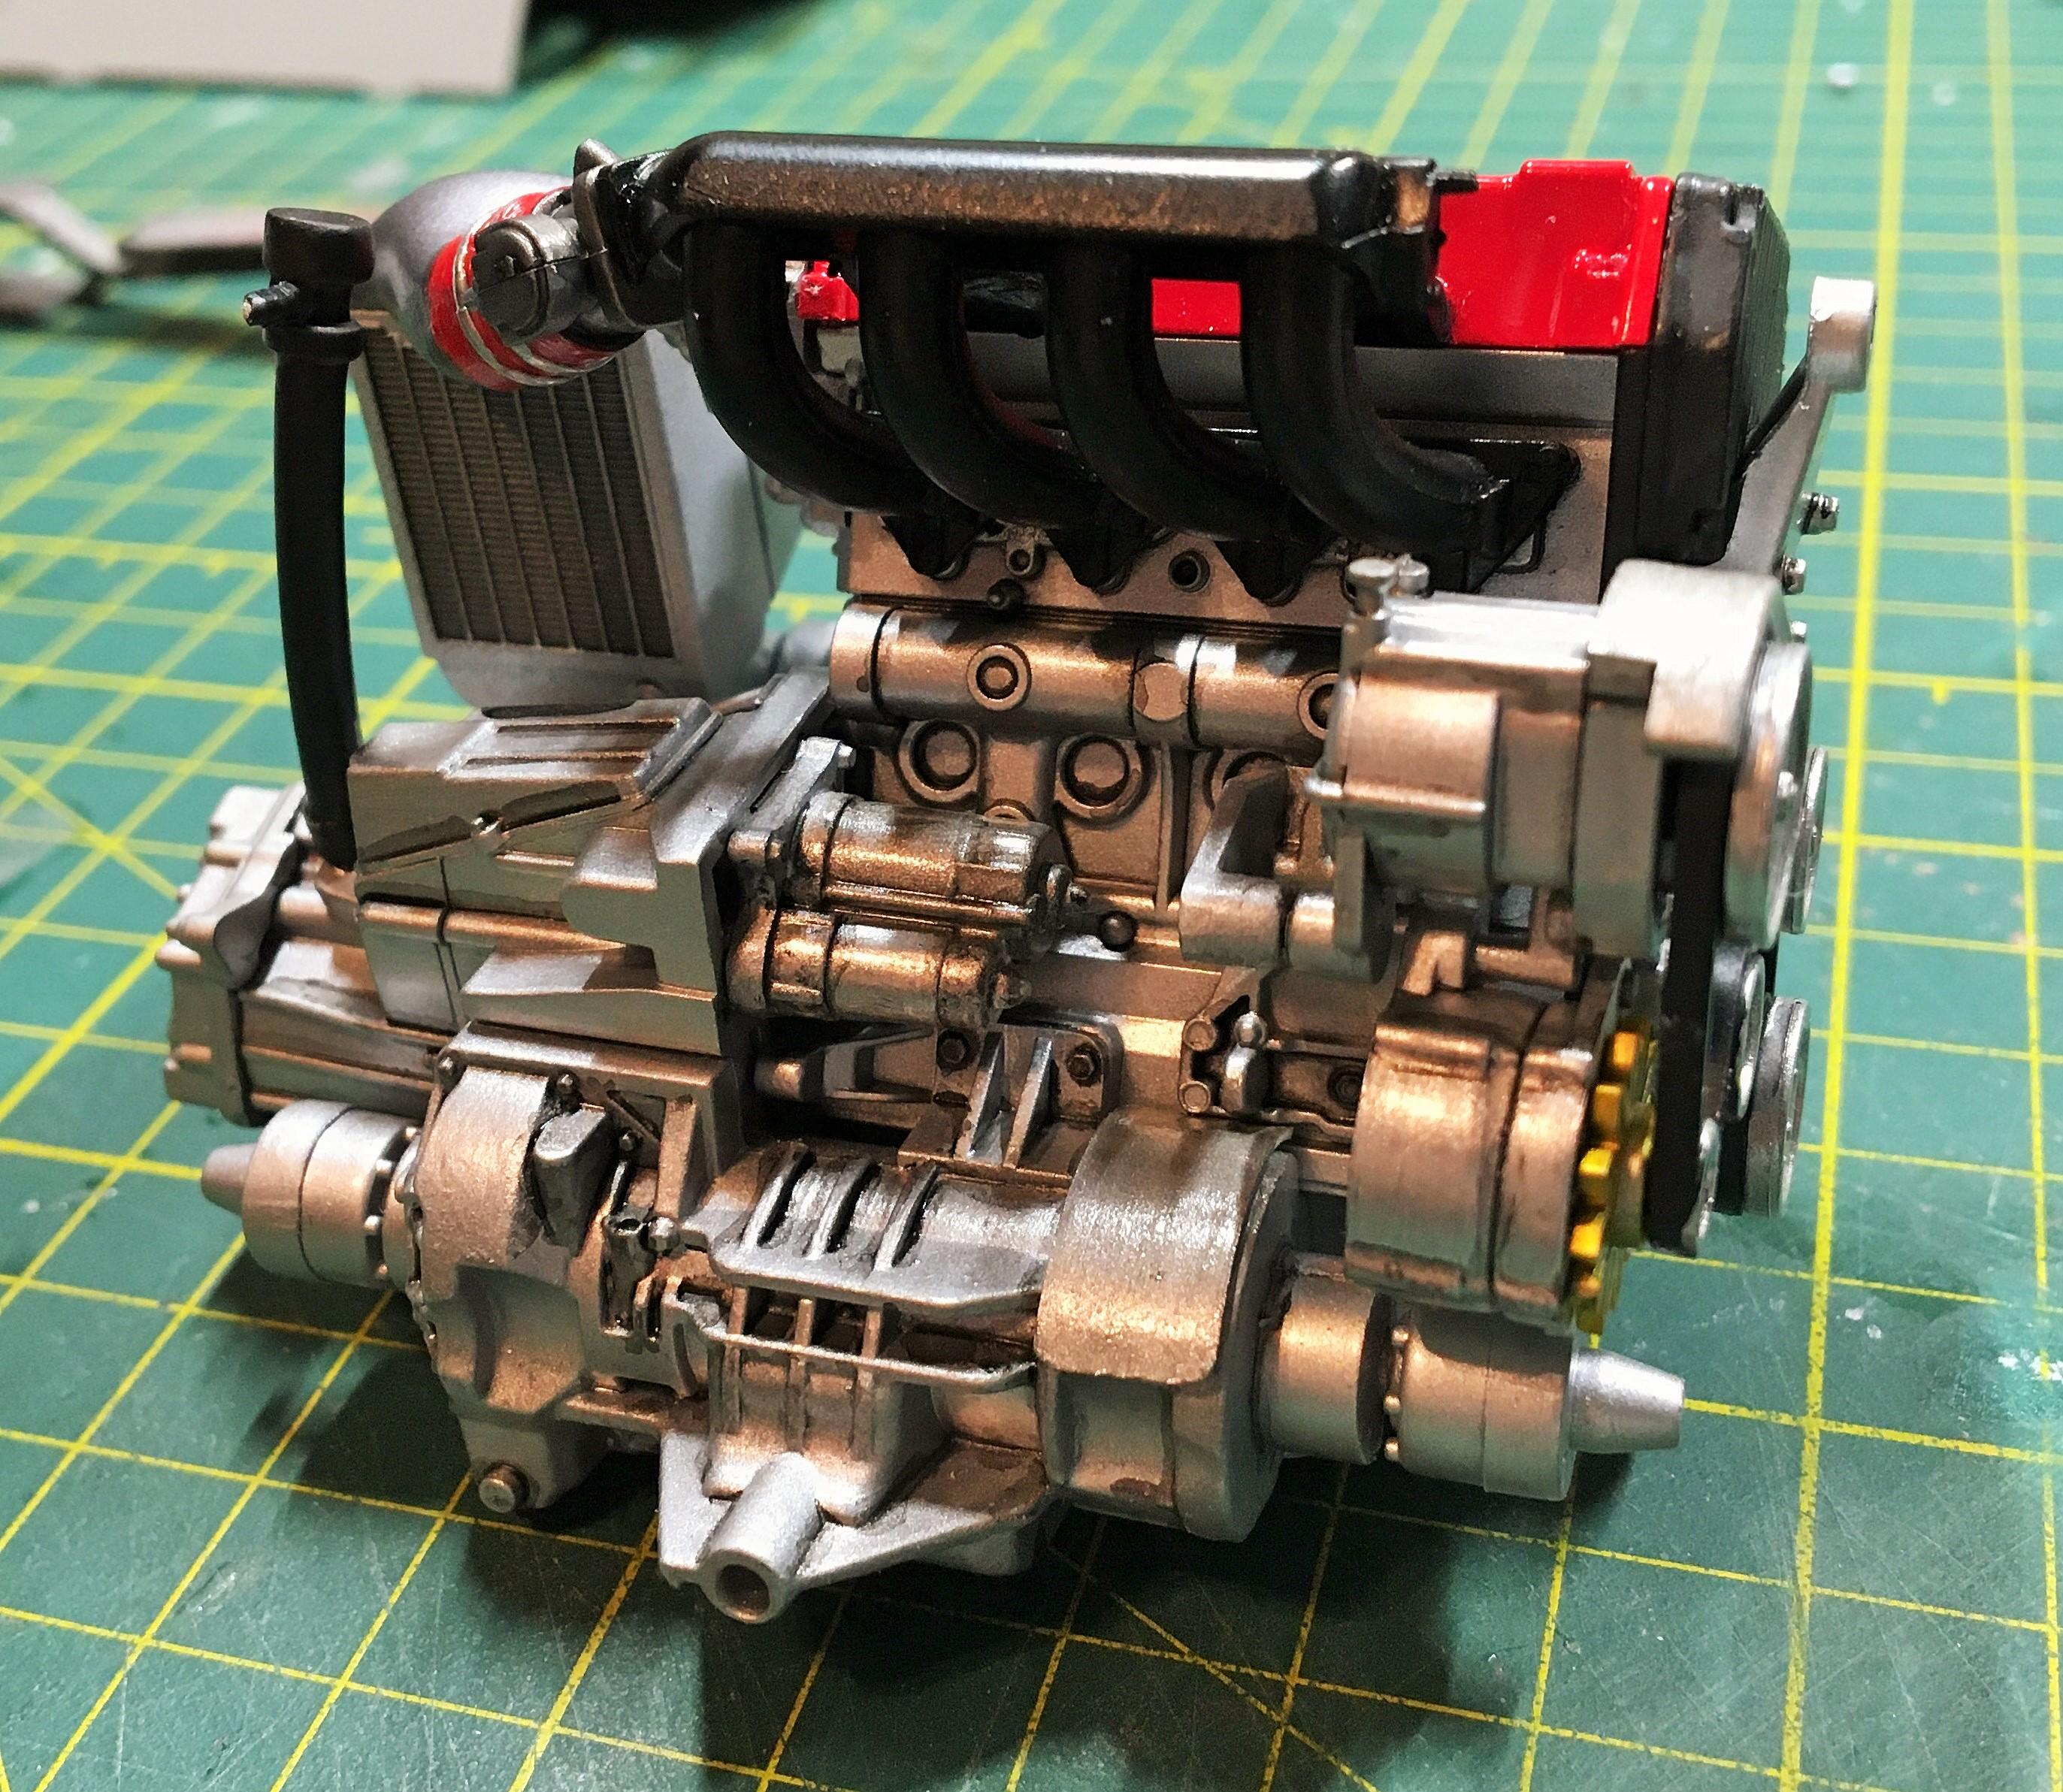
I should have been posting these pictures as I went along. A little less than 2 months ago I purchased the Italeri 1/12 Lancia Delta HF. And I had all the intentions from the beginning to paint it yellow and make it the Camel/Clarion sponsored car from the 1989 Swedish Rally. This was a good challenge but it has went together really good with no problems what-so-ever. I have added a lot of details that is not furnished in the kit, and to numerous to list here. You can see in the pictures I tried to add as much detail as I could. There were a few things I changed like the color of the suspension arms....I didn't want them to be painted silver as they would just blend into the chassis. The chassis is completely done and I'm now onto doing the body. This has been my most detailed kit to date and I absolutely love it. Hopefully will get it done in the next week or so.
-
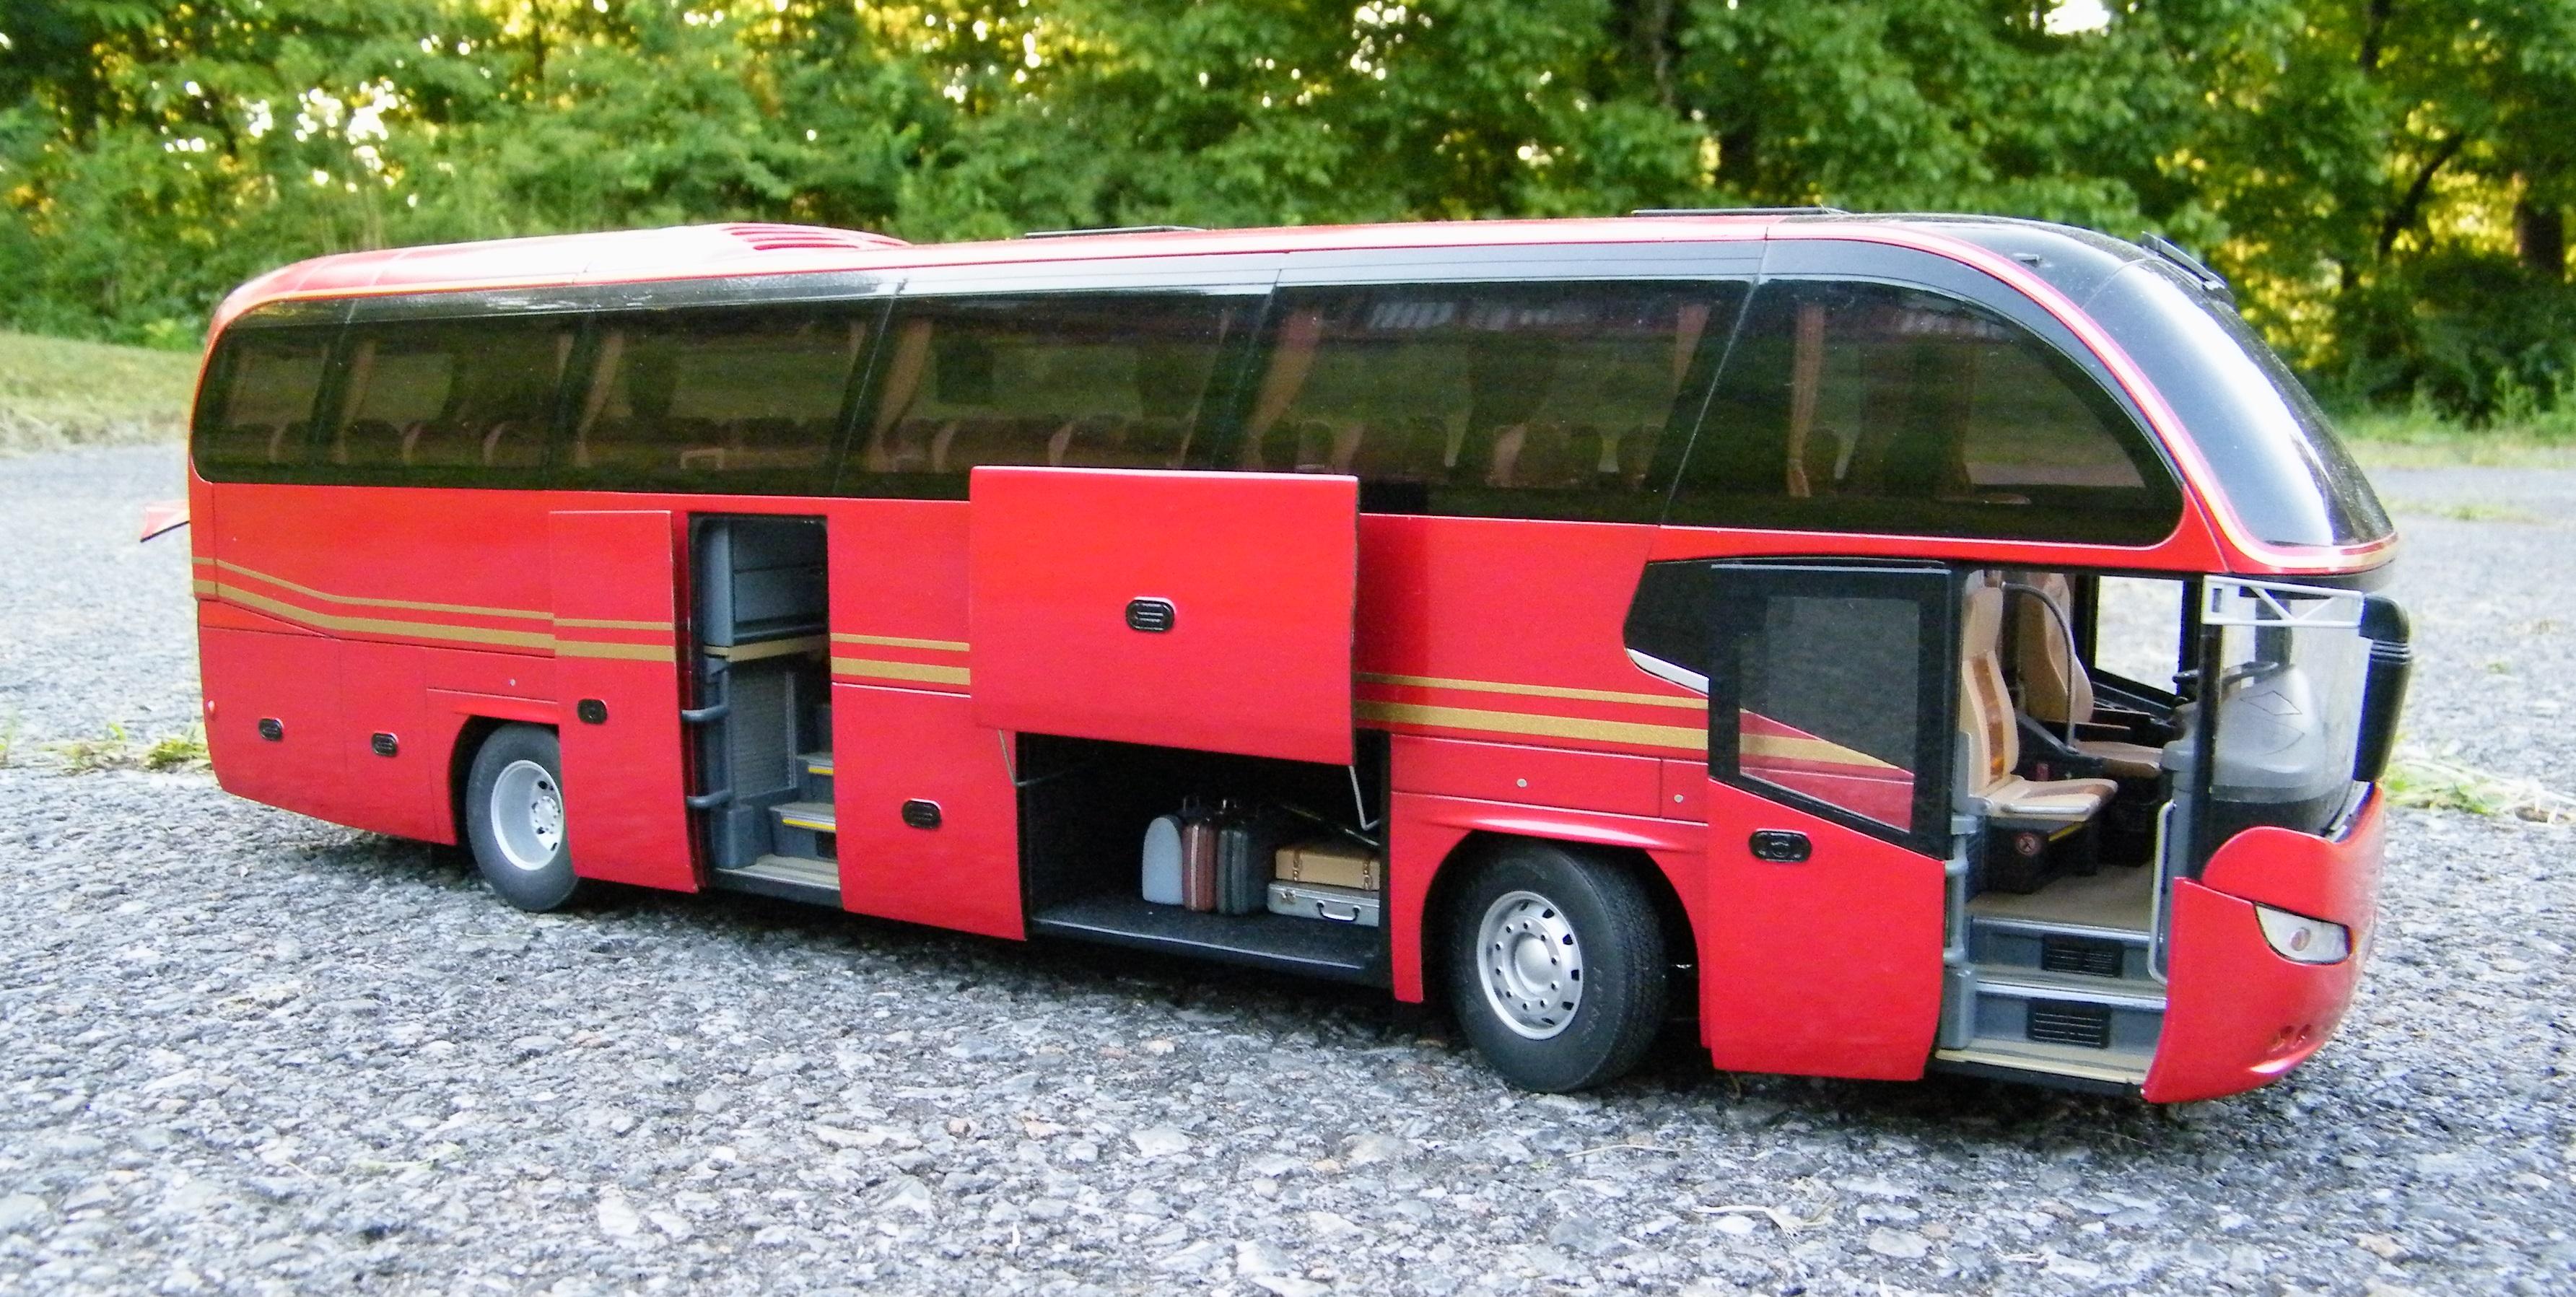
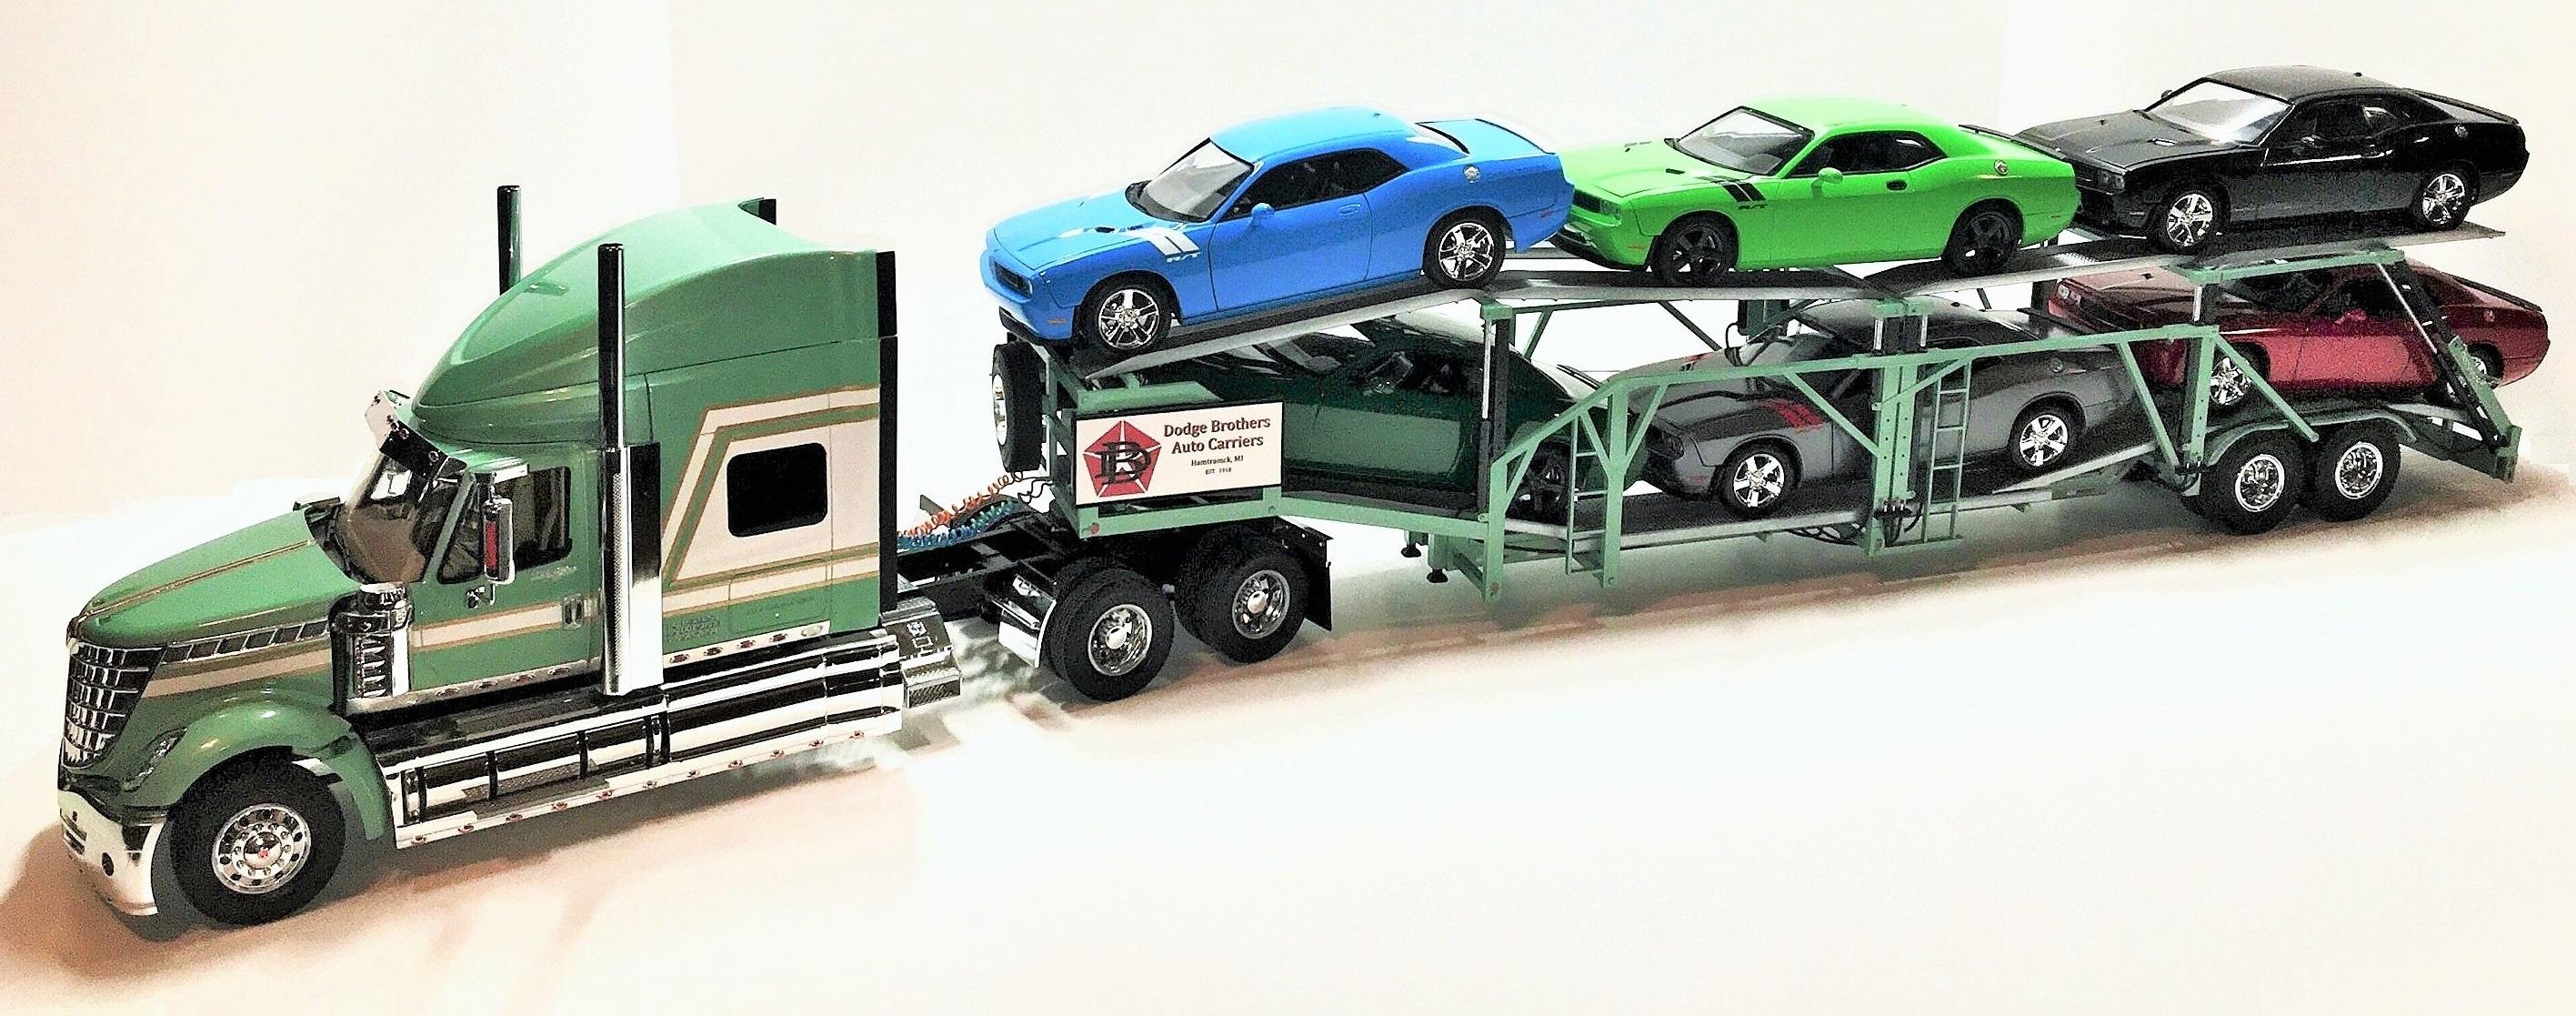
Here is one I finished not to long ago. I did a lot of detail work to this one. I was able to find a photo-etch kit for it and added those details. I then added lights to the sleeper area so you could see it better even when the top cap was off of it....which I also cut into the cab top to show off the interior better. The trailer is just the basic Revell Auto Carrier but I did relocate the spare tire to the front of the trailer and of course added 6 Dodge Challengers. The Dodge Brothers signage I made on my computer and it represents the logo the brothers had when they started building cars in Detroit.
-
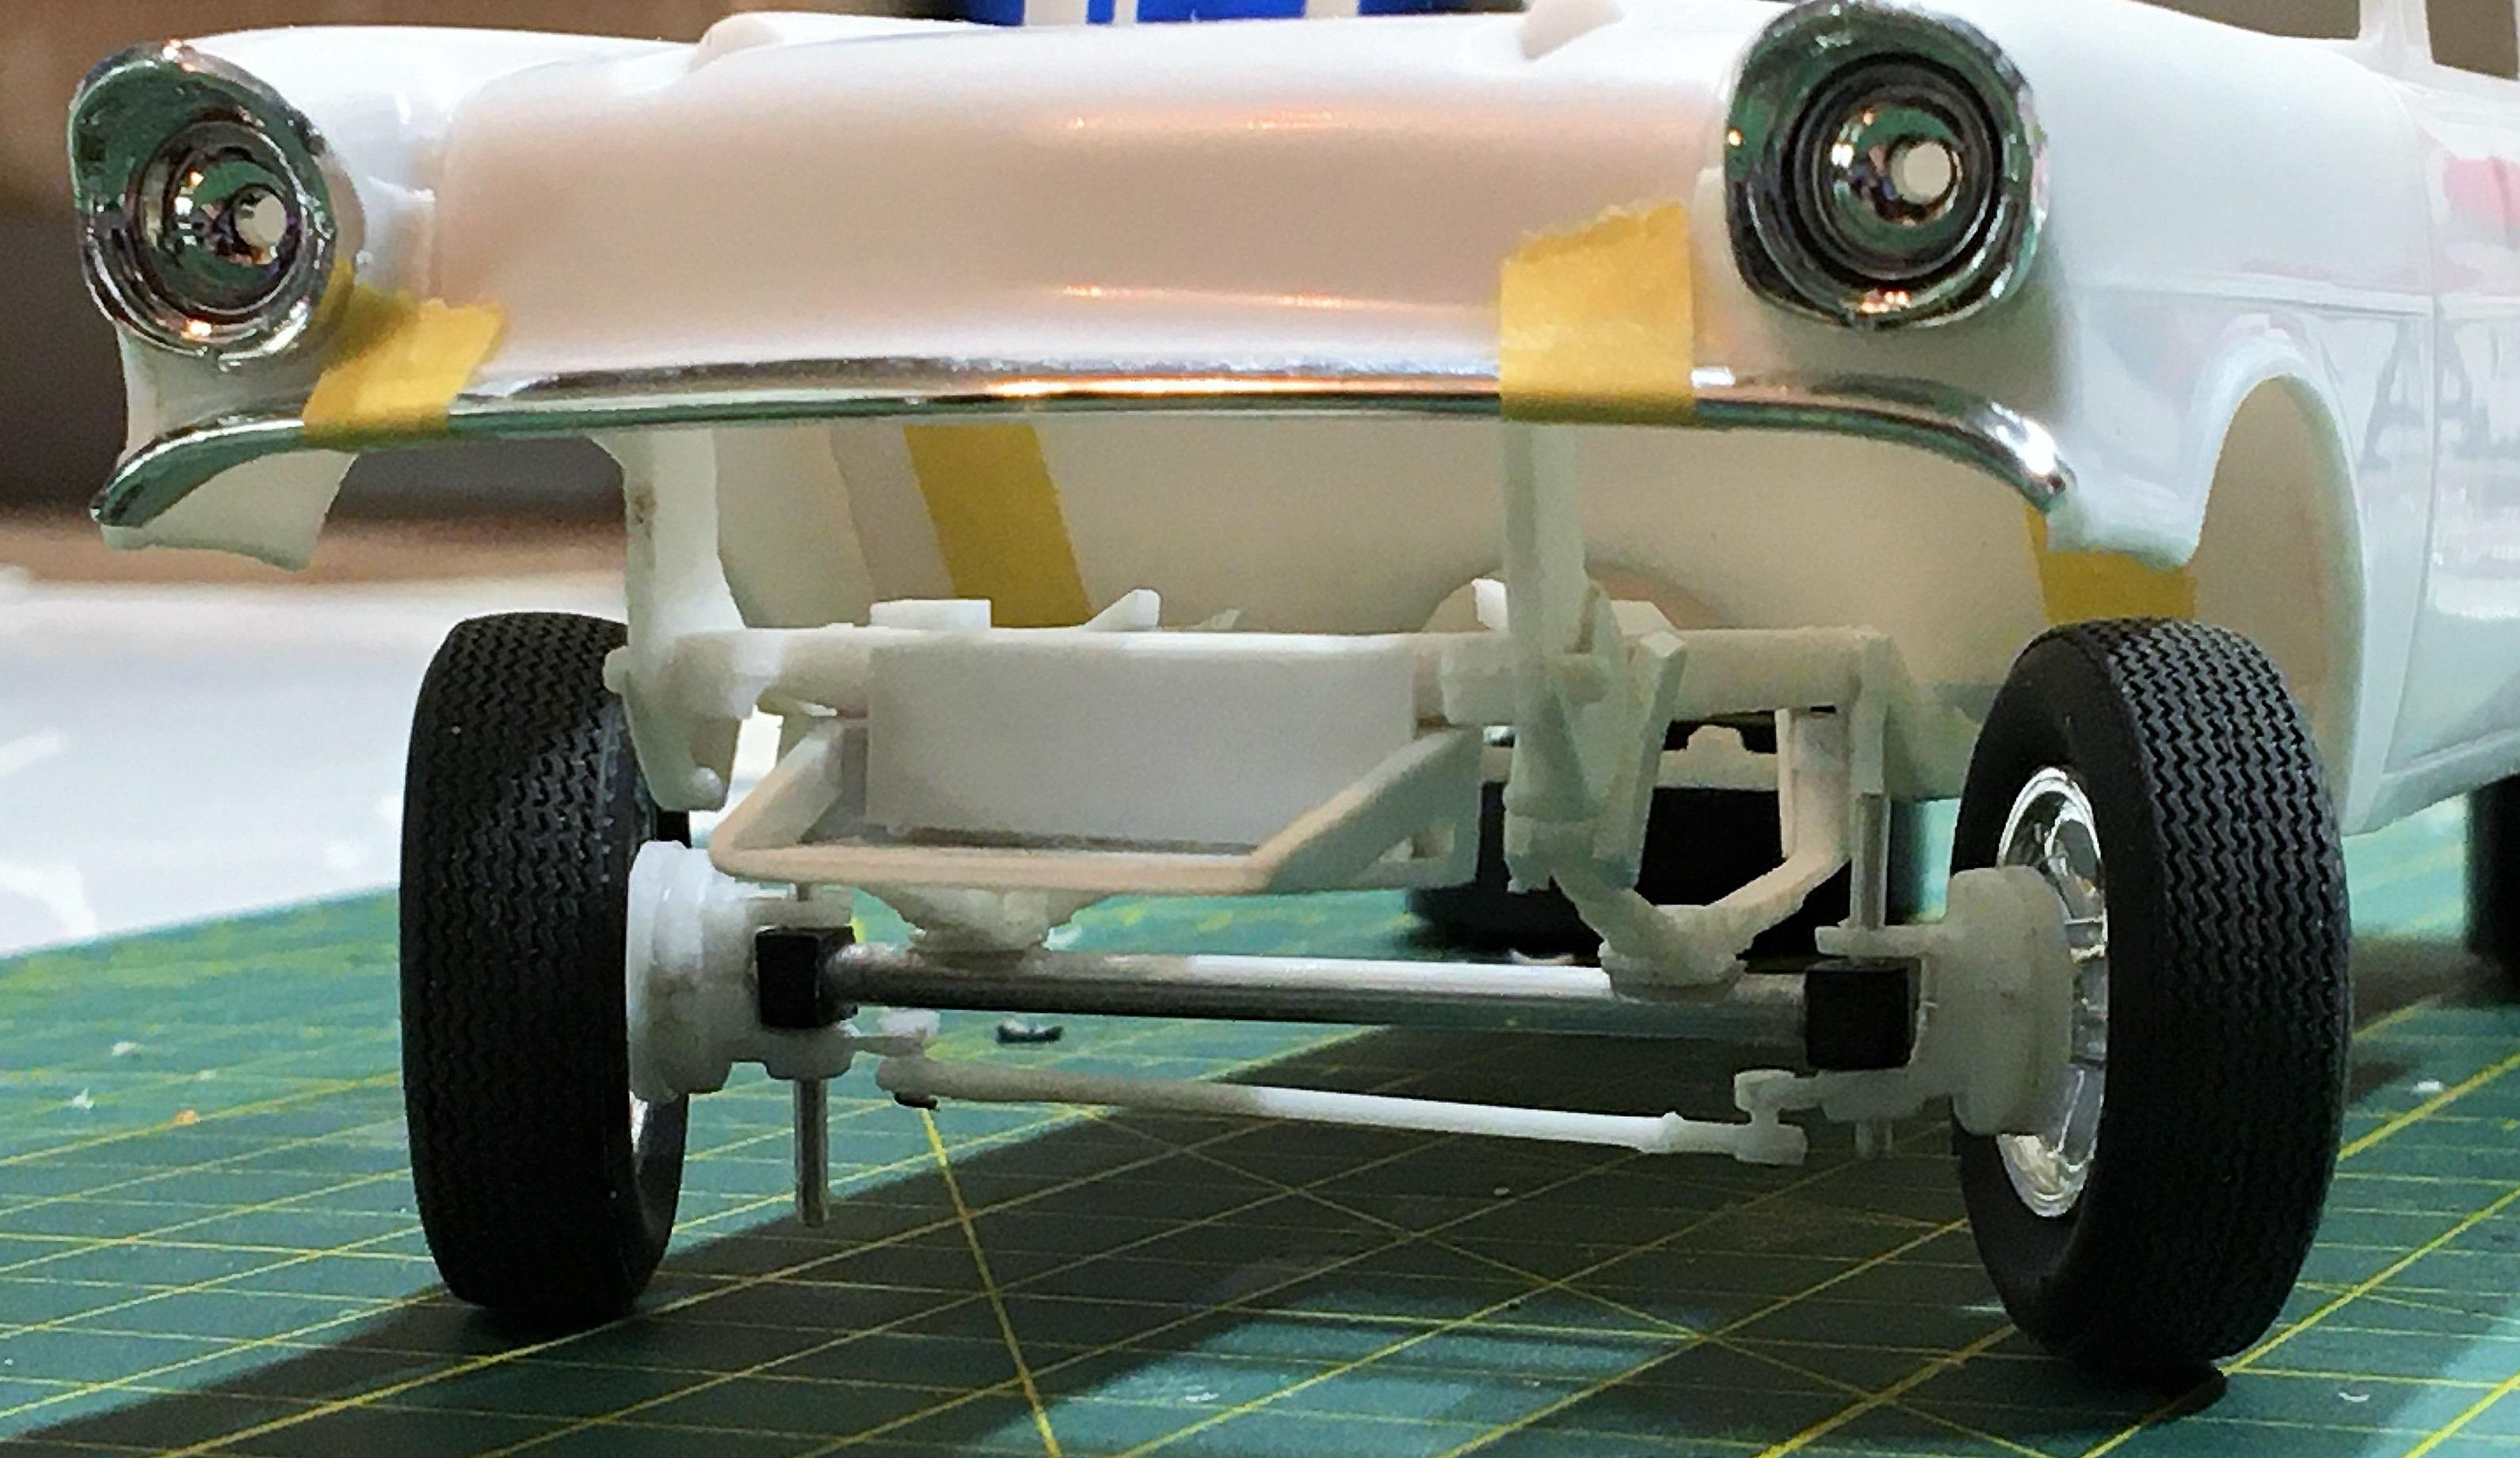
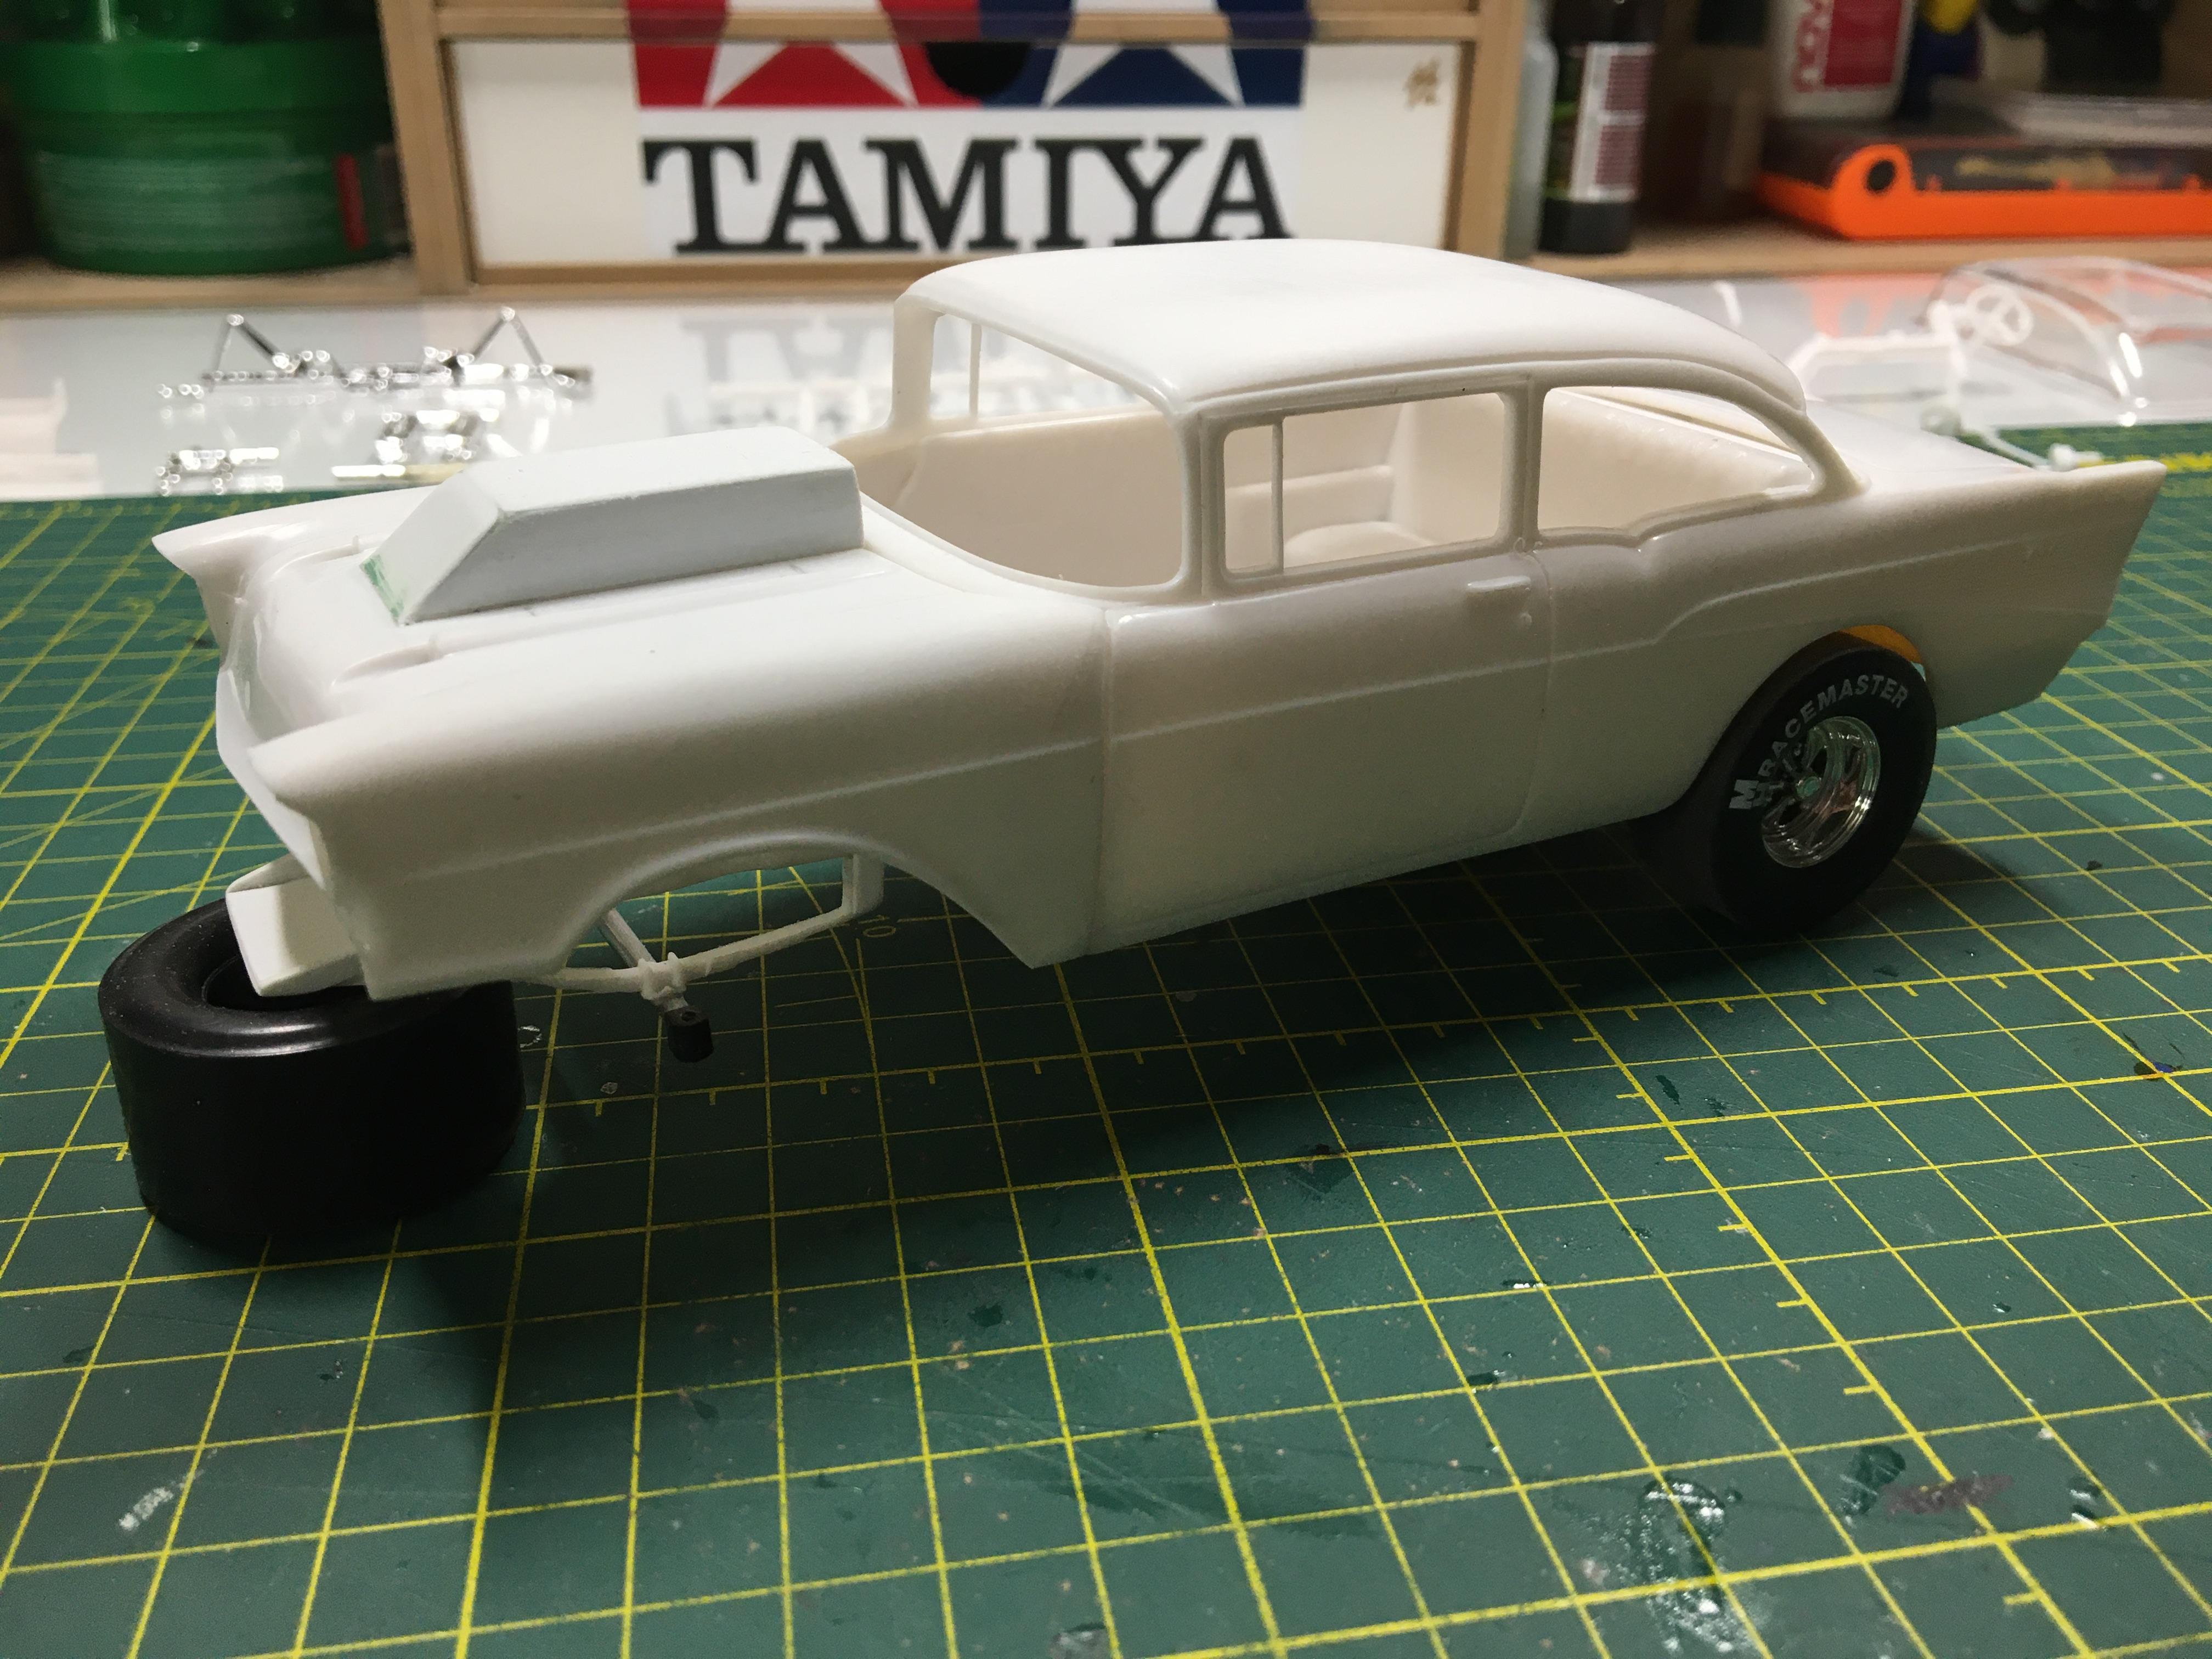
I finally finished my 57 Chevy gasser (look in the WIP for progress pictures). There was a lot done to this kit......scratch built front suspension with poseable steering, front gas tank mount, scratch built battery tray, radiused rear wheel openings, the rear suspension is a combination of NASCAR Craftsman truck and '41 Willys ladder bars, aluminum driaveshaft, computer made decals and a host of little things from other kits. I really enjoyed this build. This is my first gasser model I have ever built. I might build more.
- 29 replies
-
- 12
-

-
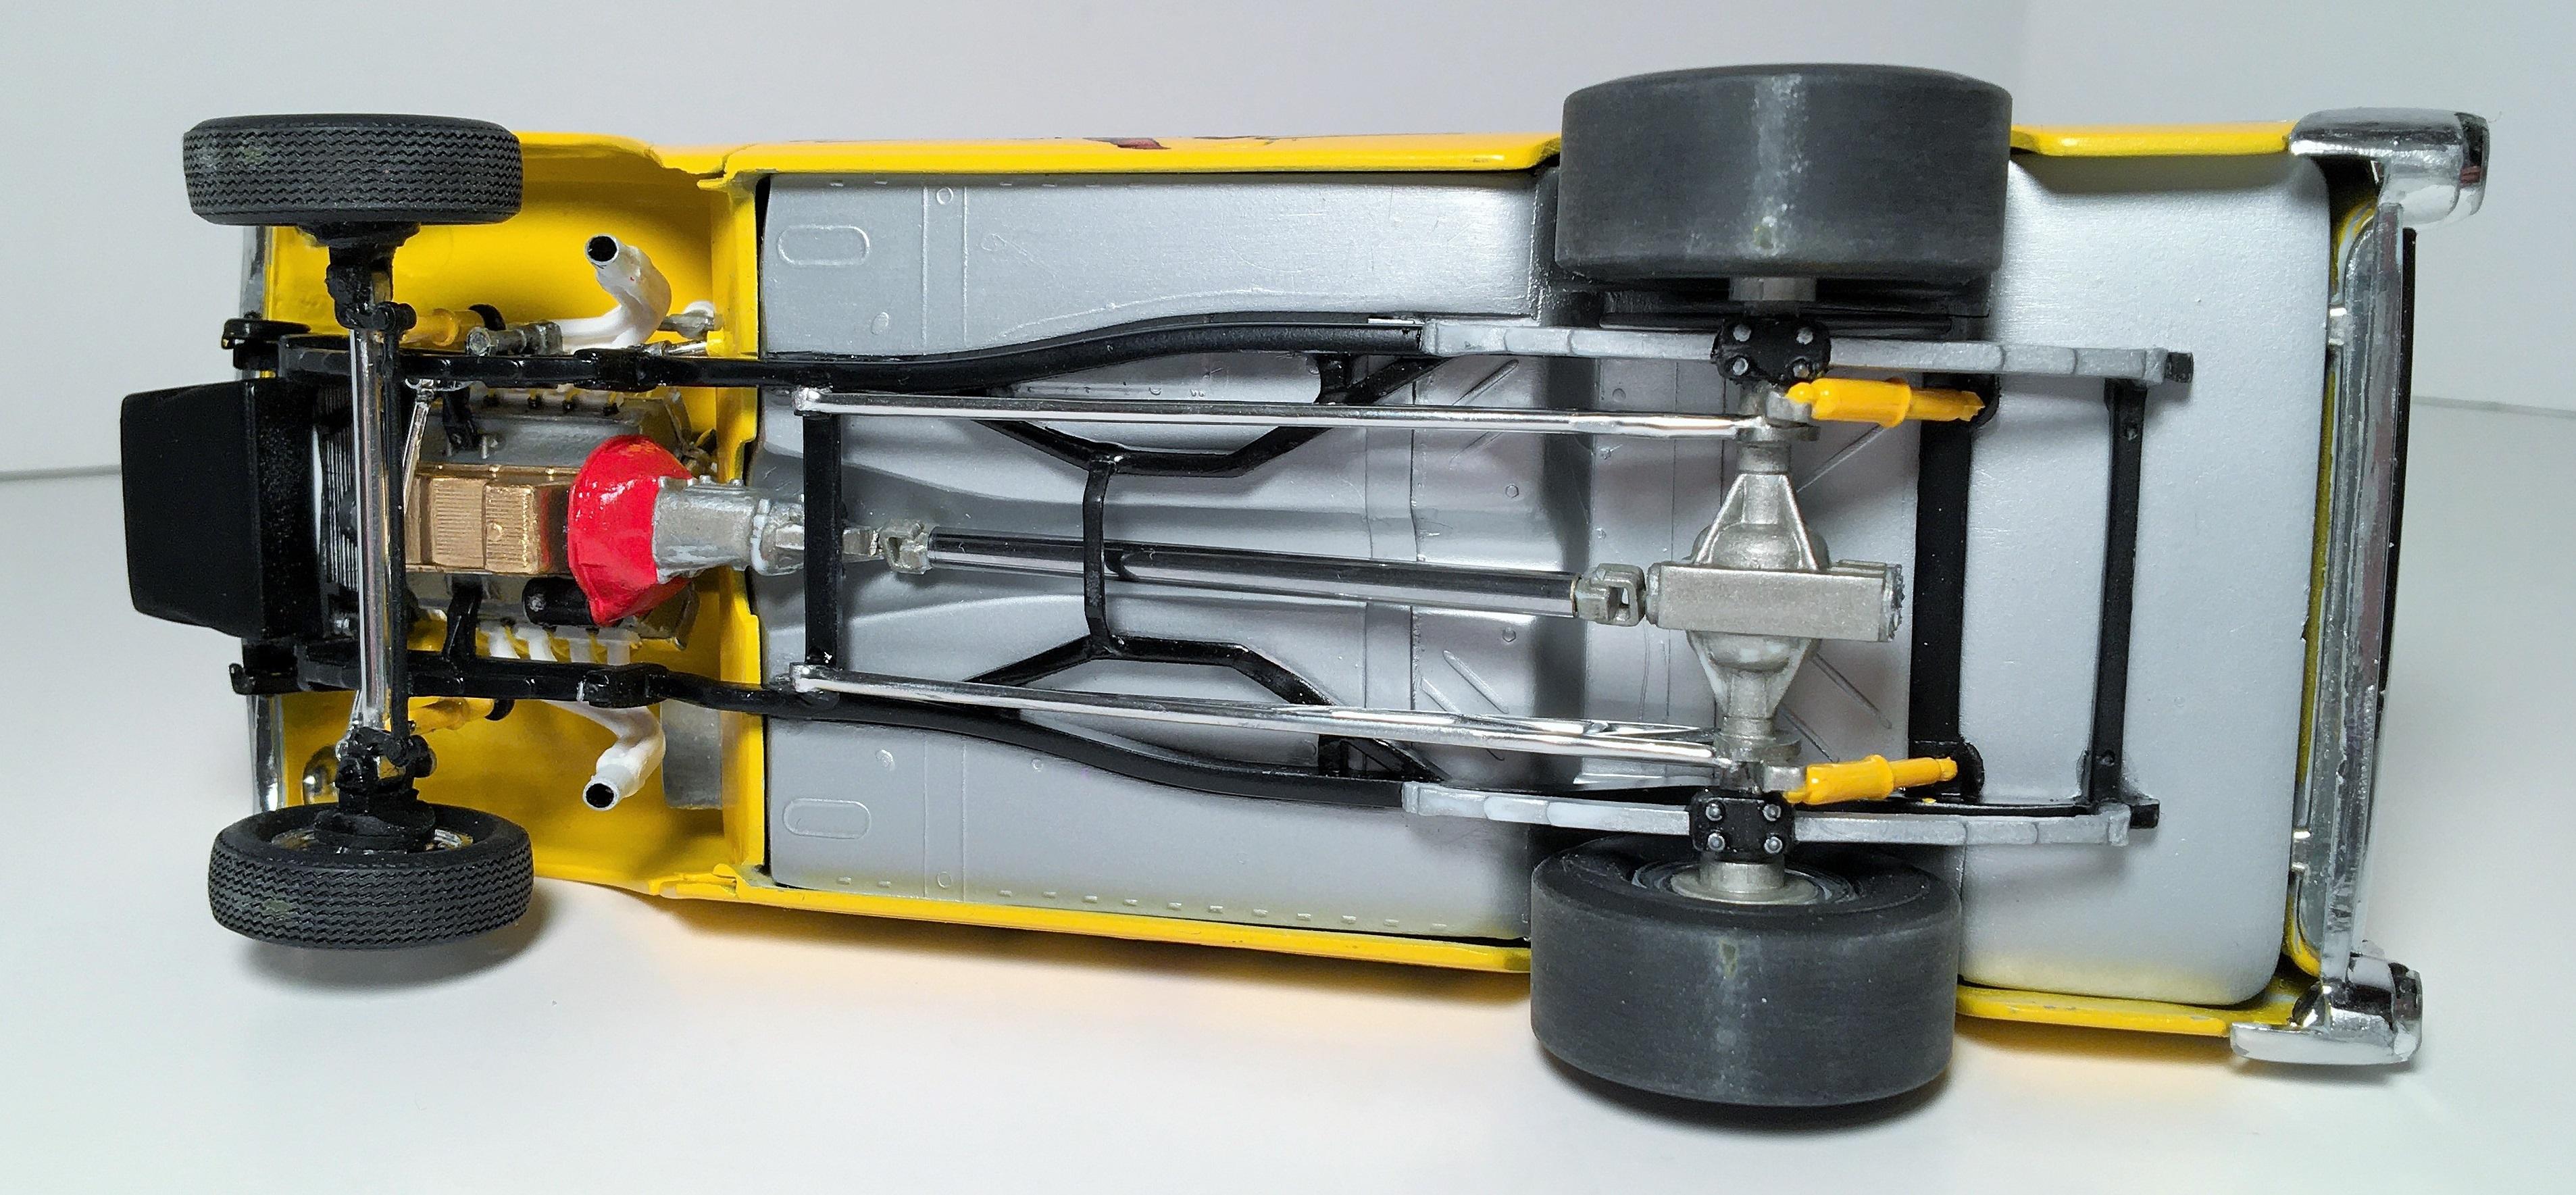
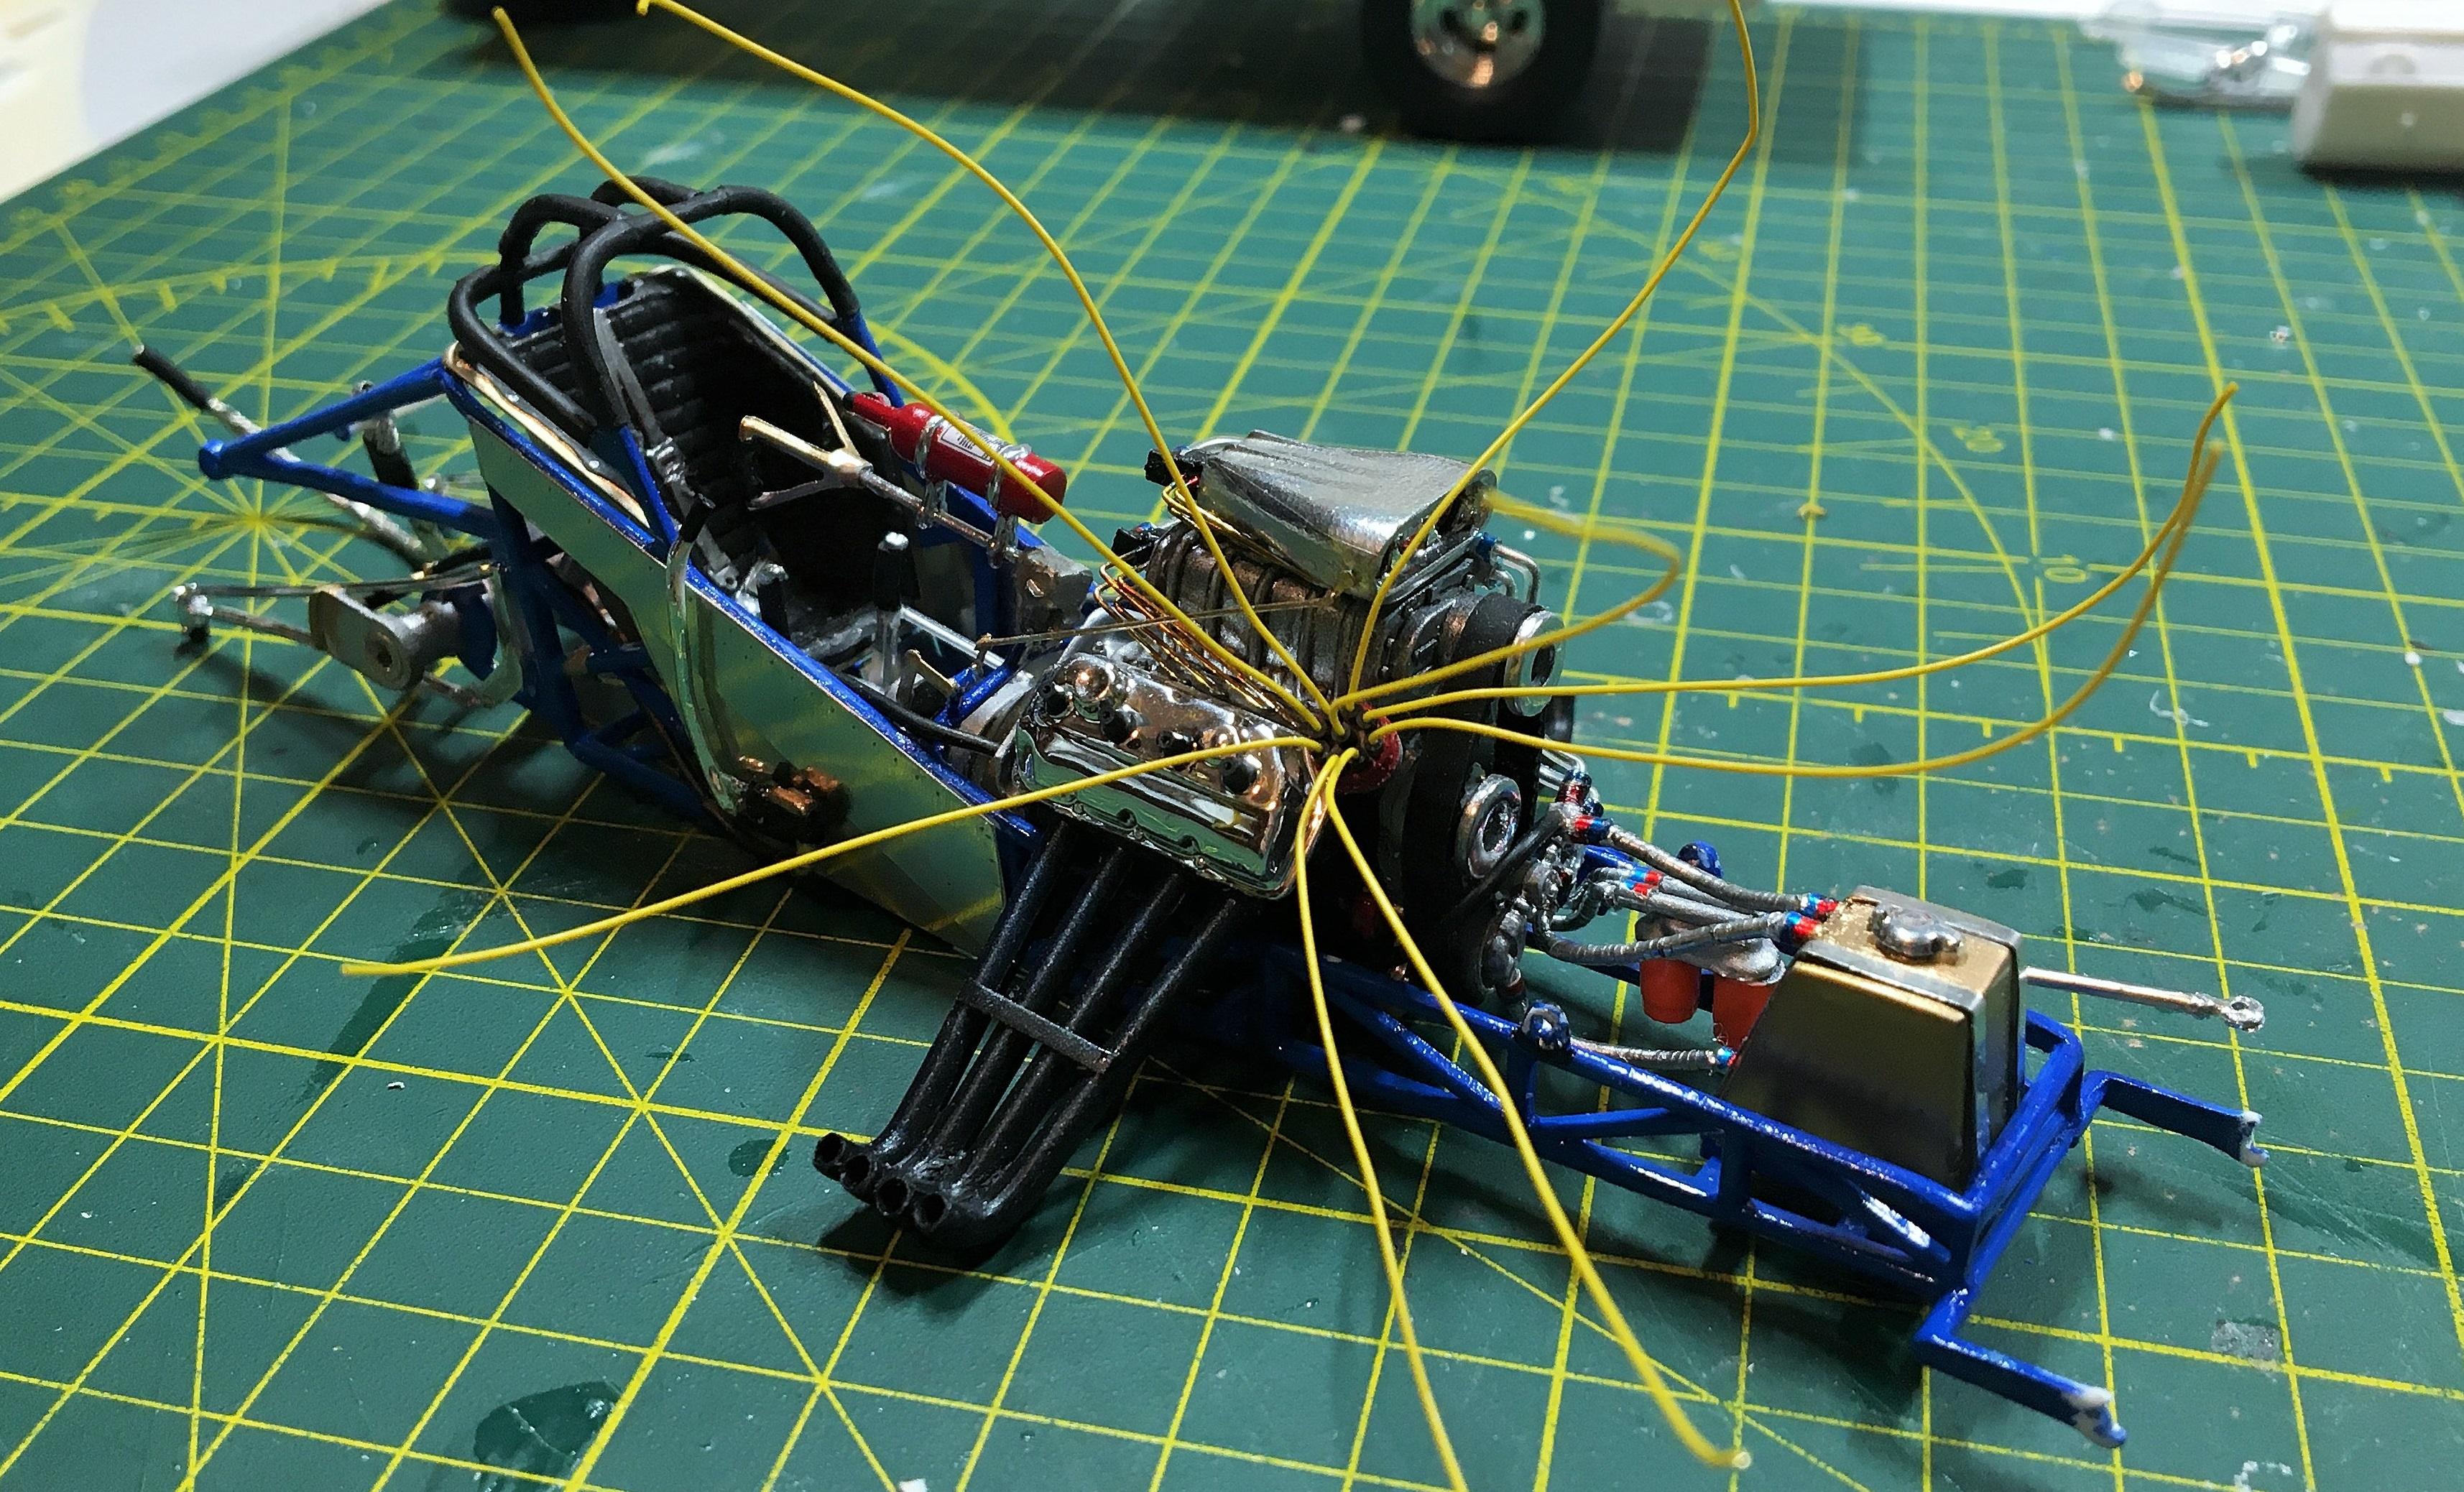
Sorry I have been a little behind on updates. With the holidays and everything else going on around here, I just didnt get time to post anything. BUT, here is an update on the '57 Gasser. I got the interior finally done (along with a metal flake steering wheel) (and yes, I see the injector marks....i didnt see them until it was painted, but you wont see them anyway when the car is together), the chassis and drivetrain are in and done and the motor is in except for the front pulleys and hoses. Im not going full blown detail on this one, just mainly spark plug wires. I may do more at a later date, but I am happy with what I have so far. The body is now painted, which I will save for the reveal on what it looks like until later. Im really happy how this is turning out and it being my first gasser model ever.
-
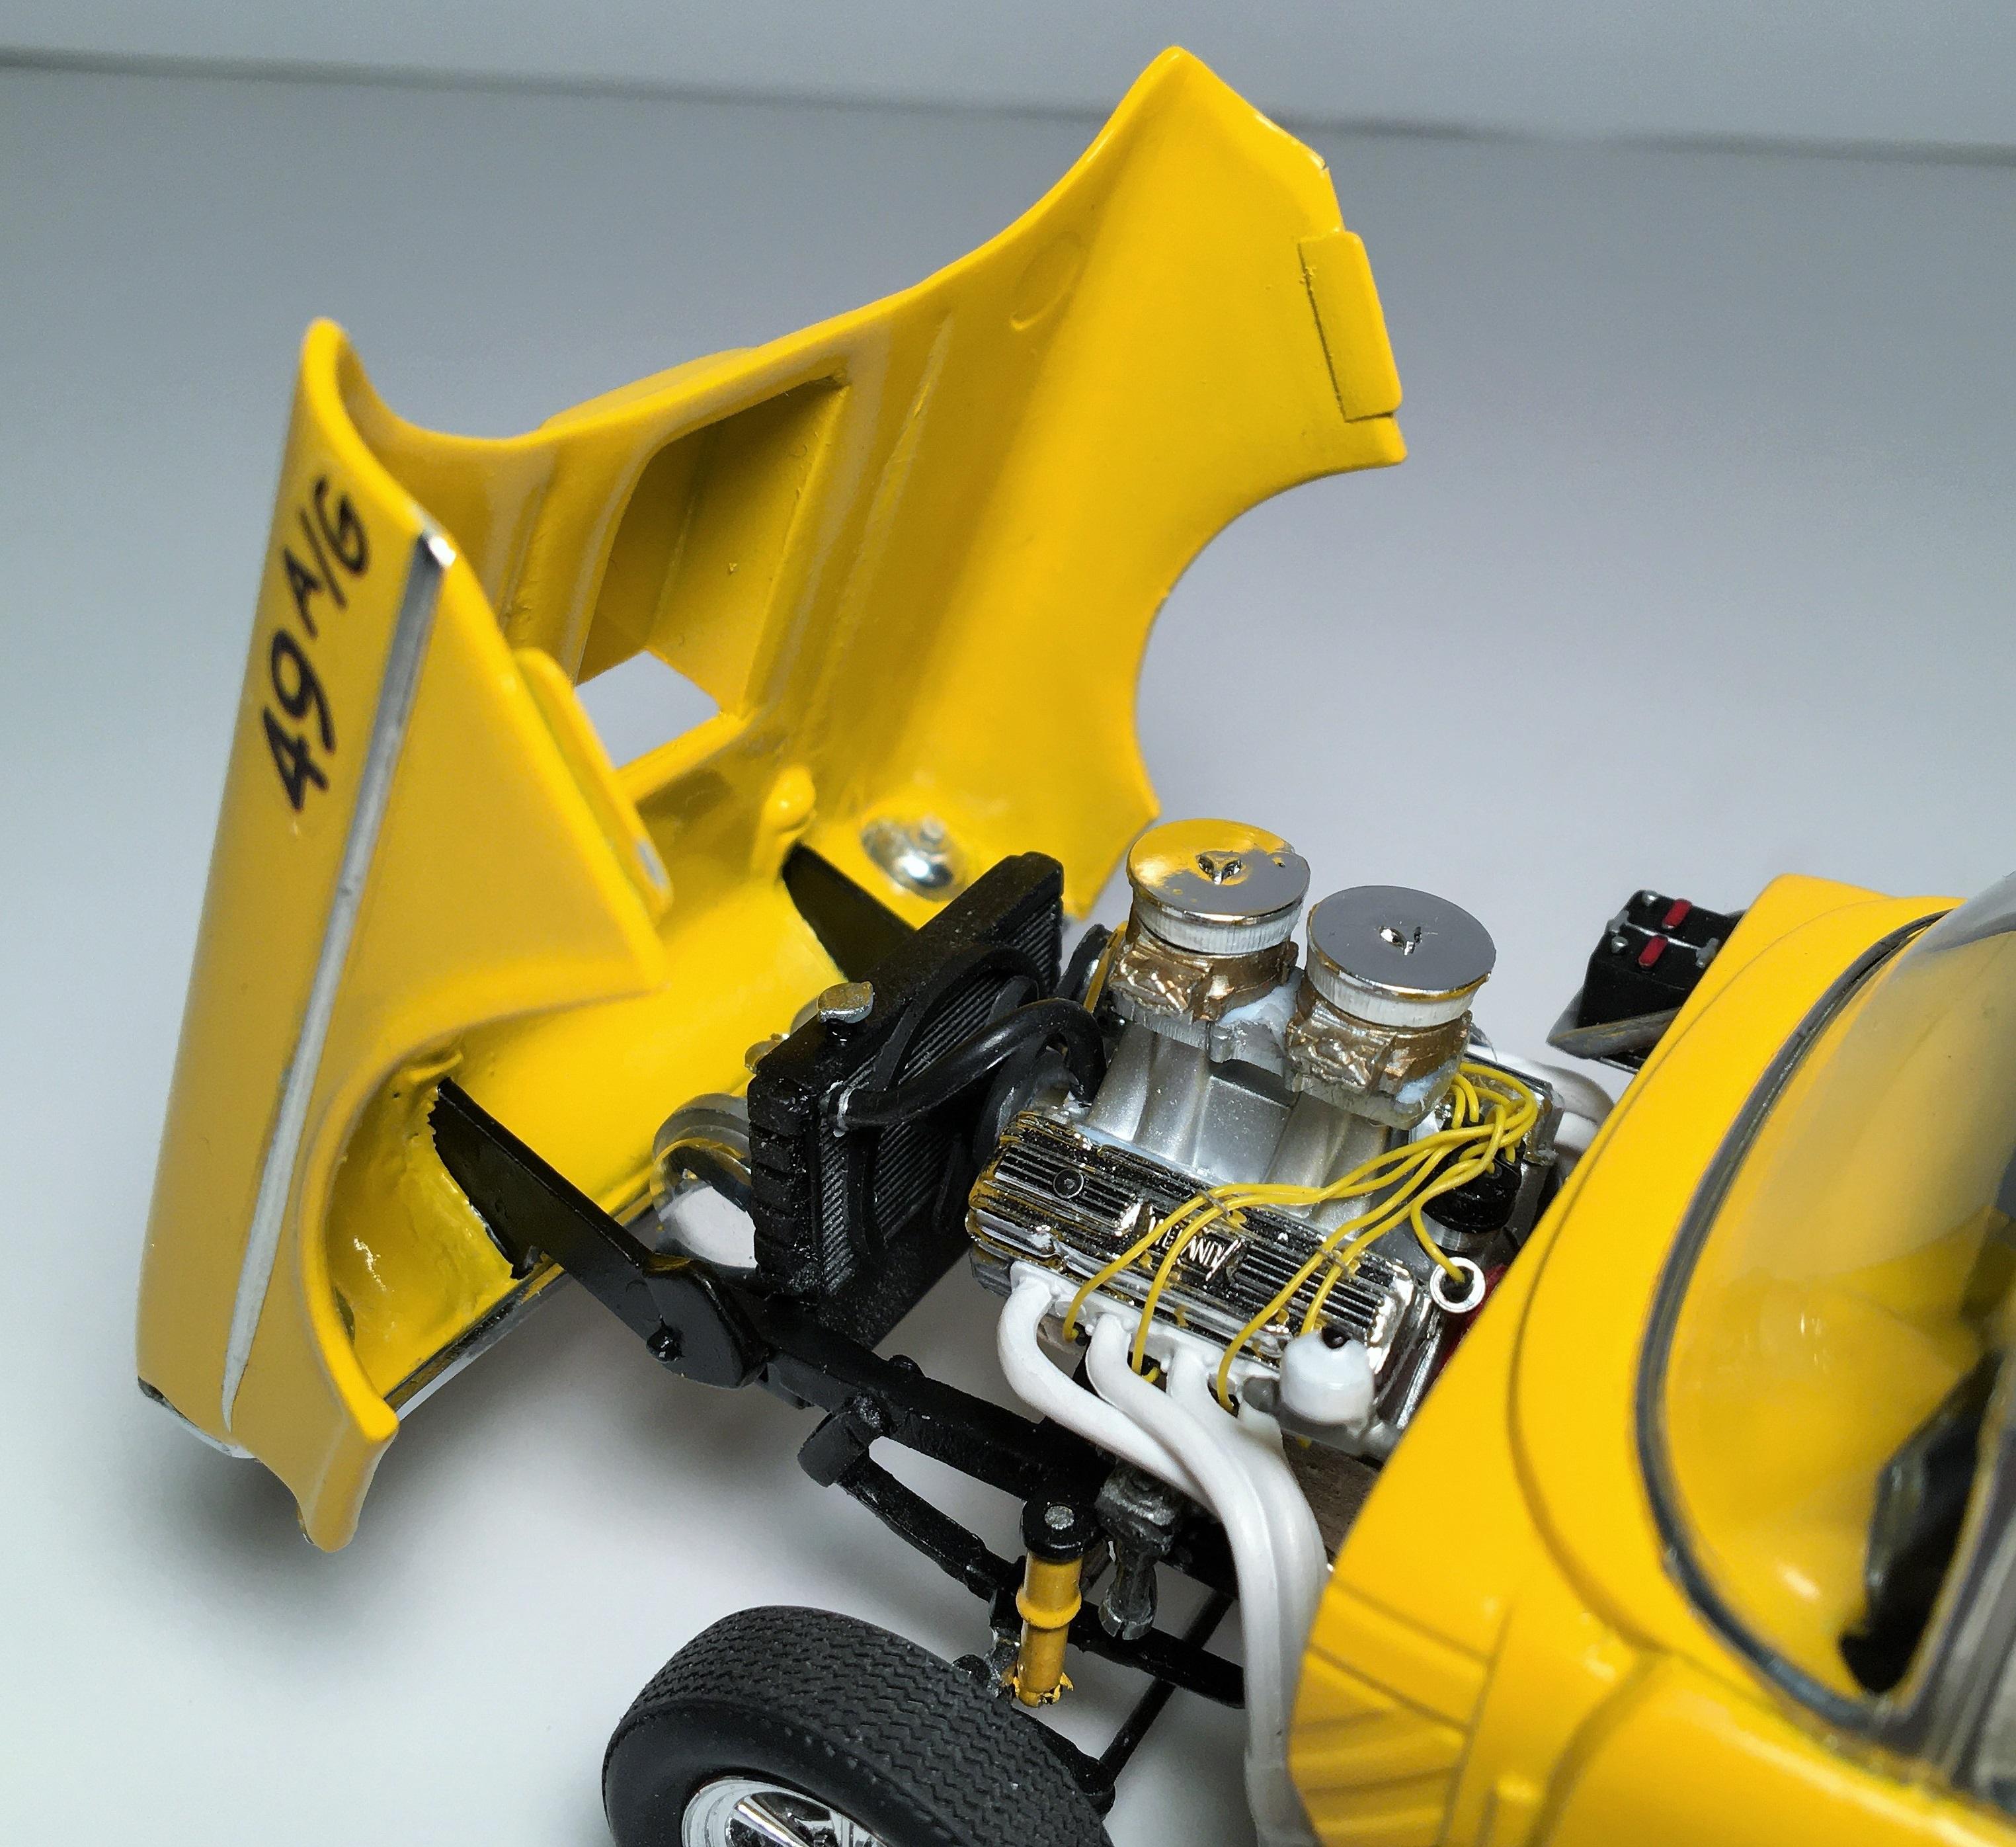
I decided to make a more realistic steering u-joint going from the firewall to the steering box. This is NON FUNCTIONAL. Take some small aluminum tubing....cut a slice down the middle....then taper the ends into a point....make 2 of them. The slide them over a slightly bent piece of solid rod....making sure the cut ends line up.....then cut the rod to the length you need. Here it is installed on my 57 Gasser. Im pretty sure these can possibly made functional....but for what I needed its fine.
-
Sorry I haven't updated in a lil while, but with a few things going on here around the house.....just haven't been able to. But, here is a small update on the '57 gasser. I finally got a rolling chassis done and I'm onto the motor details. I do have a small mock-up of the body on frame, the flip nose is working great and lines up really well. I did cut off the lower fenders and glue them to the body so I wouldn't have to worry about them scraping up the body when its open, and I think it looks better. Hopefully will have it done in another week or so.
-
Small update on the '57 gasser. I scratch built a battery tray to go on the firewall and did some more smoothing on the firewall itself. And then I noticed when the nose of the car was flipped forward....I kept thinking something was missing. Then I figured it out. It needed some sort of representation of door hinges. I just took some simple strips of plastic and glued them in place. It may not be exactly correct, but will look better than nothing at all. Adding those "hinges" actually helped keep the flip-nose aligned with the body and the panels stay even.
-
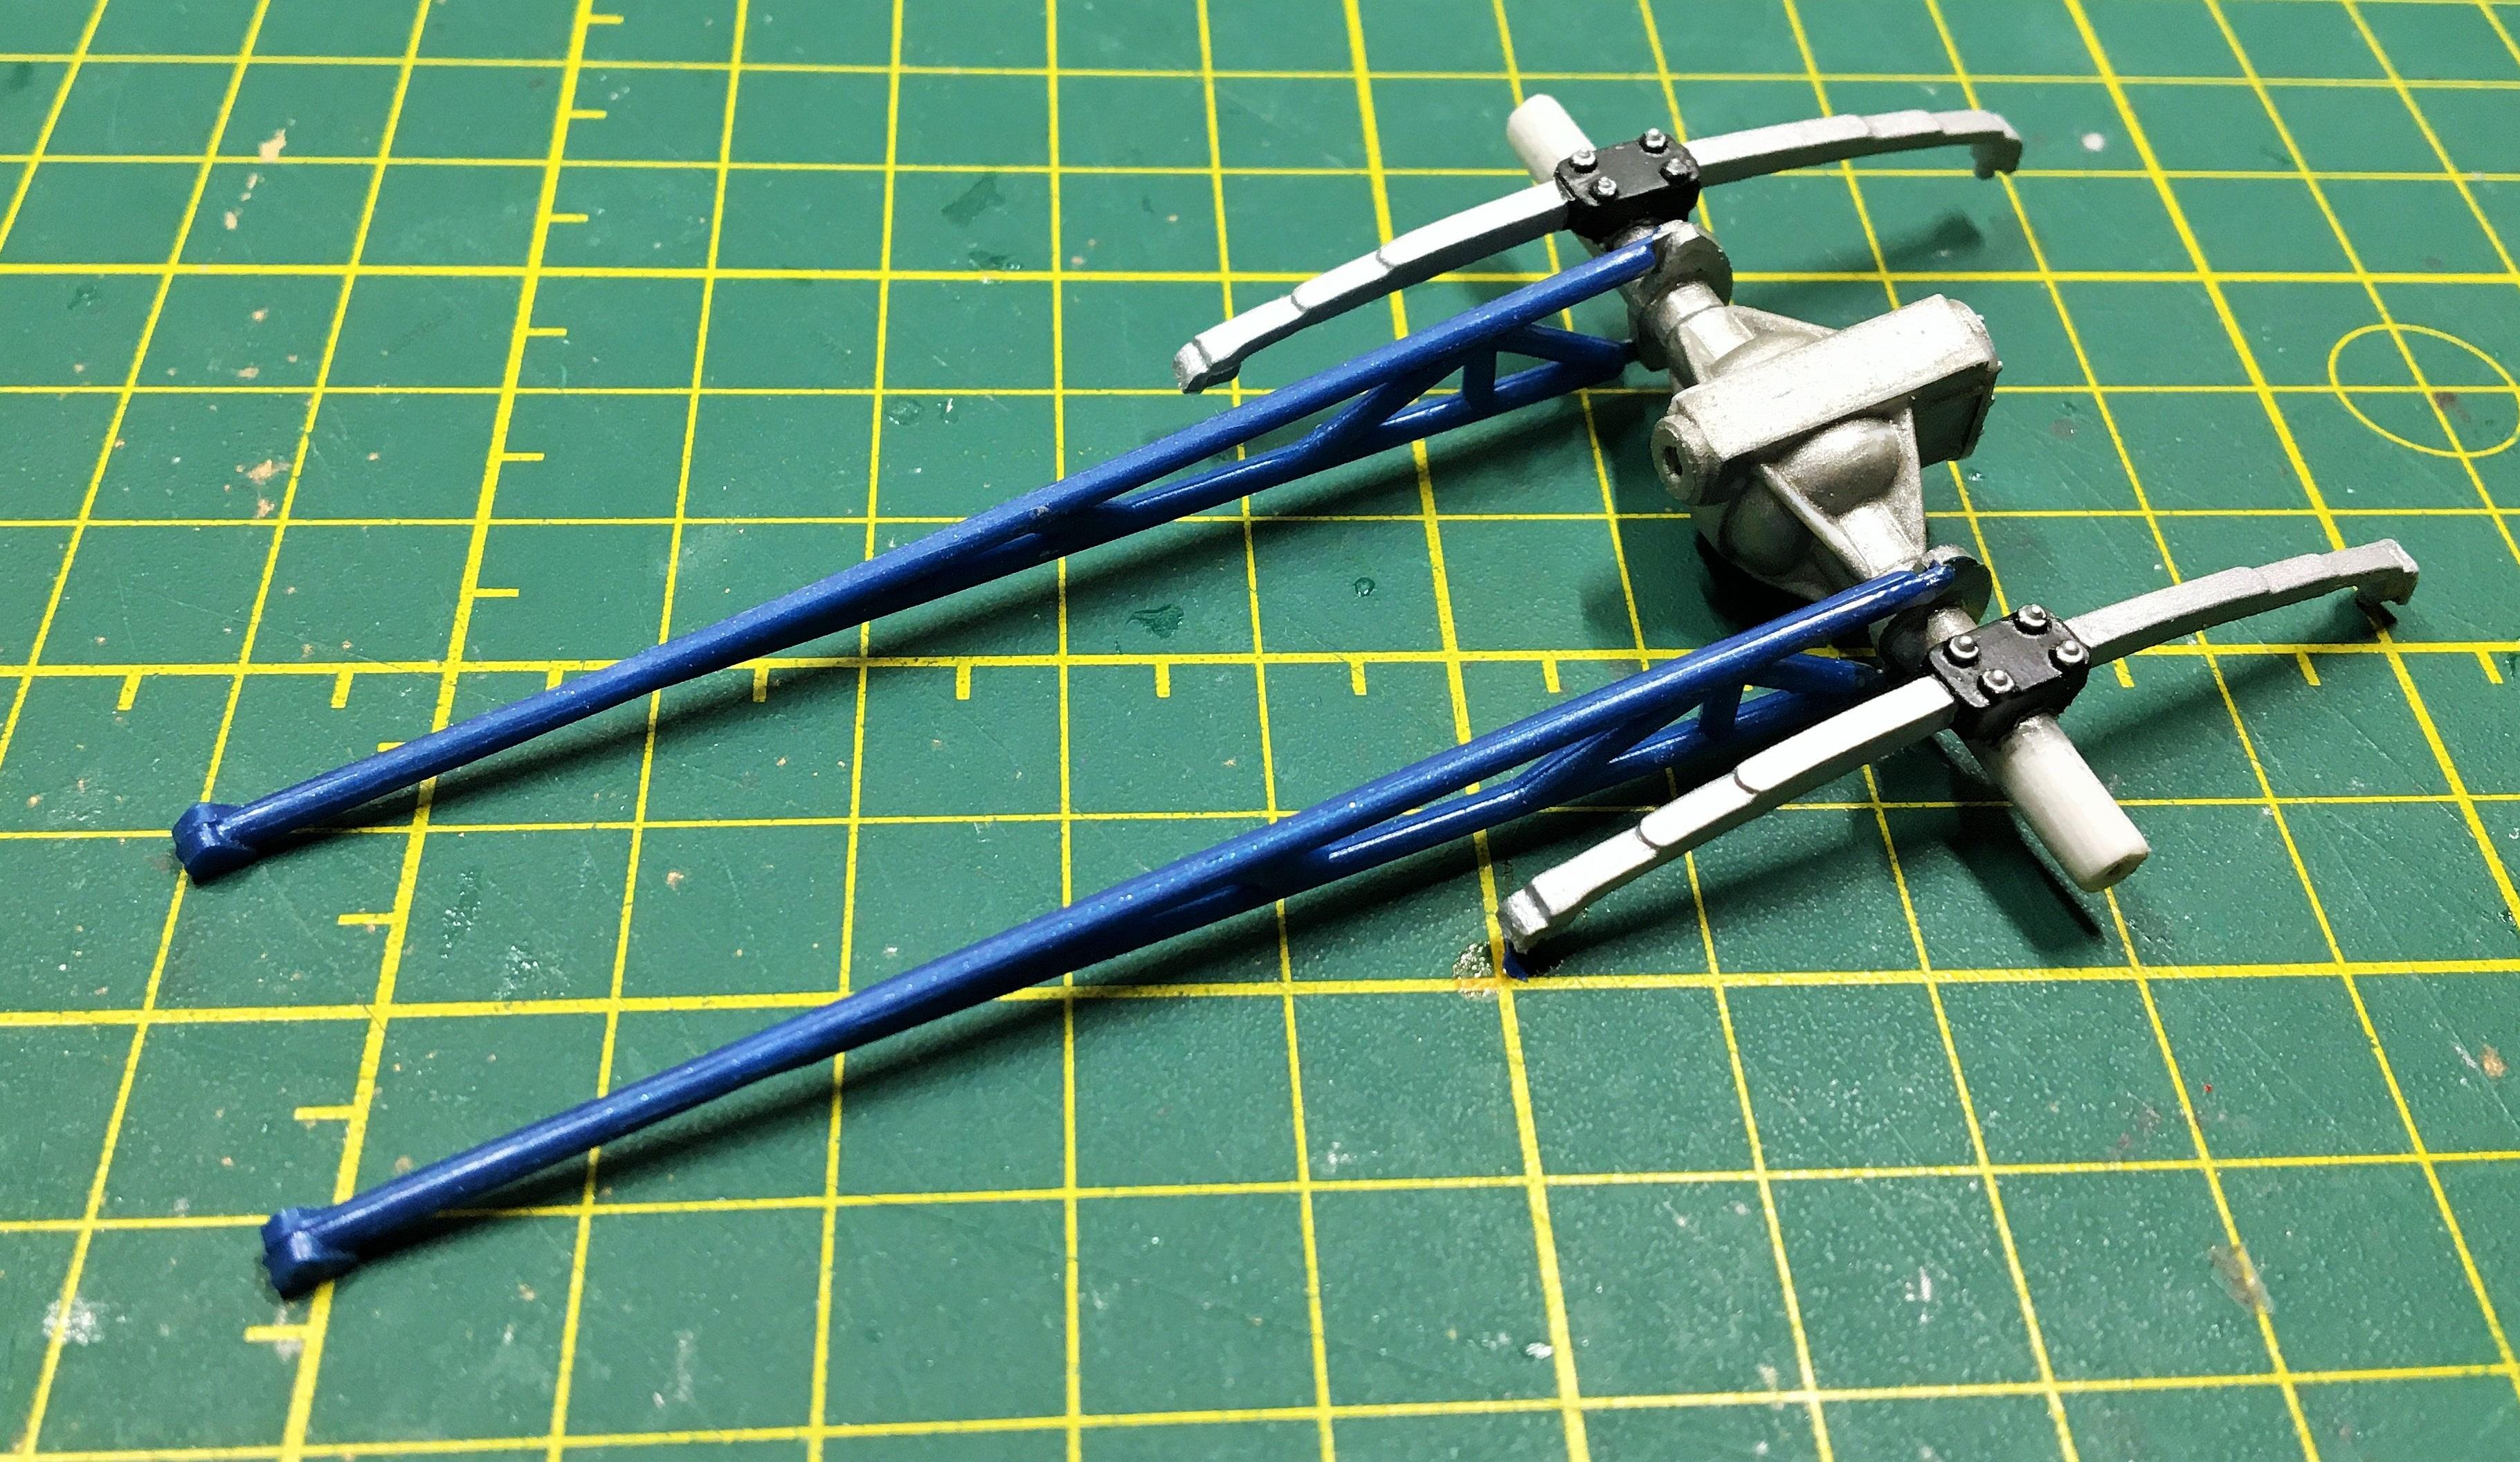
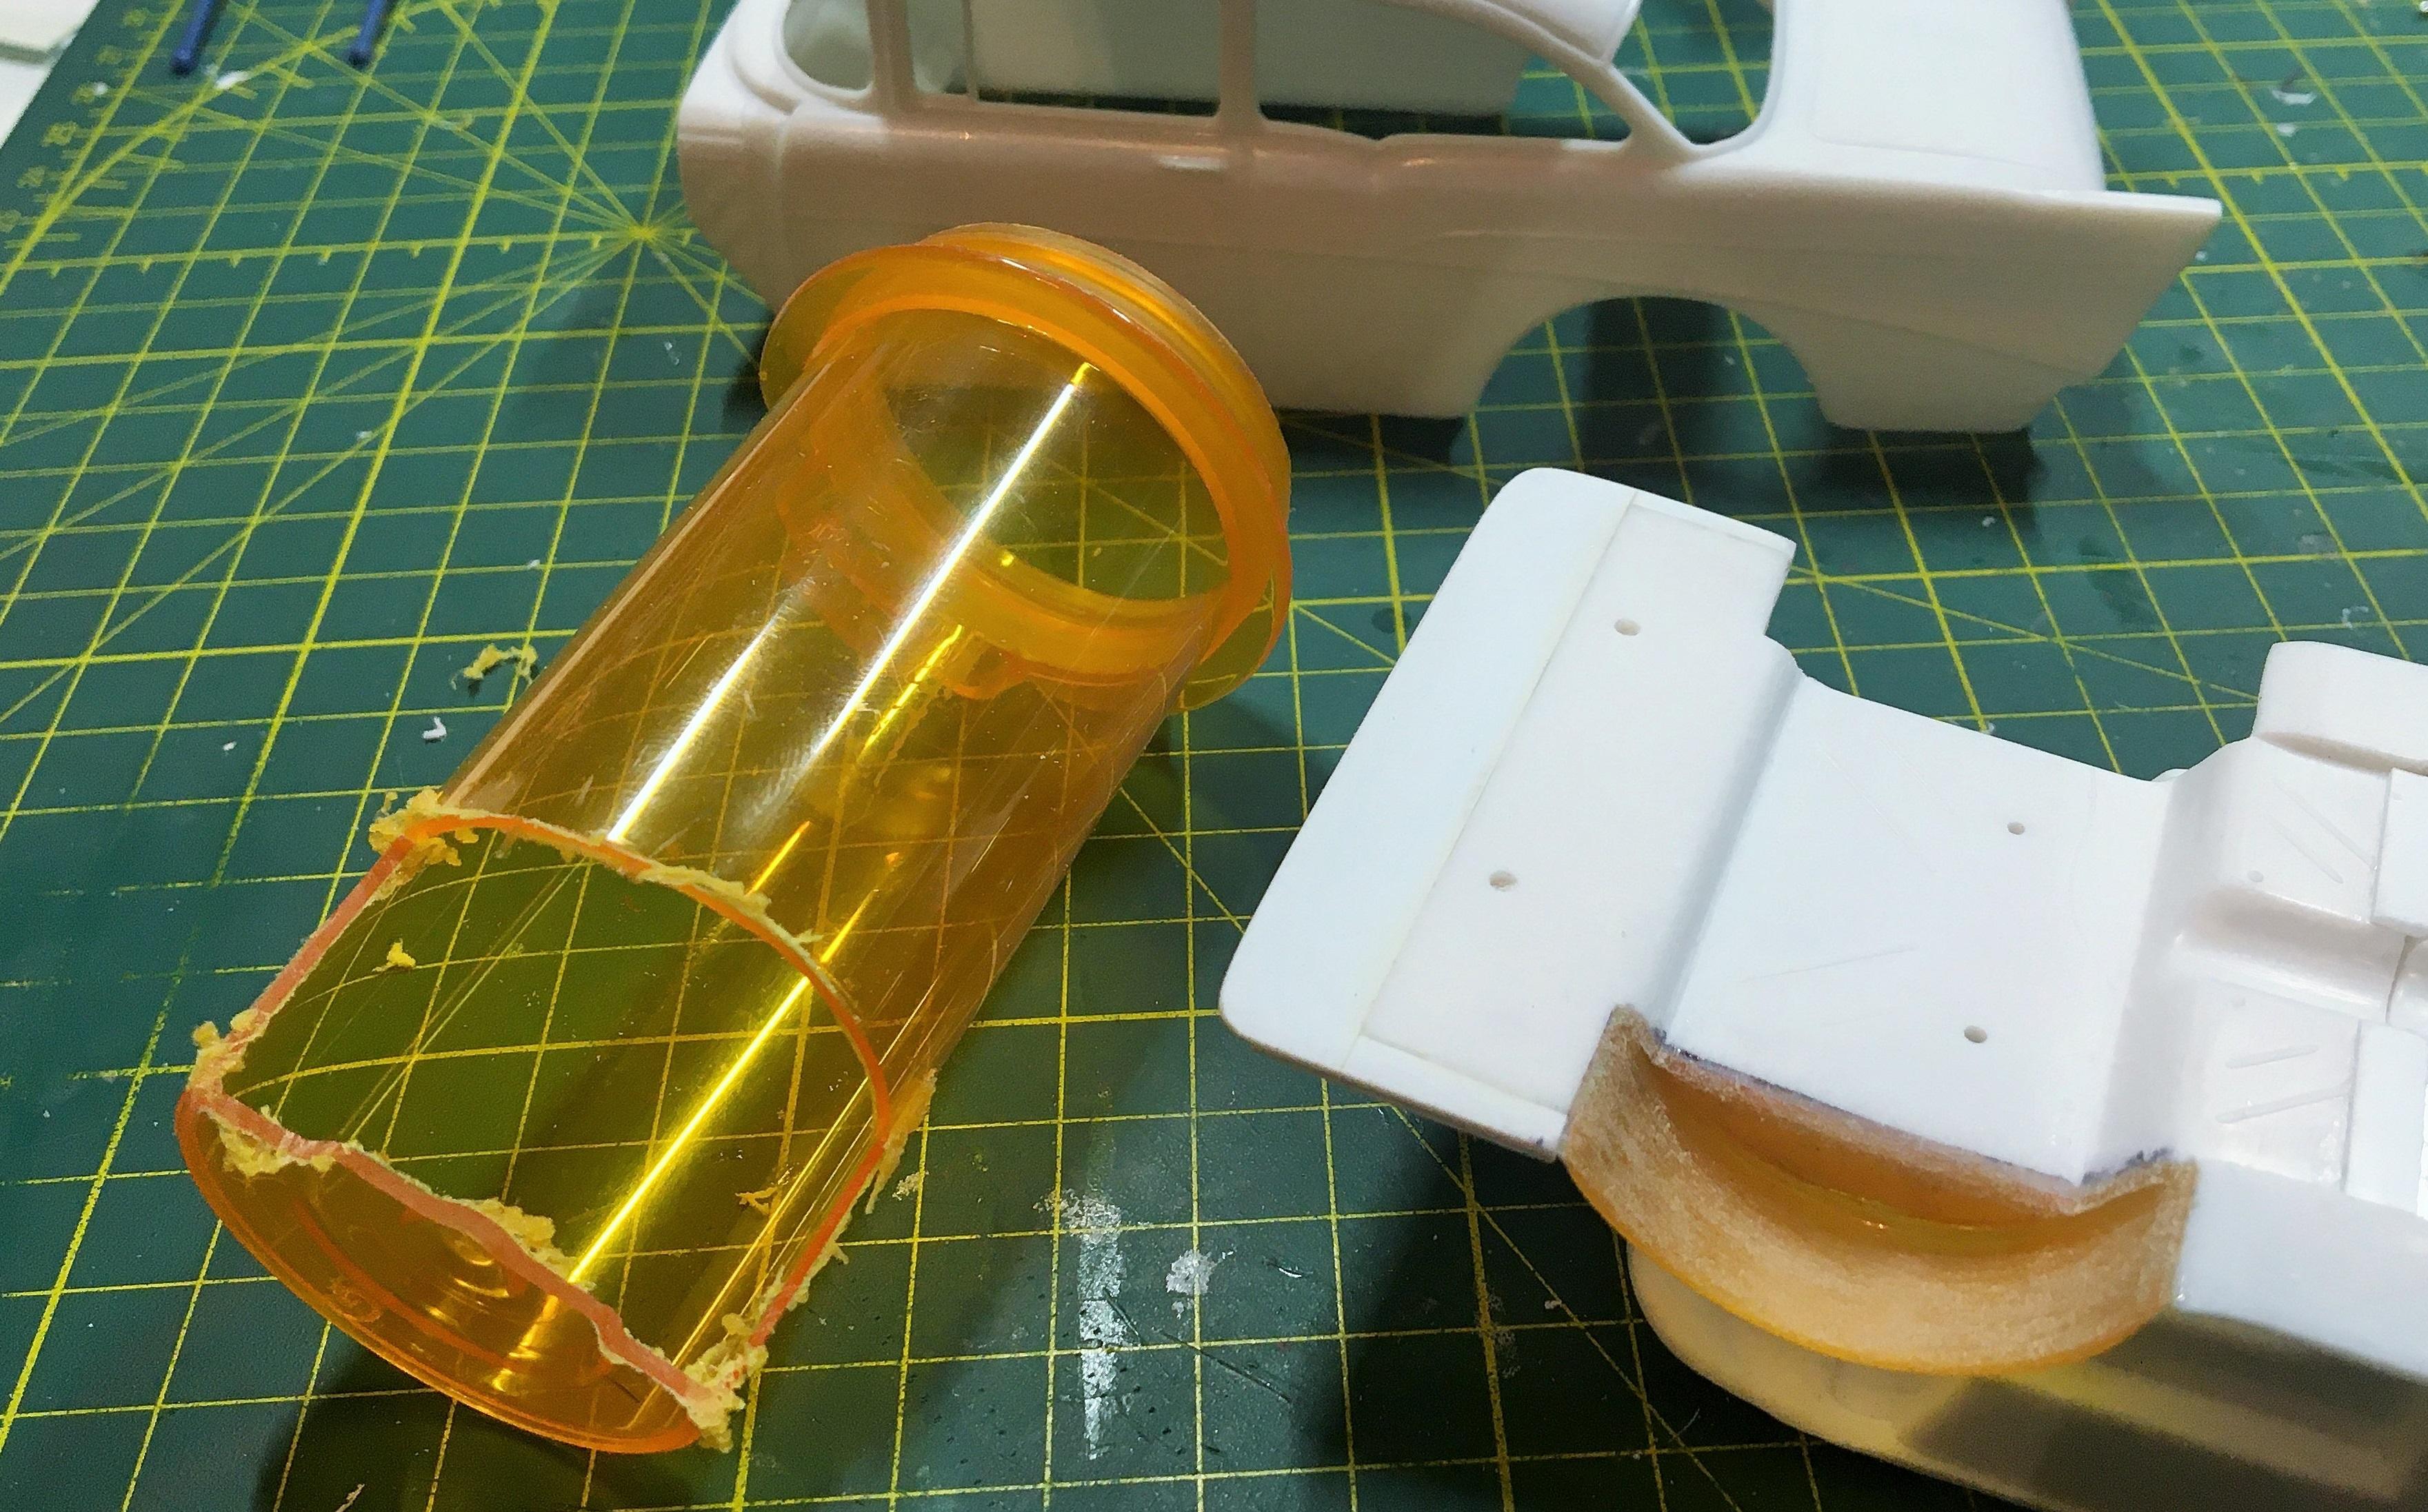
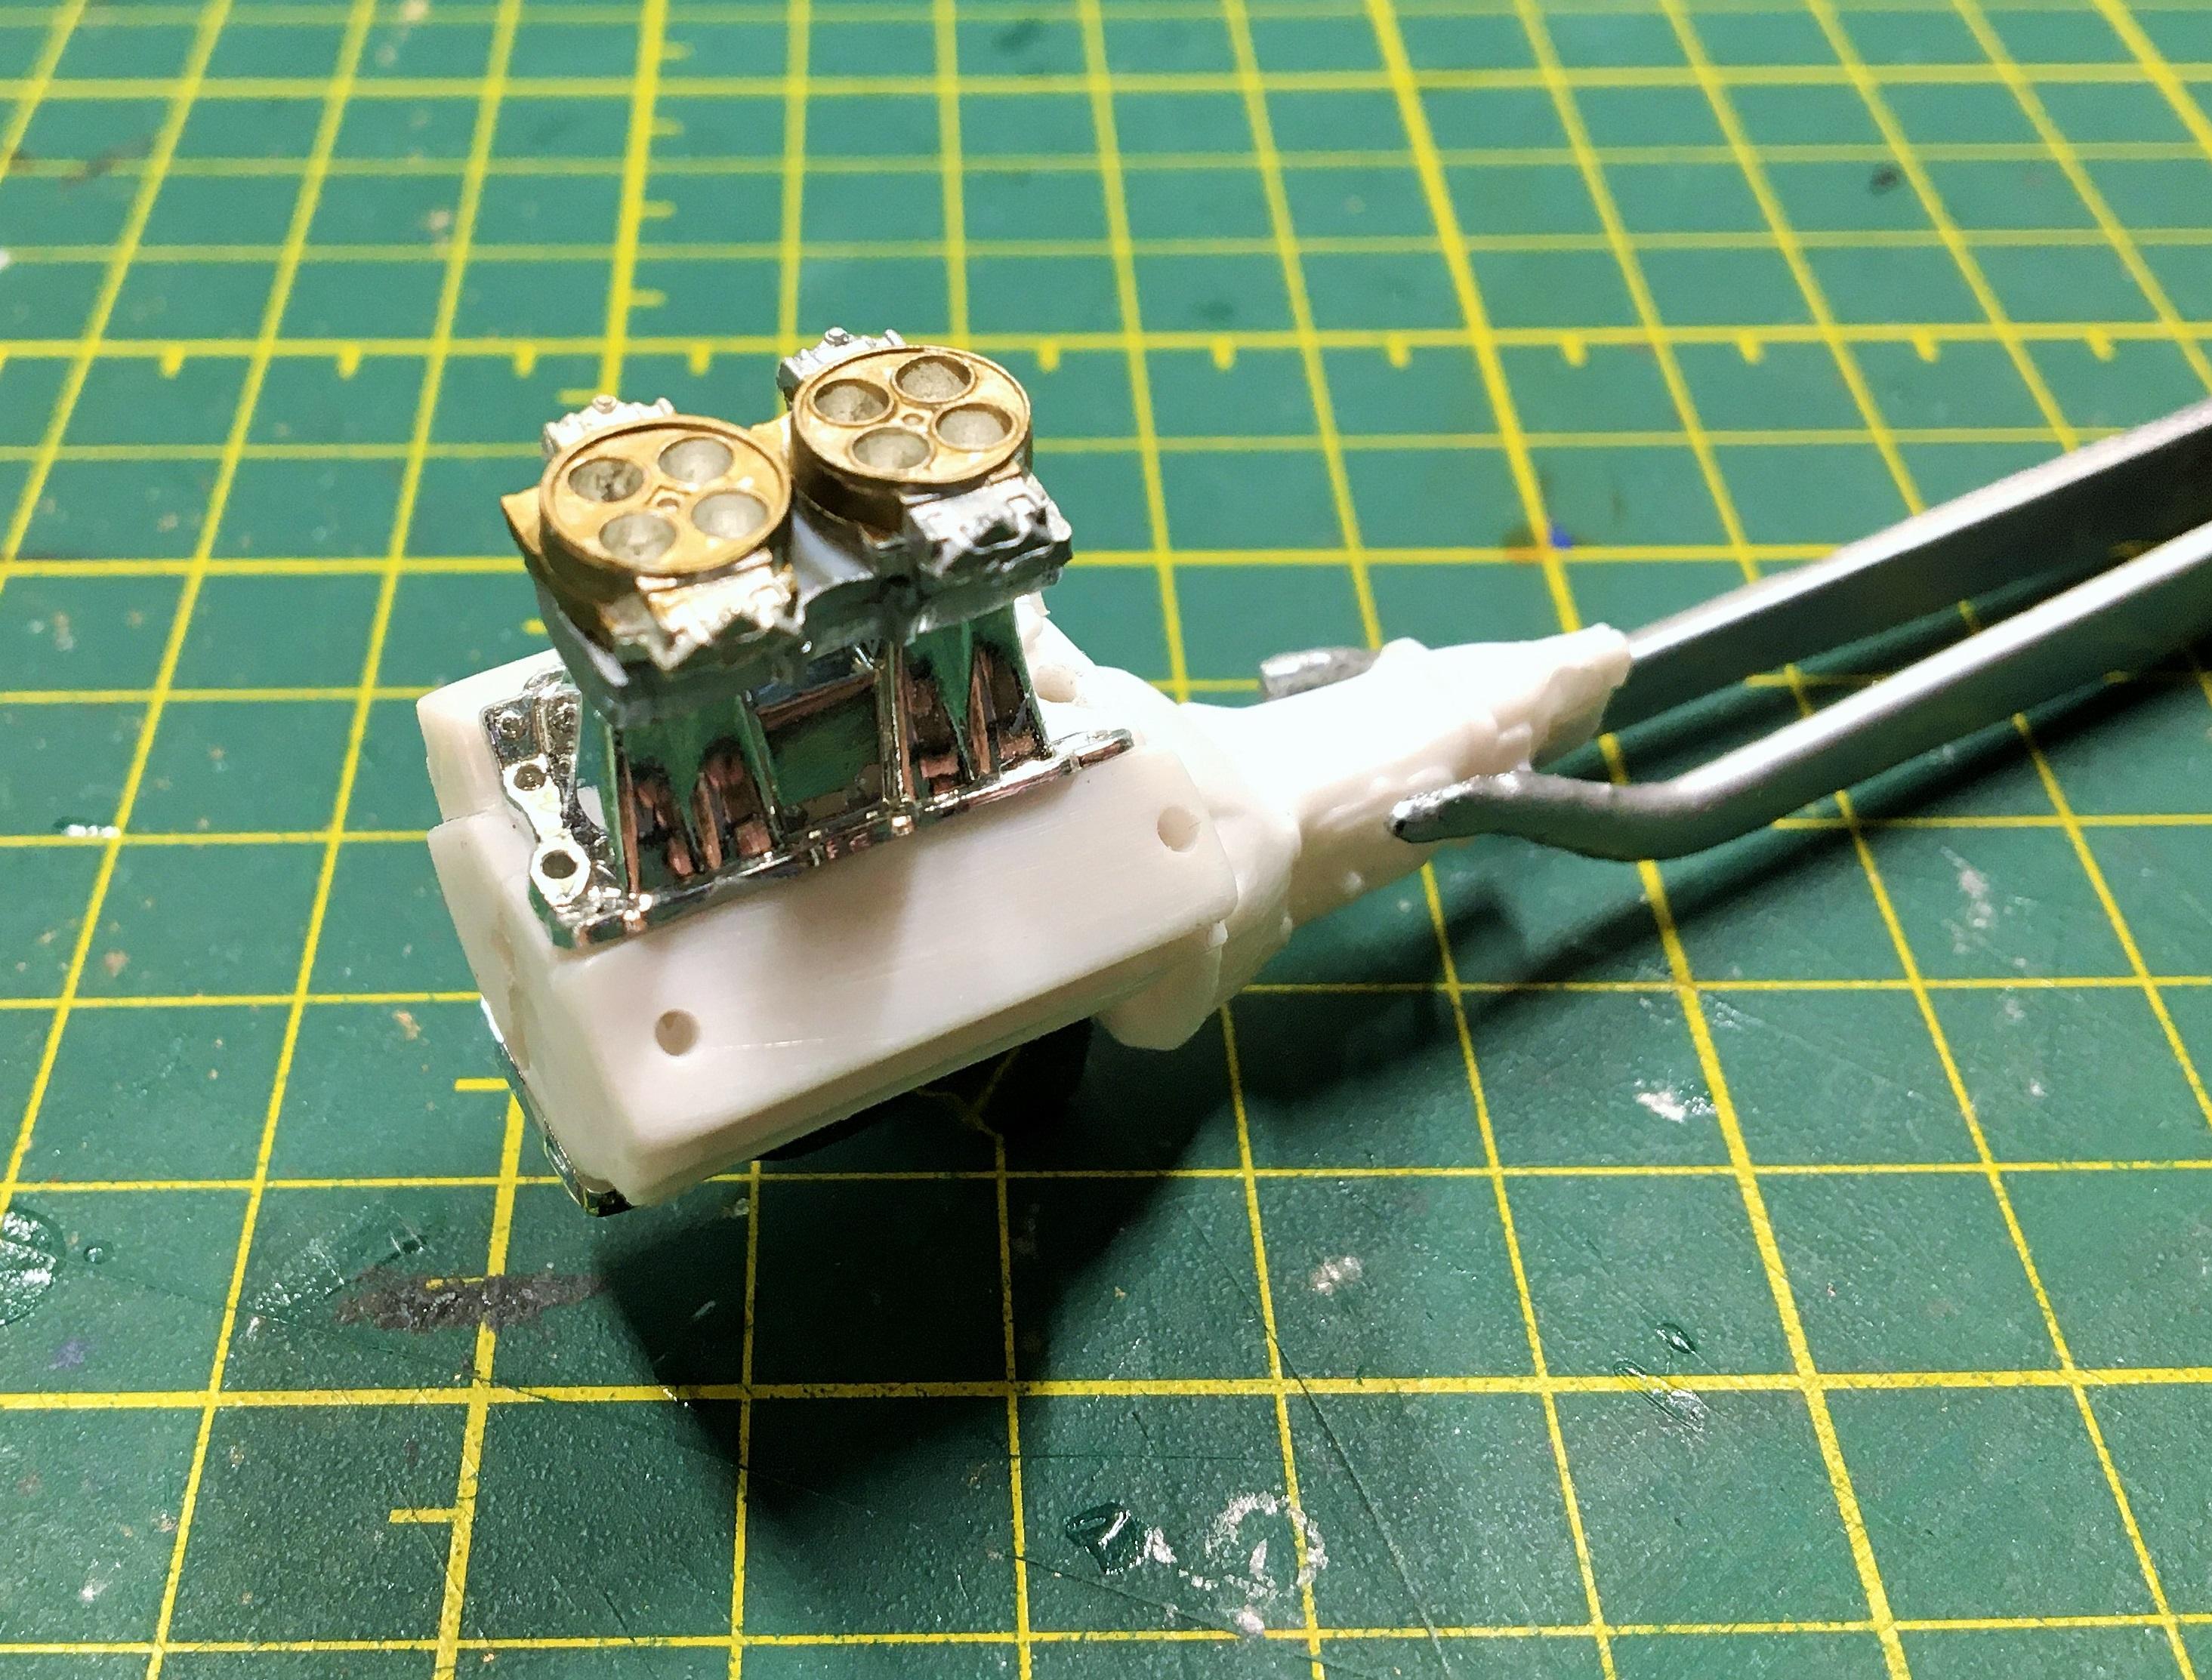
Here is a '57 Chevy gasser I recently started. There has been a lot done to it so far. I started with the MPC '57 Gasser as my base kit. I was wanting a combination of the 2 Lane Blacktop '55 along with some style and flash of Project X '57. So far I have done these modifications..................scratch built front gas tank mount, scratch built hood scoop, scratch built front suspension including the axle and spindle mounts using a combination of parts from the Henry J, a Tamiya on road car, aluminum tubing and some sheet plastic to make posable steering. Then I radiused the rear fenders and made new inner fender tubs from an old medicine bottle. The rear axle is a combination of a quick change rear axle from a Craftsman truck, the leaf springs from the gasser kit and ladder bars from a '41 Willys. The motor is is from the gasser kit but has a tunnel ram with metal carbs from Pro-Tech. The rear clicks are parts box with tire decals and the rims are from the Little Red Wagon truck. It wont have a front bumper at all. Its going along good.
-
I did sleep yes.....I just work really efficiently. I can actually build 2 models a week sometimes. This is my 20th build for this year. The way I did the masking was......I cut out the decal that goes on the whole side of the car.....used that as a template for masking off the white. It worked perfect and actually came out better than I thought it would.
-
And here is the finished product. This is my FIRST time ever doing a 1/24 scale model to this level of detail. The details are as follows......spark plug wires, fuel lines, brake lines, sheet aluminum chassis side panels, aluminum strips on fuel cell, parachute release cord and chute cables tied to the frame, seat belts made from tape and tied to the frame rails, scratch built injector lines, headers braces, photo-etch throttle linkage, tire decals front and rear, modified the interior "tins" to sit body lower. This took me about a week and a half to build and I am very happy with how it came out.
-
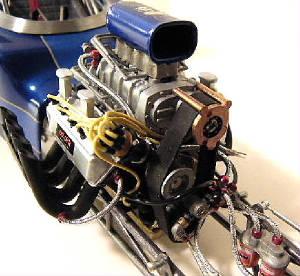
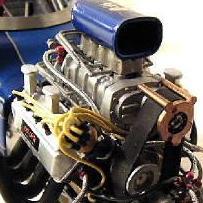
I should have been posting this as I went along, but I didn't. So....here are some pictures of the process. The car is finished....I just wanted to show a few pictures I took along the way. These pictures are of when the chassis was actually completely done....but I decided to pull the front suspension off of it and redo the tires (going from MH Racemasters to Goodyear) along with adding chrome valve covers and redo the spark plug wiring.
-
Revell visible v8
Wolfangel replied to johnfin's topic in All The Rest: Motorcycles, Aviation, Military, Sci-Fi, Figures
They one thing I did on mine...and it helped a lot. And this depends on if you can get it back out. Is sand the mold seams off of every cam lobe....and make sure it it smooth. The lifter will get hung up on that and cause problems. Also make you don't "flat spot" the cam lobes. Make sure they stay rounded. I used an oil that is made for slot cars, its light and doesn't cause problems. All of that makes a huge difference.