
Mj-Styro
-
Posts
524 -
Joined
-
Last visited
Content Type
Profiles
Forums
Events
Gallery
Everything posted by Mj-Styro
-
i like this set of pics!!!! I would really like to try my hand at those true flames!! i love that look!!!!!! Awesome!!!
-
1960 Edsel Conversion BMF'ed update 08-11-06
Mj-Styro replied to Mj-Styro's topic in WIP: Model Cars
Wasnt intending it to be but it sure does look like it! Also it is a great subject that being the restoration aspects to it....... Thank you everyone! I will try not to disappoint anyone............... I just like to share my restoration skills at work.weather its good or bad we all learn and i hope by me showing how i do it, It may help others! -
1960 Ranch wagon(80's street machine!) *UPDATE* 08-15-06
Mj-Styro replied to Mj-Styro's topic in WIP: Model Cars
Got a little model time this early evening...... i spent it well................ Made a fuel line from fire wall to Fuel Rail.....(High pressure Aircraft rubber line with AN fitting's red) LOL Added Air cleaner and V/Stacks to the carbs, and added valve stems on the tires so i can air them up now LMAO!!! :twisted: -
1960 Edsel Conversion BMF'ed update 08-11-06
Mj-Styro replied to Mj-Styro's topic in WIP: Model Cars
Gettin there guys!!!!! Still have the tips of the front fenders to BMF yet and i have added the wheels to get a mock up of it........ Heres the whole build if some one would like to see it........ http://public.fotki.com/drasticplasticsmcc...sel_conversion/ -
1960 Edsel Conversion BMF'ed update 08-11-06
Mj-Styro replied to Mj-Styro's topic in WIP: Model Cars
Polished my first Enamel paint job and didnt wreck it! Also seeings how i only got 4 back wheels i made two fronts by using a small plastic rod i cut it to lenth,and installed valve stems............ Slowly gettin there!!! -
Seems i have more stalled projects then i have finished! ACK! LOL Heres a link to check some of them out,will add more later...... http://public.fotki.com/drasticplasticsmcc...alled_projects/ First up is a pair of 1968 Galaxie's, one i am converting to a sport coupe,i used the roof from a 1970 Galaxie 4dr that was cut down the middle (long ways) then across (short way) then section back togather, the rear tulip panel and trunk (70% of it) is from a 1964 Pont GTO Monogram kit...... It has a resin hood and chassis...........I need to finish the C-piller inside trim and get it BMF'ed some day LOL...... The 1968 Sport roof was a basket case when i got it, since i have replaced the trunk lid with a resin piece,added a V/top (which needs work it was my first try at it) and ofcourse a few other things..........
-
1960 Ranch wagon(80's street machine!) *UPDATE* 08-15-06
Mj-Styro replied to Mj-Styro's topic in WIP: Model Cars
Thanks! its gettin there still alot to do with it yet.......... Here ya go, the first set of pictures is the build room,the last set of pitures is the storage room,hope these help...... http://public.fotki.com/drasticplasticsmcc...new_hobby_room/ -
1960 Ranch wagon(80's street machine!) *UPDATE* 08-15-06
Mj-Styro replied to Mj-Styro's topic in WIP: Model Cars
I couldnt help it! i grabbed the rattle can and my air brush jar and went to town Also painted the new Drag link,wheels (detail paint) and i was wondering if it could be done and i guess so! the white plastic rod i brush painted with gloss black,then dry brushed again quite a few layers of Aclad ll which really worked!!!! then hit it with stop light red,line was done with steel paint.......... Second Sorry for the bad pics!!! it got dark on me! LOL tomorrow or the next day i will wet sand with polishing cloths and get it ready for another coat of paint............ -
1960 Ranch wagon(80's street machine!) *UPDATE* 08-15-06
Mj-Styro replied to Mj-Styro's topic in WIP: Model Cars
dragged this old post back up with an update......... Made a Drag link from scratch tonight as well as a fuel Rail for the two 4's...... Also filled the door jambs with some two part putty (more on them at a later date).... And put in a Pre-wired Dist............... -
1960 Edsel Conversion BMF'ed update 08-11-06
Mj-Styro replied to Mj-Styro's topic in WIP: Model Cars
I rushed home from work! around 4pm (now 6:15) and rushed the body work! and used super glue to fill in some pin holes left from the glue etching into the plastic........reshoot it in primer acouple times! Hit it with dry 2000 grit to speed it up a tad! And here she is! Dusty Rose Pearl By Boyd's Enamel mixed 50/50 with Acetone and shot thru a Paasche Vl Air Brush.......... next up is to put the body in a cooker! and back the paint! then i will clear coat it with some Crystal Clear shot thru the aur brush....... Decided not to do the top in white just wouldnt look right....... -
1960 Edsel Conversion BMF'ed update 08-11-06
Mj-Styro replied to Mj-Styro's topic in WIP: Model Cars
Heres another update! i have it in acouple coats of primer,checked the body work and have it polished up and awaiting the next few coats......... Leaning torwards dusty rose with a white roof i think.......... -
1960 Edsel Conversion BMF'ed update 08-11-06
Mj-Styro replied to Mj-Styro's topic in WIP: Model Cars
Got alittle more done, Added the lower front piece on the passenger side, looks like it was broken off,and i couldnt find it in the box with the ragtop but i did find a piece that some one had cut off something else so i trimmed it to fit and filled it with putty,just got done sanding all the putty down and went thru the polishing cloths.....and after its bath i will see what it looks like after a coat of primer...... Here ya go! -
OOPS sorry! the bubble skirts are resin(came from F&F resin) not really sure what kit they came from............. the paint is Light green metallic from plasti-kote! back dated to 1990 never opened or used till i got ahold of it! LOL
-
Thanks Bill!!! The up-top is a inprogress Org made from resin ofcourse that i am modfying what it started as i couldnt tell ya..........picked up a bunch resin up tops awhile back......... Also i did get the one done for the med size chevys! the 72 olds i did was made from acouple resin up tops and will be casted at a later date. As-well as this ford one............. should have it done soon! reason being is most new kits or some kits didnt have any, and certain cars look very well with up tops.....
-
How old are you??
Mj-Styro replied to KT EASTMAN's topic in General Automotive Talk (Trucks and Cars)
Heres a hint.................... -
Got any pictures of the thunderbolt in the back ground! That looks neat!
-
WIP - pickups
Mj-Styro replied to Matt T.'s topic in WIP: Model Trucks: Pickups, Vans, SUVs, Light Commercial
'50 Ford pickup gets my vote! thats gona be stunning when done!!!! -
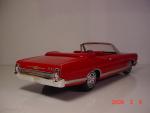
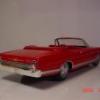
Finally after almost a year in the restoration stage i think i can call this one done!! Body,interior,chassis are Org to the this kit...I used one of the re-issued '69 Torino Fastback for the hood,scoop,front grill/bumper and modify'ed the rear bumper (by using the back side to a #11 blade i cut the taillight panel off).......... I think i did a pretty good job of it since i restored it once before back 4 or 5 years ago and lettin it go..........but i fiqured i had the chance to get it back and really wanted to this car justice the second go around......... The up top is a work in progress still afew things to do to it yet,here and there, but i wanted to get a picture of it on the finished car just for the look Need to find one more Cragar wheel for the front,seem to have miss-placed it...........
-
Just havent decided about the up top........(one of the things i need to do is touch up the old glue spot) LOL Thanks Walt
-
Thanks! Yes i know! but we are still unpackin from movin........and will have to get some new poster board :cry: still a few things to do tho like i said........
-
For the most part! still have a couple things to touch up paint yet........ almost got the best part of me building this! but i continued forward!!!!
-
Just used the kit chassis, the straight Axle came from a 67 falcon....... the rear tires are from nascar cars that was sanded down to look like slicks........... Your welcome
-
This started out as a F&F Resin kit and the donor was the 69 olds 442.... here it is with the Chrome parts Aclad ll...........its shaping up! Heres a handy little trick,i prowelded a piece of sheet stock to the back side of this firewall so i could get it in paint and not have to touch it up Picture of the engine bay while inprogress Pict of the chassis Here it is with chevelle decals Heres a resin up top that i modyfied with acouple other resin up tops to get a pretty close oen to scale.........thought i did pretty good! Sad to say i sold it on evilbay afew months back..........BUT! i have a 71 to build yet tho
-
Really tho! thats nice!!!!!!!!!!!!! lot of hard work so far and it shows!! 2300 ford would be different for power :twisted: but i am sure you have plans there! keep sharing it!
-
you could throw us off and keep the rubber band............. Duckin! :twisted: