

Ryan S.
-
Posts
922 -
Joined
-
Last visited
Content Type
Profiles
Forums
Events
Gallery
Everything posted by Ryan S.
-
Thanks Harry. I've got that link bookmarked, but totally forgot about it. But the quote from the text answers my question. Thanks!
-
If Future is used as a clear coat over white paint, will it yellow over time like some other clears are known to do or does it stay closer to true clear? Thanks.
-
Looks good. Nice choice of color. What paint did you use?
-
Stunning build, Tom. Loving how this one came out!
-
How about a blown 409? Just a thought. This is looking good. I love the 62's with the bubble top. You picked a nice color. Keep it going!
-
I'm going real also. Though if it's a model it's very well done. I'd love to ride that thing!
-
Got a little done friday. The chassis is painted, flat black. Got the tires and rear end in. Been working on a NOS plate system which is installed as well as the bottle in the interior. I gave the body a final couple of coats of paint and it's drying right now. Once that cures I can polish it up and hopefully put this one to be too. Thanks for looking!
-
Thanks for the comments everyone. This was a fun one to build. The 68 'bird is one of my personal favorite cars so I love seeing it on my shelf everyday.
-
 Now the trick would be to make all those purchases work together... *Military theme graphics on the drag car *Carbon Fiber Push-blade on the 'dozer *Combine them all and make a drag-racing-military themed-bull dozer!
 -
I'm really digging where this is going. Keep it up, I'll be watching for sure.
-
Little bit of a bummer, but not major. I was getting the little detail pieces organized, chrome and glass cleaned up etc. and I was going to put the tail light assembly together and black wash the recesses BUT, it turn out that one of the little, tiny tail lights is gone Not surprising I guess seeing that I started this kit something like 15 years ago and at least everything else is here. Not a big deal, I'll just have to fashion one our of some red sprue; sand it to shape and polish the heck out of it. ...dry paint, dry...
-
USAF Monster Truck
Ryan S. replied to Jim Gibbons's topic in General Automotive Talk (Trucks and Cars)
That thing is sweet. I'd love to see it built. Nice find! -
Thanks for the kind words everyone. I'm still literally watching the paint dry as we speak. Phillip, yours looks great too. Love it in red!
-
Thanks for the comments, guys. Cruz, I was looking at the pics and thinking the same thing, I'll have to find something a little bigger.
-
So I'm determined to wrap up some of these projects that have been hanging around for a while. Got the Nomad into paint and it's looking good. Reworked the radiator support and ended up setting the radiator forward a little and I went with an electric fan from M.A.D. rather than the motor driven fan for more clearance. This way I didn't have to set the engine back. The 454 is pretty much done. I gave it a little grease for that "driven" look. Smoothed the firewall a little. At this point, I just need to rub the paint out one if fully cures (yay enamals!), foil the trim and then final assembly really. Oh, and adjust the front of the frame to bring the front bumper closer to the grill. The thing really sticks out there and looks like a sore lip. As always, thanks for looking.
-
Finally wrapped this one up yesterday. Color is Boyd's Grape Pearl, the stripes are Testors one coat Graphite Dust. This was built pretty much OOB except the parts box wheels and tires and the valve covers and only some basic detail on the engine compartment. I did lower the stance a little bit as well. This was a fun build despite numerous paint problems. I'm really happy with how it came out. Thanks for looking.
-
Looks like a cool project. I like the idea of that 427 in there! You 'cuda is looking great too. I love the color combo! Can't go wrong with Green and Black!
-
Cheers to a local hobby shop
Ryan S. replied to Ryan S.'s topic in General Automotive Talk (Trucks and Cars)
I did, yeah! It's easier when you are born and raised there, but it's a great place to be from for sure. I only moved an hour south to be closer to San Francisco and yet, I still work in the wine industry in the big city. Not a bad trade off really. I've got family and friends in Napa so I'm still up there quite frequently. -
Awesome to know. Thanks a bunch!
-
Here's some more inspiration. First time I've been using the camera in the hobby room, on a Saturday so I got a bench shot. Lot's going on. Left side are my projects, 68 Firebird, 70 Chevelle. On the right are my girlfriends wip's; Mustang on shelf with decals drying, '69 Camaro and parts on the shelf as well, '70 AMT Charger (so much flashing everywhere!) that she's getting started .
-
I've got to give a quick shout out after a great experience at a "local" hobby shop this weekend. I say local because although I don't live in Napa anymore, it's where I'm from and I like to support the hobby shop there when I'm in the area (I only live about an hour away, now.) This was the case this weekend. My girlfriend and I went in to pick up some paints and some plastic stock as well as to pa-rouse the collection of kits on the shelves. We ended up with only paint and plastic this trip. While we were checking out, the gentlemen behind the counter was chatting with us and my gf was telling him how I've got her totally addicted to building cars and what she was working on and I was telling him how I was only back into the hobby for about a year or so now. With out any prompting, he offered us the 2010 Revell catalog as well as two back issues of... Model Cars Mag! It's nice to see great customer service is alive and well sometimes, and it's little things like this that will keep me going back there. So thanks and cheers to Loose Caboose in Napa for keeping us very happy customers!
-
Wow, been a while since I updated this one! So, I had some issues with the last paint job and the clear did not agree with the silver that I used for the stripes. Soooo...into the purple pond it went and I had to do it all over again. I decided I wanted the stripes to be darker, not as silvery as before,so this time I primed the body, then gave it a couple of thin coats of Testors Graphite lacquer, masked off the stripes, sealed with some clear, sprayed the purple, pulled the tape and sprayed a few final clear coats over all of it. Whew, lots of work but the results are well worth it. I'm more happy with it now that I have been yet. Here's a couple of pics and I think these will be the last on the bench. Once I can fully rub out the paint it'll be on to final assembly and then under glass. Thanks for looking and for following along!
-
stunning. This is coming along great. I'm really loving the color. All these 442 posts has me wanting to pick up one of these kits (like I need another at this point... )
-
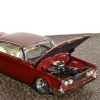
Been getting some work done on this one so time for an update. I got the ride height and the front suspension worked out finally. The chassis is now in primer with some putty on it to fix some blemishes. And from this picture I'm realizing that I've got some sink holes in the underside of the hood to fill and fix... Got the rims done and the disk brakes finished and in place. I had a set of photo etched brakes (on the smaller tires) that I used and for the rears I hacked off the calipers from a parts box set that had too-small of rotors and used some small washers as new rotors and voila, disk brakes! I also fabricated up a piece of aluminum tubing for the drive shaft,and I've got the rear end painted up. Here's a shot of the front of the motor with the belts that I kitbashed and fabbed up to work. I brought the alternator in a little bit and I'm going to try to fabricate a bracket of some sort. The carb's not glued on in this pic, but you can see the plate I made underneath it, gonna put some nitrous on this bad boy too! Thanks for looking. More to come as things progress!
-
That's a sweet looking ride you got there. Great color choices and the wheels really set it off and give it some muscle. Well done!