modelercarl
-
Posts
387 -
Joined
-
Last visited
Content Type
Profiles
Forums
Events
Gallery
Everything posted by modelercarl
-
Can't cut BMF nice and even?
modelercarl replied to Johnt671's topic in Model Building Questions and Answers
Thanks for the info! -
Can't cut BMF nice and even?
modelercarl replied to Johnt671's topic in Model Building Questions and Answers
Chillyb1...Where did you get that blade holder? It uses the standard #11 blade? -
It's a 1948 Chevrolet Aerosedan, Kit #98011 made by Galaxy Ltd. This kit is no longer in production and Galaxy has sold out. These are available on EBay once in a while but it seems that those of us who have some are not selling them very often so they are somewhat hard to find. This build is one of the best I have seen. It is a great kit to build.
-
Poor resin '65 Pontiac Parisienne Sport
modelercarl replied to 421gto's topic in Car Aftermarket / Resin / 3D Printed
I am getting prepared for a break in the weather to start building again and I have just received resin kits from Model Car World ('56 Chevy 2 Dr HT) and from Promolite2000 ("59 Ford & '59 Oldsmobile) and they are excellent quality. The exterior finishes equal a styrene kit and the interior resin has been held to a minimum and even been trimmed by the source. I have built resin kits from both of these sources in the past and have never been disappointed by the quality they furnish. Another plus is that both of these guys are a pleasure to deal with and always eager to insure customer satisfaction. -
Another Lonestar
modelercarl replied to ntc8733's topic in WIP: Model Trucks: Big Rigs and Heavy Equipment
I am finishing up my build of a Lonestar and noticed that you seem to have the same problem I am in that the hood assembly does not close properly leaving a big gap at the fender joint and also behind the air cleaners. I have noticed this on other Lonestar builds that have been posted. I certainly don't have the building skills you do and have pretty much given up on solving this, do you have any fix in mind? The ultimate position of the cab is determined by details 168 & 169 and the fit/location of other relevant details contributing to the "stackup" through the location of the hood assembly is very good so I don't really know where the problem comes from. -
This is off topic but I am always curious why someone lists an item on Ebay with a reserve price...why don't you just make the start price $120.00?
-
Wrong....Jim sent me the decals in a #10 security envelope with his sender address and my address both hand written and there was no postmark. My letter carrier even thought it was unusual and thought they were just covering up how long they held it before forwarding.
-
There is one listed on Ebay (toys & hobbies/dioramas) for $39.
-
Panel scribers.
modelercarl replied to modelercarl's topic in General Automotive Talk (Trucks and Cars)
Thanks for the feedback guys....I have practiced some more and have found that using a lighter touch improves the ability to scribe more accurate lines and I think that using some of the ideas put forth here will get me to where I want to be. Thanks again!!! -
I just got a panel scriber from Micro-Mark and need some tips on achieving straight lines on curved surfaces. I am building a '70 Pontiac station wagon by using the styrene front clip from the '70 Pontiac Bonneville/speedboat kit from Model King and a '65 resin Pontiac sta. wagon body from R&R resin. I have made the saw cuts and epoxied these two parts together (the match came out perfect!) and am now removing and adding features on the body to replicate a '70 model year. One of the problems I encountered on the resin body was that the door panel lines are not very well defined. I have practiced using the scriber on flat syrene sheet stock and with a steel straight edge as a guide it is no problem getting a good scribed line. I tried scribing on the curved surface of a scrap styrene body and can't get a good straight line without a guide. I tried using various masking tapes but the scriber would actually lift or move the tape edge.....no good. I fooled around with a scrap resin body also and noticed it is even more difficult as the tool really seems to "wander". Is resin more difficult because of some inconsistency in the material after curing? Any help is greatly appreciated..
-
Yeh, all over a $21 plastic model kit...ridiculous!! Some people need to get a life and relax...there is nothing on this kit that isn't easily remedied and I would suspect that as more production is done some, if not all, of these minor problems will be addressed. You have to wonder how some of these model builders are able ro turn out great looking builds when they voice their concerns about how shabby a job was done on this kit.
-
Just received a set of Michigan State Police car decals from Jim Botatis (JBot Decals) and as usual they are excellent. This is the second order from him and I suggested he update the images with the new changes that have been instituted by MSP for their car signage and license plates after I got the first set and he did his usual fine job with the revisions. Just want to pass on to anyone thinking of ordering from Jim that the Canadian post office took 2 months to the day to get this order to me and I noticed with this order that the CPO does not use postmark dates any more so you don't know how long they take to forward mail...poor service for sure. I recommend using JBot decals for their quality but you should plan on waiting a significant amount of time for delivery after ordering....just a "heads up" for everyone.
-
As a freshly licensed driver in 1956 in suburban Detroit and with my first car in 1957 ("53 Studebaker) I can tell you that the Olds Fiesta 3 bar spinner was by far the most popular hubcap around. They were a hot item with thieves and you could usually find someone while cruising the many drive-ins around the Detroit area who was selling them out of his trunk. Perhaps next in popularity was the Plymouth "Chinaman's hat", I think a '57 model year, and then probably the full moon finished out the most often seen hubcaps. A few guys who regularly ran their cars at Detroit Dragway or Milan had unadorned steel wheels. You would see some baby moons but not many. This prevailed pretty much through the end of the 50's and very early 60's. I went into the service in '61 and when I returned to the States in '64 these hubcap styles had been replaced by the Cragers and other specialty hubcaps.
-
Rollback kit
modelercarl replied to sstacey47's topic in WIP: Model Trucks: Pickups, Vans, SUVs, Light Commercial
Definitely interested in buying one of these kits...how much including P&H and how do I order? -
Dearborn, MI model car club
modelercarl replied to modelercarl's topic in Model Club News and Announcements
Thanks for the reply George. I will try to make next month's (I have put in my calender), what time do they usually start? -
Anyone know if the model car club in Dearborn, MI is meeting at the ice arena this coming Friday (7-22-11)? Id so, what time? Thanks for any info.
-
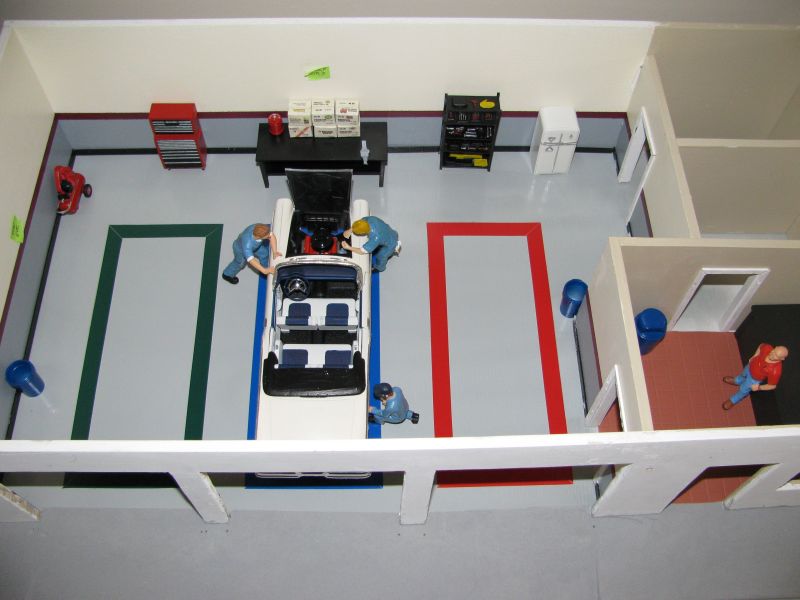
I appreciate all of the comments. Ed, I understand what you are saying and I envision this garage diorama acquiring some clutter on the floor, some shelving going up on the walls with stuff on them, maybe some posters, some misc. car parts, etc. Maybe I will even find something to add to the outside too. In the past couple of days after getting my first diorama this far I am realizing that this is really a WIP, so hopefully in the coming months it will acquire the look of working garage, still well maintained, but a working garage. Thanks again for the comments.
-
I bought the wood at Loew's and it was labelled "poplar" You're right the grain is beautiful, a shame to cover it all up. And you are right again about the look being sanitary. I based this on a garage we had back in the late 50's in the town where I grew up. A guy had a 2 stall and did pinstriping and flame jobs along with light body and interior work and his place was always immaculate....no painted floors but other than that pretty sterile. It did have some "clutter" in it which I will be adding as I find stuff for the garage and I think in a year or so it will not seem so "sterile". I wanted the garage to replicate that early one from my memory but also I am one of those model builders who doesn't want to weather and trash a build so that it looks like it is all "used up" so I "did my way"
-
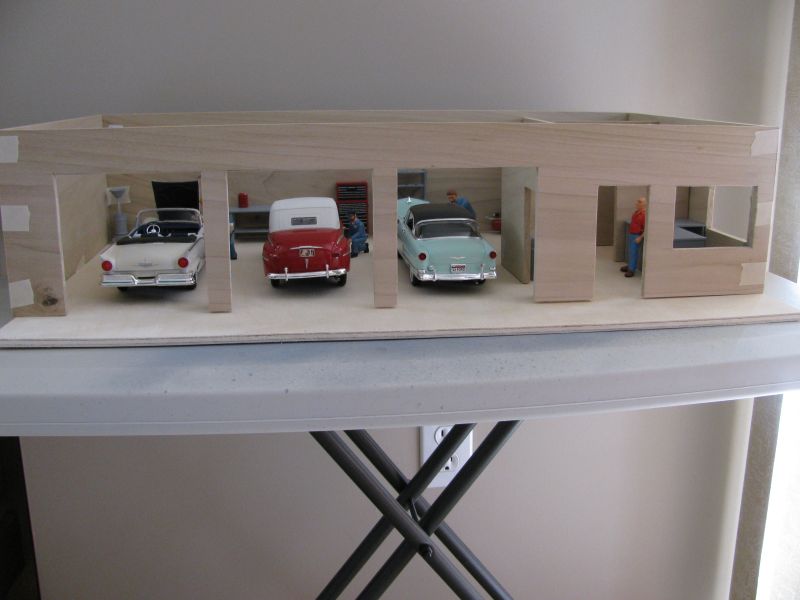
I used a belt sander held at a very shallow angle to form the incline, just kept moving it back and forth until I had what I wanted. A lot of places around here have the posts protecting the door frames...some show evidence of being hit so I guess some mechanics get a little too agressive when moving cars into the garage! I think I would be pretty upset to take my car in for service and find out some wrench jockey has banged it up hitting one of those. Originally I planned on all the walls just being screwed together so that I had the option of removing one or two for pictures but with the bricking system I used it required the mortar between the joints so I couldn't do that. I didn't cover the rear wall so I was able to leave that removable and I am hoping when I get more detail and clutter in the garage it will work out.
-
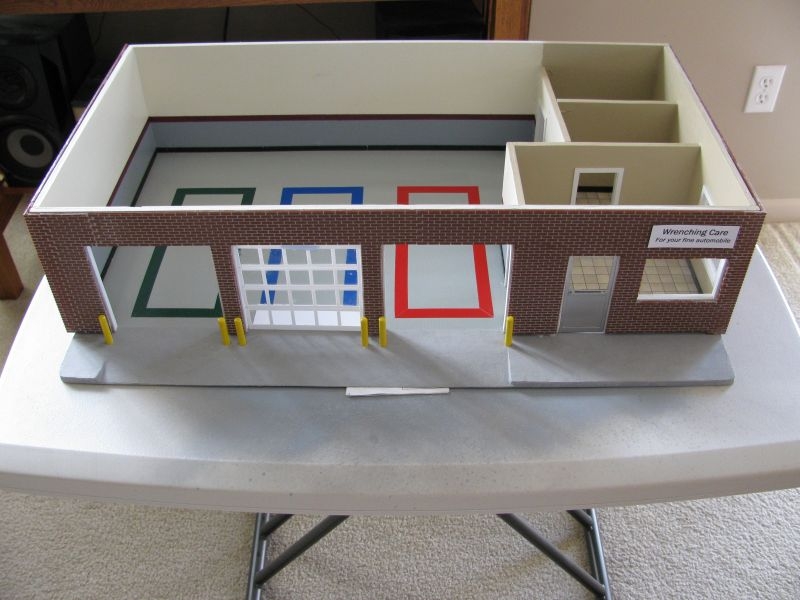
I have posted some earlier pic's of this project and some members have asked for updates. I have finished the main "structure" finally, the interior walls, floors, and have the exterior "bricked". Have some doors to build, install window lentils, and "cap" the walls. Then I can detail the interior at my leisure as I find or discover things to add for some "character". FYI...the walls are 1/4" poplar, I used Sherwin-Williams Color-To-Go samples for wall paint, Tamiya Texture Paint Pavement Effect (light gray) for the front apron, Valspar spray gloss interior/exterior for the "epoxy" floor and colored electrical tape for the colored parking guidelines. The doors are clear .06 thick clear acrylic cut/trimmed to size with .020 thick styrene strips added for the finished effect. The brick is Houseworks Brickmasters common joint brick #H8206 (corner pieces and sheet) and Miniature Brick & Stone Mortar #0R599 (Grey). All in all I am pretty happy with this project....never done anything like it before and I think it will be a good setup for photographing future builds and I imagine it is a "living" project, because I will always see something and think "hey, that might work in my diorama"

-
How to print your own decals! - My Method
modelercarl replied to Drake69's topic in Tips, Tricks, and Tutorials
Thank you!!! I have been intimidated when it comes to making my own decals...tried a few times but not knowing exactly what steps to use I never had much success. I am going to try this and I certainly have some confidence in the outcome now. Thank again. -
I have been plugging along on a diorama while also trying to finish some builds and thought I would post a couple of pics. During the 50's in Garden City, MI where I grew up there used to be a detail/custom shop that looked pretty much like this, the only major difference, it was a 2 bay shop but I figured as long as I was going to build one I would add a 3rd bay to display more builds. I remember quite a few of us would take our cars there for pinstiping by a guy named Paul Hatton. He also did some flaming, but too much...I think he made his real money lettering and pinstriping trucks. He wouldn't let you pull your car into the shop if it wasn't clean. I think I have got the worst of it whipped...waiting for some "bricking" materials to get here and then will determine which way I want to go and that will let me know how to finish framing the windows and bay door openings. I have got the material for garage doors but am waiting to see what the final opening size might be before building them up.
-
I know I am being redundant with this but I received my (2) Lonestar kits a couple of days ago and have been going through the one that I opened. I am not a "major league" truck builder, having built only (6) truck kits so far and still am developing my skills. I do consider myself more than capable and thoroughly enjoy (as a hobby!) building 1/24 & 1/25 scale cars and trucks. I am a 70 year old retired machine tool design engineer with 35 years experience with high volume engine, transmission and other auto/truck component manufacture. I feel compelled to add my praise and thanks to Moebius and ALL those personnel involved in bringing this kit to market. In my opinion, Moebius has raised the bar to a level that I would not have thought possible just a year or so ago. CONGRATULATIONS!!!!! Unfortunately this kit has created an even greater anticipation for receipt of the (2) Hudson and (2) Chrysler kits I have on order, and any other future releases from Moebius. Thank You Moebius
-
We finally got some decent weather today so I was able to work in the garage. I have always wanted a garage diorama for staging models for pictures. I bought a styrene kit but wasn't happy with the narrow walls and it really was just a little too small in just about every dimension. I drew up what I wanted, bought the wood and cut it out this morning. The pic's show it mocked up. I am pretty happy with how it came out. Now have to prime it and then start painting the interior walls, figuring out how I am going to finish the exterior walls (would like to have a brick finish), and the floors. I have bought some sample pieces of brickwork, concrete and tile to help me make up my mind. I have been buying some 1/25 resin accessories and painting them in preparation for this. There is some very nice stuff available for these garage dioramas. There are some great dioramas already posted on here that are useful for ideas too. I will post more pictures as I go along but this is going to be a slow project.
-
Absolutely beautiful!!! You got every detail perfect, very tasteful!