

codie27
-
Posts
515 -
Joined
-
Last visited
Content Type
Profiles
Forums
Events
Gallery
Everything posted by codie27
-
ford 9000 project
codie27 replied to showbuilder's topic in WIP: Model Trucks: Big Rigs and Heavy Equipment
very nice work!!!! you got a good eye for the little details,makes all the difference. how many hours did this take to build? -
new pics/update
codie27 replied to codie27's topic in WIP: Model Trucks: Big Rigs and Heavy Equipment
thanks for your comments, i agree with you, the u series is one cool looking truck, after spotting one on an image search, i decided the only way i would get to have one would be to make it, as i dont think anybody sells them in kit form, and as far as i know the 1:1 were never brought here to australia. i wish i could help you out with reference material for dimensions etc, but i refered to the pics i found on the net of various angles and then built it by guess work and a careful eye. as i used the lindberg dodge kit as a donor, i used the chassis as a basic template for length and width. and for the cab i used a peterbilt 959 cab as a guide for width and height,as its 1/25 scale[roughly]. are you planning on trying your hand at one also? if you have any more queries just ask and i will try help you out as best i can. thanks, codie. -
new pics/update
codie27 replied to codie27's topic in WIP: Model Trucks: Big Rigs and Heavy Equipment
Thanks for looking and your comments guys.I am considering a trailer for it but am a little unsure of what type would suit it,any suggestions or pics? Thanks Codie. -
white road commander
codie27 replied to codie27's topic in WIP: Model Trucks: Big Rigs and Heavy Equipment
They were quite a common sight here,I remember seeing them all the time as a kid in the 80s,not very common these days though. The paintwork on this one is based on a pic,of the 1:1 sitting in the dealers yard in Sydney, brand new, that I found on the web. -
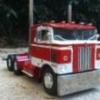
I had posted this one a while back but the photos were small and not very clear,so I decided to post them again. For anybody who missed it,it is a 1951 Autocar.The entire cab and chassis is scratchbuilt from evergreen sheet and tube,cut to make c channel.I used a lindberg dodge for its wheels,axles, suspension and also the motor. All the chrome bits and pieces except for the horns and marker lights,were out of my parts box. It was quite challenging getting the curves on the roof and nose right. Most of the evergreen was heated with a lighter and quickly moulded before it cooled,then filled with auto body filler,and sanded,sanded,sanded,sanded! I cut the tops off pin heads and used them for bolt detail on the chassis,i think it was nearly fifty all up! The interior I had to just take a guess on,coz I couldnt find a single picture anywhere of this particular series,so is loosely based on other Autocars of this era. The only bit in there that was really fiddly was making and glueing the seperate spokes onto the steering wheel,cutting the original tri spokes out as i went,so as to keep the centre where it needed to be. All up it was about three weeks solid work. One thing that i really love about these trucks is the factory suicide doors,never seen them on a truck before.Anyway follow the link and have a look,leave any feed back,good or bad. Codie.My link
-
this is another conversion cab i bought from aussie resin models.to complete the conversion i bought an amt freightliner and used basically every thing but the cab,[bigger plans for that one]. as it is the aussie road commander i had to convert the steering to rhd,quite a simple task really. because it was such a simple conversion the only scratchbuilding i had to do was to make some strong hinges to tilt the cab, the side steps on the cab,some thin evergreen cut to spell out white across the visor, and the crossbrace/chain rack between the exhausts,which was really only to get them to sit in line with each other. kind of a fluke,coz i reckon they look really cool now. scratch built wipers were very fiddly but easy enough. the interior is mostly what came from aussie models but uses the freightliner seats steering column and wheel,gear stick and seats but i also added a c.b radio,speakers[painted light lenses] and a couple of scratchbuilt lights. i used appliance white and red mica with some pinstriping to finish it all off and bare metal foil for the chrome work.anyway,follow the link and have a look,leave a comment here in the forum,good or bad. cheers,codie.My link
-
a little help?
codie27 replied to codie27's topic in WIP: Model Trucks: Big Rigs and Heavy Equipment
no i dont,i will try and set one up and see how i go.better than trying to resize every pic i want to put up.thanks. -
this is my latest project,still in progess,been about 3months now.it is the revell aussie kit,i have converted it to an sar,shortened the chassis 30mm,i scratchbuilt the bonnet,cab and sleeper mounts,the battery boxes,the skirts under the sleeper,opened the doors,recessed the firewall,added the sleeper from the revell snap kit and fully detailed it with storage cupboards painted to look like woodgrain and made a small lcd tv then used grey felt to simulate carpet.the gauges and switches have all been detailed with gold paint.outside it is painted to look similar to the gold nugget edition,night stalker2,built by the klos boys here in oz.was a real pain to get right,but was well worth it,especially after using bare metal foil for a lot of detailing,good stuff! i still need to make rear guards and a few other pieces and possibly a correct looking bullbar and have it tilt with the bonnet.

-
ok guys i think i have solved my uploading drama,follow the link and see for yourselves.feel free to leave any comments and feedback in this forum,enjoy.cheersatkinson 3800
-
a little help?
codie27 replied to codie27's topic in WIP: Model Trucks: Big Rigs and Heavy Equipment
one image is 565kb and the other is 95.4kb,not having much luck. -
ill try get more pics up soon of this one,having trouble with uploading limits.
-
can anybody help me out?i am having trouble uploading pictures,i have a memo telling me that i have used 1.89 of my 1.95MB global upload quota. what can i do to get my pics up? cheers codie.
-
My linkhello again to you all.after an absence from the forum i thought i might share some of my latest builds,starting with this resin cab from aussie resin models.i used an aussie kw for the conversion and shortened the chassis 40mm to get the right proportions,and used the wheels and running gear also.i had to scratchbuild a number of parts such as th air con unit,grab rails on the cab,air cleaner mounts and intake,air lines and coils,battery box[with batteries]chain box,rear tail light bar using the lights from a volvo kit.tanks are from the peterbilt firetruck that have the chrome removed except for the straps and painted silver.the spot lights are king bee headlights from a 32 ford kit.the interior also has quite a few scratchbuilt parts such as the roof and walls being lined with grooved evergreen, rear air vents,air con vents,overhead console with speakers and c.b radio.even added a pine tree air freshener and coke can for added charm.it is probably my favourite truck in the collection now as it is based on the actual truck[as i remember it] my dad drove back in the nineties.was one cool truck! hope you guys like it,cheers.
-
Query for mackinac359
codie27 replied to codie27's topic in WIP: Model Trucks: Big Rigs and Heavy Equipment
Tim Thanks for your reply.I think i may have to do something similar to what you did with yours for the frame and suspension and base my instrument panel on a K-100.I will still have to scratchbuild my cab, I think I would have that done in the time it would take to have a resin cab sent to me here in Australia,and probably be cheaper too.Anyway I will post some pics of the progress once i get started for feedback and tips for anybody interested. Thanks,Codie. -
Hey there Tim, I have been having quite a good look at a lot of your model trucks on your site and noticed your black 53(?) bullnose Kenworth,very, very nice.My next project is to scratchbuild one of these for myself, so I was wondering if you may have a couple of pics that you could post of suspension and interior of these old beasts that i could use for reference,as I have been having a hard time finding any.I would like to try and build it as close to the real trucks, that were offered from Kenworth in 1953, as possible.After the comments i have got about my Autocar,I am getting excited about getting this project started. Anyway hope you can help,thanks in advance. Codie
-
Here is my first attempt at something a bit more ambitious than something straight OOB, its first build was out of the box,as it is the revell fire truck kit. The truck was trashed during the process of moving house and was beyond restoring,so i decided to have a go at a bit of custom and scratchbuilding work.One of the main mods is the chopped roof and the doors converted to suicide,was very fiddly trying to get the door frames looking right,I also added some cab extensions below the doors. With the bonnet i wanted something a little different so i butterflied the top,so now it opens upward and tilts forward.I made new wheel openings so the front wheels fit real snug.This was also my first attempt at lowering a truck,took a whole lot of time but in the end it sat down nice and low and the front bumper i made helps it look real close to the ground.The rear guards are also scratchbuilt and roll right around the tyres.All up there was around 120 hours in this ones build time.Hope you like it.
-
my first scratch build
codie27 replied to codie27's topic in WIP: Model Trucks: Big Rigs and Heavy Equipment
thanks for the comment, you have made my head swell up now i am planning on scratchbuilding a 1953 kenworth bullnose next,i am just trying to find a few more photos for reference. maybe that will top this one. -
-
this is my 28 ford delivery, converted to the delivery from the pick up kit from revell. i decided to base it on one of the many matchbox diecast models i had as a kid. i decided to lightly hot rod it with the dropped front axle,leaving off the side curtains and the chrome dress up parts for the engine and the painted steel rims with 40 ford caps. the delivery box i made from evergreen sheet. quite a simple and effective build.
-
that is a very nice job you have done there ed,the shopfront has that nice,period look about it. very cool.
-
custom 359 pete
codie27 replied to codie27's topic in WIP: Model Trucks: Big Rigs and Heavy Equipment
haha,yes it does sit very low,it is riding on airbags.i was a little unsure about the brass at first,but they really do set it off. -
my first scratch build
codie27 replied to codie27's topic in WIP: Model Trucks: Big Rigs and Heavy Equipment
thanks for getting back to me on that one. i will have a look around for that,hopefully i will find a copy somewhere. -
my first scratch build
codie27 replied to codie27's topic in Model Trucks: Big Rigs and Heavy Equipment
thanks a lot .the open windshield is the old style air conditioner!! i love that sort thing about old cars and trucks -
my first scratch build
codie27 replied to codie27's topic in WIP: Model Trucks: Big Rigs and Heavy Equipment
thanks a lot!! all these comments are getting me all inspired to get my next project started,a 1953 kenworth bullnose -
my first scratch build
codie27 replied to codie27's topic in WIP: Model Trucks: Big Rigs and Heavy Equipment
thanks, i have seen a lot of your work on your site,very nice,so your comment has given me a swelled head!!


