

Tony Bryan
-
Posts
367 -
Joined
-
Last visited
Content Type
Profiles
Forums
Events
Gallery
Posts posted by Tony Bryan
-
-
nice inside detail, look forward to following this project
-
Evan, any updates for your project???
-
Well, that is a interesting question, and as Matt said,Patience is a virtue!!! I think you have to look at it several ways, some people are happy to build out of the box, with paint they get close to hand, and that is fine, as long as they are happy with the results, who cares what or how they build as long as the person that is building is happy, now then you get some one that is well conversant with a truck, and is happy to scratch a few parts, mind you, not everyone has these skills, and some are better than others at it, but the point is they have a go, then you get others that are just so stupid with detail, that want to include every possible thing they can think of that with show the skills of the builder, and start to make things work, like drop down visors, wind up windows, moving seats, working suspension, door locks that work, tank caps that screw on,working brakes, drums that come off to show, fluid levels that show, and making all the correct rubbers for the tanks, and that dam list just gets longer and longer, all time consuming to say the lest, and when your skills get better, you start remaking what you have done already
How long does it take????, for me so far close to 800 hrs and 3 years to build just 1 truck, and it is not even half way...... here is a photo of the original

-
Evan
I wouldn't use the plastic check plate, I really don't like it, and for a couple of reasons, 1st, you have already set the side rails, these determine what you can use on the inside, so if the plastic is a1mm thick then things start to go
hay wire, the photo etch is only 0.1 mm, so no change to what you have done, 2nd the detail is better, compare the 2 and you will see,
I am sure that the rail of the Auslowe kit is piano wire, but any stiff wire will let you make clips and stuff, K and S have a great range and by clips I mean these,
these are on my Scona Jeep, (Canadian for Dolly, could be a American thing also)and they are for holding pins in the turn table, much like a C clip, this is part of my oil field build, this matches onto a Klaus Clever picker trailer which will be changed a little
Now, my view may not be your view, so do let me talk you into something that you can't afford, or don't like, the choice is really yours, I just like things done the way they should be,
and trust me, this really plays with the head....... a lot
Any questions just ask them, there are plenty here that will help, and if I can answer I will
Have FUN
-
That is a cool little project
-
Evan
Yes wood would look good, but this is where research comes into play, if you look at websites like Freighter, or Bryne, Hallmark, or Titan ,Smith's up in Qld you will see with road train trailers, the majority of them
are checker plate, not many these days are wood, so here is the thing, where or what era is your model based on, if it is early then all the suspension ad rims will have to be changed, but if it is late model then
you have the lot already and the deck should be check plate,
Nigel does sell a very nice check plate from KFS, but I do prefer the Kangaroo check plate, the nice part about check plate is it looks like it should be there and you can "fake" the weld lines, and then you can make all the clips etc out of Piano wire
Keep your updates coming
-
Will be nice project to keep an eye on,
Is there any legal limit to what tractor can be stretched to in the states?, or is this dependant on each state?
-
That is Cool,
-
Nice, like the combing rail,
coming along very nice
-
Some one should start a list of all the people making 1/16th parts,
So what has happened to the KW????? do they still have the moulds or have they been sold??
-
Thanks Tony, I am only having the two trailers at the moment. Already learning from my mistakes. As I'm new to the truck side of modeling what do you suggest for a strengthing method? This is something I am not rushing and I want to take my time with but will be taking photos and posting them as I go along and maybe get some advice. Any advice would be grately appreciated.
Evan
K&S do a real nice brass strip that fits perfect on the inside of the rails, this would be your best bet, and glue it in with epoxy , then it will never move, do this before you put the frame together, the brass is nice and thin, so doesn't change the width that much, maybe 0.5mm
The hardest part of this kit is fitting the windows, what a pain, cut it out and file it to fit, this will take a while, but worth the effort
-
Sergey
Nice job on the engine, the fan belts look great,
and there is nothing wrong with being a perfectionist, and this is the closest I have seen to it http://www.henribaigent.org/Ferrari/ferrari.htm make sure you read the story, as this man far out does the famous Mr Wingrove,
not to say that Gerald Wingrove does make a beautiful model, Henry Baigent does it with more detail enjoy
-
Evan
Nice job so far,how many trailers are you doing?
When you start your titan, make sure you add some strength to the frame the Italeri frames don't like the weight of the resin as I imagine you are doing the full set up, big sleeper,and lots of tanks, the Titan is not a easy kit
but am sure you will do a nice job of it
-
That is a cool build I like it,
Have you any plans to add some stripes to the guards???
They do look good as a daycab
-
It's all in the detail, and you nailed it to the wall with this build
-
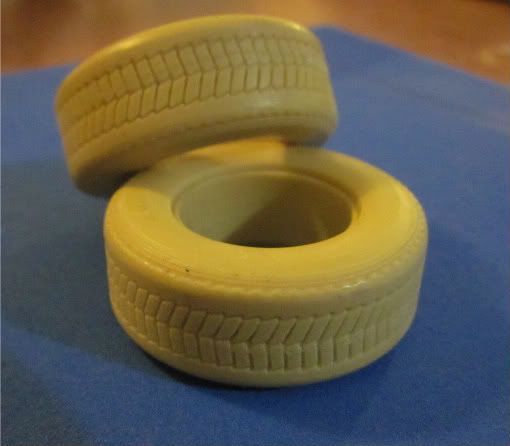
Does anyone know who cast rubber like the KFS tyres are, as these don't have problems with resin rims
I want to have the above tyres cast in rubber instead of resin
-
WOW
That is a nice build,
-
Sergey
Nice work as usual, but need to ask why the decals? thought it would have been easier to paint the cab, then add the decals as needed, it must be hard to get the
cab colour to the chassis
I don't have a picture of the cab over clutch set up, only the conventional W model, but it would be on the same sort of set up, with brackets and levers,
would be much easier to do hydraulic set up with a slave cylinder
Got any more up dates?
-
Love the detail,It is always good to do your research before you start building, that can be just as much fun as building itself
-
Jim
The red plastic is not a problem at all, you can easily paint it white with NO bleed through, use a neutral colour as a primer, desert sand works great
As for the Alcoa, try a small drop of Future to help seal them onto the rim
Nice paint choice by the way, that will look real cool when finished
-
Sergey
The Chassis has come up great, look forward to seeing it come together,
As for the mechanical clutch it runs rod and lever type arrangement, I will dig out a pic for you of the W model
Tony
-
Now that is a nice build, I like it
-
Tony, are those Evan's tires?
Jim No these are not, he doesn't make anything like these
Hey Tony, who sells these tires?
Ben
Send me a email, and I'll hook you up with a set
-
You could always buy the right tyres, these are the same tyres as on the box of the Can do
These are a lot better than what comes in the box.....


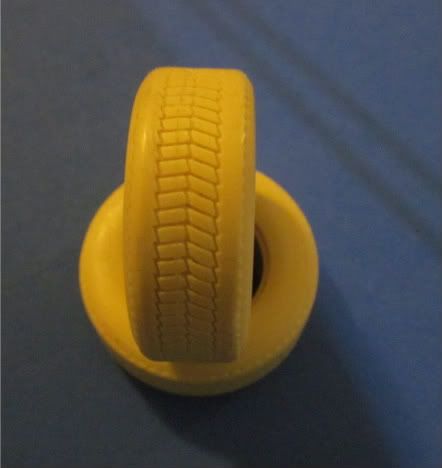
My little project
in WIP: Model Trucks: Big Rigs and Heavy Equipment
Posted
Dirty it up, throw a load on it, and it is ready for a trip to the out back,,I think it will look great with the check plate before you cut and fit it, make sure you have it so that 1. you get the best cut out of the sheet, and 2.you don't damage the edge,
I use the dept of war and finance's dress making scissors they have a nice sharp edge, but do this FIRST, check which way the scissors cut if you use this method, and cut the sheet so that the waste curls, and not what you want to use
Have fun
With the photo,s, check what your host up loads them at, you may have to change the settings