

tyrone
-
Posts
2,781 -
Joined
-
Last visited
Content Type
Profiles
Forums
Events
Gallery
Everything posted by tyrone
-
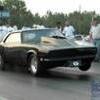
1969 Camaro outlaw prostreet updates 11/19/11
tyrone replied to tyrone's topic in WIP: Drag Racing Models
thanks for the comments fellas, well the interior is almost done I got the nos bottles and brackets done, I"ve also plumbed it and got on the on/off valves, the engine is pretty much done also, I added the dry sump tank, and hoses, still need to put in the radiator, and some carb linkage, next up is the seat harness, steering wheel, and then on to the trunk area, thanks for looking and comments welcome... -
63 Pro Mod Vette.......Updated 09/28/14
tyrone replied to 1320wayne's topic in WIP: Drag Racing Models
Oh yeah Wayne this is looking AWESOME... I see your gonna build the chassis on this bad boy, nice start it all looks good.. -
Very nice,neat and accurate build I love it....
-
1969 Camaro outlaw prostreet updates 11/19/11
tyrone replied to tyrone's topic in WIP: Drag Racing Models
yeah they are Darryl and they are really nice,... -
1969 Camaro outlaw prostreet updates 11/19/11
tyrone replied to tyrone's topic in WIP: Drag Racing Models
Thanks Brett,,,more updates a little later... -
1969 Camaro outlaw prostreet updates 11/19/11
tyrone replied to tyrone's topic in WIP: Drag Racing Models
heres a few more.. -
1969 Camaro outlaw prostreet updates 11/19/11
tyrone replied to tyrone's topic in WIP: Drag Racing Models
I also got the ignition coil mounted, got my brake lines ran, and got the chute handle and cables done, heres some more pics.. -
1969 Camaro outlaw prostreet updates 11/19/11
tyrone replied to tyrone's topic in WIP: Drag Racing Models
Thanks for the kind words fellas, Dave, much thanks, RG, one of these days I'm gonna have to take a stab at one of those turbos, trying to round up some good reference pics, so many projects, ideas and not enough time. I did get some work done on this one I got the electronics made up and installed, I really like the new decal sheets from Slixx, there's some of everything on the sheets, here's a few pics thanks for looking and comments welcome..... -
1969 Camaro outlaw prostreet updates 11/19/11
tyrone replied to tyrone's topic in WIP: Drag Racing Models
Thanks Greg, Bart and Thumper, I appreciate the kind words..... -
1969 Camaro outlaw prostreet updates 11/19/11
tyrone replied to tyrone's topic in WIP: Drag Racing Models
here's a few mock ups.. -
1969 Camaro outlaw prostreet updates 11/19/11
tyrone replied to tyrone's topic in WIP: Drag Racing Models
Randy for my A/N fittings I use pro tech pieces whenever I can, I also use very small craft beads and crimp tubes from Michaels, they work well also and they are alot less expensive, so it does not hurt as bad when you loose them by dopping them on the floor lol..Not knocking Charlie's stuff at all, but doing the nitrous type engines takes a lot of fittings... here's a pic of them. Well I got the front brakes/rotors done, I used Detail Masters drilled rotors and cut the calipers off the rotors in the pro stock cutlass kit, then I used my dremel tool w/the cutting wheel on it and carefully cut a groove down the middle so the rotor fits inside, I used a piece of round tube to make my hubs, I added a piece of stytrene to the face and drilled a hole through the center to fit on the spindle,,black paint and bolt heads from pro tech. I'll get my braided hoses on tomorrow, thanks for looking and comments welcome... -
1969 Camaro outlaw prostreet updates 11/19/11
tyrone replied to tyrone's topic in WIP: Drag Racing Models
Thanks fellas for all the comments, flattering comments from heavy hitters like you all are, means alot, I didnt get a whole lot done tonight, kinda thinking of what I'll be doing next and also trying to decide on a color. Bart I'm not going to add any styrene pieces to this one I kind of like the stance like it sits..here's a few pics w/primer on the body... -
The paint job is killer on this bad boy for sure Darryl, I like how you've got the front tires positoned also. Nice car...
-
63 Pro Mod Vette.......Updated 09/28/14
tyrone replied to 1320wayne's topic in WIP: Drag Racing Models
Nice touch on the wheel wells Wayne... -
1969 Camaro outlaw prostreet updates 11/19/11
tyrone replied to tyrone's topic in WIP: Drag Racing Models
first mock up pic.. present mock up pic... -
1969 Camaro outlaw prostreet updates 11/19/11
tyrone replied to tyrone's topic in WIP: Drag Racing Models
Charlie, Joe, Darryl ,Randy and Chris, thanks alot fellas I appreciate it. Well I got the fuel lines on the engine almost done only two more lines from the nos solenoids to the firewall are left, then I'll start on the oil lines and then on to the brakes. More updates soon thanks for looking and comments welcome -
This is some amazing work the rear end, and brakes, and brake lines look INCREDIBLE......
-
1/16 Scale Army Vega Funny Car - Finished 10/14/2018
tyrone replied to Mooneyzs's topic in WIP: Drag Racing Models
They look awesome Chris, keep the updates coming... -
1969 Camaro outlaw prostreet updates 11/19/11
tyrone replied to tyrone's topic in WIP: Drag Racing Models
Thank you Andy, Charlie and Bart, well I got a little more done I've got all my fuel lines done and some of the oil lines done, the demon cards and hose are from Charlie at Pro Tech I decided to go with black lines on this one so I colored the hose with a black sharpie, here's a few pics, thanks for looking and comments welcome... -
1/16 Scale Army Vega Funny Car - Finished 10/14/2018
tyrone replied to Mooneyzs's topic in WIP: Drag Racing Models
they look nice man,,,great job... -
This is a Super Nice build....
-
1/16 Scale Army Vega Funny Car - Finished 10/14/2018
tyrone replied to Mooneyzs's topic in WIP: Drag Racing Models
Your doing some AWESOME work on this one Chris.....those are going to look KILLER.... -
63 Pro Mod Vette.......Updated 09/28/14
tyrone replied to 1320wayne's topic in WIP: Drag Racing Models
I totally agree pro stock wing, keep it going.... -
I totally agree with what everyone has said, I personally think that if your building a promod, then dont use the pe grille. I like the ideas you have going on for your build, I have built a quite a few of these type builds, and have also used the Ross Gibson engines and I love them, they look real nice when detailed up. As far as sanding them down I take a coarse sheet of sand paper and tack it to a flat board and then sand each piece that needs it across the sandpaper on the areas where it will be glued to another part and they usually are fine after that.. When I started opening doors on my builds I always wanted them to be functional and removable, my method is simple, may not be the prettiest but it works. I use plain old staples for my hinge/arm,, they are mounted by either drilling a small hole through the bar on the cage, or if that does'nt work with the build I am doing then I'll add a slightly thicker piece of styrene to my area that I want to mount the door, drill 2 holes for my staples and mount them there, here are examples of both. drilled through the bar. and on my latest build I added styrene to give me a place for hinges to mount. Once this is done I take a piece of my styrene rod #221 and drill a whole in the center of it and make sure that the staple fits nicely and turns, too big a whole and there will be to much movement uo and down with the door when opening, test fitments alwaysd are good, once I cut them down to size I cut them down to size and the place them on the staples first then I apply some glue to the area on the rod the will make contact to the inner part of the door, and the tape them shut the body, after the glue is dry they usually work fine with only adjustments needed as far as either pulling out or in the staples to make sure the door is flush with the body...here's a few more pics. Once this is done the will open and then you can also remve the doors when they open by simply pull up on the door when its open, If you have any questions dont hessitate to ask..
-
1969 Camaro outlaw prostreet updates 11/19/11
tyrone replied to tyrone's topic in WIP: Drag Racing Models
Brad I usually super glue or plain ole testors glue for plastic models in the orange and white tube I personally have had no issues with either, Well I got the front and rear suspension finished and installed, I also put in the rack and pinion and steering shaft,, here's a few pics...