
aksarben
-
Posts
209 -
Joined
-
Last visited
Content Type
Profiles
Forums
Events
Gallery
Everything posted by aksarben
-
Cool, thanks for all the great comments everyone! Wasn't really goin for the European look but I guess that works... Steve
-
Lookin good man, that engine is clean n mean! Steve
-
'29 Ford pickup "Deep purple"
aksarben replied to ERIC L's topic in WIP: Model Trucks: Pickups, Vans, SUVs, Light Commercial
Wow! Very cool and the color is outstanding! Steve -
-
-
Hi everyone. Just got a new camera and thought I would share this recent build . This is from the parts box, the main body is from a 32 Ford I think from about 15 years ago, don't remember the brand. The body work forward of the doors is completely scratch built, including the grill which took about 6 tries to get it where I liked it. Wheels are from the concept Camaro, rears are set in the front wheel shells and tires of the Jada Mustang. Fronts are the Camaro front tires. Engine is the LS from the Wagon Rod. Interior is all scratch built aside from the steering wheel, which is from unkown origin but modified with an aluminum center cap and a fabbed aluminum stalk. The suspension is the one that goes to this body but highly modified, scratch built coilovers, home made rotors up front and various brackets etc. Solder exhaust, scratch built magna flows, aluminum tube tips. Comments, questions, criticisms welcome. Steve
-
If you are looking for a seat belt set with a lever lock, you might consider these. http://www.radubstore.com/index.php?main_page=product_info&cPath=89&products_id=200 They are for 1/32 aircraft models but I have used them in a 1/24 race car project and I think they scale out perfectly. They are very nice. They only come in singles. Shipping is very fast I recieved my set in about a week. Here is how they look in my project. I just painted the straps and supplied my own logos. Steve
-
Wow, looks sweet. That engine bay detail is incredible and the interior is very clean and crisp. Steve
-
I love it! The blacked out features are cool, that air cleaner rocks and those wheels are I think a perfect match. A little different from the factory stock Judges seen. Steve
-
Very sad to hear, I hope you will find the strength to carry on. Steve Deisley
-
Killer! That paint looks dripping wet. Very inspirational and an unbelievably fast project. Steve
-
Thanks all for the great comments. And thanks to Tony for pointing out certain issues, I'll have to convert that steering stalk to a tilt wheel... Steve
-
The fuel and air lines were secured to the chassis with small strips of aluminum from pop cans as well. I built the fuel pump from stock plastic along with photo etched bolt heads. The gauges were printed out on my home printer on glossy photo paper, then glued into sections of polished aluminum rod. Thanks to everyone for your great feedback, it's nice to hear what other builders think of this project. Steve
-
prop shaft? if you mean drive shaft, then sort of. It is alluminum rod with u-joints from a Revell 69 Camaro kit. I used sheets of aluminum cut from a can of Dr Pepper. I glued them to precut pieces of stock plastic for rigidity. Steve
-
-
more pics..
-
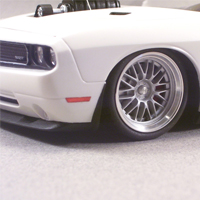
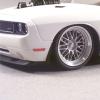
Hello everyone, I'd like to share my latest build and about a year long project, just worked on here and there between other builds. Revell kit Bumpers narrowed scratch built front and rear spoilers grill opened wheels are the optional set from the Revell 2009 Challenger kit, painted with MM titanium, modified to fit Pegasus 22" sleeves aluminum lug nuts punched out from pop can hubs shaped from sections of solder rear tires from the Wagon Rod seats from Tamiya skyline engine from the 2009 Challenger also, solder headers, pulleys shaped from solder ProTech braided lines throughout inner fenders are cut from Dr Pepper cans frame sections and air suspension from the Wagon Rod kit shocks are aluminum tubing fuel cell is Dr Pepper as well more photos here http://www.ravenart-...1970_challenger questions, comments, criticisms are most welcome Steve
-
FULL BUILD REVIEW: 1/12 Revell Shelby Mustang GT500
aksarben replied to David Thibodeau's topic in Car Kit News & Reviews
Man this is looking sweet as hell! Youv'e done an excellent job of making the belts look like they are seperate from the pulleys, in fact I'm not even sure their not. I just don't understand why anyone could bitch about this kit after seeing your build. Steve -
Yep, you got it right with the first one. I just placed the inner wheels in the sleeves at different depths for the front than the back. All 4 sleeves were the same. Thanks Cesar and Hugh! Steve
-
Looking good so far, keep it up. Glad to see young people getting an interest in the hobby. Take your time and take pride in this one. Steve
-
Pretty cool. What is that color? Steve
-
Hi Alexandre, this project is really shaping up nice and I love your scratchbuilding efforts on the inner bed, as well as the frame and suspension. Great work. Hey I was interested in asking where you aquired the 392 HEMI engine, looks like it may have been an aftermarket set from seeing it in that bag, but I also see from the shots of your work desk that you have some molds so maybe you cast this engine yourself? Steve
-
Wow! Love that paint job Man and the engine is looking great! I'm looking forward to seeing this progress. Steve
-
I just used a light wash in the handles, trunk and doors. I did also scribe the door panel lines deeper with the back of an Exacto blade first. Thanks for the boost but I am NOT by any means a pro, this kit fell together. The fit is incredible especially the glass. Awesome engineering if you ask me. The only thing I wish was different is that they made the inner grill a seperate peice, it would have been way easier to detail paint. Steve
-
Well I dug up the Viper's remains and you were right Jason, it was the 1/24 scale Maisto. Steve