Talbot90
-
Posts
88 -
Joined
-
Last visited
Content Type
Profiles
Forums
Events
Gallery
Everything posted by Talbot90
-
Britsh capri,American power..Its Finished....
Talbot90 replied to 1 bad55 stan's topic in WIP: Drag Racing Models
Hi Stan, Awesome looking build mate, Just a quick question, Where'd you get the resin blower pulleys??. Ive got several builds I can use some of those on. cheers Ian -
thought Id try making some aluminium interior door panels. Ian
-
Hi Superbike Shaun, mnwildpunk Thanks for the feedback ..Yeah, Im not happy with them either. Ive tried wrapping wire some around a machinesscrew and theyre looking promising. cheers Ian
-
Thanks guys,. .yeah the chop is the first ive one on a later body style. Bit of a mission but its getting there.
-
well I thought this was going to be a quick and dirty build but for some unknown reason i thought i'd open the doors, build an interior and create some stronger hinges. Ive built hinges from styrene before, but they've been way too delicate and I didn't like the usual wire hinges. So it came to me tonight to try a different way. Im pretty happy with the result too. Once straightened slightly and painted they'll blend right in and give me the strength i was looking for. thanks for looking Ian
-
shattered safety glass
Talbot90 replied to spawndude's topic in Model Building Questions and Answers
Hi I used 80 grit sandpaper scuffed across the window in two diagonal directons, then I just used salt so replicate the glass. cheers Ian -
Tried my first chop on a body style other than just a straight drop. I think Ive over chopped it compared to the pics of the original car, but I like it! :-) Body now in bare primer. No filler yet. Lots of work on windows and roofline to go..as well as lots of filling and sanding as well.
-
Hi David, I had the same problem on my last build ..so I used some Evergreen rectangular bar and formed an unjoined circle and put it inside the tire. The pressure of the Evergreen pushing out took the concave out of the tire. cheers Ian
-
Hi Guys, Thanks form the ideas regarding bodies. Ive found the Revell 37 Ford Coupe at my LHS and its close enough for me. :-) Ive rebuilt the front shocks and steering components. Also fabricated a rear end setup. I don't have any pics of the rear so again its an educated guess. I'm happy to be corrected by those more learned than I. :-) Everything shown is just loosely mocked up and Ill be chopping the body later this weekend. thanks again for looking and your suggestions. Ian
-
Thanks for the suggestions guys. At closer look I like your idea krassandbernie, it'll save me a heap of work. cheers ian
-
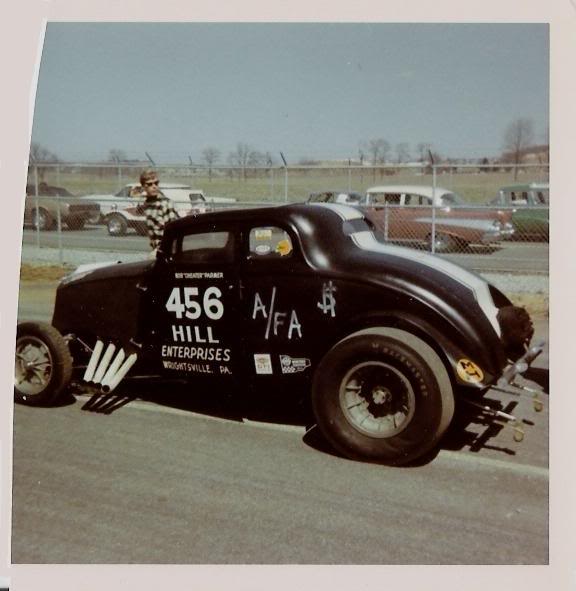
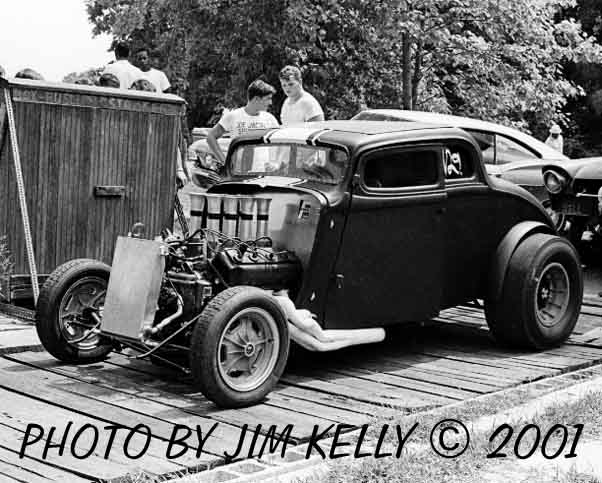
Hi all, I like building obscure race cars. This one caught my eye, with its use of a coil sprung front end rather than the usual leaf springs. Again it seems like there is only the one photo of it in this configuration with these unusual headers. I started by building a chassis based on the best guess principal. Im happy to alter it if someone has any better info. Since I cant find a 36 Dodge body anywhere, Ive used a 39 Chev Coupe from my parts bin. I'll reshape the B Pillar and windscreen areas to better match the Dodge. Very much still in the mockup stage. thanks for looking ian
-
First attempt at a burnt out car
-
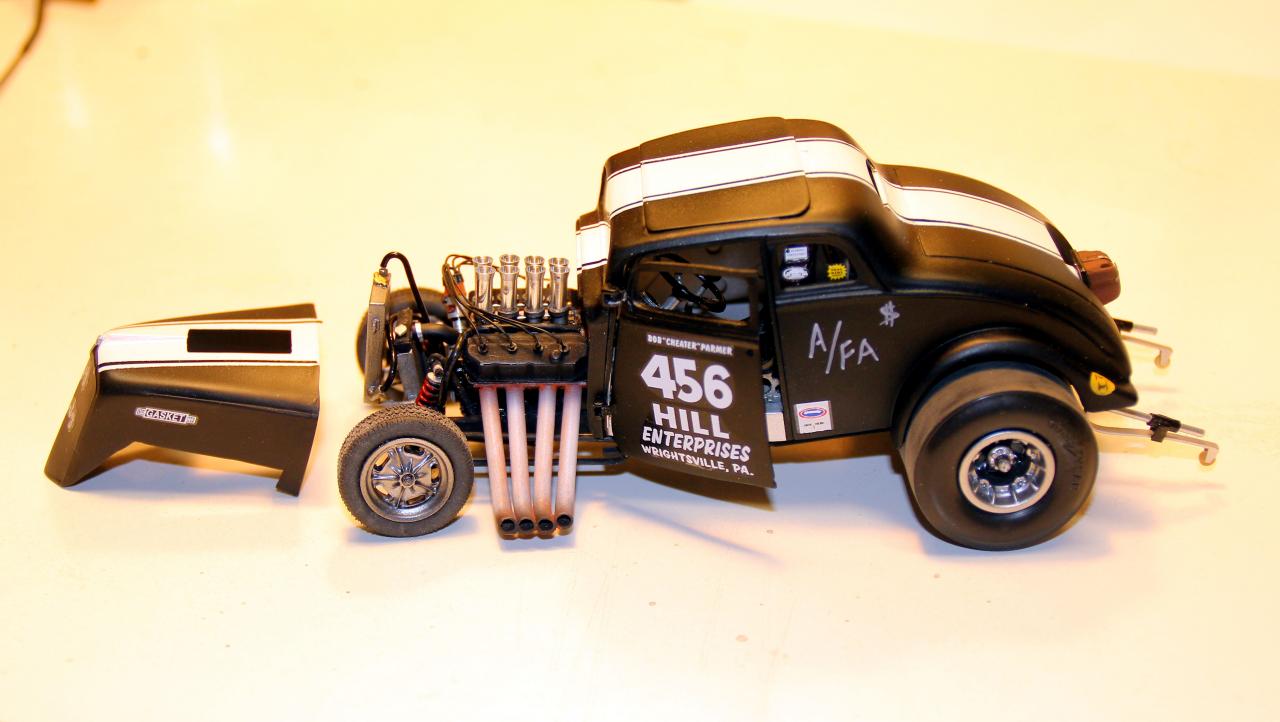
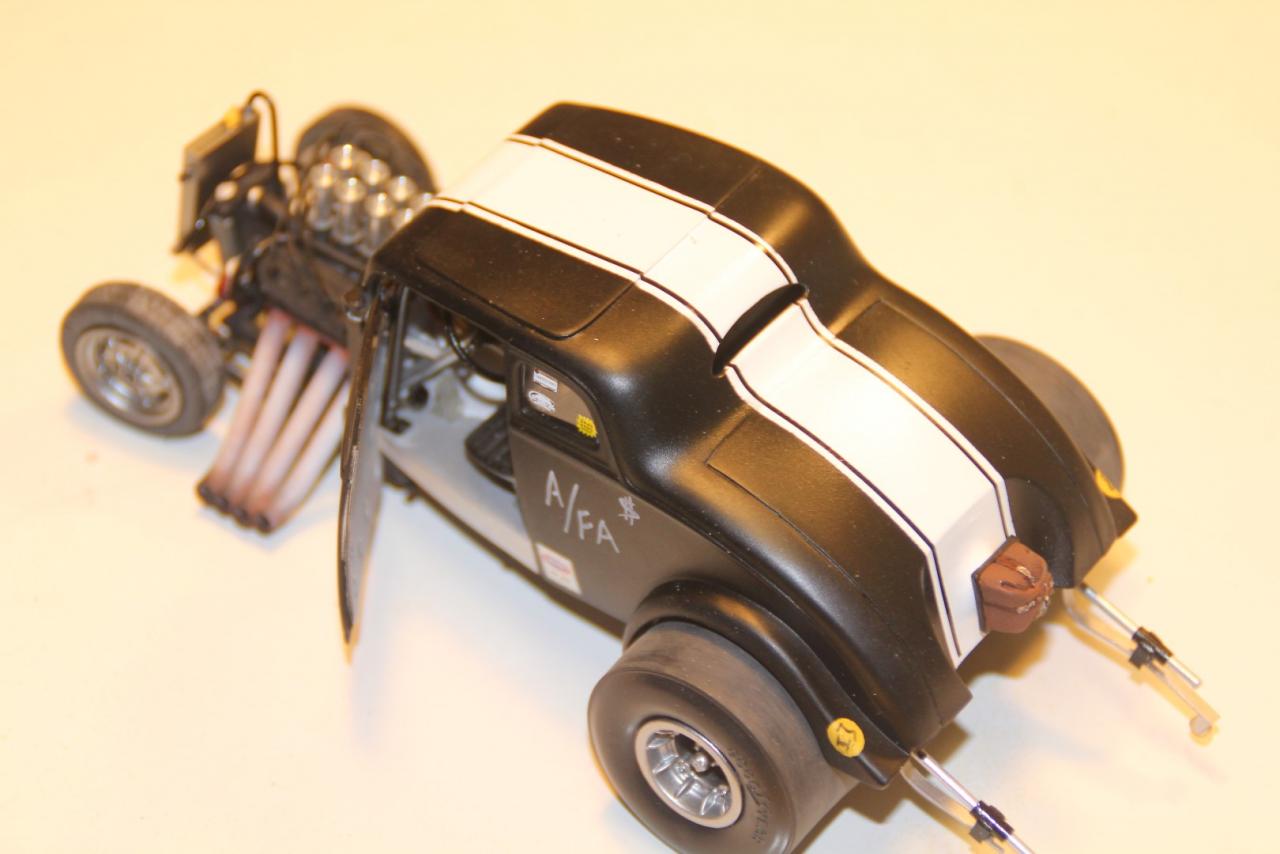
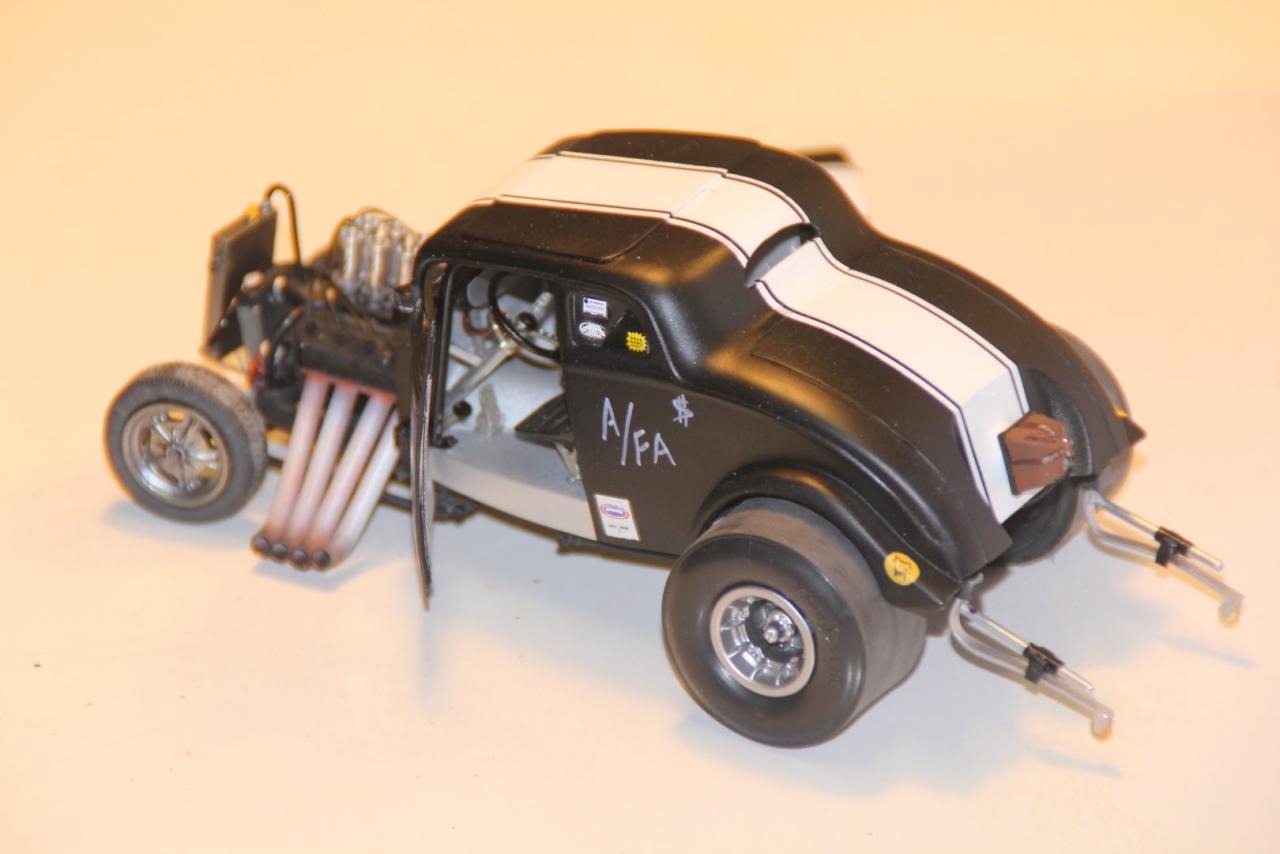
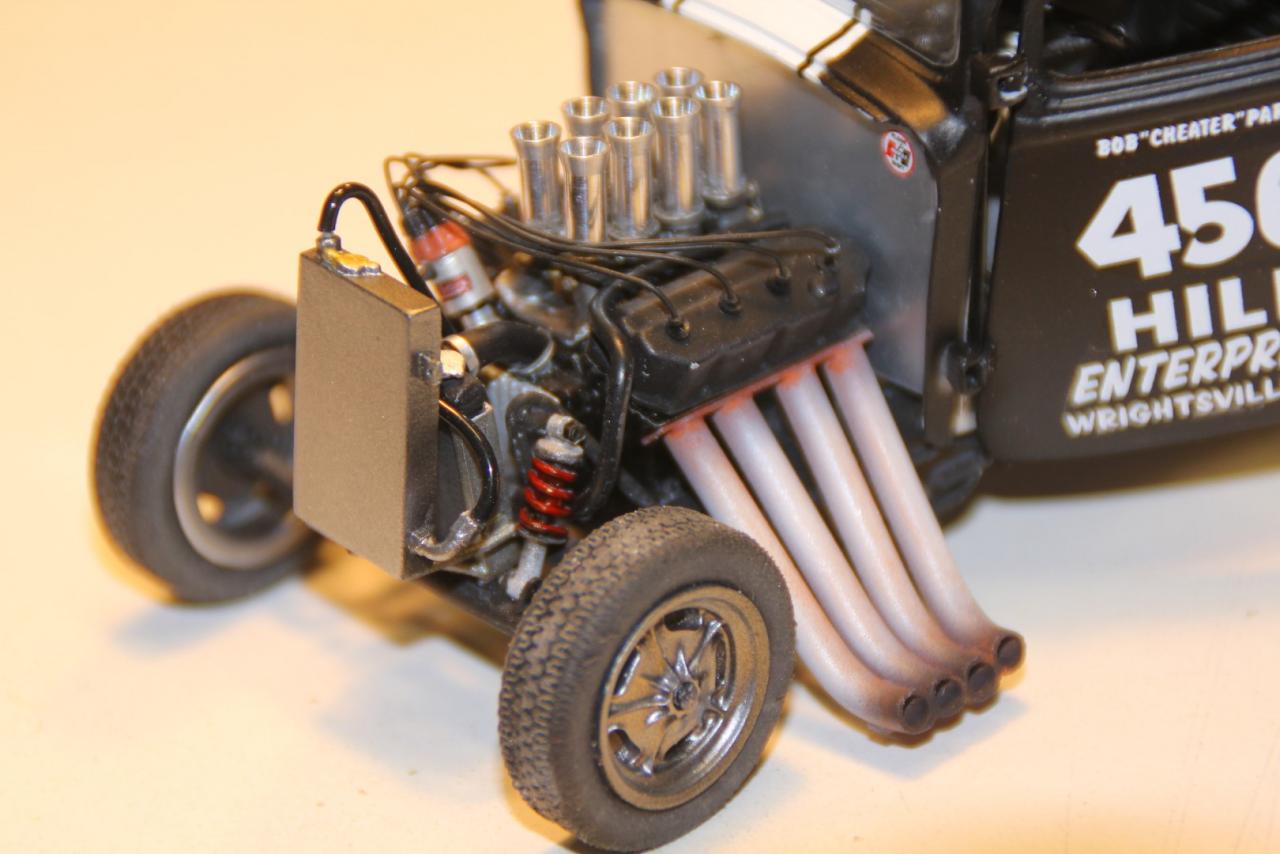
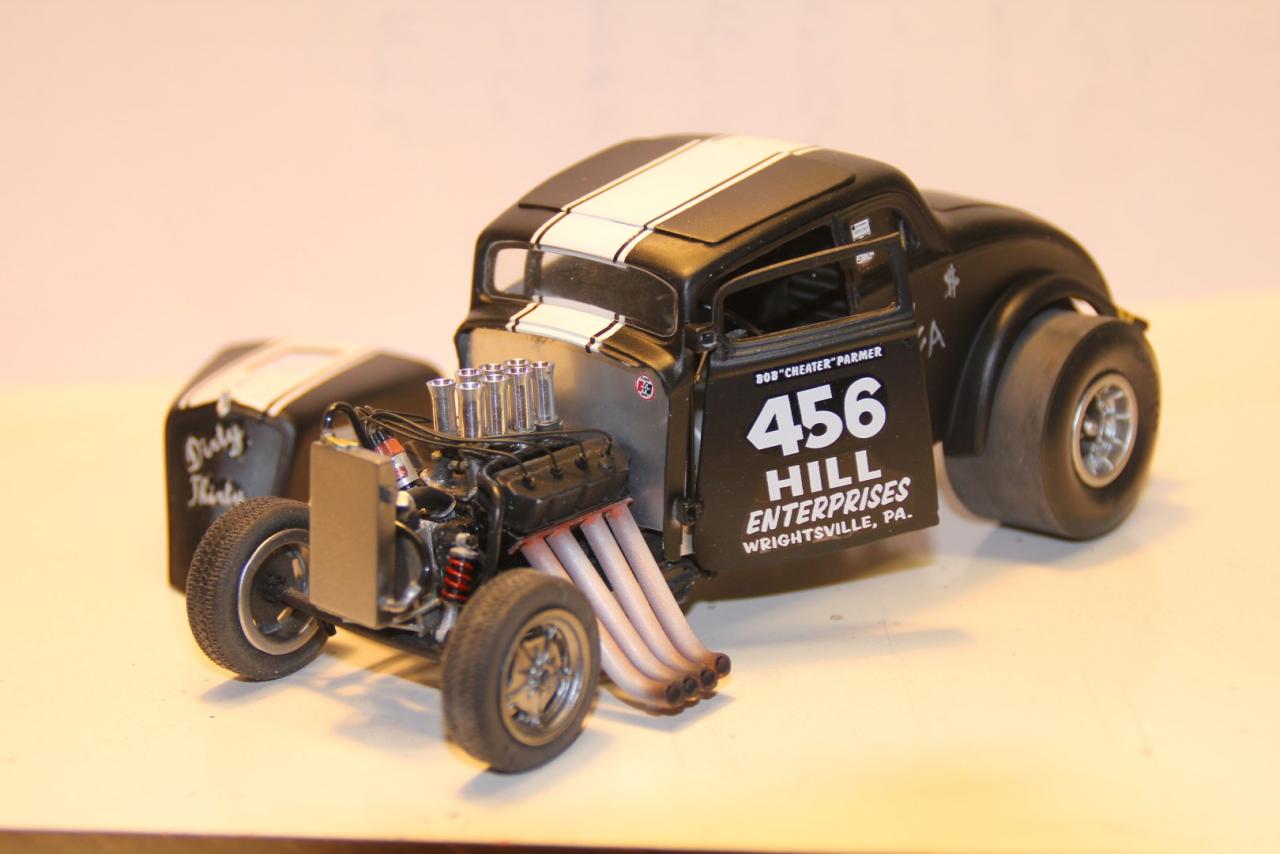
Well I've used the long weekend and wet weather to final finish another one. This one has been fighting me every step of its creation. Taken me almost 18 months, but stick a fork in it..coz its done!! Its a replica of a car that raced in the Sixties. There is a only one known photo of it in this configuration so I've been as accurate as I can in most aspects but other have been an educated guess. The only kit part is the body and some small parts. Everything else I've had to make from scratch.

-
29A Rat Pickup
Talbot90 replied to Talbot90's topic in WIP: Model Trucks: Pickups, Vans, SUVs, Light Commercial
I got completely burnt out on Modelling halfway through this build. I didnt open my hobbyroom door for 10 months. Well three nights ago, the bug hit me again and Im back into it. ive just finished up the 34 Rat and amping to get into the rest of my unfinished projects. Well heres is the 34 in all its rusted glory. cheers Ian -
29A Rat Pickup
Talbot90 replied to Talbot90's topic in WIP: Model Trucks: Pickups, Vans, SUVs, Light Commercial
Hi BubbaJoe, They are Artists pastel purchased from a local art supplies shop...cheap and they have all the shades of rust you'll ever need.! :-) Ian -
29A Rat Pickup
Talbot90 replied to Talbot90's topic in WIP: Model Trucks: Pickups, Vans, SUVs, Light Commercial
some update pics on the 34. -
29A Rat Pickup
Talbot90 replied to Talbot90's topic in WIP: Model Trucks: Pickups, Vans, SUVs, Light Commercial
Ive been asked how I do some of my weathering... here's the process for the brake drums that can be applied to any item you would like to appear rusty. This is just a process that works for me. Im not saying its the right way..but the most important thing is just try, experiment and most of all, have fun! :-) Paint the item Flat Brown..I use Tamiya Xf-10 Flat Browm Then I use a darker Brown, Tamiya XF-64 Red brown. i apply to the brush and then wipe off 95 % on a rag until the brush is virtually dry. then mix up a weathering powder mixed with Tamiya acrylic thinners then I add dry weathering powder and some darker pastel scrapings.. its pretty easy..just take your time ..and if you dont like it..strip it off and start again..( Ive done many times) !! :-) cheers Thanks for looking Drop me a message if you've got any questions.. Ian -
29A Rat Pickup
Talbot90 replied to Talbot90's topic in WIP: Model Trucks: Pickups, Vans, SUVs, Light Commercial
Hi Blazefox.. By golly your right!! I was looking at the wrong box I got the body from..oops.!! Thanks for that now...how do I edit the topic header..? Ian -
Sorry there's no earlier WIP pics of this build as my camera decided to take a dump.!! Heres a 29A Rat pickup that was inspired by a cartoon pic I saw on the net, some random images and a lot of input from my imagination. I'll document the build from here on, but here's where I'm up to so far. I chopped the cab, with the frame, front and rear Suspension and the exhaust all scratch-built. The things you only see in photographs,.. I see I've messed up the carb linkages..arrgghh!! thanks for looking Ian
-
Hiya George 53 The engine is the Revell Parts Pack 54 Cadillac. Only has 3 exhaust ports http://i655.photobucket.com/albums/uu272/modelnutmike/Dioramas/IMG1386.jpg thanks for the positive comments guys.. Ian
-
Hiya BeeRS, Thanks for the kind words. I drilled out the top of the carbs then punched some small alloy discs out of thin aluminium from a soda can ( actually a Jack Daniels Bourbon and Coke can ) :-) real easy to do. Ian
-
This my first attempt at a chop that I've completed. Very happy with the result and the whole car has come together pretty well. Enjoy.! many thanks for all the comments and help along the way Ian
-
Finished...first successful chop I've completed Im happy with it..your comments good and bad much appreciated.
-
slow progress ..but added linkages and pulleys to the engine.
-
Thanks Mark, That's the way I was leaning... I've built too many flat cars lately. :-) I can get on and finish this one now! cheers Ian