futurattraction
-
Posts
1,647 -
Joined
-
Last visited
Content Type
Profiles
Forums
Events
Gallery
Everything posted by futurattraction
-
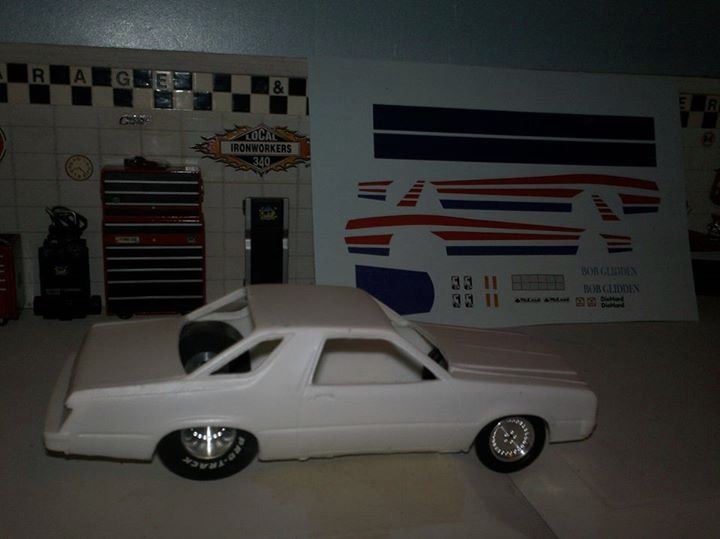
 that a resin caster who I’m not familiar with has started making copies of my Fairmont pro stock body. He has a closed group on Facebook. If you search WHISKEY RIDGE RESIN & DECALS you should find it. I haven’t seen any publicly accessible websites by that name. I’ve attached a picture of his copy of my body, just so you can see what it looks like as compared to mine. I just wanted to let anyone know, who might be interested. If you know of other modelers who you think would like to (or should) know, feel free to pass this info on. Thanks... Scott PS - If I have any updates I'll post it here.
-
Thanks, as always, for looking in Tyrone. I ended up making the extension tubes out of .042" OD stainless tubing and am adding RBM nuts to the end of them to simulate part of the fittings. They'll slip fit over some .033" tubing that's inserted into the pan. My RBM hose ends can then slide right into the extension tubes and be really secure. Hopefully I'll have pics up of that before too much longer... Thank you, Robert. Feel free to look through the thread. There have been some stops and starts, burps, etc., along the way, but I'm making progress - albeit it slow...
-
Thanks Jason! I spent a lot of time modifying an AMT Boss 302 block to convert it into a 351C-inspired block. I added the extended timing chain housing, water jacket plugs, scallop around where the distributor goes. I also added the cut-out around the fuel pump block off plate and reshaped the intake manifold mounting surface to look like the Cleveland intake. Also added a bunch of detail to the ends of the cylinder heads. As you'll see (if you haven't already), I've also got scratch-built Moroso valve covers for it... I'm trying to decide how I want to finish a set for this build...
-
I hope so, Ron... Thanks for stopping by.
-
1979 Malibu Pro Mod Finished! 8-1-14
futurattraction replied to am73grand's topic in WIP: Drag Racing Models
I love your updates, Ron! Looking forward to more... -
Thank you Stan. I'm figuring to keep working on the oil pan and get the rest of the prep done for plug wires and will probably nurse a few other small projects along at the same time. John - patience is the name of the game... at least with me!
-
1982 Reher Morrison camaro build
futurattraction replied to lou s's topic in WIP: Drag Racing Models
Lou, You asked about better slicks than the kit slicks. While I'm not very good at tooting my own horn, I've got what I refer to as a 16x33 slick that I sell on my website that is a direct replacement for the kit 2-piece slicks. It's 1-piece and molded in such a way that the tread surface is perfectly flat. Here's a pic of one with the Revell DragStar wheel I'm using on my Fairmont build: It's real rubber and is a great replacement. BTW, are you planning to go to the KKIM show in Davenport in October? -
Thanks Ray... More to come!
-
Hey - thanks for stopping by Brad!
-
I was on vacation for a bit over a week and just got back last night. I wanted to share some pics of some slight progress I made just before leaving. I've begun revising my dry sump oil pan by adding the lower sump section and extension tubes. They will be cut flush with the edge of the pan and will have a hex fitting added to them at that edge. The ones shown aren't glued in and I may end up using tubing of some sort that will more readily accept RB Motion fittings. I added high port exhaust plates and have begun prepping them for adding plug wires. I'm going to use one of Kris Morgan's pre-wired distributors. Last but not least, I received the lug nuts for my rear wheel stud conversion.
-
1969 Outlaw Camaro...updates (10/21/14)
futurattraction replied to tyrone's topic in WIP: Drag Racing Models
What you've done so far is looking super, Tyrone. I like the idea of cleaning up the separate frame rail and detailing it on your own instead of using the cast-in-place components. Can't wait for your next update! -
Mustang and Fast Ford projet car, on the desk
futurattraction replied to phantomw's topic in WIP: Drag Racing Models
Very nice start, Val! Looking good... -
That's coming along very nicely, Andre. Can't wait to see your next update!
-
Thanks Bill. I appreciate your stopping by... Norbert - I appreciate your saying so, but I'm nowhere near that. The only thing I can claim is to be detail-oriented and a bit OCD... LOL Thank you, Chris. I'm trying... I don't have any photo update at the moment, but will briefly describe a couple projects I'm working on. I have to confess that I jumped the gun on gluing my dry sump pan on the block and then started questioning the placement of the scavenge outlets on the pan. The example of a 351C dry sump I'd seen online showed the outlets on the passenger side, which was what I patterned my pan after. Unfortunately, I'm so short on space on that side of the engine, that I decided I needed to do a bit more snooping. After consulting with Dave (comp1839) I decided to change up my oil pan configuration. While I can make the necessary changes on the block it would've been much easier to do off the block. Anyway, I'm going to be adding an additional half-sump to the bottom of the pan with the outlets on the driver's side. I've got a motor plate and dry sump pump support brackets drawn up in my CAD program for photo etching, which will go in on my next .010 nickel-silver order. That's all for now...
-
That's an amazing transformation! Looks good...
-
70.5 Z28 10.5 Outlaw (WIP....Update 7.9.13)
futurattraction replied to hOLMS's topic in WIP: Drag Racing Models
Wow, Jeff! That looks super! I'm glad to see you back. Don't be gone so long next time... -
1979 Malibu Pro Mod Finished! 8-1-14
futurattraction replied to am73grand's topic in WIP: Drag Racing Models
Cool project Ron! I'll be sure and keep an eye on this... -
That's beyond art, Clay. I'm still shaking my head at how stellar the entire assembly looks...
-
Thanks Fred. It's always nice hearing from you! I appreciate your encouragement and stopping by, Val.
-
1990 lx mustang street car finished! 8/1/14
futurattraction replied to Dragfreak's topic in WIP: Drag Racing Models
Your chute/mount and on/off switch both look great! Very nice job... -
Very nice update, Rick. Super work, my friend!
-
Very nice, well-thought-out job, Val. I'm looking forward to seeing it finished with decals!
-
Looks super! No pun intended... LOL
-
Thanks for your questions and interest, guys... Hi Bill - It's more the ????? This specific build isn't replicating any particular car. I've borrowed a lot of what was more or less common "outfitting" of these cars at the time they were run in NHRA, i.e., 351C with UR-19 Edelbrock TR intake, high-port-plated heads, Lenco 4-speed, 9-inch Ford with strut front and disc brakes fore and aft. The pan and cage, too, reflect how they were built at that time. I've designed this to look like what, in my eyes, would be the ideal Fairmont pro stocker, which is part of why I had a tough time deciding what type of class it would fit into. For example, I've always liked the stretched, stock-height rear wheel well openings better than the taller squared-out openings as used by Glidden on his '80 and '81 cars or the Bruckner-Islin-Dreese AHRA Fairmont. I like the tin work in the nose of Animal Jim Feuer's "Zeke" Z-7 much better than Glidden's tin work. I've seen pictures of Glidden's '80/'81 cars and he had a non traditional, roll cage in it, which I don't care for. His main hoop only ran about 2/3rds of the width of the body and the halo bar ran out at an angle to the A-pillar. The main hoop fore-aft placement is consistent with where they were legally required to be, so the seats can't be set back nearly as far as current rules permit. The pan and my forward strut tubing places the engine in its legal location, with the right-front spark plug being in line with the spindle centerline and, of course, I've tried to get the front down in the weeds as much as possible. At the rear of the car, I've chosen to add the PE frame rail/trunk floor supports just because it looks cool and adds some interior detail. The rear of this build sets at a much lower, contemporary ride height and I'm using the larger wheel/tire combo, full width rear deck spoiler with spill plates and it will employ much longer wheelie bars, again because I think they look cool. Having said all this, the basic pan, chassis and body are all what I consider to be consistent with construction practices at that time, but there are lots of deviations I've made to reflect my own personal preferences. Brad - The thought crossed my mind to add some "flow through" ventilation holes. Holler if you have other questions or comments.
-
Thanks for looking in, Stan. I appreciate your comments.