LAV25
-
Posts
76 -
Joined
-
Last visited
Content Type
Profiles
Forums
Events
Gallery
Everything posted by LAV25
-
RC Paint Job: Lunch Box
LAV25 replied to LAV25's topic in WIP: Model Trucks: Pickups, Vans, SUVs, Light Commercial
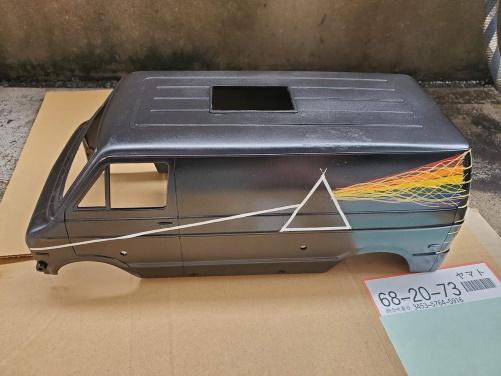
Yeah, I hope it's okay. I won't be posting anything not related to the paintwork, and from that standpoint I hope it can be allowed as a 1:12 scale model monster van. Won't be able to prove from my pictures that it can move under its own power -
RC Paint Job: Lunch Box
LAV25 replied to LAV25's topic in WIP: Model Trucks: Pickups, Vans, SUVs, Light Commercial
Of course, that only took care of the sides. There's still a nice panel on the back that I didn't quite know what to do with. I've got no freehand skills, but it occurred to m e that there was another pattern I could use.
-
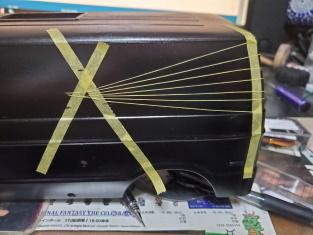
Mods, I hope this is in the right place. Not really much of a build, but I got (another) Tamiya Lunch Box this summer. It's a 1/12th scale 80s Dodge van done as a monster truck. The only thing I really did to it was fill the antenna hole. I don't have access to an airbrush or anyplace to use one (apartment dweller), so all of the painting was done with either rattlecans or brushes. I wanted to do a Dark Side of the Moon thing, but when I started mentally mapping out the masking I'd need to do I knew that it wouldn't work in the straight-up album cover version. So I took a different track. Body came in the white, so after priming I painted it Tamiya Gloss Black. Then I started masking out my logo. After getting the guidelines in for the colors of the spectrum I hand painted them with bottled Tamiya paint. Then I got some 0.7mm masking tape and added all sorts of sound waves (ish) over the rainbow.
-
continuing: Anyway, that's pretty much it. I'll try and get some better lit pics in a day or so and post them up "Under Glass," but I'm kind of glad to see the end of this thing. More research before I buy another kit, see what works, have a clearer plan, all that. Thanks for looking! -val
-
Necroposting my own project. I got tired of this little car, so I boxed it up and stuffed it in the closet for, well, five months or so. Took it back out a couple of weeks ago and decided to start again, then I remembered why I got tired of it. I just don't like this kit, there are a lot of parts that don't seem to fit the way they should, and some of the directions, IMHO, need to be reordered. Attach the chassis to the floorpan, then try and thread the driveshaft in. Didn't bore out the hole in the transmission? Too bad, so sad. I did play around with some Bare Metal Foil equivalent (Hasegawa? I forget, lost the package) with mixed results. I think I'll be using it more in the future, but I've got to study up on the best ways to get it to do what I want. Anyway, after going through some careful frustration, tonight I decided that I was going to just finish it. Get it done. It could have come out better with more time, I admit, but it was getting to be a chore rather than fun, and taking up too much of the hobby bench that I share with my wife, so here it is: Lost one of the lenses somewhere even before I could start to assemble it: to be continued below:
-
64 chevy WIP
LAV25 replied to gray07's topic in WIP: Model Trucks: Pickups, Vans, SUVs, Light Commercial
Please do keep working on it, I had a '66 Stepside and I love where you're going with this! p.s. where did you find those tires and wheels? They look perfect. -
A short update before I get seriously to work on this. I'd like to thank the person that originally posted this suggestion, I just can't find the thread anywhere. My kit has these big ugly posts that support the rear trailing arm. It never occurred to me that those were where the coil springs were supposed to be until I saw someone else's kit, so I'd painted them rust. However, I've got some 1mm solder. 1mm=1 inch, so it isn't for the hardcore purists, but I'm new to this. I painted the posts flat black (on top of the rust I'd already done). I took the solder (takes about 3-4 inches per side!) and brush painted it Tamiya Flat Red XF-7. It was hot yesterday, and I deliberately didn't let it dry properly. I painted the one piece, put it down, painted the second, put it down, cleaned my brush, and wrapped each piece around its post, then adjusted the coil with my thumbnail. Not letting it dry (I think) gives the paint some flexibility as it's being bent. As you can see, I need to touch things up a bit, but overall, I don't think it looks too bad, much better than just posts. Opinions and suggestions are always welcome!
-
Weathered 64 Chevy C10
LAV25 replied to BigEdsGarage's topic in WIP: Model Trucks: Pickups, Vans, SUVs, Light Commercial
Wow, yet another build to aspire to. Great work -
Thanks Bradley and Dr. C, it means a lot for a newbie like me to hear that! I'm not sure it I'll do a wash or not, but I found on my last project that the door and panel separation lines will draw in thinned paint with capillary action really well, so I plan to do that with some thinned black at a minimum. I need a windless day so I can paint my hood and trunk lid though, the waiting is driving me nuts. More later
-
And finally, I did say this wreck was under restoration. Just barely. The driver's side either some small dents or rust that went deeper than just the surface and needed some bondo and primer: This was tough to do. No airbrush yet, so i tried a bunch of different things. Tried to drybrush gray. Didn't work. Painted gray, and tried to use a wash/thinner to feather the edges. Didn't work. Wash of white on top of that. Sort of worked. Finally, Tamiya Weathering Master Snow (the makeup compact stuff) on top and I got my sprayed edges. It's not perfect, but I'm happy with it. I still have to paint the hood and trunk lid, I may do the hood in flat black, 70's drag racer style, not sure. Let me know what you think, good, bad or otherwise.
-
OK, dents. I used a messy and experimental (meaning I made a lot of mistakes) combination of gunmetal, silver, and rust to do my body damage: Not perfect, but it looks OK. It's a little hard to do research here, Japan has strict safety inspection laws that keep older and more damaged vehicles off the road. Probably a good thing....
-
A little bit more. The body was primed in gray under the blue, so I took some 1000 grit sandpaper and lightly went over the whole thing. I left the rough spots I found on purpose, but any area where the gray started to show through, I rubbed some Tamiya Weathering Master Rust onto. Oops, hit my picture limit. To be continued.
-
Not insulting at all, it was actually quite helpful, I wouldn't have known that it looked OD without your comment. I went for a year or more before I learned that my favorite green tie was brown, my brown sport coat was green, and one of my gray shirts was actually brown. When I was in the service, my vision was so amazing that they stuck me in a Radio Battalion ! Back to work.
-
Thanks again Sylvester, I am in Osaka and there's a Joshin right down the road, I'll look into that. As for my interior. Hmm. The kit calls for flat red and silver, which may be correct but just sounds awful to me. Since this car is more than 20 years old at the notional time it's being built to, I figure I can do whatever I want. My 1:1 '66 Chevy Stepside had Camaro bucket seats (one of which was secured with only one bolt!) and welcome mats on the floor when I bought it in 1988. I wanted a two tone thing going on, but nothing seems to have worked out right. I'm using Tamiya Flat Blue XF-8 for the darker shade, and Tamiya Medium Blue XF-18 for the lighter shade. Somehow, though, the Medium blue looks greenish to me. Since this is about the fourth color combination I've tried on the seats (blue and white, blue and grey, blue and silver), I think I'm just going to stick with it. Here's the look: I know it still needs a little touch up, I brush painted it since I don't have an airbrush. The front fender, however. If that looked Olive Drab, it needed to be fixed. I gave it a wash of Flat White, followed by a wash of Field Gray. This, I think, is the look I want, and I'll probably do something similar to quite a bit of the rest of the body: No Turtle Wax there! The bondo in the lower corner is Japanese Navy Gray XF-12. Much better, I think. Opinions and suggestions are very welcome!
-
And a serious answer, part of what plagues me in this sort of hobby. I'm red/green color blind, I can tell the difference (usually), but I have lots of trouble with greens and browns. The fender is Tamiya TS-2 Dark Green, which may well look olive drab, but I just have to go off the label. I didn't really think about whether the factory made fenders in that color, and while olive drab is a problem, not being a factory original color isn't. I'm thinking that this car is sometime in the mid to late 1980s, so that fender probably came off a car that was even more badly wrecked. It's definitely going to be getting some rust on it. More later.
-
Thanks for the advice Charlie. This model has just been fighting with me. Not the model itself, as far as I've gone, Revell has done a pretty good job but, like I mentioned at the start, this is a work of fiction. None of the colors I've chosen seem to look the way I wanted them to, and nothing seems to come out the way I envisioned it. I know I have a long way to go technically, but right now I'm struggling with the artistic side of things. That having been said, I'll shoot some pics later and throw them up for advice. It couldn't hurt, could it? -val
-
Just a little bit of progress. The interior is basically done, but I'm not too happy with how it turned out, so I probably won't show it off without the body. Paint on the body. Lots of weathering to do, but I've got my base coat down: This side looks OK, the light spot is a reflection, the paint color is really pretty even. It's Tamiya Mica Blue (TS-50). The right side, on the other hand, was involved in a little sideswipe and needed some new panels: These are also going to need to be weathered, and I of course need to do the damage on the rear panel. Slow and steady.
-
Very nice! May I ask how you did the springs? Were they molded in, or did you wrap the pillars (I'm working on the Revell '63 SS now) with some sort of wire? Thanks!
-
Thanks Silvester, I'll have to look into those. Hasegawa sounds like something I could find around here, not sure about the others, but there has to be something like that. I plan to sand off the badges, I just think it was kind of foolish of Revell to mold them in and then provide decals also.
-
I'm very new to modeling, so I can't say for sure. If you have specific points you are interested in, I'll be happy to have a look for you. It does have separate exhausts and axles, but I haven't really looked too much at the interior yet. There are a couple of things that I don't like. The aluminum trim (the part that I filed off) is molded in, which means that you'll have to paint it, and paint never looks as shiny as chrome or chromed plastic. Also, the SS badges on the front fenders are molded in (I'll try and get a pic for you later) and you are supposed to put a decal over them. I don't think that's going to work. Also, as I mentioned, if you are planning on dents, the plastic is really quite thick, much thicker than I remember it being on my Revell '65 Chevy Stepside. Hope this helps!
-
Thanks for the input, I'll have to look into Year One, I had a similar thought of doing the fender in primer gray. I think I'll keep the hood the same color as the main body and test out my weathering skills on it. (OK, let's be honest, try to grow some weathering skills!)
-
This is going to be tough. This is my second plastic model kit in thirty years, and my second this year. The first one was autobiographical. I'd actually owned the truck, had reference pics, and knew exactly where the rust went, what was dented, etc etc. This is going to be a work of historical fiction. Starting with a Revell '63 Impala SS kit: The Stepside was a truck owned by a teenager with no money and no car repair skills. This is going to be a vehicle that is in the very first stages of restoration (or hot rod conversion). I just got started, but posting keeps me on focus, so on to some pics. Partially threaded the passenger side door and installed some dents: It doesn't show well in the pics, but I also filed off the aluminum trim strip from the passenger side door. The car was involved in a pretty good passenger side crash, so the door will be from a donor vehicle, painted a different color, and at the moment lacking its trim. The plastic was thicker than I'd hoped, so the dent was a bit tough to do, I'm not sure yet what my plans for the right front quarter panel are. Anyway, that's all for now, time to break out some paint and get going on all the boring bits. More later! Constructive criticism, especially from those who own or are familiar with Impalas of this era is very very welcome, I'm flying with only Google images and a history of owning poorly maintained older cars as a guide!
-
Something a little outside of the box for this site. I was at a model shop in Kyoto a couple weeks ago, looking for a new car to work on. They didn't have anything to my taste that day, but I found these little photo-etched brass kits. I got a Fokker Dr.I for about $25USD. It's a 1:160 scale kit, doesn't require any trimming, gluing*, or filing. I thought that it'd be pretty easy to put together. It wasn't. It's tiny tiny tiny, and my fat fingers had trouble lining some of the parts up. This isn't a criticism, just a discovery. Here's a picture of the whole, unassembled kit, next to a quarter I scrounged up: Not a whole lot to say about the assembly, I'll try and get a couple pics of the instructions up but my camera battery died before I thought of it. Basically, you use an Xacto knife to carefully pop the pieces free of the main sheet, and then bend using a tweezers. The kit includes a practice piece, so that you can get a feel for how the brass bends, and how many mistakes you can make before it breaks. I managed to do it more or less cleanly. Here's a pic partway through the assembly: If you've ever fancied a career in watchmaking, this is a good starter. There's no gluing (*a dab of glue is recommended and necessary to keep the wheels on), everything is held together by folding tiny little tabs of metal. All done (the kit includes the base it's pictured on): Thanks for looking -Michael Valentine
-
First airbrush: What is important?
LAV25 replied to LAV25's topic in General Automotive Talk (Trucks and Cars)
Thanks to everyone for the replies. The advice above is some of the best, but unfortunately the hardest to follow. I live in Japan, but my Japanese skill is, um, not good? However, with all of your advice, I can figure out how to ask more educated questions at the local shops. You've all (even when you contradict each other) been a big help! -val -
First airbrush: What is important?
LAV25 posted a topic in General Automotive Talk (Trucks and Cars)
I don't know if this belongs here or in the tips and tricks section, but I'm looking for a bit of advice. I'm thinking of getting an airbrush, but I'm a little lost on what I need to look for. I've got no experience with using one, and the variety of options out there is a little baffling. I'll be using this to paint 1:25 scale plastic models and the occasional 1:10 scale RC body. The key things I know I don't understand are: 1. Single or double action: Why is double action better, is it important for a newbie? 2. Gravity feed or pressure feed (gravity seems to be more expensive) 3. Compressors and regulators: How important is it to be able to vary the air pressure 4. Trigger or button type: pros and cons Finally, I live in a fairly small apartment. The paint booth/boxes are crazy expensive. How much of a Dexter kill room would I need to make (spreading newspapers everywhere or whatever), and would it be safe just to paint with a couple windows open? I know that my dad used to airbrush on occasion in our basement, but the concrete floors didn't mind overspray, and it was the seventies, before anything was dangerous Thanks for any help you can give me. -val