traditional
-
Posts
469 -
Joined
-
Last visited
Content Type
Profiles
Forums
Events
Gallery
Everything posted by traditional
-
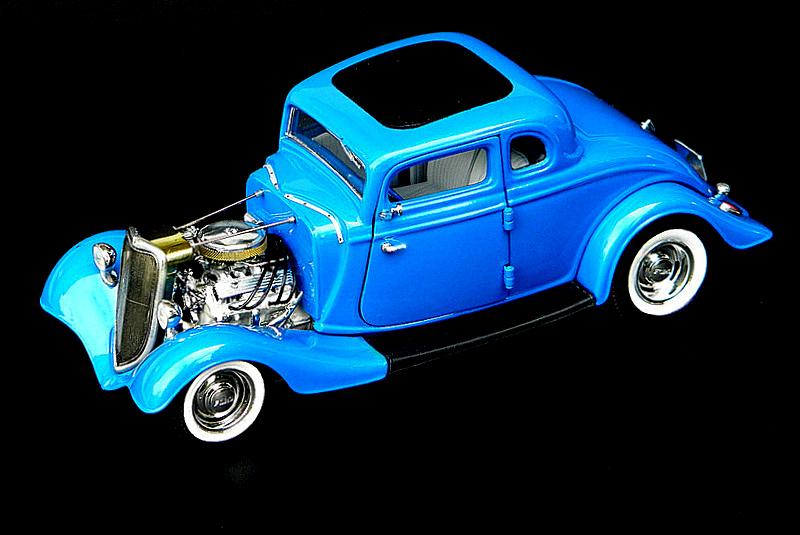
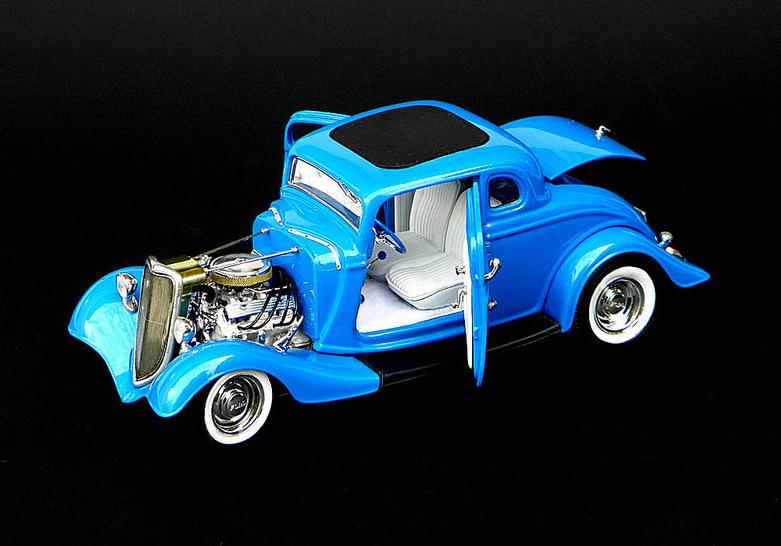
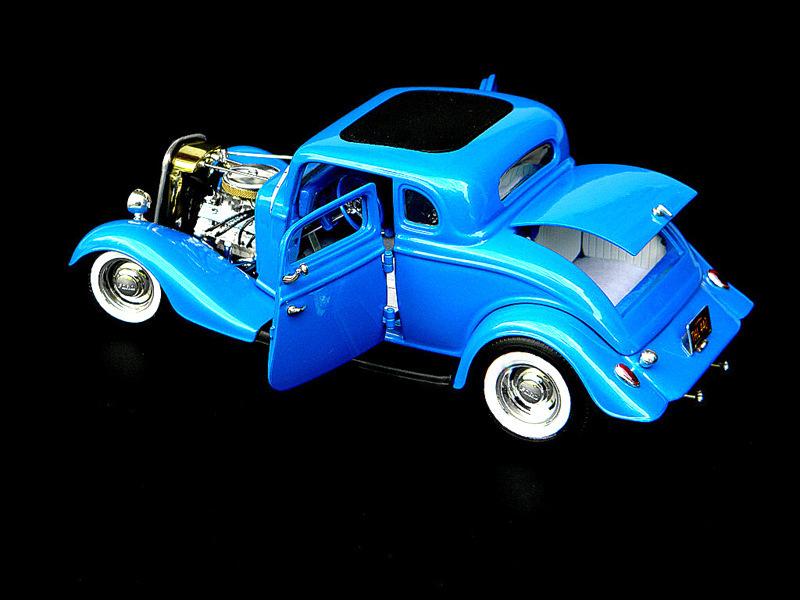
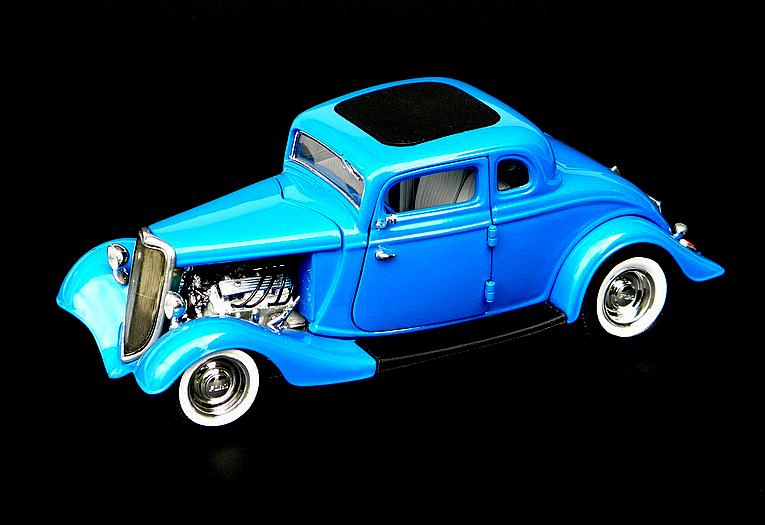
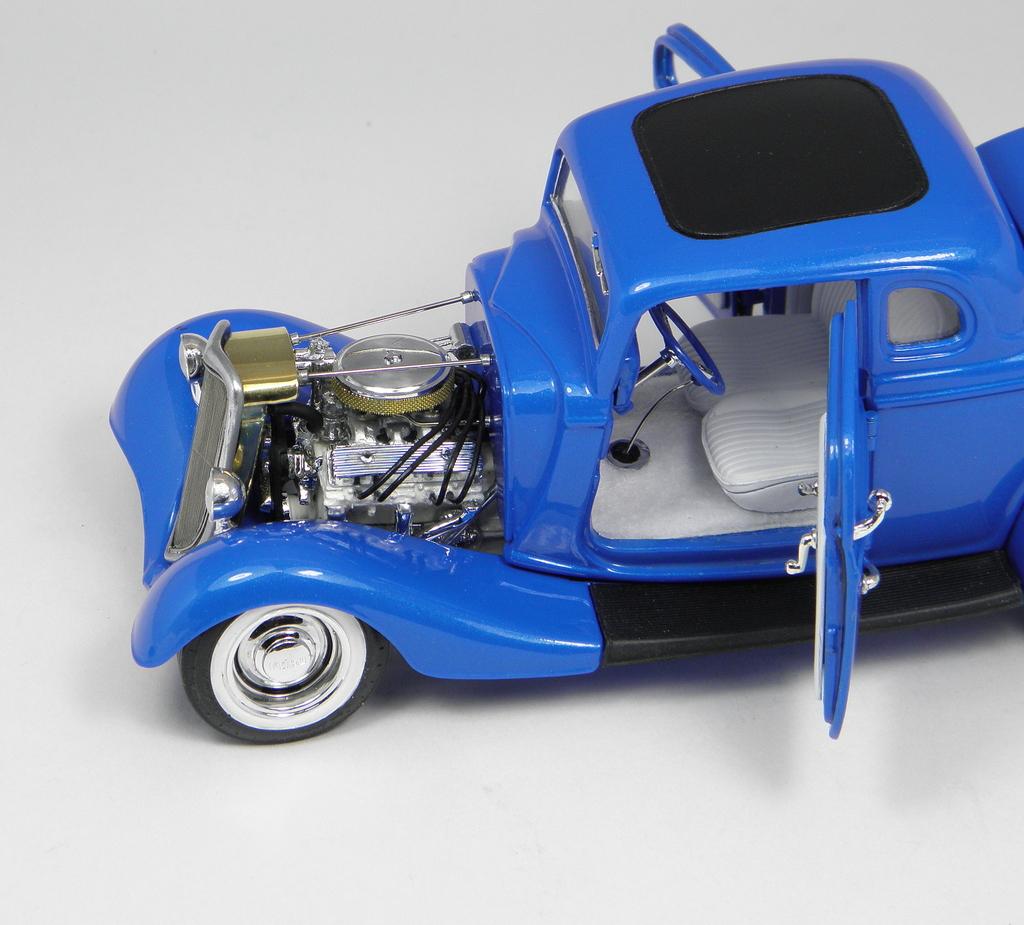
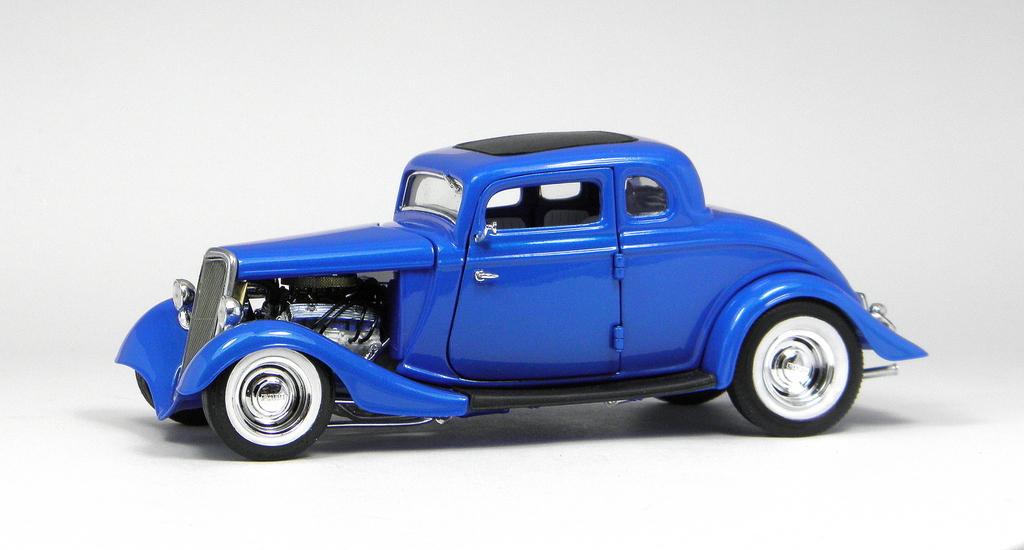
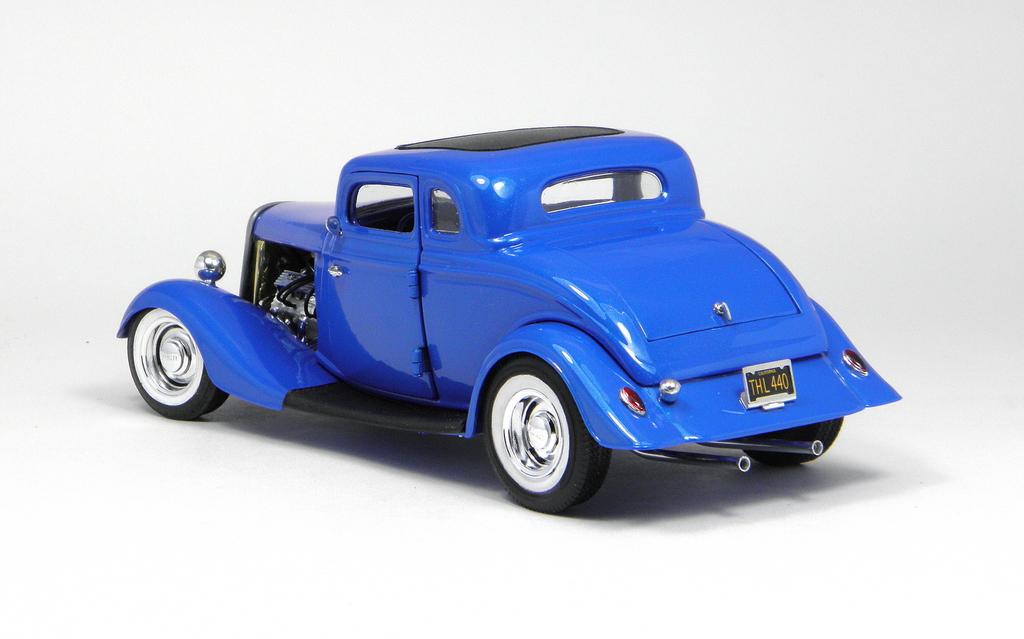
In the past, I haven't had much luck getting dramatic pics on dark backgrounds...partly my lack of photographic skills, and partly my basic camera's limited capability. You've seen this (last winter) model before....A traditional, chopped, Olds powered '34 Ford 5-window coupe, the body almost entirely gleaned and salvaged from my parts-bin, with some scratchbuilding as well as a lot of modifications to make various disparate parts fit together to look the way I envisioned. Anyhow, I was quite pleased how these pics turned out.

-
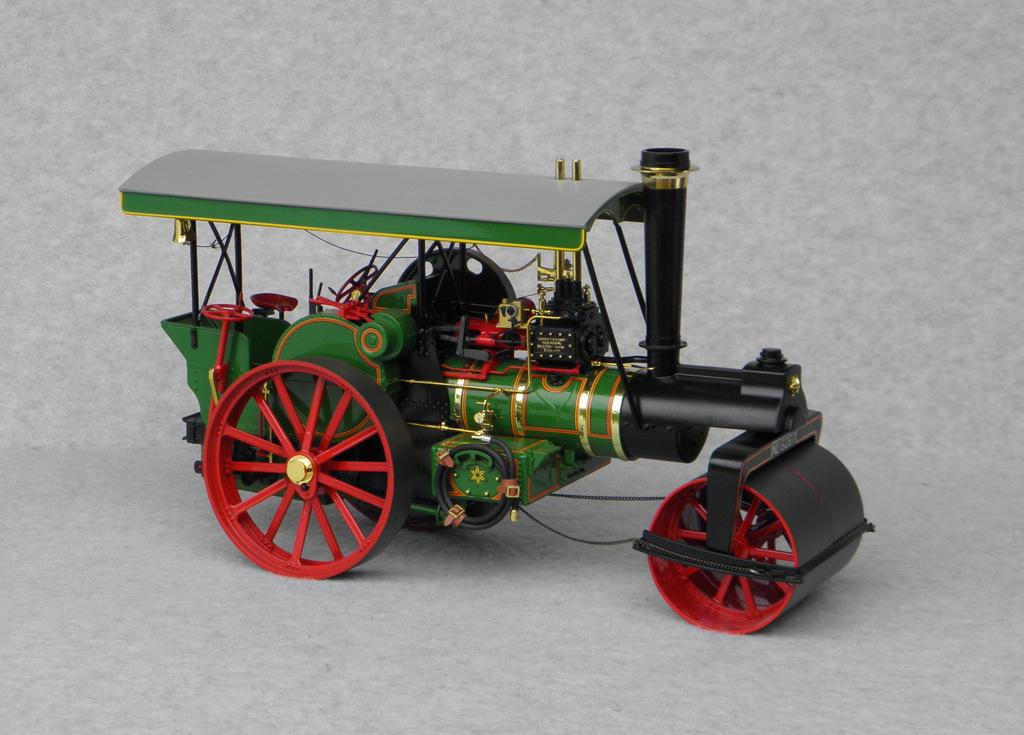
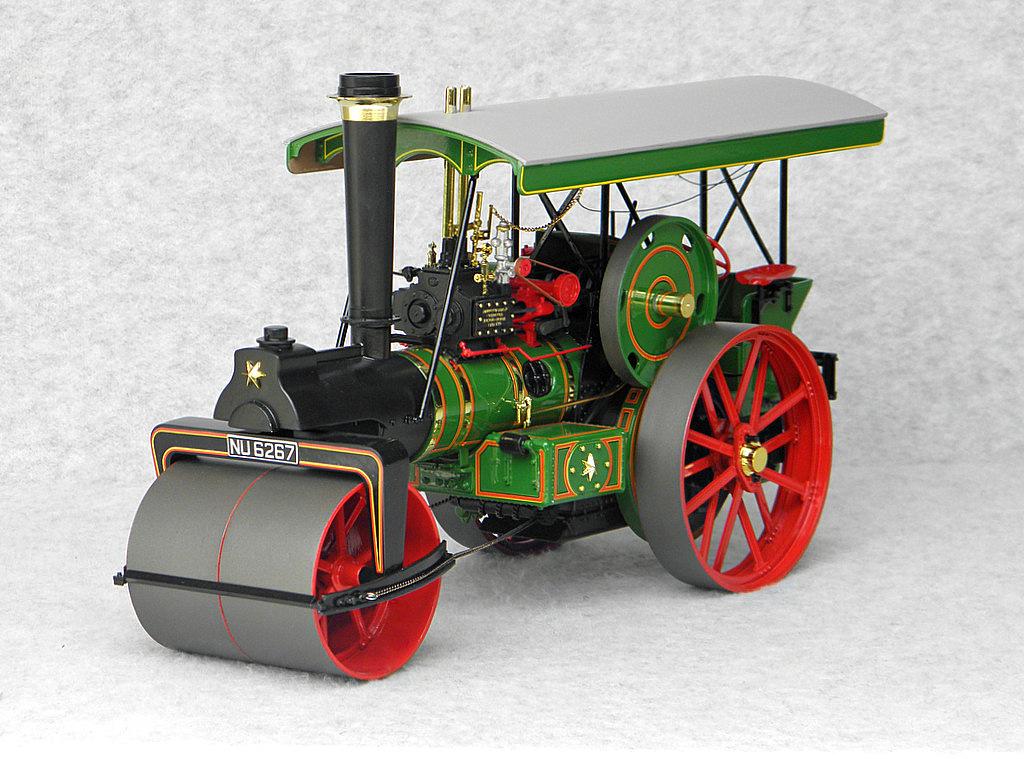
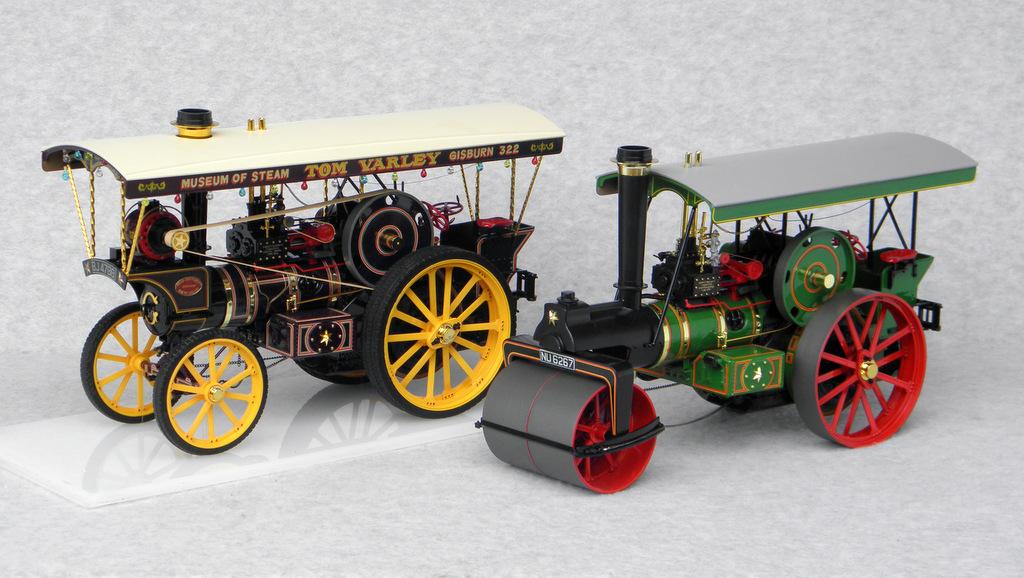
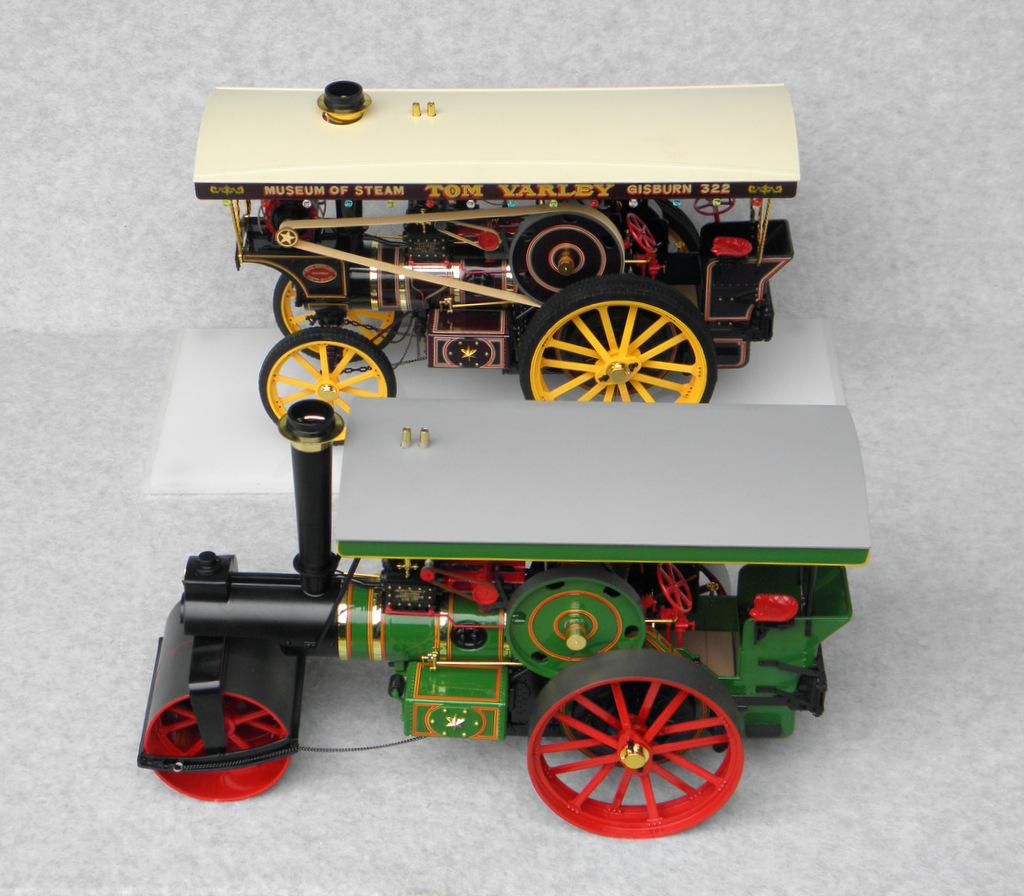
I bought this old Bandai 1/16 Garrett steam roller kit at a toy show (Toronto??) well over 20 years ago and just recently, with eastern Canada's current heatwave, I finally got around to painting and building it. Its stable-mate is the similar Garrett 'Showman's Engine' which I built over 40years ago. I've painted everything, but built it box-stock, as you might expect with a subject that isn't mainstream. Bandai's mold quality was outstanding and even the decals which have been in the box for probably well over 40 years were in perfect condition. I'll probably fiddle with a few things over the next few days, but for all intent and purpose, it's now complete. Below: Shown with the Bandai/Entex Garrett 'Showman's Engine' (which I built over 40 years ago). Showman's Engines were typically used by travelling circus companies and used as prime movers as well as the generators for electric lighting, etc. They were entertaining themselves with what they called an 'exciter' causing the colored light-bulbs surrounding the top to be flashing on and off sequentially.
-
Group 29 - the thread for everyone's '29 Ford Roadster builds
traditional replied to Phildaupho's topic in Model Cars
Not from a Revell kit, but still a '29 Ford rod:
-
Curt, Your Satellite looks fabulous. ...beautiful car and very nice pics as well. Your modifications to achieve the vehicle you wanted all worked out superbly. I hope you're doing fine these days. Cliff
-
Eric, That Shoebox is just sooooo sweet! It's so tasteful and gorgeous and captures the 'LOOK' perfectly. Beautifully planned, and beautifully executed! I look forward to seeing it in person when this Covid19 episode is finally over.
-
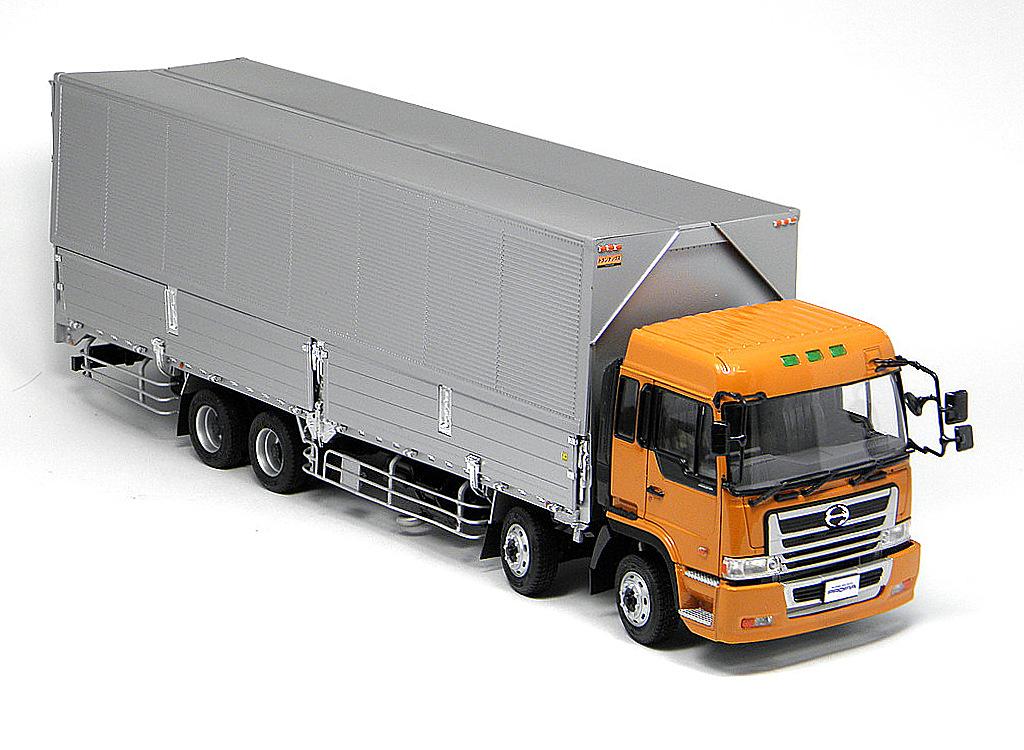
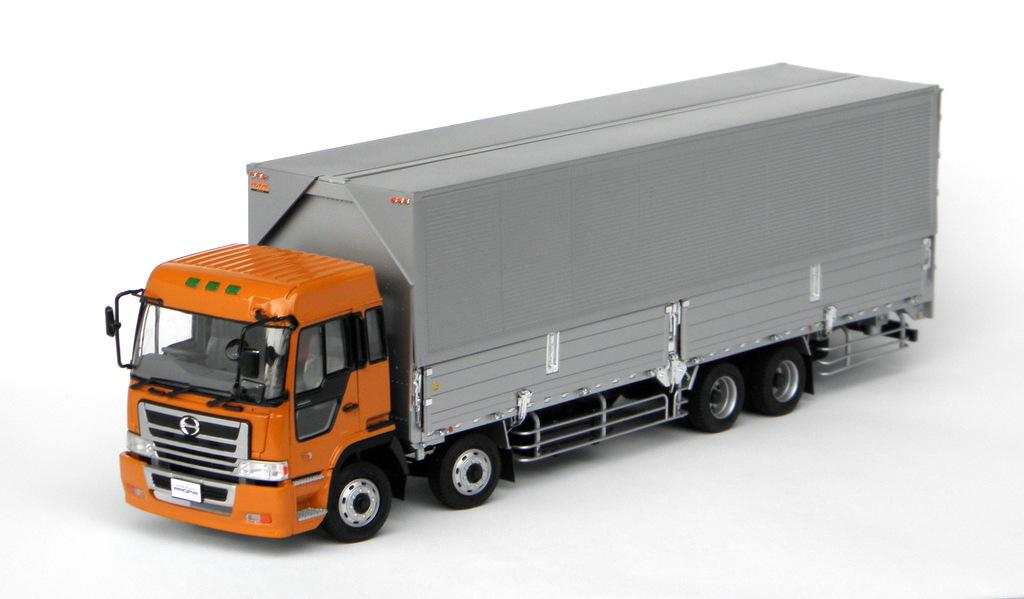
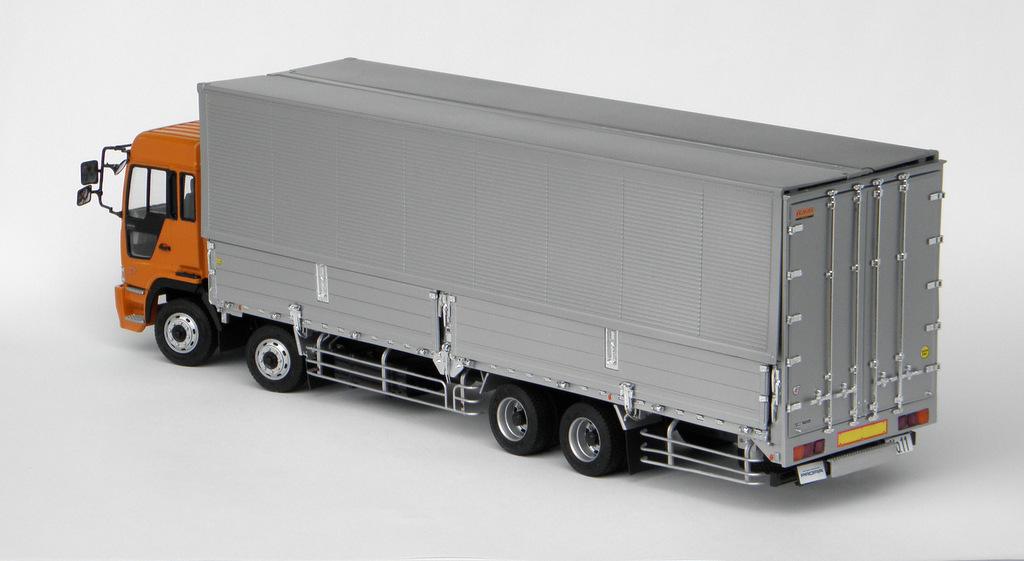
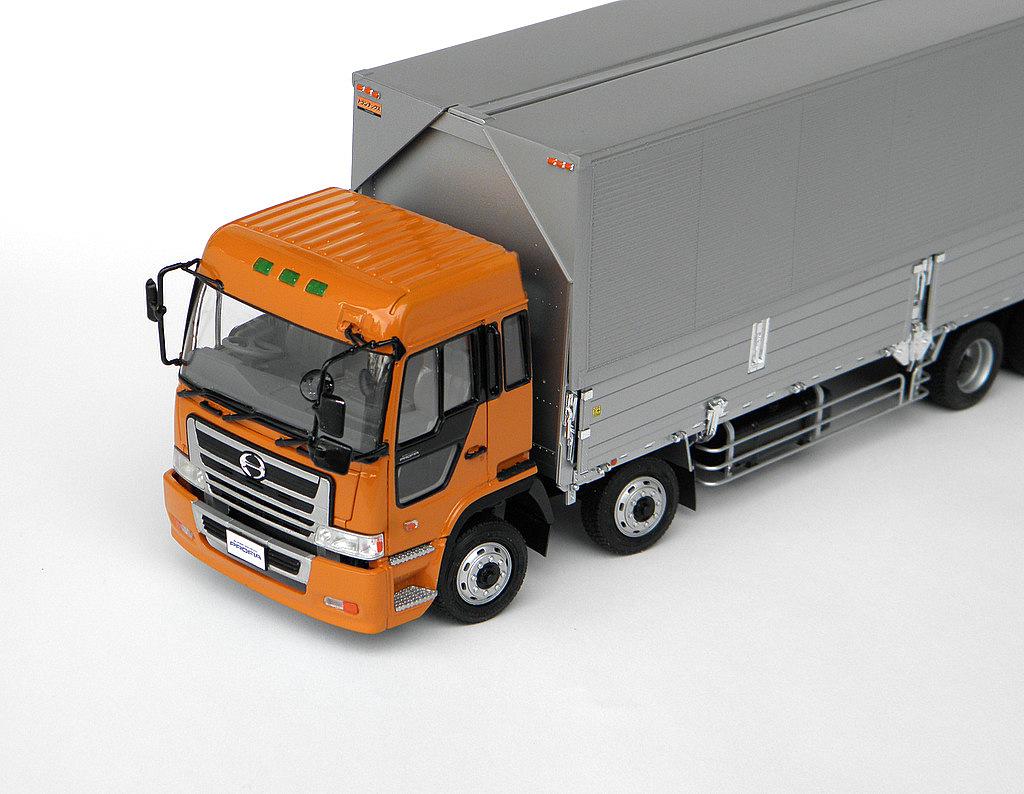
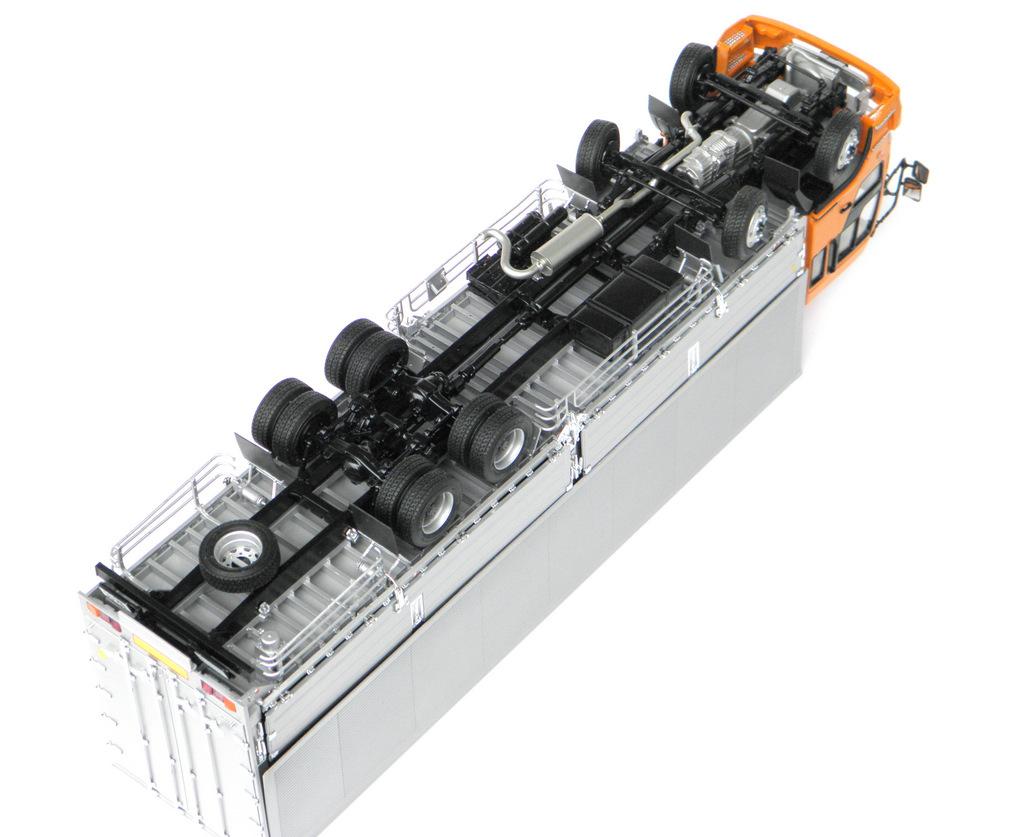
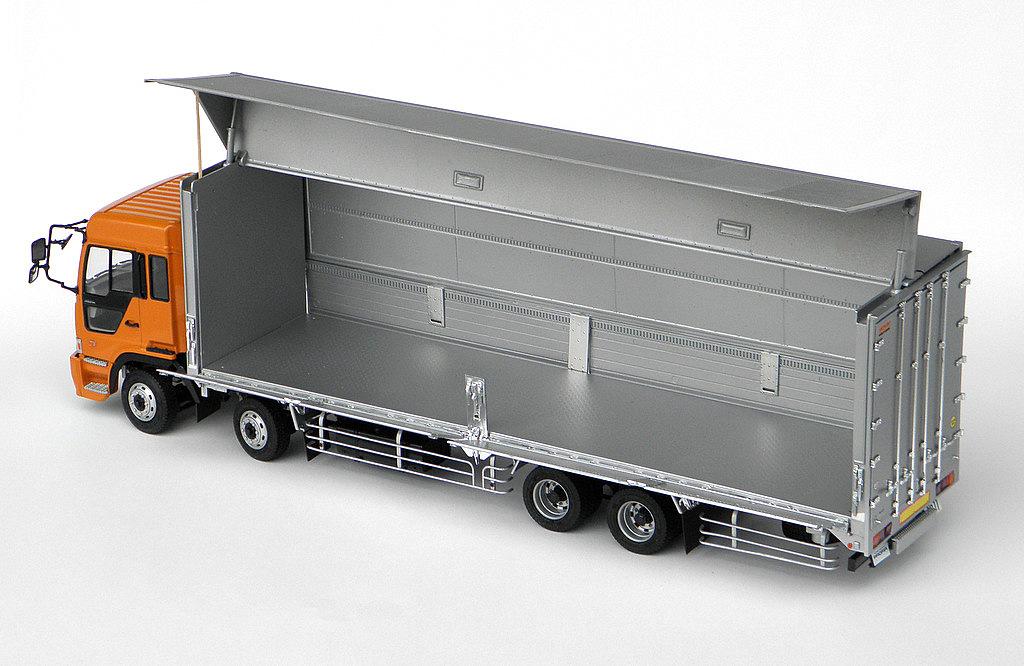
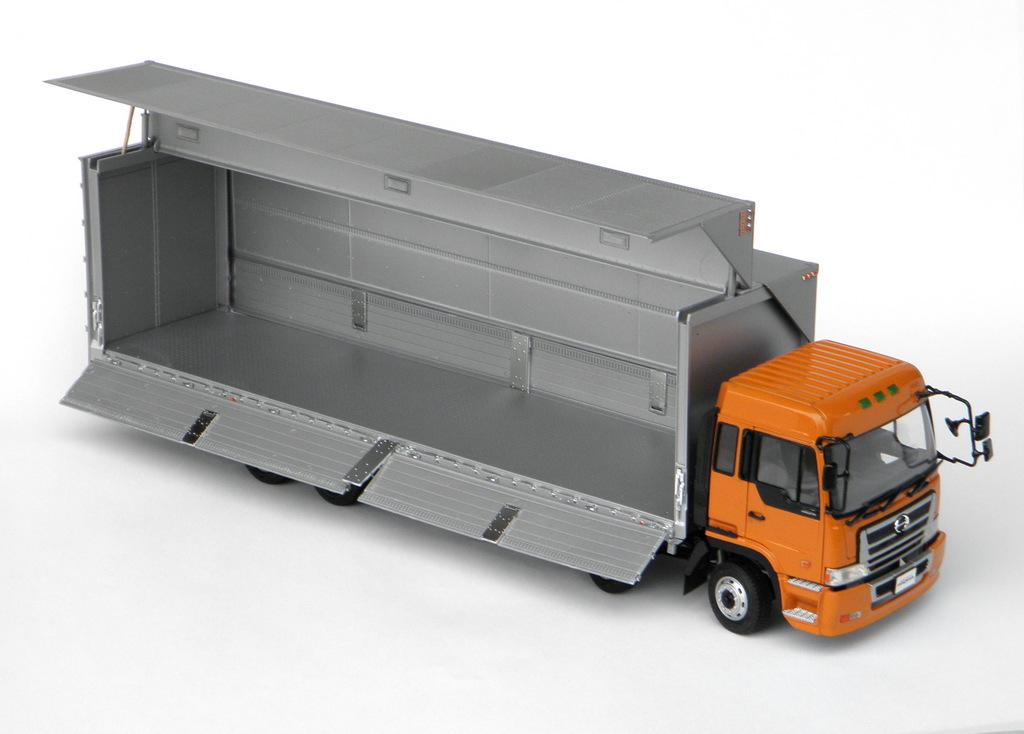
Every now and then, I find it pleasurable to build a model ‘box-stock’ (especially when I don’t have a lot of knowledge of this type of Japanese transport) and during these days of ‘Covid 19 social-distancing’, an Aoshima 1/32 truck kit fills the bill nicely. Aoshima truck kits are always beautifully molded with no sink-marks, and very precise location points. What makes them somewhat challenging, however, is the sheer number of miniscule, finnicky, and sometimes fragile details. The box art for this 2003 (or so) Hino Super Dolphin Profia Teravie (yes, thats the rather obtuse actual name) shows a plethora of cab chrome plated panels which, although probably optionally available on the real trucks, compromises the commercial vehicle look that I prefer. Following many internet pictures of these vehicles, I chose to paint out most of the plating, and I even decided to tone down all the plated details on the ‘Hi-Wing’ low deck van body with satin clear to look more like the anodized aluminum details on the real vehicles. The model took around two weeks of ‘stay at home’ time, and I must admit I’m pleased with the finished model.
-
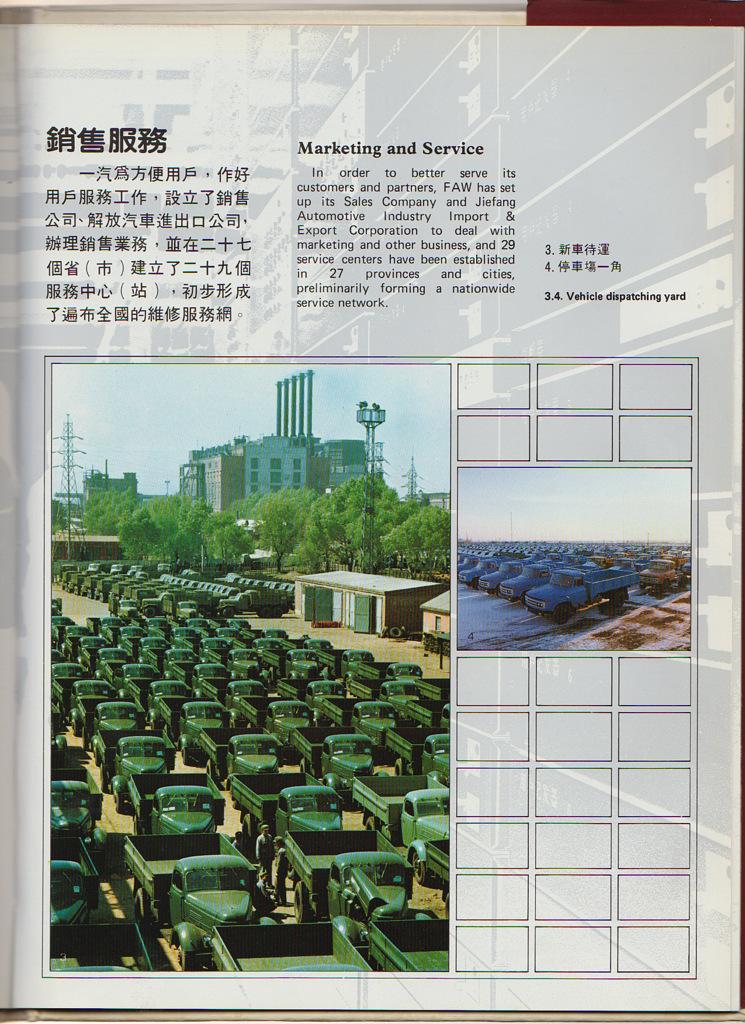
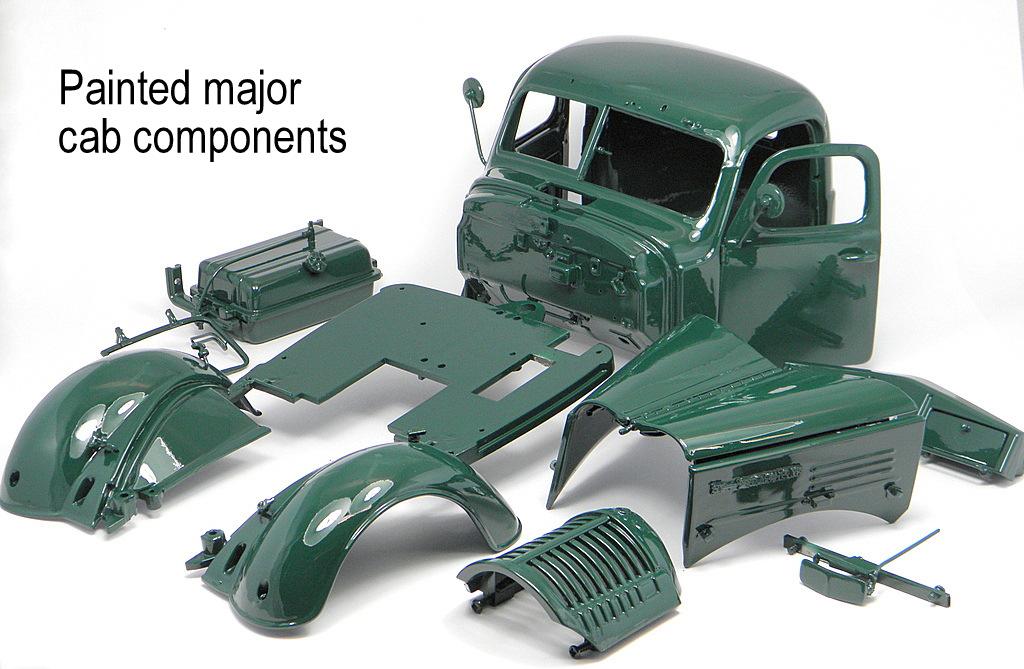
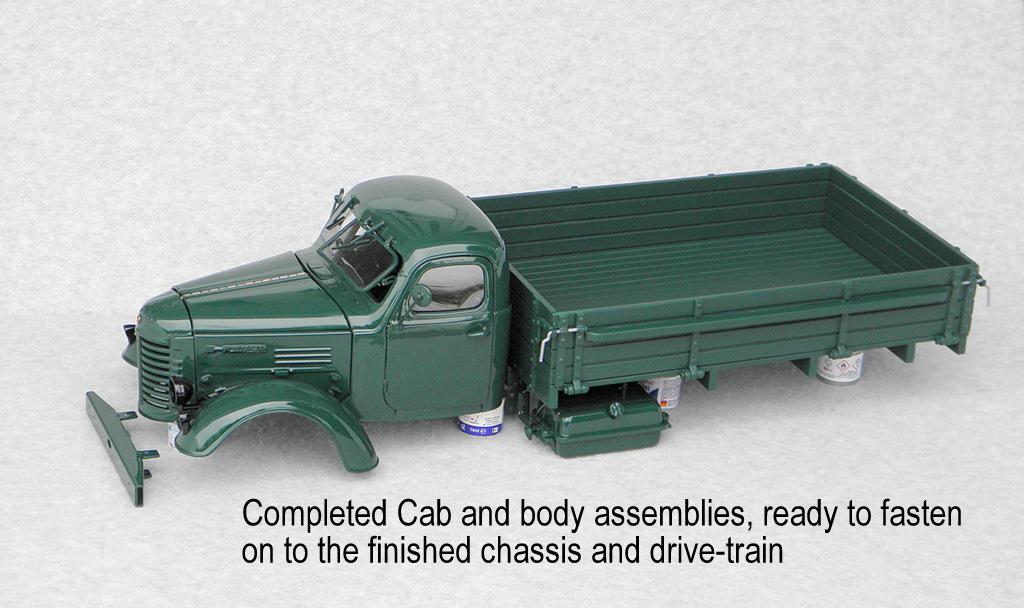
Actually, The Chinese plant built both military versions as well as civilian versions. The civilian versions were done in gloss green (probably enamel at that time) and although, like all work trucks, it would be no time at all to look dirty and sun-faded, they left the assembly-line as clean glossy vehicles. Like all his other model trucks, Larry (my twin brother) is only interested in vehicles as new, and therefore wanted his model to look as it may have just been factory completed. Attached is a factory pic of the Jiefang CA10 yard full of civilian tracks out in the dusty sunshine, waiting for delivery
-
-
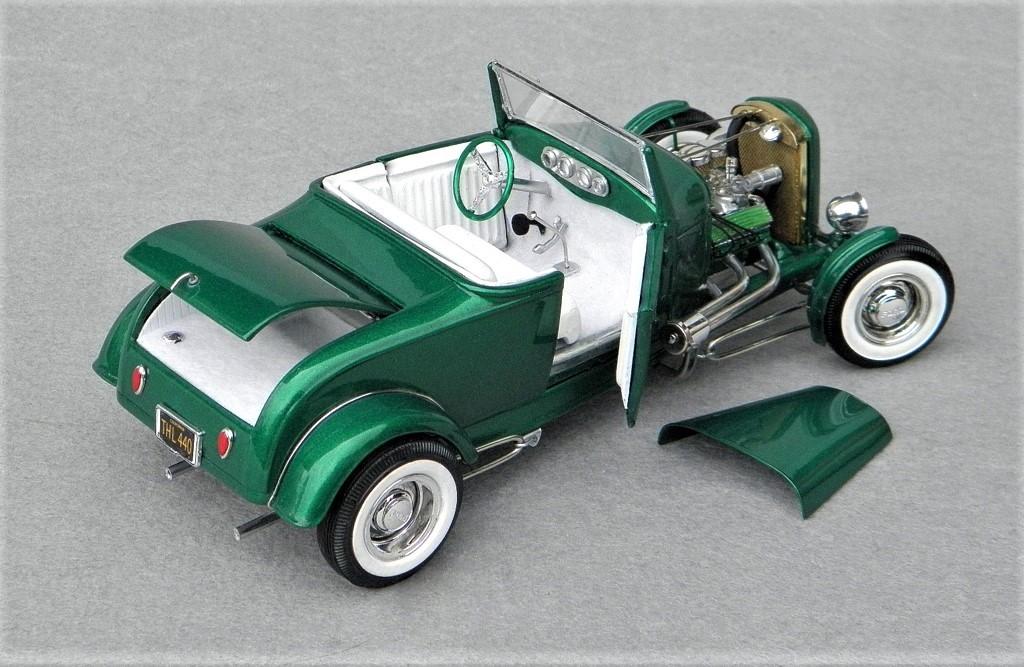
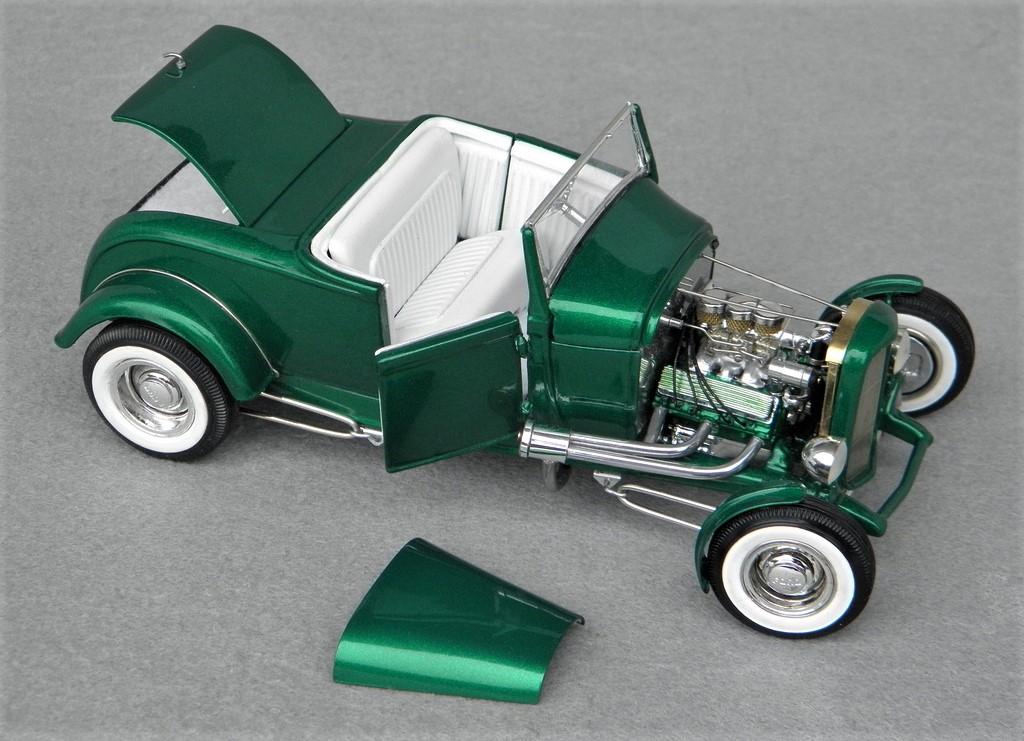
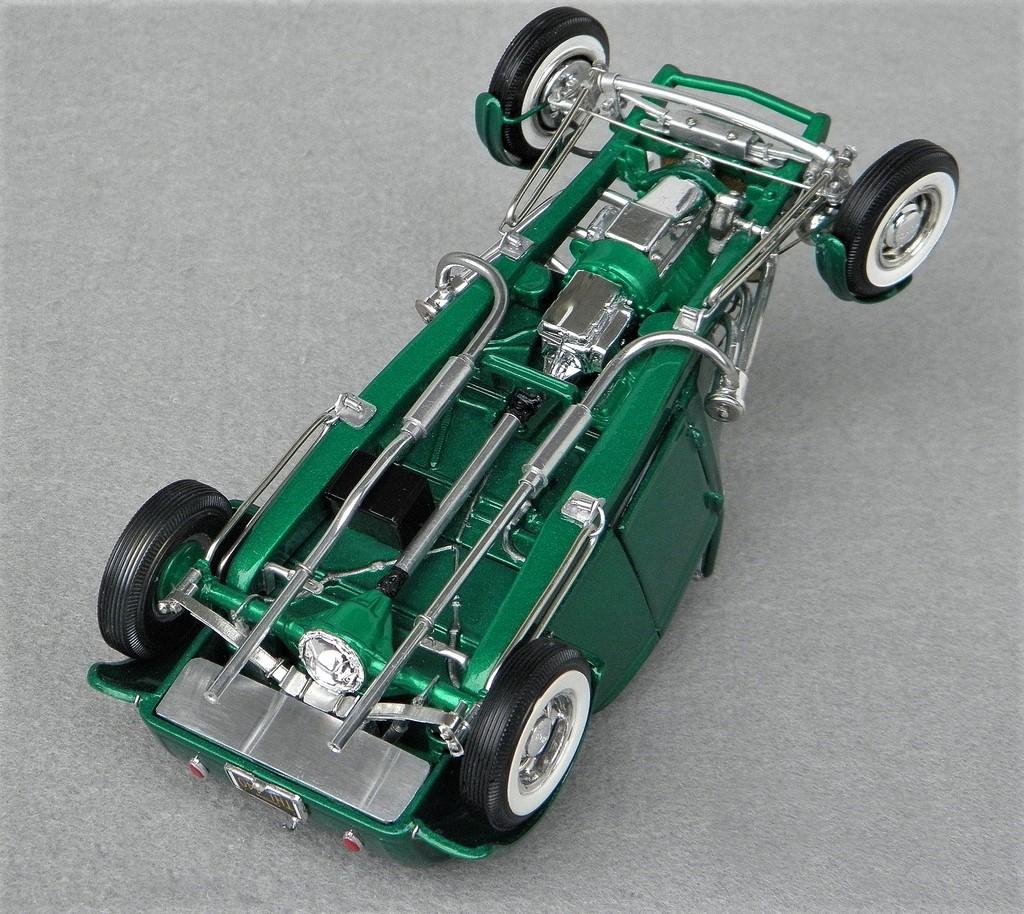
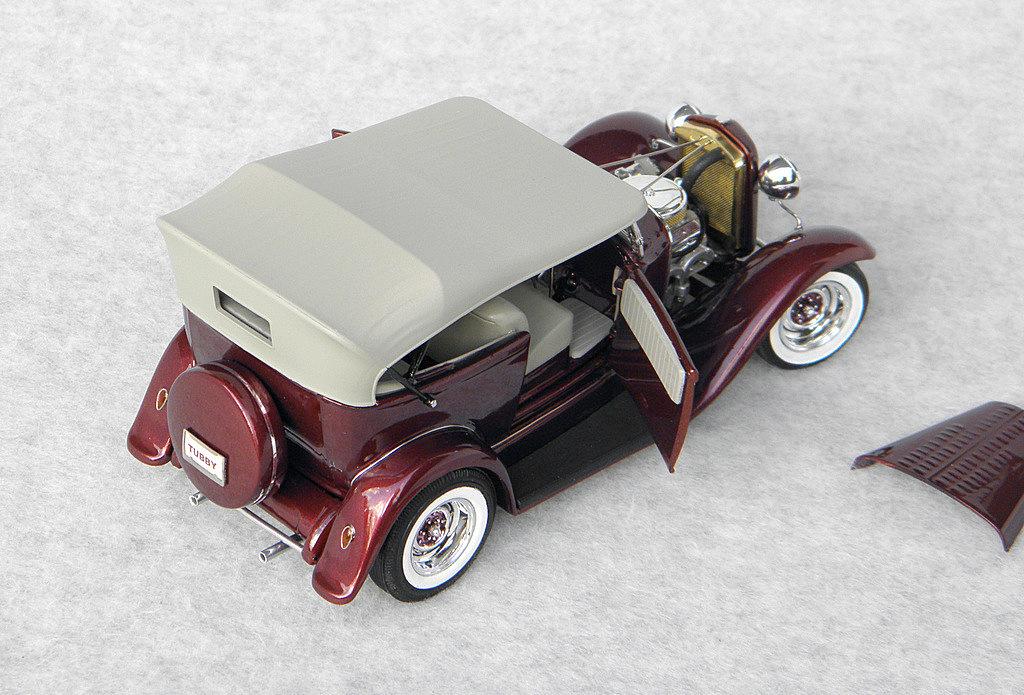
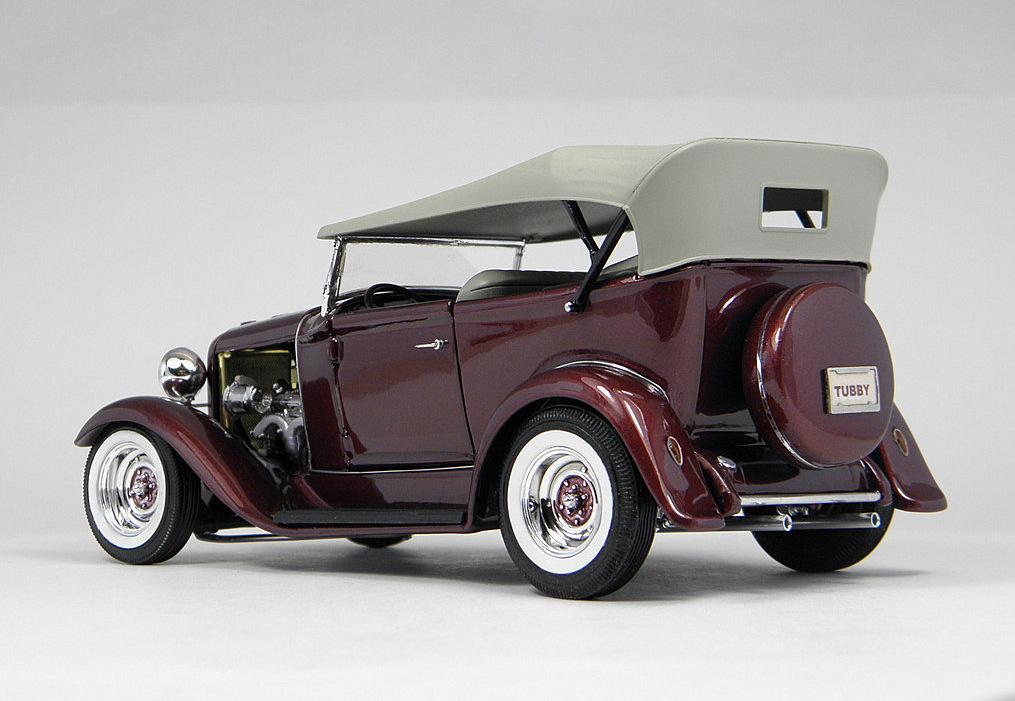
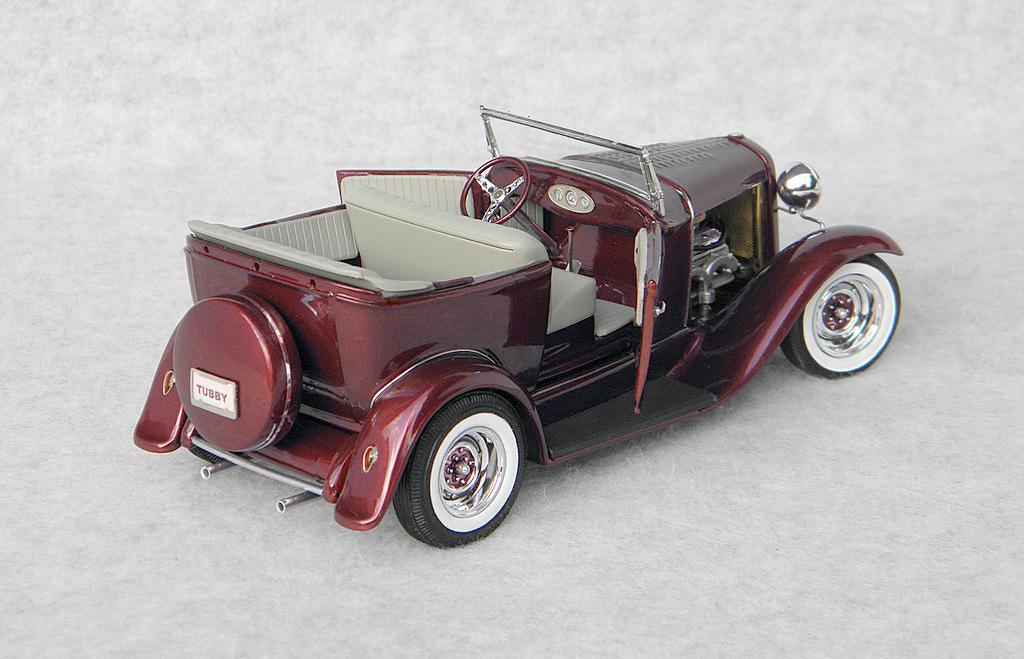
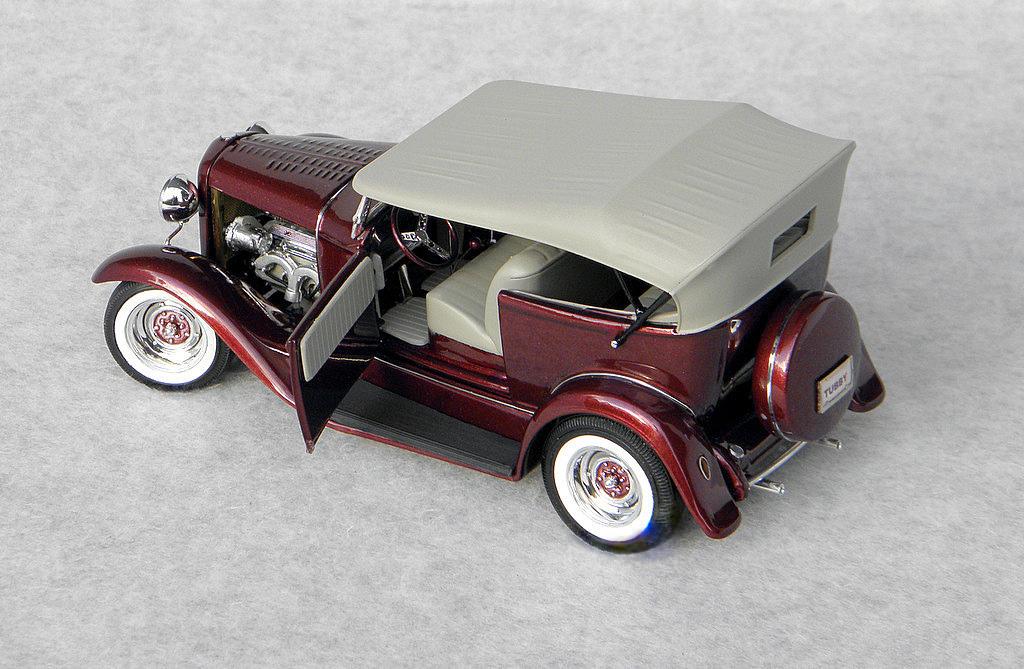
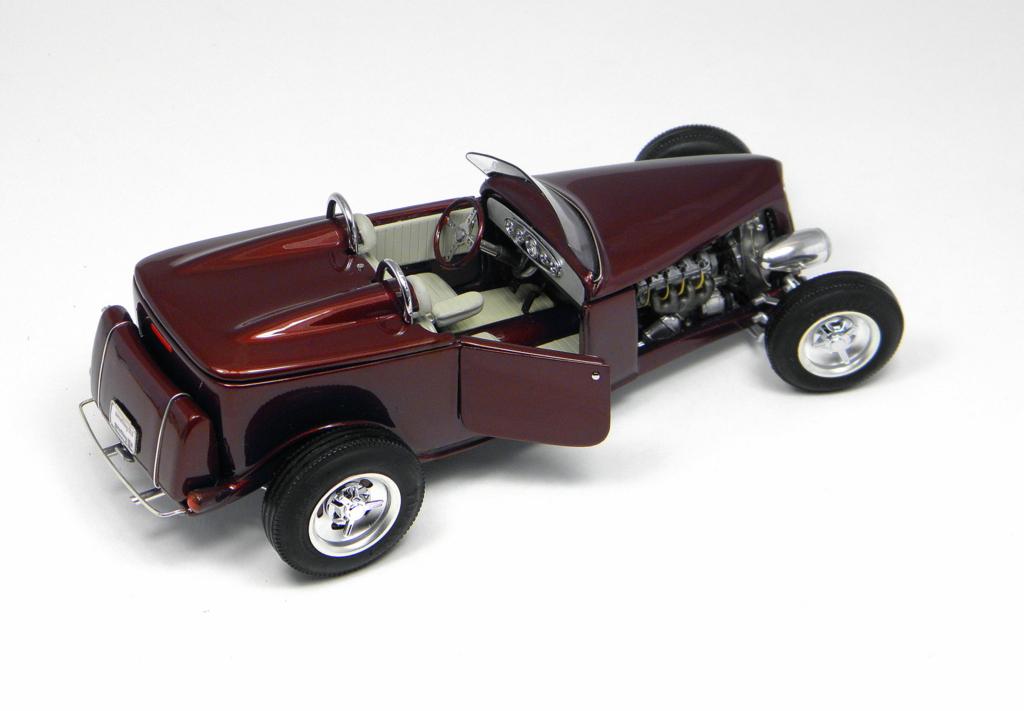
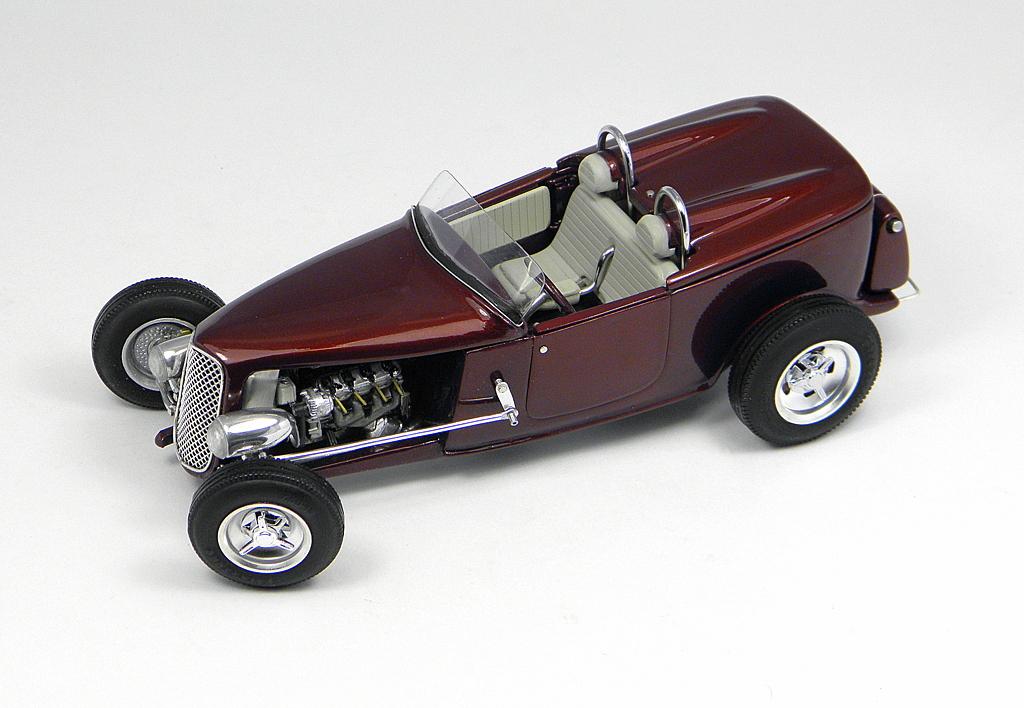
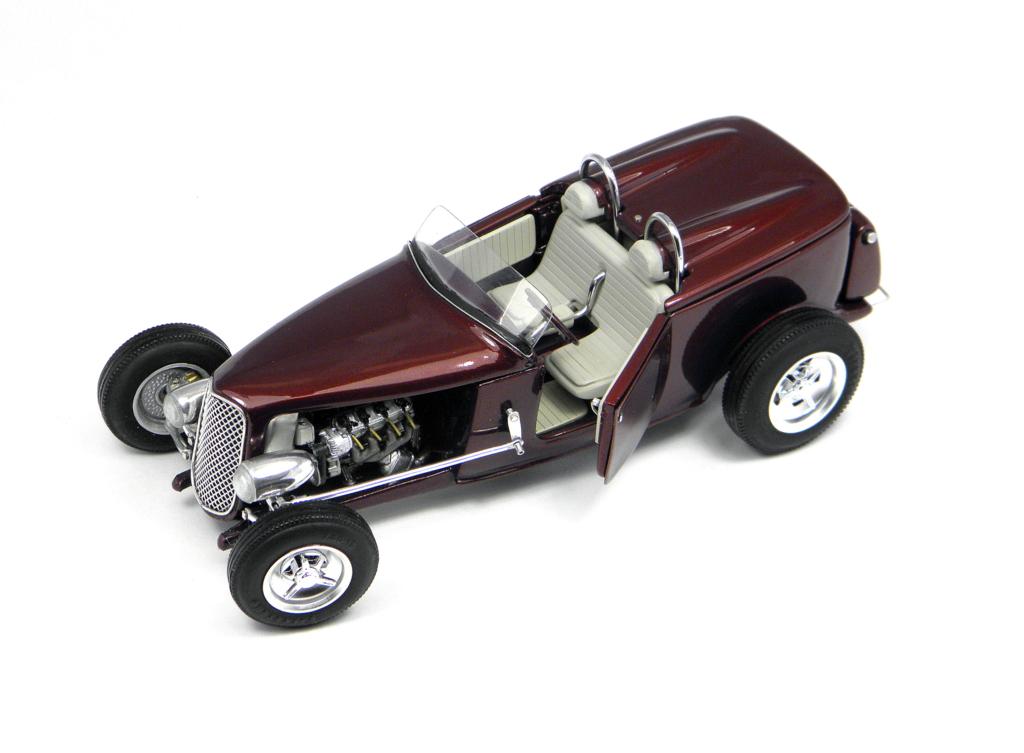
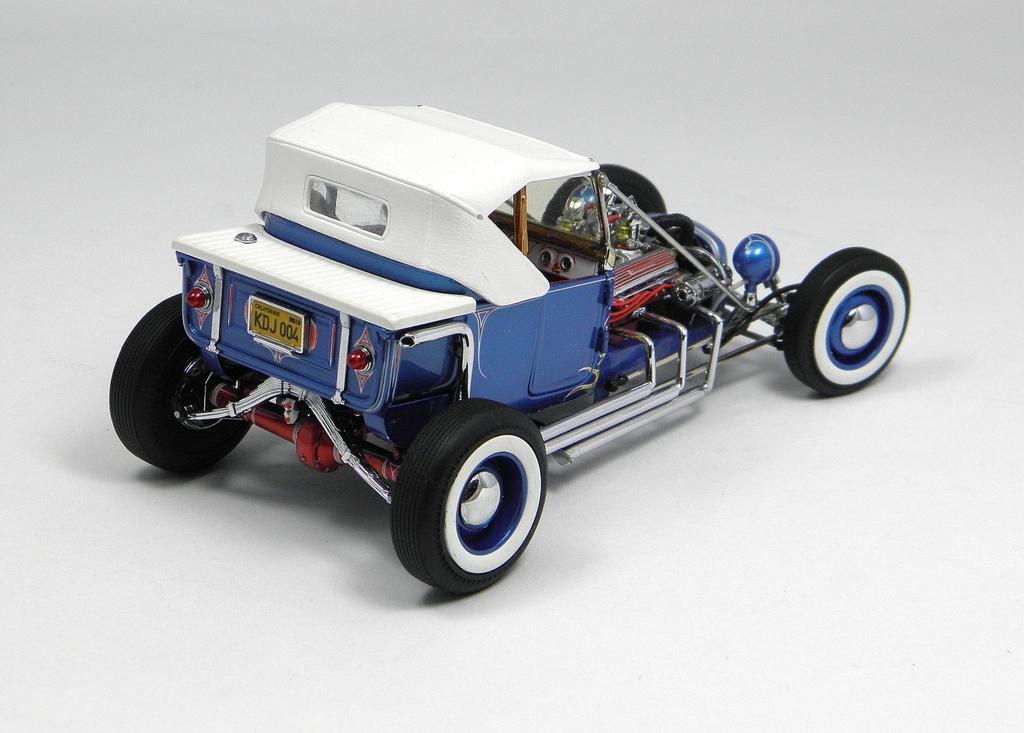
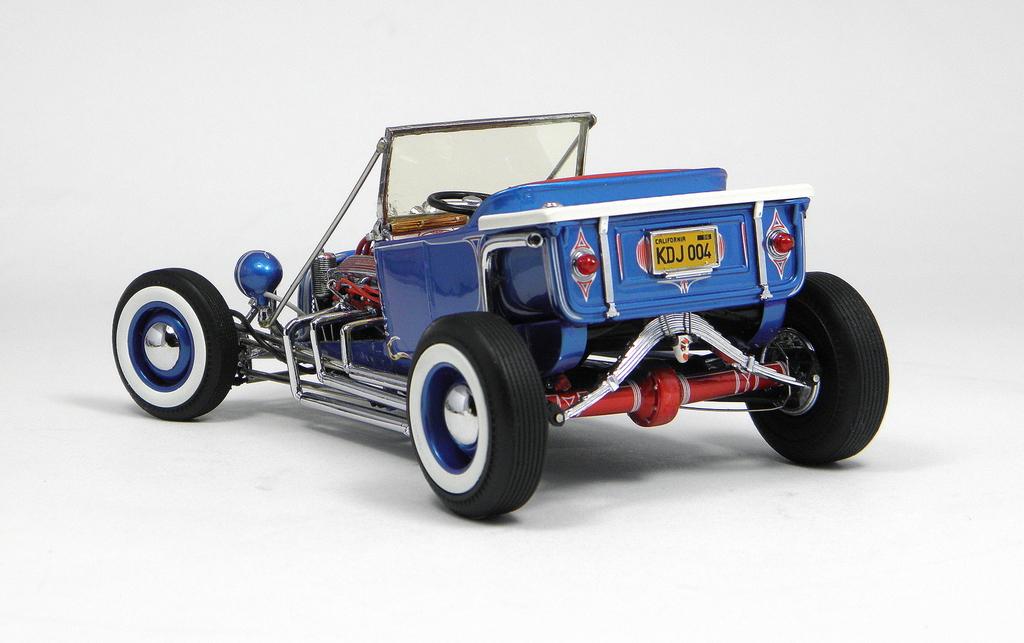
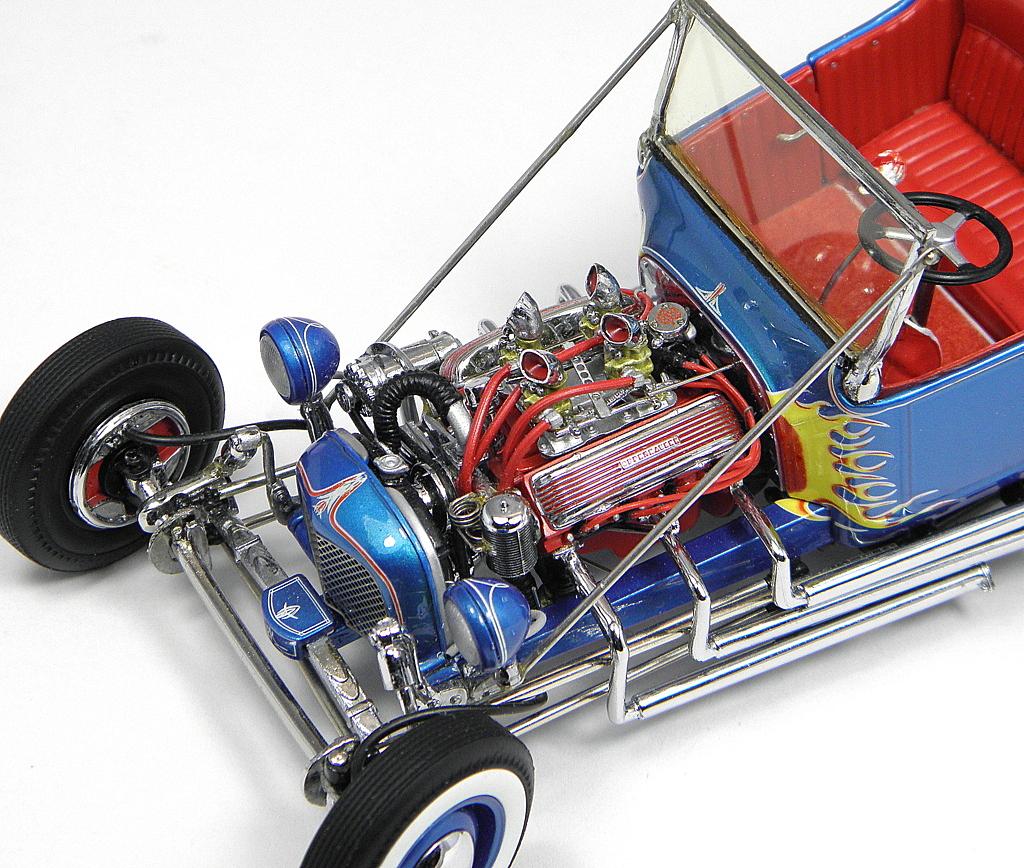
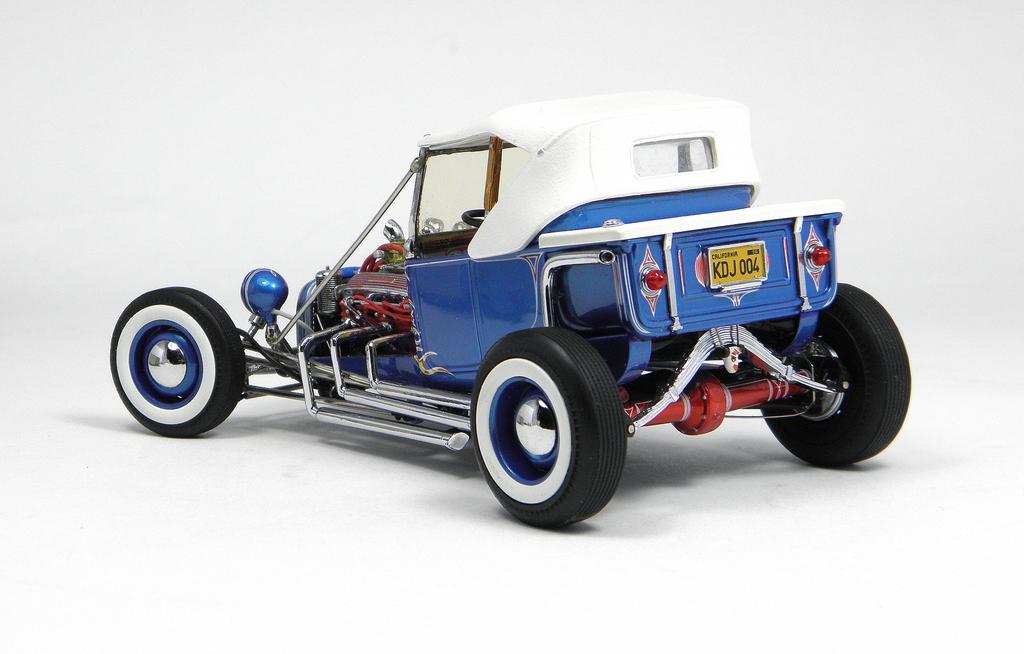
The original inspiration for this hot rod came from the nicely done plastic soft top from a Russian toy Model A. I wanted to build a 2-door phaeton but all the 1/25 or 1/24 Model A or Deuce tub toy or kit bodies available are 4-door models and since ’31 was the last year for Ford to build a 2-door (actually a 2 door ’32 ford was available in Australia) , I decided to use a ’31 body and transform it into the 2 door version. Like many builders of full size Model A hot rods, I much prefer the look of the softer looking Deuce grille and hood, so I also decided to use one of my parts bin Revell/Monogram deuce roadsters for grille, hood, headlights, windshield frame (now chopped slightly), rear fuel tank with frame horns, valve covers, and running-board rubber. The small-block Chevy motor has also been modified and detailed from one that was in my parts bin, as are the steering front axle and Revell ’55 Chevy rear axle. Fabricated details include my usual polished brass radiator, the opening hinged doors (tin sheet and styrene), the individual leaf semi-elliptic transverse springs and shackles, the polished tubing exhaust system, the plated wire grille surround, the simulated roll-n-pleat upholstery panels, and the lathe-turned spare tire cover. The wheels are Pegasus chrome-reverse on parts bin tires, and Model Car Garage supplied the PE Deuce grill insert, gauge- cluster, tear-drop tail-lights, and license plate frame. Paint is custom mixed basecoat/clearcoat.
-
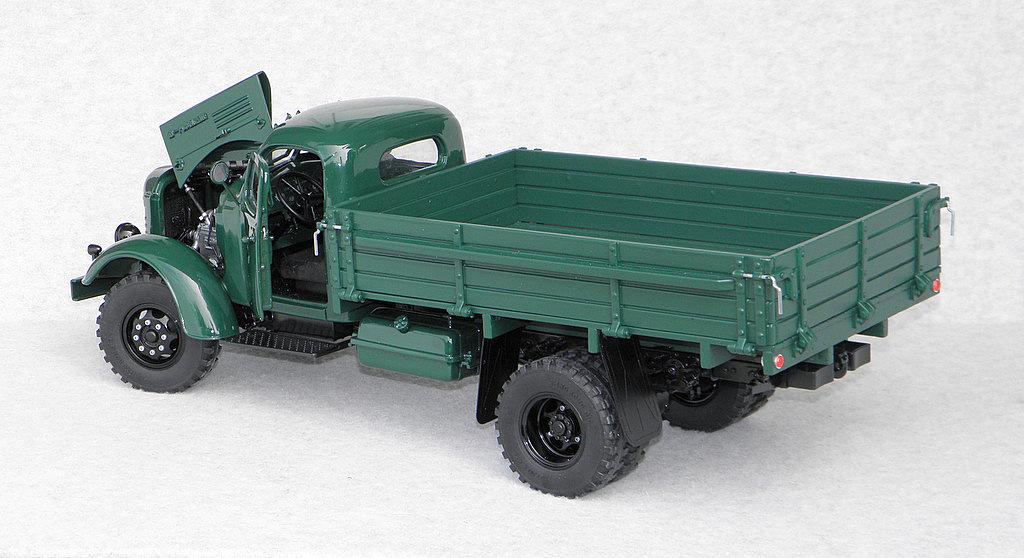
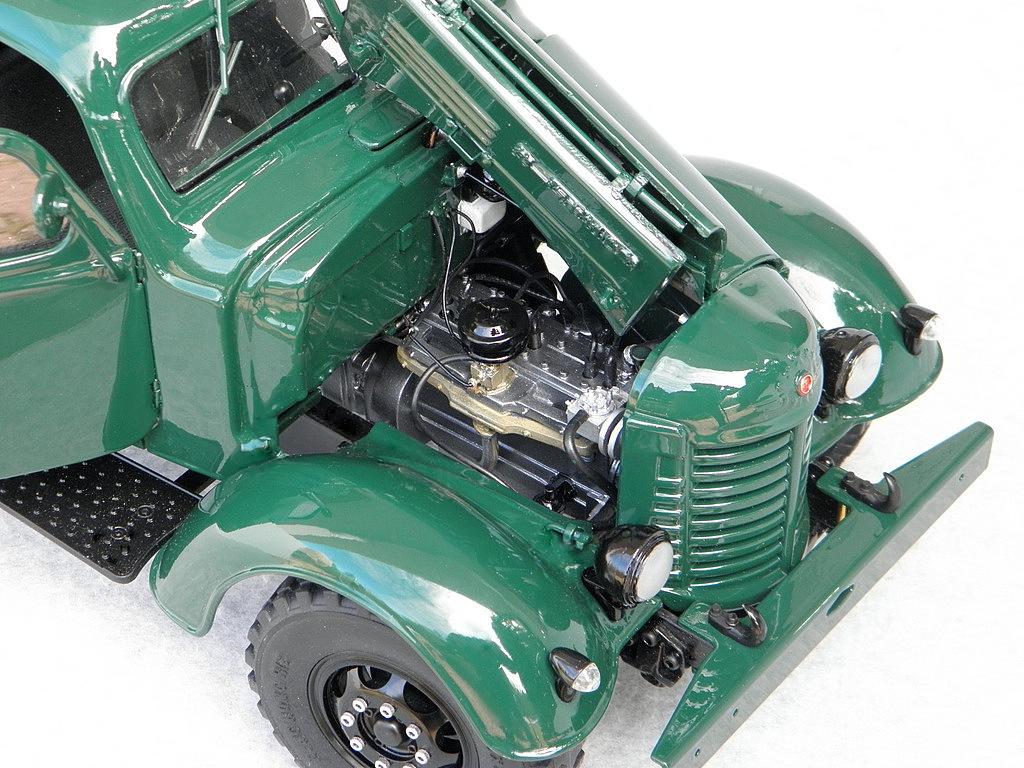
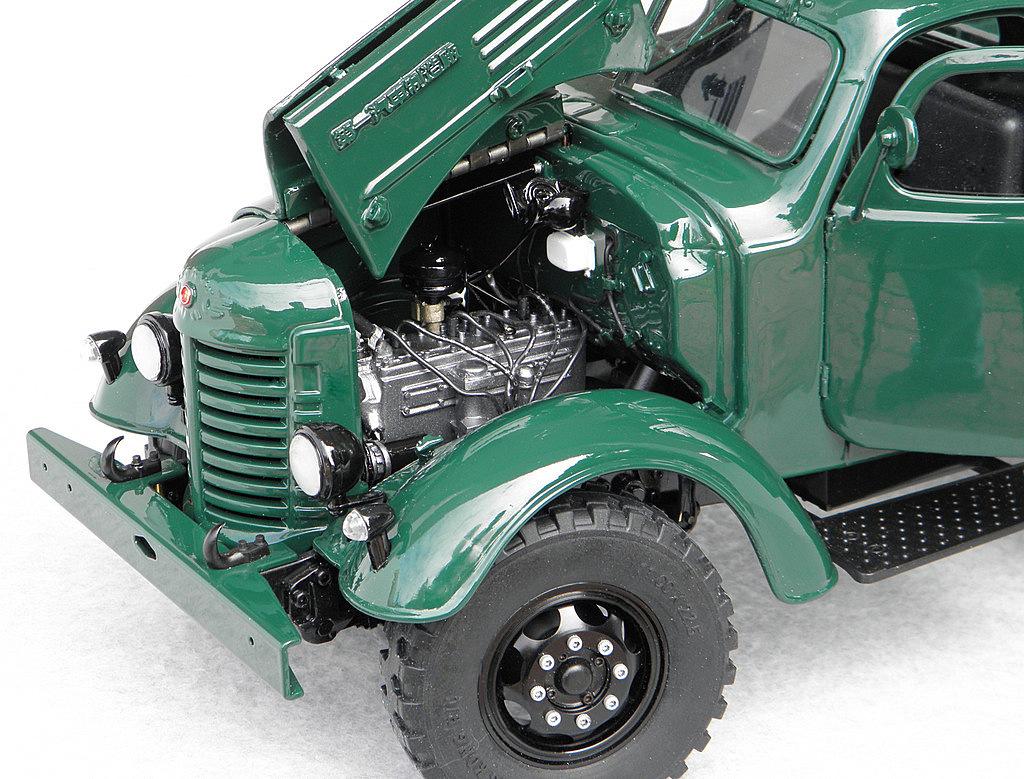
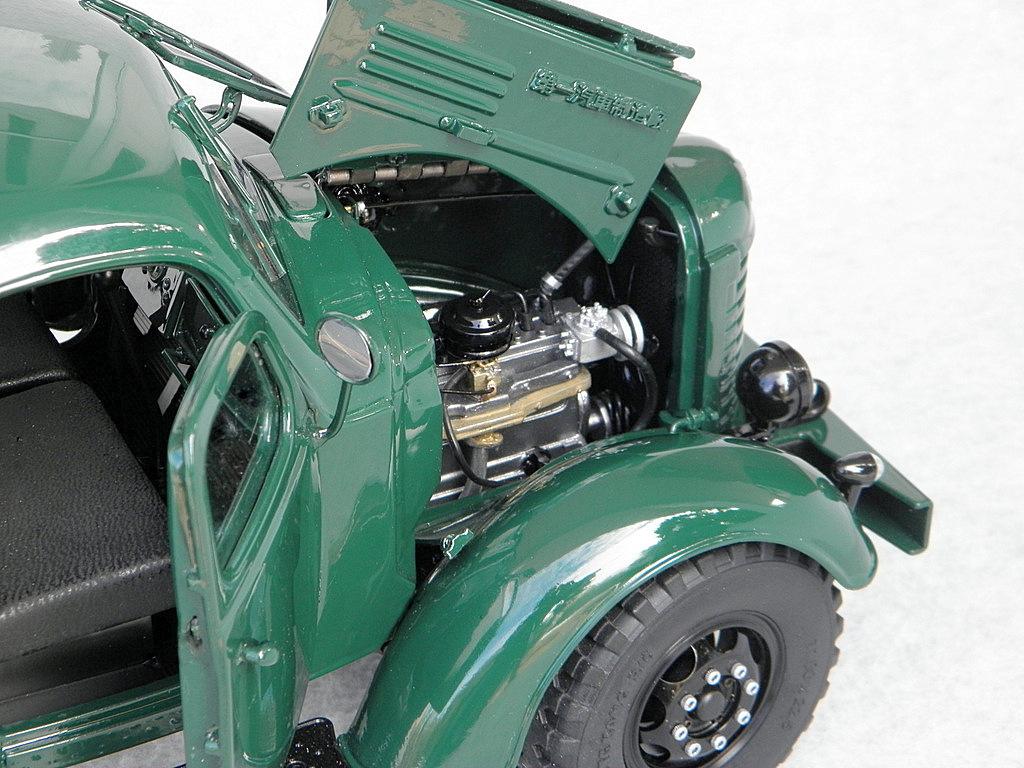
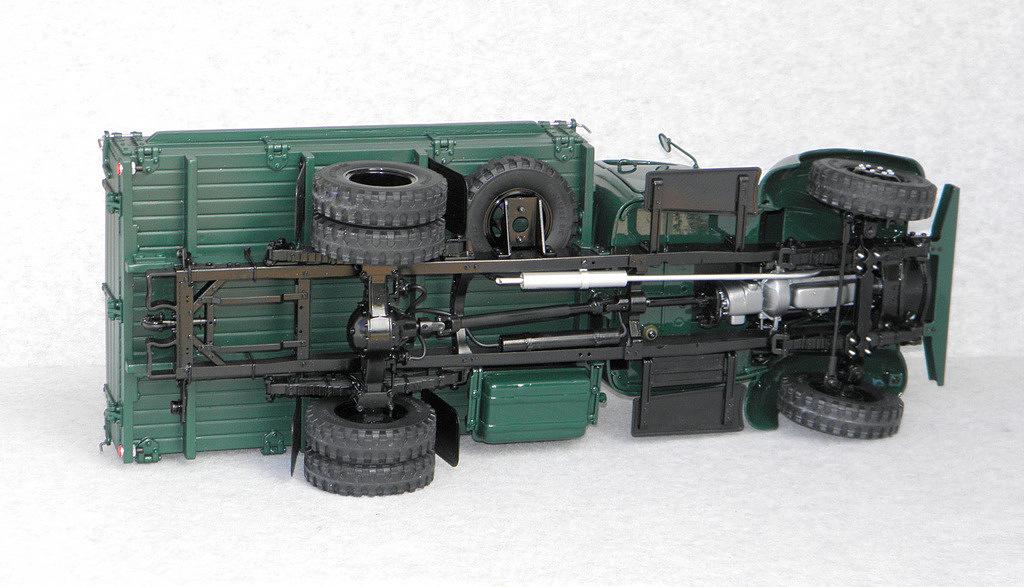
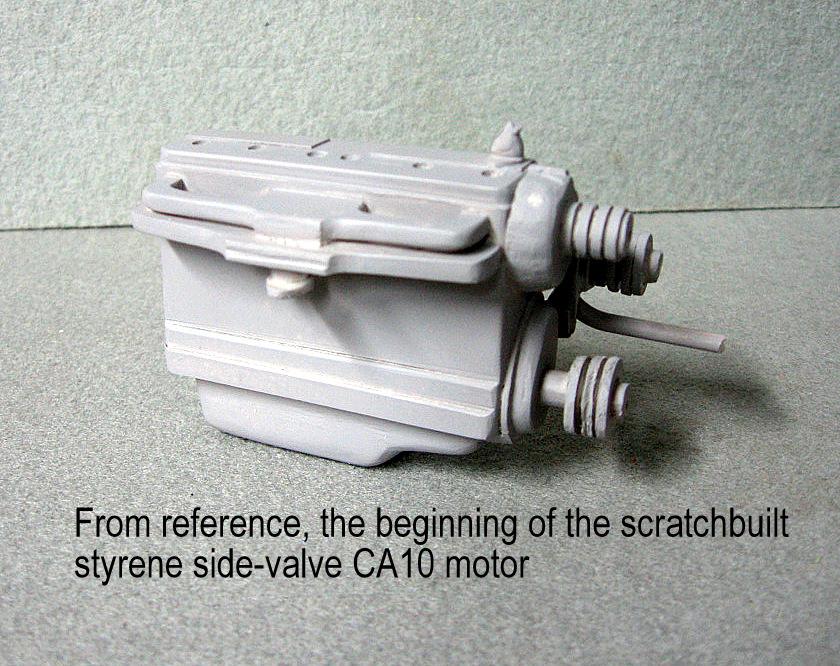
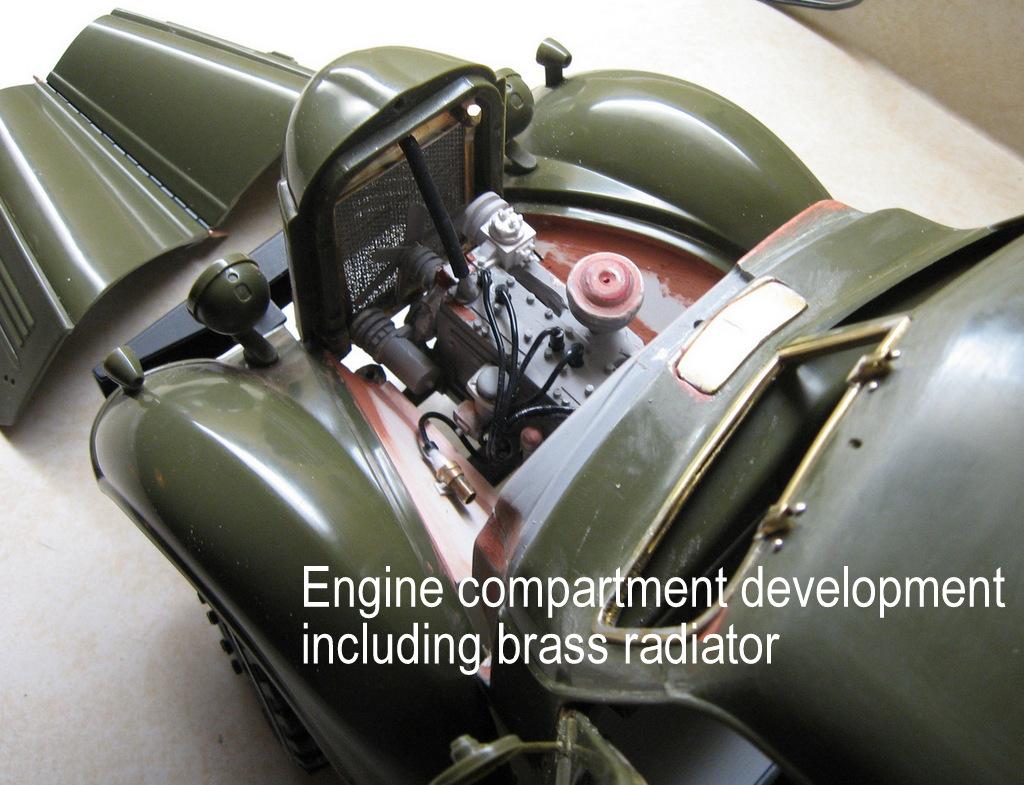
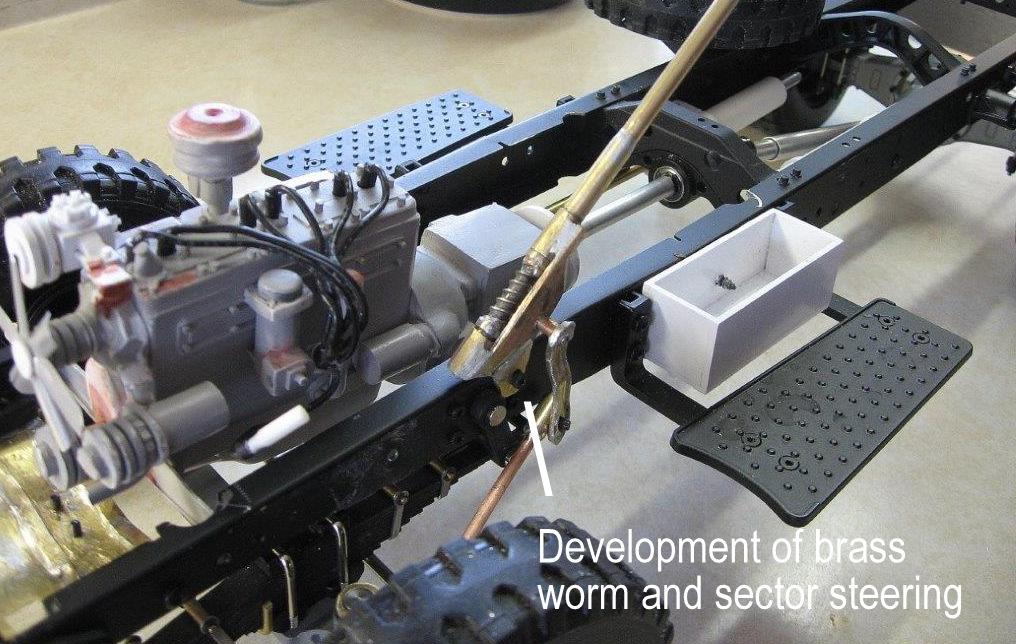
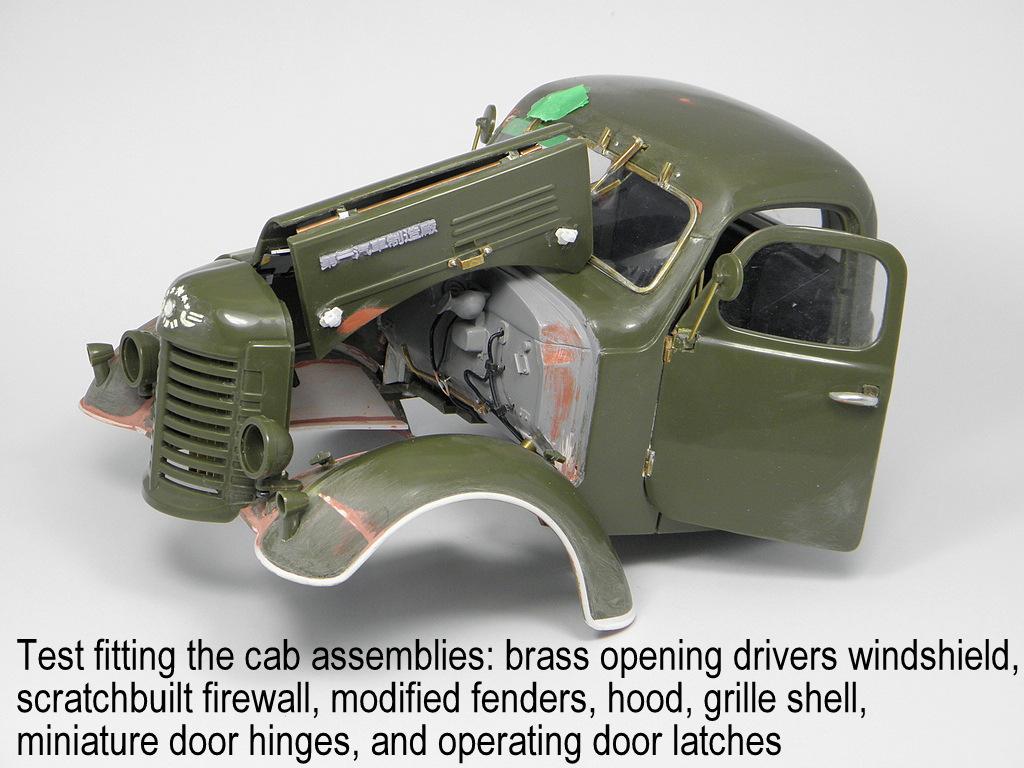
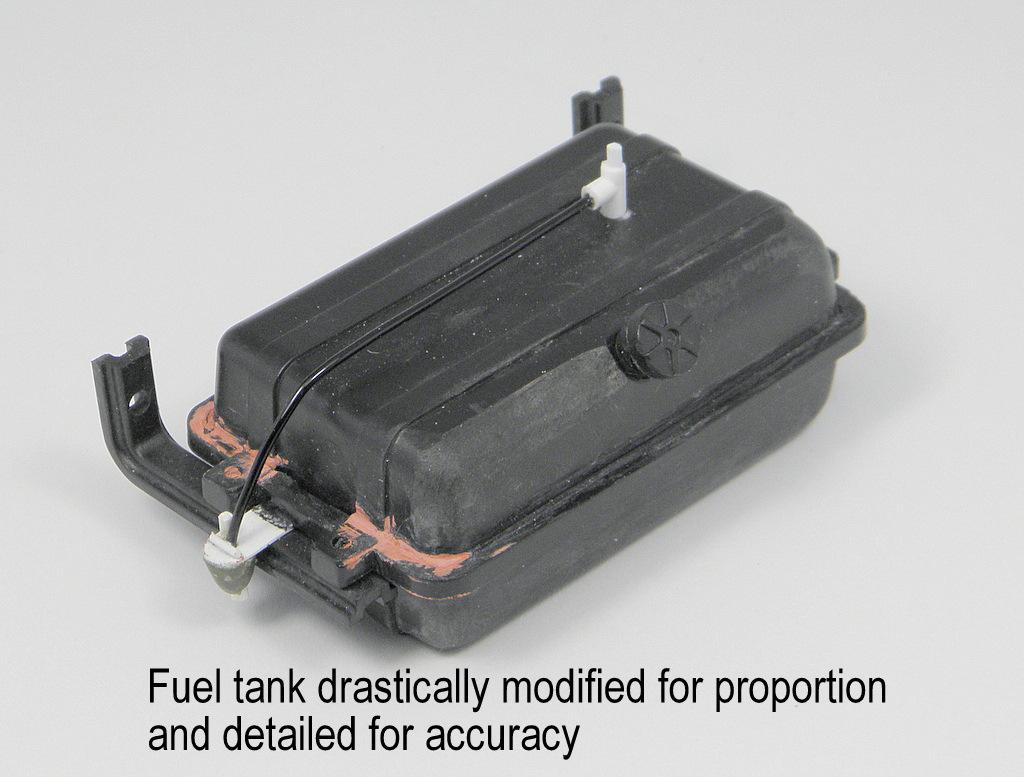
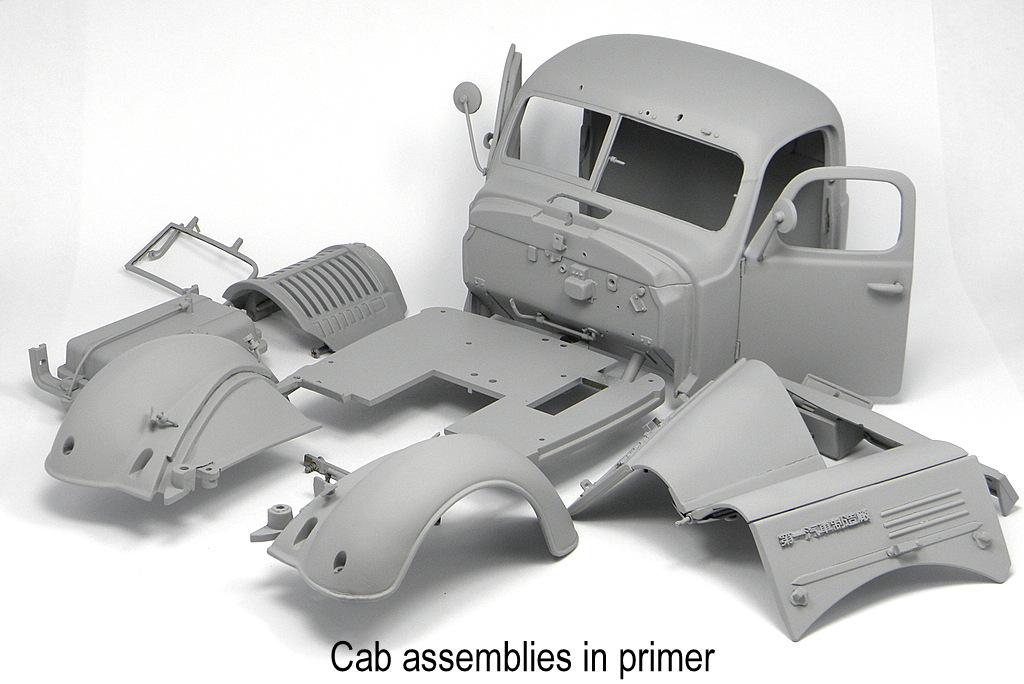
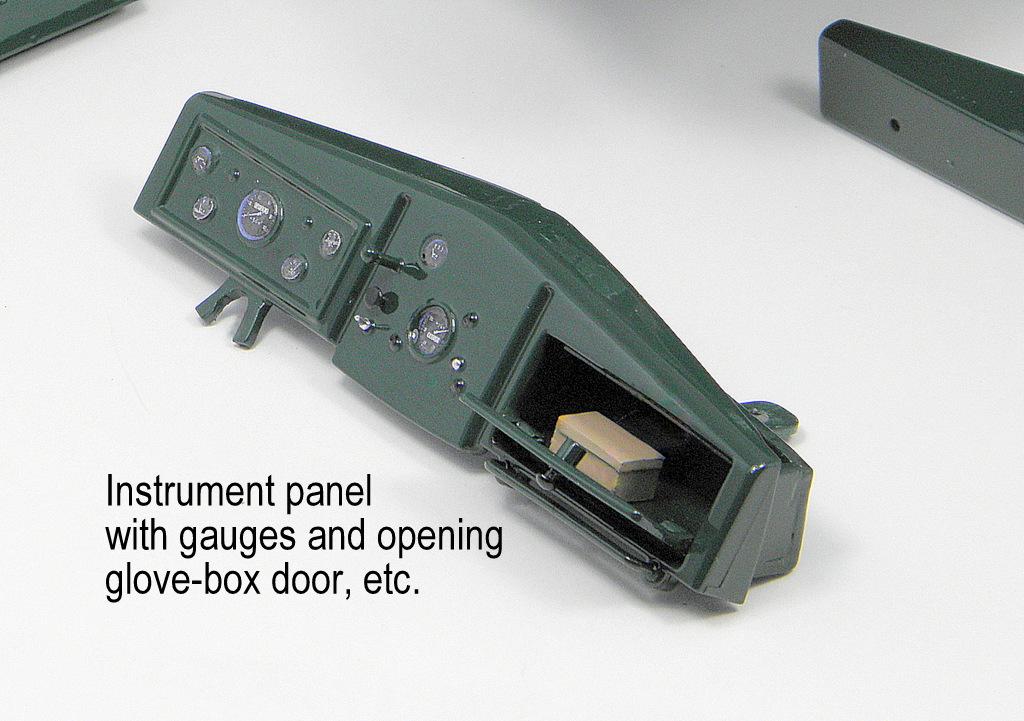
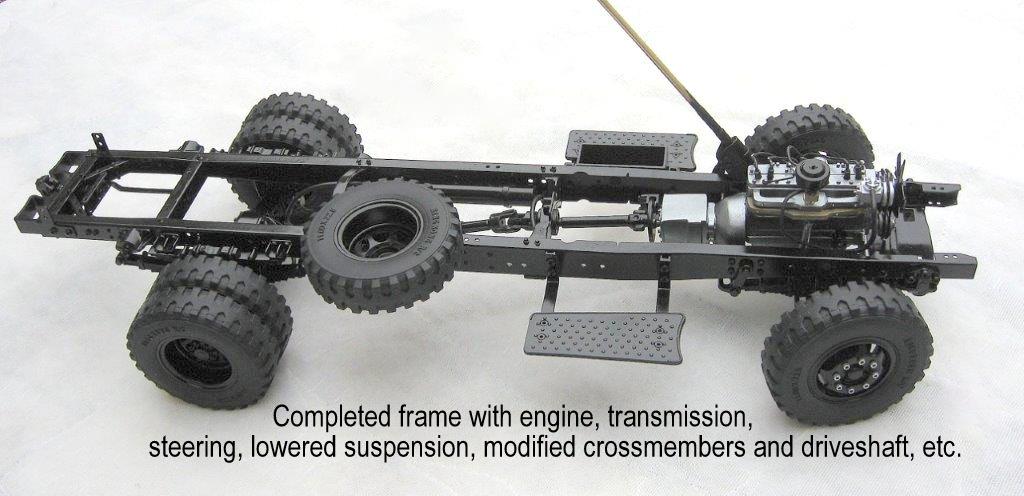
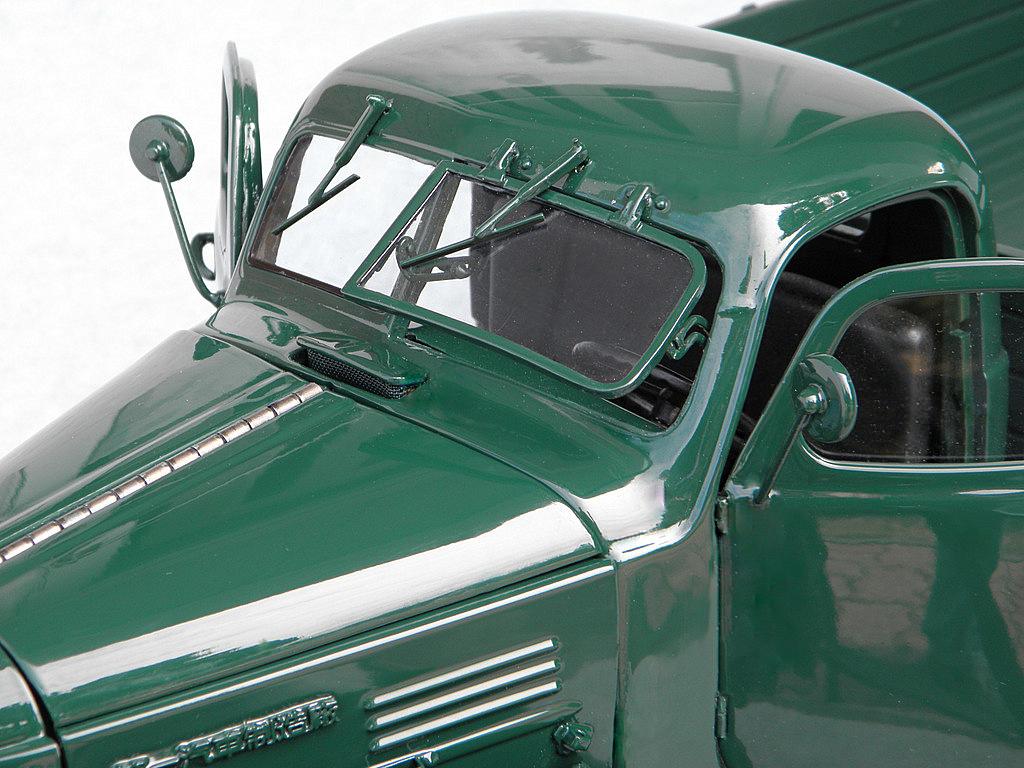
Following is in Larry's own words: Around 30 years ago, I obtained basic reference to a late '50s Chinese manufactured Jiefang CA10.truck. The tooling for the truck had been obtained from the Russian ZIS, which, in turn, was based closely on the American K Series International, many of which had been sent to Russia through ‘lend lease’ during WW2. Somehow, I became focused on that Jiefang vehicle and, over the years, managed to collect additional reference as well as various diecast versions in 1/24, 1/32, 1/43, and 1/64 scale. Last year I purchased an impressive 1/12 scale RC (radio controlled) King Kong toy in kit form.... minus any of the electrical or transmitter based components, with the express intention of converting the RC toy into a more proportionate and detailed 'high end' static display model. With a good deal of reference in hand, much of the early aspect of the project focused on more accurately proportioning the cab (windows, fenders, etc.), I installed properly hinged doors with functioning handle latches, more finely hinged hood assembly, a hinged opening left hand (driver's) windshield including pivoting windshield wiper (as on the full size vehicle), a pop-up cowl vent, detailed dash board with opening glove box door, a complete and fully detailed firewall, radiator, dual horns, and actual fine leatherette applied to formed seat cushions, etc. Of note, the entire 'drive train' …engine, transmission, external brake and safety brake components, etc. have been fully scratch built. A working worm and sector steering box (with its accompanying Pittman arm and drag-link) and a proportionately accurate fuel tank (with its lines and filter) have also been scratch built along with various other chassis components too numerous to mention. The model now has all its belts, hoses, electrical lines, re-proportioned/ lengthened drive shafts, 8 holed wheels, etc. Paint is mostly automotive basecoat/clearcoat with assorted Dupli-color automotive touch-up applied to chassis, wheels, motor, etc. Materials used are styrene and ABS plastic, aluminum, rubber, vinyl, soldered brass, and assorted steel fasteners. There is no zinc diecast material on this model
-
-
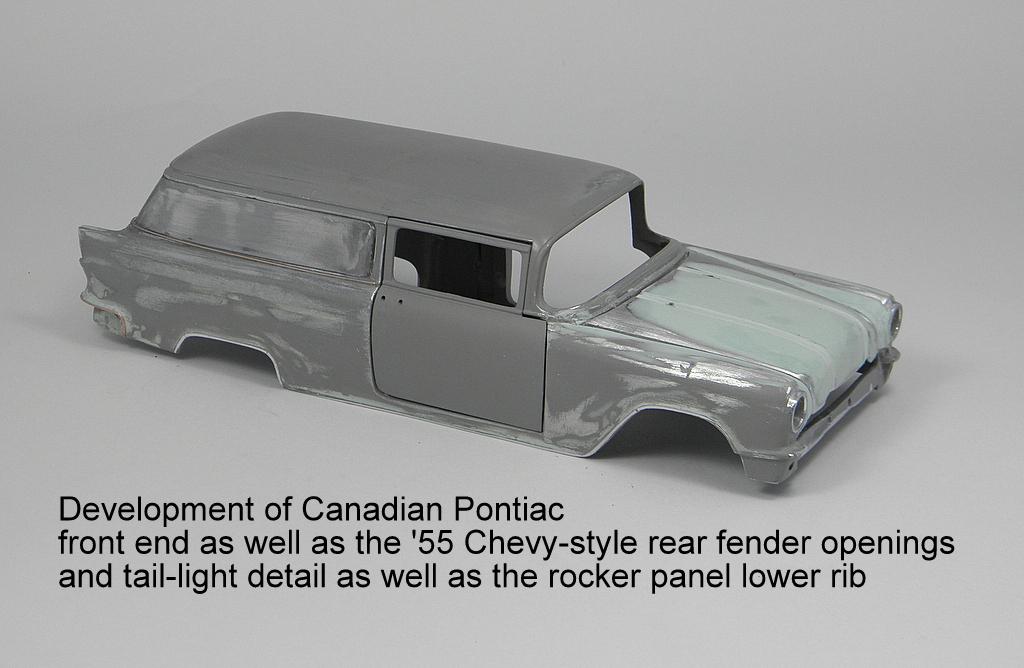
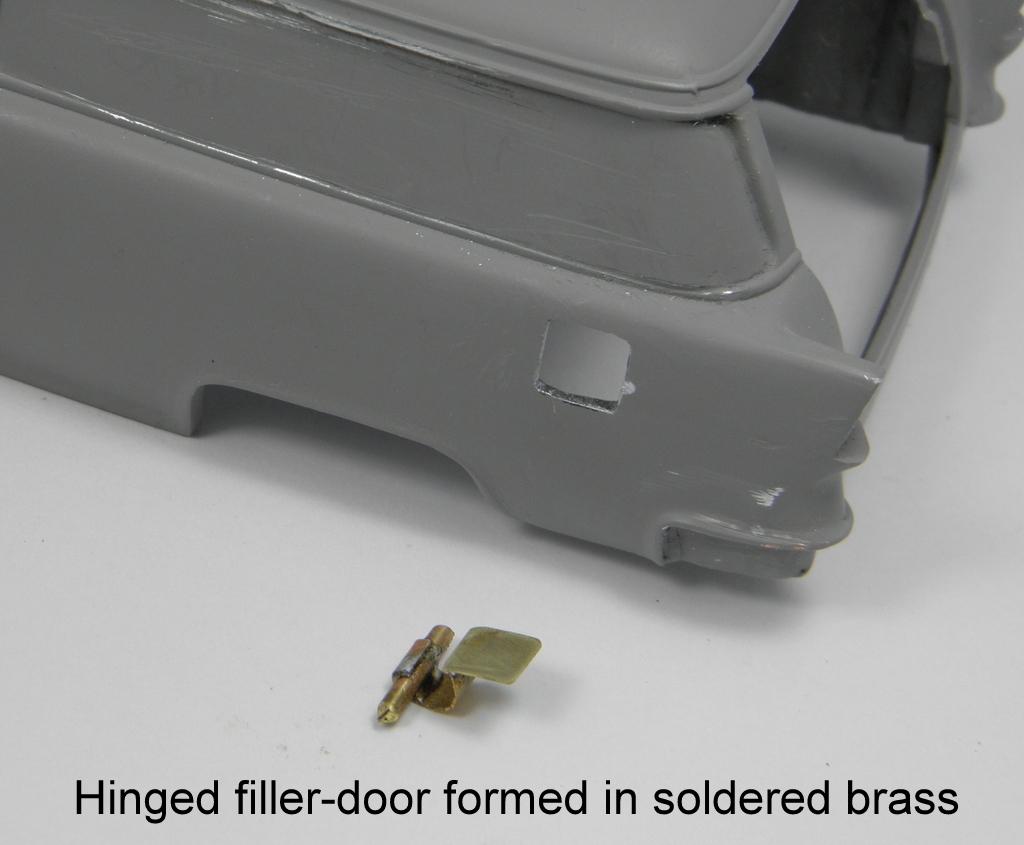
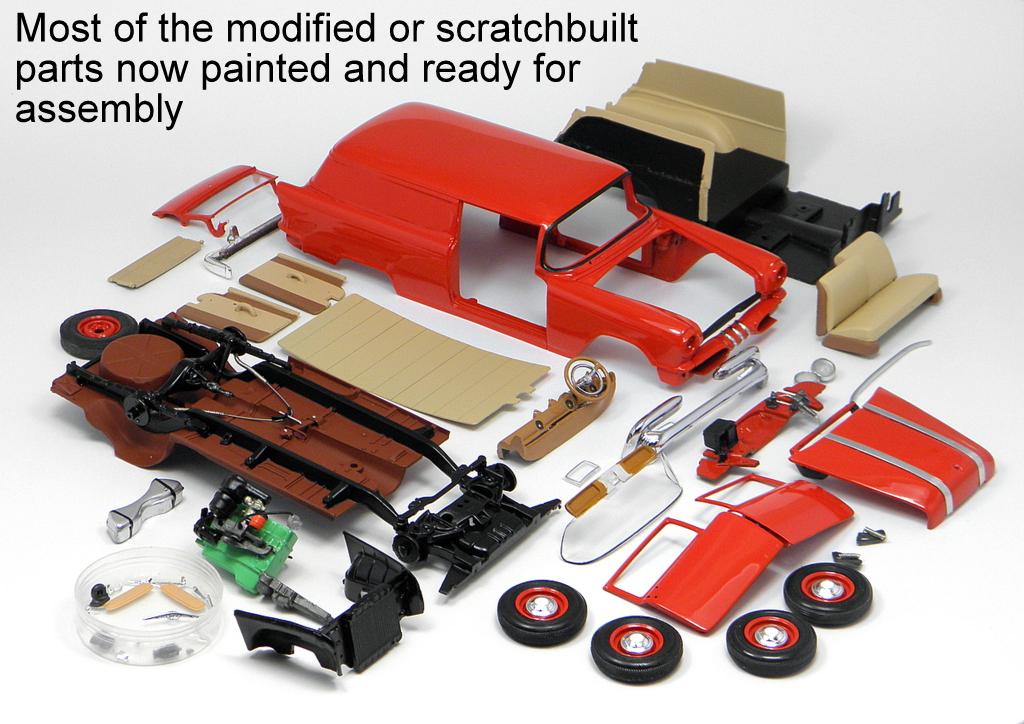
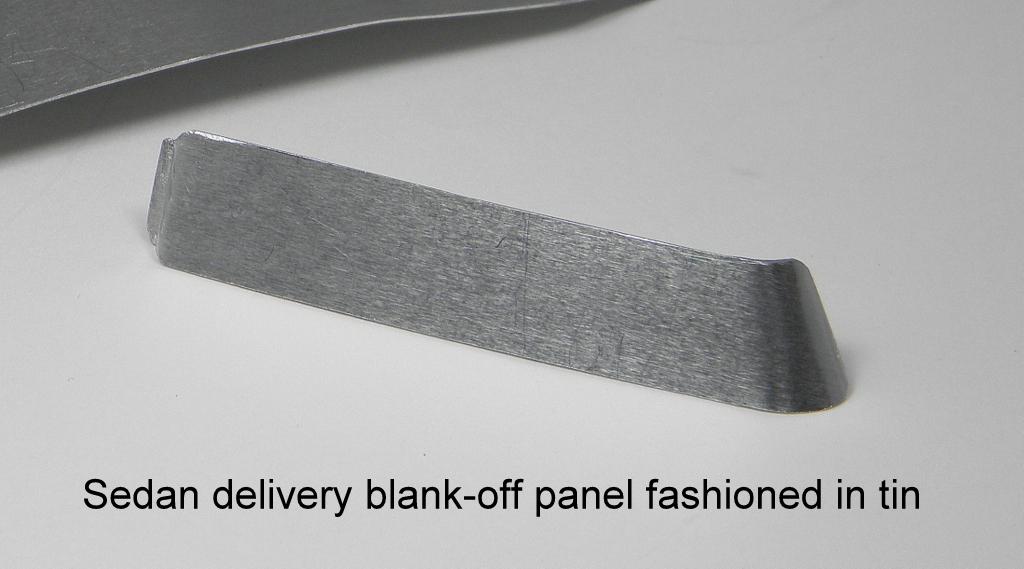
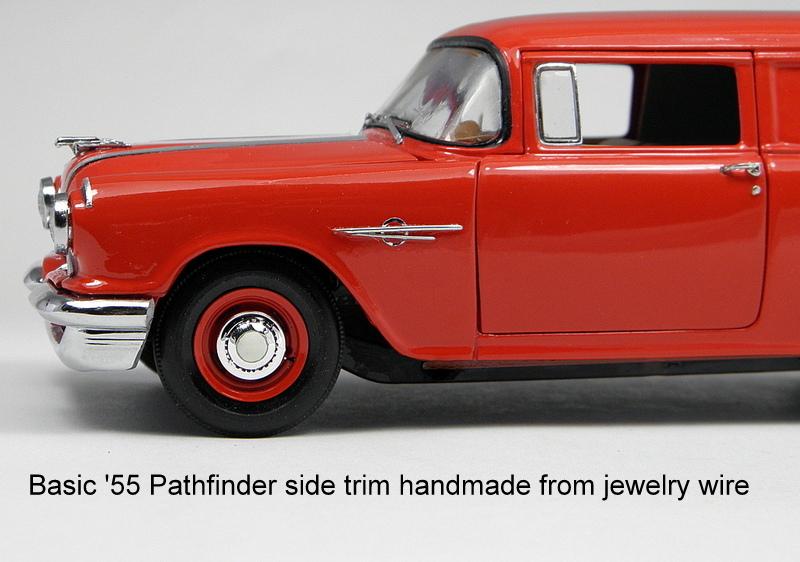
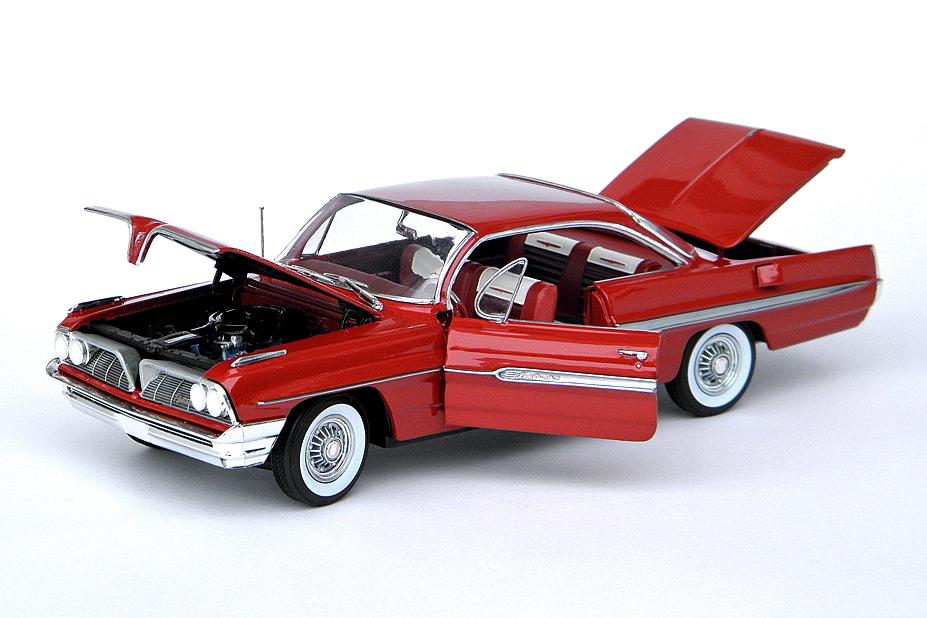
I’ve just completed this stock ’55 Pontiac Pathfinder sedan delivery using a toy low-rider ’57 Chevy wagon as the main starting material, and the basic front trim and dash-board was in my parts bin from an FM American ’55 Pontiac on which the body had self-destructed from a bad batch of metal alloy All of Pontiac’s production sedan deliveries from ’54 until ’58 were built only in Oshawa, Ontario, and like the other Canadian Pontiacs at that time, were built on a Chevy platform. Compared to the American ’55 Pontiacs, the Canadian Pontiacs were shorter (Chevy chassis and drivetrains), and although they had similar front end trim, the shortened fenders had a different wheel opening shape, a shorter, taller, and narrower engine hood (to clear the higher available six cylinder motor) with a slightly more blunt nose. The front bumpers, while similar in appearance, had a shorter side length. This is the third detailed sedan delivery that I’ve built in the last three years, using similar techniques and although they’ve all been time consuming builds, at least the build plan was familiar, and most of the research had been done….in this case, I also had reference to an unrestored full size version which was somewhat rough, but I was able to photograph lots of details which had been questions on my mind. The main paint is Automotive basecoat/clearcoat to approximate Pontiac's Bolero Red
-
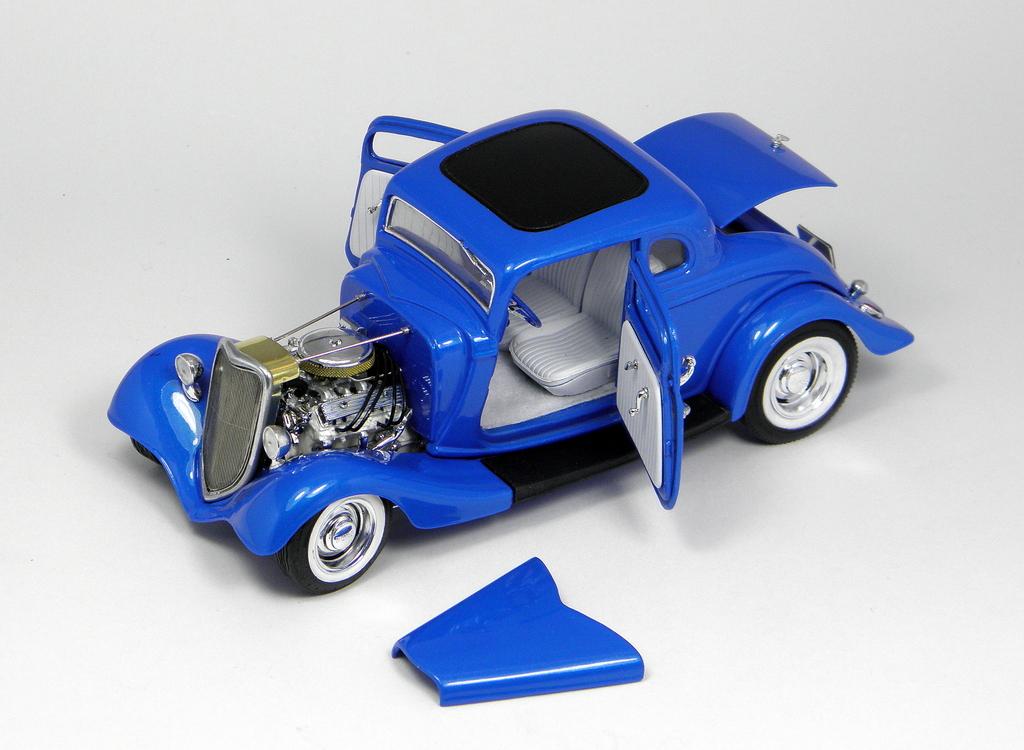
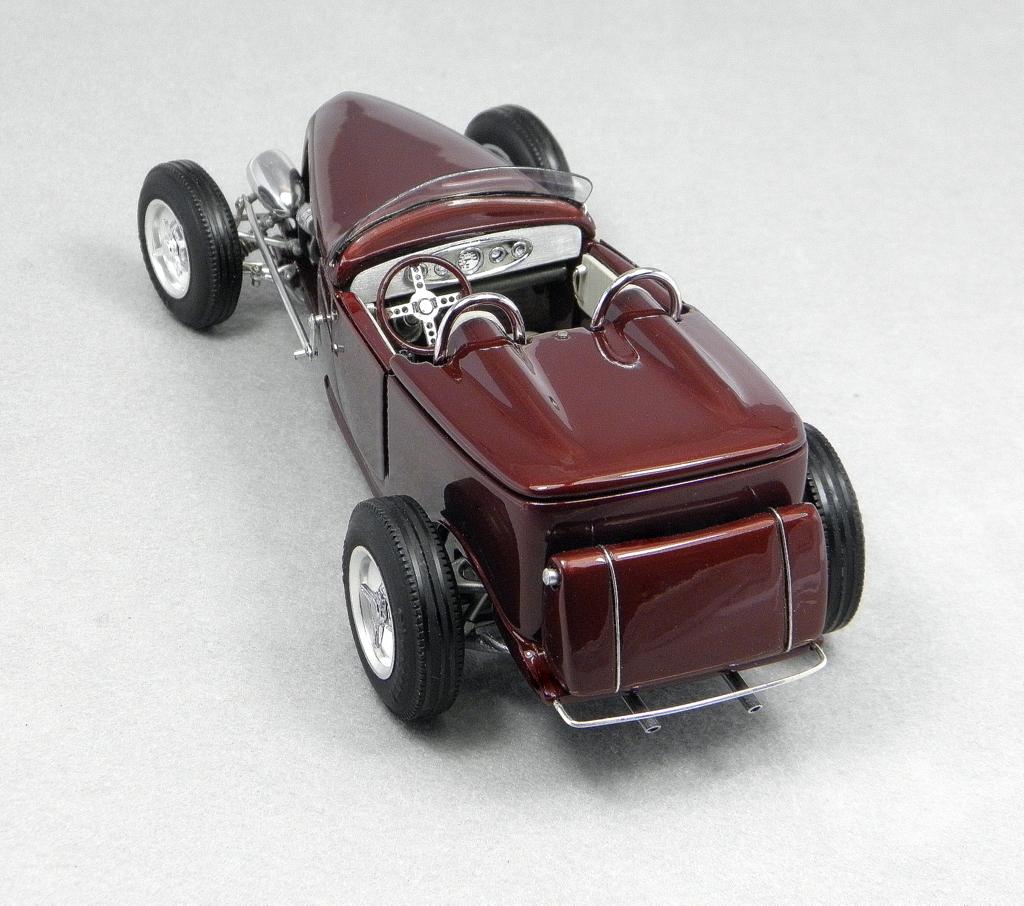
This 1/25 model is made almost entirely of modified stuff in a variety of materials, rescued from my parts bin. The only new purchases for the model's completion were the PE grille and licence frame from Mode Car Garage, as well as the aluminum tubing used for a bunch of the mechanical parts, etc. I believe the wheels are from the Revell/Monogram Deuce roadster kit, and the tires are a complete mystery as to their origin. The simulated tuck-n-roll upholstery is formed from model railroad siding, and the tri-carb Oldsmobile J2 motor was modified and detailed from a Revell parts pack Cadillac motor. Suspension is individual-leaf transverse springs/chackles fabricated from aluminum sheet, and the radiator is fabricated from polished brass sheet and mesh. Paint is automotive custom mixed basecoat/clearcoat.
-
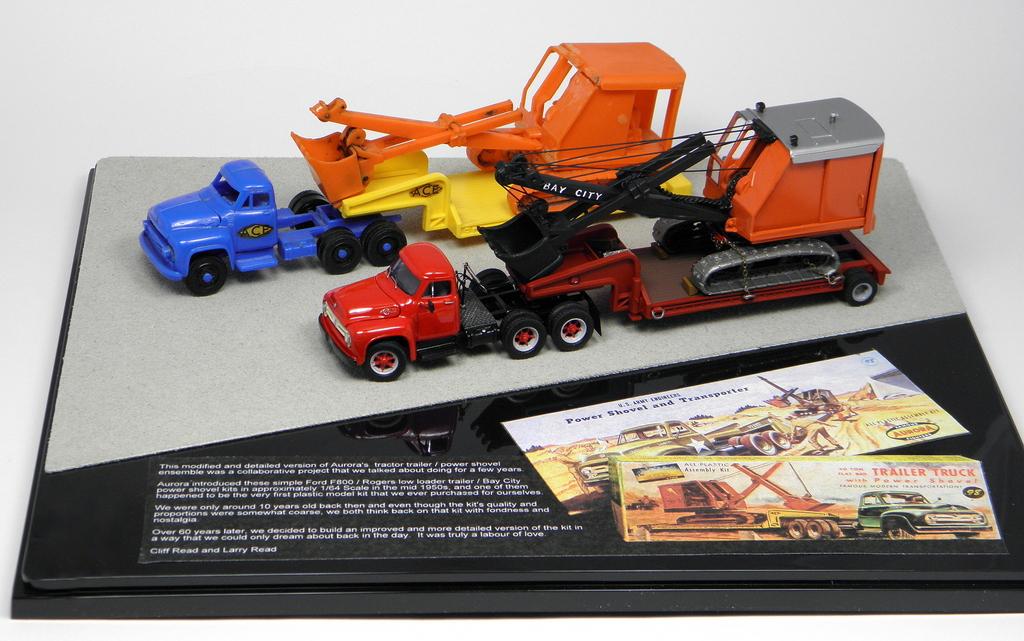
I wish everyone here a happy and healthy 2020 This Aurora Ford F800 and BayCity powershovel project was a collaboration between my twin brother and myself. We'd always wanted to do a significant improvement to a model that was our very first kit purchase in the 1950s.
-
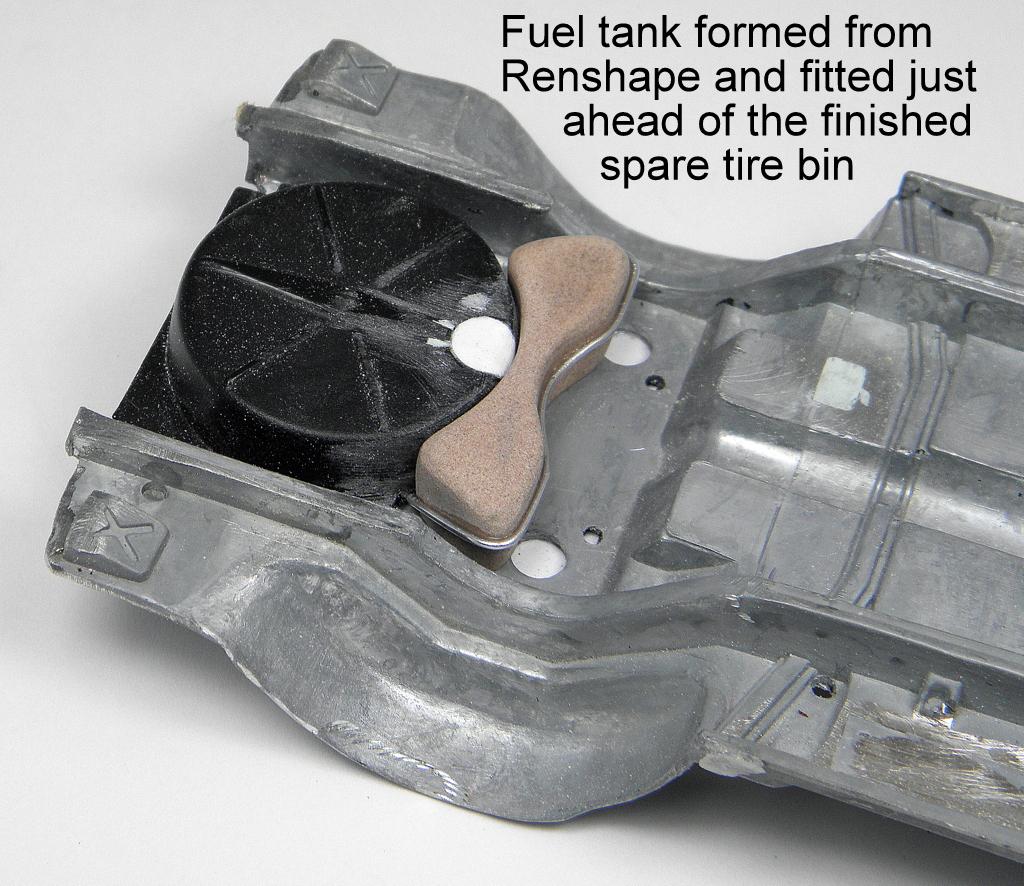
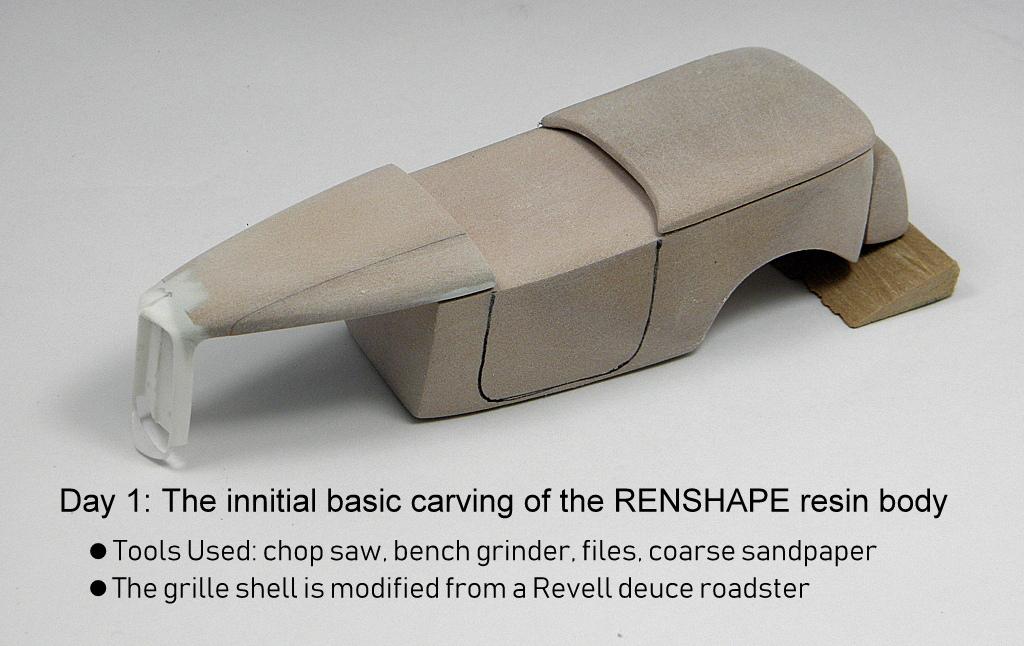
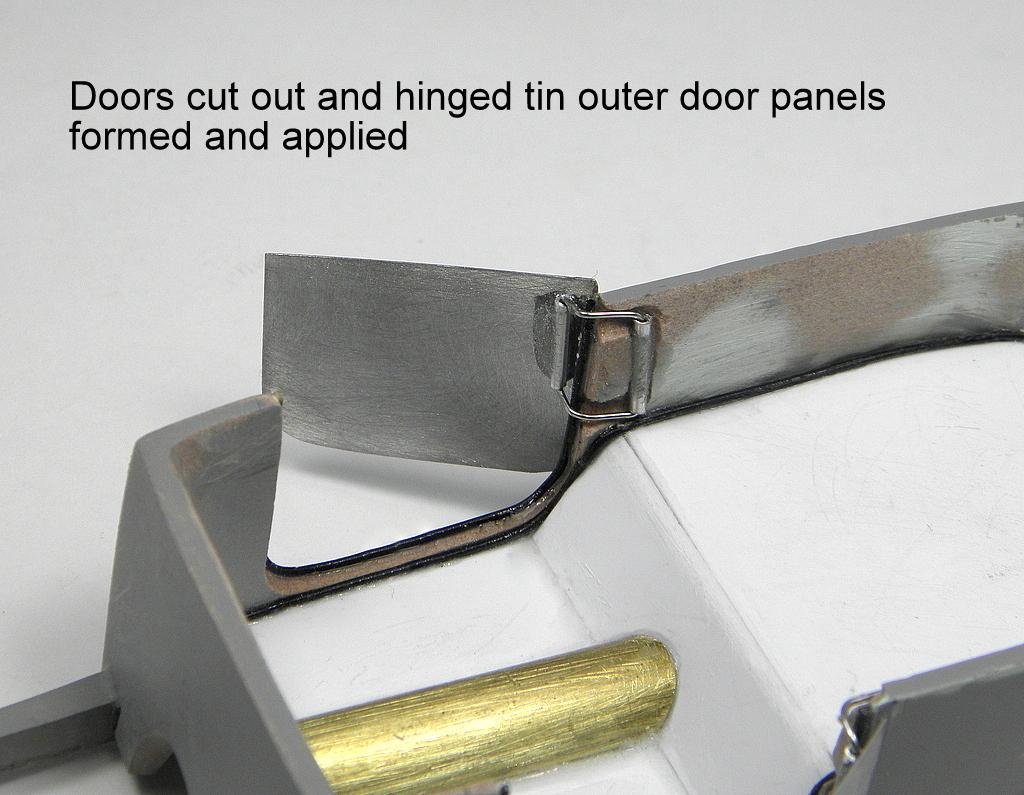
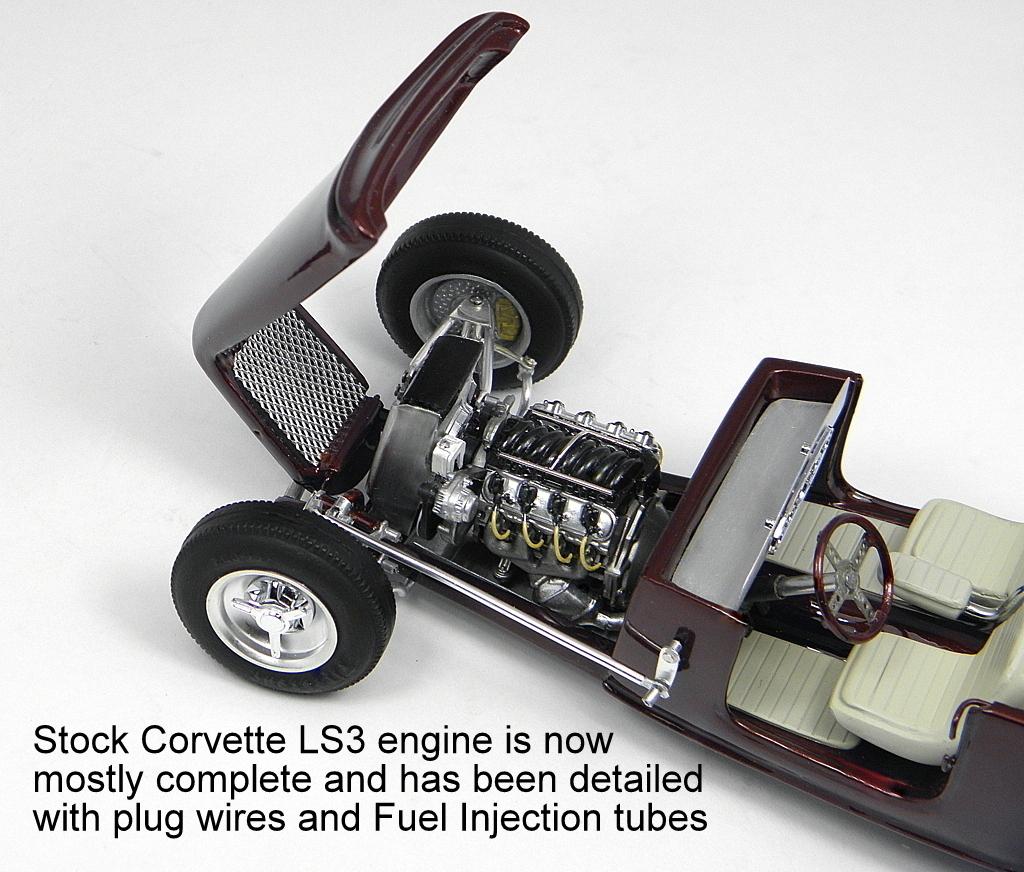
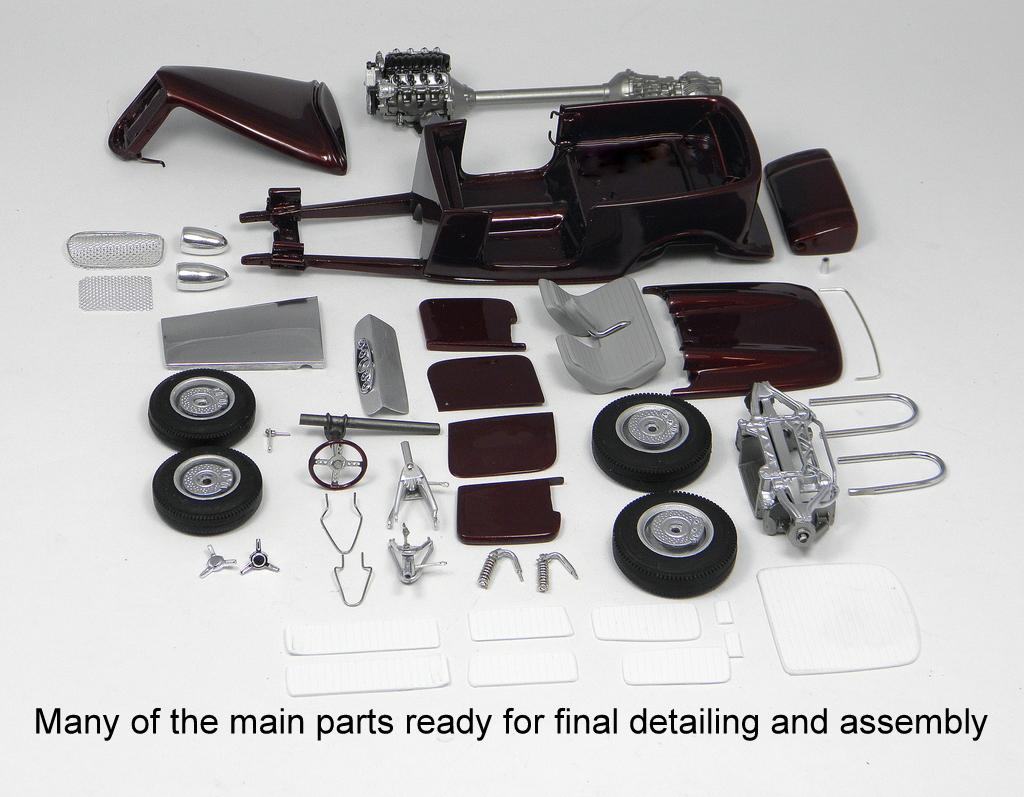
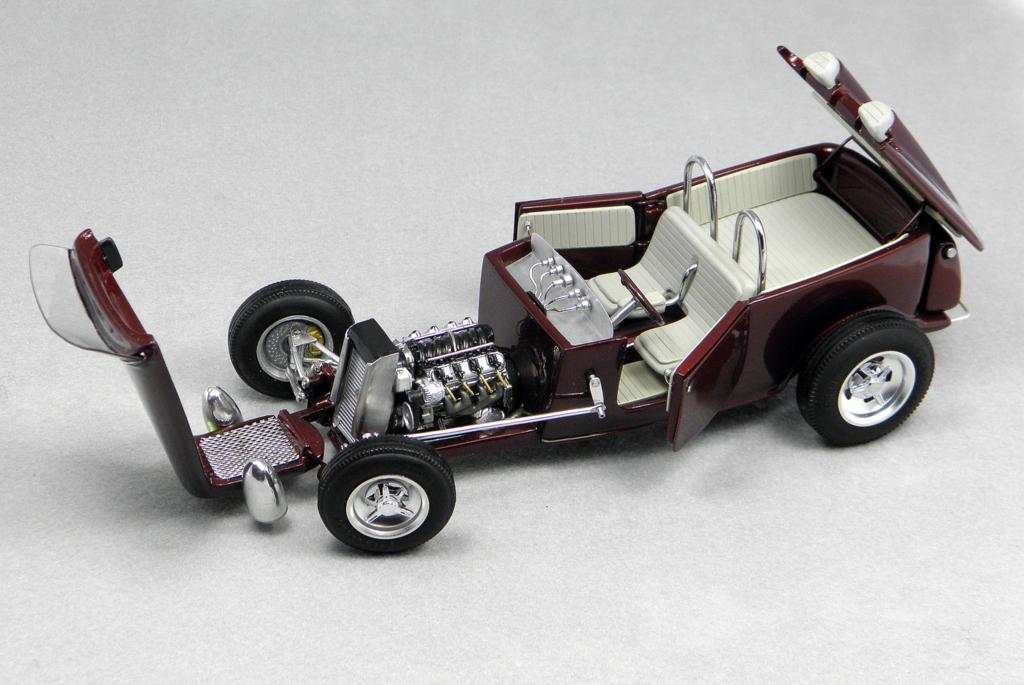
For some reason, at the beginning of this winter (2019), I was sketching a custom fenderless deuce tub (phaeton) and I soon became inspired to build a model based on that sketch. I usually only build somewhat traditional hot rods, but in this case, I decided to live dangerously, and use a complete Corvette LS3 drivetrain, including independent suspension. Parts of this model are a bit traditional, and parts are mildly avant-garde: The complete custom tub body including interior, stretched and channeled Deuce frame, fuel tank, tilt front hood and rear body cover are all scratchbuilt from Renshape (a design modelling resin material), using only a bench grinder, chop saw, and rotary tool to form the parts, and then various files and a variety of sandpaper grades were used to finish the shapes. Styrene sheet was used to form the interior floor as well as the simulated roll-n-pleat interior padding and then aluminum sheet and tubing was used for the handmade hot rod version of independent front suspension as well as the exhaust system and sprintcar style steering system. The late ‘30s style General motors elongated headlight housings were lathe turned from aluminum rod and then polished, the door skins are formed from tin and use handmade suicide-style double acting hinges and formed Renshape inner door panels. The Renshape custom made seat includes a separate center armrest The entire drivetrain and rear suspension was modified from a Revell Corvette C7 kit and the wheels/tires are modified from those in a ‘50s era Monogram Curtis Indianapolis racecar kit . A Deuce grille shell from a Revell Monogram roadster kit was split, ‘V’ed, and tilted back to match the similarly tilted custom firewall and door details, The modified grille opening is filled using aluminum expanded metal mesh with plated jewelry wire trim. The tub’s main paint is custom mixed basecoat/clearcoat with fine jewelry wire used for some of the trim. The project took well over 100 hours but since most of the parts had been test fitted a few times before final assembly, the model went together nicely and completely as planned.
-
Hi Jon, To each his own. I happily do both: build lots of models and also collect precision diecast. My point was not at all to stop you from building whatever you enjoy. My personal preference, however, is to build models that haven't been previously done....there are so many potentially pleasurable projects out there without the futility of struggling on a project that DM did so well.
-
Years ago, Danbury Mint did such a fabulous job replicating the original Kookie Kar that, personally, I think it would be too unsatisfying trying to even come close. but that's just me.
-
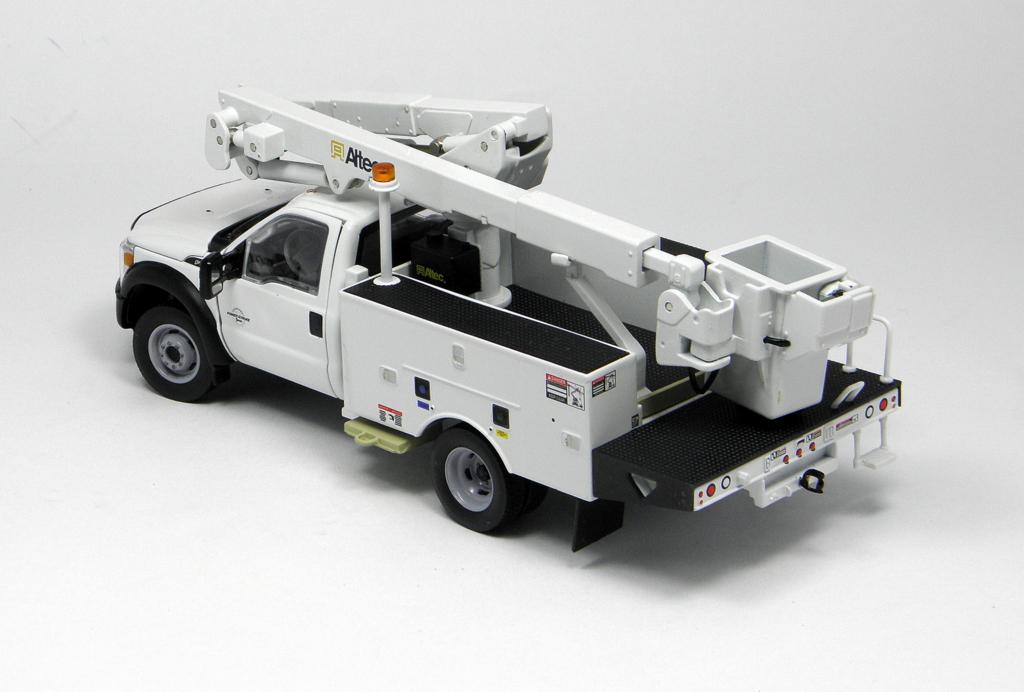
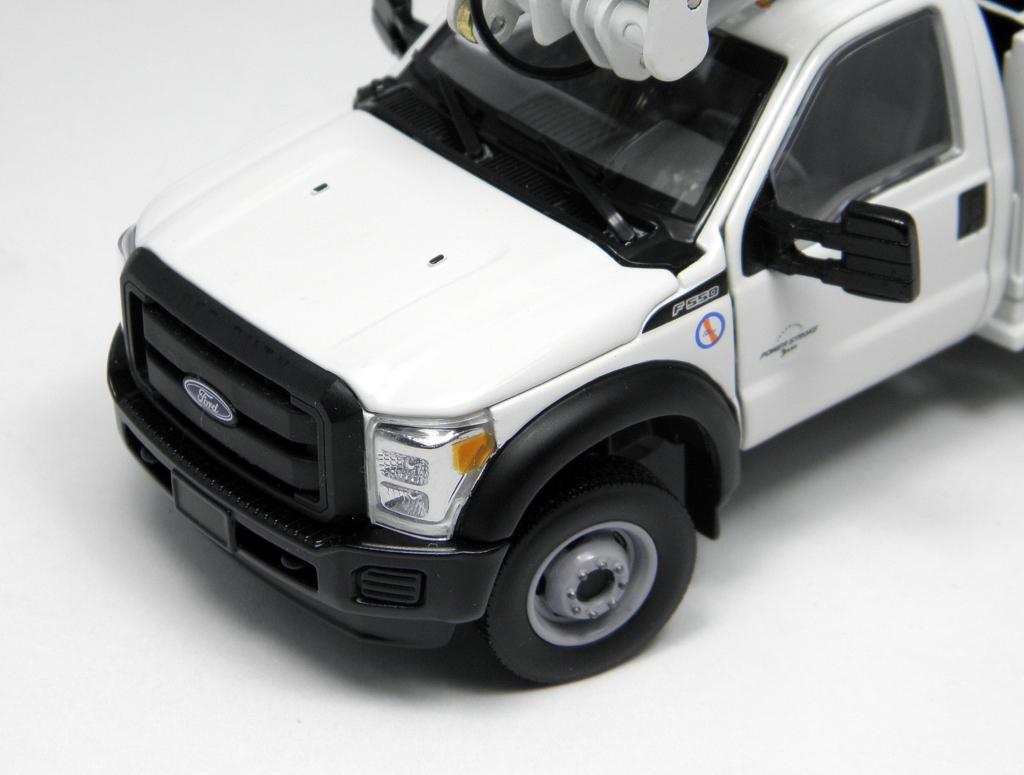
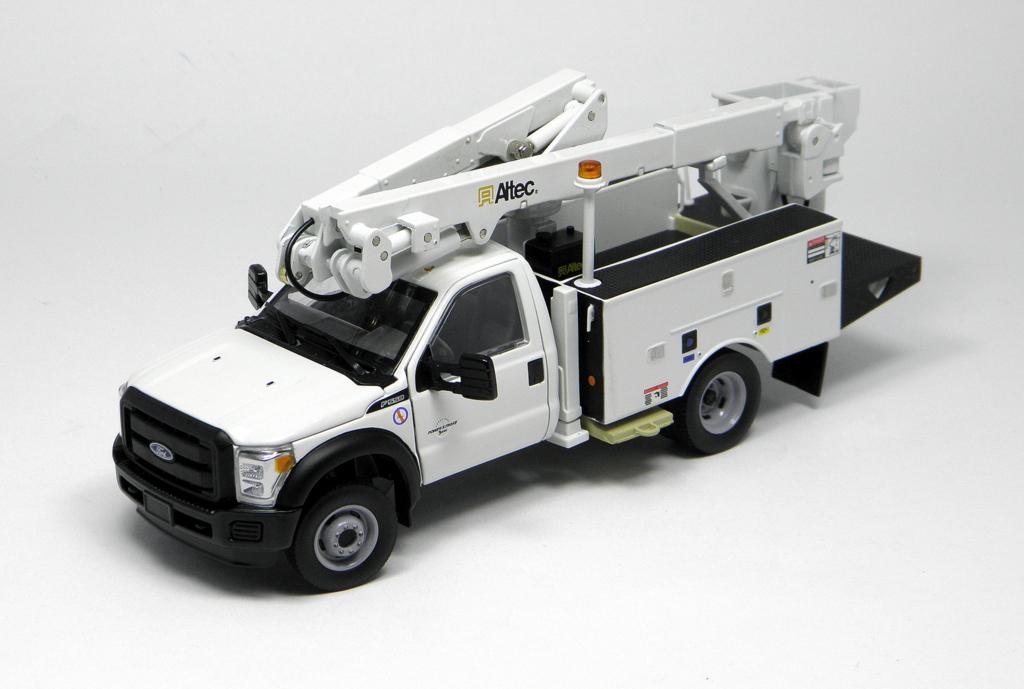
Something to entertain those who can enjoy models in various scales. Both of these trucks are done in FirstGear's typical 1/34 scale but there are no FirstGear markings, so I don't know who actually manufactured them. The smaller Ford 'cherry picker' is a current promo and the Peterbilt crane truck was done a few years ago. They both were (are?) available from ALTEC dealers in the US and both have lots of articulating parts and details.
-
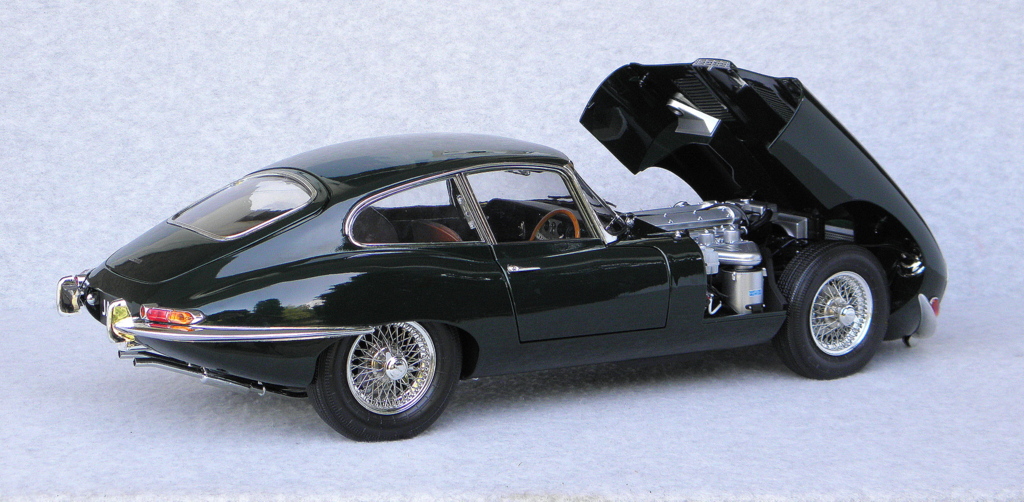
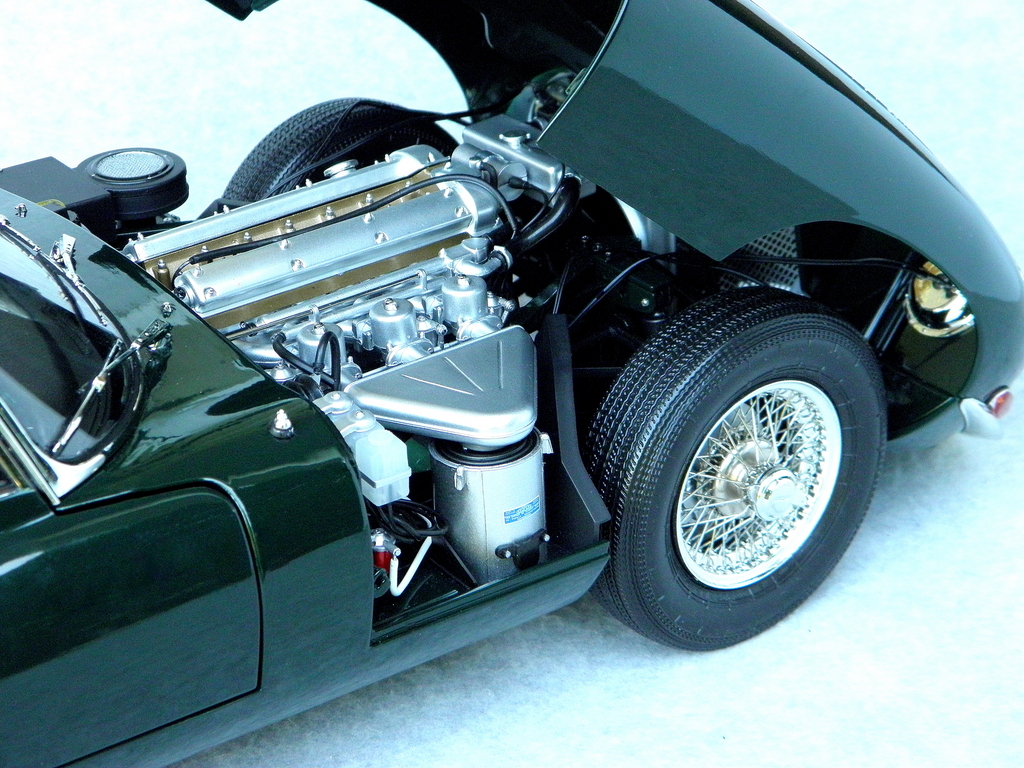
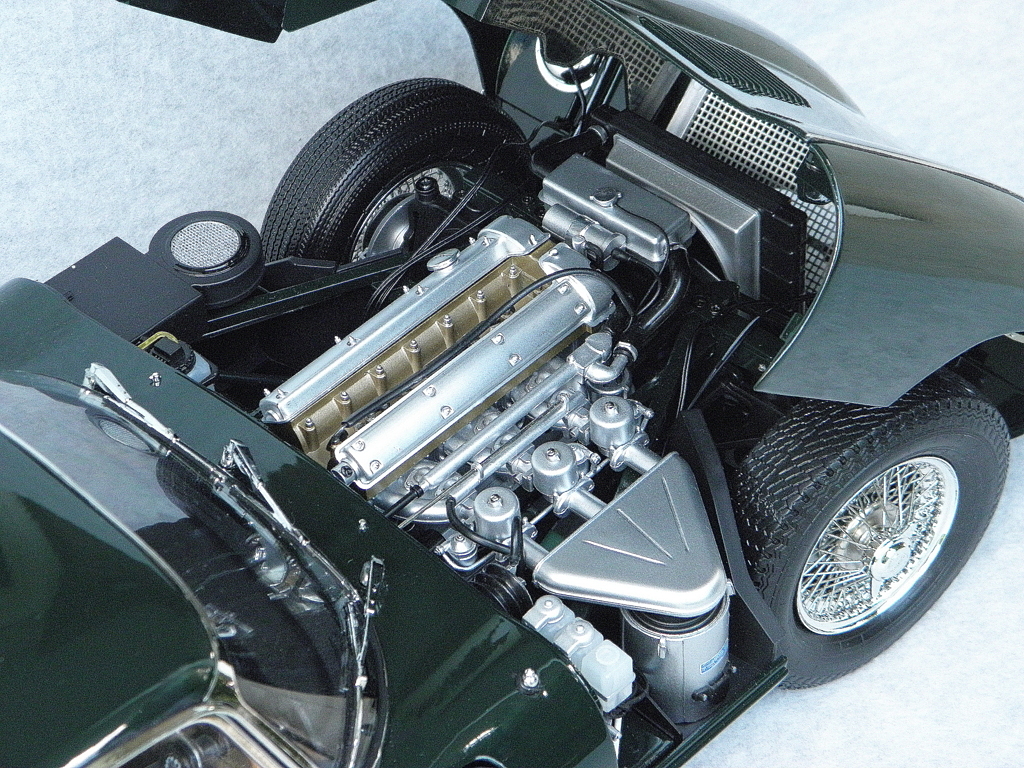
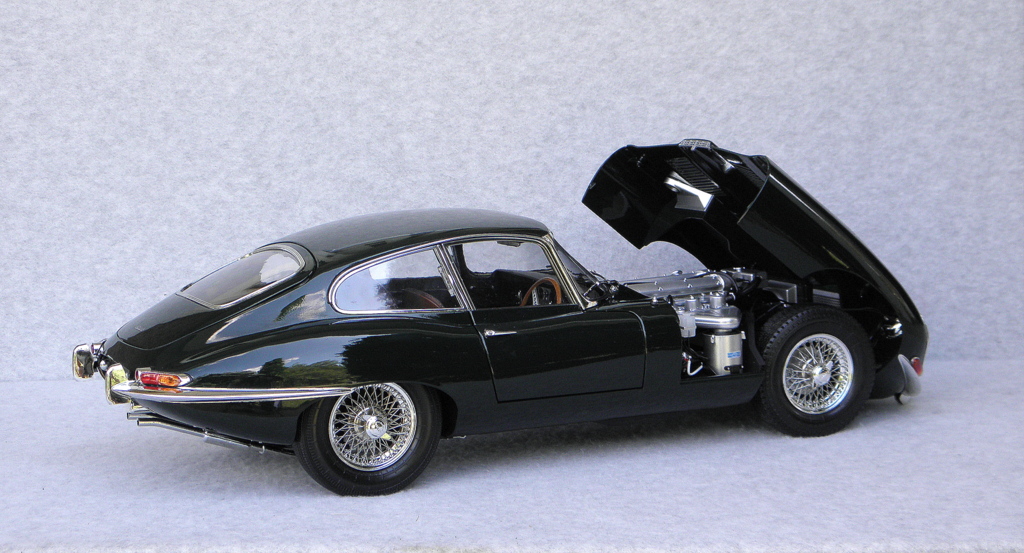
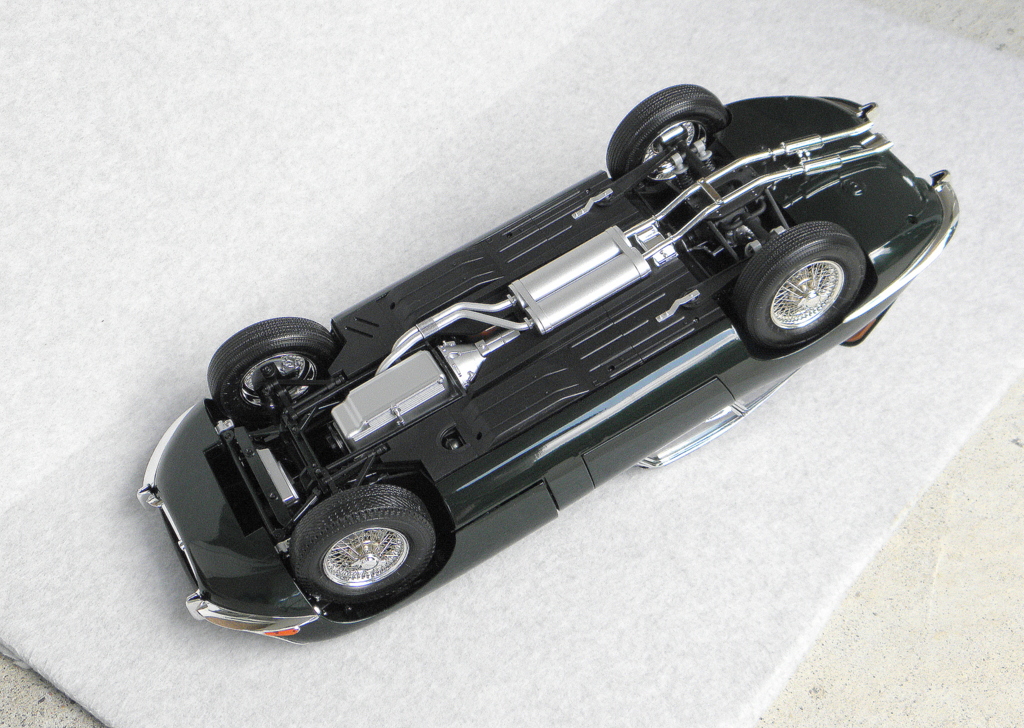
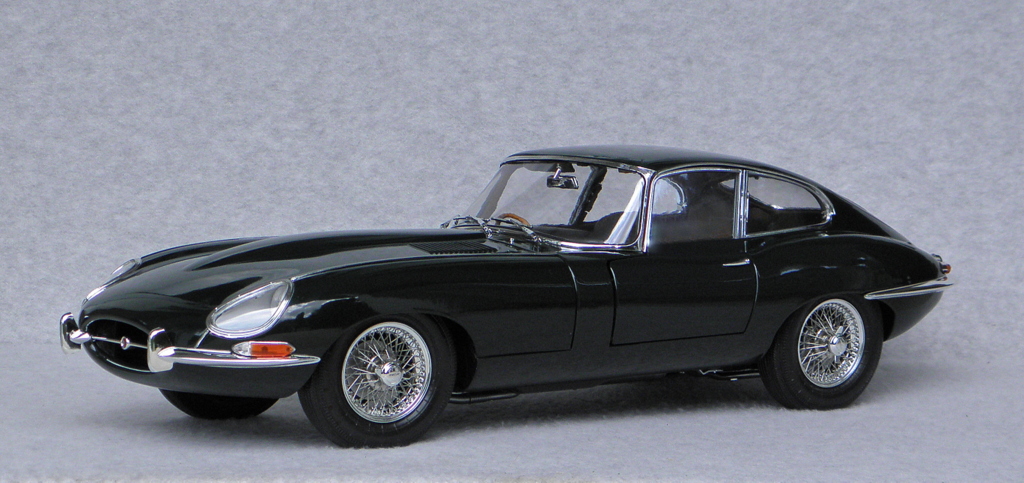
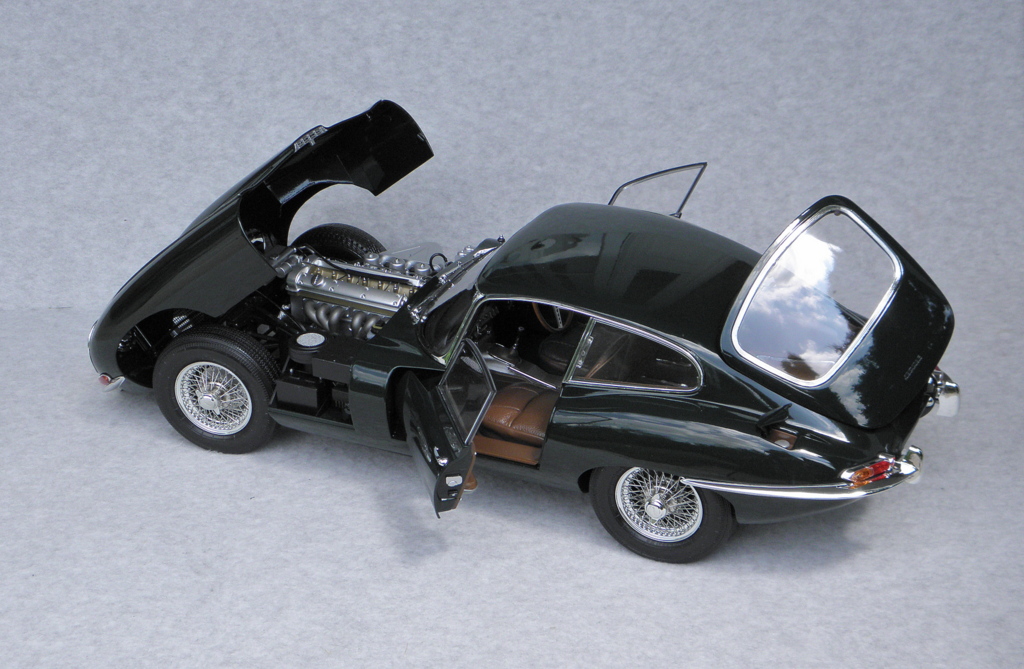
1/8 scale Jaguar E type from DeAgostini
traditional replied to traditional's topic in Diecast Corner
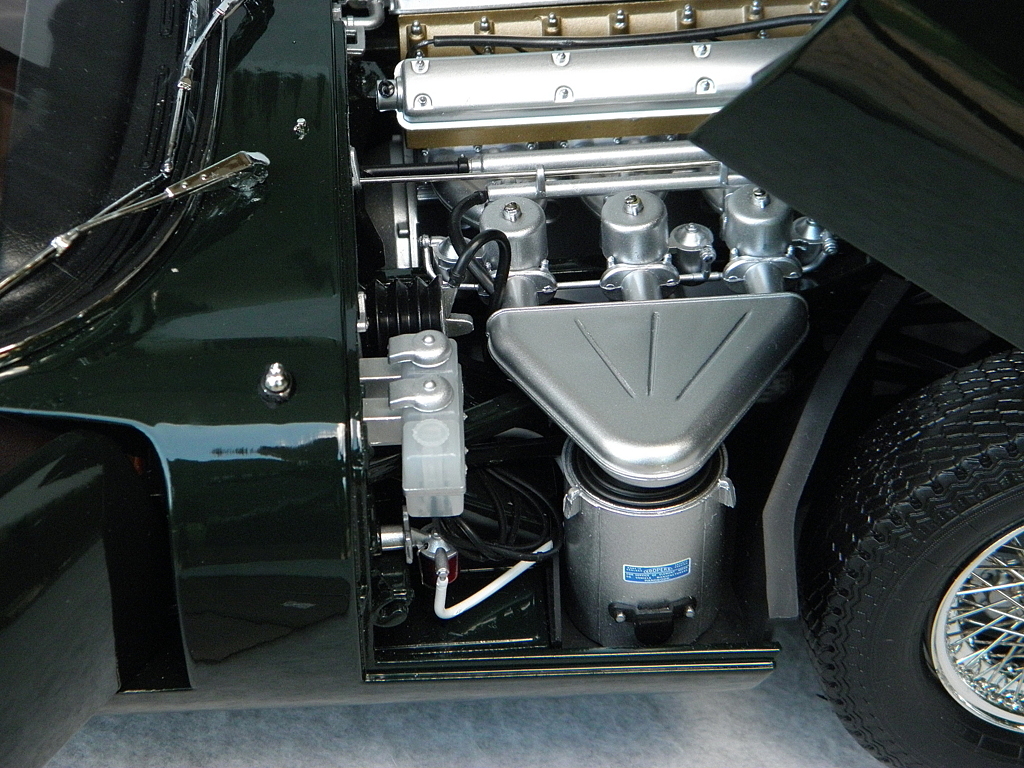
Bill, you're absolutely correct. I guess I was so eager to get the wheels on the car after about eight long days of assembly, that I never even noticed the tire difference. The construction pictures of the wheel /tire assembly looked so similar that I didn't even read the text. I can only imagine that the full size car they measured for the model development had a different style of spare tire and they went with that. Thanks for pointing that out....the wheels have now been shuffled to be correct (see pics)
-
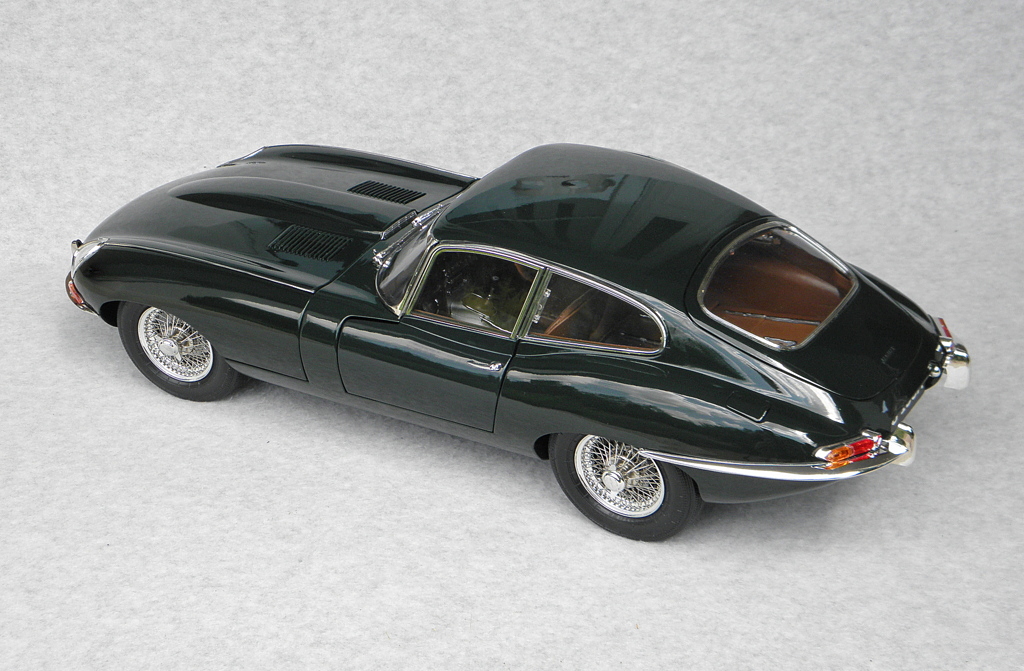
1/8 scale Jaguar E type from DeAgostini
traditional replied to traditional's topic in Diecast Corner
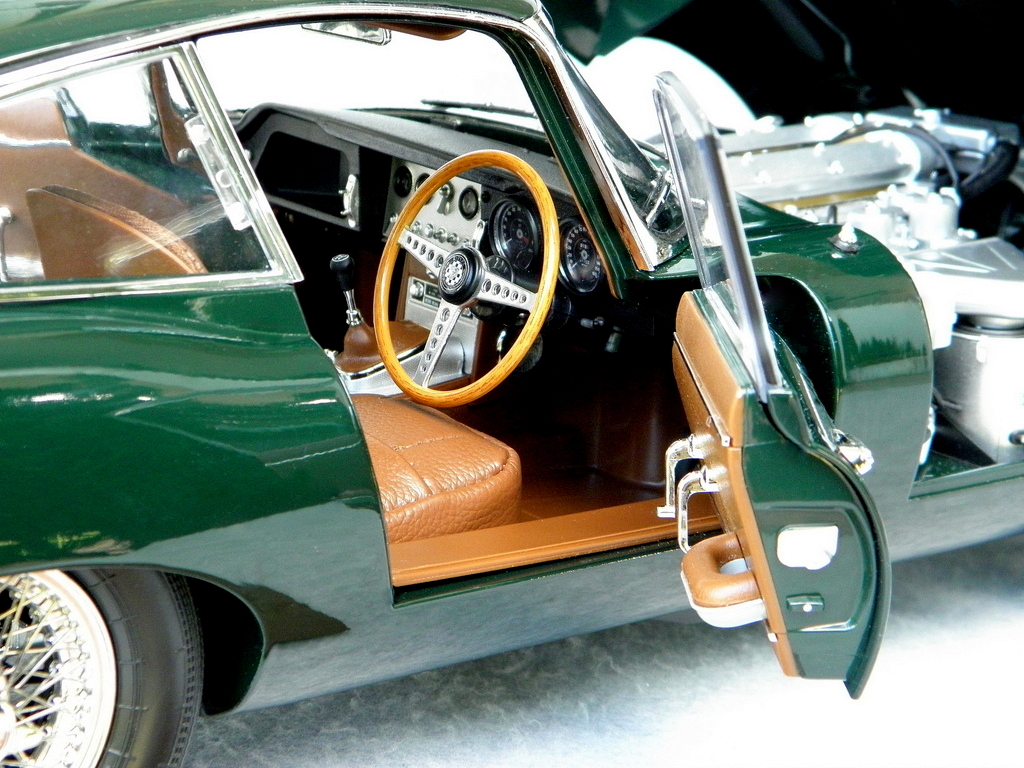
Here are a few more pics, including a few detail close-ups. Notice that the quarter-windows (rear,side) hinge open with realistic over-center latches, and the seats are stitched leather over foam pads.
-
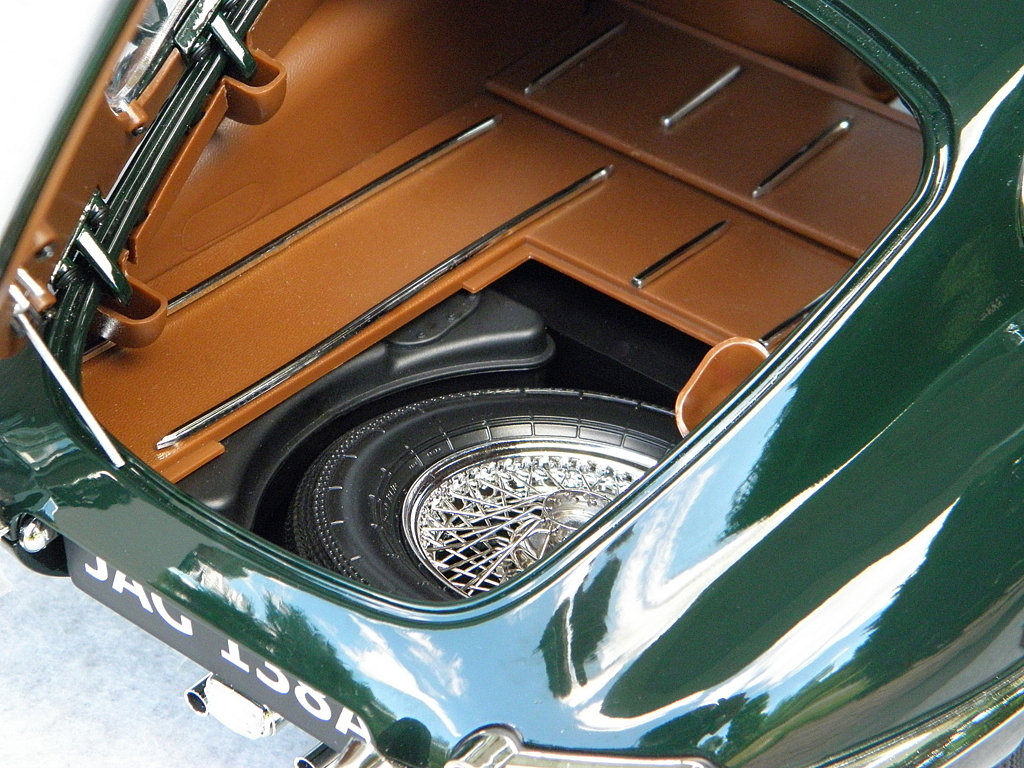
This model usually comes as a two year assembly subscription with something arriving every week or so, but recently they also offer it as a complete kit all at once (delivered by DHL in 5 large cardboard boxes) The painted kit is usually considerably over $1,000 but there was a super sale on this item during July 4th and my brother and I decided to share the effort, and we pulled the trigger. The kit goes together very nicely using the original 100 magazines as incremental instructions, but the wire wheels (fabulously accurate looking) took a whole tedious day each. Anyhow, we've completed the build, and must admit, the finished model looks quite real. It goes together with an electrical system for all the lights ,etc. but I have yet to find and install the correct batteries to check that detail out.
-
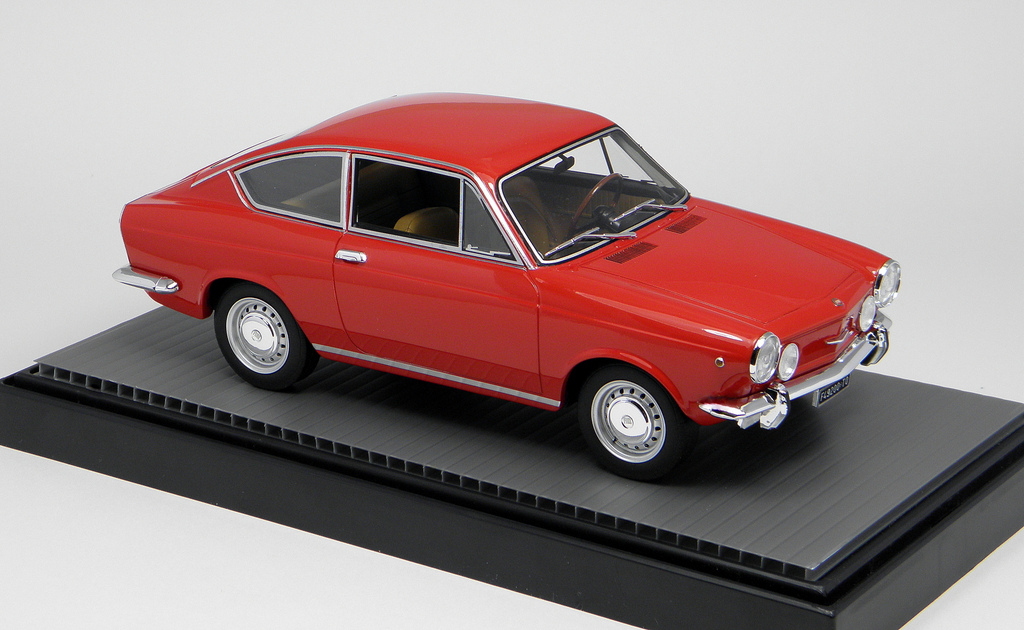
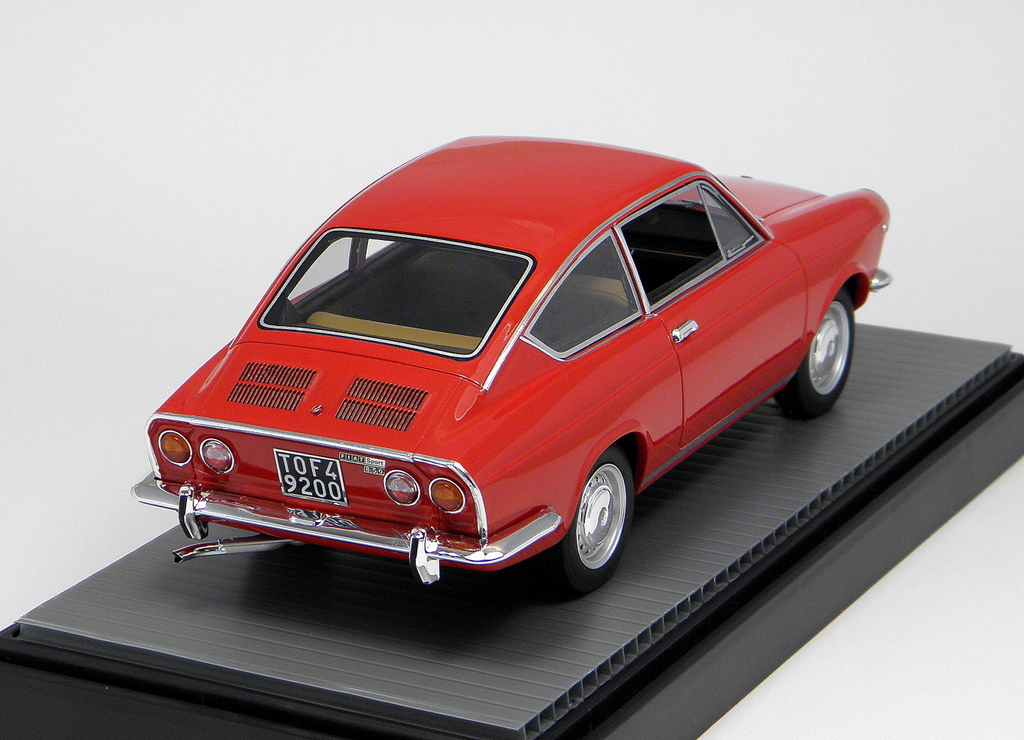
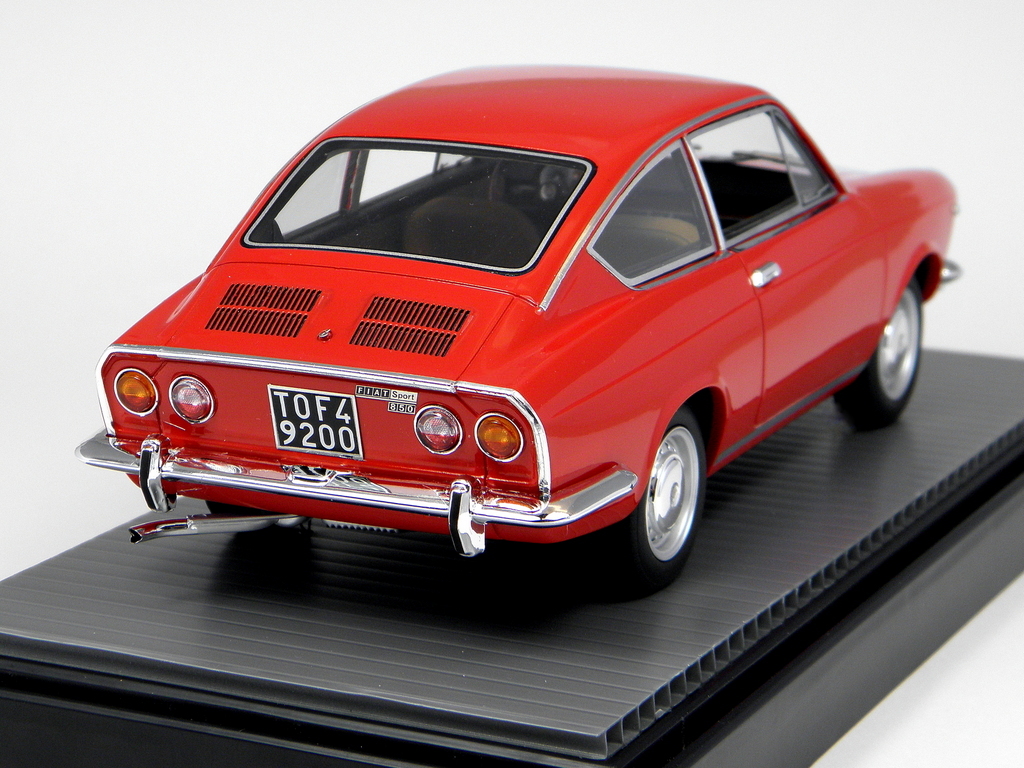
In the late '60s when I was finishing college, I'd seen a few of the Fiat 850 coupes running around Toronto and I even thought I might buy one as my first car as soon as I found reasonable employment. I've always liked small cars, and I thought these were so nicely styled. Luckily, I'd changed my mind by the time I had enough money to actually purchase a car, because from all reports, the Fiats at that time, although really cute, were simply not durable enough for Canadian roads and climate. I've always harbored a fondness for those 850 coupes though, and I was delighted when Laudoracing introduced their 1/18 resin replicas of the 1968 version, and I think they've done a really accurate job. I've mounted the model on the base of a display case which is not supplied with the model.
-
Jurgen, That is simply fabulous. One of the things that I always appreciate about your models, besides the excellent proportions, is that you don't get carried away with excess chrome plating. They look like they would have looked new at the time. Congratulations!
-
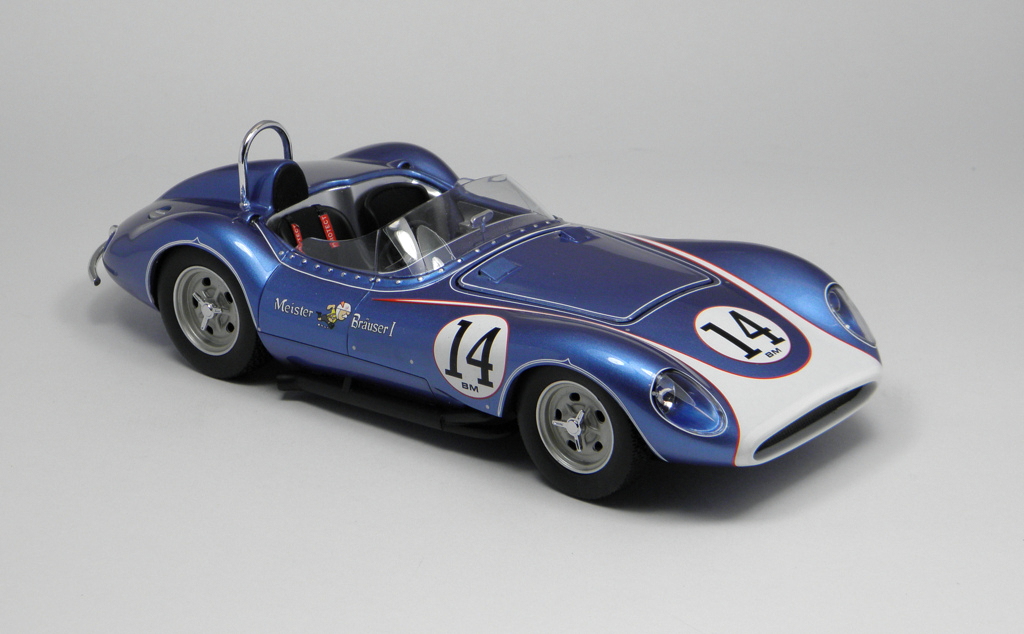
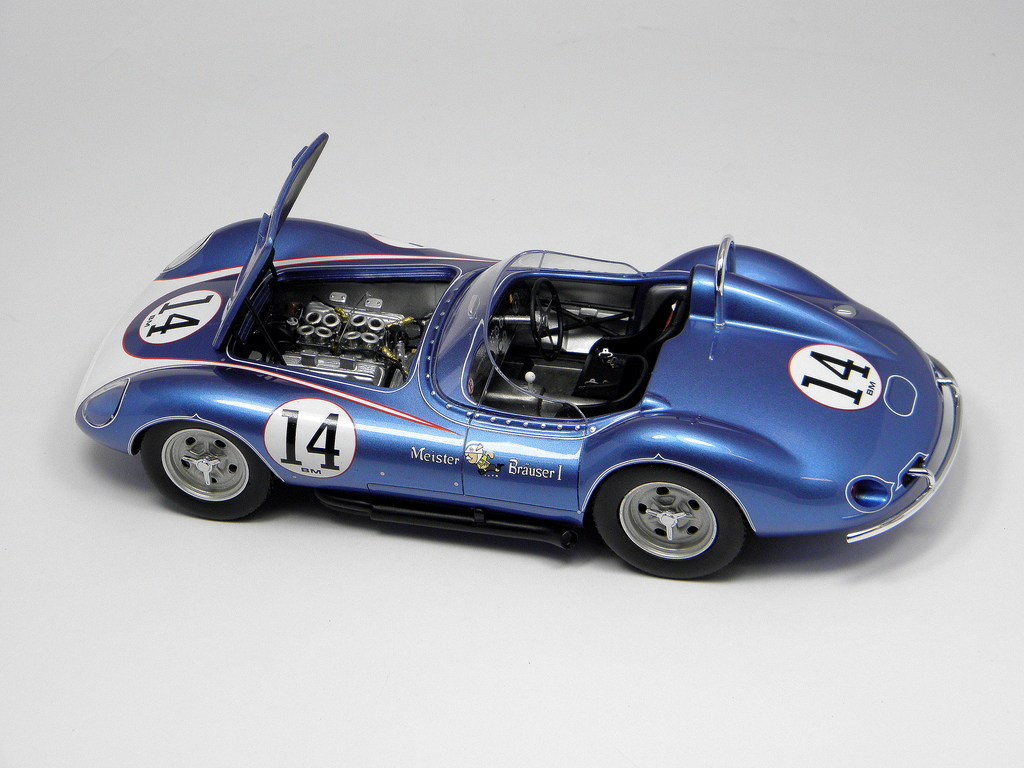
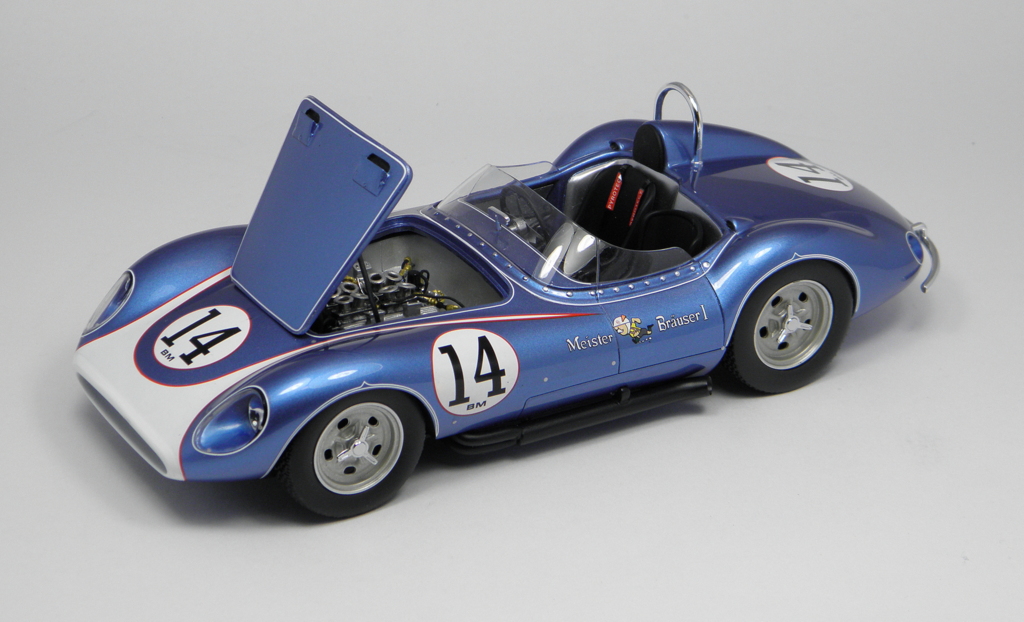
Finally!...A Scarab (I've added some detail and corrections)
traditional replied to traditional's topic in Diecast Corner
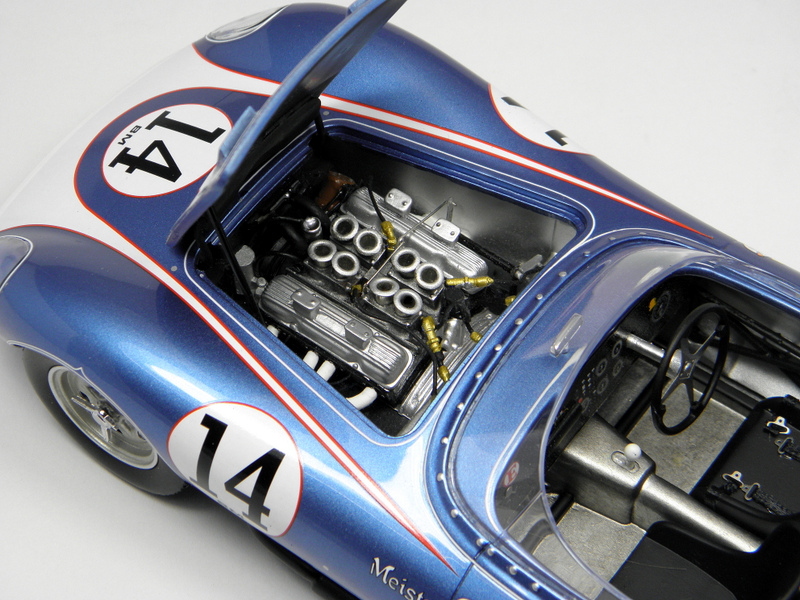
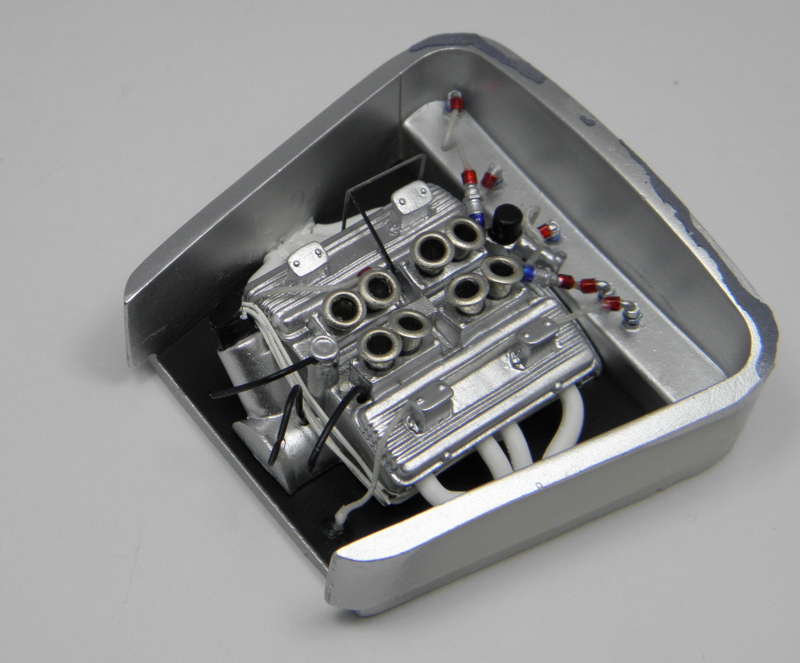
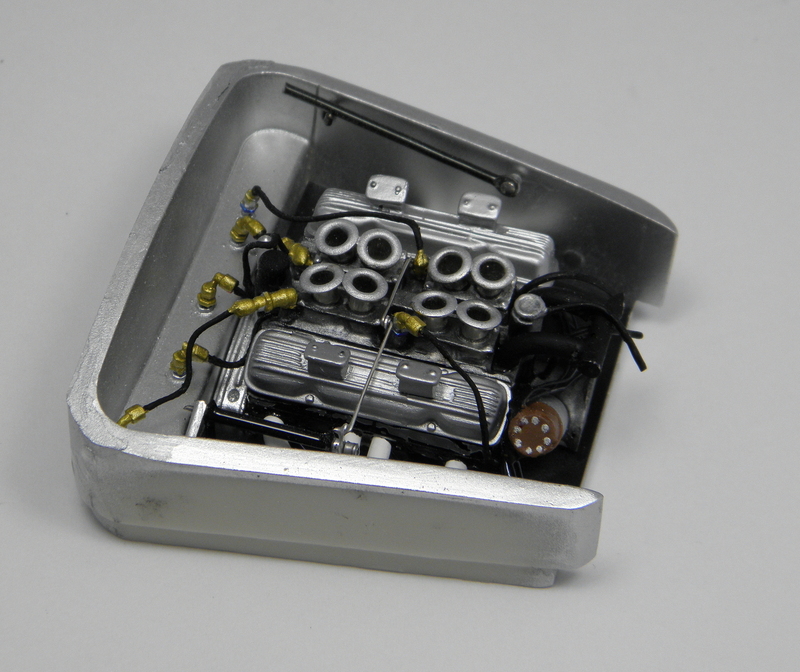
Actually, thats exactly how the model comes from Replicarz. The only changes that I made were hinging the engine hood, toning the wheels to look more like clean magnesium, and detailing (and modifying) the engine compartment. Replicarz makes two other versions of the Scarab as well, and in all cases, the body proportions and paint finishing are quite beautifully done. It's really only the engine compartment that is a disapointment. -
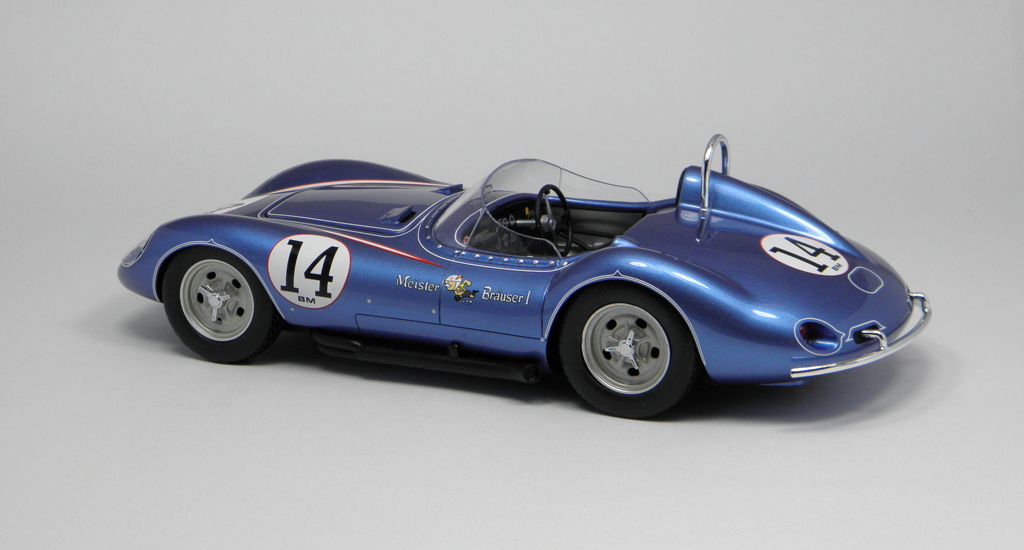
I think that the Reventlow 1958 Scarabs were one of the most beautiful (and successful) sports racers ever and I've wanted a model of one of them for years. I was delighted when Replicarz recently decided to do one (actually three different versions) in 1/18 scale. Like many limited volume models now-a-days, this one is done in resin but with an open engine compartment. That engine compartment was the only serious disappointment with this beautiful model since it looks absurdly disproportionate and bland. It's supposed to be a Hilborn injected small-block Chevy but the Replicarz version of the motor is overly simplified (considering the price) and the Corvette valve covers are unfortunately about the size of a Chrysler Hemi. The model's engine hood is a loose separate part. I decided that, since this is the only Scarab game in town, I would modify mine to be more detailed and proportioned, as well as front-hinging the engine hood. I also decided to paint the mag wheels to be a bit more representative of clean magnesium (a slightly more grey-silver with a touch of yellow/gold) rather than Replicarz plain silver. I then chose to use some more accurate knock-off spinners from the surplus parts tree of a GMP 1/18 Hot Rod kit. The Replicarz Scarab version that I chose is the one bought and raced successfully up until 1961 by Harry Heuer (driven also by many other successful drivers, including Augie Pabst for its last win in 1961) and sponsored by the Peter Hand Brewing Company. I fabricated hinges for the loose engine hood as well as correcting lots of engine detail Replicarz' Chevy engine is quite basic and way off in proportion including absurdly oversized Chevy Valve covers I've added the correct small-block Corvette valve covers with the added breathers in the script area as well as lots of throttle linkage detail, hood prop-rod, brass fittings instead ot the later-style color anodized versions, etc. I also fabricated a new top detail for the Vertex ignition magneto.