

classic
-
Posts
63 -
Joined
-
Last visited
Content Type
Profiles
Forums
Events
Gallery
Everything posted by classic
-
69 Trans-Am Boss 302 Mustang - finally completed
classic replied to Phildaupho's topic in Model Cars
Lovely build of a great car. Nice tip on the rim reduction trick. Regards, Steve. -
Thanks for the kind words guys. Jim, it is 1/24 scale, the engine module was photographed on top of a paint pot which gives a false perspective. This kit was all white metal and turned ally. The 'chrome' parts such as the intake trumpets were very brittle and difficult to work with. I did manage to drill them eventually using TCT drill bits. I am currently working on a 1953 C type Jaguar from the same company, this time the body is cast resin and the whole kit is beautifully made, no engine detail though and expensive for a curbside model. Regards, Steve.
-
White metal kit from K&R Replicas, manufactured in the UK. In 1966 Jaguar developed a new V12 engine and built the XJ-13 to run in the LeMans 24 hour race. However, development and testing became delayed and by the time the car was ready, it was deemed un-competetive and never turned a wheel in anger. The prototype crashed during testing and was almost completely destroyed. Jaguar decided to rebuild it though and it remains a museum piece today. Paint is a mixture of auto rattle can green and black. Only top of engine is included in the kit and this was detailed with Detail Master and Ejan wiring with dome nuts size 1mm. Hope you like it. Regards, Steve.
-
Hi Dwayne, I have just finished one of these, I must say it didn't go well for me, the kit was old and the decals were quite bad. I hope you have a better result than I did. Although it is a curbside and fairly basic, it has a lot of potential. I was at a model show today and saw a stunning example, wish I had taken some pics of it. Regards, Steve.
-
The old Tamiya kit. This was a disaster for me from the start, the top coat was rattle can Halfords Appliance white and I sprayed from the can instead of decanting like I usually do. This didn't go well and I ended up with a few blemishes. Disheartened, I carried on with the decals which broke up and shrivelled under Micro-sol. I managed to touch these up reasonably well and coated the whole lot with 2K clear. At this stage the project looked slightly better but not up close so I decided to do some race weathering as an experiment. In the pics it looks fairly light but in reality it is quite heavy weathering and looks quite good. I started by mixing tan with a bit of black and washing this in the fuel filler recesses. I then gently wiped it rearwards to replicate slipstream stains. When this dried I darkened the wash with more black and gently built up the race dirt all over the car. I particularly like the way it looks over the rear wing, the dirt just stains the front edge and naturally fades. Loogs ok IMO. Wheels were done with black pastel after I drybrushed the tyre lettering with yellow. I am going to call it a save as the base kit is poorly built and finished but the weathering adds interest and takes away from the issues I had. Pics were taken before I added the ariel and, looking at the pics, I can see a couple of areas were I need to touch up slightly. Thanks for looking, Steve.
-
Thanks for the kind words on my build guys. On the dashboard panel, Fujimi have made a bit of a mistake with the tubing that the panel sits on. The pin and hole fixings are a bit askew and one of the holes is not moulded on the tubing. To be honest, it is an easy fix but a bit suprising from this manufacturer and a bit annoying considering what they charge for it. I am not entirely sure why the tape was applied to the front end. An educated guess, bearing in mind the box contains a pic of the car straight after winning the race, is that the protective tape was applied, not to repair or hide damage, but to protect the finish so that it could be ripped off, when the car won, and the car could be viewed in a clean condition. I hope I explained that OK, my sentances could have been constructed better! The S27 etch fret contains the usual stuff like hood catches, wiper (very nice), steering wheel spokes. etc. One handy item is a paint mask for the tyre lettering, that will be useful for resin kits without tyre decals. I used the tyre decals in the kit for this build but I think a better look could be achieved with the masking plate. I am currently building a Fisher 917 LH so I will try it out on that. Kind regards, Steve.
-
Hello all, my first model post on the forum. Fujimi kit painted with Zero colour matched Gulf colours. Most of the Studio 27 etch fret. I added the tape on the front to try and mimic the race preparation put on the car, as per box art photo. Tamiya tape was used with strips of black decal around the headlight covers, finally all oversprayed in Gulf blue even down to the overspray on the tear-off strips. A nice kit to build apart from the dash-top assembly, dunno what Fujimi were thinking of, letting that out, not a quality move. Here are some pics. Thanks for looking, Steve.
-
Apologies for digging this thread up after 5 months but I am new to the forum and I had to post my admiration for Cato's build. I have built the kit but not to this standard. Things I particularly enjoyed, the squashed bugs, stones caught in tyre treads and general weathering including the swept clean area of the wind screen. Super job Cato and thanks for sharing. Steve.
-
Hi Cato, thanks for the link to this forum, there is some great stuff in here and it is so easy to navigate. I am here to stay! Cheers, Steve.
-
What is your dream model kit?
classic replied to Jordan White's topic in General Automotive Talk (Trucks and Cars)
Some classic Brit cars please. Jaguar XJ12 coupe, Rover 3.5 coupe, Triumph 2.5 PI Saloon, Aston Martin V8 (any Aston) Triumph TR5 or 6 (prefer 5!) More Grand Prix cars from the same ilk as Tamiya Lotus 25 and Honda RA-272, how about BRM, Cooper, etc. Oh, and a 1/12 scale full detail Triumph GT6 MkIII just for me lol. I'll get me coat !! -
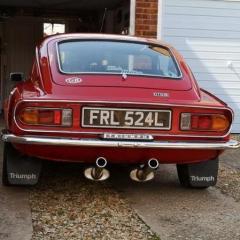
Hi Erik, keep up the good work on this model. I love your colour combo and detailing. I also started down the dark path with this kit, it is buildable and draws a lot of interest at shows as you hardly ever see one completed. Yours will be a show stopper once completed. I did do some detailing to mine but not as much on the interior. In the end I was glad to get it all together! Here is a pic of my completed build. Regards, Steve.
-
Hi Sean, your model is looking very neat. I see you used Eduard etch belts? They certainly look better than the moulded in ones. This is going to look great when its done. Regards, Steve.
-
Super job on the Gunze kit. I am one of those hoping that Academy do manage to release it again, never did manage to get my hands on a Gunze kit and they sell for a lot on ebay (too much!) I got the Academy Ferrari 250 California kit recently, boxed as a European classic sans Ferrari decals, an interesting way of getting round licensing. I doubt it would stand up too well to the property law in court, if Ferrari wanted to go down that route! Regards, Steve.