cavejohnson
-
Posts
71 -
Joined
-
Last visited
Content Type
Profiles
Forums
Events
Gallery
Everything posted by cavejohnson
-
Chevrolet Titan 90 build
cavejohnson replied to cavejohnson's topic in WIP: Model Trucks: Big Rigs and Heavy Equipment
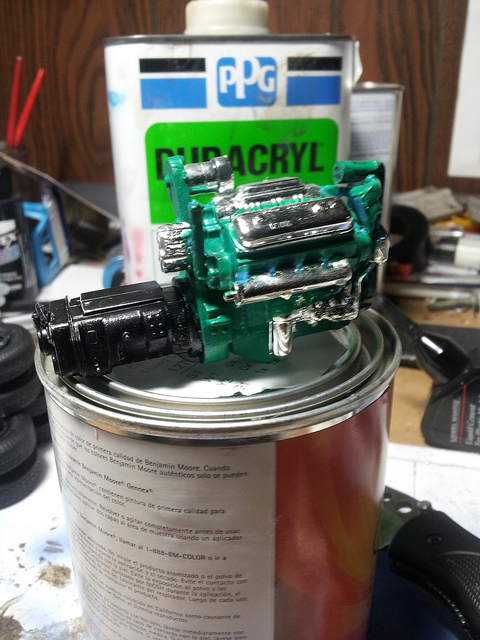
Here's the engine with some of the paint done. I have to put another coat on and touch it up a little. But that's about as close to DD Alpine green as I could get.
-
On the plate
cavejohnson replied to charlie8575's topic in General Automotive Talk (Trucks and Cars)
Yep, it was all about authority to operate. Some states had deals with eachother so one plate could operate in 3 or so states. But if a west coast truck wanted to operate in eastern states, they had to have the appropriate plates to do so. That all went away in the late 70s I think, then the truck got one apportioned plate and a card that said what authority they had. The more states on the card, the more money you had to pay! -
I found them at Hobbytown. Here are the GOW bulbs I used. http://www.hobbytown.com/Shop/Clear-Grain-of-Wheat-Bulbs-12V-w/6-Leads/ The small amber lights I used are a massive pain to find O.o
-
I'm actually in the process of trying to make a kit that has 5 marker lights (revell style), 2 tail lights, 2 extra amber lamps, and headlights + battery clips and switch. If I get enough of "I want one of those!!!" I'll start making 'em.
-
Started First Build in 35 Years
cavejohnson replied to Rich_S's topic in WIP: Model Trucks: Big Rigs and Heavy Equipment
That freightliner is on my list again, I tried to build it once before when I was still pretty new at it, and that cab gave me a lot of troubles. Must say, your Old Gold Cummins looks pretty nice! -
I built this truck a while ago, but all the pictures I had of the in progress were lost when my phone decided to die. Still a few things left to do on it, such as finish the decals and bits of the trim. But I modified it slightly using Revell marker lights that I drilled out to fit the grain of rice lamps, then I drilled out the backs of the headlight bezels to accommodate the grain of wheat lamps. The opening doors on the sleeper were the perfect size for 2 nine volt batteries. I had to add some sort of resin filler to the notch I cut in the sleeper to hide the wires. The wheat lamps have their own dedicated 9V while the rice lamps have a separate battery. The whole thing is controlled by a DPDT. As soon as I get a new decal sheet (the one that came with it got ruined and I have no idea how) I can finish it off!
-
Chevrolet Titan 90 build
cavejohnson replied to cavejohnson's topic in WIP: Model Trucks: Big Rigs and Heavy Equipment
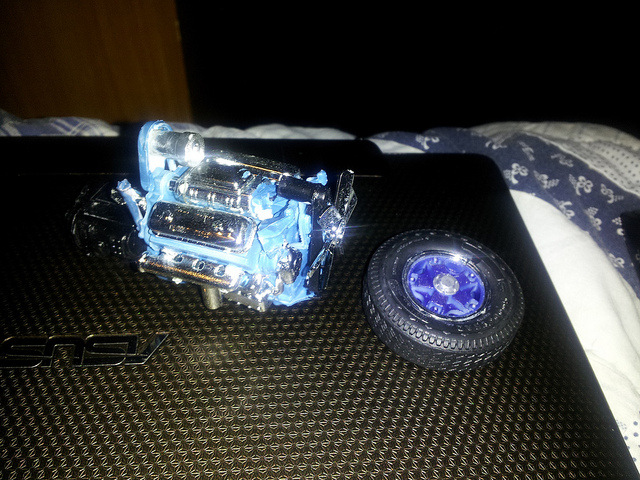
Here's what I have so far, the wheels are finished in that dark blue with silver hubs and lugs. The engine needs one more coat of paint that I have to mix myself. I figured out that if I put on the robin's egg blue first then put my mixed detroit green on, it looks perfect.
-
Got somewhere on that Titan 90, Not my favorite truck ever, but I have a soft spot for cabovers and 2 stroke Detroits so I couldn't resist.
-
I haven't been on in a while, been incredibly busy. But I got some free time and picked up the AMT Chevy Titan 90 just for kicks. My grandpa (drove for 38 years) saw the 8V-71N and decided to share a few stories with me. The first one happened in a 72 Kenworth K100 with a 8V-71T. He said that the guy who owned it was having massive problems with the parking brake valve and the parking brakes wouldn't engage. So that night, he parked the truck with the rear end facing the shop and left it in one of the low gears (it was a 5x4). Sometime in the night, the truck managed to hit compression and start rolling. The old 71 fired up and the truck started crawling. Now mind you this lot was in the middle of nowhere. The truck crawled forward and drove its way through a corn field and ended up face-first in a ditch. They showed up the next morning to find that old kenworth still rumbling away with it's rear wheels stickin up in the air still spinning. The next one involved a GMC General with an 8V-92N that my grandpa drove for a while, he said that he rolled up to a stop and his foot slipped off the clutch, then he stomped it back down. The truck was in gear and it nearly died, but then started making all kinds of funny noises. Somehow the engine managed to reverse itself and it blew exhaust out the aircleaners for about 5 seconds before it died. Anyways, once I get somewhere with that Titan I'll start post some pictures. All I've gotten done on it so far is an unpainted engine and blue manure spreader wheels =P
-
James Bond Kenworth W900L
cavejohnson replied to cavejohnson's topic in WIP: Model Trucks: Big Rigs and Heavy Equipment
I think I'm going to do both actually. I have a 36" sleeper from AITM and an A model cab with frame I can use (from an RG kit), All I'd need are some two hole budds, and to compliment it I'll do the W900L with the B hood and cab. Since the truck uses a Kenworth air ride suspension I'm just going to use the frame and probably leave the 3408 in place on the 60" model for some added zing. I think due to the complexity of the stripes I'm going to use decals. While I'm waiting on the hoods and cab I'll get to making them. Anyone have any tips for making the decals...I've used the Testors paper in the past but I'm not a huge fan of it for anything bigger than a 1"x1" decal. -
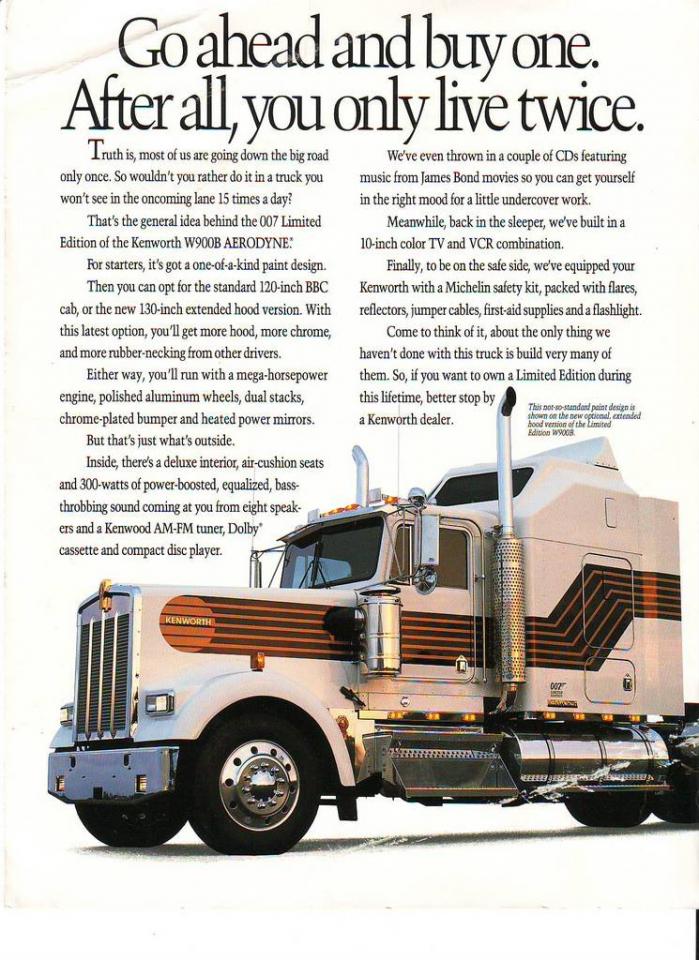
The Peterbilt has been put on an indefinite hold while I figure out what to do about the cab...but in the mean time. I've come across this on the vast reaches of the internet.... It's a 1989 W900L decked out in the paint scheme from the James Bond movie "License to Kill" . The movie trucks were based off of the Kenworth Mexico W900Bs (which were old A series cabs with a B series hood) with 36" sleepers with some modifications for the movie...like 1000 horsepower engines and crazy suspension mods so they could do wheelies. The consumer version didn't have that but I think they're pretty darn cool. I have a cab and found a 60" VIT sleeper, but don't have a B hood (since all revell makes are A series hoods). Anyone know where I can get a B series hood?
-
Paulie Hauling's "Love Machine"
cavejohnson replied to Sergey's topic in WIP: Model Trucks: Big Rigs and Heavy Equipment
I wish I was half as good as you Sergey. Watching your progress really facinates me! -
Need a pair of wheels and tires!
cavejohnson replied to JRJ's topic in WIP: Model Trucks: Big Rigs and Heavy Equipment
JRJ, PM me, I've got lots of those. -
my latest lonestar/fruehauf combo
cavejohnson replied to Chad's topic in WIP: Model Trucks: Big Rigs and Heavy Equipment
Chad, I've got enough 10 hole AMT wheels and tires for 4 axles if you're intested. -
2011 pete 388
cavejohnson replied to scale trucker's topic in WIP: Model Trucks: Big Rigs and Heavy Equipment
That looks great so far. I love the detailed DPF system. Say, what color of blue did you use? -
Oh, a little update, I've done some basic airlne plumbing to the brake chambers and from the air tanks. Also added some ultra thin red wire to the batteries to make them look a bit more realistic. I've got the marker lights all done, wired up the brake lights, and now all that is left is wiring up some headlights! I'll get some pictures up tonight!
-
I think I can salvage it. I got to looking at it up close. The driver's side, top, front, andd back are easily fixed with some careful sanding. The passenger's side though, all of the rivets are gone, the door hinge is just a mess, and the door handle is melted. I'll get some pictures in later today after I get out of my classes for the day (being a physics major is a blast let me tell you)
-
Thanks, I think with some careful xacto knife work i can get the details back in.
-
Well... I went to paint the cab... It's fried. The guy who painted it the first time around used urethane primer. (I can tell by its rubbery texture) The activator in that primer ended up pitting the entire surface. The hood was fine, it wasn't primed (for reasons I can't work out). Well.. this is annoying.
-
My marker light installation method.
-
The cab is going to be white with the fenders and roof the same color as the frame, then a stripe of some sort (haven't worked that all out yet) in that darker blue with a lighter blue pinstripe on either side. The wheels all hit, The frame has a weird twist in it when it doesn't have any load, but once I put the wheels on the weight is just enough to balance it all out.
-
I have most of the frame and driveline done and about 75% painted at this point. The fuel tanks, battery box, all axles are on. The suspension was missing a few things. So it has 2 airbags from an Italeri 377 kit and some brake chambers from a W900 (they were almost an exact match!) One of them isn't on in the picture because I noticed it needed a bit of finish work to make it look the same as the driver's side chamber. Grain of Rice lamps I'm going to use for the marker lights. I have wheat lamps for the headlights, and I'm going to use two of those amber lights for the brake lights (it looks red through the lense.)
-
Working hydraulics
cavejohnson replied to skulls's topic in WIP: Model Trucks: Big Rigs and Heavy Equipment
My setup looked a lot like Tony's, except I don't have any means to make a precise friction piston. I did have both ends sealed up and after 2 years it still works and no grease has escaped. I use that No. 2 to grease fifth wheels and then spray it to create a crust of sorts so it doesn't make a mess. -
Problem has been encountered in my quest to remove the paint. I got the paint off the cab with no problems (thanks Wagoneer81 for the alcohol suggestion!) I had some so I used that mixed with a bit of this absured PPG thinner I had and it took the paint clean off. I got to looking at the frame (it's painted white) and notied...it's warped in a bad way. I think I may have gotten it straightened using a heat gun on low and put some weight on it. Hopefully I'll have the body all painted tonight so everyone can see.
-
AMT.MOVIN ON TRUCK
cavejohnson replied to ranma's topic in WIP: Model Trucks: Big Rigs and Heavy Equipment
I got a factory sealed AMT Autocar A64B kit off of ebay a while back and when I opened it i found 14 tires and two amber light trees. I've got so many amber and red lights I could cover a whole model with them and still have enough left for 3 trucks. You could make 3 tag axles and have one of them crazy dump trucks that look about 30 feet long.