
kennb
-
Posts
1,056 -
Joined
-
Last visited
Content Type
Profiles
Forums
Events
Gallery
Everything posted by kennb
-
i will try a 58 impala i got this week...i cheated tho and started it tonight/ Kennb
-
I have been wanting to do this one too along with a few others based on the early Corvette. I have the Corvette ordered so I guess I will go with one of the other variations....Very nice start and looking forward to the finished product. KennB
-
red and white even
-
George. I have been covering all of this in the following thread. It outlines the methods,materials, and other items. Most things are 1/25th scale roughly. http://www.modelcars...showtopic=49928 I also have 6 other threads running on scratchbuild vehicles that might give additional information. You can also type "KennB" in the search box at the upper right on this page and it will bring up all the things I have done or am working on. KennB
-
i needed to design some additions to the front end. Then to send the rest to the paint shop. It is close to new undates.
-
in primer ready for pint shop and final wiring and assembly. KennB
-
I have the final appearence and shape. The wheels ave been adjusted and i think the stance is right. It cant negotiate a manhole cover now will be getting color this weekend. KennB
-
http://www.modelcarsmag.com/forums/index.php?showtopic=51153
-
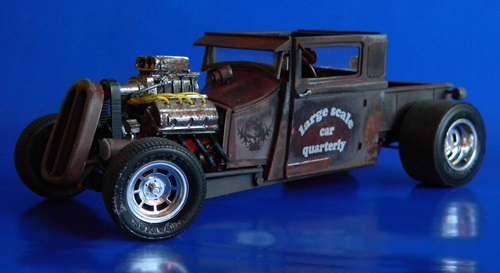
Update time. I have the frame started and interior ready for paint. I made a few minor changes that realy dont show much. The exterior is ready for final primer. I am toying with bright red for this with a tan interior and red highlights. I think I am ging to use the stock wheel setups but they need to be set out to the fender edges and drop them about 1/16th inch. KennB
-
I normally do not build kits but thought I would give this one a try. 2010 Mustang that I am trying some Ideas out on. I have a ways to go as it is just still roughed out. KennB
-
Just a fast update. I have both sides roughed out. A lot of sanding I think you can see the subtle adjustments I made to the body. KennB
-
Picked up a kit, ya I know, what is he doing with a kit. Well I did. I have some ideas I wanted to play with and since i am waiting for parts and most everything else is in various staged of paint I would try a few out. I have one side done. KennB
-
Here the rear end pumpkin is made.
-
Molding Plastic: You can use almost any types of objects to mold plastic. For this example I am using pens, handles, and markers. Here you see markers, exacto handles and pens. You also need a series of tubing slices about ¼” thick. This can vary but I have found this size works for most things. Use your imagination as to what you will use fot the male part, i.e. pen, handle, ect. You will need a heat source such as a candle to heat the plastic until it is pliable and fluid. It will drop and curl, that is the point to mold it. Here you can see a saw handle molding a simple concave surface. The heated plastic is pressed over a large diameter tube section. This is a felt tip marker pressed into the plastic for a deep dish type of shape. You will see most of these used on the motorcycle. In the last photo you can see the removable end of the marker is used. Practice a few times and you will get the hang of it. By placing more than one tube together concentrically to form more complex shapes. Such as the hubcaps shown in the next post. It is a lot easier than it looks and you are limited only by your imagination. KennB
-
I will set up some of the molds I used on this and have photos tomorrow sometime. I will give the dimensions and procedures so you can duplicate them easily. They are not as hard as one might think. KennB
-
Liking the looks of this project. Very nice choice of model to work with. I like to see the different and unusual types of cars that are done.
-
Just about ready for finishing. I have the motor done with some wiring to look credable. I dont go for high detailed models but aim for credable looking models. I have the rear gear bolted on ready for the chain. There is a clear fender that covers the top front of this. I still have handle bars and the seat. The frame sides were cut out and through several gyrations and trial and error tearing it out and redoing it I came up with what you see. I took very few photos at that stage. The sides where taken directly off a drawing that I printed out so the exact scale is not known but the bike is all to the same scale, About 1/12th . The center section and transformation from side to side was the most difficult part. KennB
-
Additional motor shots. Note: All that parts that have the shapes I made by heatin the plastic and pressing it into a simple mold with different handles of my tools. KennB
-
Short update on the start to the motor build. KennB
-
Been working on the rims in front and rear. I also decided on the overall type of motor and have scalled patterns to fit the frame. KennB
-
Since I have no dimensions for the origional. i Just printed the side view out and went from there. Since it is about 8 1/2 " long and 2 1/2" high (aprox.) I am guessing it is about 1/12th. Thanks for the comments. KennB
-
This is something I ran accross that I could not resist. I should challange me sufficently . I started the frame and wheels. It is going to be a long term project fit between other projects that are all in the paint shop right now. Finished length is about 81/2". KennB
-
I bought the 1:1 of this in July 1964...Loved it,,,,It was the second one in town . Traded in my 58 Plymouth Great Project KennB
-
Got a little color going now. working some on the motor assembly. KennB
-
If I was not scratch building it would have been easier, but then that would defeat the idea of building from nothing. It would also be easier to use commercial tires and rims and engines. I enjoy scratch building it all and as I do more I find it easier each time. I really like building this way and right now have several ready to finish up. I have been painting this week on 4 projects that are about done. This ine still has a few little things to do and ready to go to the paint shop. I have the engine block painted and ready for assembly. The rear end is a modified Jag XKE clone. There is more I could do but since for the most part it will never be seen it is enough for this application. KennB
