-
Posts
362 -
Joined
-
Last visited
Content Type
Profiles
Forums
Events
Gallery
Everything posted by tjones87
-
I wanted to use the stock hood, but during mock up it hit the breather. After final assembly I just thought I would see how it fit...and it sits down perfect, I guess I trimmed more off the chassis than I thought. I was going to go ahead and use the stock hood, but I had already glued the hood edge trim to the cowl hood. I think I will find another trim piece and swap hoods for an even better sleeper look. Here is a pic of it wit the flat hood on...let me know what you guys think....thanks for the comments
-
Thats kind of the look I was going for....
-
all finished up and undrglass http://www.modelcarsmag.com/forums/index.php?showtopic=69010
-
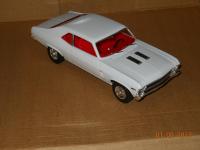
I decided to go a different route with this build. I always seem to go with darker paint jobs, but decided to go witht the white on red for this Nova...I tried finding pics of actual cars in this colour combo, and not many out there. First thing I did was swap out the small block for the big block from the 67 Chevell ProStreet kit. It fit perfectly in the engine bay, with no modification, other than replacing engine mounts. You always see these cars built al out hot rod or bone stock..hardly ever any built in between. I combined the stock and drag parts and this is what the outcome is. You can catch up on the build at this link -- http://www.modelcarsmag.com/forums/index.php?showtopic=68230 More pics at this link -- http://s903.photobucket.com/albums/ac235/buysaletrade87/model%20misc/1969%20Nova%20SS/
-
I am not sure what happened to the upper radiator hose...it was fine until I went to put it on...looks like someone has cut it off a bit short....hmmm..still trying to figure that one out lol...its not as noticeable in person..the flash from the camera makes it stick out like a sore thumb
-
Got the body/interior joined to the chassis finally....now on to the bumpers and small chrome pieces and it will be underglass.... I am not crazy about how this car sits, but after looking at others, they seem to all be this way...unless of course you jack the rear up...but this kit seems to go together quite well.
-
It is still being built...should be done with it in the early AM....I got the chassis completed (radiator/fan shroud installed) and also got all the glass and interior installed into the body...not just waiting for some of the glue to dry so i can join the chassis with body/interior...then get to put the little chrome pieces on. Thought about doing them before, but I know I would end up breaking them off...anyways..here are some shots of what I have so far....next pics should be in the Underglass section...hopefully (fingers crossed) lol...thanks
-
-
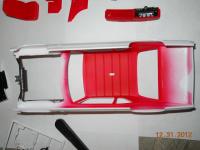
I have always hated seeing a nicely built kit and the headliner doesn't match the interior...I just taped off the windows and sprayed it with the same paint as the interior...had a little clean up along window edges, but good thing with this pain, it rubs right off with a little water.... It is just Opaque Red from CREATEX -- it is very easy to scratch and chip until its cleared...the interior didn't get cleared, mainly cause I like the look of it straight out of the airbrush. Yeah the only thing I'm not fond of is the exhaust...but I have tried using what I have to make a new section of pipe, but it just looked way too big compared to the headers. It is just slipped in the headers lightly glued to the chassis, so it may get changed, if I can find something the right size... ---- got the wheels.tires mounted....hard to do square them up with the center caps sticking out past edge of tires lol...but they seem to be straight.
-
some pics of the body as it sits...the front and rear window trim is BMF, as well as the side posts...went over the Nova badges again with the red sharpie to darken them up a bit
-
Got the chassis assembled this evening....got a few more things to do to the body and its ready to be joined together...also got the wheels/tires assembled and ready to be installed on the chassis
-
pm sent about decals
-
Looks liek the side is approximately 6 1/2" from the middle of the front side marker light...unsure of how accurate this is, without original decals I am not positive on where it kicks up.... the hood measurements -- the scoop portion are approx 2 1/4" long x 7/8" wide hope this helps ya out....let me know
-
Got the interior assembled, rear end assembly (including traction bars), front/rear bumpers black washed in certain areas and chrome trim on hood. Also went over the Nova badges on fenders and rear with a red sharpie...should look really good with the red decals....I was hoping to get this one fully assembled tonight...but celebrated a littel too much and cant seem to concentrate on one piece at a time lol...lovely triple vision...anyways...here are a few pics to round up tonight...Will post more tomorrow evening....thanks
-
ok shouldnt be a problem....
-
I can get some measurements of the hood if it would help....let me know
-
yeah I have rattle can flat black...but with the colder weather i cant spray outside..and no good ventilation inside to spray....but none the less...it looks better than I thought it would. Just hit me up when you get the decals....I will get this thing built and assembled...wont need the decals until its complete anyways lol...thanks again
-
amazing build
-
Got the engine/trans mounted (this is usually my main problem in building a car) and it went in pretty good considering its not the original to the kit. Exhaust is painted and drying as well as the rear end assembly. Also got the interior assembled, except for dash (left it out for pics so you can see interior better... I ran out of black paint for my airbrush...so had to paint the chassis the old way...with a brush lol....took longer..but doesn't look too bad.
-
its cool...I don't even know were to begin with making decals lol so no problem at all....If the Camaro hood decal is a little different its cool...as long as they are the same color lol
-
finally able to get some pics of my slow progress.....will be assembling most of the kit tonight.... I also tried my hand at BMF'ing the window trim...got the front and rear done and that will be all lol...don't have the patience at the moment for it....it still looks good with nothing else foiled....will have more pics up as soon as more progress is made...thanks
-
I am lacking the motivation to get on this build....lol...but I did manage to get some stuff done last night....Got the rear end assembled and painted as well as the chassis painted. Also got the interior painted, just need to assemble it. i will get some pics up in a little while...need to recharge my batteries for the camera...
-
Sorry I clicked on the wrong section...my bad...no need to comment like that...its not like I posted it in the parts wanted section or something off the wall...would have been just as simple to move it and say "it was in wrong section so I moved it"
-
I have a build planned but do not want/need to paint the main body...how could I go about polishing the styrene to make it look better? thanks
-
Going be a cool build...thinking bout doing a similar build....will be following this for sure.


