ShawnS
-
Posts
349 -
Joined
-
Last visited
Content Type
Profiles
Forums
Events
Gallery
Everything posted by ShawnS
-

Scratch Building an Aussie Ford Falcon **New update,15/1/18**
ShawnS replied to ShawnS's topic in WIP: Model Cars
Guys guys guys, I don't know why you would need a book when you can ask me anytime about how I did something. I'm more than happy to take questions and if I can help you with what you need to know I will. Call it an interactive book.... Cheers ShawnS -
Scratch Building an Aussie Ford Falcon **New update,15/1/18**
ShawnS replied to ShawnS's topic in WIP: Model Cars
Thanks again. You are all very generous with your praise. Here is another quick update for you all. This week I made a mould of the sump and trans mount and cast them in resin. I found a gearbox in my spares box and cut it up. I glued both the gearbox and the trans mount onto the chassis. I then cut a section of evergreen sheet and glued it to the top of the gearbox.. This will sit inbetween the front chassis rails. I added the gearbox extension and a CV joint, I also continued detailing the main underbody. The driveshaft is temporary until I figure out how I'm going to do the rear section. I cut a section out of the sump that was the same width of the crossmember and made a dummy oil filter and pulley/belt. Once I had glued everything together I ran some Tamiya liquid primer around the areas that butted up against each other. I also made a sway bar. Everything fits nicely where it is supposed to sit. It's cold, windy and rainy where I am at the moment so I haven't had the chance to hit it with some primer yet. Still plenty to do so stay tuned my friends. Cheers ShawnS -
Scratch Building an Aussie Ford Falcon **New update,15/1/18**
ShawnS replied to ShawnS's topic in WIP: Model Cars
Hi Roger. The shock towers are easy to explain as they are just 5 separate pieces of evergreen sheet. First figure out the dimensions and cut out one large flat part and two sides then glue them together. After the glue set I sanded the back side to get the angle that I needed. The get the rounded face I cut out a section of thicker evergreen sheet and cut it to be the same shape as the rest of the tower, glued it on and then I rounded it off with sand paper. I also capped the top with a scrap piece of styrene sheet and blended that in with sand paper too. The original on the far left with the resin cast parts. Hope that helps you out. Cheers ShawnS -
Scratch Building an Aussie Ford Falcon **New update,15/1/18**
ShawnS replied to ShawnS's topic in WIP: Model Cars
Thanks guys. Yeah I do seem to have accumulated a lot of different sizes, shapes and thicknesses of evergreen styrene as well as a selection of glues, knife blades, sandpapers, drill bits and scribers in the last few years. I am always on the lookout for new tools to help me along. -
Scratch Building an Aussie Ford Falcon **New update,15/1/18**
ShawnS replied to ShawnS's topic in WIP: Model Cars
Hey guys I am pleased to return with a new update. It's been a while but something clicked and I hit the workbench a few days ago and started some more scratchbuilding. I find the best way to jumpstart myself after a slump is to do some major construction so it's time to do a curbside chassis. Obviously I intend to do more than one version of this car in the future so I will need to make a resin castable curbside chassis. I thought about it for a while but I couldn't find a way to successfully cast the chassis that I had previously made so I had to start this one from scratch. The plan is to keep the parts count to a minimum so there wont be a separate diff or suspension or driveshaft etc.. but I want the detail to be reasonable without going over the top. Visuallise something along the lines of an Aoshima or Fujimi style curbside chassis. I started by cutting a slab of evergreen sheet to the right width and started to go from there. I measured and cut out the main underbody sections and scribed some detail into them and sanded them to shape. I bent the front lip of the main flat section the same way I did the interior tub. I put that aside and then took a chassis from an AMT Mercury and cut off the front section. The kit part was too narrow so I had to make it wider. I also had to fill in the under cuts to make life easier when I am casting as well as blank off the main engine area. I also needed to extend the rails at the rear of the front section. Evergreen to the rescue again. The wheel locating stubs are temporary and will be removed before casting. The main rails were added to underbody. Everything fits nicely. I will be building and casting the chassis in two parts which will give me the option of doing different rear end configurations that the Aussie XD/XE/XF Falcons came with. The next step is to add engine and gearbox detail so I will have to make a resin copy of the 6 cylinder engine oil pan as well as the trans mount that I have made for the full detail version and go from there. It's really good to be back at the bench and I hope to keep it going for a while. Cheers ShawnS -
Scratch Building an Aussie Ford Falcon **New update,15/1/18**
ShawnS replied to ShawnS's topic in WIP: Model Cars
Sorry no new updates yet. I'm just taking a break and trying to recharge my creative batteries, but I do hope to get back to it soon. -
Thanks for the kind words guys. You can never build too many of them Geoff. Never. CheersSS
-
66-67 Morris Cooper S. Seats by me and Decals are from the spares box too. This one has wheels and flares from the rally Mini kit. All six new builds for 2013 My Mini collection so far. I have one more that's getting a light freshen up as well Thanks for looking Cheers ShawnS
-
Hi guys. I have been a busy boy this year and have so far completed 6 Minis. I decided to add the new builds to this old thread. Four weeks ago I started out with the simple aim of restoring an old build that I wasn't happy with and then things just blew out of control. I decided to finish the Morris 850 ( the white #55) that I had started a couple of years ago then I figured one more and then I figured that I may as well do the others in my stash as well. So here is the result of 4 weeks work. 1961 Morris 850. I made the grill, seats, dash and wheels. The bumpers are cleaned up parts from the rally Mini kit. 1963 Mini Cooper's . Modified seats and decals made by me. 1966 Mini Cooper S It has my own seats and the decals are made from assorted spares from my decal supplies. To be continued...
-
Yes, they used the whole circuit and they were completely standard production cars.. This particular Mini that I modelled spent most of the race having a battle for Classs A honours with a VW Beetle only to end up on its side on the second to last lap after contact with the VW. It would have been a heck of an effort to race 500 miles in those days that's for sure.
-
Yeah I love the minimalist look that old race cars have too. As for the grill- It took a bit of thinking but I figured it out in the end. It's made from scratch not adapted from another part. Very hard to explain with out pictures. The wheels are modified from the kits original wheels. Thanks for the kind words Cheers ShawnS
-
Hi guys. I have put my scratchbuilt Falcon on hold in favour of something that I could actually finish. It's a Morris 850. This is a car that raced at the Bathurst 500 mile race in 1963 and came second in Class A. It's the Tamiya MINI Cooper kit with a scratchbuilt grill and a whole new interior including a single gauge dash and new gearstick as well as different seats. I also made the decals. Thanks for looking Cheers ShawnS
-
Scratch Building an Aussie Ford Falcon **New update,15/1/18**
ShawnS replied to ShawnS's topic in WIP: Model Cars
Thanks again for the kind words guys. Well the two weeks it took to cast all of that stuff sure felt like forever. Me too Wayne . Me too. It's a pity that there's still alot more work to do. Cheers ShawnS -
Scratch Building an Aussie Ford Falcon **New update,15/1/18**
ShawnS replied to ShawnS's topic in WIP: Model Cars
Hi guys. I've been taking a break from any sort of construction work and have turned my attention to casting the interior. I had always intended on building two versions, my parents old car (red, manual, grey interior, full detail) and my grand parents car (beige, auto, tan interior, curbside) so I had to do some serious resin casting. I started with the interior tub. As I had already cast one tub a while ago, all I had to do was make two more. One of them had 3 large air bubbles so I filled them with superglue mixed wih talc. I'll be using that as a spare. Next up was the door cards. I forgot to take the crank handle off of the front door cards before I made the mould so I have to live with them as moulded in parts. The dash and it's parts were next in line. The steering wheel was a pig of a thing to make a mould for but was easy to cast. The consoles were fairly trouble free during the casting process. Lot's of seat parts were required too. I had already made a mould for the front seats and head rests and had cast some seats earlier too but still had to make more. Here are the parts for three complete interiors, two to be built and one for spare parts if required. The only other work that I had done recently was to spray the chassis with some primer and mark out the ares that require attention. I won't be casting the whole chassis just the centre section to add some detail to the curbside chassis that I am yet to get started on. That's about all for this update. Things progress slowly with me but if I keep diggin' away at it one day I'll get it done. Cheers ShawnS -
Scratch Building an Aussie Ford Falcon **New update,15/1/18**
ShawnS replied to ShawnS's topic in WIP: Model Cars
Thanks guys. Kelly you are right, patience is an important modelling tool. I have to remind myself that it's not a race all of the time. Engine is bought to you by evergreen sheet and strip styrene,Tamiya thin cement and X-Acto blades. Thanks again for your interest. Cheers ShawnS -
Scratch Building an Aussie Ford Falcon **New update,15/1/18**
ShawnS replied to ShawnS's topic in WIP: Model Cars
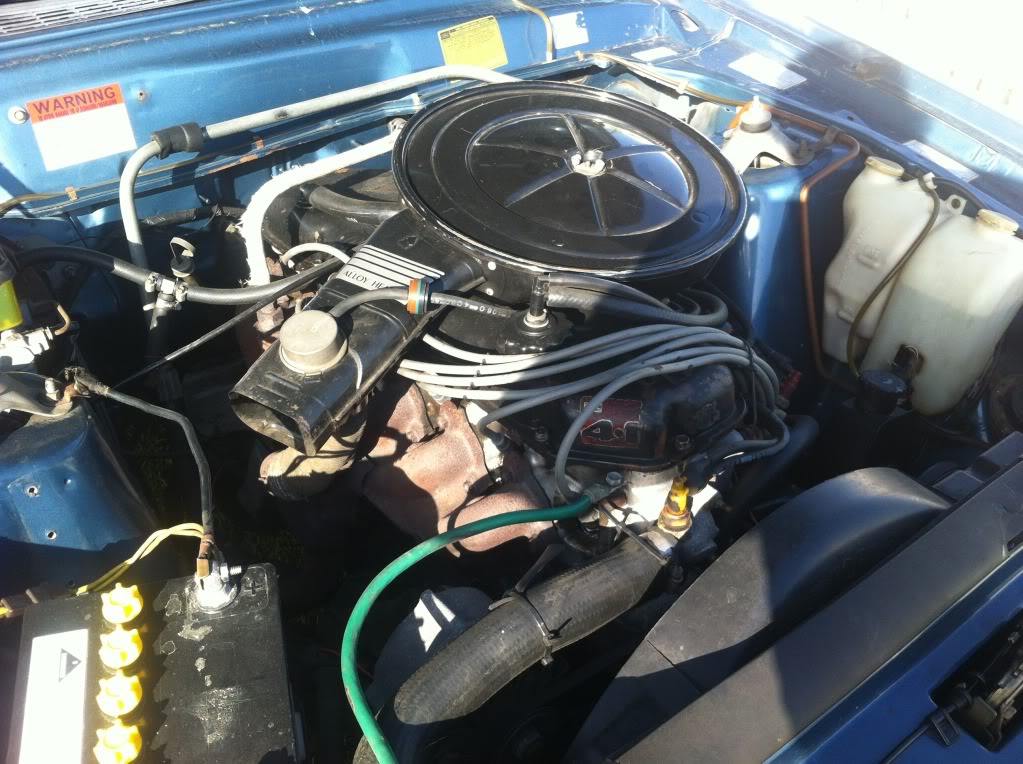
Hi guys. The last month has been a little bit of a bad luck stretch which led to several parts breaking and having to be rebuilt so I was away from the bench for a week or two to reset my modelling mojo. When I restarted I just wanted to do something that wasn't too stressfull so I turned to starting work on the plumbing. Here is a pic of the real thing. There are a lot of hoses but I'll probably just do the main ones with a few minor vacuum hoses here and there. I also made the throttle cable and linkages for the carby as well as the clutch cable. I made the throttle spring from a guitar string and mounted it on a bracket made from a Coke can and some PE parts. It's mounted on some PE linkages on the back on the carby. I drilled out the distributor cap and added a coil. You can see how busy the left side of the engine is. There are plenty of hoses and cables running in all directions and I am still yet to add the alternator and A/c unit as well as the A/c hoses, fuel lines and battery cables. The engine bay will be full by the time I'm finished. Thanks for looking. Cheers ShawnS
-
An absolute stunner. 50 Olds + Firey orange + cream = delicious. I'm with Charlie, go and take some pics in the sunlight to get that paint poppin' for us to really drool over.
-
Lovely work Chris. Super little Jag.
-
Smooth and slick just like a 49 Merc should be. Good work Jason.
-
It's a brilliant build Craig. You've built something to be proud of that's for sure. Well done.
-
Scratch Building an Aussie Ford Falcon **New update,15/1/18**
ShawnS replied to ShawnS's topic in WIP: Model Cars
Thank you gents. Looks like I've found my true calling. new website scalemudflaps.com coming soon. Hi Johan, I got them from http://www.bnamodelworld.com/index.php?main_page=advanced_search_result&inc_subcat=1&search_in_description=0&keyword=%25&manufacturers_id=169&page=16 It's the only place that I have seen them. Cheers ShawnS -
Scratch Building an Aussie Ford Falcon **New update,15/1/18**
ShawnS replied to ShawnS's topic in WIP: Model Cars
Thanks again. I'm still amazed at the reception that this gets everytime I post an update. I also always get a little buzz when someone says that I am inspiring them to give scratchbuilding a go, It's easy to get caught up in the mindset that forums can be more of a competition than a community so if someone learns from my posts it gives me reason to continue and share even more. So with that I give you the mudflaps. I didn't really need to make them at this stage but as I had an idea about how to do it I couldn't help myself. Here is a pic of the real thing. To kick off I made the ribbed area first by sandwiching thin strips of evergreen with wider strips inbetween. I then made a resin cast of that part so I didn't have to make another one if I made too many mistakes. I cut out a square of that ribbed part and put it into a strip of scrap styrene that was cut to the width of the mudflaps. I then chiseled out an oval shape in the ribbed area. I got these stick-on metal badges from an Australian model website. They are made by a Chinese company called Easy Decal. I have had them for ages but could never figure out a use for them. I stuck one of the smaller Ford logos onto the mudflap and shot it with primer. I then cast them in resin that I added a drop of black pigment to for effect. It's something that I would have loved to have made with Photoetch but as I'm not setup for that yet I'll have to settle for styrene and resin. Thank you again for your kind comments . Cheers ShawnS -
Scratch Building an Aussie Ford Falcon **New update,15/1/18**
ShawnS replied to ShawnS's topic in WIP: Model Cars
Hi guys thanks again. Time for another update. I have been working on a few things that I needed to finish so I could move on to new areas of the build. First up is the exhaust manifold. I started building this part when I was working on the engine but it went into the 'Too Hard' basket. I based the part on exhausts from AMTs 67 Mustang. It was just supposed to be a cut and shut job but AMT's grey plastic doesn't seem to like being cut and glued and looses strength around the joints. So I resin cast the part and modified it from there. I added flanges and some boltheads and made a heat shield. I also made the hose that goes from the heat sheild to the air cleaner snorkel from fine wire and plumbers tape. I also started work on the exhaust system. While I was working on the engine I noticed that I hadn't made the dipstick yet so i made one with some 0.5mm brass tube and a piece of 0.3mm wire. I bent the end of the dipstick around a drill bit for the finger handle. That's all for now but as usual work will continue and updates will too. Thatnks again. Cheers ShawnS -
Scratch Building an Aussie Ford Falcon **New update,15/1/18**
ShawnS replied to ShawnS's topic in WIP: Model Cars
Hi all. I have finally finished making all of the smaller details for the engine bay. I found some horns in my spares box and added some extra detail and made some mounting brackets out of strips of Coke can. I made the air-con condenser the same way that I made the radiator. It gets mounted to the front and covers most of the radiator. The air-con drier bottle was the next thing that I needed to do so I made that too. The emission regs at the time required a charcoal canister to catch and recycle excess fuel vapours. That will be plumbed into the fuel system later. Here are all of the little pieces in place in the engine bay. The engine bay is finally finished... YAY. I also noticed that the chassis rails lacked detail so I added some strips to the top and the bottom and some boltheads too. Before After I have now turned my attention to finishing everything else in the front end of the car. Stil many hours of work left to do. Thanks for looking Cheers ShawnS -
Scratch Building an Aussie Ford Falcon **New update,15/1/18**
ShawnS replied to ShawnS's topic in WIP: Model Cars
Thanks again guys. I think I''l go back to the regular builds after this. Ironically I have so many projects that have stalled because I needed to scratch build parts but didn't know where to start. I think this build is going to be a bit of a confidence booster that will allow me to kick start those projects. As for the next update, well I work slowly so you'll just have to wait like everybody else . Welcome to the forum Martin. The only measurements that I have used have been the wheel base and track width. I also managed to get the dimensions for the bonnet and boot (hood and trunk) to help me figure out the width of the body. Everything else has been done by guess work and what my eyes tell me. I have had to remake quite a few parts because they were too big or too small, It's just a matter of making things in the right order. The putty I use is Tamiya polyester putty which is a two part putty. Thanks for your interest Cheers ShawnS