ShawnS
-
Posts
349 -
Joined
-
Last visited
Content Type
Profiles
Forums
Events
Gallery
Everything posted by ShawnS
-

Scratch Building an Aussie Ford Falcon **New update,15/1/18**
ShawnS replied to ShawnS's topic in WIP: Model Cars
Thanks guys. Even though this build has been going since march 2011 the reception that it continues to get from modellers around the world still blows me away. I never set out to do anything other than a basic kerbside build with a few extra details here and there but everyones encouraging comments have spurred me on to test how far my own skills could possibly go and I have even surprised myself with what I can do. While sometimes I feel that I am just showing off I remind myself that I have learnt from many builders (that's you guys) over the course of the build and that I sure hope some guys are learning from me too. I'm sure when I have finished this build I will reflect on how much I have evolved as a builder and I hope that you guys also keep challenging yourselves and passing on your tricks and tips to help yourself and others evolve too. Thanks again. 'till next time Cheers ShawnS -
Scratch Building an Aussie Ford Falcon **New update,15/1/18**
ShawnS replied to ShawnS's topic in WIP: Model Cars
Thanks again guys. This little job is still ticking along nicely and now I have some more to show you. I had to scratch build the brake master cylinder/booster/reservoir setup. I found a battery in the spares box and made a tray and mounting frame to suit it. I made the overflow and washer bottle too. The firewall is all evergreen. The wheel well now has a spring cover. The shock tower now has a vertical strengthening bar and some extra stryrene on the front. I made some shock mounts for the top of the towers and test fitted the lot. I slotted the engine in place to check for any interference. I am a little concerned about how and where the alternator sits so I will have to work on that. That's all for this update. Still plenty more to come in the future. Cheers ShawnS -
Scratch Building an Aussie Ford Falcon **New update,15/1/18**
ShawnS replied to ShawnS's topic in WIP: Model Cars
Hi guys. This little build still occupies a bit of my time so I figure you should see how I'm progressing. My main focus over the last couple of weeks has been the sides of the engine bay. Starting with the usual evergreen sheet cut to shape with bits added to it along the way. Shock towers The finished product The sides still need extra details added to it like the vertical strengtheners and boltheads etc as well as further work on the fronts. The sides will be mated to the firewall at a later date and joined together at the front also. Still plenty to keep me busy over the next few months. Thanks for looking Cheers ShawnS -
Scratch Building an Aussie Ford Falcon **New update,15/1/18**
ShawnS replied to ShawnS's topic in WIP: Model Cars
Nah mate. I'm resisting the urge to fiddle around with other models. I reckon it's well over the half way point in the project and my mind is focused on the light at the end of the styrene tunnel so I keep telling myself to not waste valuable build time on those other 20+ half started models. cheers ShawnS -
Black on green is a winning combination on this model. If it was a 1:1 it would be a real head turner wherever it went. One of the best 55's that I have seen for a while. Keep up the good work Larry.
-
A very slick build, the two tone paint looks great. Good work Doug.
-
Great paint job on a very clean build and the foil looks fine to me too. That's one to be happy with.
-
Man that would be one hell of a wild sled ride. Nice build Ray. Well done.
-
Another classic build, Good stuff Matt.
-
I love old race cars of any type and those are fabulous. Your passion for them really shows through in the build quality and the way each are individually displayed. Great work Darryl.
-
Scratch Building an Aussie Ford Falcon **New update,15/1/18**
ShawnS replied to ShawnS's topic in WIP: Model Cars
Thanks guys.The ozautobuilders forum has lots more pics of this build but if you want to see them you'll have to sign up and join us. If you're an Aussie, there's no excuse for not joining us. Non Aussies are also welcome. I am progressing nicely with the engine bay but it will be a while before I can give you some pics so here is some work that I did on the wheels earlier. I originally intended to make this model as a curbside with basic wheel backs but as I started to make more and more details I realised that I needed hollow wheels to house the brakes in, this is how I did it. I found the right sized wheel in my spares box and used my Dremel to grind out the centre, I then cut a section the width that i required off of the wheel I then used a circle cutter to cut some discs the same diameter of the wheel, I drilled a hole in the centre and inserted a length of rod. Here are the wheel components. Once it's all together you can see the difference between the typical wheel back style and the hollow pin style that allow detailed brakes to be fitted. There you go, a basic How-To on turning wheel back style wheels to the pin type that manufacturers like Tamiya use. Thanks again for looking and for the nice comments that you have been handing out. Hopefully next time it will be the engine bay. Cheers ShawnS -
Scratch Building an Aussie Ford Falcon **New update,15/1/18**
ShawnS replied to ShawnS's topic in WIP: Model Cars
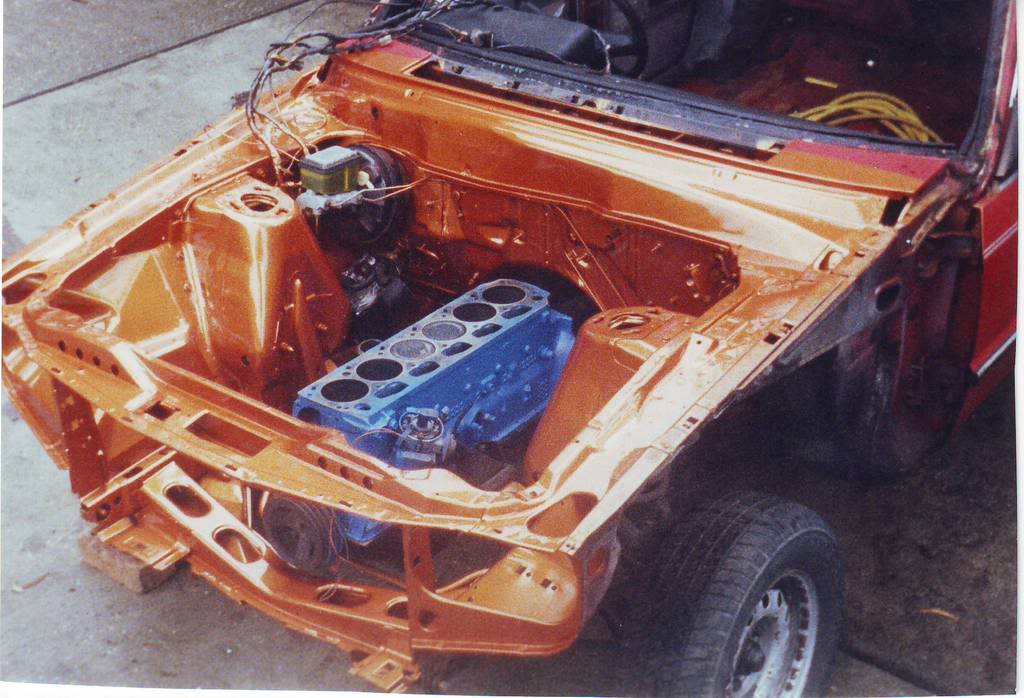
Cool. Thanks for that. I've posted this build on two other forums and I have seen it on three more forums where others had posted parts of it but that is the first non-model site that I have seen it on. Has anybody seen it or posted it anywhere else? I don't mind if it gets around just as long as my name is used as the builder. Ok time for some update pics. I have been working on the engine bay this week. Here's the real thing. I intend to do it in three sections, the top flat section which will be attached to the body and the sides which wiil be mated with the chassis. I started out with the back and sides. I shaped some strip styrene for the back and added some strips for the sides. I then cut out a large section of evergreen sheet, cut out the middle and bent the sides up. Glued it in and trimmed the back to match the piece that I put in earlier. I started detailing it with a section that goes on the front. It's made from several bits of strip shaped and glued together. I glued that onto the front of the top of the engine bay an added some strips up the sides. I added some lumps and bumps onto the sides. I made a little bracket for the back corner, cut out the holes in the front corners and the slots for the latch then hit it with some primer and it was done. The bonnet fits without any interference but only just. That's it for now. I'll now shift my attention to doing the sides. There are lots of tricky curves and angles to work on so it may be a while before I get them right. Til then, Thanks for your comments and for your continued interest. Cheers ShawnS
-
Scratch Building an Aussie Ford Falcon **New update,15/1/18**
ShawnS replied to ShawnS's topic in WIP: Model Cars
Obscure Italian sports cars really aren't my thing I'm affraid Gerald. This thing has taken me over 15 months so far so I will be keen to return to just scratching individual parts for my kits after this epic build. Feel free to give it a go yourself though, If you get stuck, we're all here to help. Cheers ShawnS -
Scratch Building an Aussie Ford Falcon **New update,15/1/18**
ShawnS replied to ShawnS's topic in WIP: Model Cars
Thanks Ray, Del and Homer. The mesh is made by KA Models and is available from http://stradasports.com The cap is from a Model Car Garage PE engine detail set, available from them or lots of other websites. Cheers ShawnS -
Scratch Building an Aussie Ford Falcon **New update,15/1/18**
ShawnS replied to ShawnS's topic in WIP: Model Cars
Thanks for the comments guys. Hi John, The solvent glues that I use usually come with a brush. The Tamiya extra thin glue has a fine tip brush attatched to the inside of the cap. For the CA glue, I use pretty much anything that is close at hand like a bit of wire, a sliver of scrap styrene, a toothpick, stretched sprue, etc etc. Nothing too fancy or expensive. Cheers Shawns -
A Pair of Ferraris 50 years apart -- 458 Italia and 250 SWB **DONE**
ShawnS replied to Matt Bacon's topic in Model Cars
Awesome 250. In fact both models are superb. You did a top job Matt. -
Cool 'stang. You nailed that mean race car look. Well done.
-
Outstanding work Alyn. I love the paint and the bare bones interior door panels too.
-
Good work Curtis.
-
Scratch Building an Aussie Ford Falcon **New update,15/1/18**
ShawnS replied to ShawnS's topic in WIP: Model Cars
Thanks for the encouraging comments guys. I spend my workdays as a metal polisher. It's not the most awesome job in the world but I'm grateful to be employed in this time of economic instability. As for my eye for detail, It's something that I have had for as long as I can remember. Must have been all those years playing with Lego as a little boy. Mate, if I find anything else for the Falcon in my spares box that doesn't need major surgery I'll probably die from shock. So far the total of spares box virgins is 1x rad fan, 1x starter motor, 1x dizzy, 1x gearshift knob and 4x tyres The hoses are left over from a Tamiya 1:12 F1 car that I trashed years ago. Rob, I've used many different types of glue over the course of the build so far but I use Tamiya Thin cement or Plastruct solvent cement when I can get them. I also use Zap-a-gap CA glue when I'm in a hurry to get things together. As for residue, I clean up the glue as I go. There are areas of residue but thankfully they don't show up in the pictures and will be cleaned up before the primer goes on. Thanks again guys. ShawnS -
Scratch Building an Aussie Ford Falcon **New update,15/1/18**
ShawnS replied to ShawnS's topic in WIP: Model Cars
Hi everyone, thanks again for the kind words. The newest part in this big 'ol jigsaw puzzle is the radiator. A search through the spares boxes found nothing that came close to the part that I needed so I had to hit the Evergreen again. I started by making the main body from a rectangular piece of styrene and I then put some strips around the edges. I cut out a section of KA Models PE radiator mesh for it and lined the borders with more strip styrene. I made the two sides and glued them on. I made the border for the other side larger so the shroud will have something to sit on. The shroud was made from styrene with a ring from a Tamiya Sierra. All done. I added a PE radiator cap and some brackets and locating points for the hoses. Test fitted onto the chassis with some hosses installed for effect. That's it for now. The next step is the engine bay. It's a tricky area to do so the next update may be a while. Thanks for looking. If you have any questions please don't be afraid to ask. Cheers ShawnS -
Scratch Building an Aussie Ford Falcon **New update,15/1/18**
ShawnS replied to ShawnS's topic in WIP: Model Cars
Thanks for the comments guys. A break???? Mate I'm just starting to get into my groove. Cheers ShawnS -
Scratch Building an Aussie Ford Falcon **New update,15/1/18**
ShawnS replied to ShawnS's topic in WIP: Model Cars
Thanks guys. I've been a busy boy at the work bench lately so I have some more to show you. I have finished the brakes. I started by making the front discs using the tried and true sandwich method and made the centres too. The calipers started as a basic shape then I layered the details on to them. Then I added dust covers for the back of the discs. All of the parts together. The rear drums are from an AMT Mustang with rear covers from another kit. That's it for now. I'm still really enjoying every aspect of this build and I'm pleased that you guys seem to be liking it too. Cheers ShawnS -
Scratch Building an Aussie Ford Falcon **New update,15/1/18**
ShawnS replied to ShawnS's topic in WIP: Model Cars
Hi fellow builders. It's been a month since my last update so I think I should post something new. I have been working on the steering setup. I went through a lot of evergreen rod in my many attempts to get it right. I also spent some time fine tuning the parts that I had already made to make sure the work that I did on the steering fitted right. I started by removing the stabiliser bar and making a thicker one. I made it in 3 pieces for easy installation during final assembly. Then I made the steering box from everegreen rod and strip. The mounting bracket. The steering rods were made from various size evergreen rods. Here are the completed units with the pitman and idler arms. I added some boltheads after I glued it all together. In position. That's all for now. I have moved on to making the brakes and I am almost finished them so I will update you on those when I am done. Thanks for dropping by and having a look. Cheers ShawnS -
Scratch Building an Aussie Ford Falcon **New update,15/1/18**
ShawnS replied to ShawnS's topic in WIP: Model Cars
Thanks for the kind words guys. There is still plenty more to do so stay tuned.