

ClayK
-
Posts
178 -
Joined
-
Last visited
Content Type
Profiles
Forums
Events
Gallery
Posts posted by ClayK
-
-
Wow John....well now I feel silly. That is a fantastic update! I think mine just went back into the box!! Looks awesome....
-
Looking good buddy! Nice to see you making some progress.
CK
-
On 6/26/2018 at 5:47 AM, jchrisf said:
Perfection Clay! How do you do the red line on the rims?
I scrape the edge of the wheel with a sharp hobby knife after the black has been painted. Then I just run a red Sharpie over the exposed white plastic.
Thanks everyone.
-
On 7/2/2018 at 5:14 PM, MarkJ said:
This is ridiculous how good your modeling is. Every time you post something, my mouth hits the floor in amazement. Its pure joy to view your builds.
Thank you Mark! I appreciate it.
On 7/9/2018 at 10:58 PM, majel said:Looks fantastic as usual. How did you do the marbles on the tires?
I mount my tires on a tool, and spin them on my Sherline lathe. As it is spinning I hold a big flat file across the tire. It levels the tire out, removes the center seam, and roughs them up all at once. The marbles are just the excess bits left over.
On 7/1/2018 at 6:31 PM, martinfan5 said:Clay, what gray for the chassis are you using?
I mix it Jonathan. I have a quart of HoK white, and HoK black, and I just keep a big glass jar full of light gray mixed from the two.
Clay
-
13 hours ago, jchrisf said:
LOL... Clay would that be all the articles you have written for SA or are there more? I'd love to get them all if I didn't just get them with those two purchases.
The build is looking great as usual. Where do you get your Omni 2 part clear?
Oh, I have written a lot more. I stared with SA in the fall of 2004. And worked all way up until 2016 I'd say. On a fairly consistent pace. I did lots of reviews for them as well.
I get my Omni at the local parts store. Car Quest or Speedway Auto Parts here in Indiana.
-
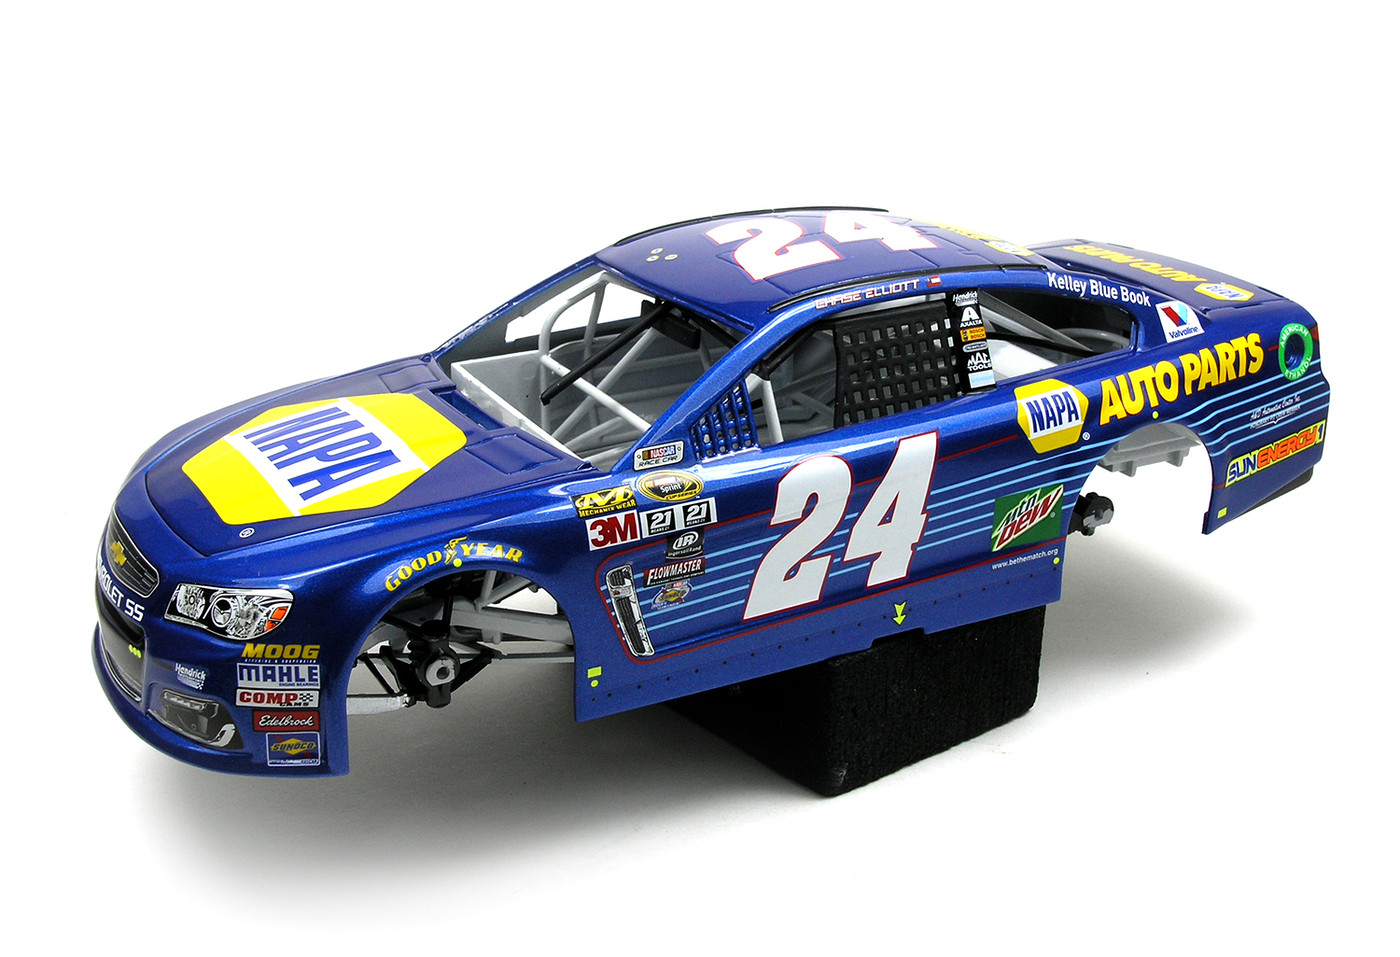
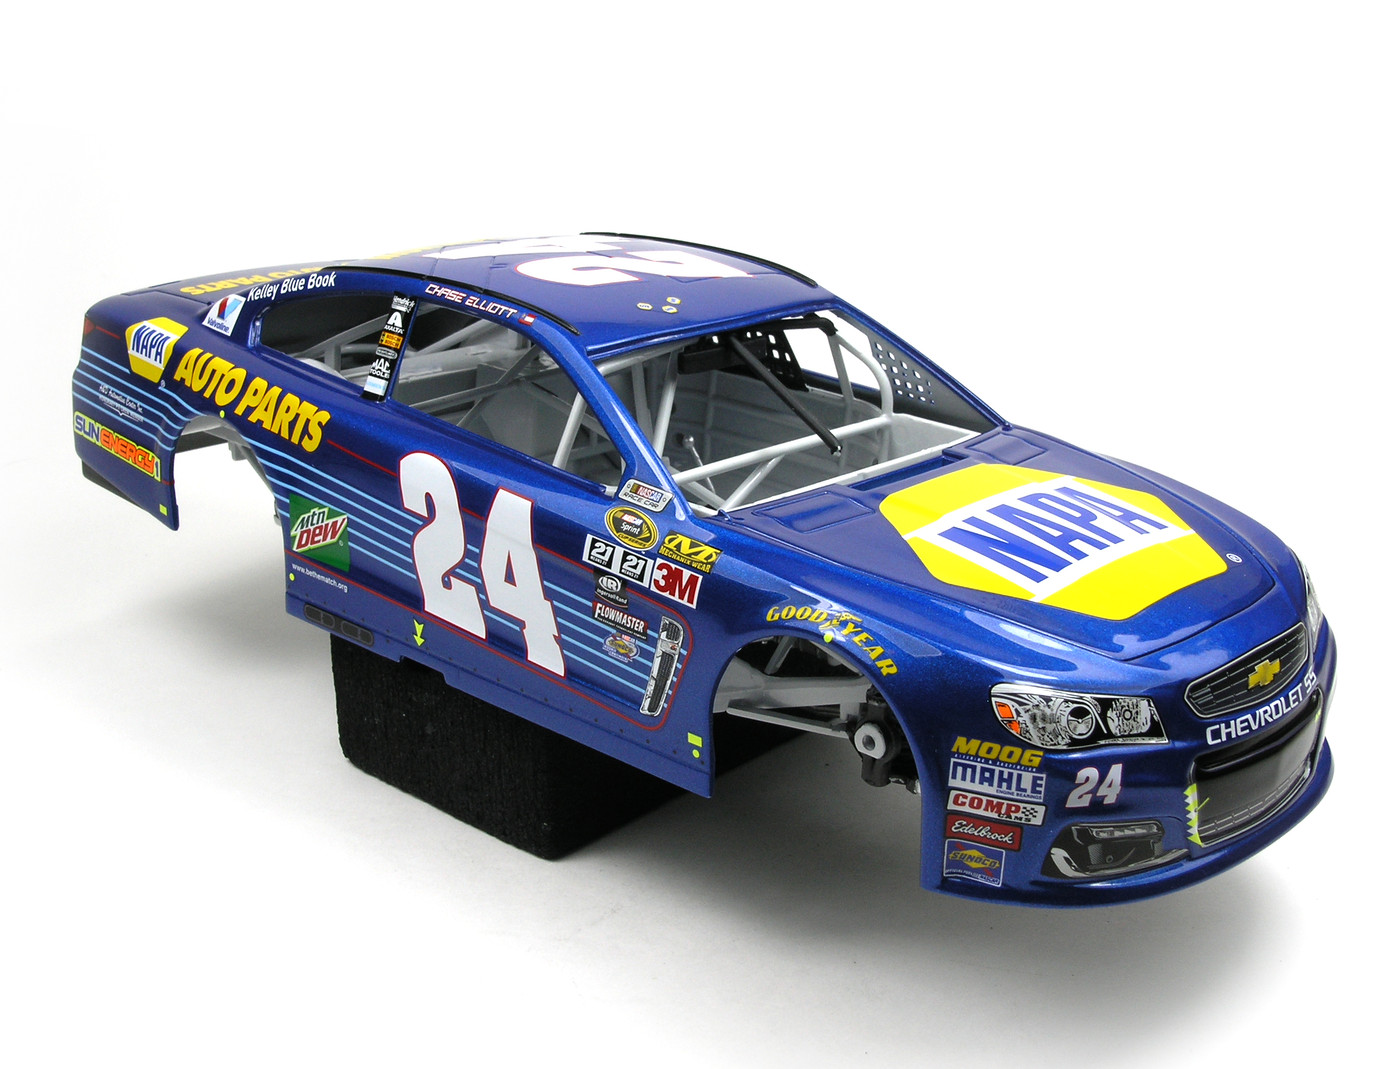
A little side project I've been working on when I get time. Box Stock Revell glue kit Chevy SS. I left the roof hatch lines in, so I had to update the rear bumper. Fille din the gap, then added the lower super speedway extension with sheet plastic. I will add a Miller Motorsports Customs SS splitter once my Shapeways order comes in.
Paint is Tamiya Mica Blue, with Omni 2 part clear polished out. and of course Powerslide decals. Not an exact copy of the car he won the 500 pole with at Daytona that year. But fairly close.

Tires and wheels are done as well. Powerslide decals on the kit tires and wheels.
Should be able to wrap it up in the next couple weeks.
Clay -
That's funny....never knew they put that one together of just my old articles. And I'm on sale!
Making some progress on the Yellow Feather. I primed the body parts with Tamiya Gray primer, then Tamiya white primer, then Tamiya yellow. I believe it was TS 16? I'd have to go look. It was the only can I had on hand. Probably a bit too dark for this car, but seems close to what his Funny Cars were. Once the yellow was dry, two coats of Omni 2 part clear, then polished out. I think I am ready for decals now.
I've also got the front axle pretty well done. Since the kit has the smaller front wing I decided to glue it on to a scratch built axle I bent up from aluminum rod. The whole thing will be painted in Alclad chrome. The tabs are from Dirt Modeller. The bends on my axle will get the front end down a lot lower than the kit one to make up for the taller front tires. I've mocked it up with the slicks on and it should sit pretty nice.
I plan to get the axle painted, and get on to some decals next. Thanks for looking!
Clay
-
I got the body shot with Tamiya yellow last night. Hopefully I can clear it tonight or tomorrow. Also been working on the front axle. Should have an update soon.
Clay
-
Cool project Brad! Love those little clamps holding the chain link on.
-
So bright! Looks great my man.
-
This one turned out fantastic! You really nailed all the little details that car had that day.
-
Thanks guys! I need to keep working!
Jose, I have a tool, I would guess you call it a mandrel that I bolt the tire to, and mount it in my Sherline lathe. I spin it up, then hold a big flat file against the spinning tire.You kinda gotta watch the speed so the tire doesn't melt. But it works great for lots of different kinds of tires. Hard rubber resin ones especially. Makes it a lot easier to remove center mold seams. Otherwise I just do them by hand with a coarse sanding stick.
Clay
-
Wow John....Looking fantastic! That is pure candy from top to bottom.
One question, did you clear over your foil?
-
Nice pipe work Tim!
-
I had an update posted the other day, but got the error message as soon as I hit submit. So I will try again!
I ended up clearing the chassis with HoK 2 part clear. Just one smooth coat. I also installed the seat and added a set of Pro Tech belts and hardware.
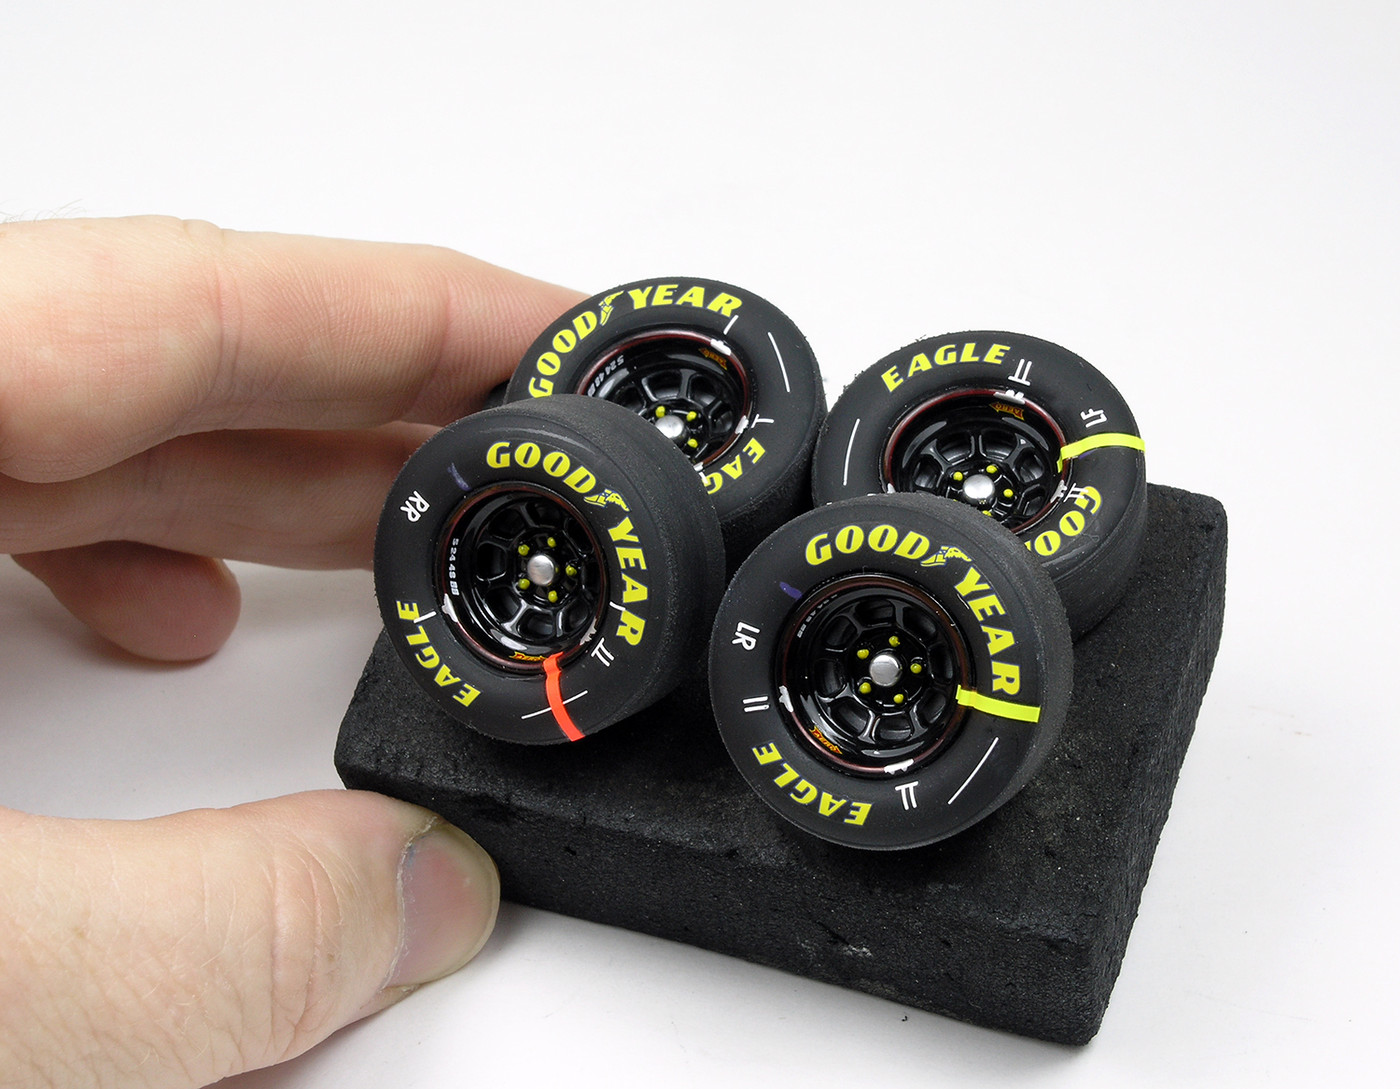
I finished the slicks as well. I used Powerslide Nascar tire decals then sealed them with Testors dullcote. Then I rubbed them with a Tamiya weathering kit to dull them down. I also got the wings cleaned up and ready for primer.
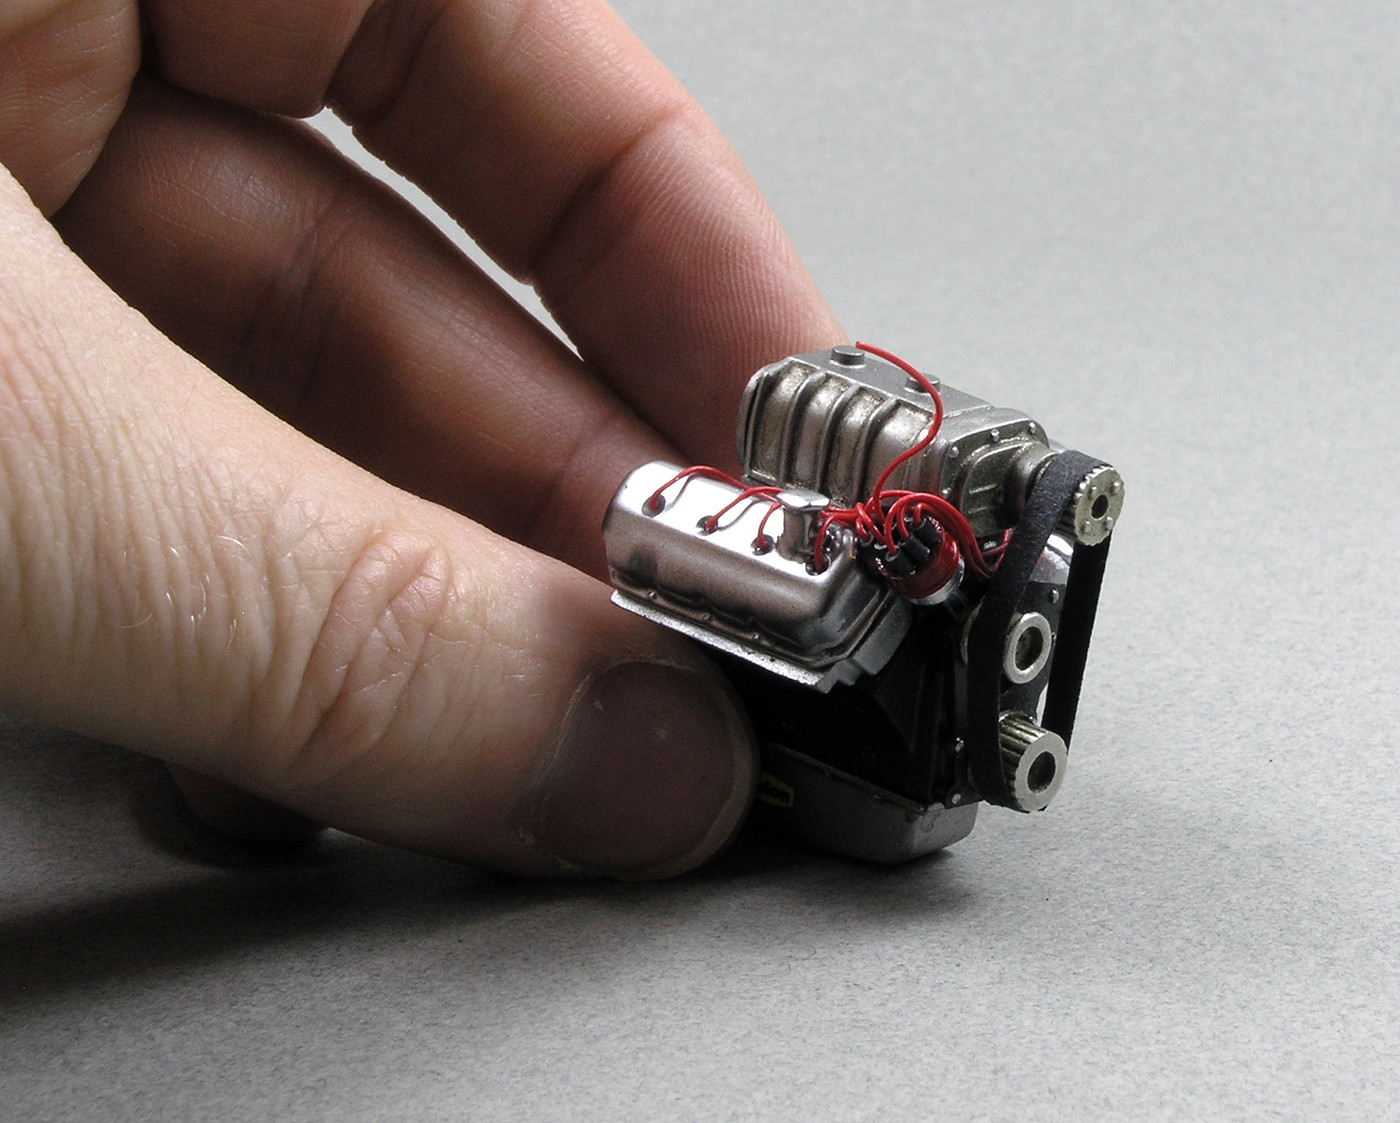
Moving to the engine....I finally got the valve covers painted so I could get them on, and add the plug wires. I used Pro Tech red plug wires, and also added a Pro Tech pulley kit to the front. I had picked up a Gravity Chrome paint kit in Atlanta last year at the NNL and had been wanting to try it. I think it works pretty well. And so far it seems pretty durable.
I need to get my front axle figured out, then I think I can get the body and wings in paint.
Thanks for looking!
Clay
-
Man Chris your chrome looks great! Thanks for showing how you do it. I would be afraid to polish it for fear I would just rub it all off. But I think I need to try that method again.
To answer all the airbrush questions....I used an Iwata HP-BCS dual action forever. Alclads, base coats, 2 part clear....I loved that airbrush. Then one day it quit working. I cleaned it over and over and could not figured out why it wouldn't pull paint anymore. If I remember right, I could get airflow. But no paint. I should either get it fixed or buy a new one. Because it was the best airbrush I ever had. Now I have two of the cheap Badger single action 350's. I use the medium tip for all my main spraying, and the heavy tip for spraying 2 part clear. I also have a Badger 150 dual action I use for Alcald, or thinner base coats. Hope that helps!
-
I love it John! Looks great. So cool to see it all mocked up!
Chris and I gotta get going!!
-
Those look amazing Tim! Nothing you can't do with some brass.
Clay -
Chris....looking good! That chassis is so close to paint. I know you can get there soon. All the goodies look nice too.
John....what can I say....your Garlits car is going to be awesome! Love what you have done so far. I always enjoy seeing how you think outside of the box on your builds. Those wire wheels look fantastic too!
I should have an update as soon as I take some pictures. I've been making some progress.
Clay
-
Alright John! Good to see you getting ready to go. I already learned something...I see you have an aluminum fuel tank to use. I think I may have one of those too. I need to go look!
I got my chassis painted and cleared. Hope to make some progress this weekend.
-
I know I've said it before, but there is nothing you can't build! WOW! I love that purple....everything is such eye candy!
-
OMG....I don't even know what to say. I can'g get two pieces of brass to solder together cleanly to save my live. And you are making those?? Unreal Tim!
-
Glad you guys are following along!
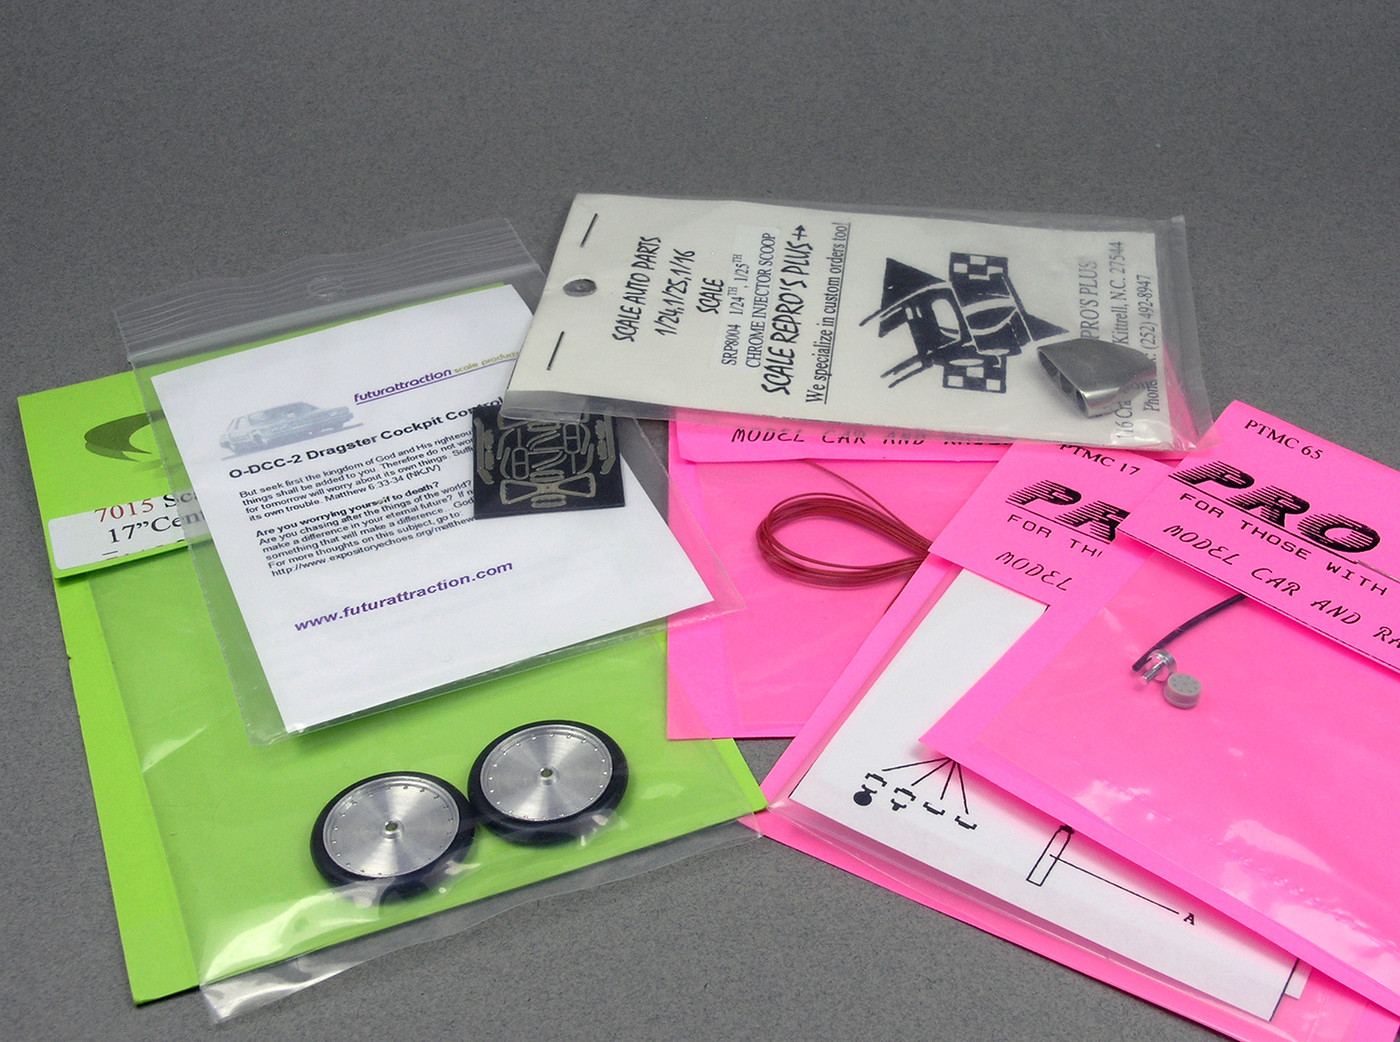
I finally got some time to take some pictures of my early progress. I went through my aftermarket parts bin and picked a few things I think will help improve these old kits. I will probably add some more such as some Pro Tech pulleys, and braided line. But this is a start. Like Chris I am replacing the front wheels with a set of JDS slot car tires. As well as replacing the square kit rear slicks with a set of Futurattraction soft rubber tires. I ran these on my lathe with a file to sand the tread surface down.
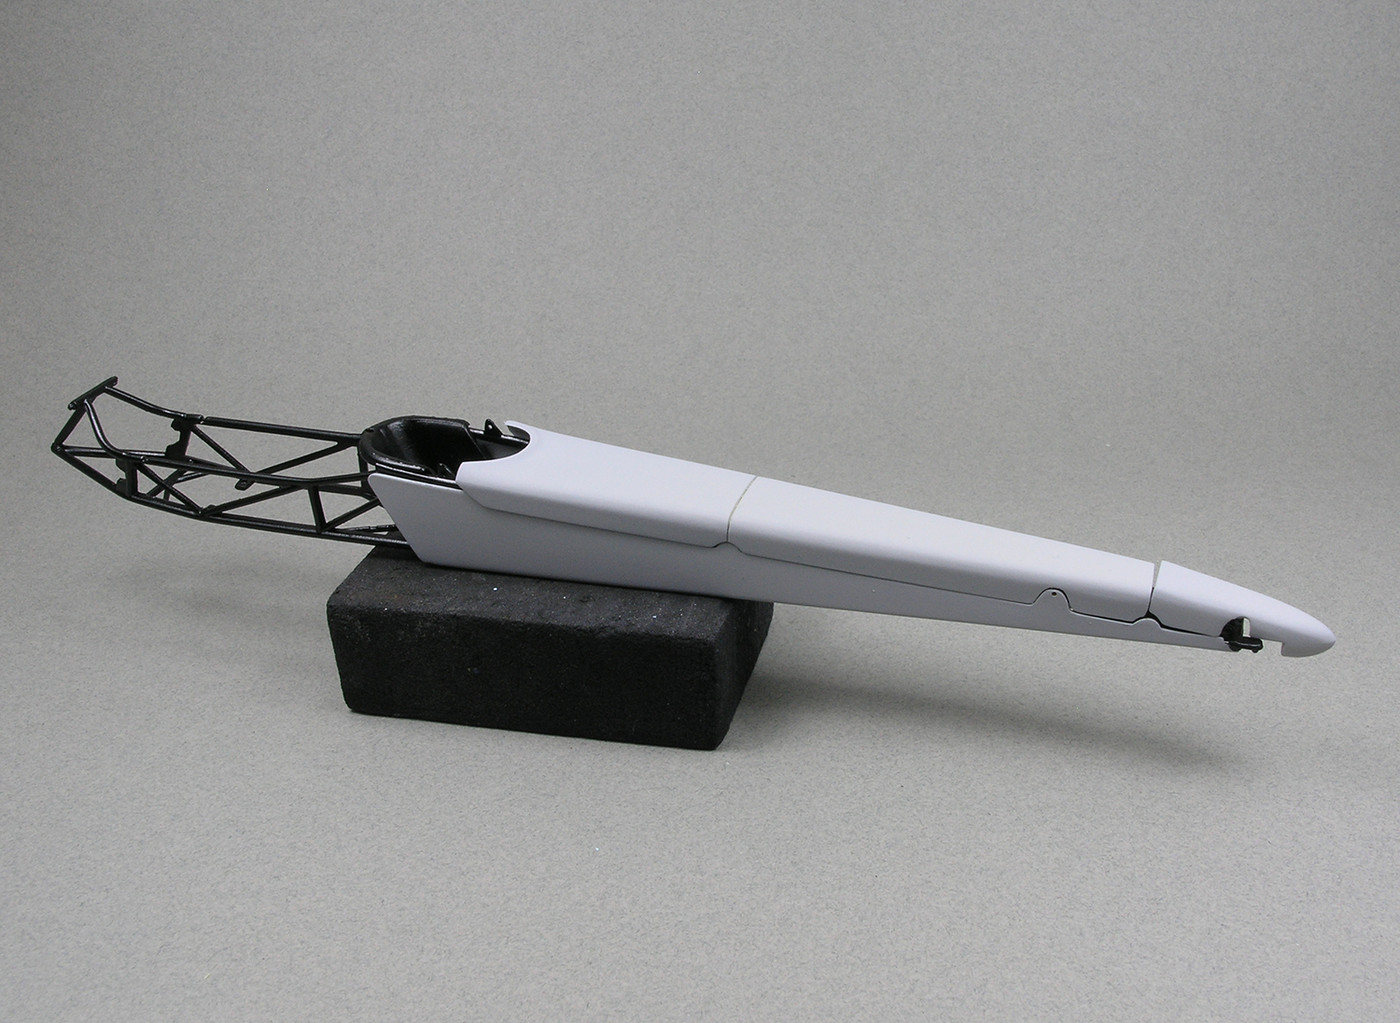
I got all the mold lines cleaned up on the chassis and got it painted in base coat black. I may shoot one coat of clear over this. I haven't decided yet. I also cleaned up the body panels and shot them in primer.
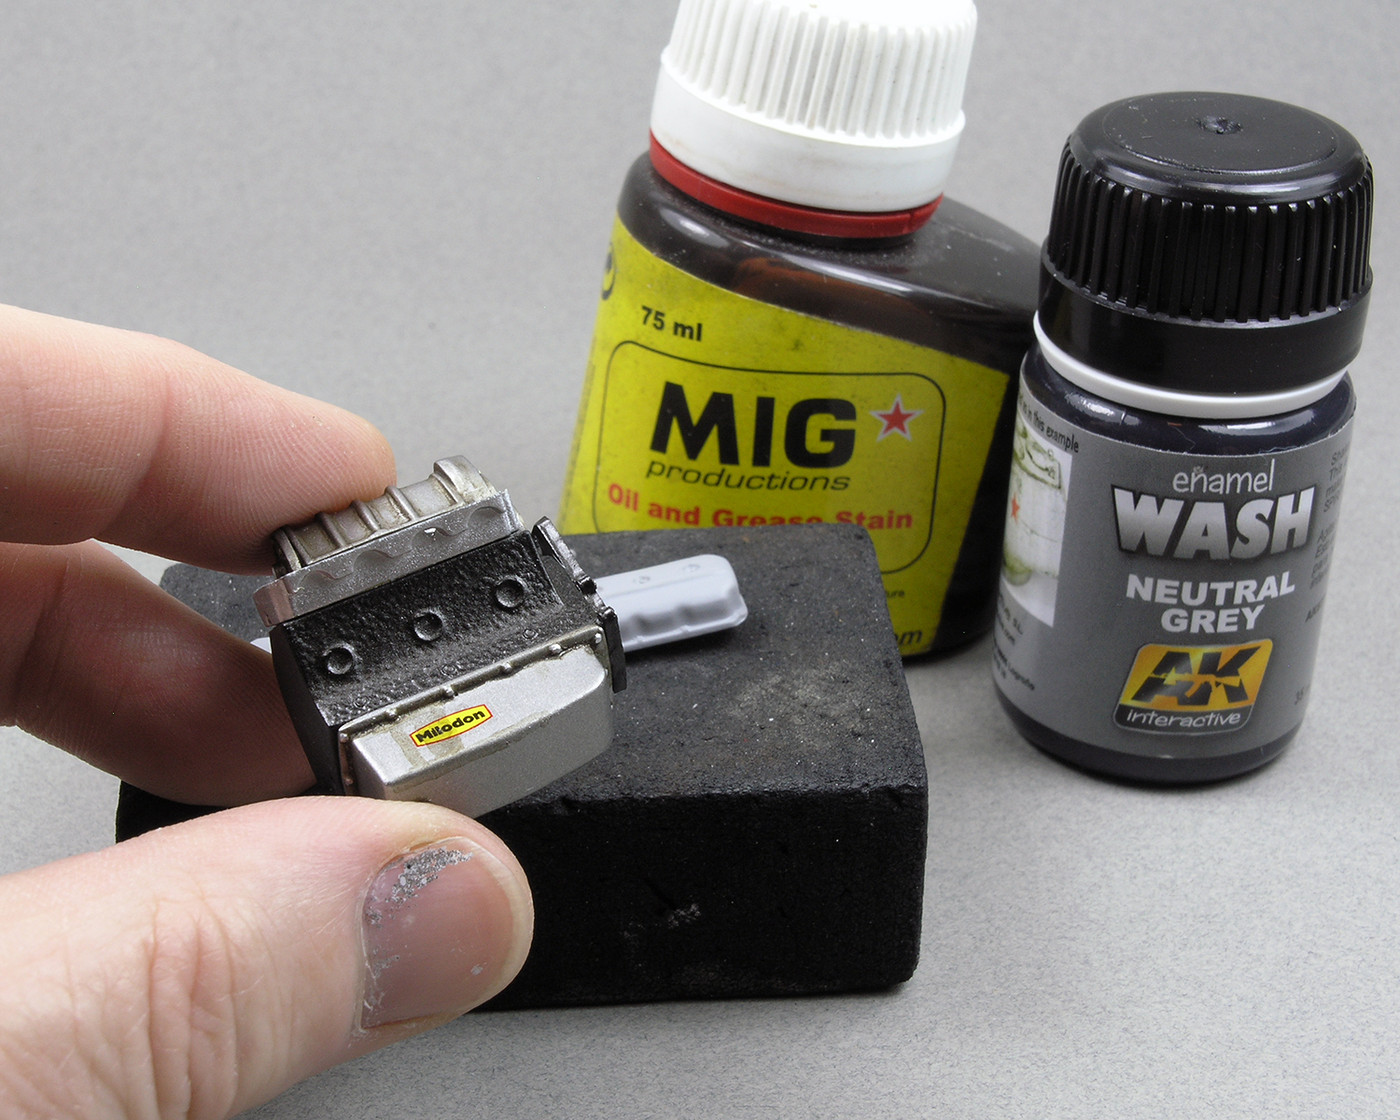
I have also slowly started on the engine. Just cleaning up parts, and painting a few things. I did a little washing and a few oil streaks on the pan. I know they wouldn't dare have an oil leak like that on the pan, but I couldn't help myself.
I just wanted to give it a little more character.
I think that's it for now. Next I want to get the slicks decaled, the engine further along, and maybe get the yellow on the body.
Thanks for looking!
CK
-
Thank you guys!


Darrell Waltrip’s 1990 Tide Lumina
in WIP: NASCAR
Posted
Turned out fantastic buddy! Glad to help.
CK