

ClayK
-
Posts
178 -
Joined
-
Last visited
Content Type
Profiles
Forums
Events
Gallery
Posts posted by ClayK
-
-
Chris I use Testors Acryl flat black jar paint for the hoses.
More engine work....I used a Shapeways Lenco tranny. I made the blanket from medical tape, and the straps and hardware are Studio 27 seat belts. I scratch built the shifter and machined the shifter pots. Just need to finish off the air lines.

I've also got more fuel lines on, as well as all of the throttle linkages. Just a few more things and the engine can be installed for good.Clay
-
That is awesome! Great detail, and flawless finish. Beautiful!
-
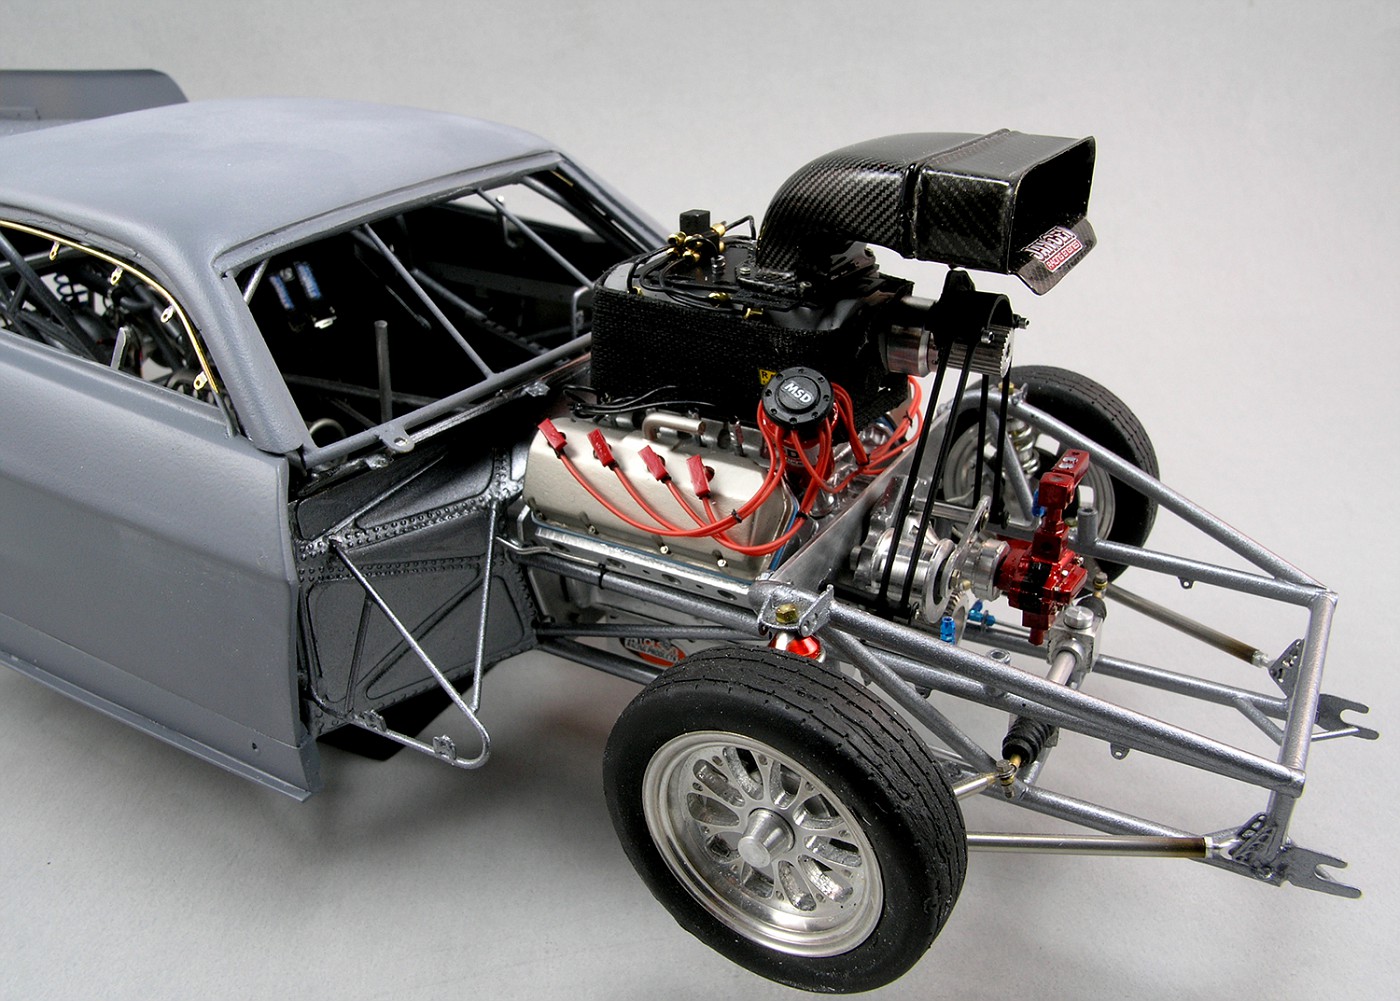
Thank you guys. Been a busy weekend working on the pro mod. I've been banging away on the engine. I ran the plug wires....I used Pro Tech's 1/16 red wire into a Micro Nitro MSD mag. I made the valve cover boots from plastic.
I scratch built a new oil pump from plastic, and a new fuel pump from a resin body, and sheet plastic. I added Scale Hardware bolts to the front over of it. I also made a blower belt guard from brass and resin and painted it plat black. The barrel valve is made up from 7 pieces of brass all soldered together, then bolted to the injector hat. I ran all the injector lines, and I'm ready to install the main fuel lines next.
I also redid the valve covers again, and added bolt details to those as well.
A few sitting in the car....
I also got all my window tabs soldered on. These are Dirt Modeler 1/16 tabs.
I need to get the rest of the plumbing done this week, then get on to paint on the body!
Thanks for looking,
CK -
Man this thing is turning out unbelievable Clay, Really motivates me to get started on my new project .
What do you mean by this?
"lock in the resin body and keep me from having issues down the road"
Should i beware when using a certain primer on resin? I never worked with resin much at all.
Also what program do you use to make the chassis and print the plans?
Thanks Joe.
I've had problems with resin from both Flashpoint and Comp Resins. Whether it is messing up the paint after everything had cured, or sometimes you don't see the problem until after you put the paint on. Almost like the resin has a skin, and once you sand through that skin, the resin stays sticky no matter what you do. My Pistonator PS has issues like that. No lacquer primer or sealer seemed to take care of it. I'm hoping the epoxy primer will do it this time.
You say you're running out of time. Are you planning on having it done for the Southern Nationals?
Yes! That is the plan...
Thanks everyone, I'm working away!
Clay
-
Thank you guys....I appreciate it.
Small update. I've finally got the body work all primed. Big thanks to John Teresi, and DaveyT for the help on sorting out what primer I should use. Right now everything is covered in Omni 2 part Epoxy primer. It will give me a good solid base to work from, and hopefully lock in the resin body and keep me from having issues down the road. I still have a few small spots to fine tune, but for the most part the body work is done.
Hopefully I can get some engine work done and get it caught up with the body. I am running out of time!Clay
-
I feel for you Chris....I've run into that so many times. Very few people outside our little circle really seem to care for what we do. Every once in a while you will find someone that does, but I've been let down more times than I can count.
Don't let it get you down though. Keep hammering away. You are doing some amazing work.
-
Right! My fingers hurt just thinking about it!
-
Thanks Chris! I apprecaite you commenting...
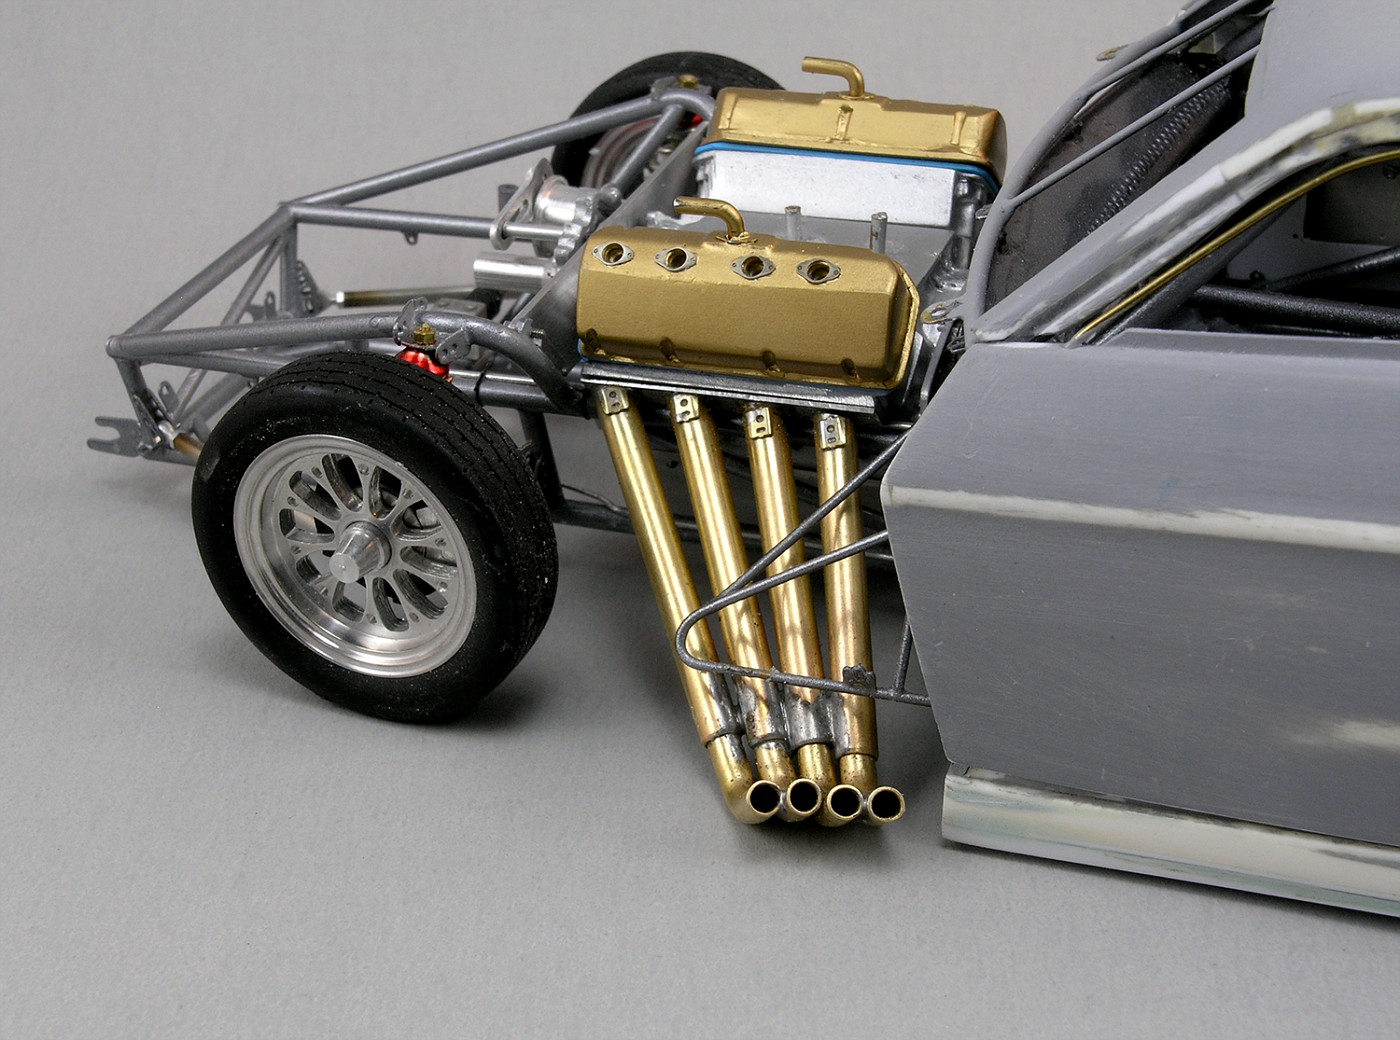
Big hurdle cleared last night. If anyone remembers when I built my Camaro PM, I put off doing the headers until the very last minute. I dread making them! I have had it in the back of my mind I had to get these done for this car soon. I had started a while back by bending the turn out tubes.
I decided the best way to do it was to make a set of plans. So I drew something up based off of the plans I used to build the chassis. I cut all four tubes for the one side from 5/32" brass tube. Then I cut four more matched to those for the other side. I laid them on my pattern and held them to the paper with super glue and magnets. I touched them with just enough solder to hold them together. Once all four were tacked together, I broke them free from my pattern, and sanded the ends of them flush where they mount to the flange.
I had the aluminum chunk left over from when I did the pieces on my heads. So I chucked it back up on my mill and drilled them for the mounting holes and parted off two to use as flanges. I wish they were brass so I could solder them, but I had all the work done already in aluminum so I used it. The flanges were glued on, then I soldered on the Dirt Modeler tabs on each tube.
Finally, I mounted them to the engine with brass rods, and added the turn outs. Those are tacked to the main tubes as well.
I still need to clean up the excess solder. And drill for the sensor lines yet. But I was so happy to get this far in one night!
Here's how it is looking at the moment.
Here you can see my aluminum flanges. I'll add the bolt hardware after I paint everything.
And mocked up on the car.
Whew! Glad that is over!! Back to body work and more sanding....
CK -
Looks pretty mean mocked up Wayne!
-
Thanks Tim...it is far from glamorous at this stage, but you gotta do it! I am sick of sanding putty!!
-
Thanks! I appreciate the replies.
Still plugging away on body work.
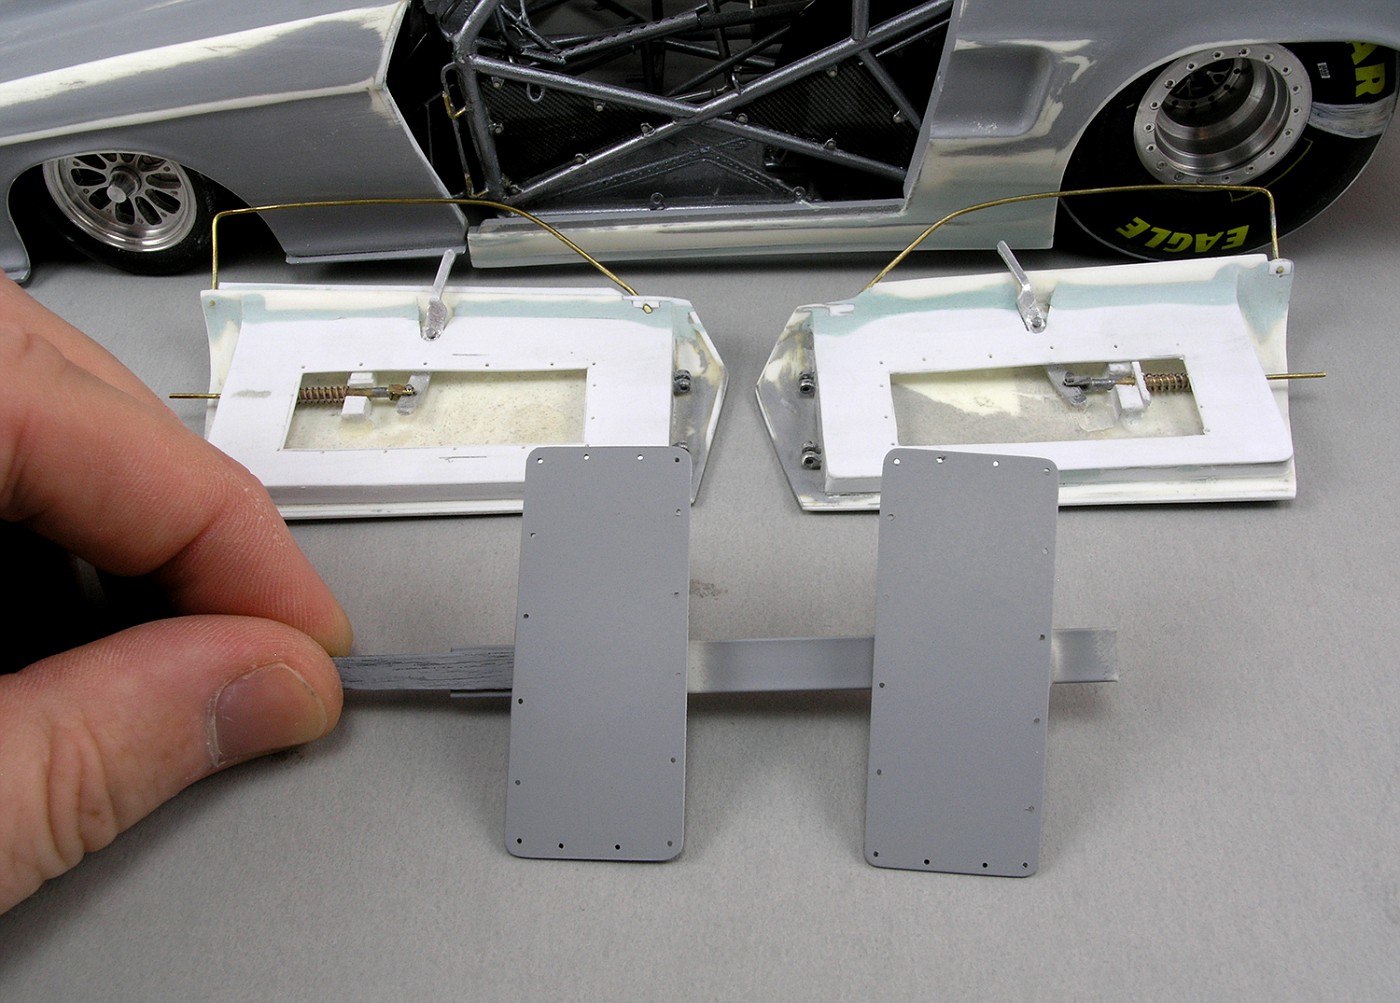
I did all the putty and sanding on the inner doors. I pretty well have everything smoothed out, and ready for primer.
I also drilled the inner door panels for bolt hardware and got them primed. These are now ready for paint and CF decals.
I also lowered the sides by adding some styrene stock. The rockers are a little closer to the ground now.
I also spent what seemed like days working on the underside of the front end. I had ground the inside a bunch trying to get clearance for the front tires. I fixed a few spots, then realized that I really needed to fix all of it. So more putty, more sanding, and it is pretty close to being all smoothed out under there.
A few more bits to fix, then I hope to get everything primed. More news on that when I get there!
CK -
Too bad you aren't doing a newer car Chris. You could just wrap a big ol blower bag around it!! Done!!
Looking fantastic. I love watching how precise you work.
Clay
-
Small update.....got the inner door skins on and sanded smooth. I need to blend the top edge into the door and they will be ready for primer. I decided to leave all the hardware in place. I will just have to mask really carefully!!
I've also started with the filler pieces. I need to go around them and drill out all the fastener holes and they will be ready for CF decals.
CK -
Thanks TIm...the trunk looks great. Sometimes brass is the perfect material for things like that. You just can't work with plastic the same way and get as good of a result.
Keep it up!
-
Well, to be honest, I winged it. Let's just say I burnt my fingers a lot! You learn what your pain threshhold is when you are trying to hang on until the joint cools enough to let go.
I was able to tack the main rectangles to the lower support bace then slightly bend them to get the right angle. Then once I had a few more supports on, I went back and retouched the joints that I had bent so they were strong again. It was like juggling worms trying to hold the car, the brass, and solder it at the same time. But once you get a few in place, it gets easier.
-
Those fire bottles are amazing!
-
Thank you guys!
Brad, I have the orange Weller iron station. The one with the control knob and yellow sponge on the base.
-
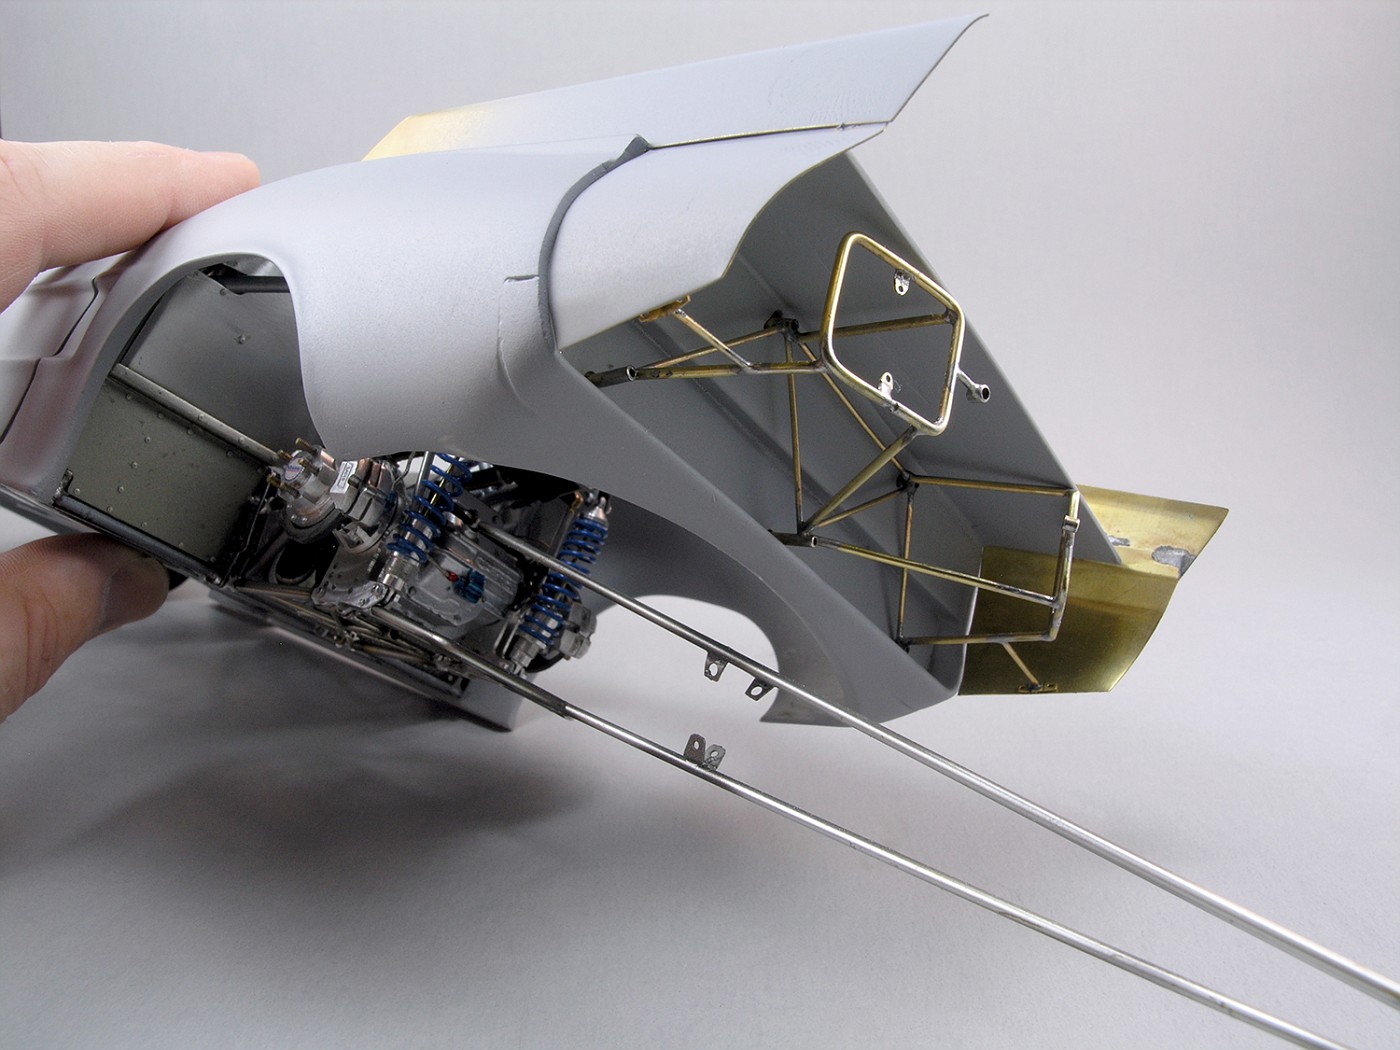
More work....I've been trying to finish up the rear parachute mounts. I had started the base of it last week, and finally got it more/less done. 26 pieces total I believe. I need to clean up my joints, but it is pretty well done. And it braces the sides of the rear wing as well.
Also got some more primer shot. You can see how the mounts hang off the back, and brace the wings too.
Should be able to start back into the headers tonight.
Thanks for looking!
CK -
-
Thanks for all the input and advice guys....I need to get back to the bench and see what I can come up with.
Clay
-
Thanks for the help chris. And the pics of your jig.
I was thinking about it last night. I may try K&S solid aluminum rod. Once cut to length, put them in the lathe and drill out the ends. Maybe 1/8" deep. Just enough to look hollow. Then take it out of the lathe chuck, and into the bender. The solid rod should bend really nice in the bender, and since it is already aluminum I won't need to paint it silver. Just polish it up and heat stain it with Alcald.
I'll let you know how it goes.
Clay
-
Thanks Scott....Like I've told you before, I am a spaz. I don't have yourt patience. I get in a hurry to get stuff done, then have to go back and fix it! But at least it is progress. Things will tighten up soon and it will start looking better. To me anyway.
-
Thanks Chris...I'd like to see it.
Have you found the tubing Du-Bro gives you for sale anywhere?
-
Thanks Niko and Dave!
More progress...
I've started trying to wrap up all the body work to get this thing in primer. I had cut the molded in rear wing sides off a while ago. I began modifying it by extending the deck with some .040 sheet plastic. I also used my saw to open up a groove on each side for the new side plates.
The new sides were cut from four pieces of .015 (I think) brass sheet. Once they were fitted and bent to shape, I solder tacked them together. I will go over these and sand down the solder, and drill holes for bolt heads to be added after paint.
I've also started on the rear parachute mounts/wing braces. Just the basics so far. A lot more to do here.
And I have finally started on the headers too. Using a tip from Ted Bowe, at Ted's Modeling, I picked up a Du-Bro tubing bender. It actually came with some brass tube that I bent up here. It must already be annealed, because when I tried it with some K&S brass I had on hand, it didn't bend near as nicely. I'll use the 1/8" for the ends, and 5/32" slid over them for the main tube. I'll also have to get some smaller rod inside of them to mount to the heads.
I've been working fast, and rather sloppy lately to be honest getting all these things roughed out. Now that I know they will work OK, I'll go back and fine tune things a bit. I'm hoping these headers go quickly now that I've got the bending out of the way.
Clay


WIP: 1/16 '68 Mustang Pro Mod
in WIP: Drag Racing Models
Posted
Ah, yes...there was more building than photo taking those last few days before I left for Atlanta! The car is pretty well finished. I do want to add a few more things.
These pics were about two days before I left. So it is even further along than these....
The paint is HoK Tru Blue pearl at the back fading into HoK Candy Cobalt, faded into black. Then I masked off the flames and put a base of white down, with a quick coat of pearl white over that. Then I airbrushed the yellow and orange. Once unmasked I cleared everything with a couple coats of Omni 2 part clear. After that cured for a few days I polished it smooth, and re-cleared it to even out the falmes and make everthing smooth. I added the decals, then hand bordered the flames and the "Problem CHild" with One Shot lettering emamel.
Clay