

ClayK
-
Posts
178 -
Joined
-
Last visited
Content Type
Profiles
Forums
Events
Gallery
Posts posted by ClayK
-
-
@GotatGuy....yes it is.
Thanks guys!
Been making more progress on the big Mustang.
A week or so ago, I painted and carbon fiber decaled the seat, injector hat, and the hat opening extender. I used Scale Motorsport 1/12 twill on the seat and injector hat. Then I used Studio 27 film for the extender to mix things up a bit. It got above freezing here finally so I took advantage of it to shoot them all in PPG clear. I also finished the texturing on my seat insert. The seat is now ready to be installed I think.
I also got the head rest and padding installed... -
Thanks guys.
Ted, my forming tools are my thumbs and fingers! LOL That .005 brass is so soft, you can do a lot of shaping with it. Oh, I do have an etch-mate bending tool for the long, straight bends. I just score a line with my hobby knife, then clamp it down and bend it on the etch-mate. That is how I did the lips on the rear panels.
Most of these parts will just be glued on, and simulated PE nuts will be added to make it look bolted. It is faster, and has less chance of screwing something up by drilling bolt holes.
Clay
-
Thank you guys. Hopefully I can keep some momentum going on this thing!
Got a bit more done on the 'Stang.
I've been messing around with the full containment wrap around headrest. I made it from several pieces of .005 brass. I started with the center section, then soldered the two sides all while forming it inside of the chassis cage. Tense stuff! I also added a lip in the back, and a tab in the front to hold it in place. The padding pieces are built up from some .020 sheet styrene. I just stack it and sand it to shape to get the desired thickness.
I also made up the back shield from more .005 brass and formed to to the back of the cage. Here's both so far.
While I had the brass out, and the solder iron fired up, I also made the lower panels to seal off the back of the cage. The main panel is .010 brass, and the lip is bent from .005 brass and soldered on. The wheel tub will sit on that lip and hopefully be held in place.
Here's everything all mocked up. Getting closer....
Thanks for looking....
CK -
Wow, Great updates Clay. Really dig the way you did the 4 link bars and lower A-arms, Did you make the black bracket on the rear end?
I did....I sort of cheated there. It is some of the Dirt Modeler wheelie bar brackets. I cut them apart, and soldered a tube across. Sort of looks the part, and will hold the top wheelie bar links. That was all I needed.
Messed around a little on this one this past weekend.
I gave up on my plan to try and machine all the block and heads. Going with the Flashpont resin engine instead. I believe this version is the one Paul Rowe mastered. I modified the injector hat to match the version I wanted to do a bit better. I also decided I needed to pin all the various parts together with brass pins to make sure things didn't fall apart later on.
Here's all the basics pinned and ready.
As you can also see, I made a new "Big Mouth" injector hat front. This is all sheet brass and rod. I bent the flange on a flat piece of sheet brass first. That made the front lip that goes all around it. Then I bend the four corners to turn it into a rectangle that matched the shape of the opening. Next I bent another piece that formed the bottom with the bent down lip. That was then soldered in place to the first piece. The last part was to bend some brass rod and solder it to the back edge and sand it flat to mate it to the hat. I'll clean up both pieces and get them painted and covered in CF decal film, then cleared.
I also messed around working on the seat insert. I wanted to make this piece separate so I could CF the seat, but yet texture the insert. So I bent up some brass and taped it into the seat and soldered it together.
This gave me a perfect fitting piece that I could easily pop back out.
Then I mixed up some epoxy putty and worked it into the brass fixture. This looks a bit rough at the moment. But once I sand it a bit, get the texture and paint on, it should look pretty good.
Once the putty cures I can get the belt slots cut, then get to painting and decaling.
CK
-
Thanks guys!
Got some more work done over the holiday weekend.
I got back to work on the doors. I wanted to have them have a spring loaded latch that could held the doors closed, but also be able to be manually opened to show the interior off. A few other builders have done something similar so I'm not reinventing the wheel here. But I drew out what I thought would work best and got to it. I machined the levers on the mill. I basically carved out a shape, drilled the holes, then parted off two of the same thickness.
The inner door box was built up from styrene, then I laid out the parts and figured out where to mount everything. It took a few tries to get the leverage right, but now they work pretty smooth. The springs were the hardest part since I couldn't find anything suitable. Eventually I stumbled on to some left over airbrush trigger springs that worked perfectly. I need to bolt it together more permanently then I can finish off the inner door skins.
In its relaxed state, the lever leans forward and the door pin is back locking the door in place....
Then push the lever back, and it pulls the door pin forward out of the way releasing the door.
On the back edge of the door opening I added a jamb, and drilled (several) holes until I got it right! But the extra is easily filled.
I've also been working on tightening up the door gaps. The back is looking pretty good. I'll worry about the front once I get further along and have the engine in there to judge off of.
Thanks for looking!
CK -
Holy blast from the past! As I mentioned......I am back working on my Pro Mod Mustang.
My first task once I got back to work was to start mocking up the front and rear suspension.
I build the lowers, I machined a brass piece for each side that had two holes in in 85 degrees apart, and then I slid in some short lengths of brass tube. Once soldered in place I slipped some stainless steel tubing over each brass "stub" to complete the lower control arms. Rod ends are from RB Motion. To simulate the welded ends I actually held the S.S. tubing under a lighter to do some real heat discoloration. The struts are from Micro Nitro and are perfect. I would new coils, and machined two new steering arms from aluminum. These were then epoxied onto the struts.
Here's how the front end looked mocked up before I added the steering arms. With the chassis mounted to my jig, they lined up right on the ride height I had planned on.
With those out of the way, I started on the rack. I machined the two ends, and connected them with a short piece of aluminum tubing. Then I machined a separate small cap fro the left side. The boots are from the TDR 3D printed rack kit. I just drilled them out, and glued them on.
Mocked up on the chassis....
Moving to the back, more S.S. tubing and RB Motion rod ends for the 4 link. The rear coil overs are from Micro Nitro as well. I need to grind my sway bar tabs down slightly to get a bit more room. But things are lining up pretty well.
Once the wheelie bar as all fabbed up from brass, I shot it with Alclad paints, and got it mocked up on the rear end. Since it is a block long, I'm just going to set it aside while I work on the rest of the car. No need to break it off early!
Thanks for looking!
Clay -
YES! This one actually made it back to the bench over the weekend after a long break. Got a lot of the suspension mocked up, and I'm looking forward to working on it more regularly. Thanks for thinking of me.
Clay
-
Joe, I am so jealous! It just keeps getting better and better! That exhaust is a work of art. Keep going man!!!
-
Very nice Joe! Lookin' like a real race car now!
-
Thank you very much guys! Finally got a little time this week to get the chassis painted and cleared.
I mixed a bunch of different dark gray metallics, and silvers together to make sure I had enough to cover the whole chassis. I went for a color a little lighter than I would normally use to try and get close to the color R2B2 powder coats their chassis with. Once the paint was dry, I gave it a good even coat of PPG 2 part clear. I need to go back and touch up the left door pad, then I can get to assembling some stuff on it.
You can see the 3D decals still showed up under the paint and clear. I think they worked pretty good!
Thanks for looking!
CK
-
Thanks for the replies guys. I finished off the final bits of the chassis last night and got it in primer. I'm ready to paint and clear it now finally.
To answer your questions about glue, I use green bottle zap-a-gap for almost everything. On this chassis I used Plastruct glue for all of the plastic to plastic joints. But for the brass I used green zap. Sometimes with some kicker to make sure it held quick, and strong. For some reason, the DirtModeler brass PE really held strong to the styrene with the zap. I don't think I've broken off a single piece of brass etch since I've been working on this.
Should have some more progress soon!
Clay
-
Good to see you still plugging away Joe. Wheel tubs are about my least favorite part......but it's good to see you getting yours under way. Looking forward to seeing that chassis in paint!
Clay
-
Finally got to spend some time on this one again! I am so close to having the chassis done, and getting it in paint. Only a few more tabs and brackets I thought. I spent almost an entire day just adding tabs and I'm still not done! But I'm close. One more night and I should be ready to paint.
One big thing left I had to work on was the front suspension mounts and upper strut mounts. I had drawn all this out ahead of time so that helped. I tried to use as much brass as I could. For looks and for strength. I think everything up here is pretty well done.
All through the interior I've added all the tabs for interior panels, fire bottle mounts, air bottle mounts, door strap loops, you name it. There is a tab for it! I've also added the rear puke tank tubes, sway bar mounts, as well as body supprt pads.
More soon!
CK
-
I wish Bill! Not there yet....
Haven't got to work on this one as much as I'd like to lately.....but I have gotten a few new things done.
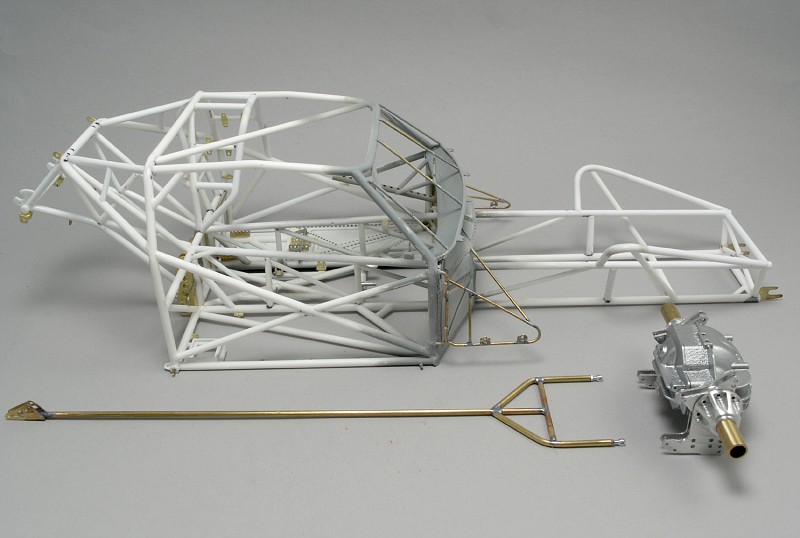
While I was painting parts for other projects, I decided to get some paint on a few things for this car. Both the Lenco and the MW rear end are from TDR, shot with Alcad. I usually mix my own to get the color I'm after. The Lenco also has a few RB Motion bolts added. Lots more to do on it.
The four link plates were custom machined by a good friend. He did a fantastic job, and I can't thank him enough! Probably not too hard to figure that guy out....
The end bells were ones I machined before for my Daytona. Once I got those all together, I soldered up the lower wheelie bar and added RB rod ends to it.I've also finally got the front strut towers on. Now I need to add the lower link mounts and my chassis will be pretty much done.
Back to work!
Clay
-
Thanks for the replies guys.
To answer the questions about the rod ends for pivots, that was something I figured out on my Blackbeard Camaro PM. I had always just glued my doors open in the past, but I really wanted to do working doors on that car. Between the brass pivots glued into the chassis, and those rod ends mounted in that styrene block inside the doors, they are so strong, they will never fail.
I actually ended up having this set too far back on the door, but at the time I didn't understand all the placement requirements and how it would effect things. And my brass pins are actually a little too short, and the doors can come off really easily on that car.
Now when I did the ones on this Mustang, originally I wanted to use brass tube for the door part to slide over the brass pivot wires. But it just wasn't working. So I went back and used the rod ends again But this time I used two per wire to help spread out the load. When I has just one on there, like on the 1/24 scale Camaro, it let the door sag too much as it opened. So I did two per hinge and it worked out perfect. It spread the load out, and the doors swing straight and true now. Now I just need to box in the inner door, and work on the door latch mechanism.
Thanks again!
Clay
-
The last thing I worked on was the front body tree. More brass rod soldered up. Once the body is painted, I will install this to it for good. But for now it's loose.
And in place.....
Next up I'll work on my door gaps, and finally get to the front suspension!
Thanks for looking!
-
For a change, I was actually home all weekend, and got lots of bench time!
My next biggest hurdle was cutting the body up, and getting the doors open. After cutting them both free, I started trying to figure out where I wanted my hinge point to be. I bent up the support bar and mounts from brass rod and got them mounted to the chassis. From there I took some square styrene stock and drilled it for some #1507 rod ends. I spaced them apart and used two per hinge. This allowed for the pivot to be super strong, and spread the load out and allow the doors to swing with zero sag. With both doors hinged and working smoothly, I moved on to the front fender support/mounts that shoot out in from of the doors. I'll get back to the inner door area and door gaps later. I wanted to make sure they worked first, then I'll fine tune later.
The front fender supports are bent up from brass rod and soldered in place. This was a pretty tricky operation. I had to make sure they matched side to side, fit the front clip like they were supposed to, and I had to be quick with the iron so I didn't loosen up any of the other joints. I probably did five different layouts before I got this style to work. My firewall took a bit of abuse during construction, but it will be pretty easy to get it back into shape. The Dzus abs are from Dirt Modeler.
-
Bart is correct......I'm hoping once under primer, paint and clear it will match the look of the real cars stitch welded panels.
I've started cutting on the body and working on the doors. Hopefully if I get a good weekend of work in I'll have some progress to show.
Clay
-
Thanks for the comments!
OK, finally got some more progress to show. Spent the last few days working on the firewall. I'm closing in on finally being done with the chassis on this beast.
I started out by filling in the area between my lower window support bar, and the main dash bar with thin brass sheet. From there I bent up three separate brass panels for each side and got those fitted. With those in place I added the center hump, and finally using .015 sheet plastic I cut out and glued on all the embossed panels.
Once all the basic construction was done I slopped on some thick liquid primer over all the panels to blend everything in. After a quick sanding a wash, I decaled all of the stitch welds like I did on the floor panels.
I also redid the front window support bars as well.
Next up is cutting the doors out, and getting them hinged.
Thanks for looking!
CK
-
Those look really good Joe. You're on the right track for sure....
-
Clay i didn't take notice if you said or not, This going to be a blower car?
Yes it will be. I don't know if I had mentioned it or not, now that you've brought it up. I'm a big fan of the blowers. I think they look bad. Not really crazy about the nitrous set-ups. Give me a huge blower and carbon hat any day!
I've got a PSI blower, and a modified four square opening hat I'll put on it. I'm going to machine the BAE block, heads, and valve covers just like I did on my 1/24 Camaro PM.
Thanks for asking!
-
Thank you very much guys. I appreciate all the nice comments. Got a new camera on the way, and should be getting going on the firewall soon.
Thanks for following along!
Clay
-
Awesome work so far buddy. I know this is your favorite era, and it's showing in the work. That engine is fantastic!
CK
-
Engine plate looks great Joe. Glad to see you still banging away on this one. The reworked front end looks really good too. Keep after it!
Clay


 But I drew out what I thought would work best and got to it. I machined the levers on the mill. I basically carved out a shape, drilled the holes, then parted off two of the same thickness.


 The end bells were ones I machined before for my Daytona. Once I got those all together, I soldered up the lower wheelie bar and added RB rod ends to it.


WIP: 1/16 '68 Mustang Pro Mod
in WIP: Drag Racing Models
Posted
I've also been working on the engine plates. I cut these from some t hick K&S sheet aluminum. I the bell housing is bolted to the rear plate with scale hardware bolts and nuts. I started on the front one. I need to get it bolted to my block then I can see how it all fits together.


That's it for now!
Clay