Search the Community
Showing results for tags 'Tamiya'.
-
Just completed this one. Had some issues with the decals so worked with what I had.

-
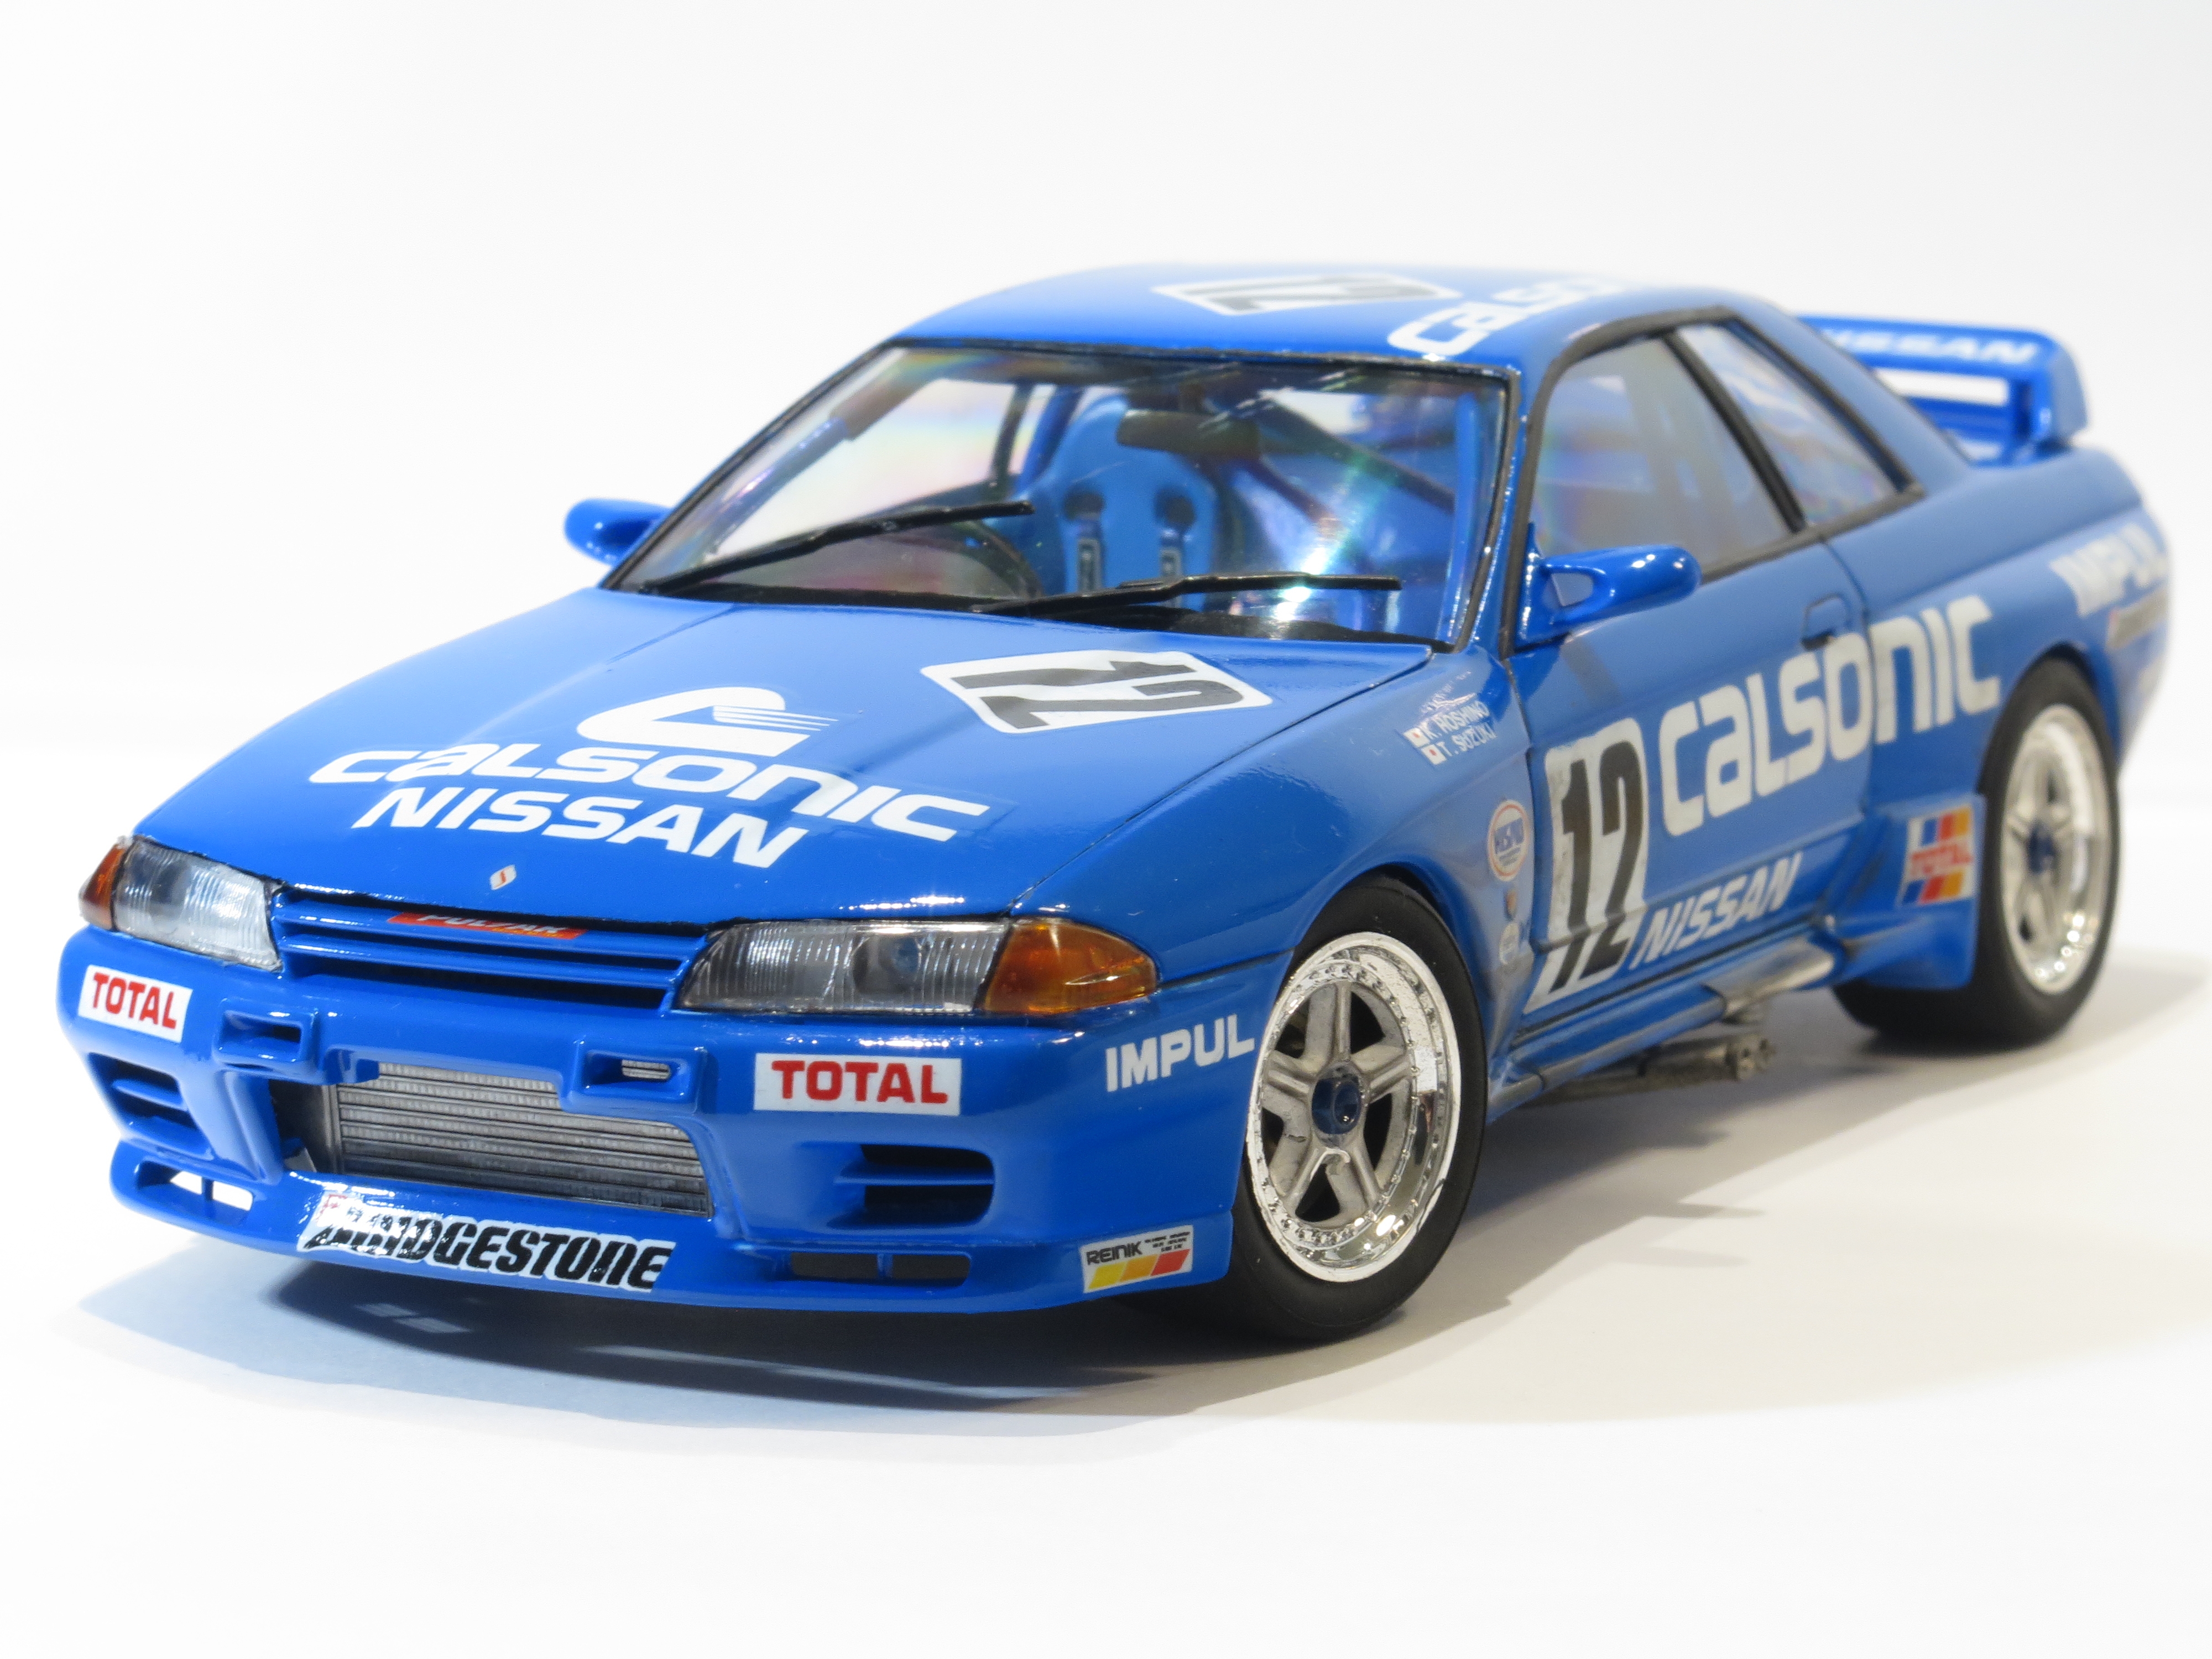
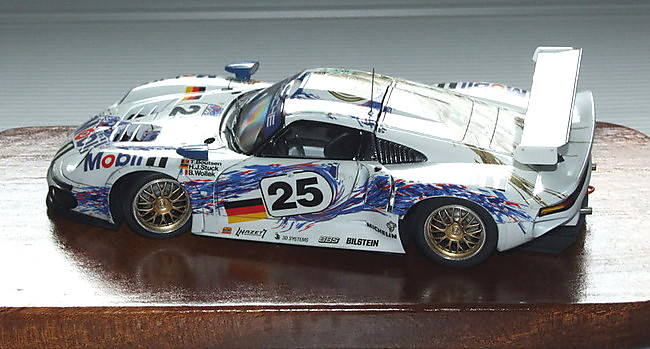
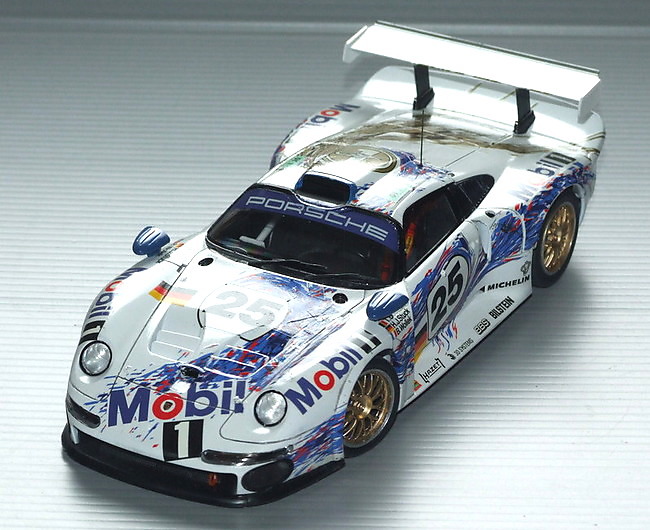
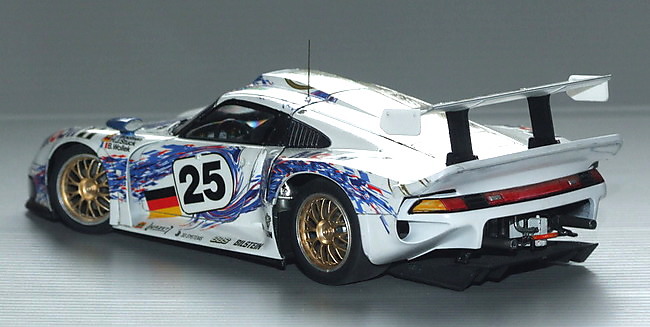
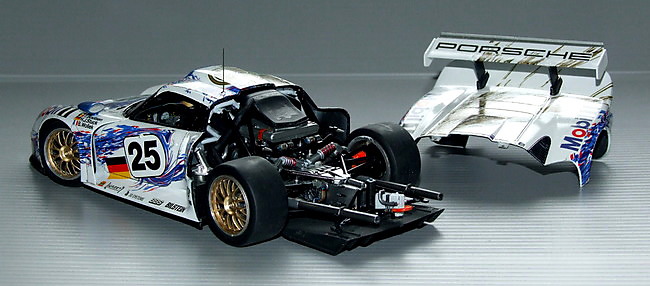
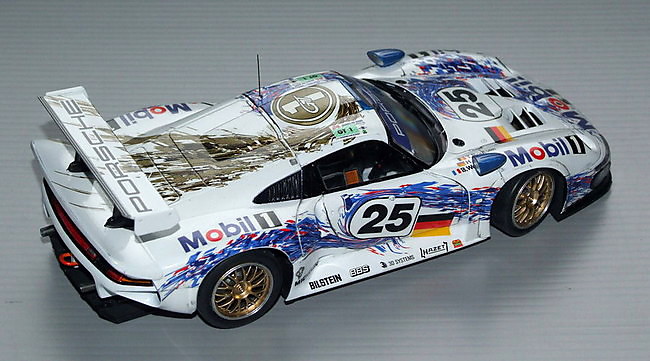
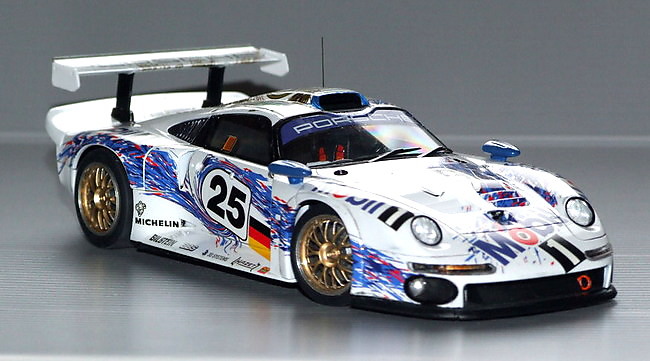
Yep. another completed, but to be fair it was started long before the 350Z that I posted here a couple of weeks ago. So straight to the point, this is another Tamiya kit, and it is as ever superbly engineered, and fits just about perfectly. The BIG thing for this project however was the excellent Tamiya plastic - this is the 'Taisan' boxing and it's molded entirely in glossy black !! - so I'll let y'all guess how many primer coats it took before applying the glossy white top coats. Decals are by Scale Design, no I've not heard of them either but they're the best part of twenty years old and behaved flawlessly. As ever thanks for taking the time to look and / or comment, please ask any question or hurl any criticism. Not sure what's next, will see what calls to me from the stash when I go in to the cave next week. AFN Ian.
-
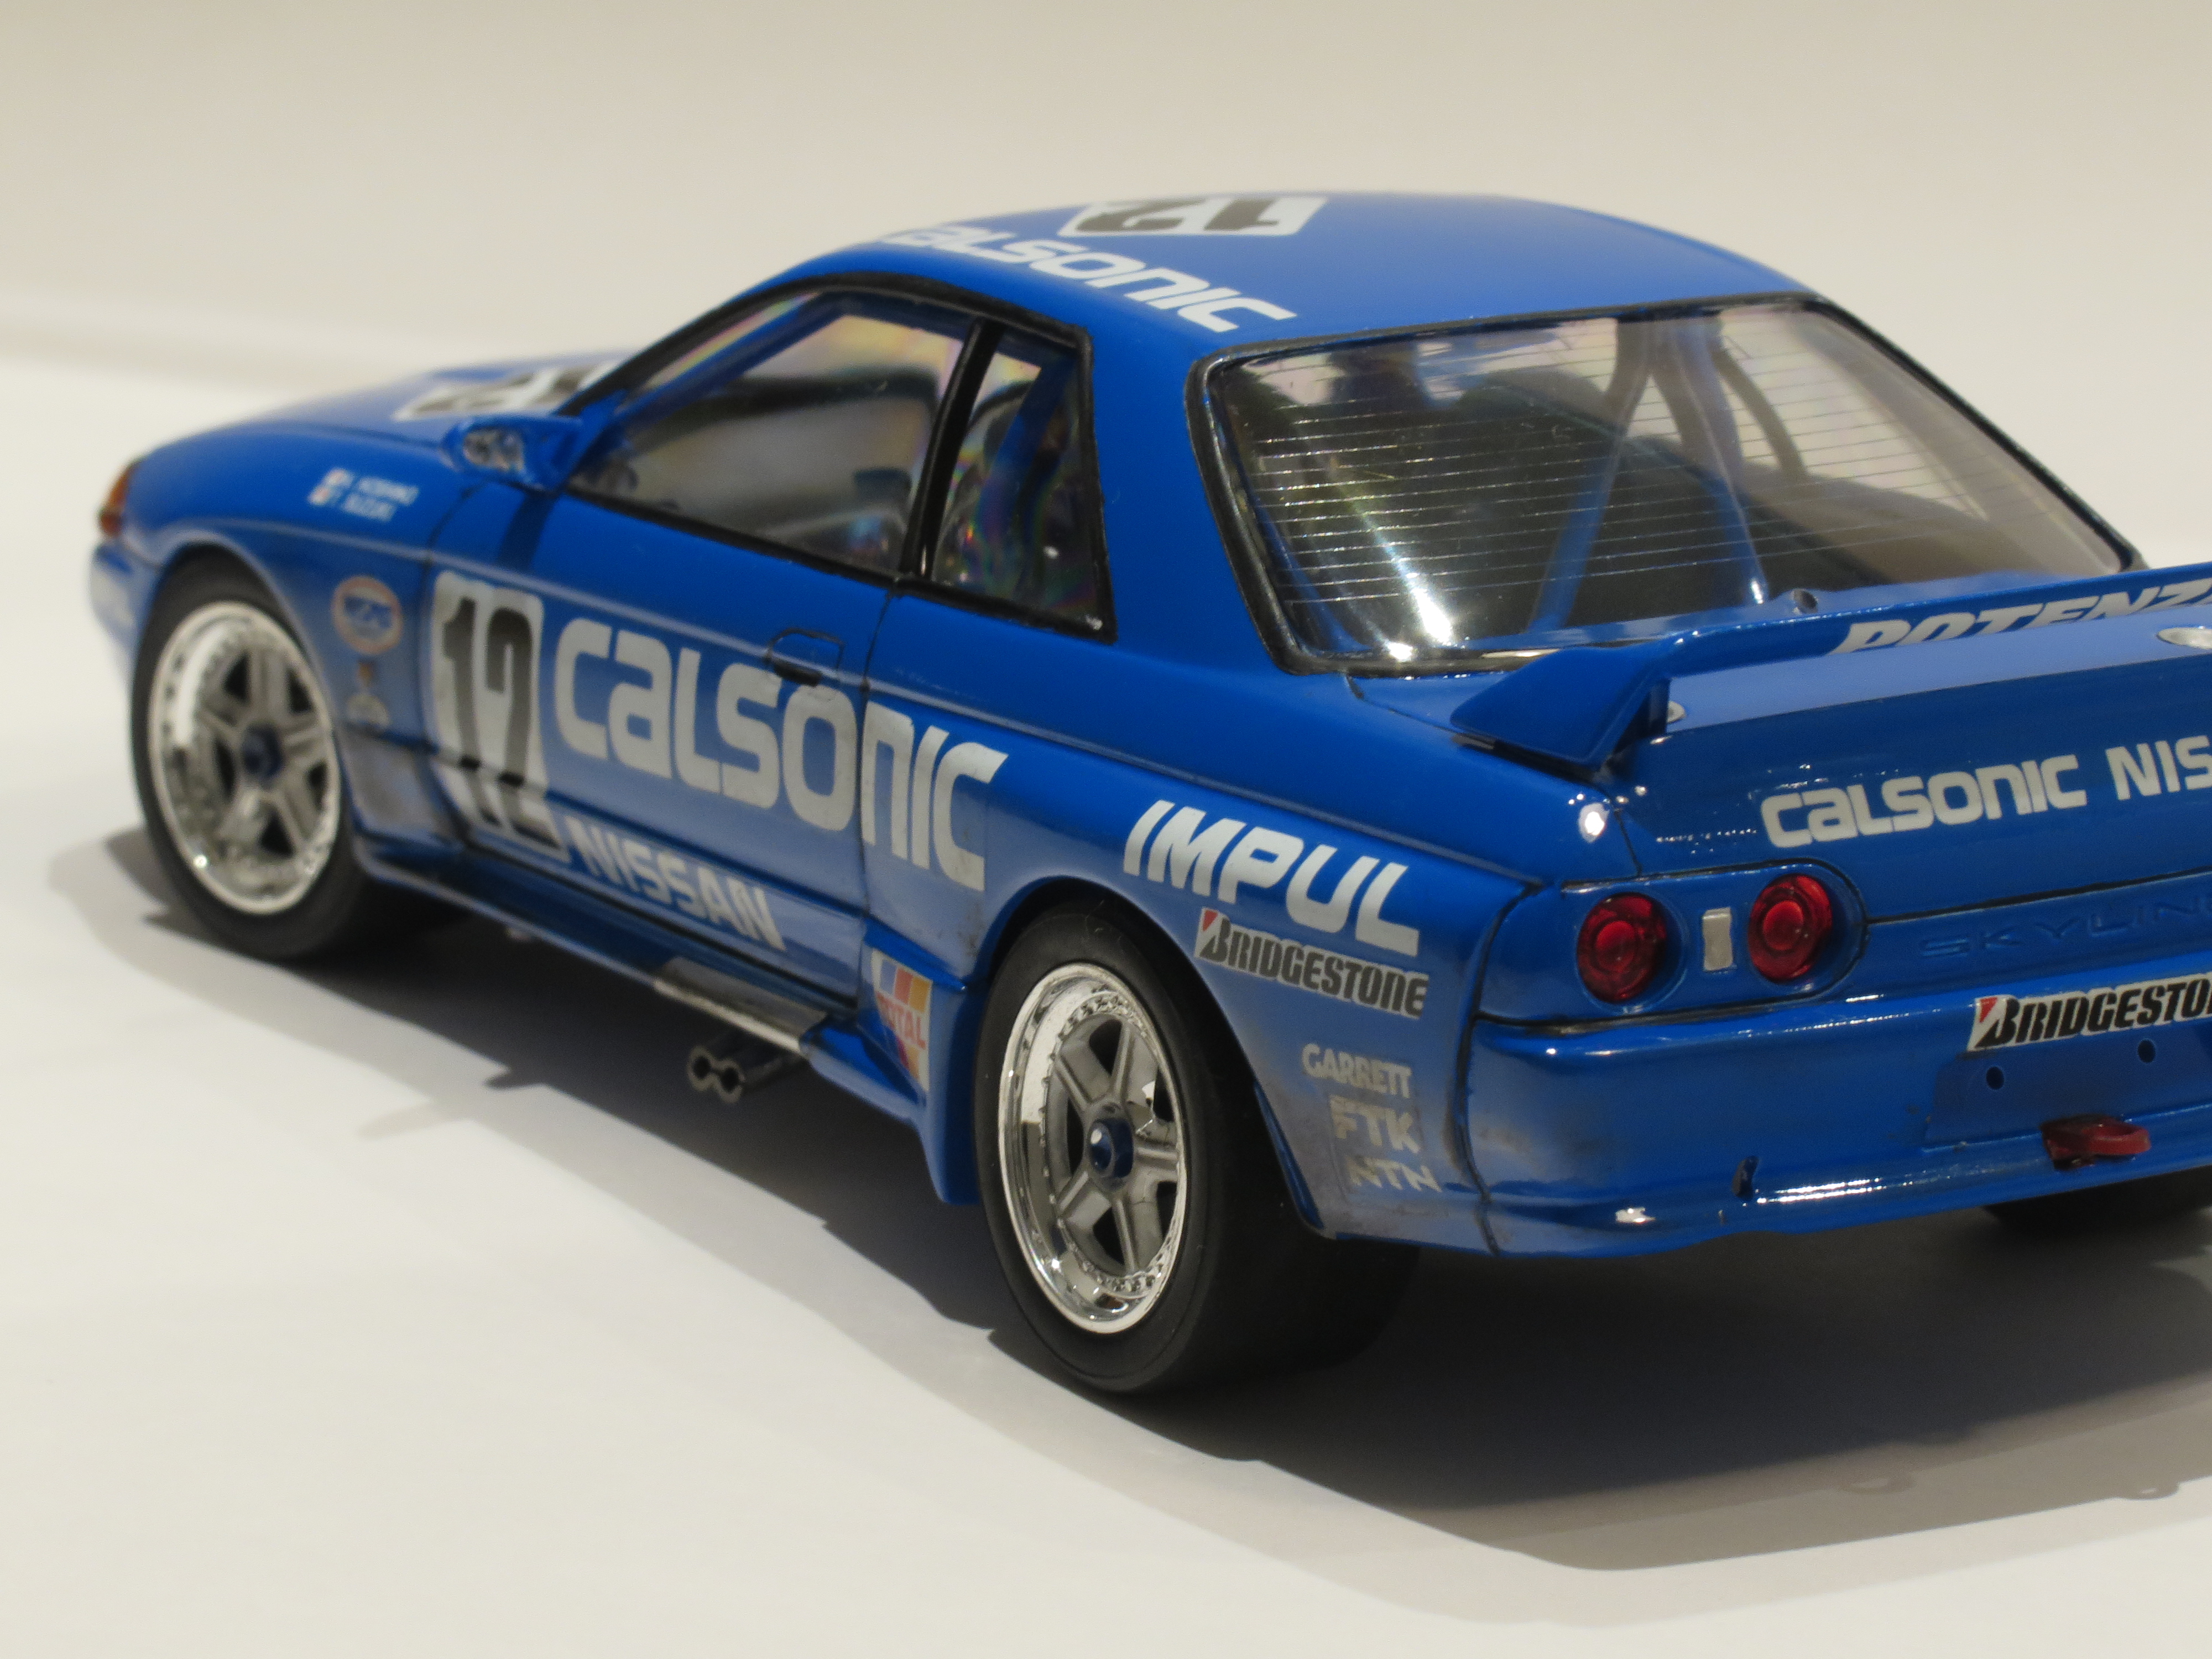
Hi All, I just completed my latest build, of the Nissan skyline GTR R34 Z-Tune by Tamiya. I first attempted this kit about 8 years ago and stiffed it up completely, so i really wanted to do it again properly. you can check out my WIP here: Now for the pretty pictures Thanks for looking Nathan
-
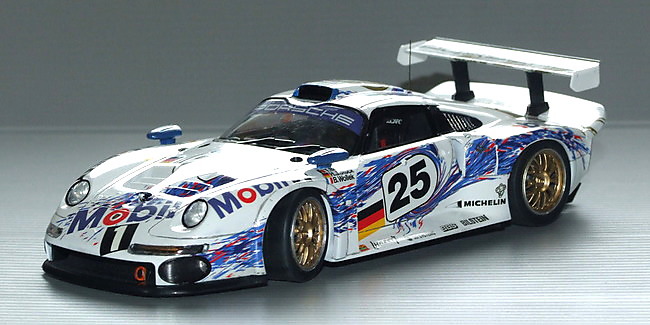
Wonderful kit, and yes it did start-out in glossy black plastic !! - Please feel free to criticise, comment and question. Thanks for taking the time to look. Ian.
-
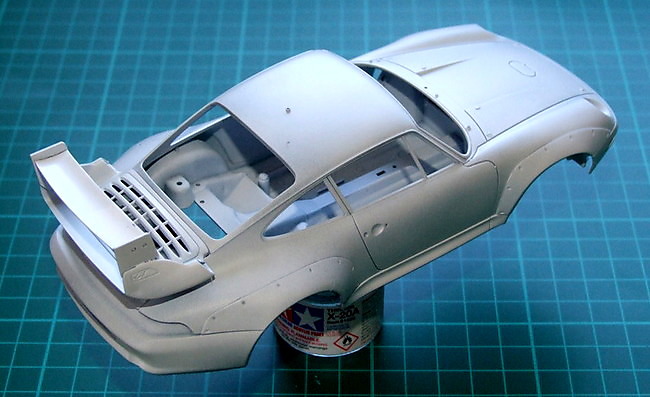
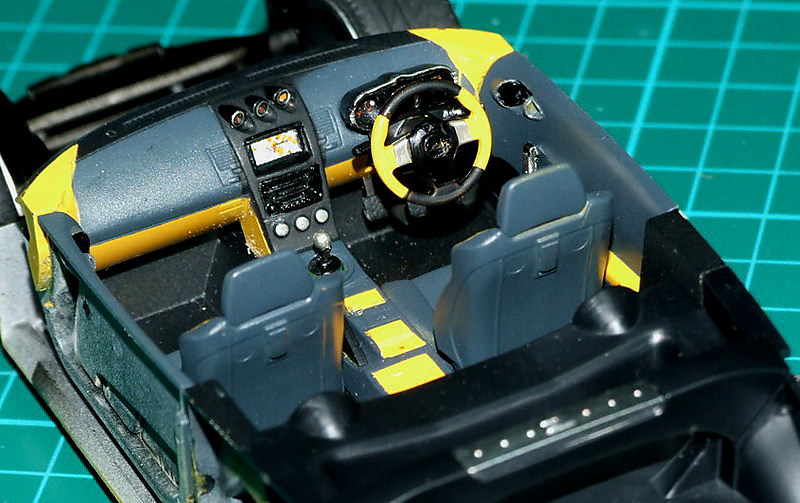
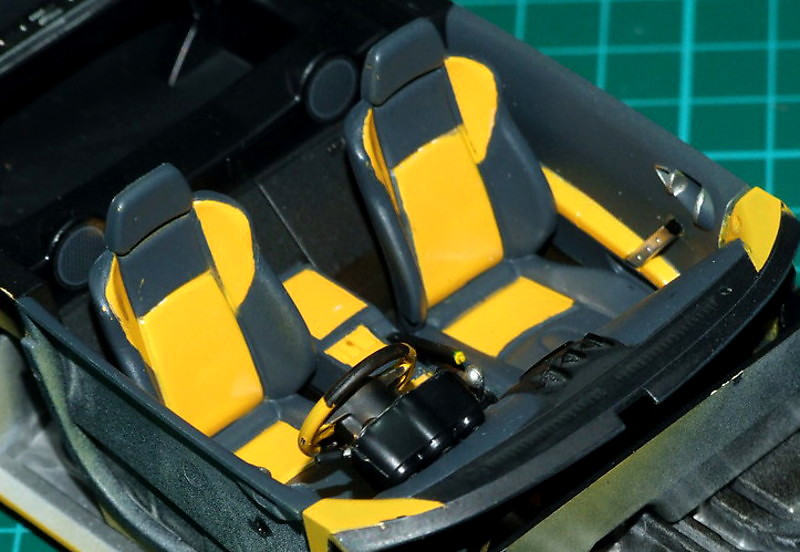
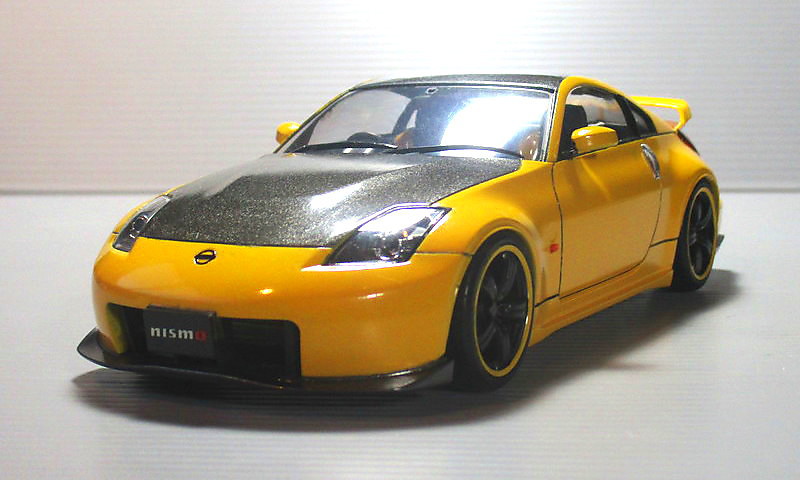
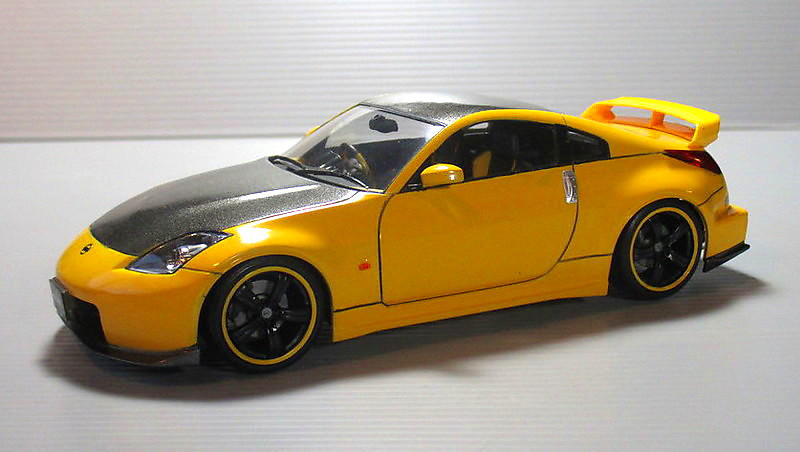
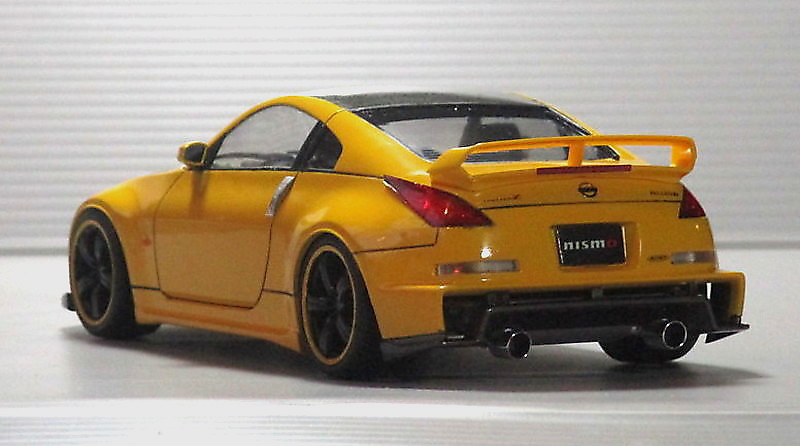
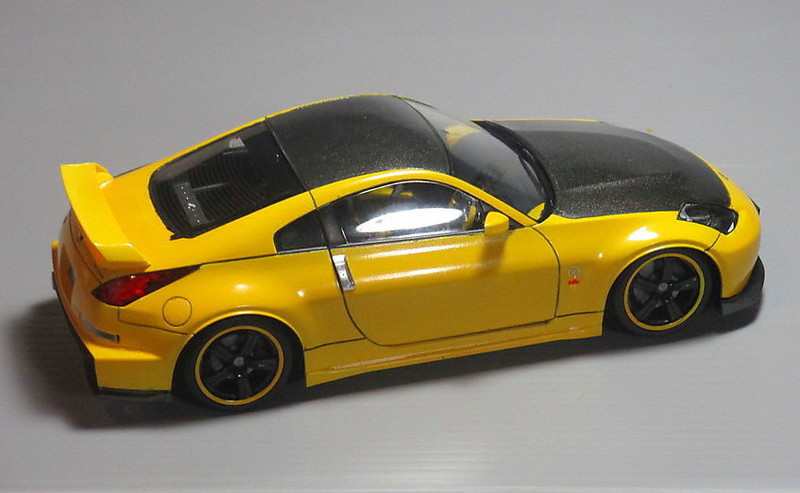
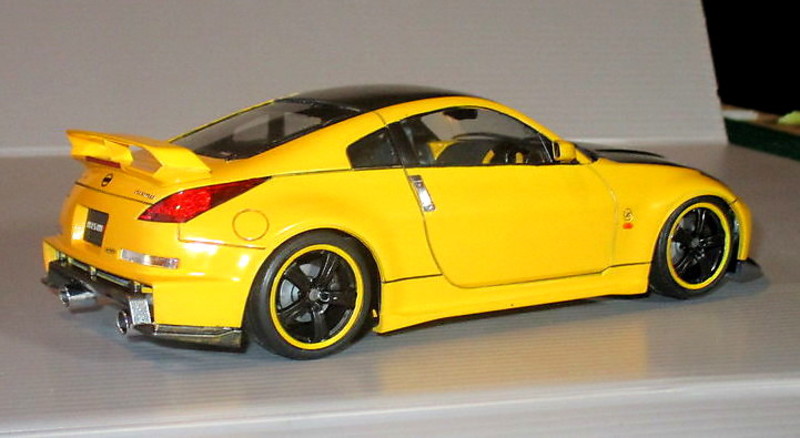
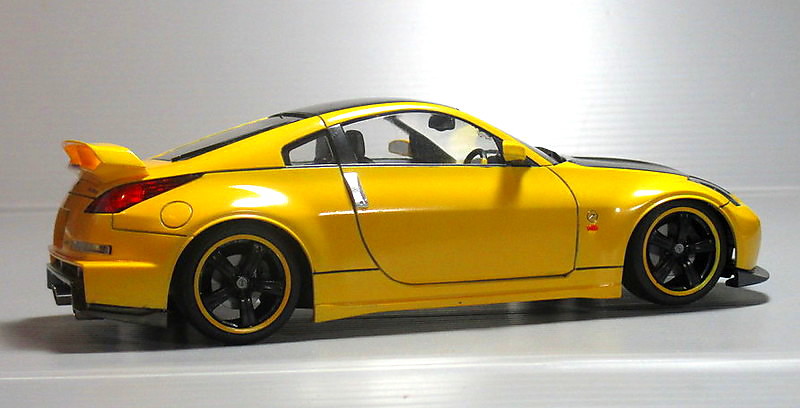
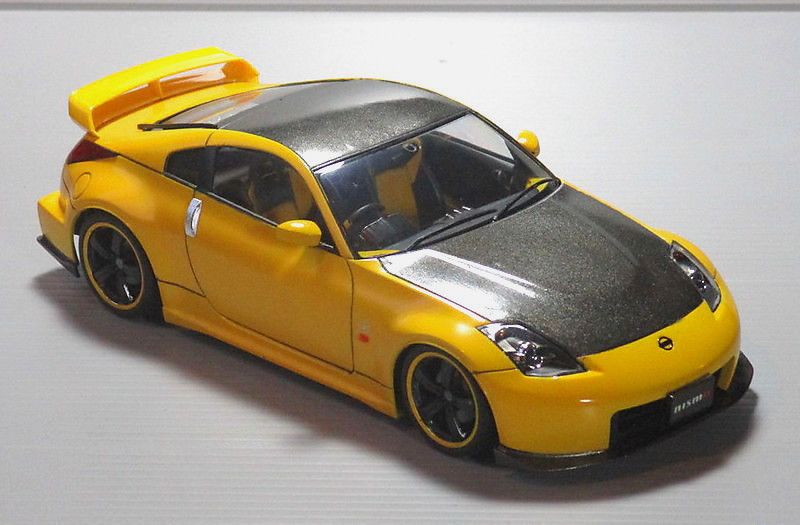
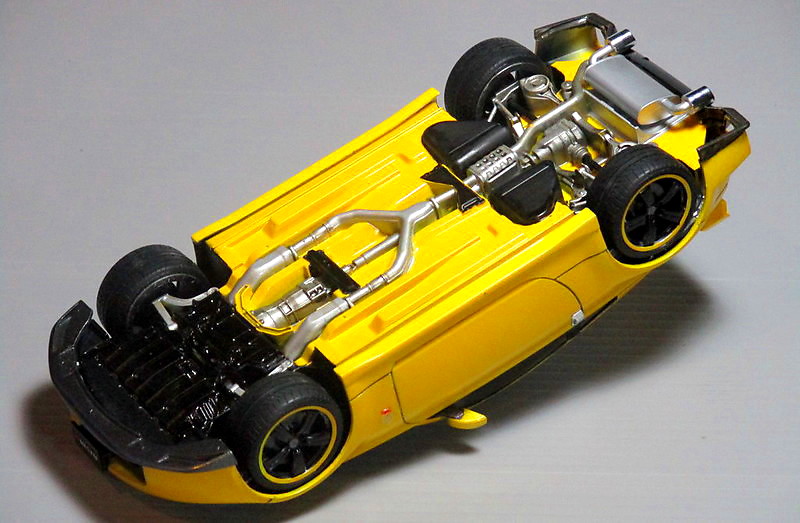
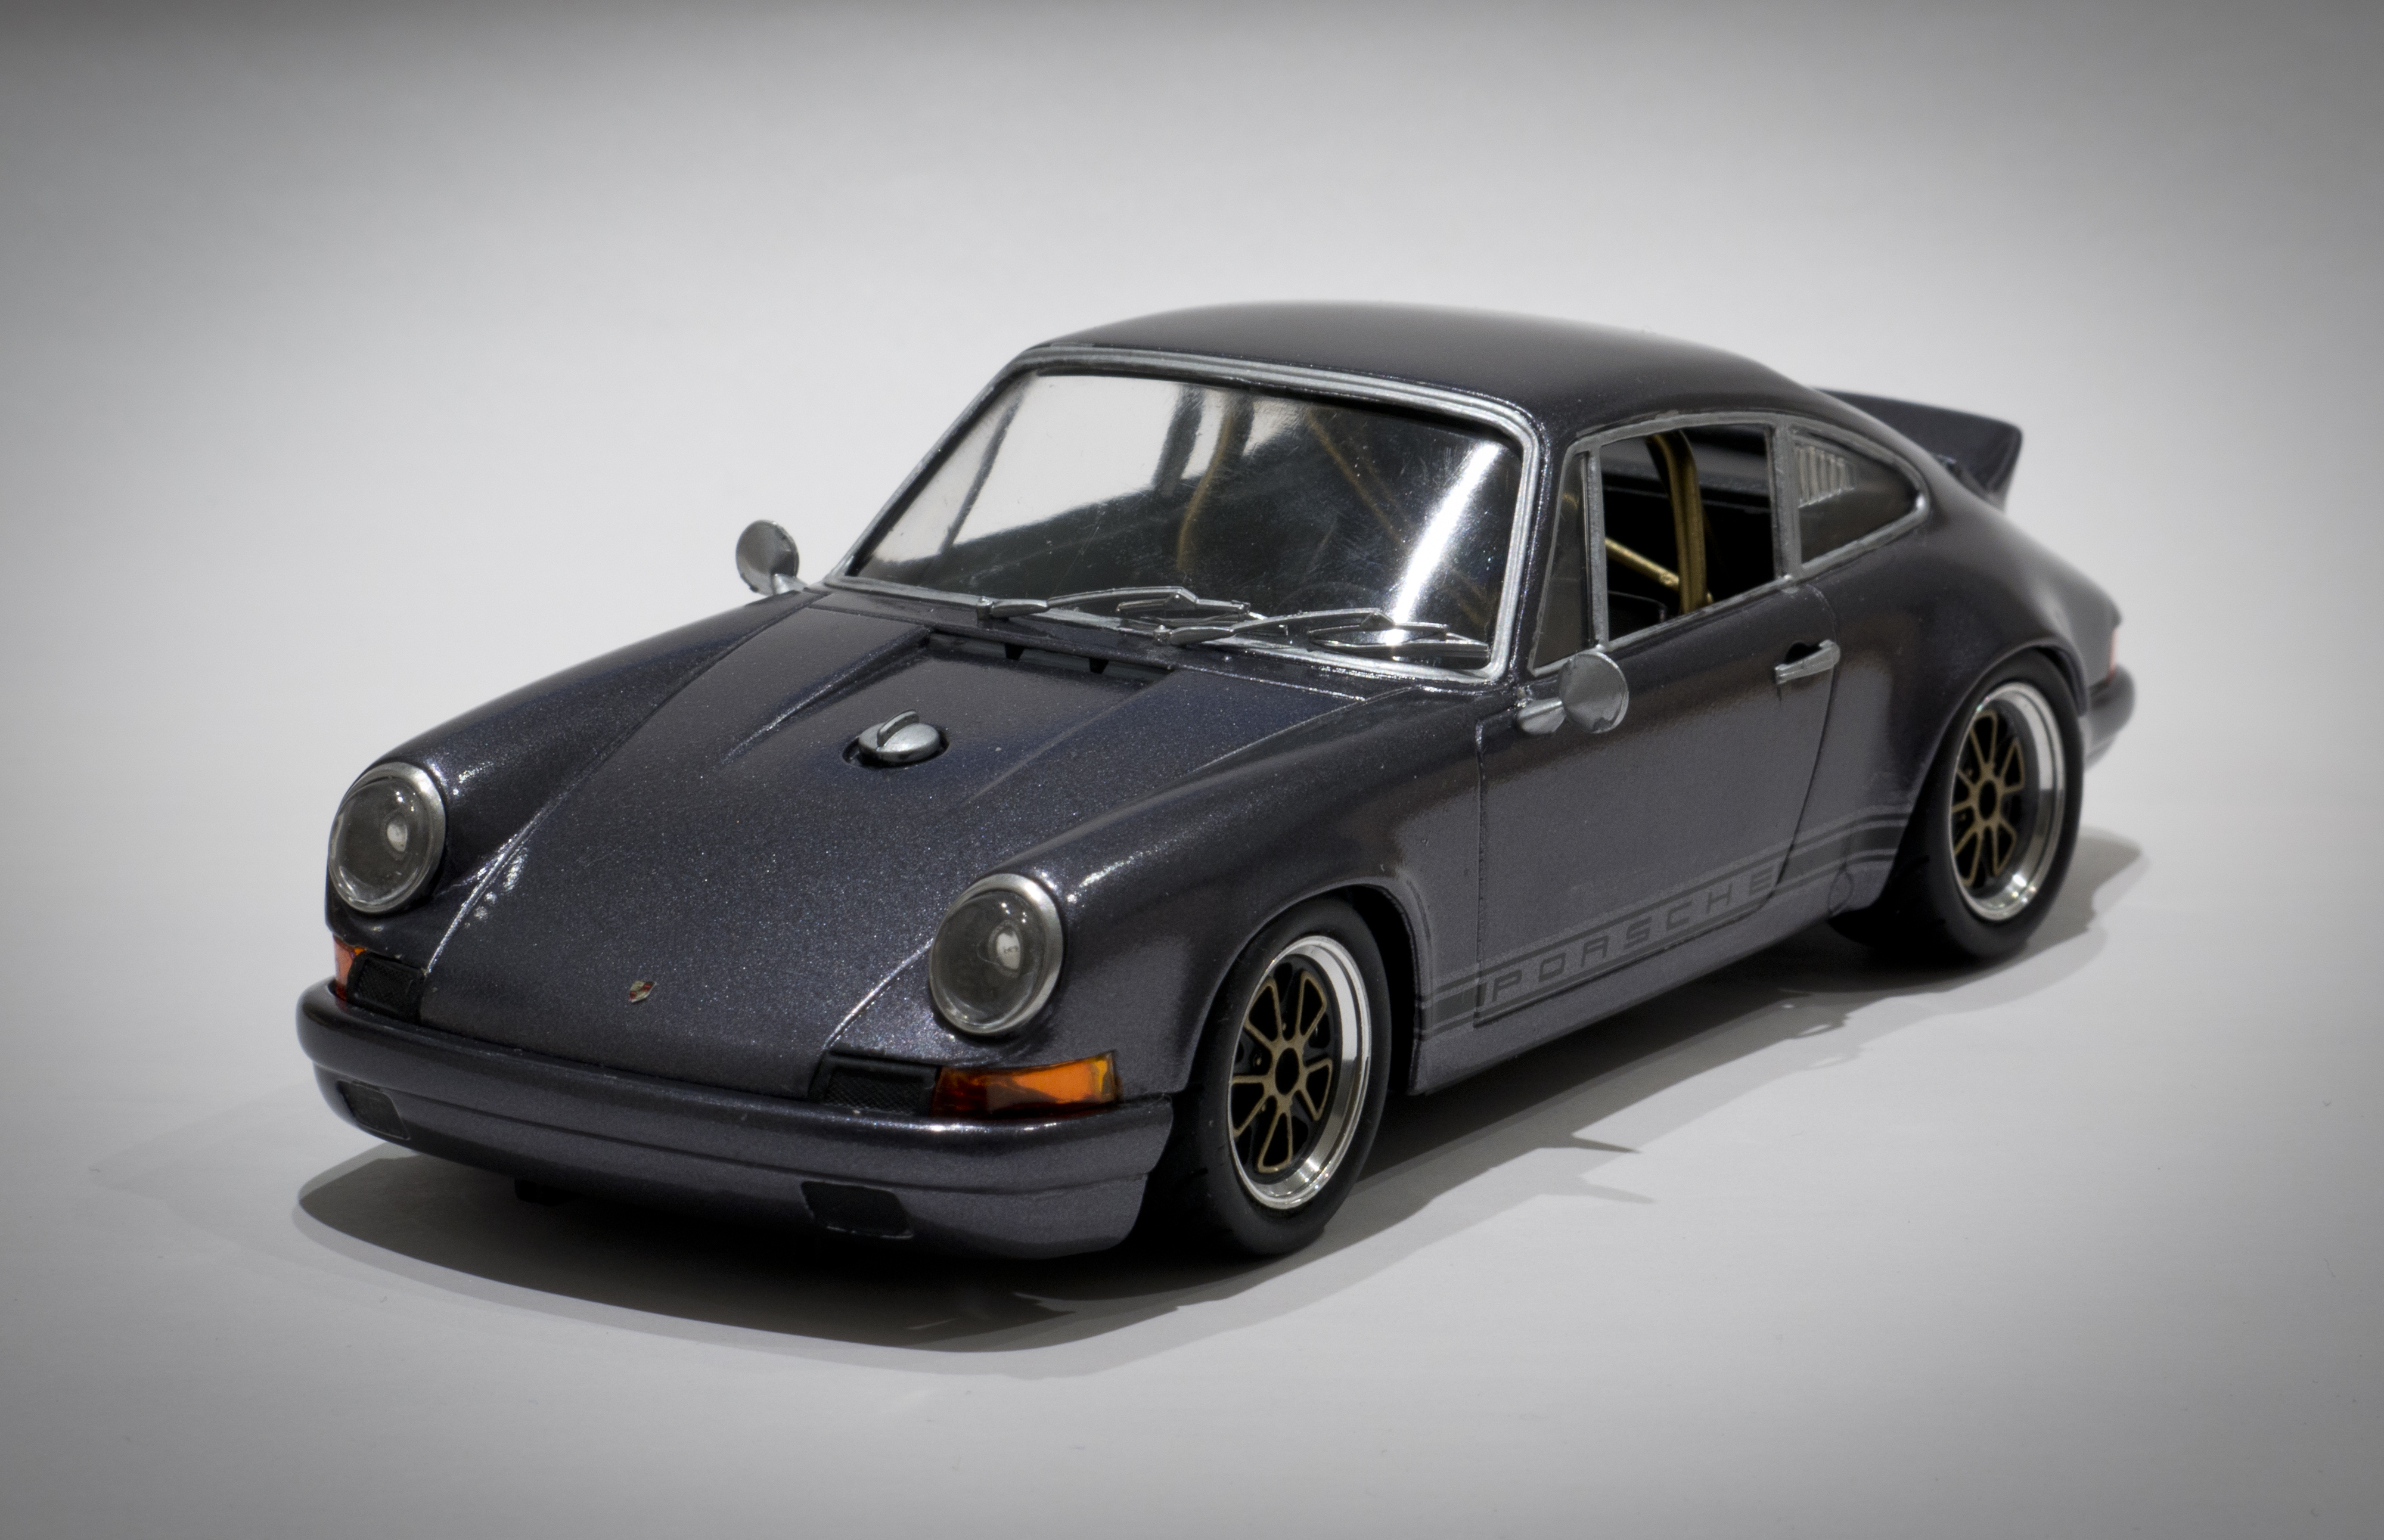
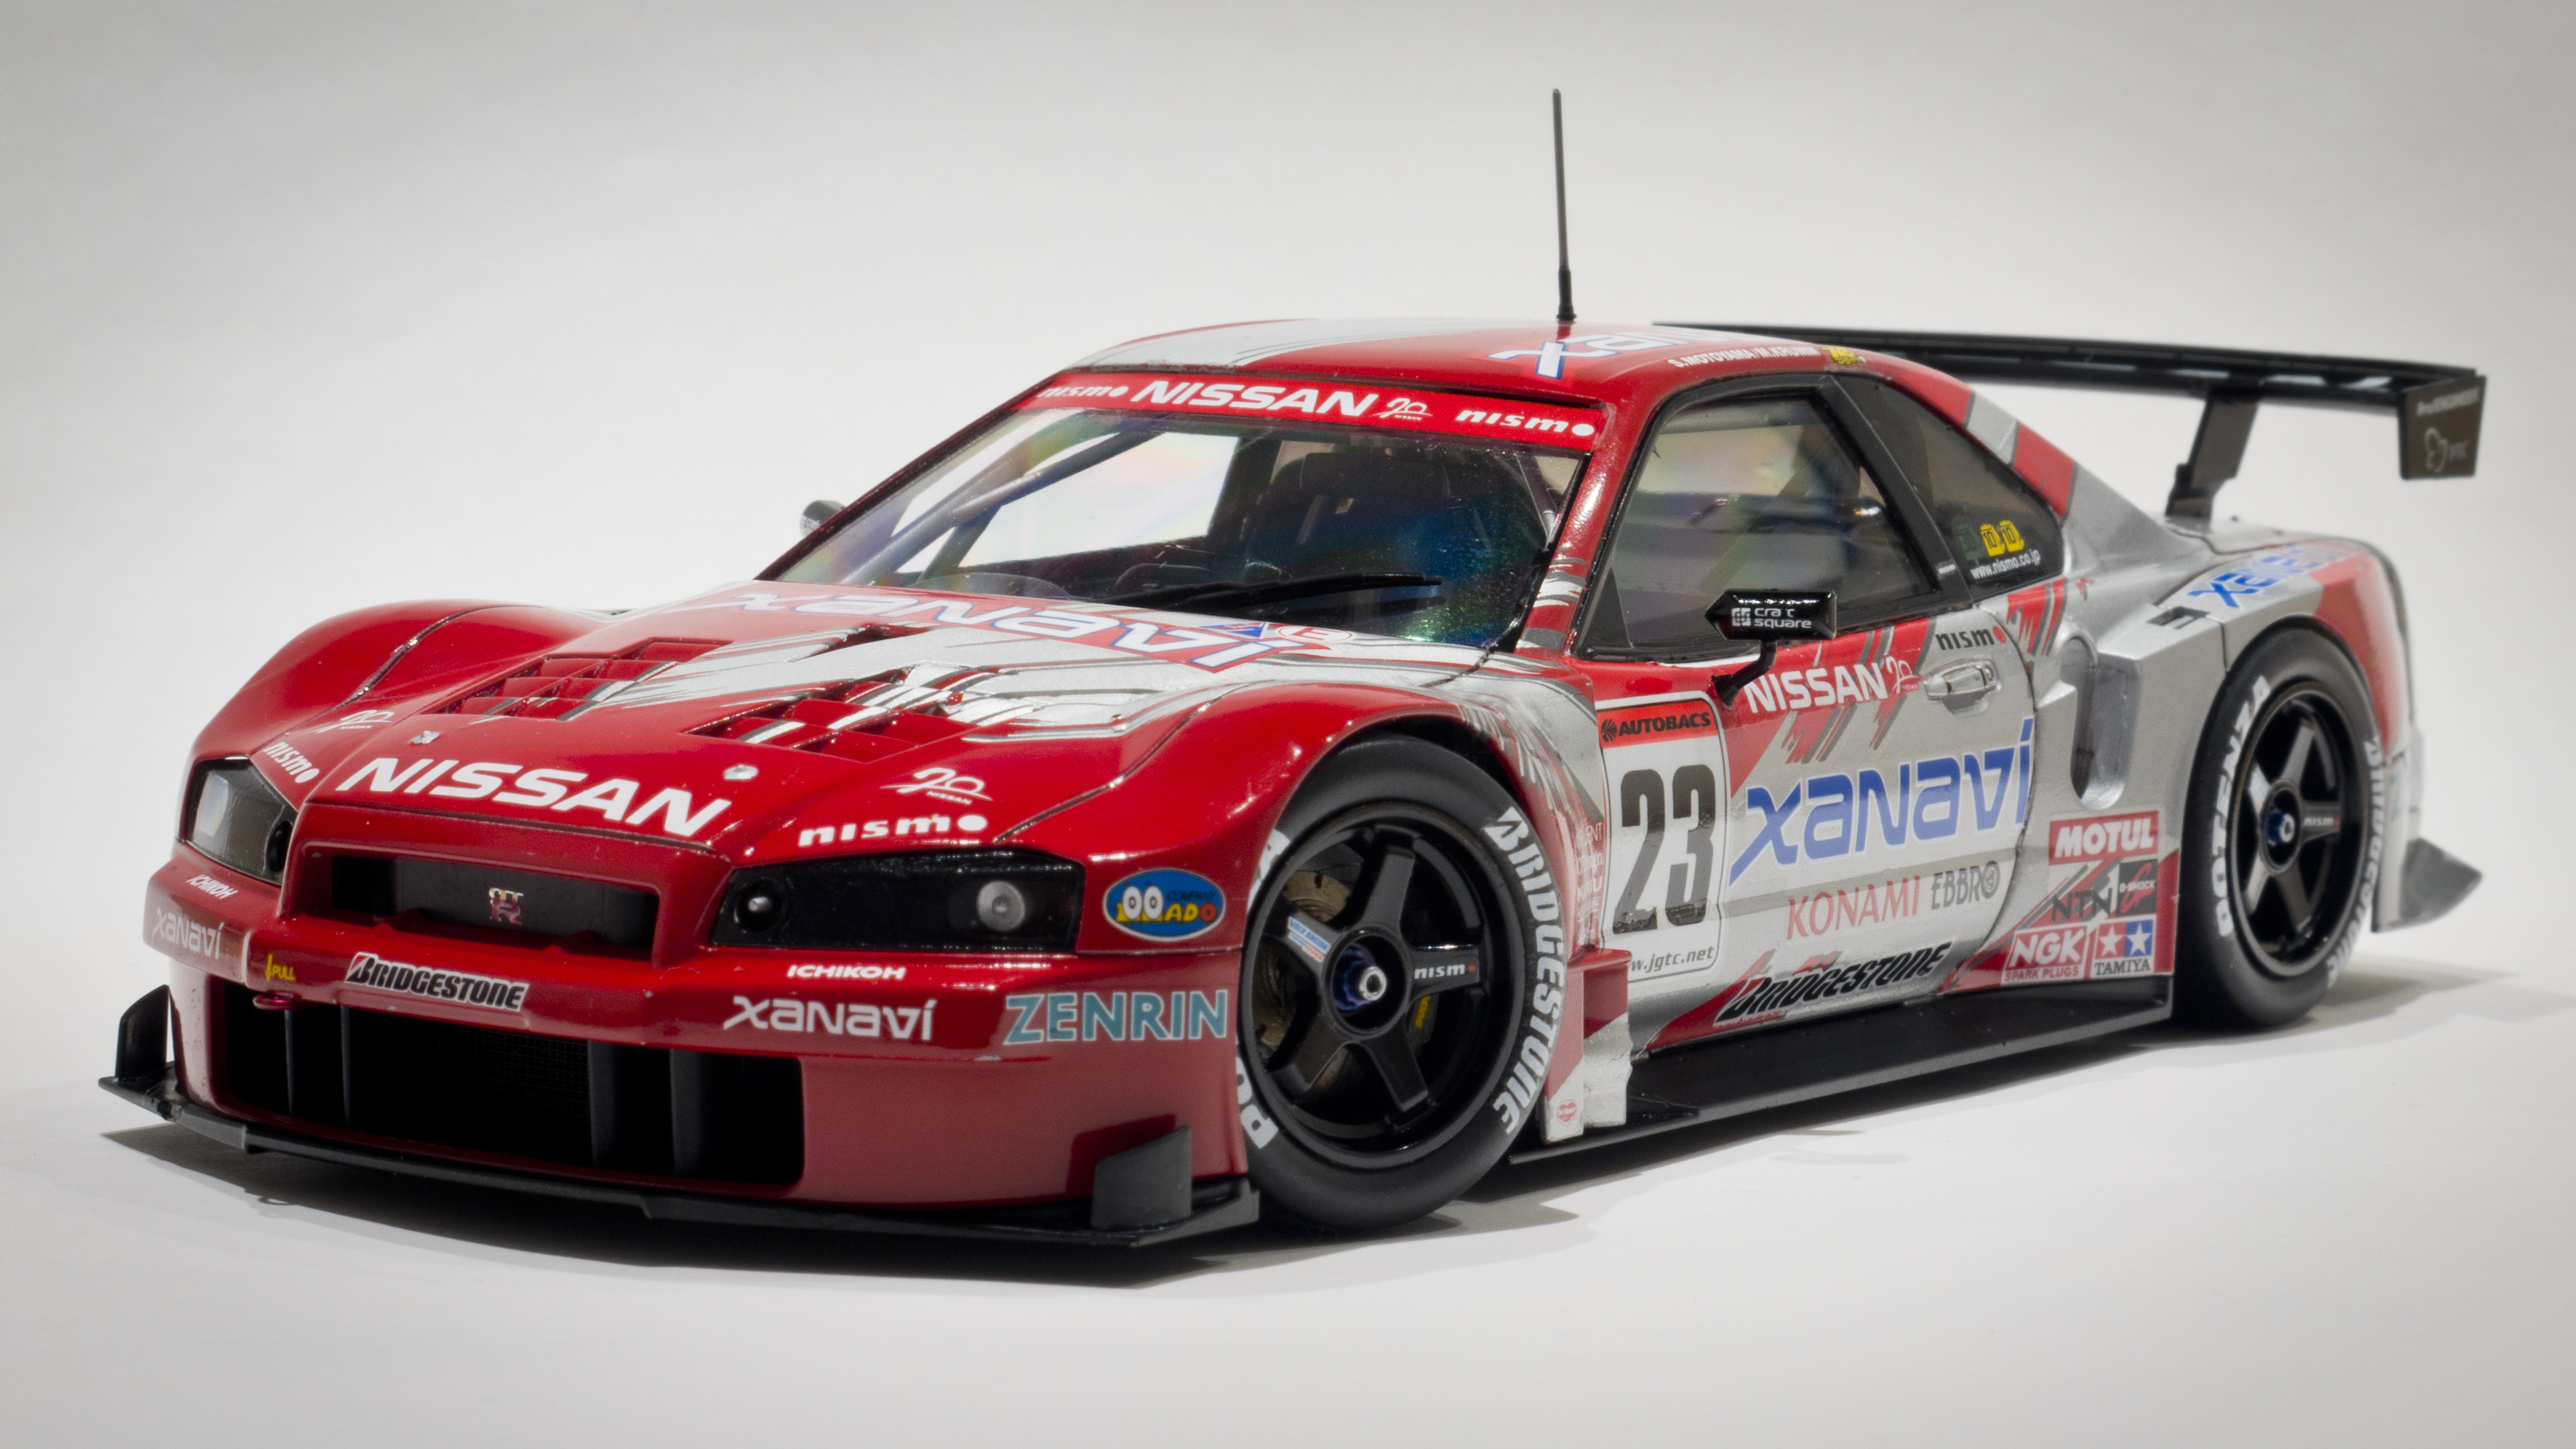
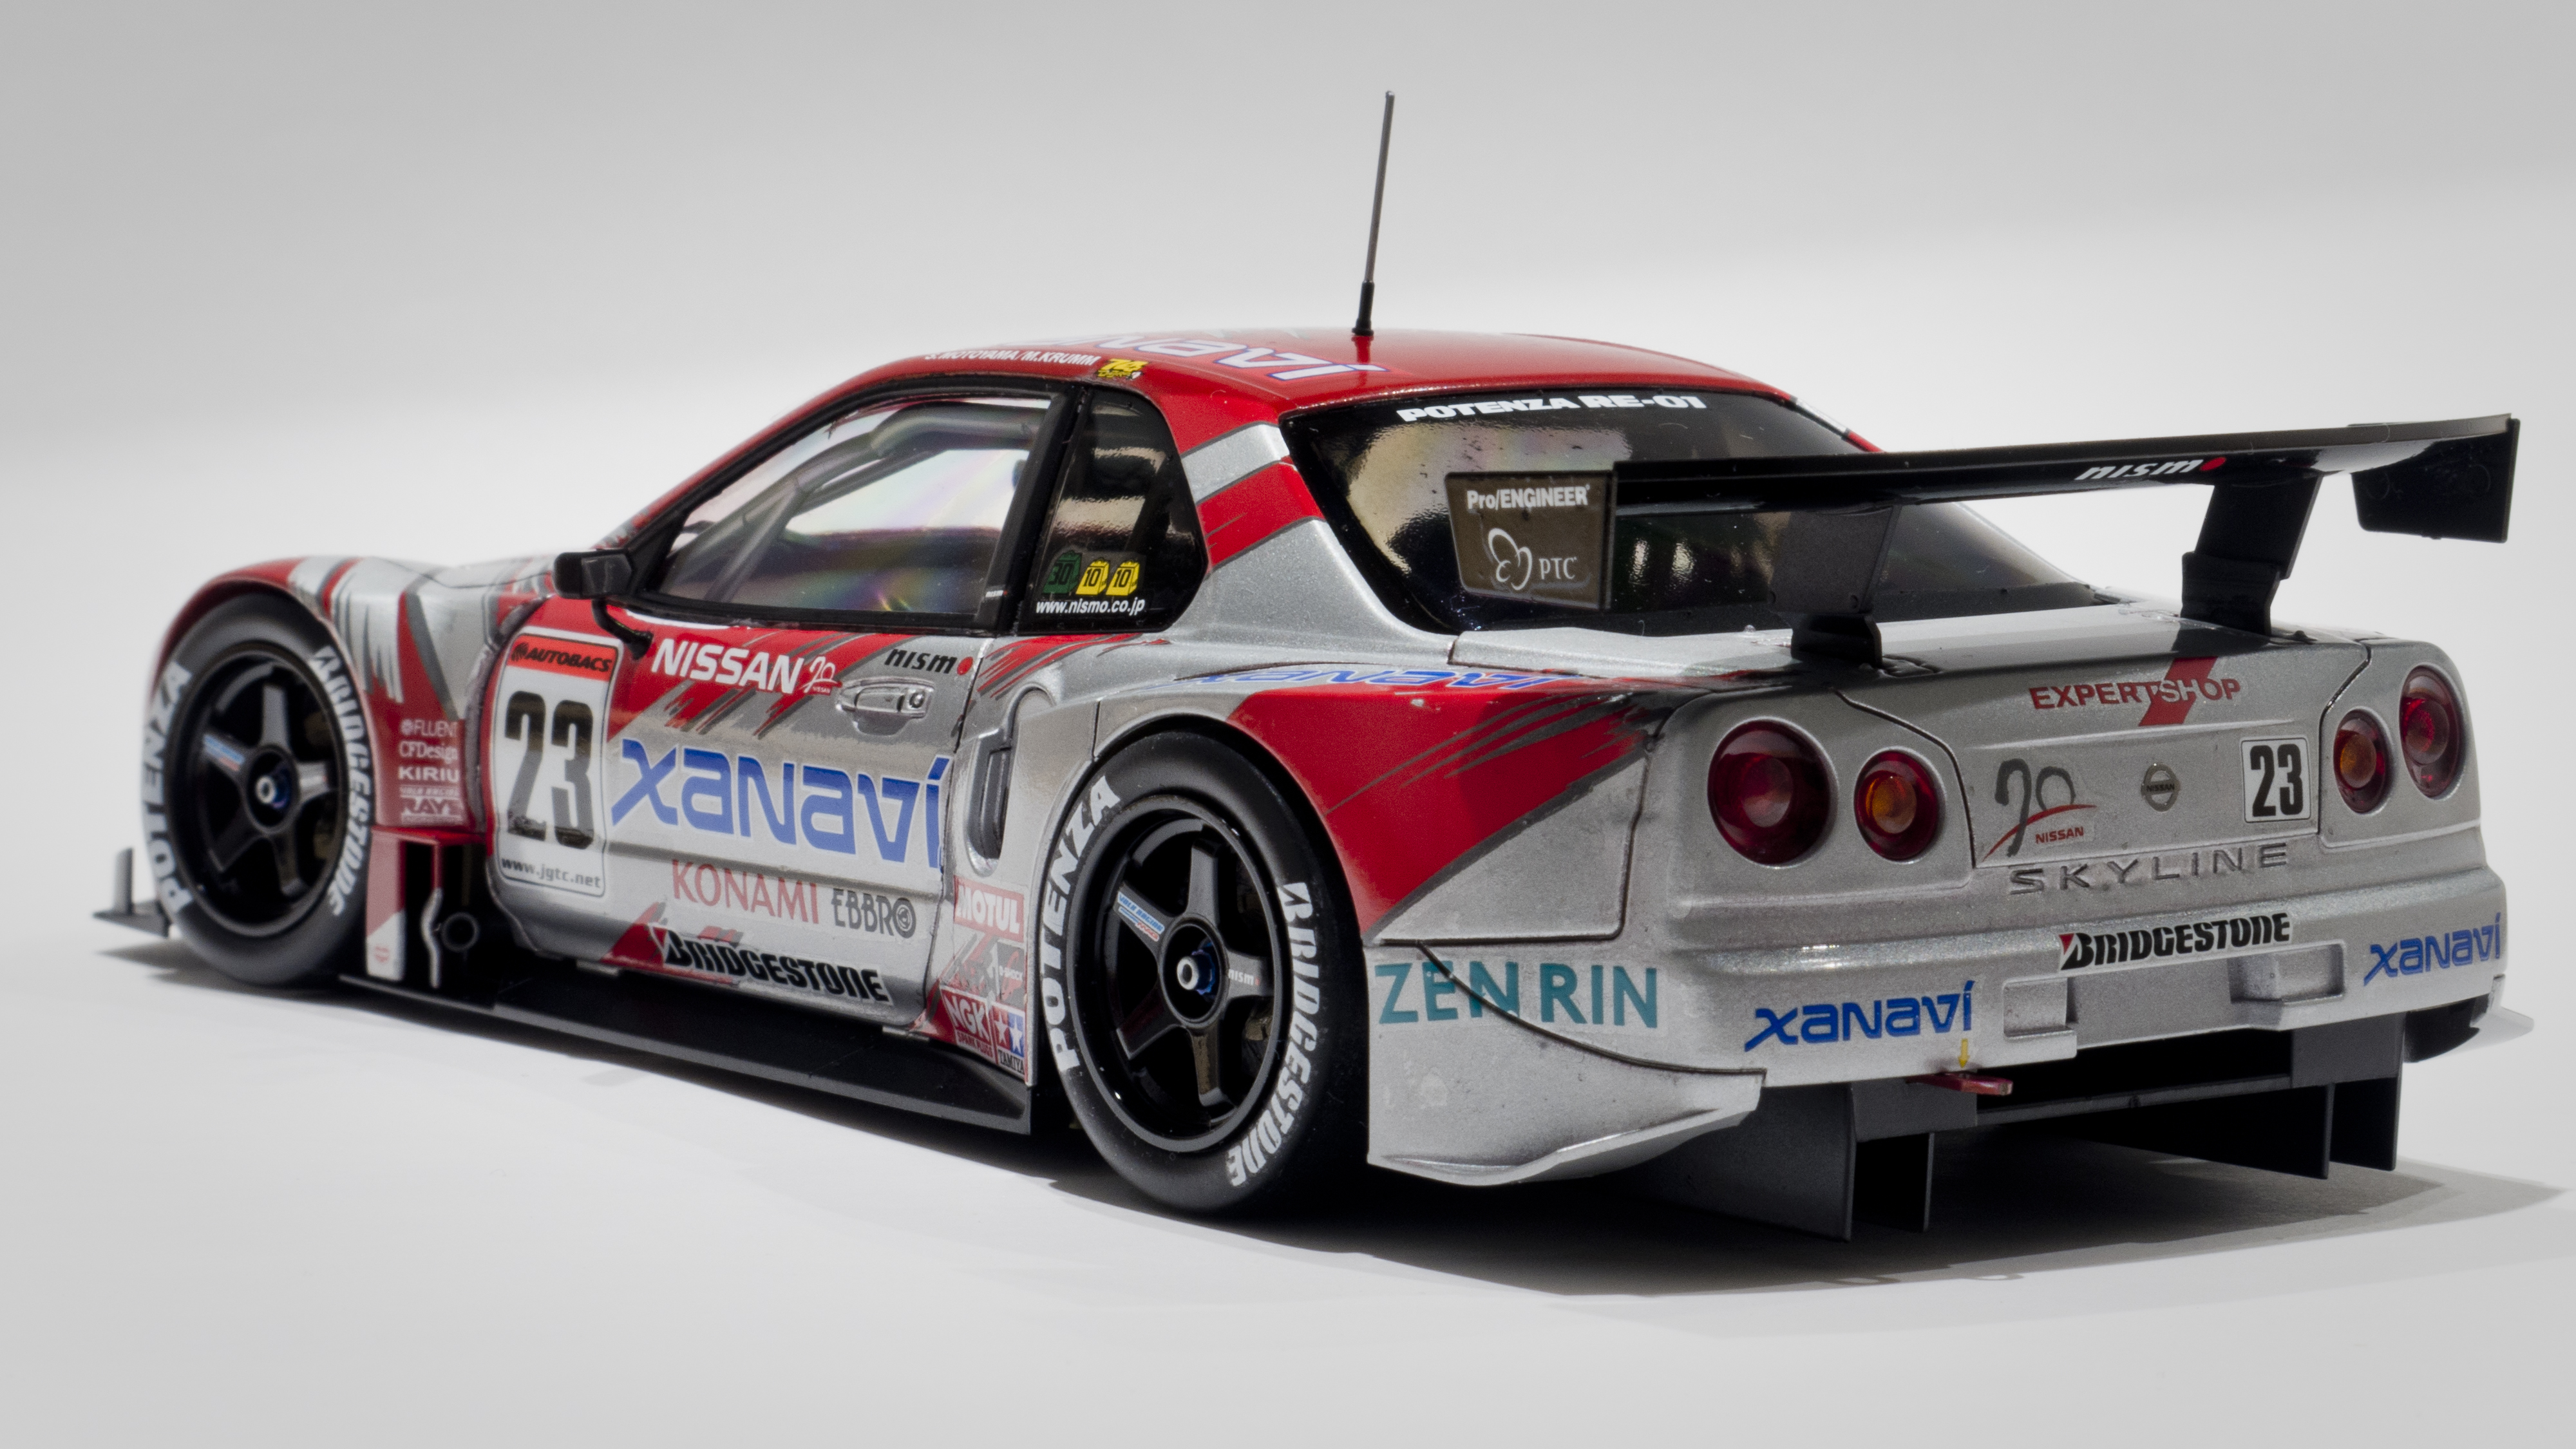
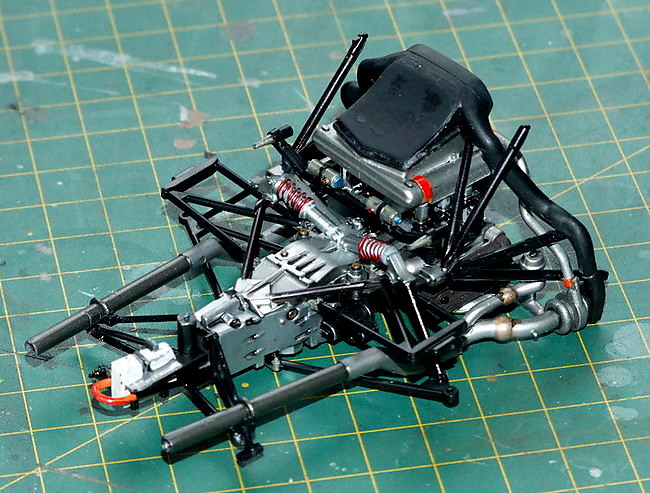
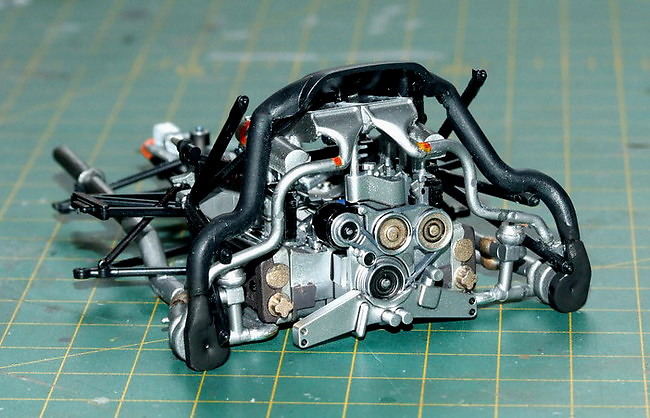
Been a while since I posted a car build here, that's almost certainly because I haven't finished one in a while, however... So, as usual for a Tamiya car kit, it’s perfectly engineered with fit so finely tuned that it almost doesn’t require glue for some of the larger pieces. Build took almost no time at all, painting the insides however… that was another story !! – I knew precisely how I wanted it to look before I even bought the kit, and just for once, I’ve built exactly what was in my minds’ eye. Talking of the paint, I’ve used my ‘default setting’ and gone with two Tamiya rattle-cans – Metallic Grey and Chrome Yellow, simply polished with and off-the-shelf ‘cutting agent’, no clear coat as we can’t get ‘Gravity’ or ‘Zero’ brands here and I simply don’t trust anything else. As ever please feel free to shout abuse, ask a question or make a comment. Have a great weekend all. Ian.
-
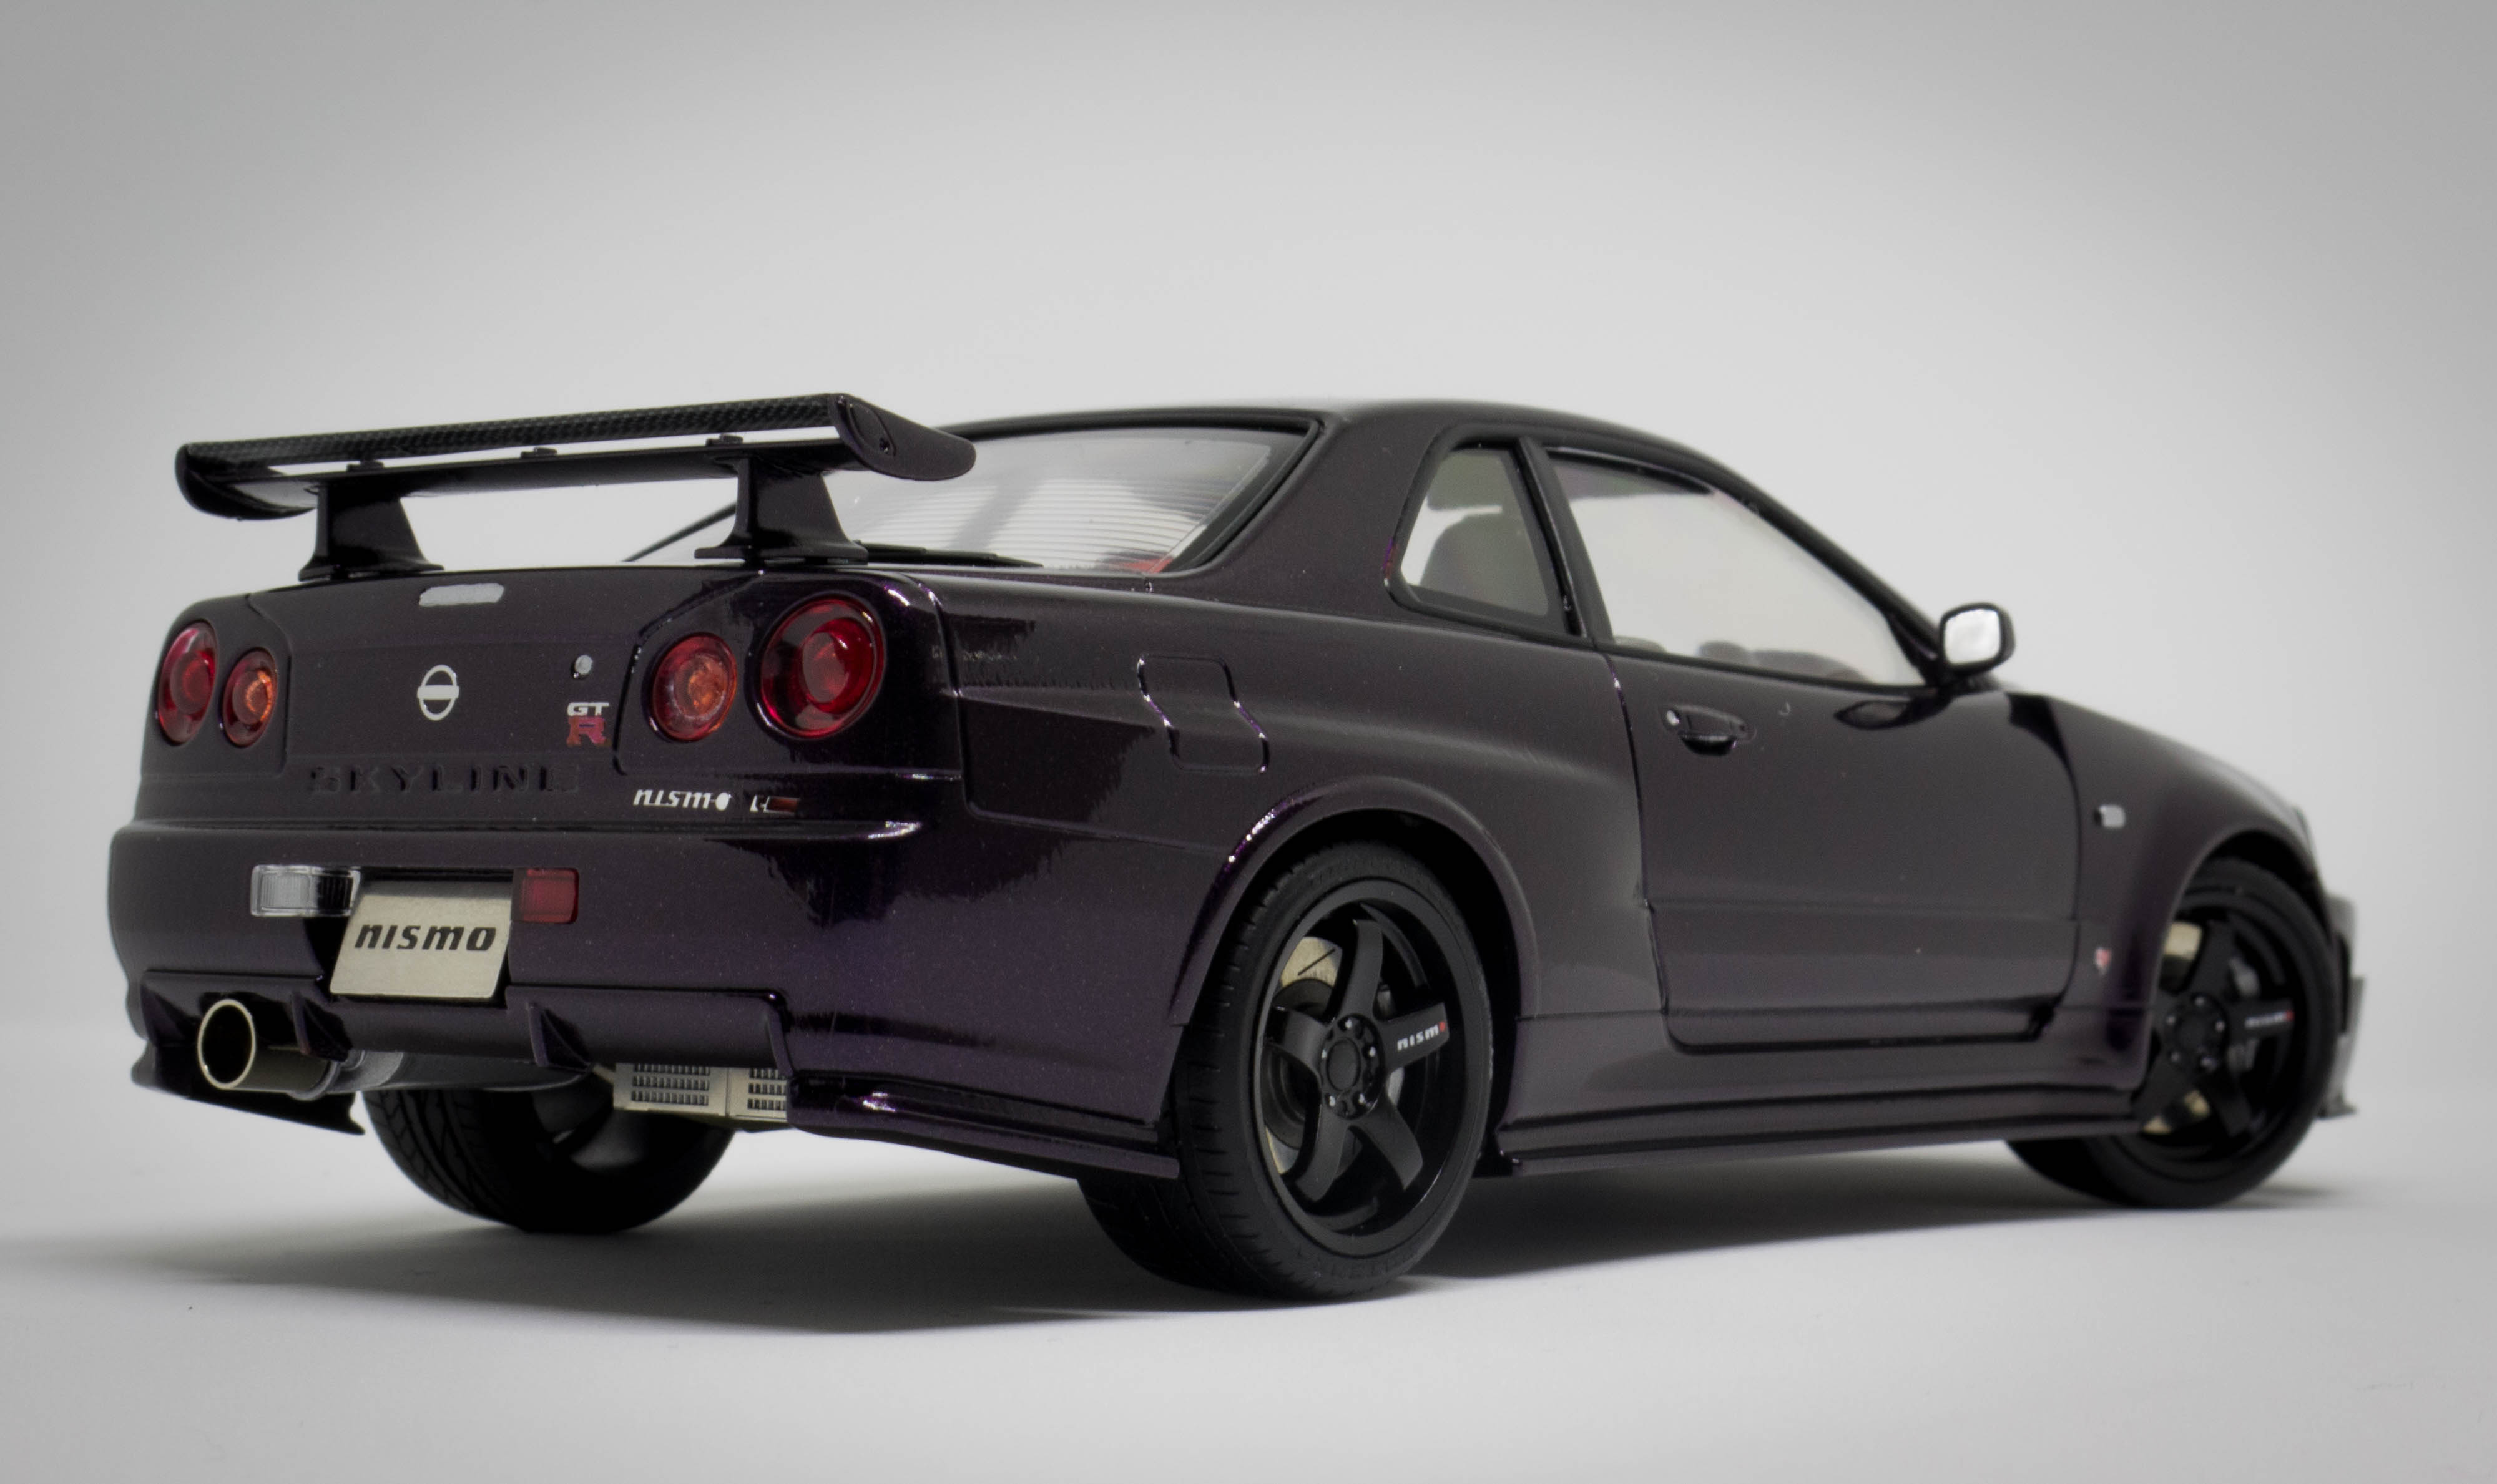
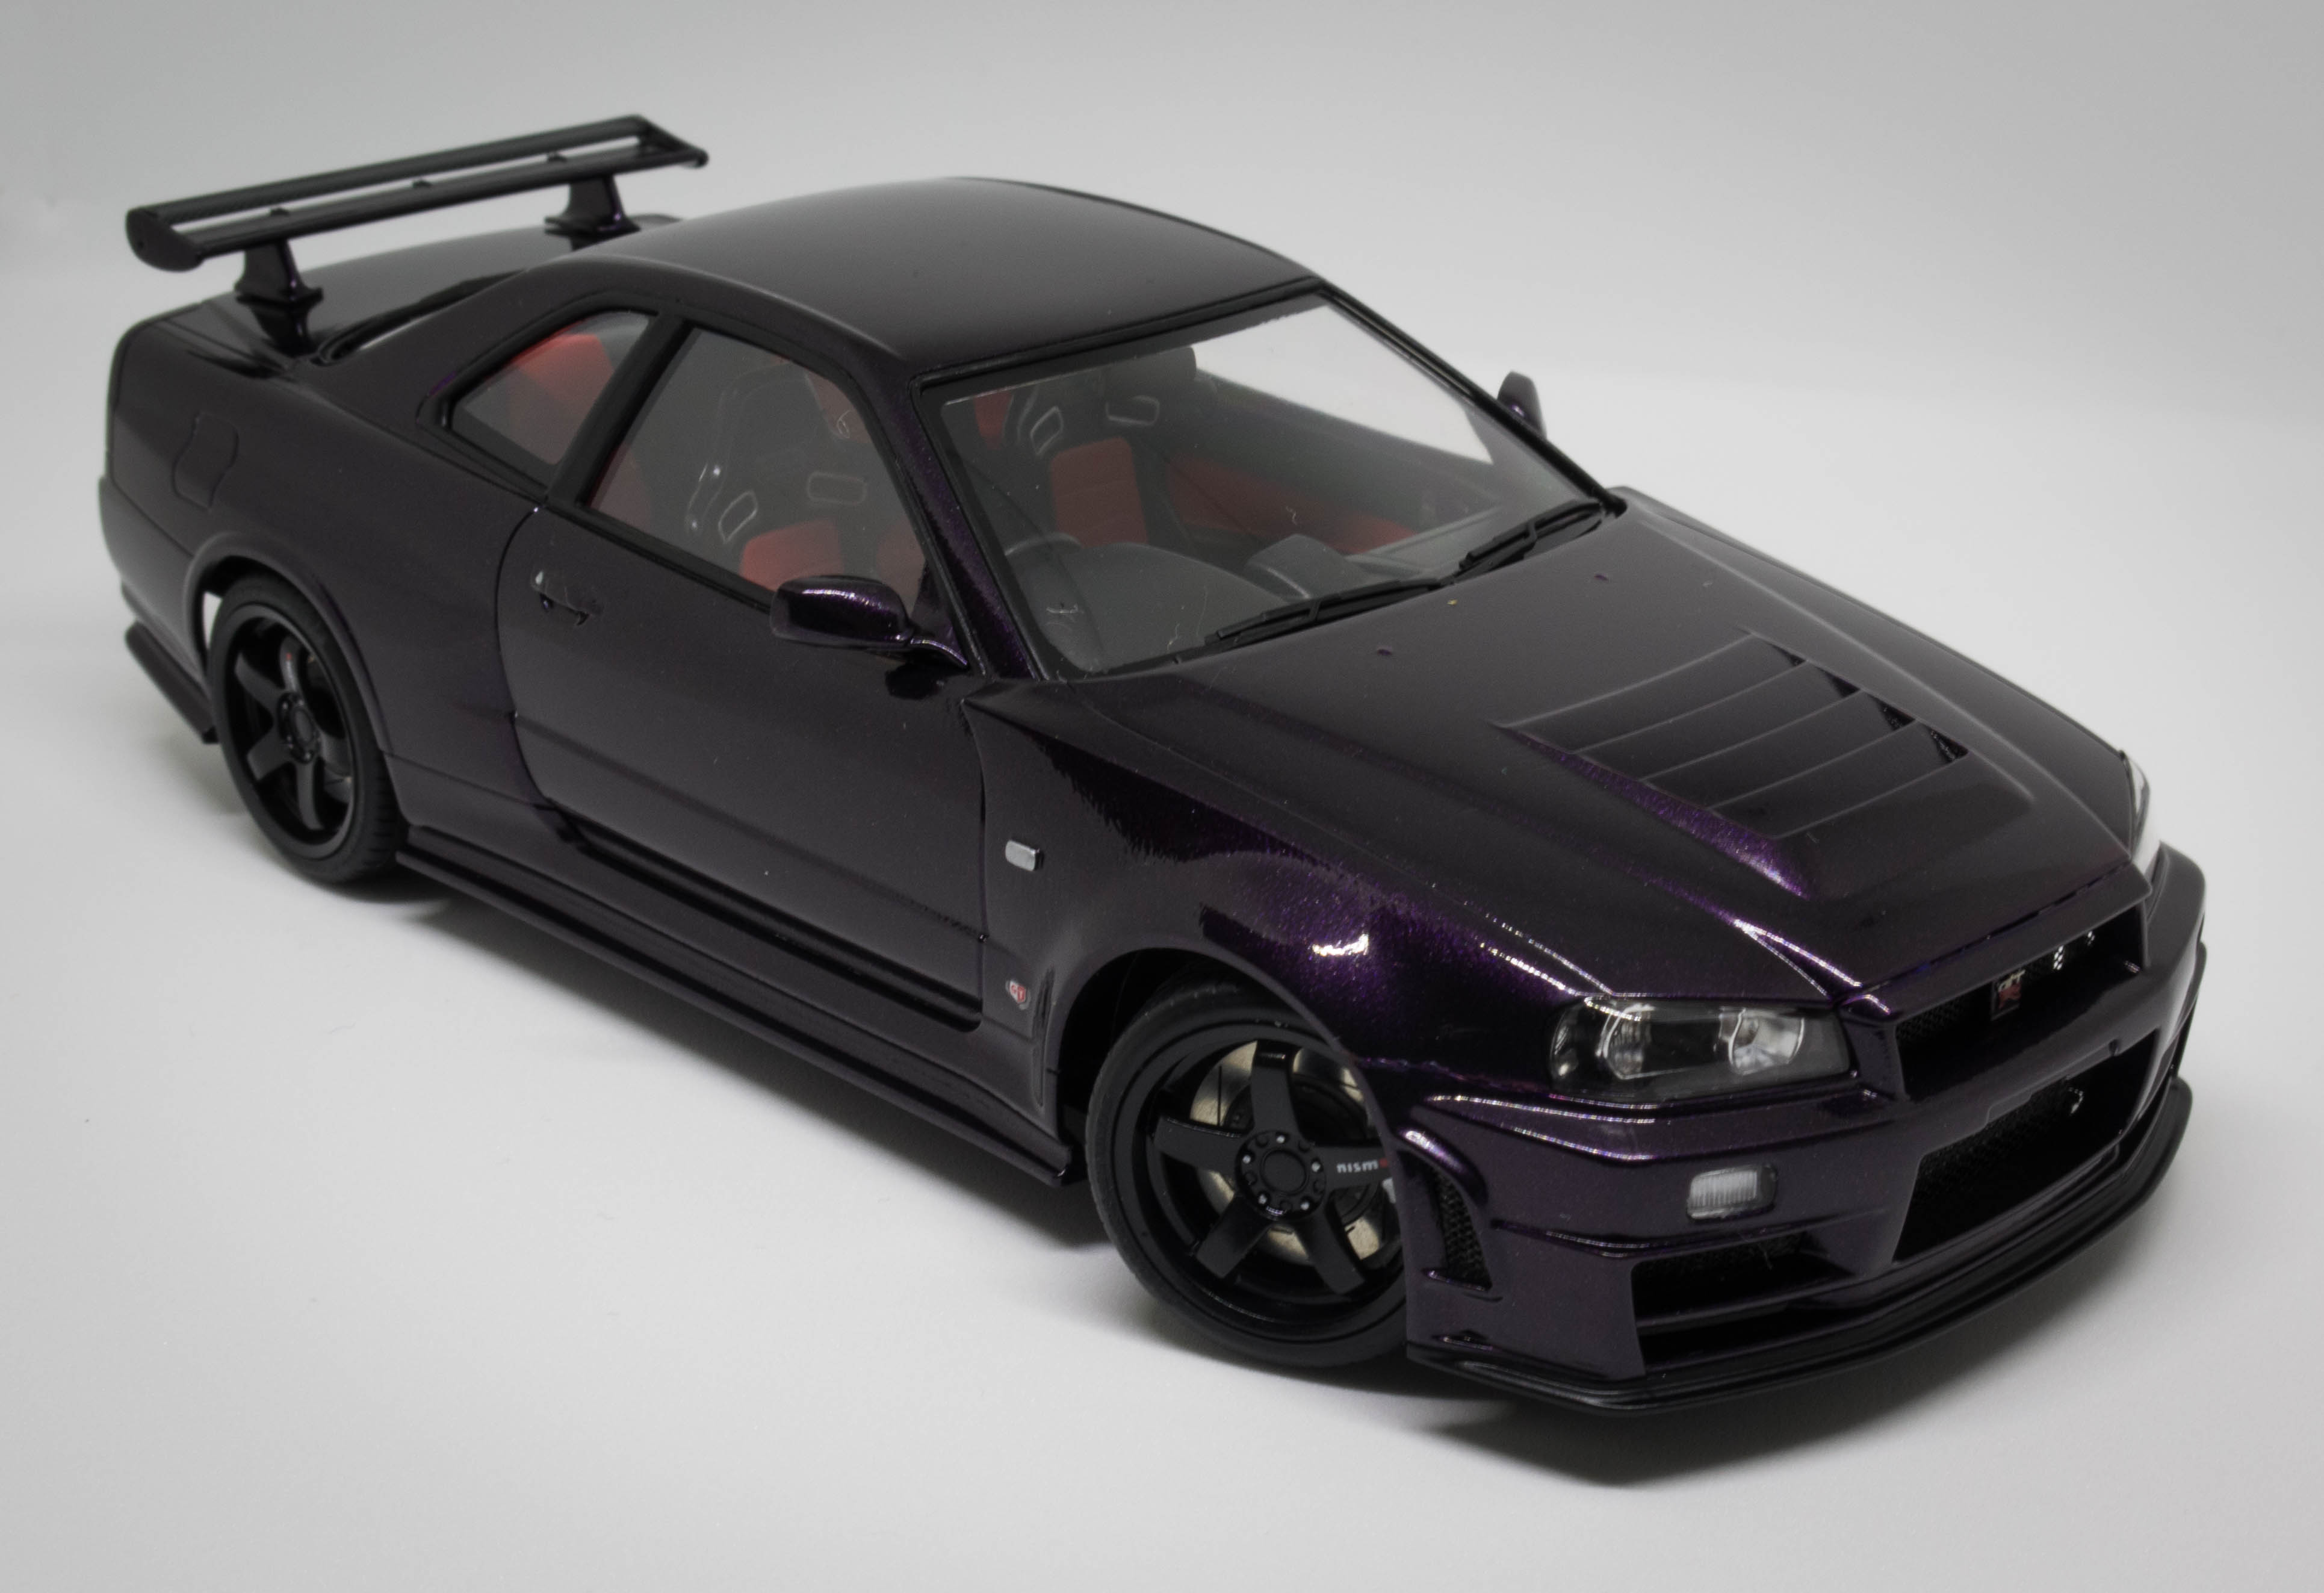
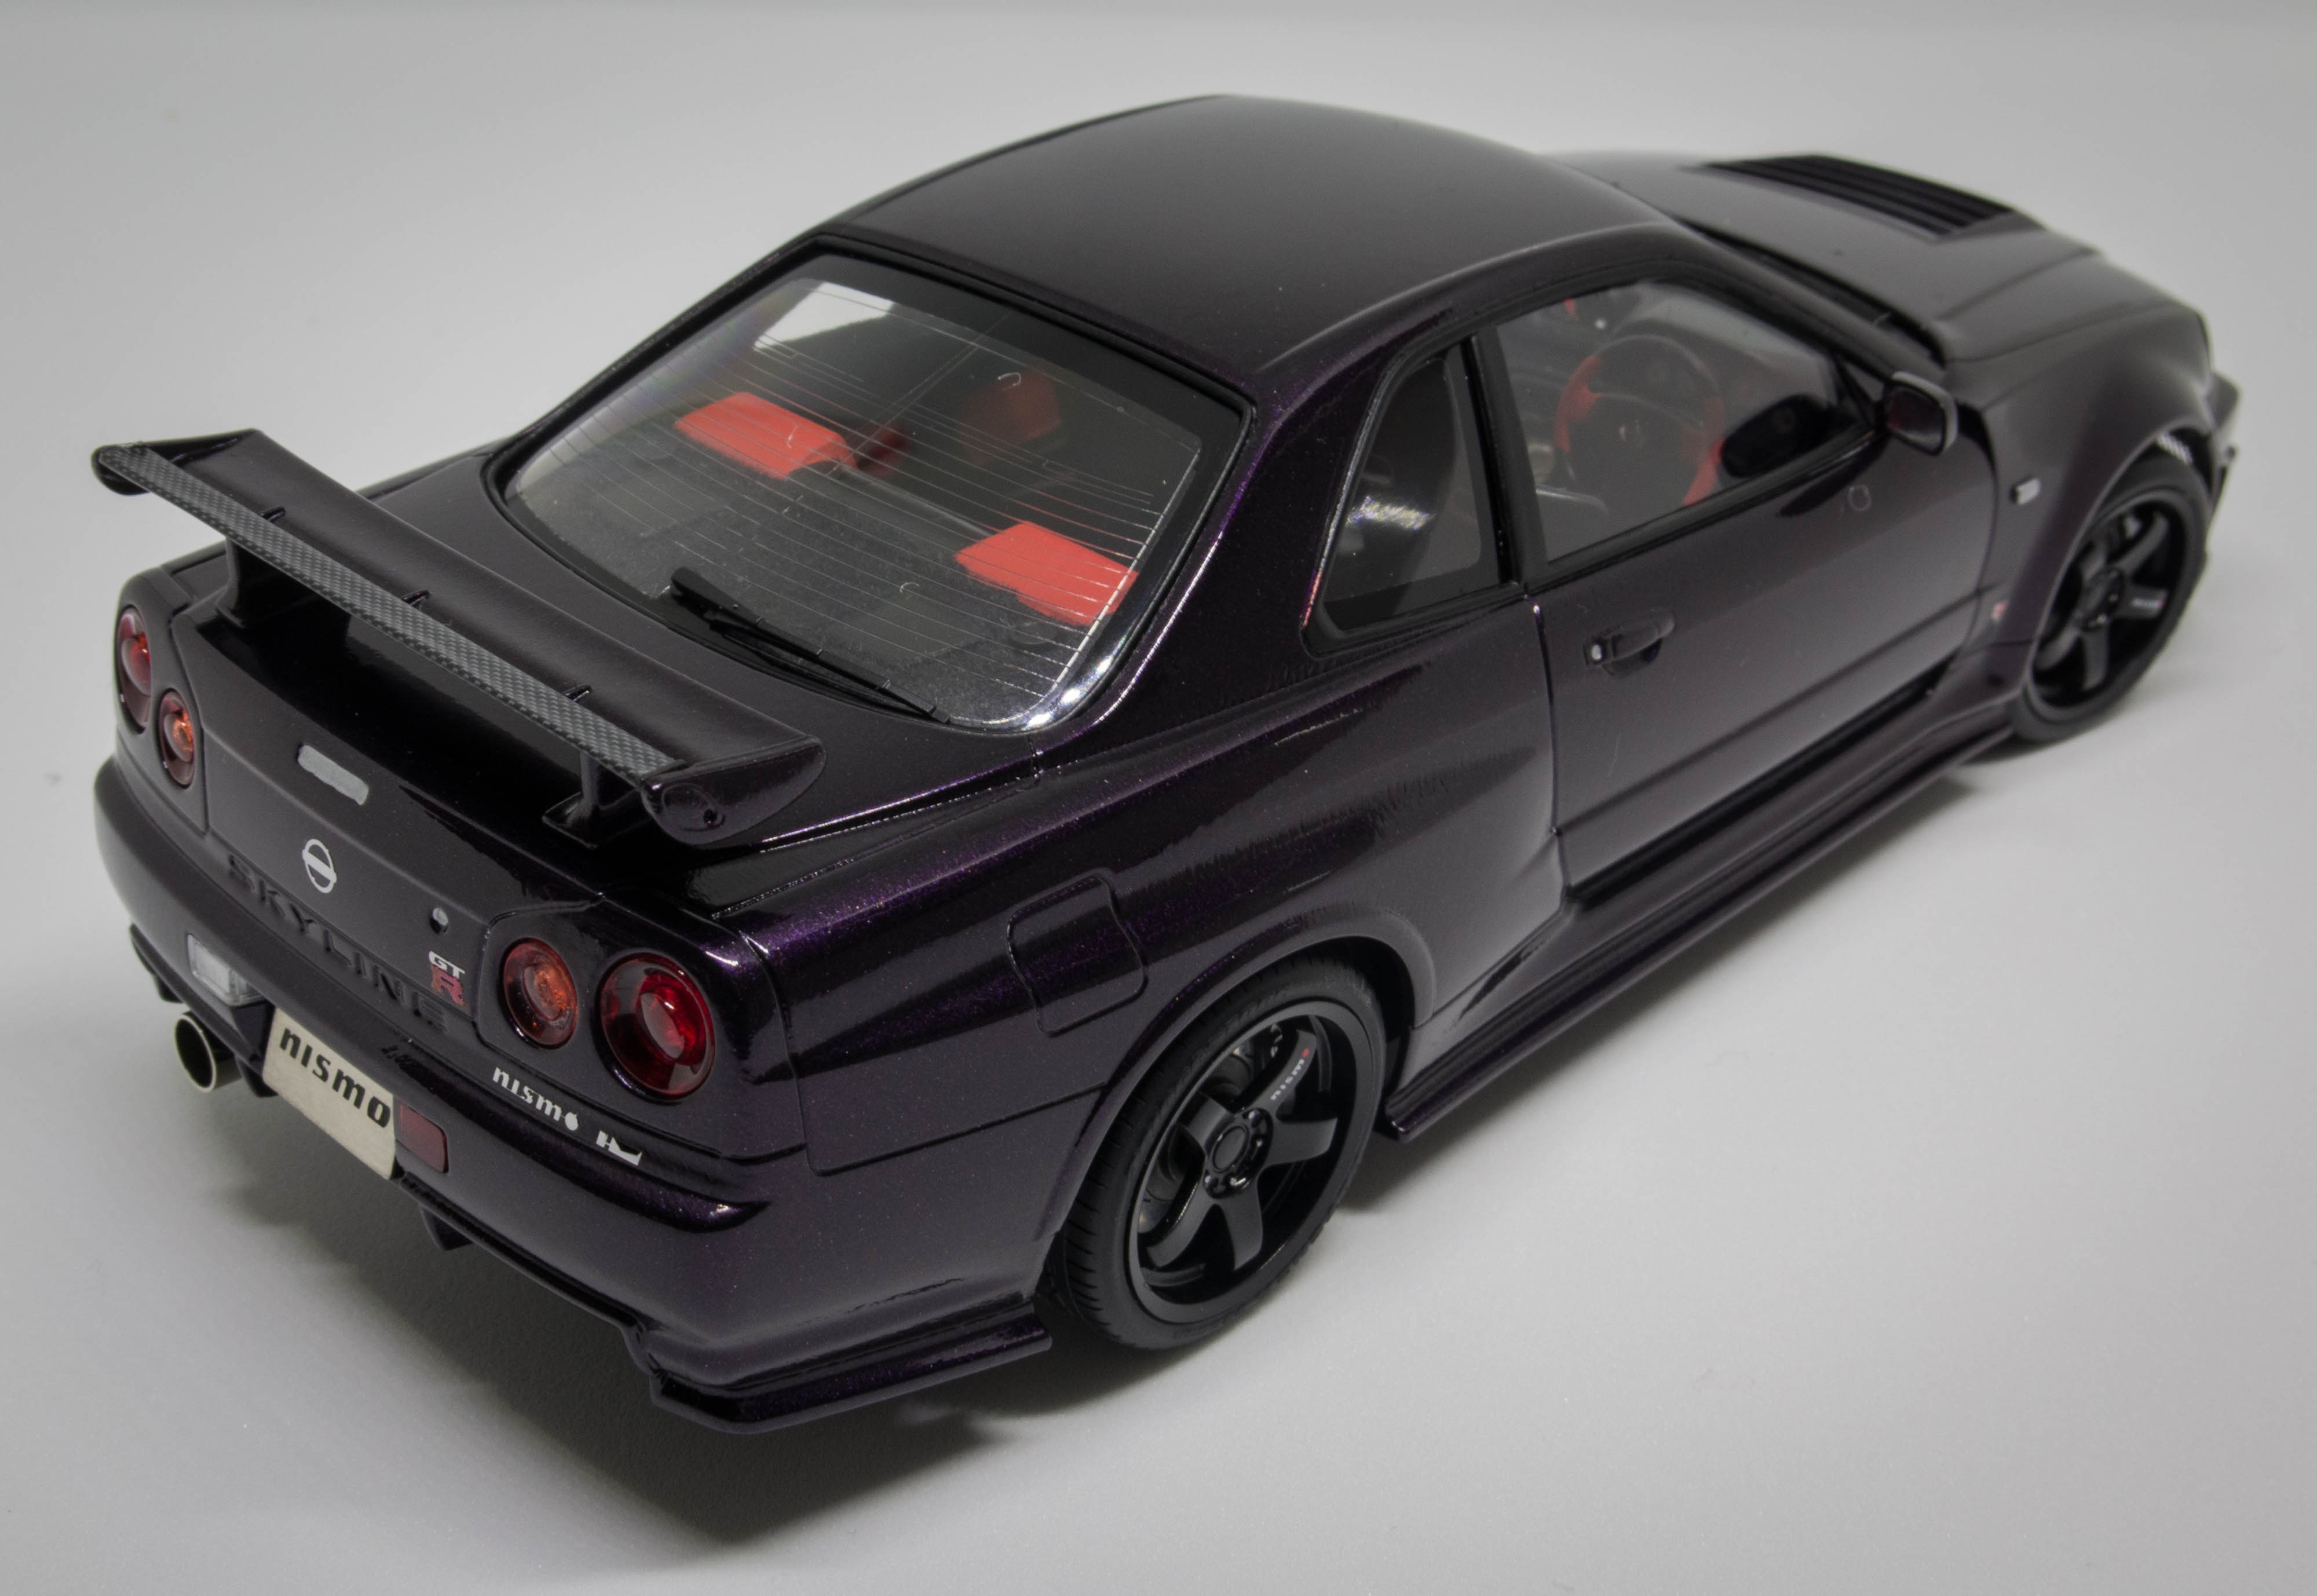
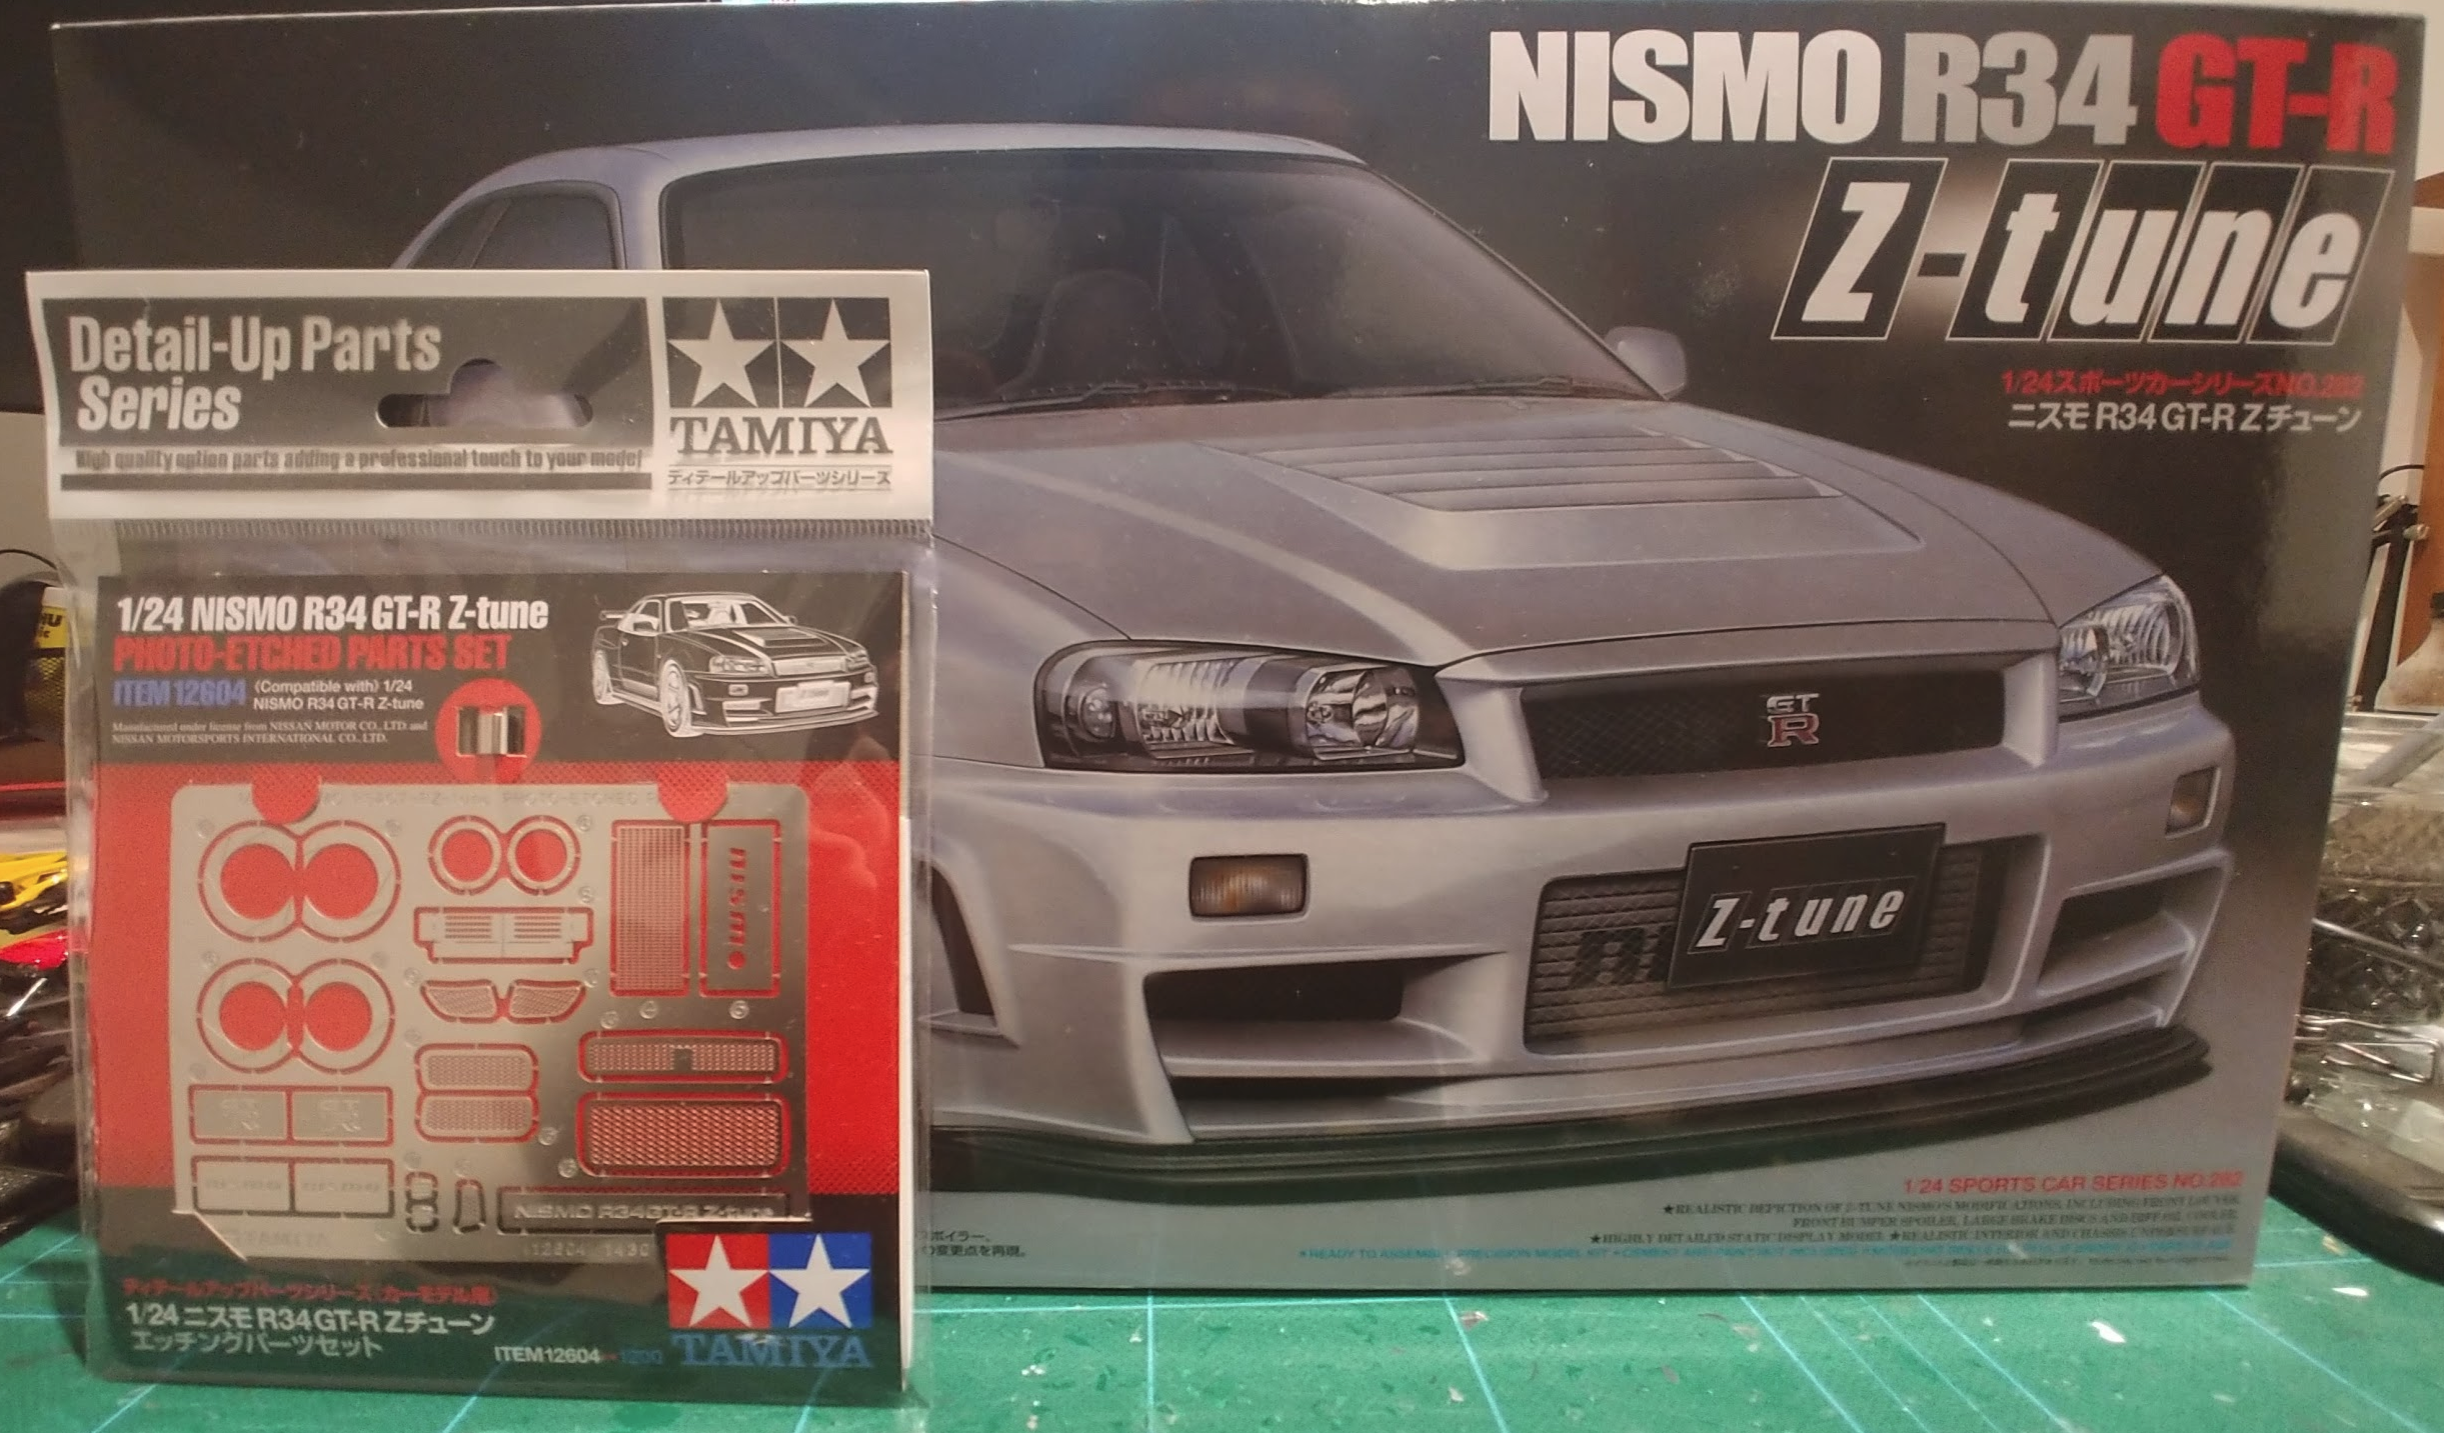
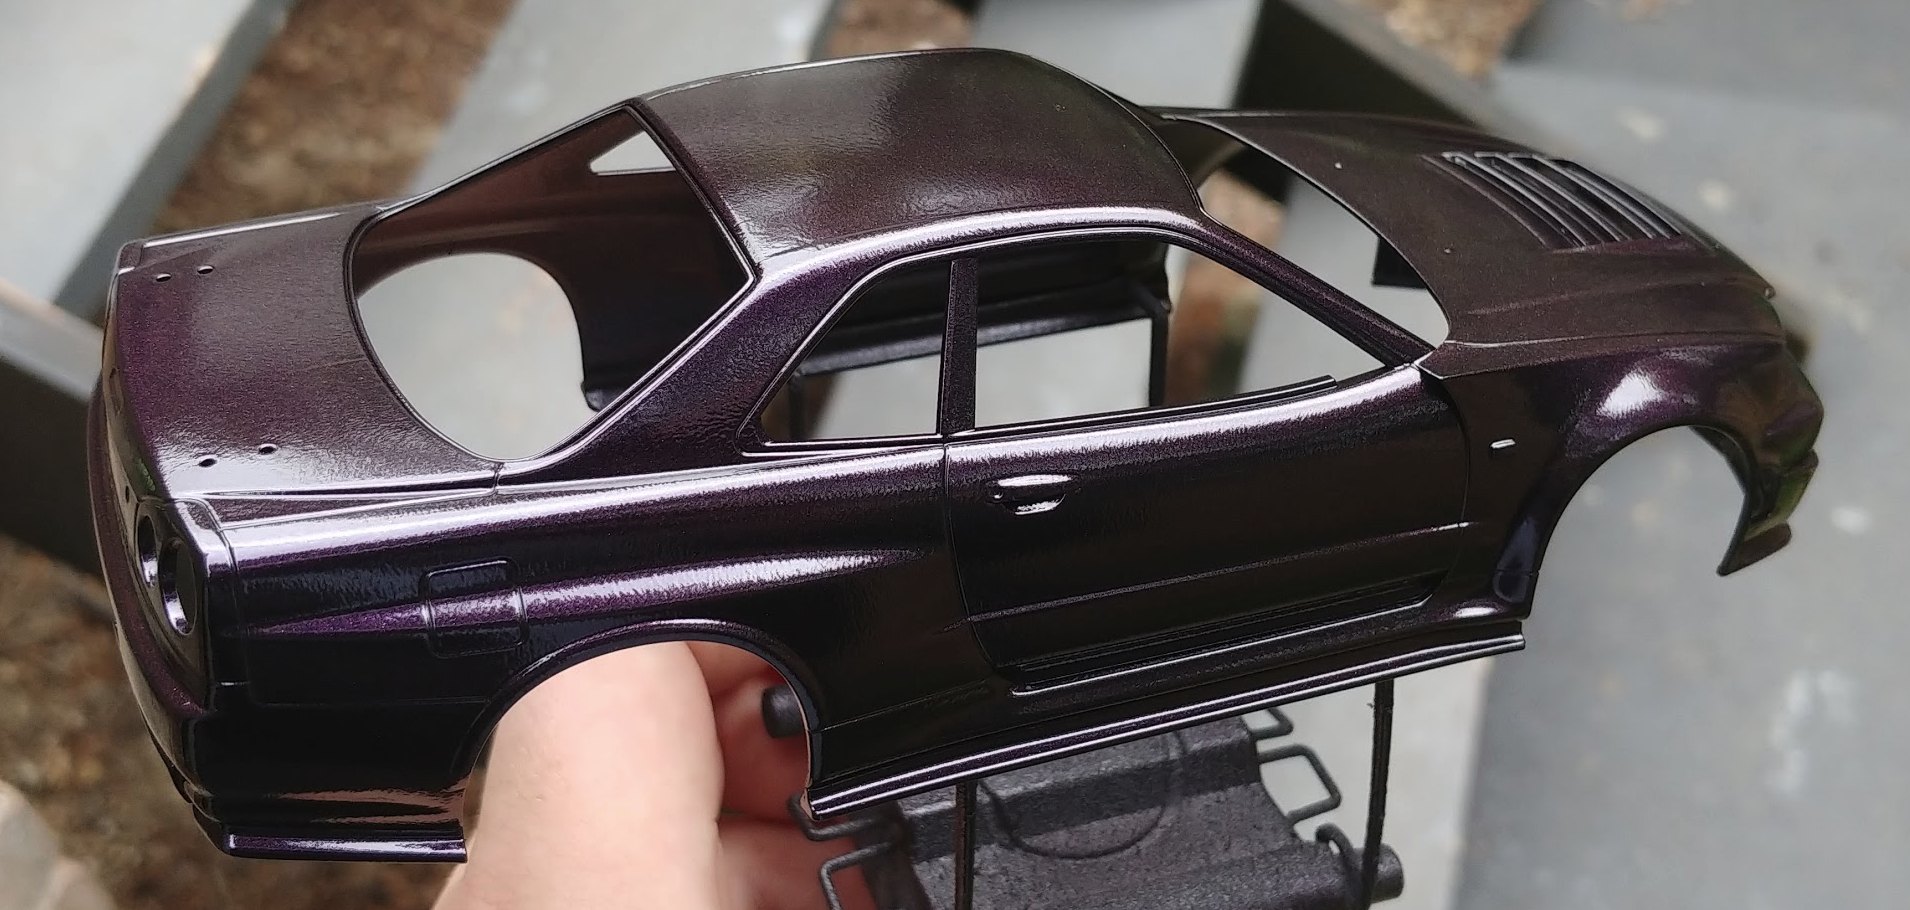
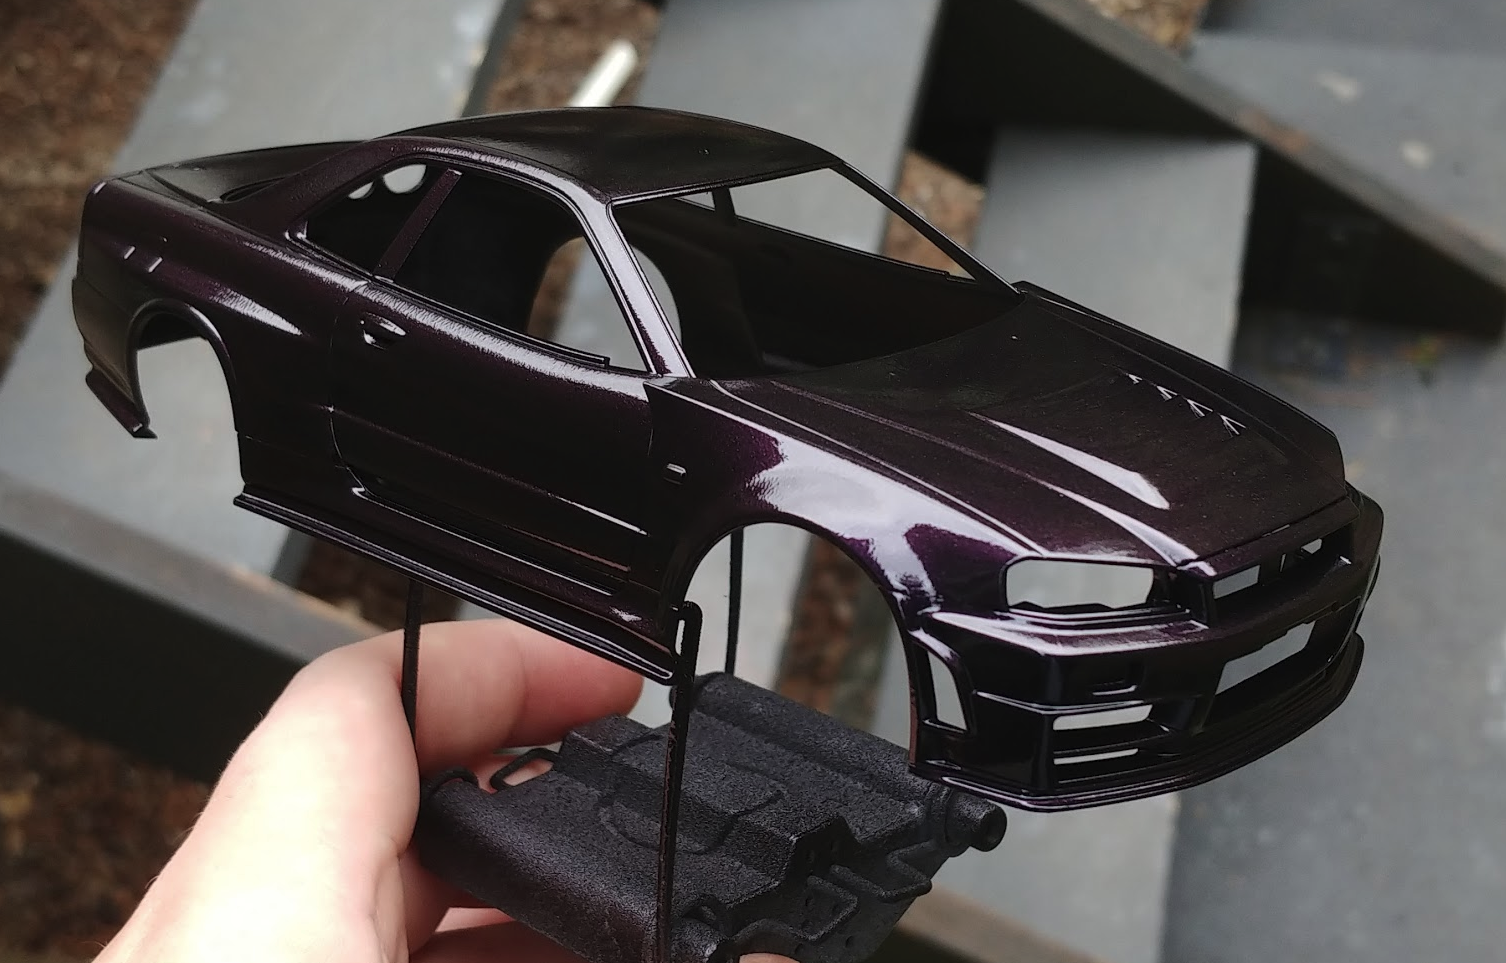
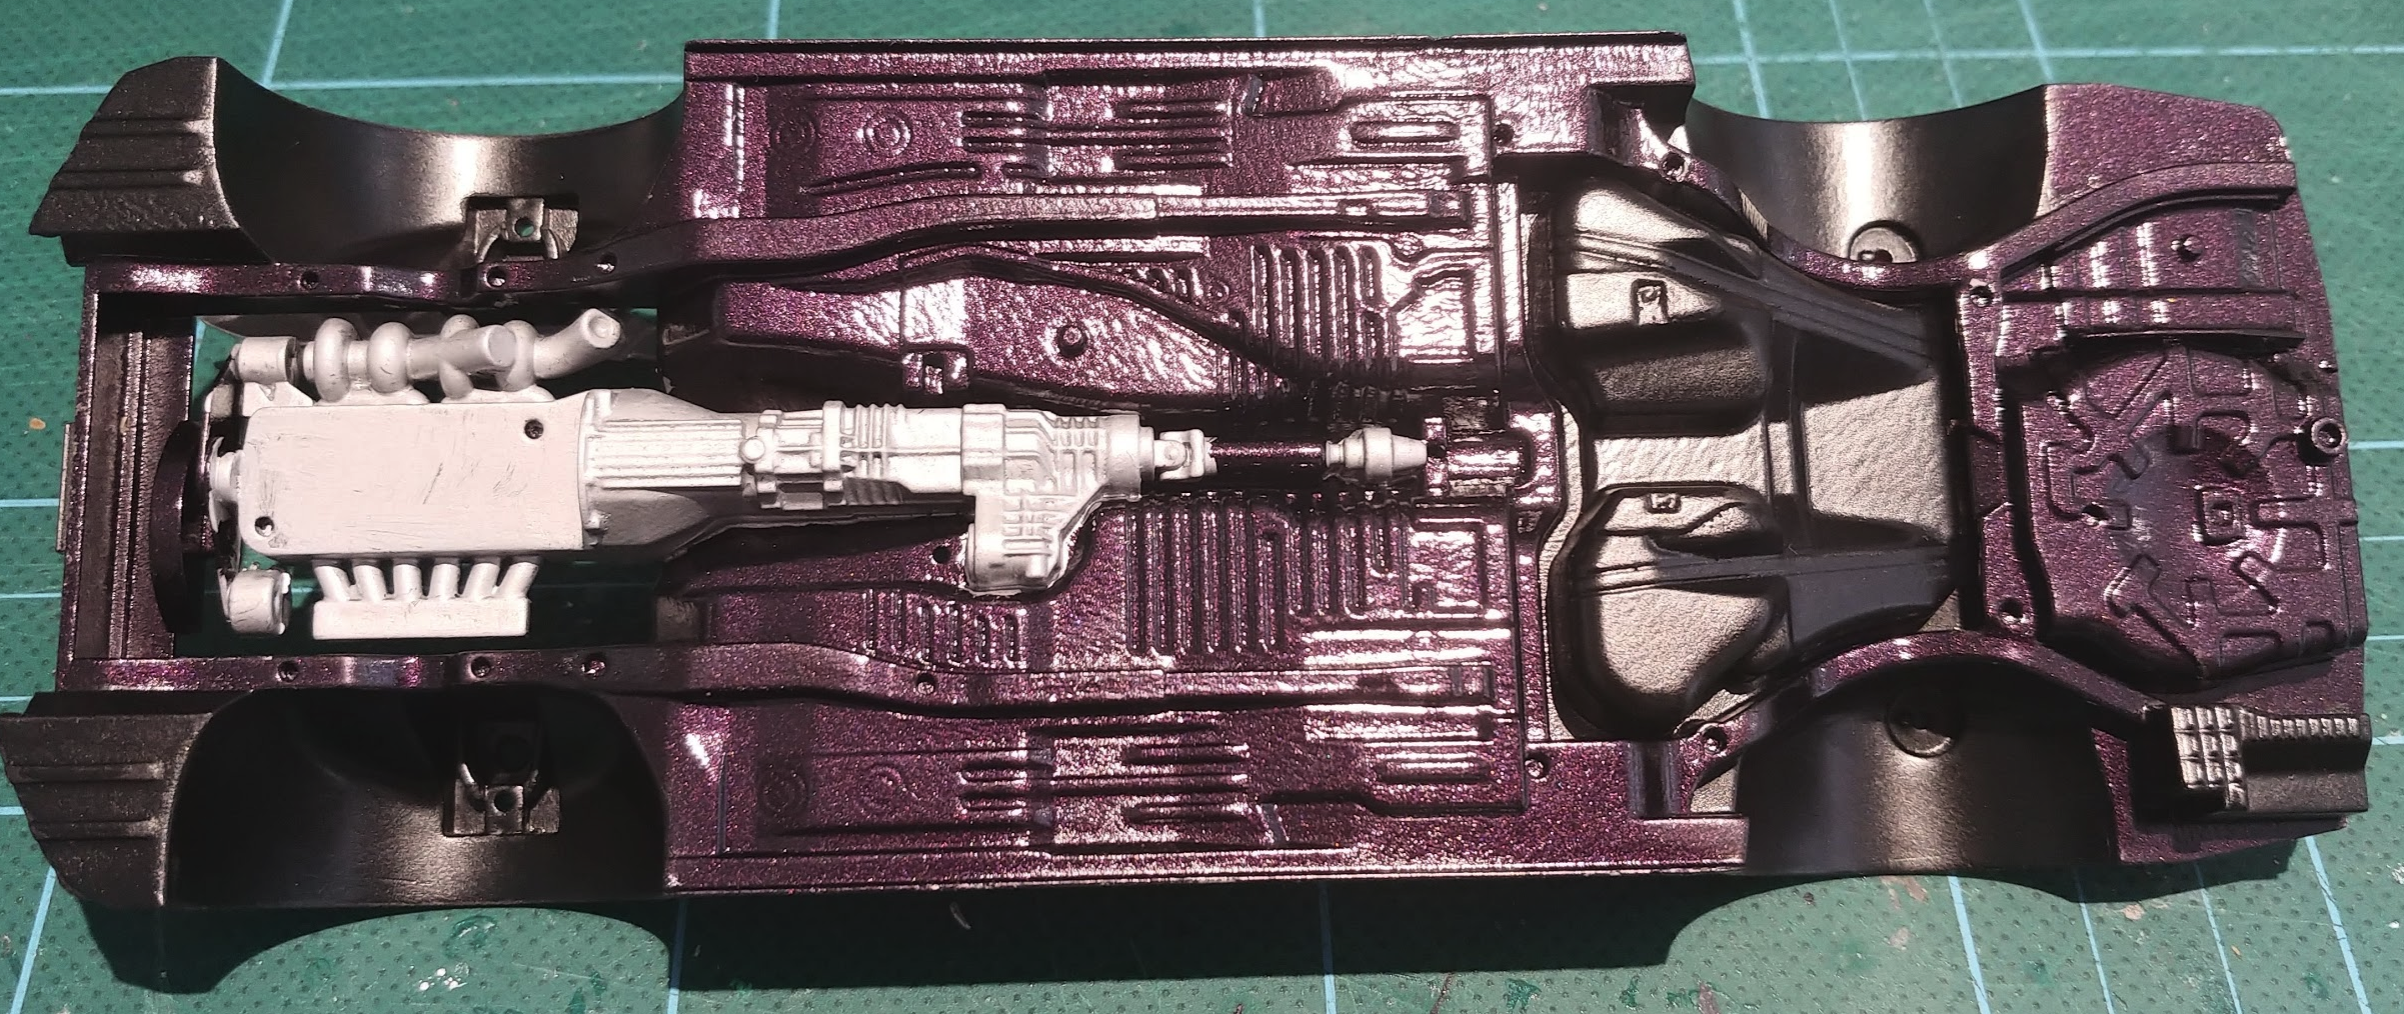
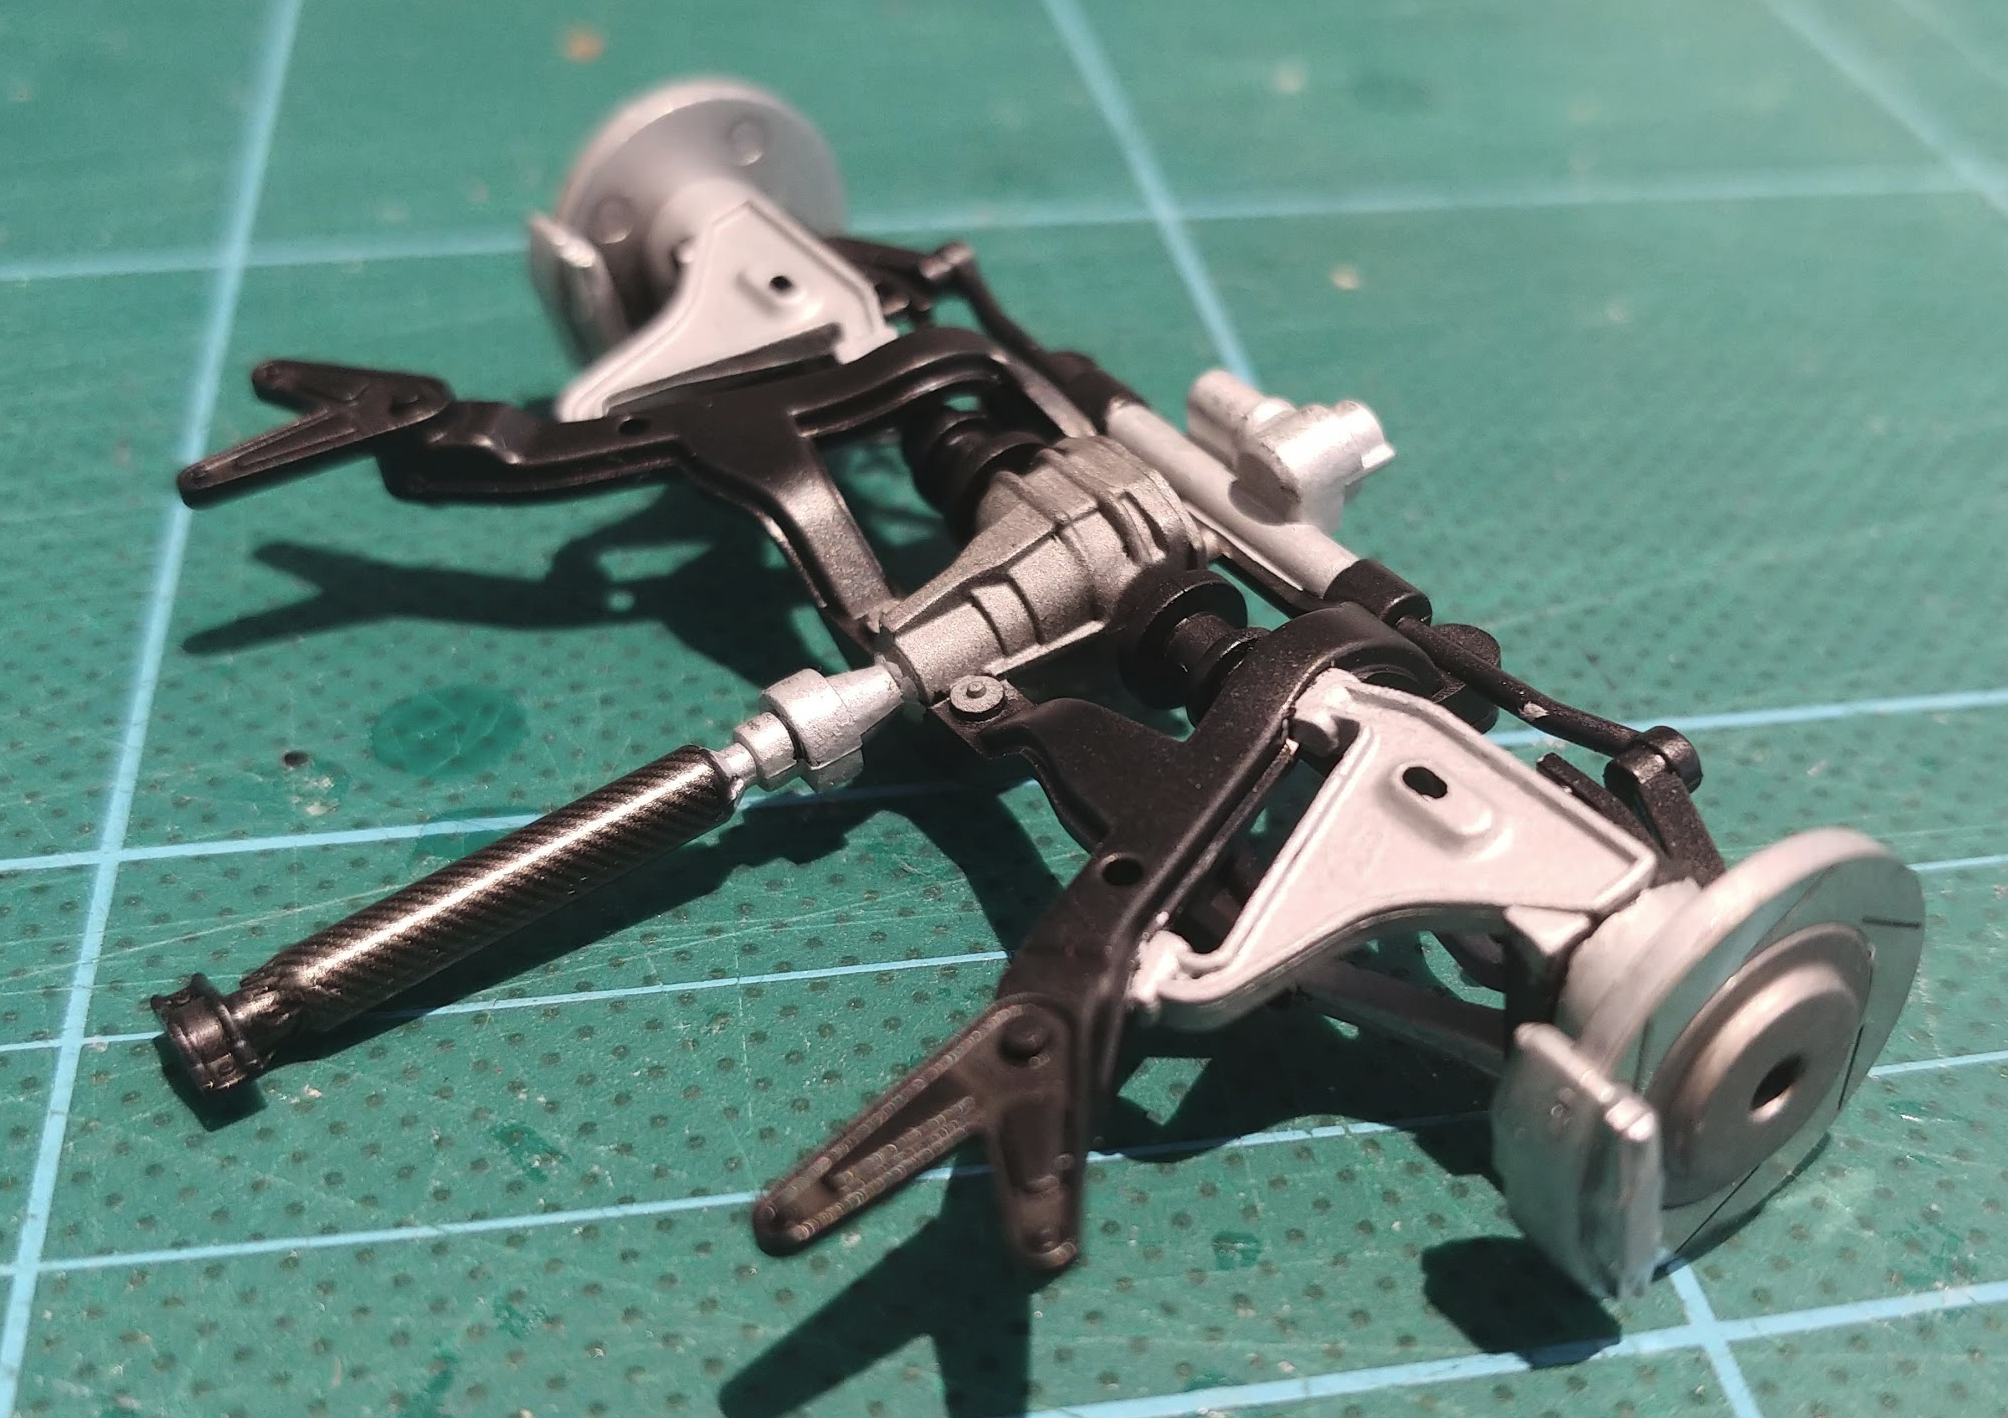
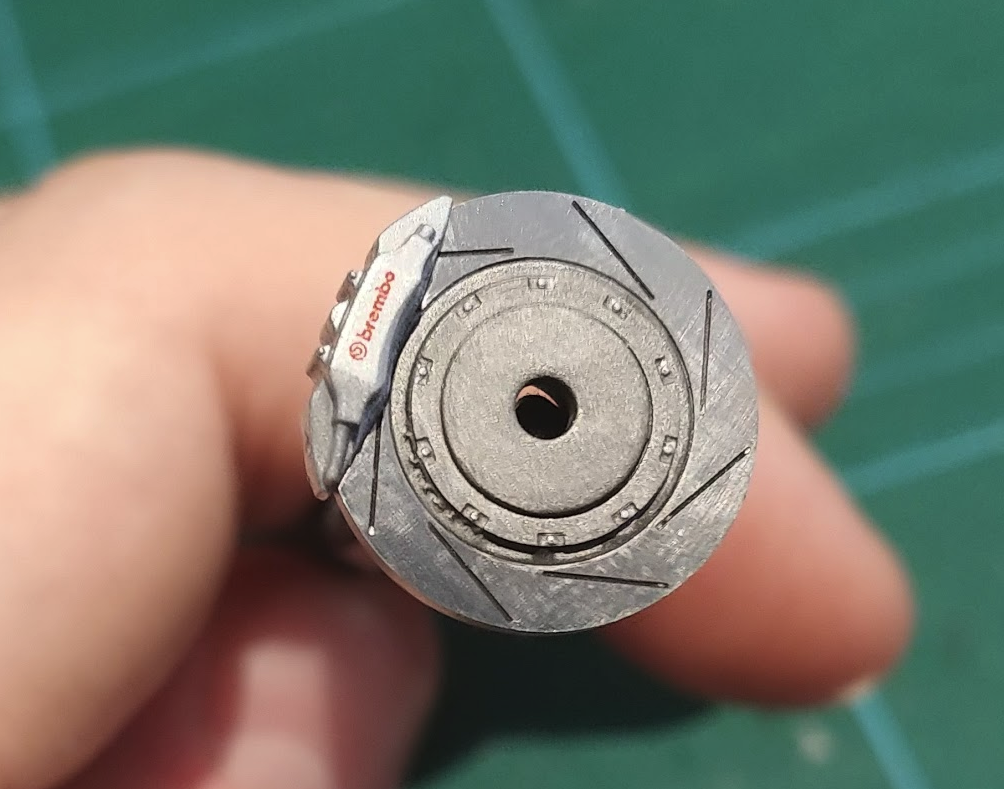
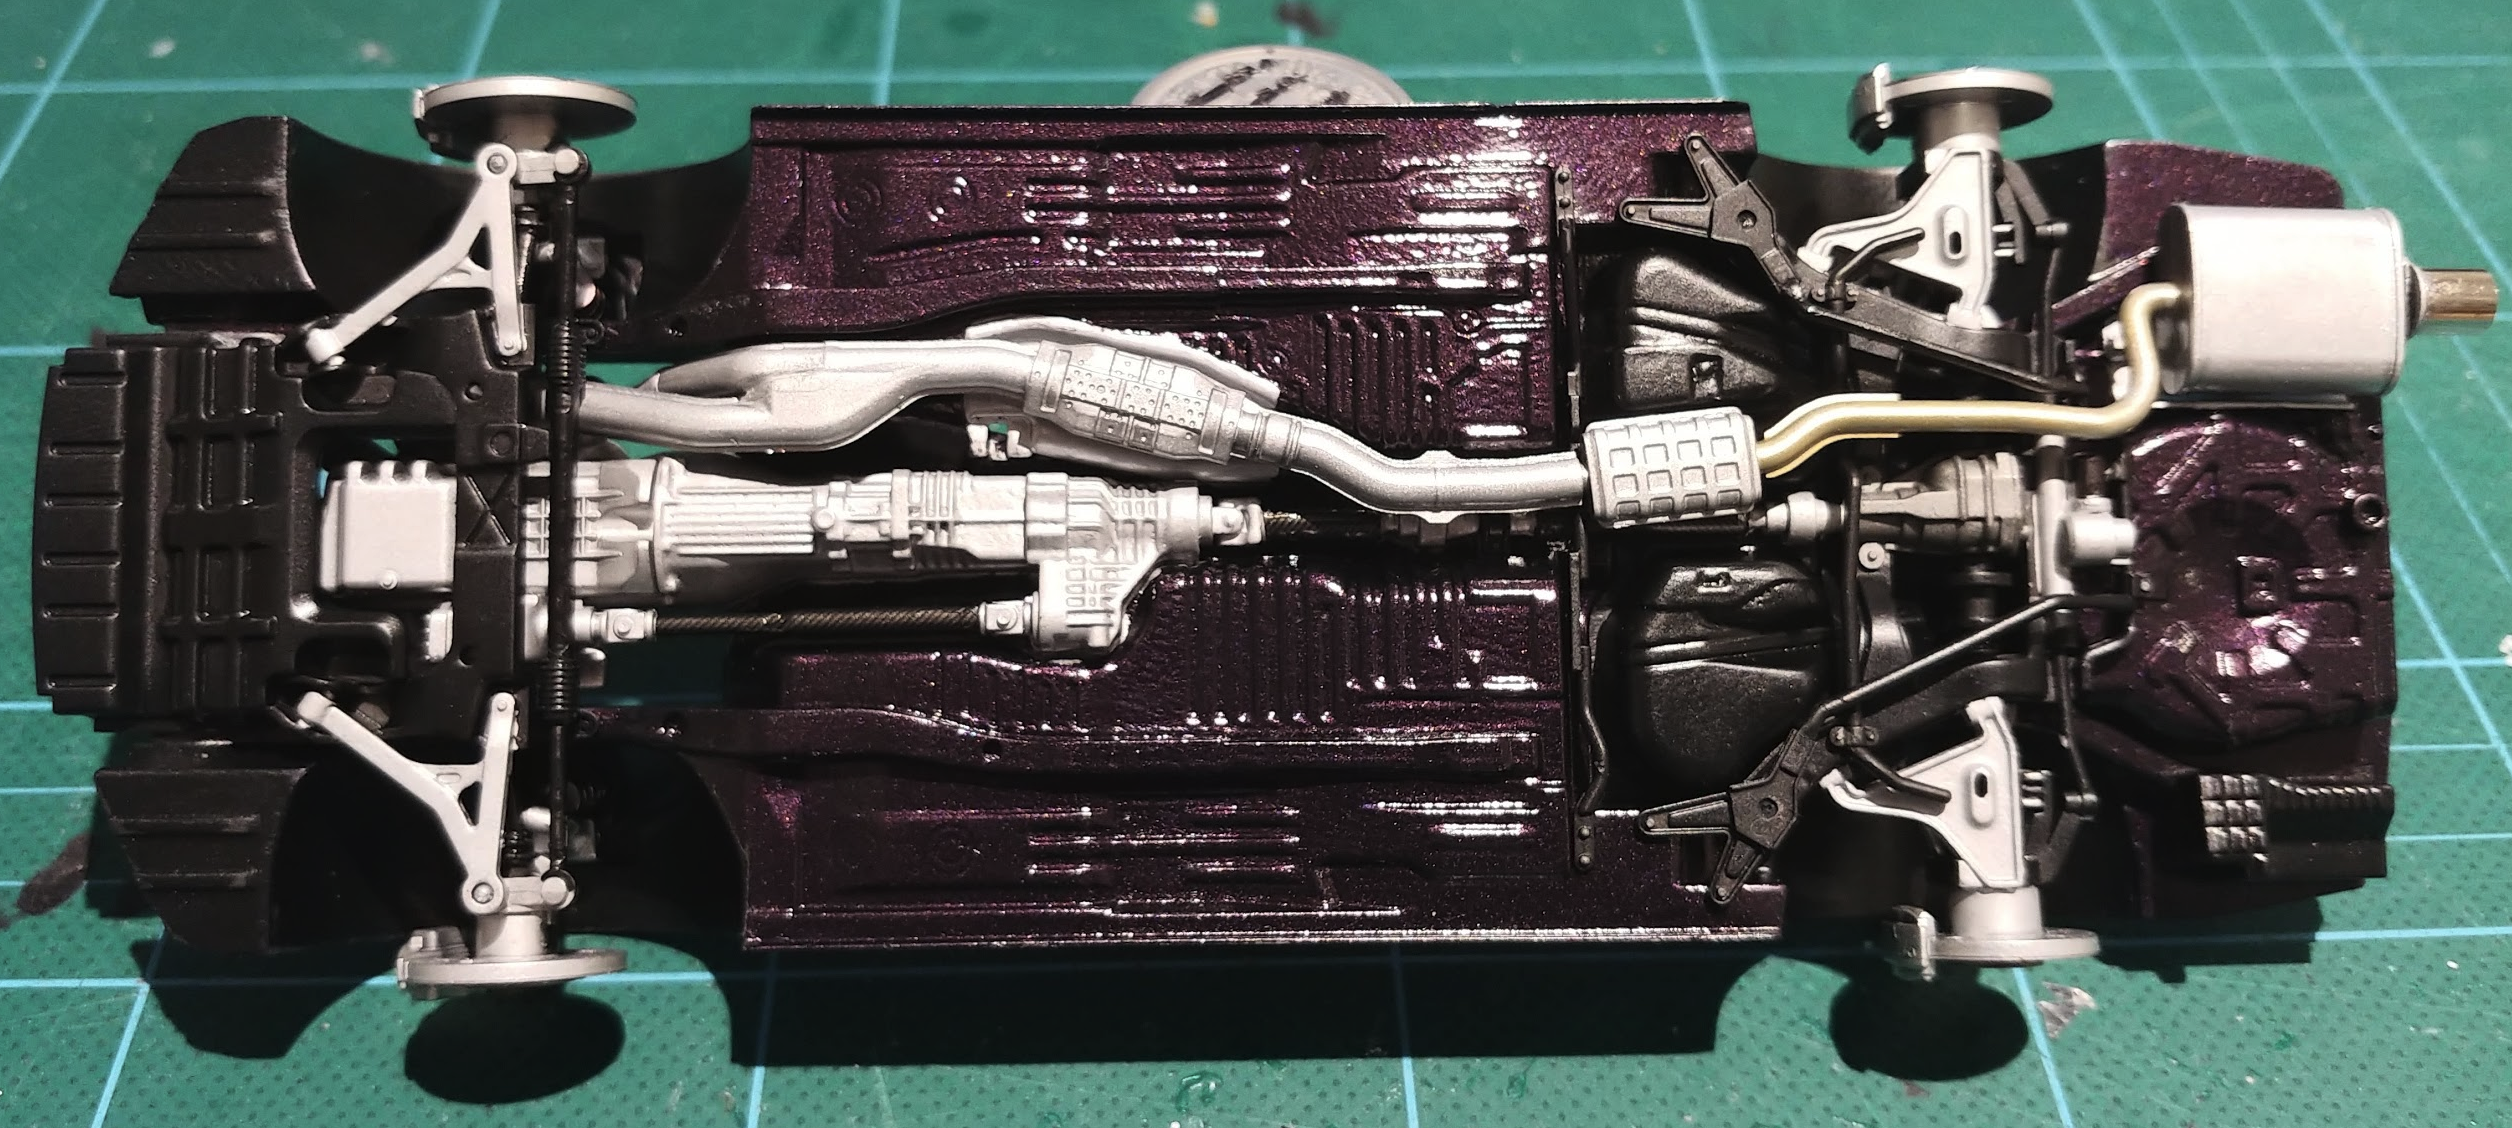
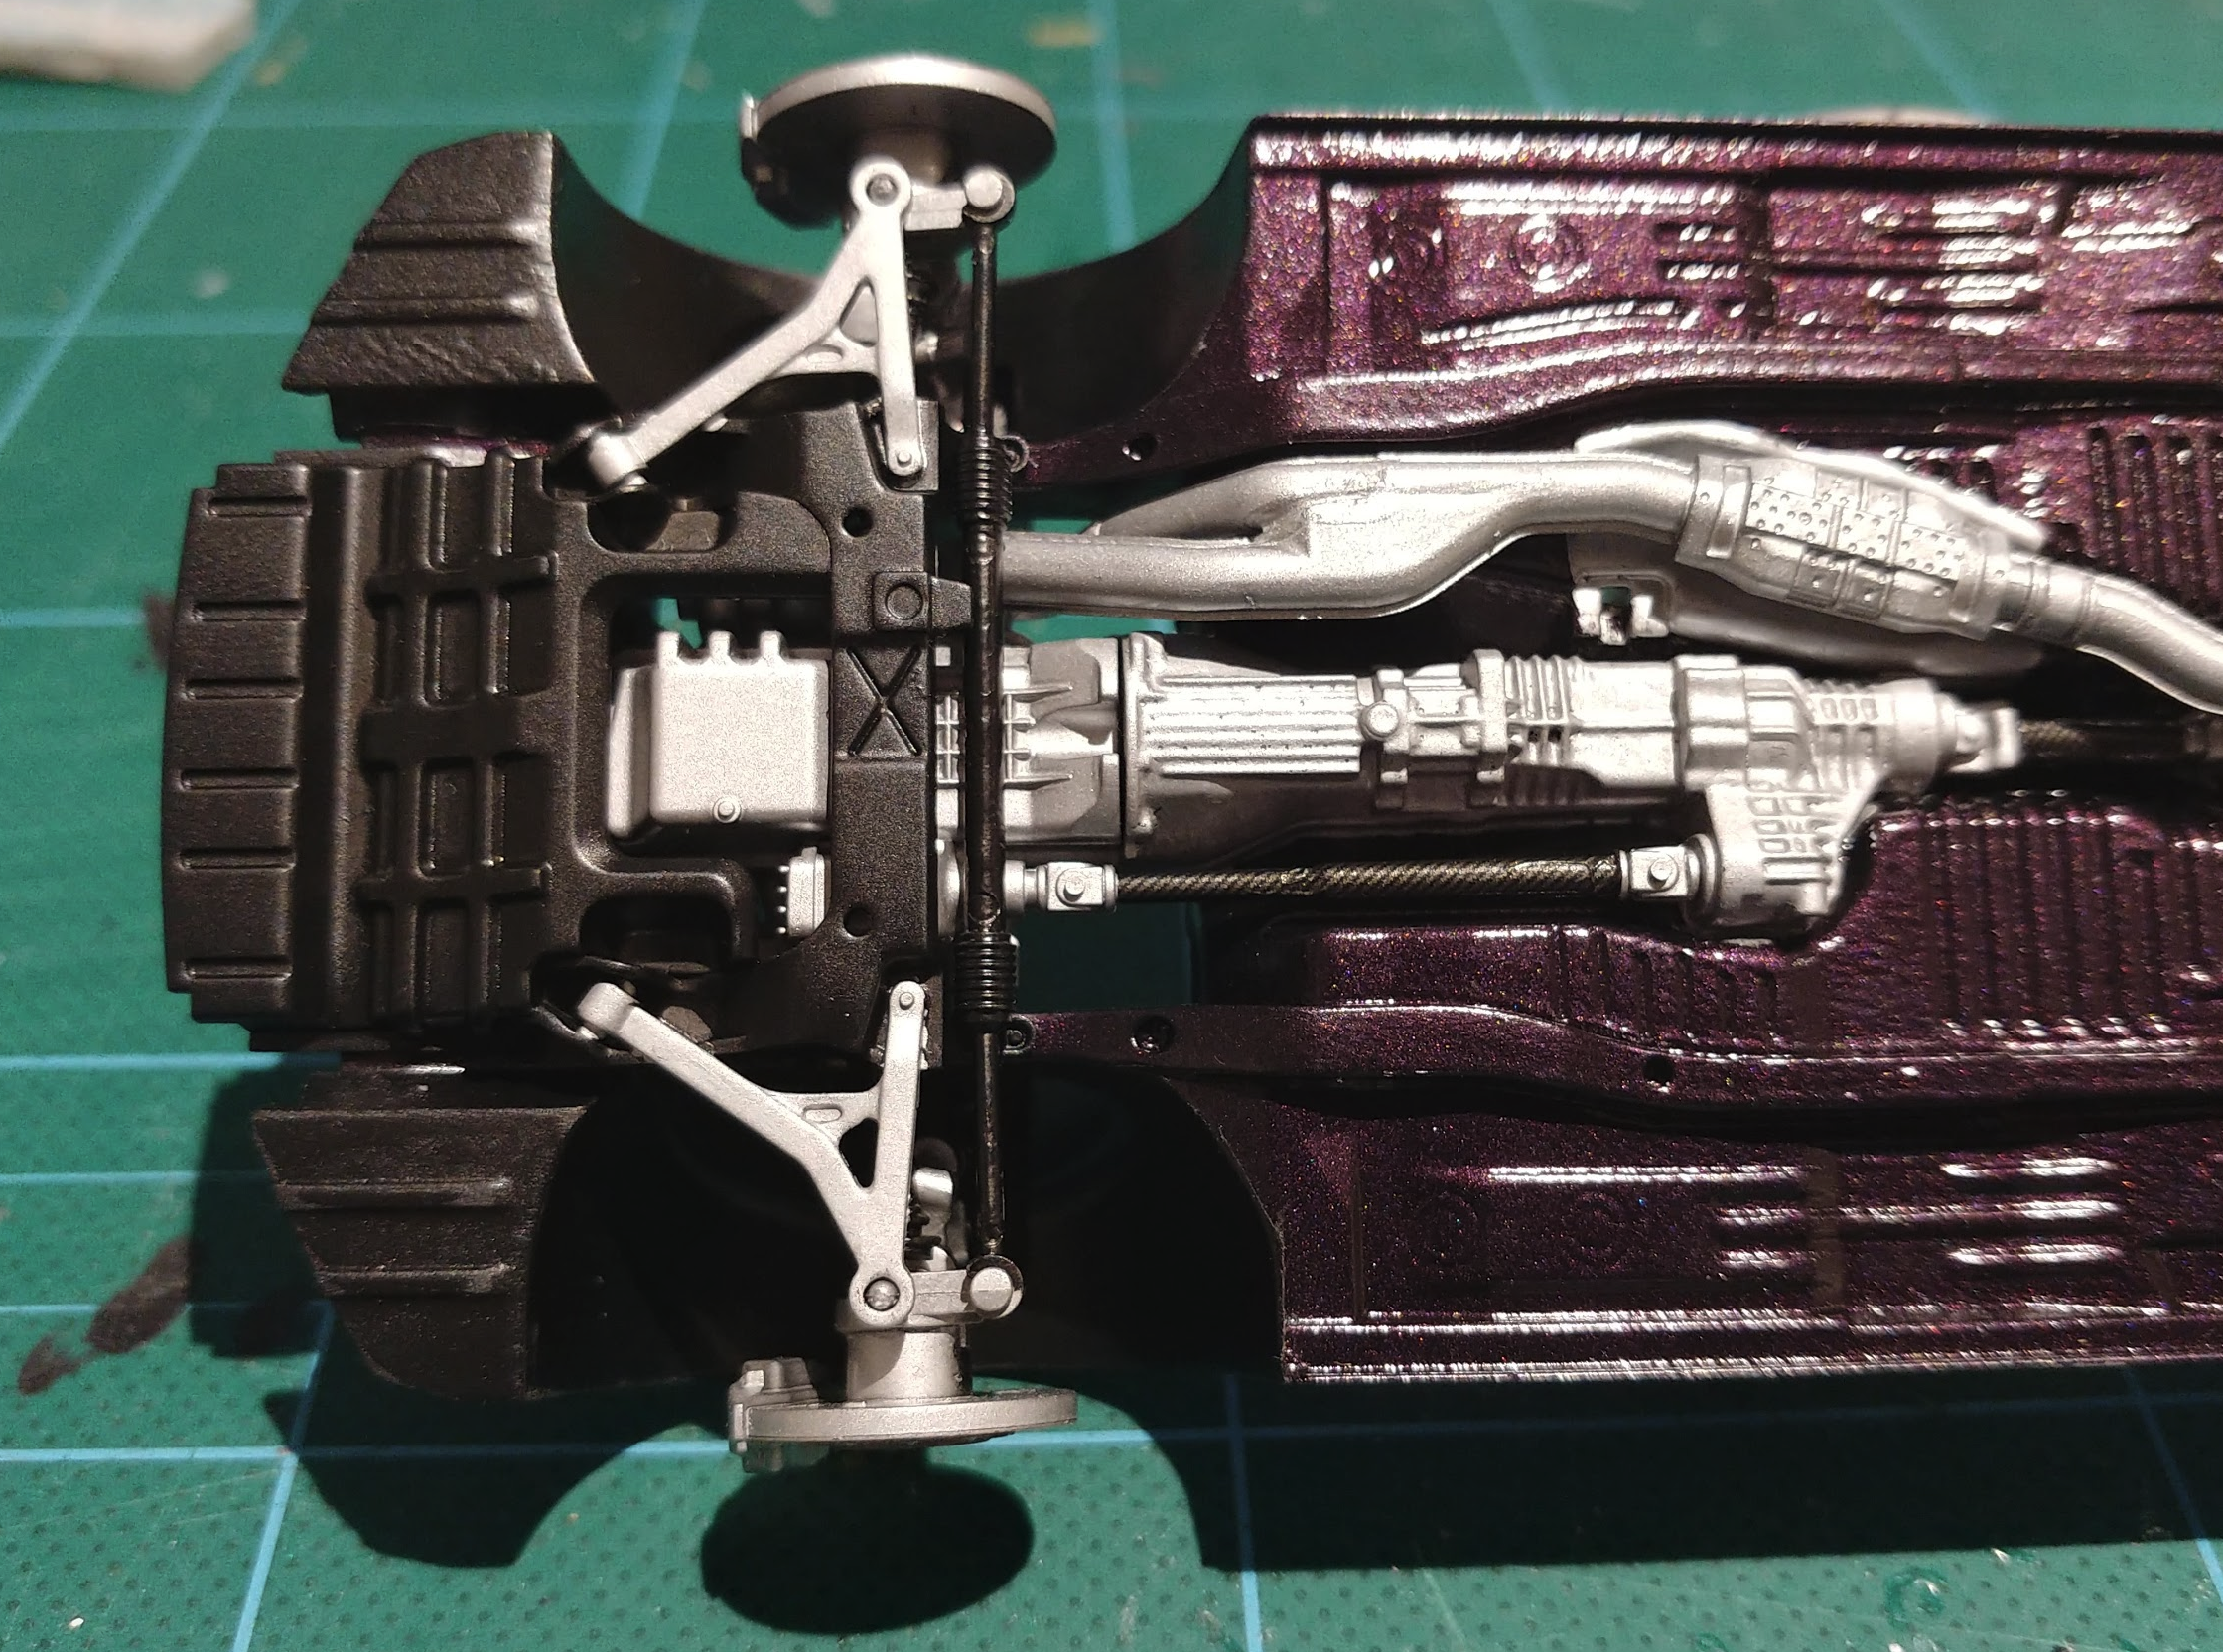
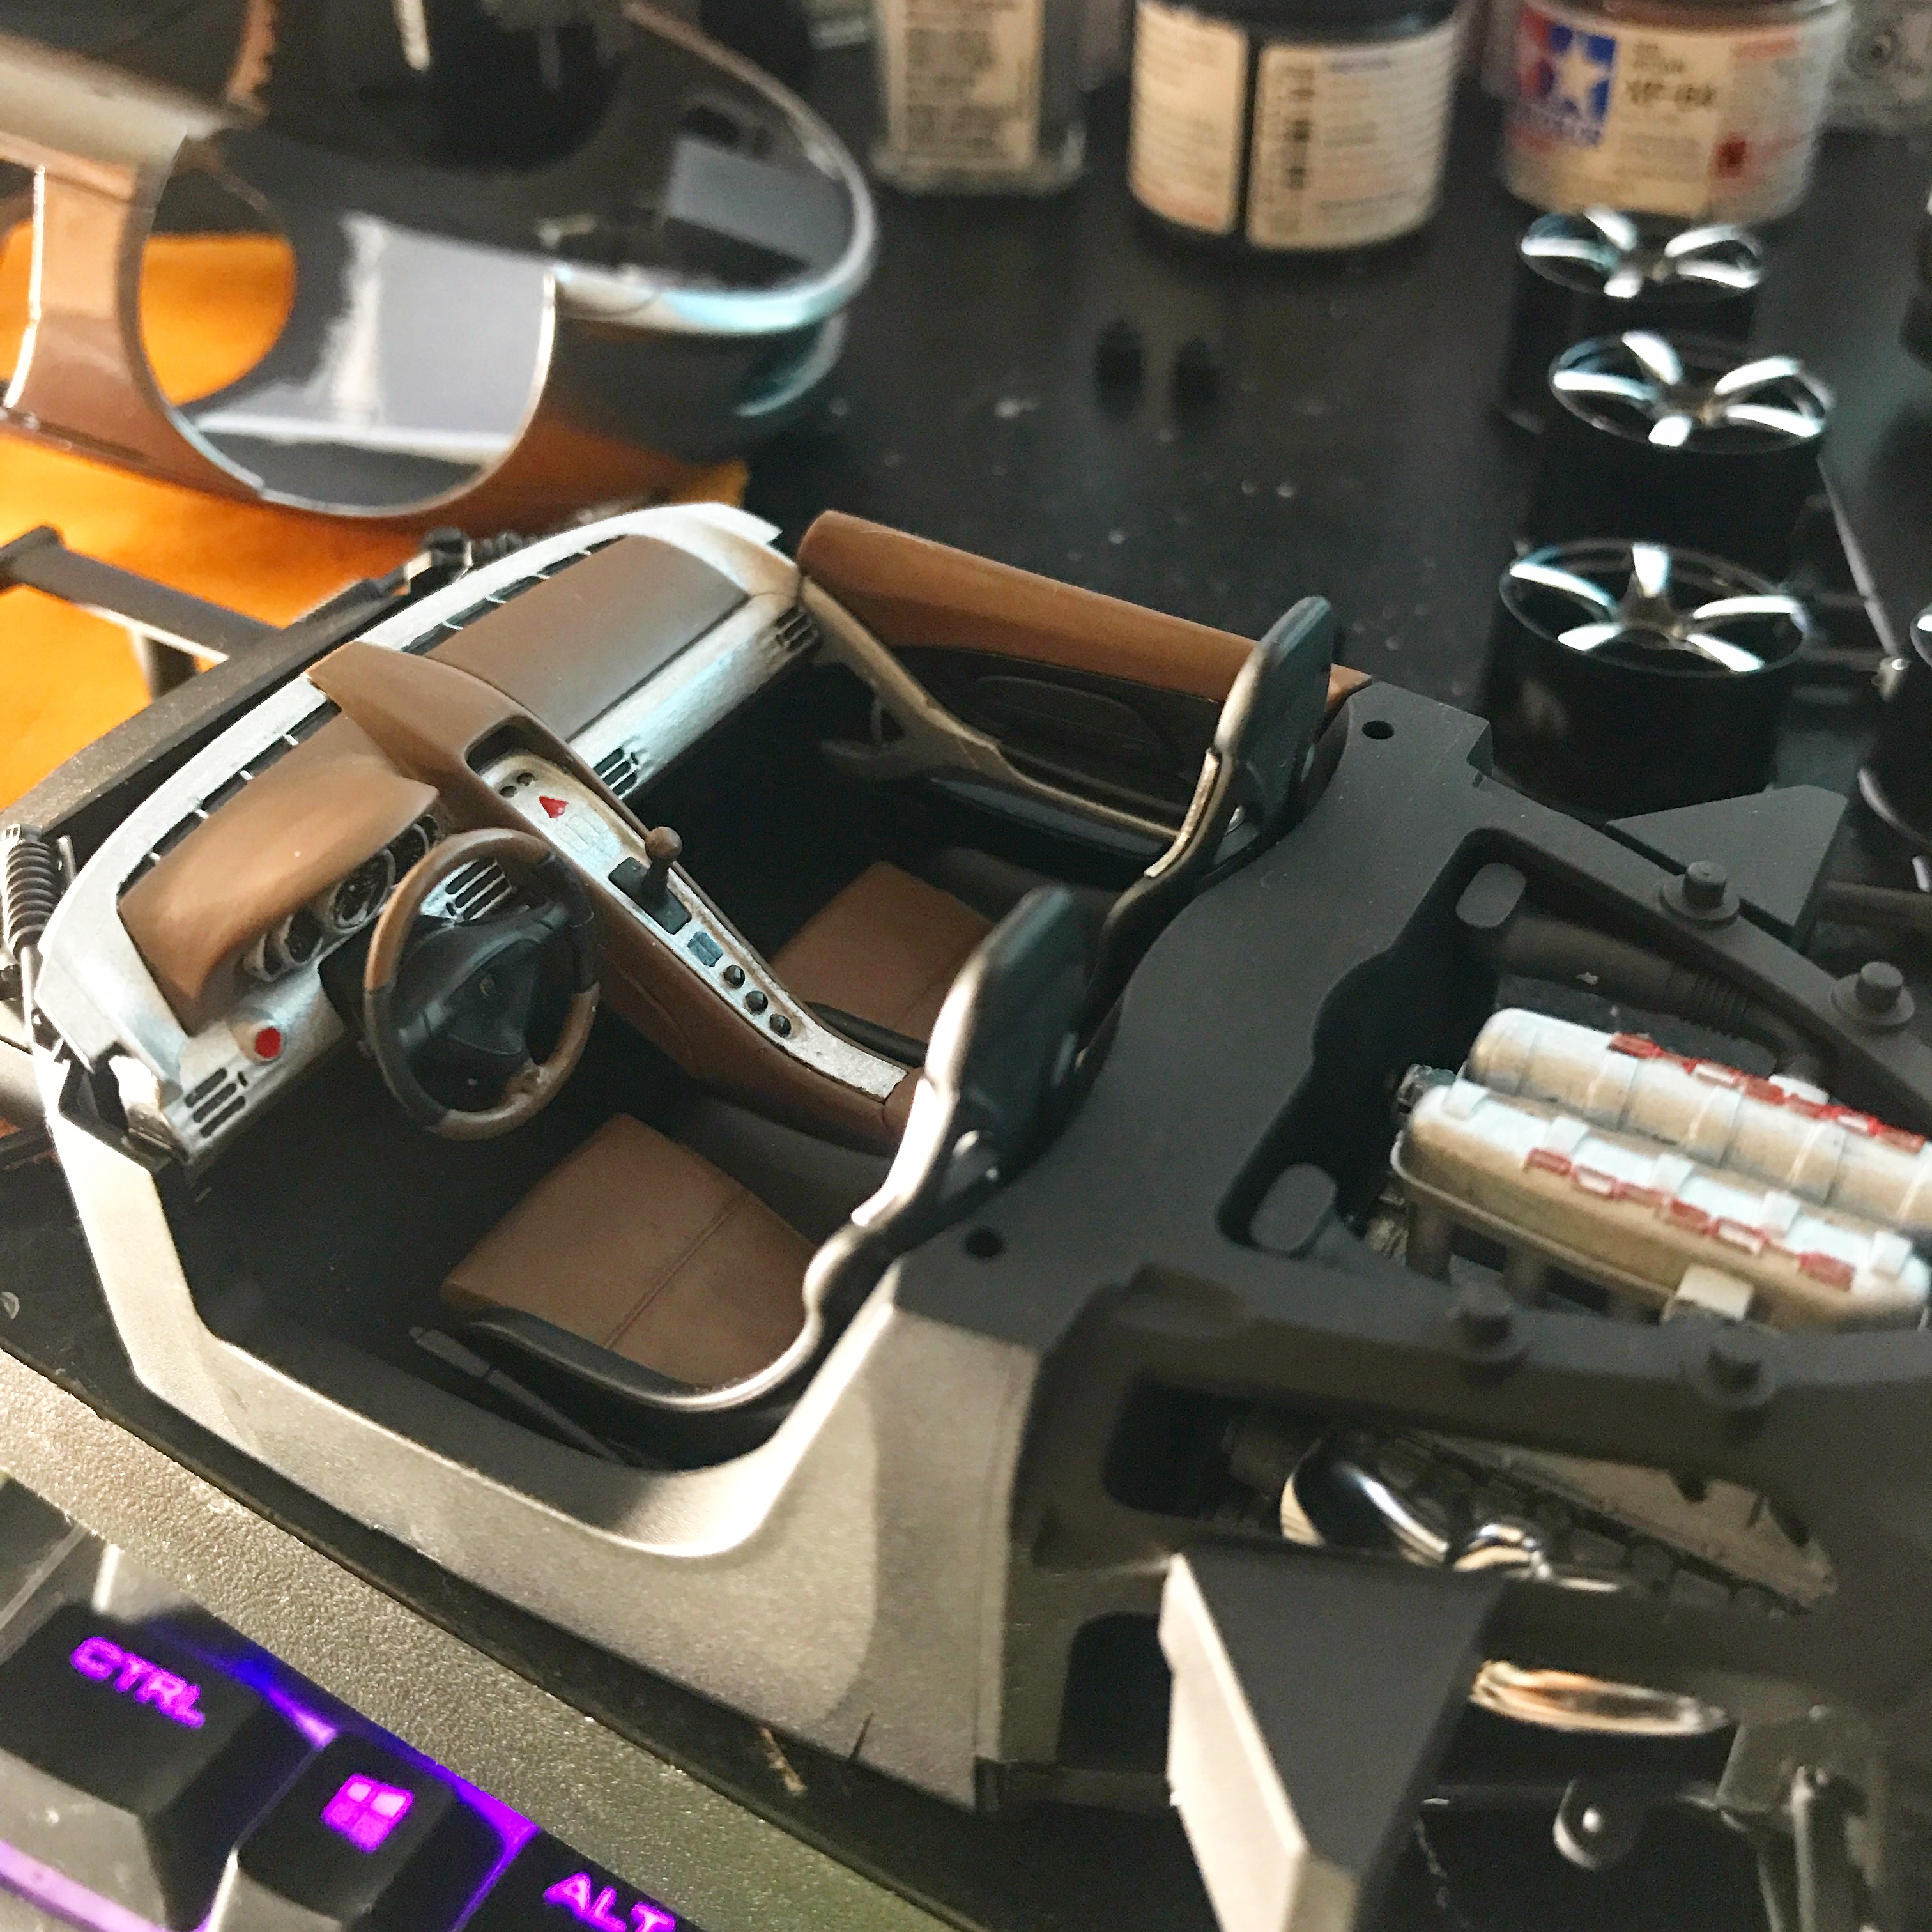
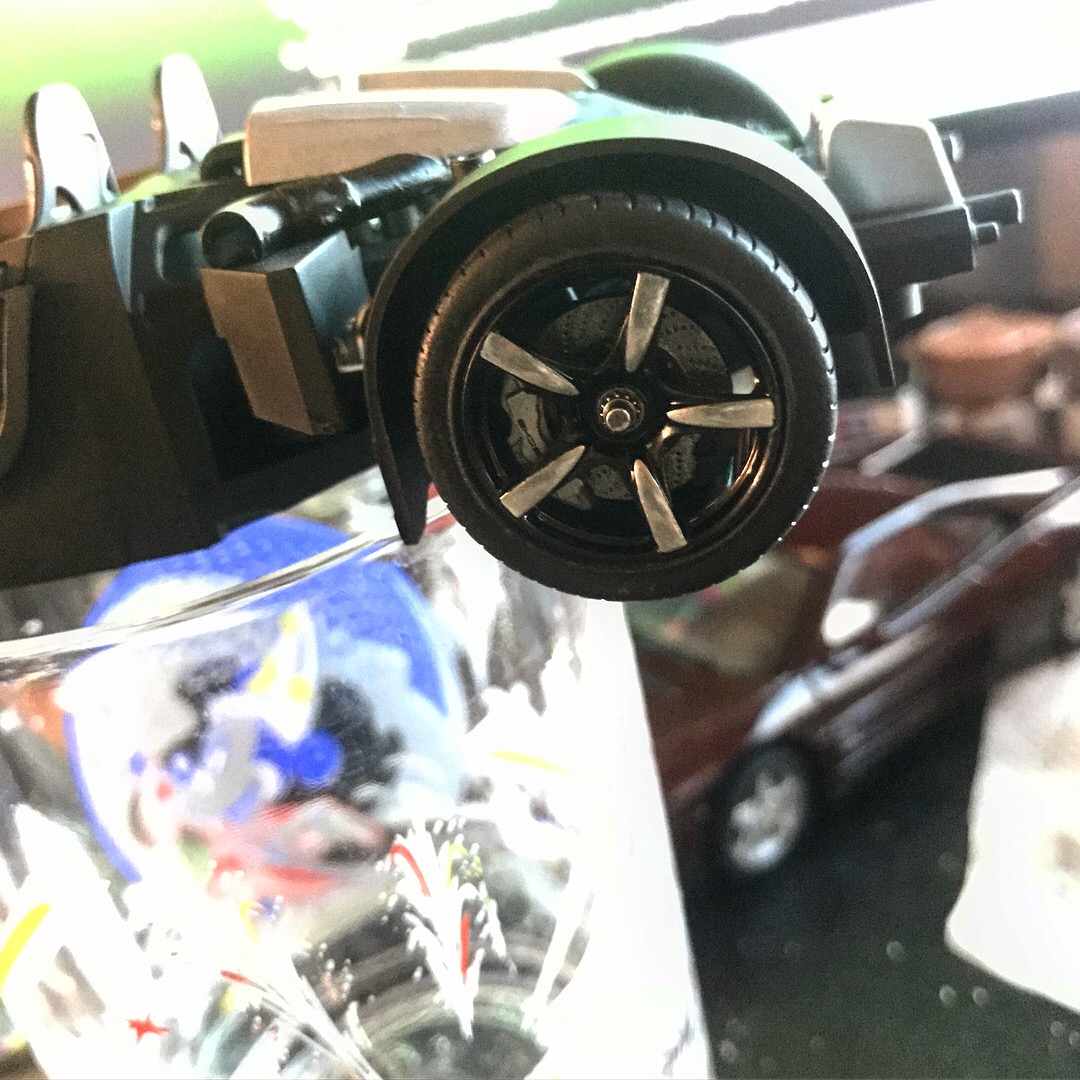
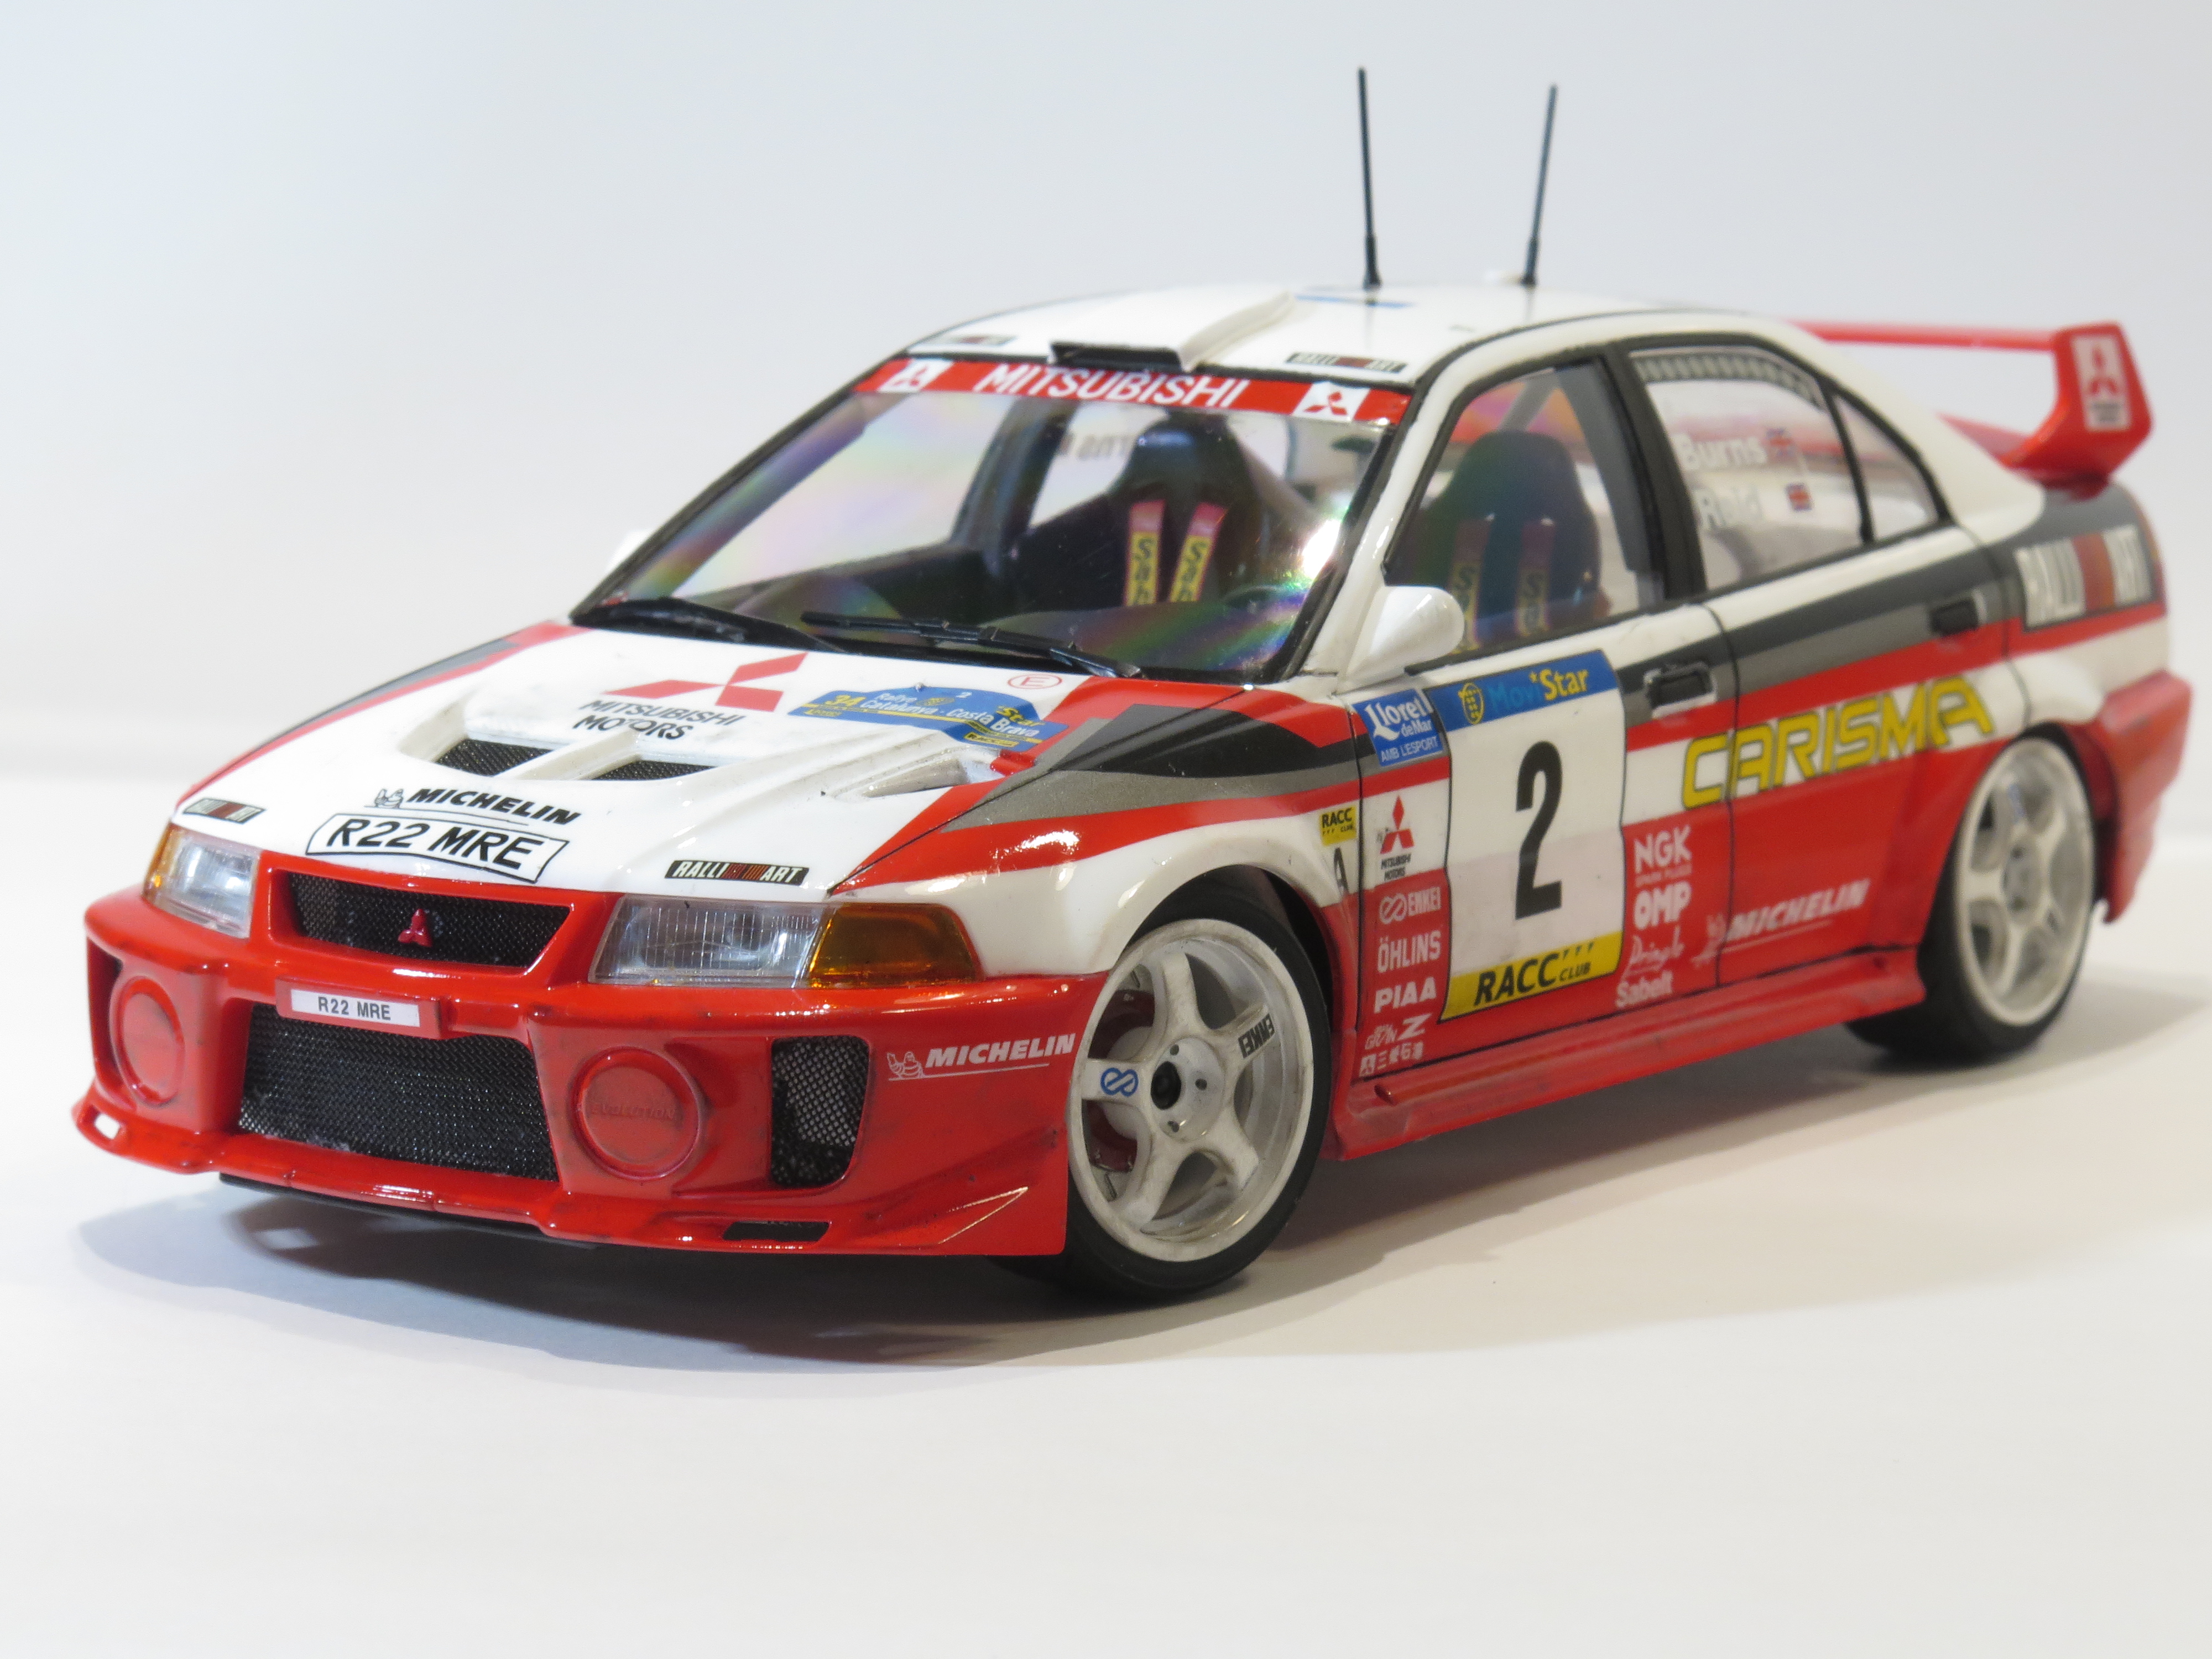
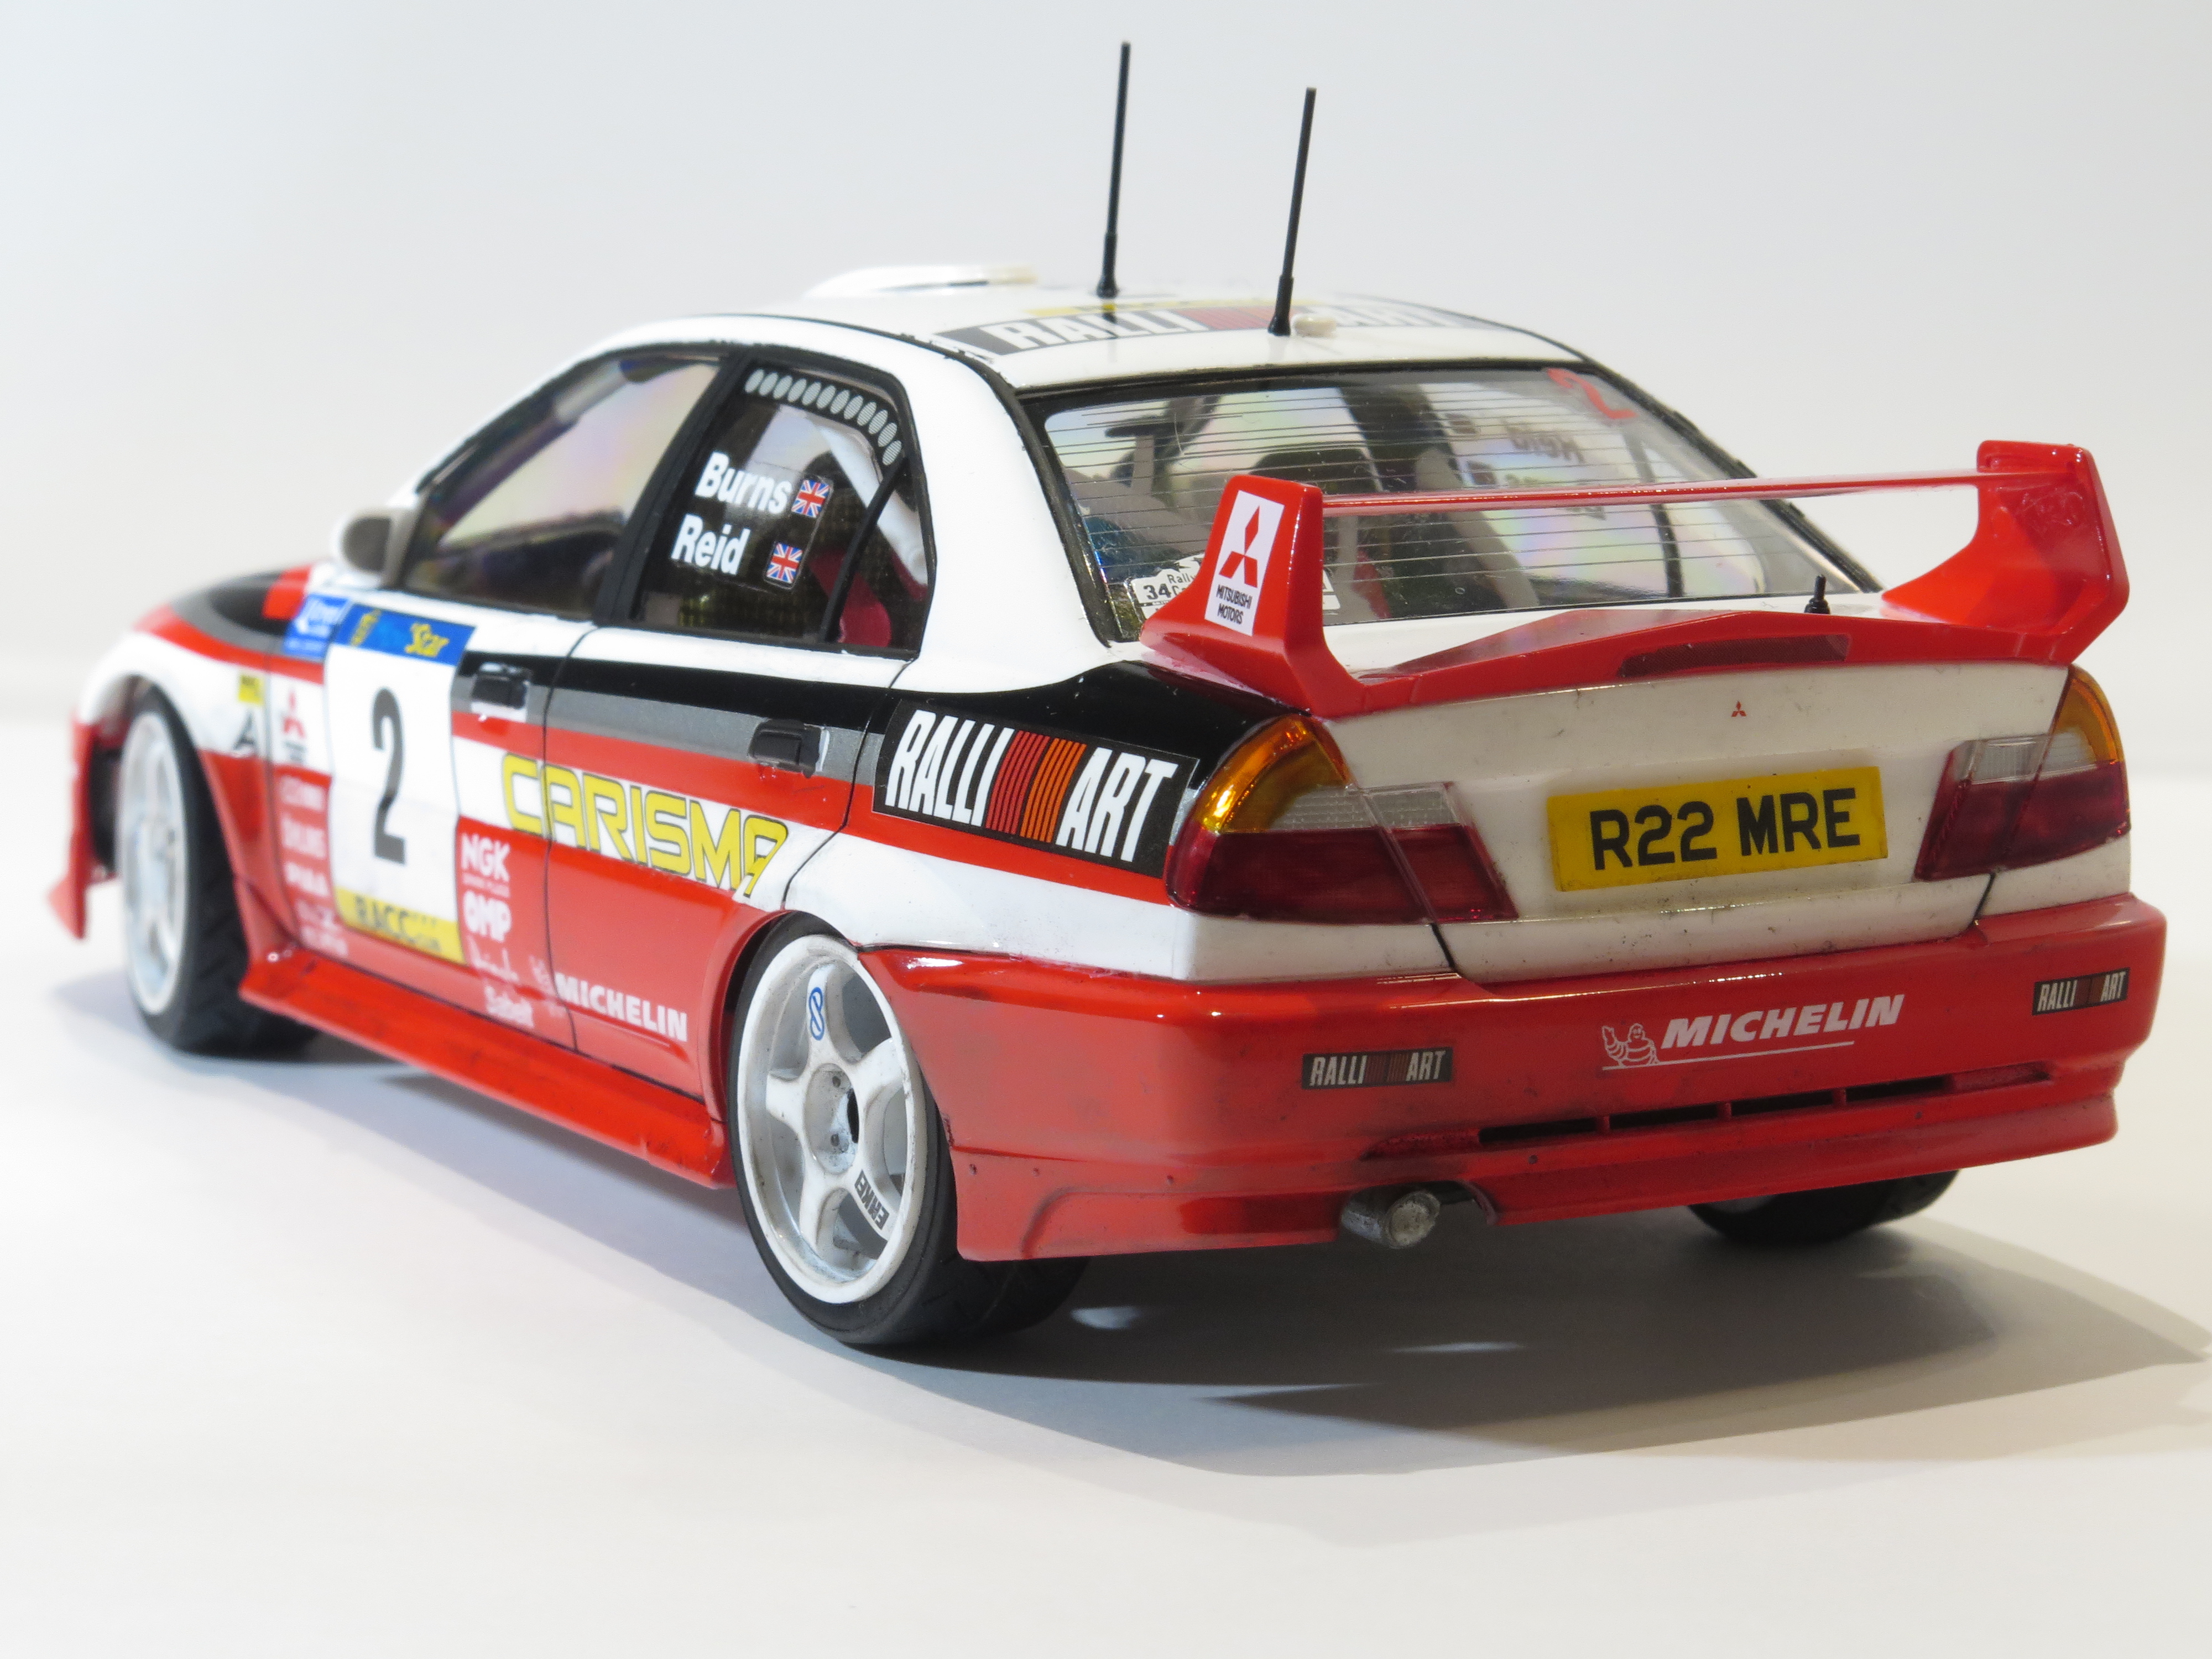
Hi All, I recently started my next project which is the Nissan Skyline R34 GTR Z-tune by Tamiya. Along with the kit, i bougt the tamiya detail up set for a bit more detail and realism. The Z-tune is my favourite version of the R34 skyline, and also the most rare, with only 19 produced worldwide. 18 of the 19 were produced in silver, but one was built in Midnight Purple. This is one of my all time favourite car colours. It apprears black in shadows, and purple in the light. In order to get this colour, I had to go to the autostore, and get them to mix me a can of touch up spray paint to the correct paint paint code (Nissan LP2) I know that zero paints make their own version of this colour, but its not available in Australia (and i dont have an airbrush...) so spray can it had to be. Unfortunately, the spray nozzle didn't allow the paint to lay very flat. There was a fair bit of orange peel in the body & chassis. The body can be fixed with a sanding and then polish, but that will have to wait until it is properly cured. While the body cured, i got working on the chassis. Most of this had to be the same as the body colour. Again, because of the spray nozzle being too blotchy, the finish didn't come out great, but it looks ok. A few areas were masked off and semi gloss black was applied. The orange peel in the purple actually helped with the black, to make it look like a textured black finish that is often found on the underside of a car. The moulded in engine and gearbox were hand painted in flat aluminium paint. Next up was the front and rear suspension sub assemblies. These parts were very accurately detailed and went together perfectly. (like all tamiya kits) From some research i did, i found that some of the paint insrtuctions were a bit off, and i found that the drive shafts are actually made from carbon fibre. so i made those changes, and added some carbon decals. Im really happy with how the brakes came out. the PE disk rotors look really realistic. I added some black paint to the slots, and sanded back the face to look like they had been used. Final Chassis assembly. Thanks for looking, Nathan
-
This is a build I started ages ago. Compkted it today. Decals where shot so I did my own thing. Paint is tamiya rattle can
-
 One of more recent build. I found this kit on eBay for a great price (both rear door panels are missing) but I couldn’t refuse. Its pained model master emeral green metallic spray can with a testors high gloss enamel clear coat spray can. The interior is just flat black and wheels bare metal aluminum spray from Tamiya. Opinions??
-
So I’m new here, but this is what I currently working on. It’s almost finished but what is everyone’s honest opinions?? Its painted Tamiya light gunmetal spray paint with a testors high gloss enamel clear spray can. I used splash paints polishing compounds on the clear. The interior is painted Tamiya red brown and aluminum. Wheels are gloss black and chrome pen.
-
 Hello friends This time I show you an infantry vehicle of the US Army, it's M2 Bradley. Manufactured from the Tamiya brand at 1/35 scale with an exterior finish of camouflage and detailed on the inside with hinged rear door. https://youtu.be/p6uWBMPZQSE Greetings and I hope you like it
 -
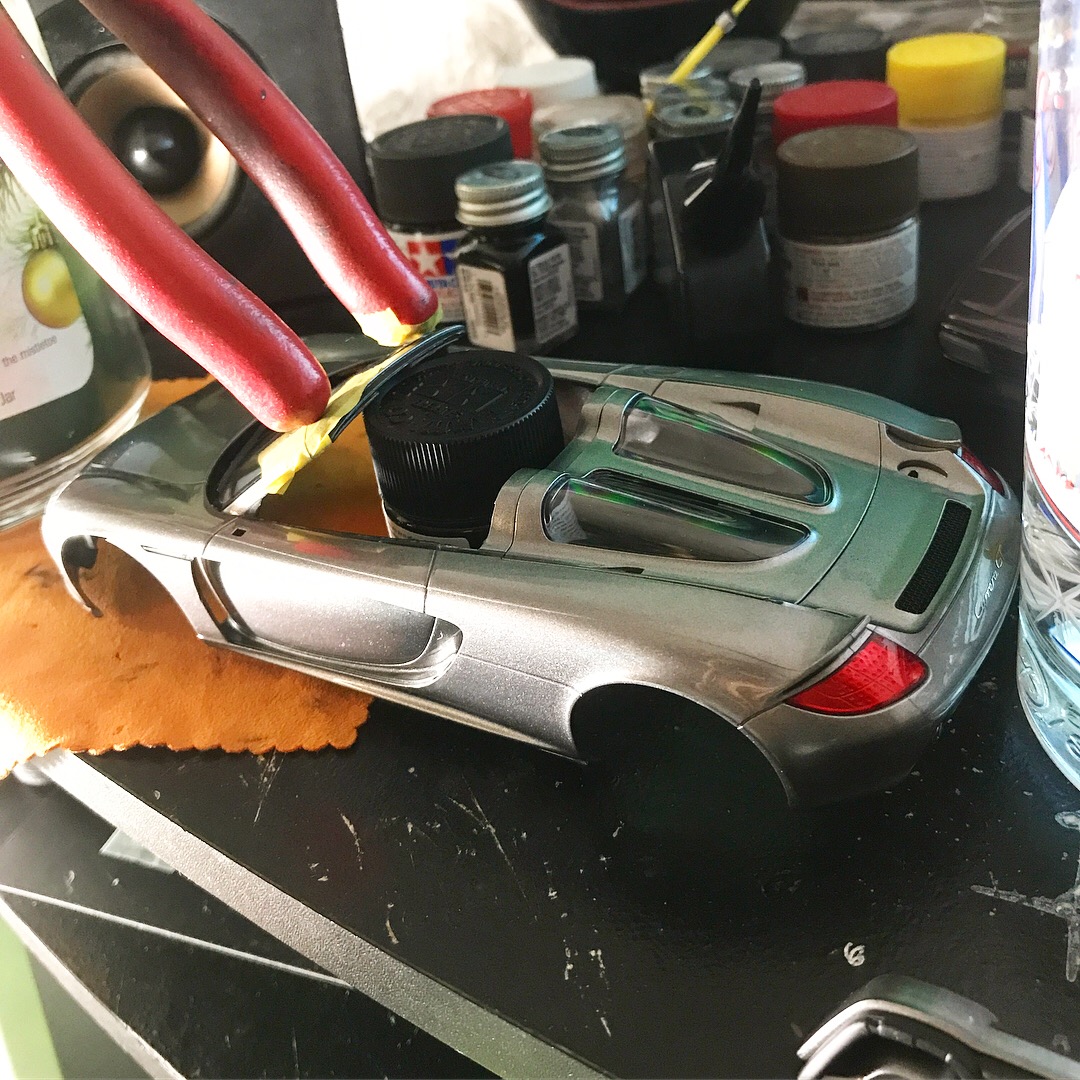
So, as you all are probably used to by now from my side. I tend to work on multiple models at once. The reason is simple, i get bored quick. but besides that its also a matter of area to spray bodies, so i do multiple at once when i have the chance to do so, and while i cant i work on the rest untill i cant go any further. The body of the XJ220 i already sprayed before xmas (together with the MK2 and GT3 porsche) so it has had plenty of time to get hard, and now ive started to work on the rest of the kit: It all starts with an engine right? Quick test of the interior, the seat inserts that are still gray on the pics, will be made black before going in for definate: And last but not least (for this moment), a test with the painted body on top:
-
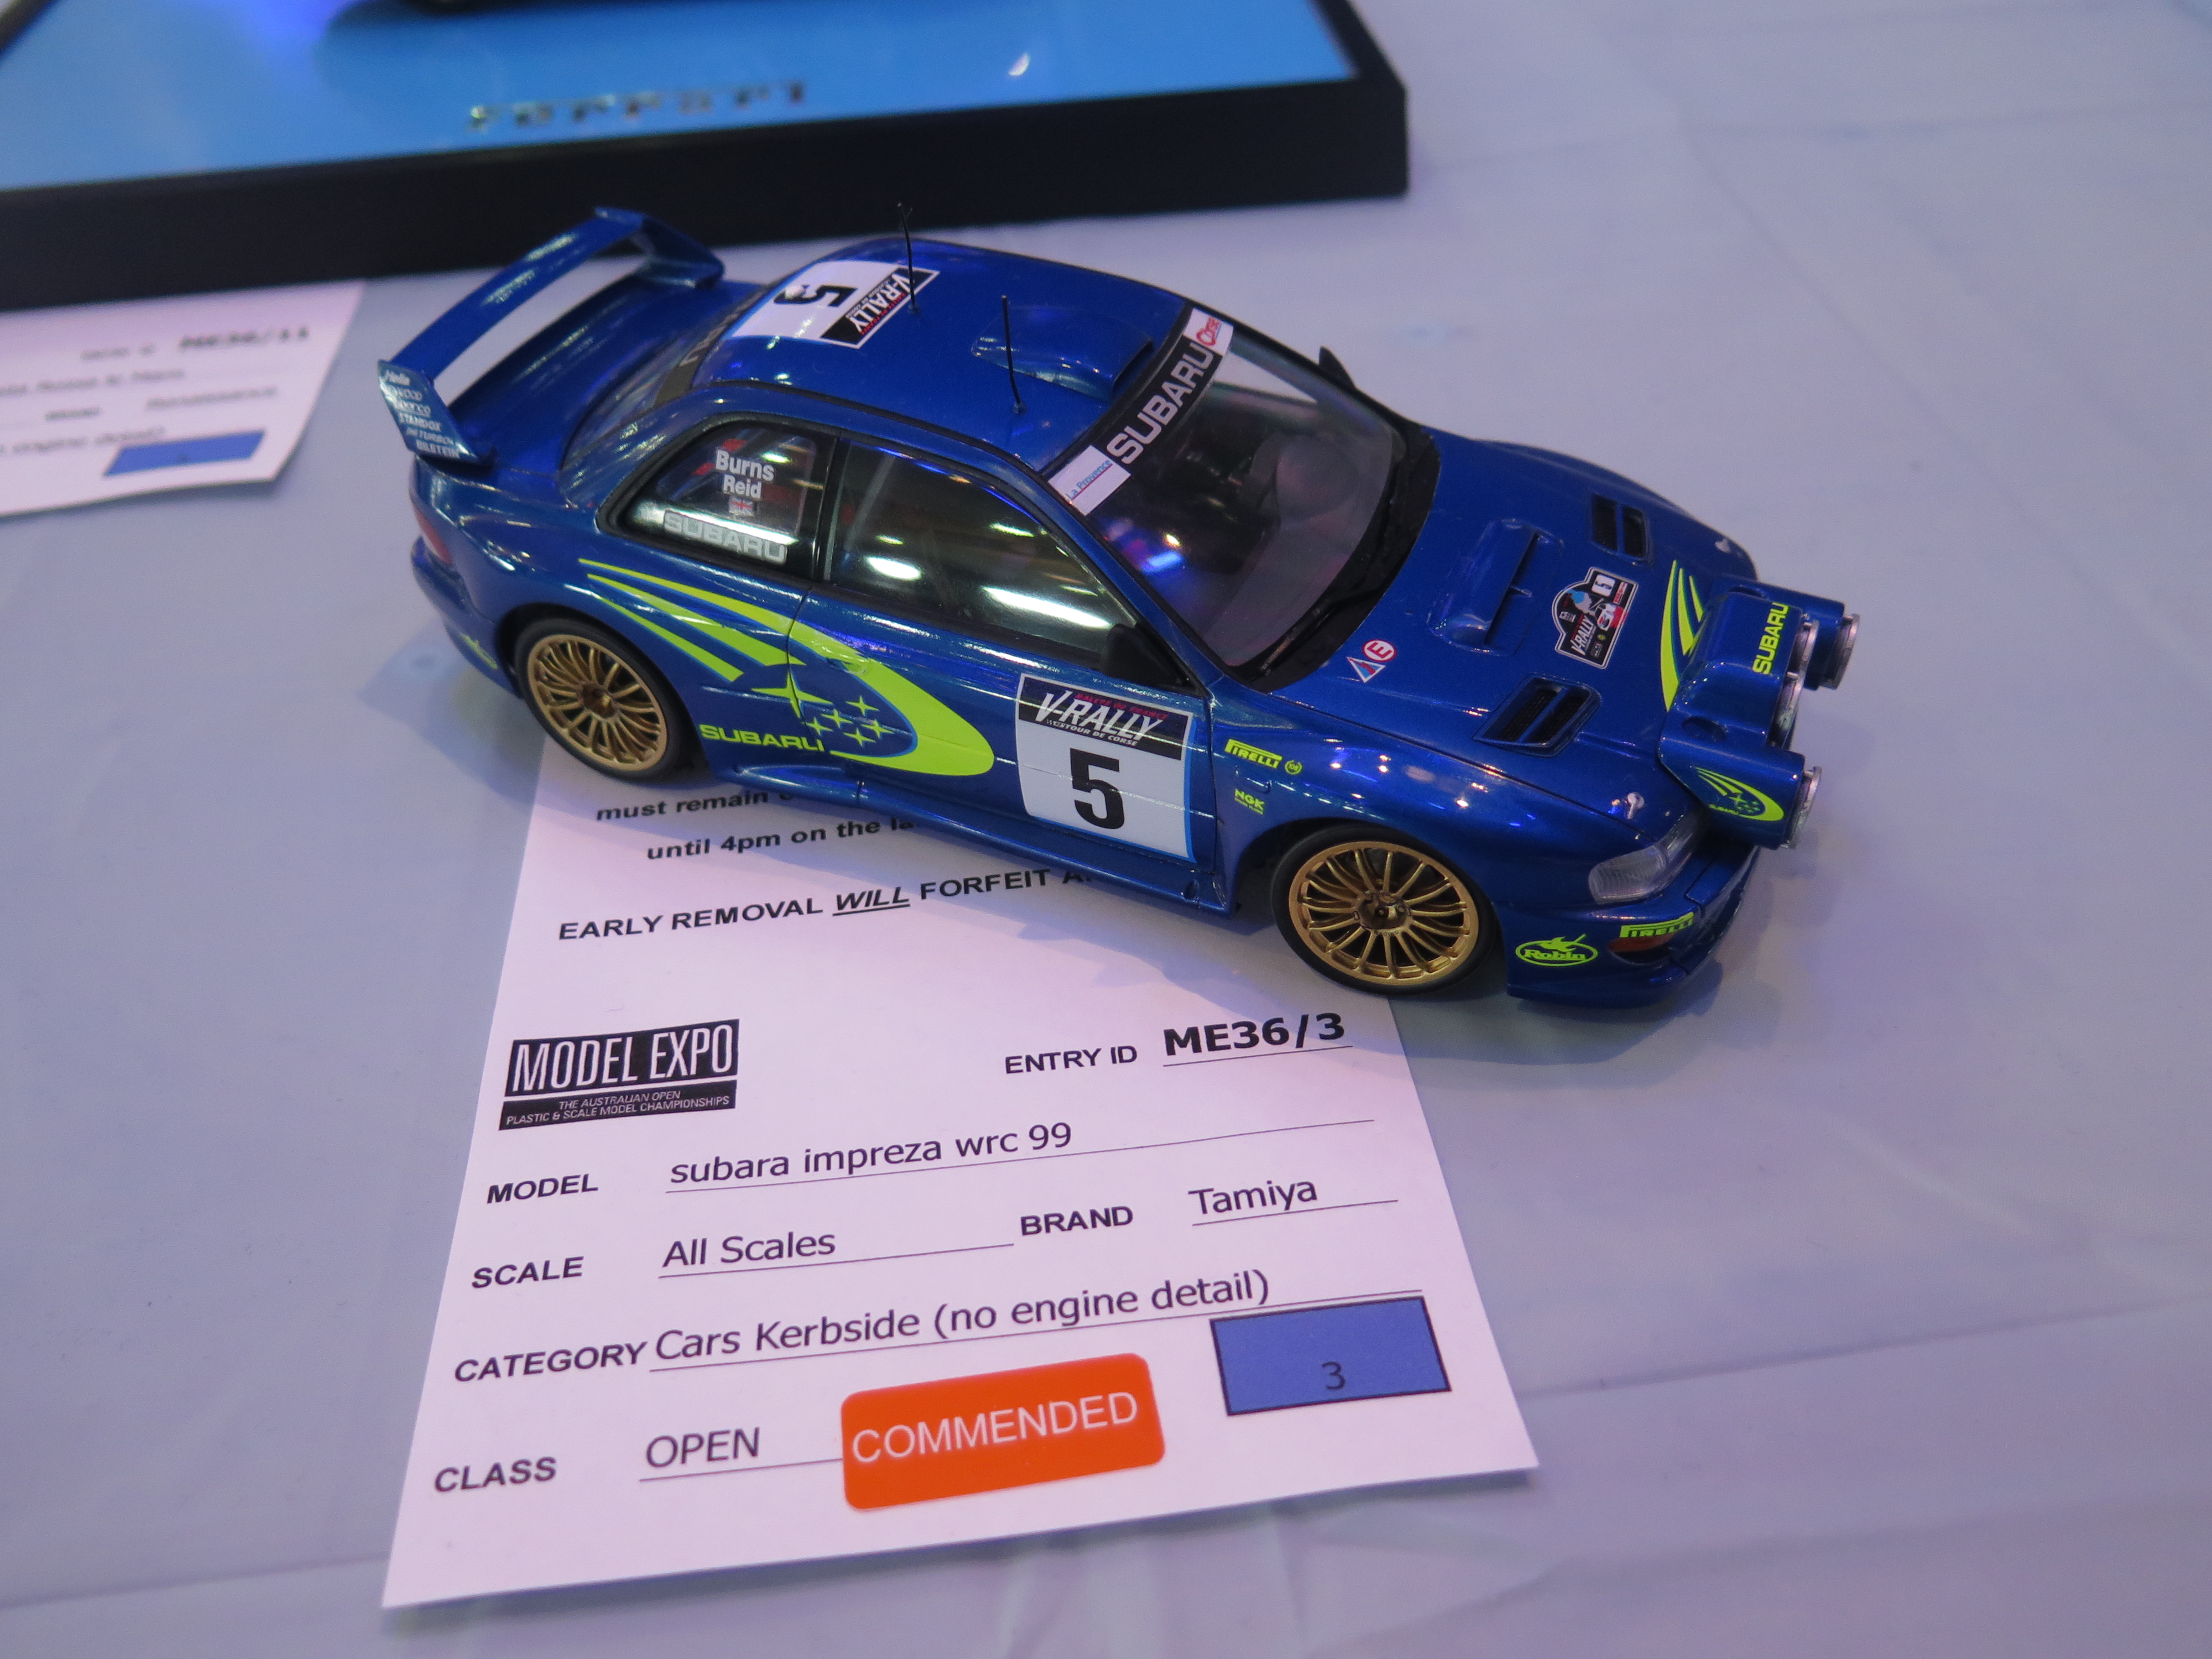
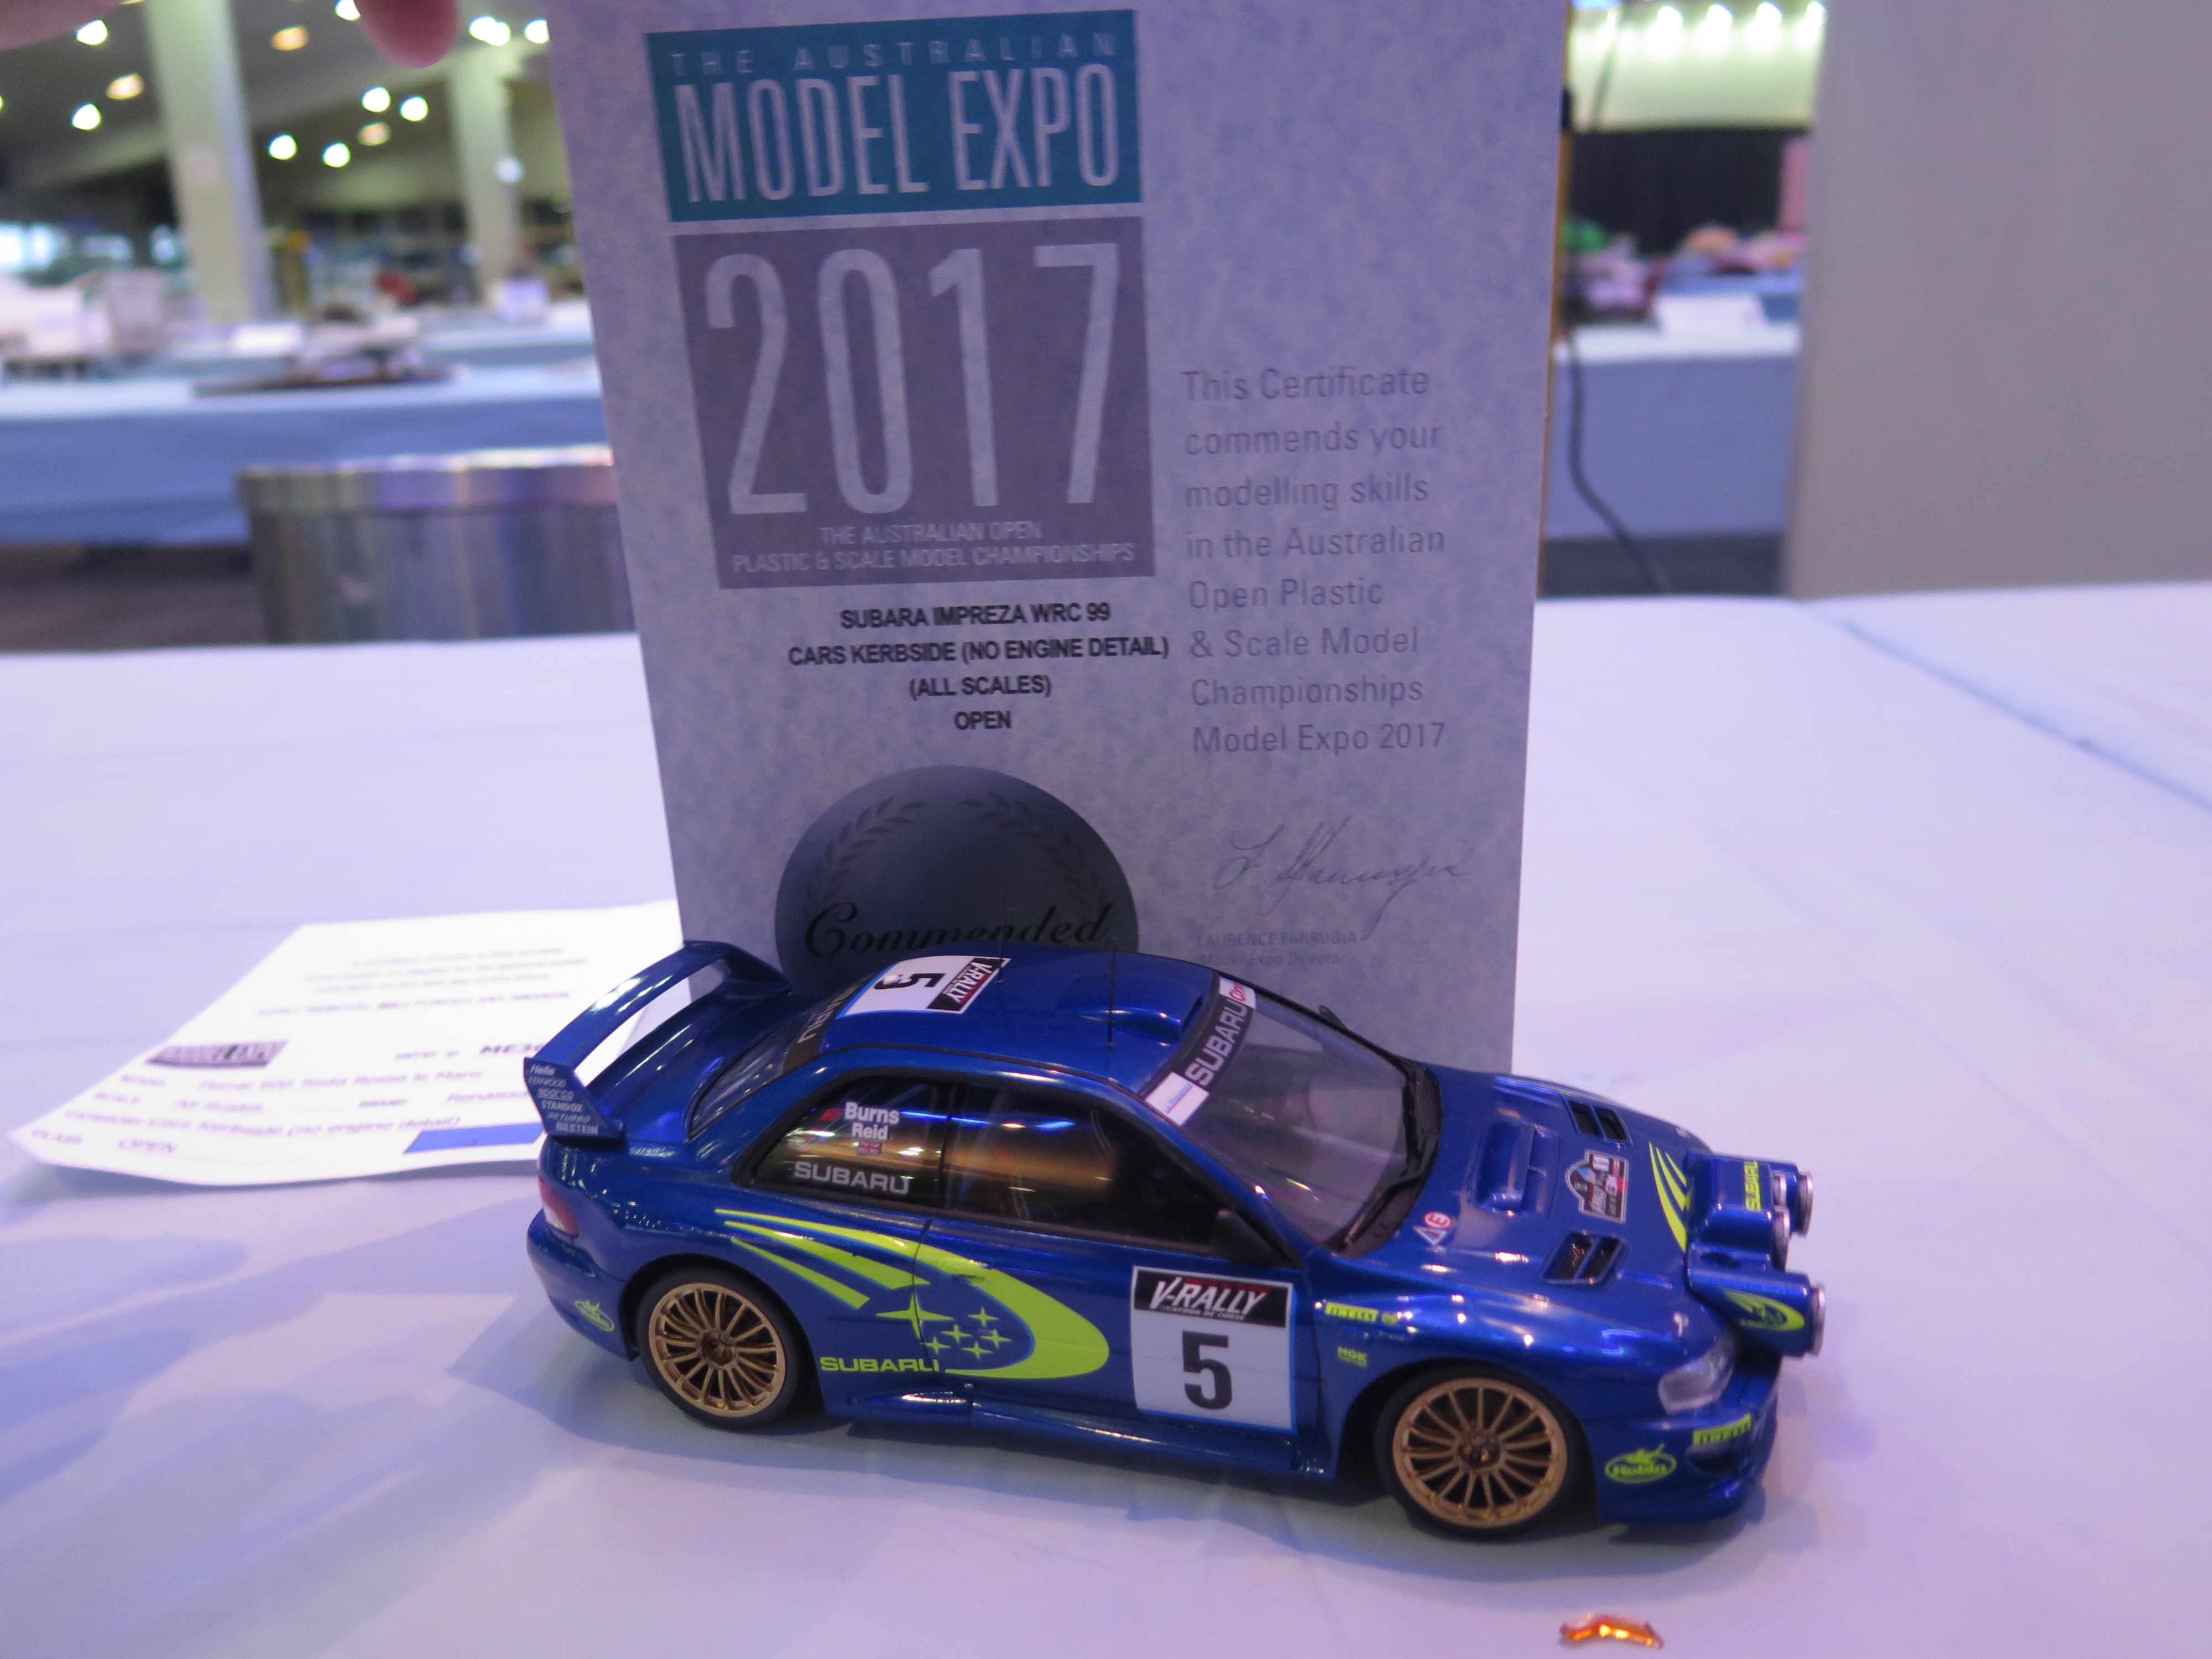
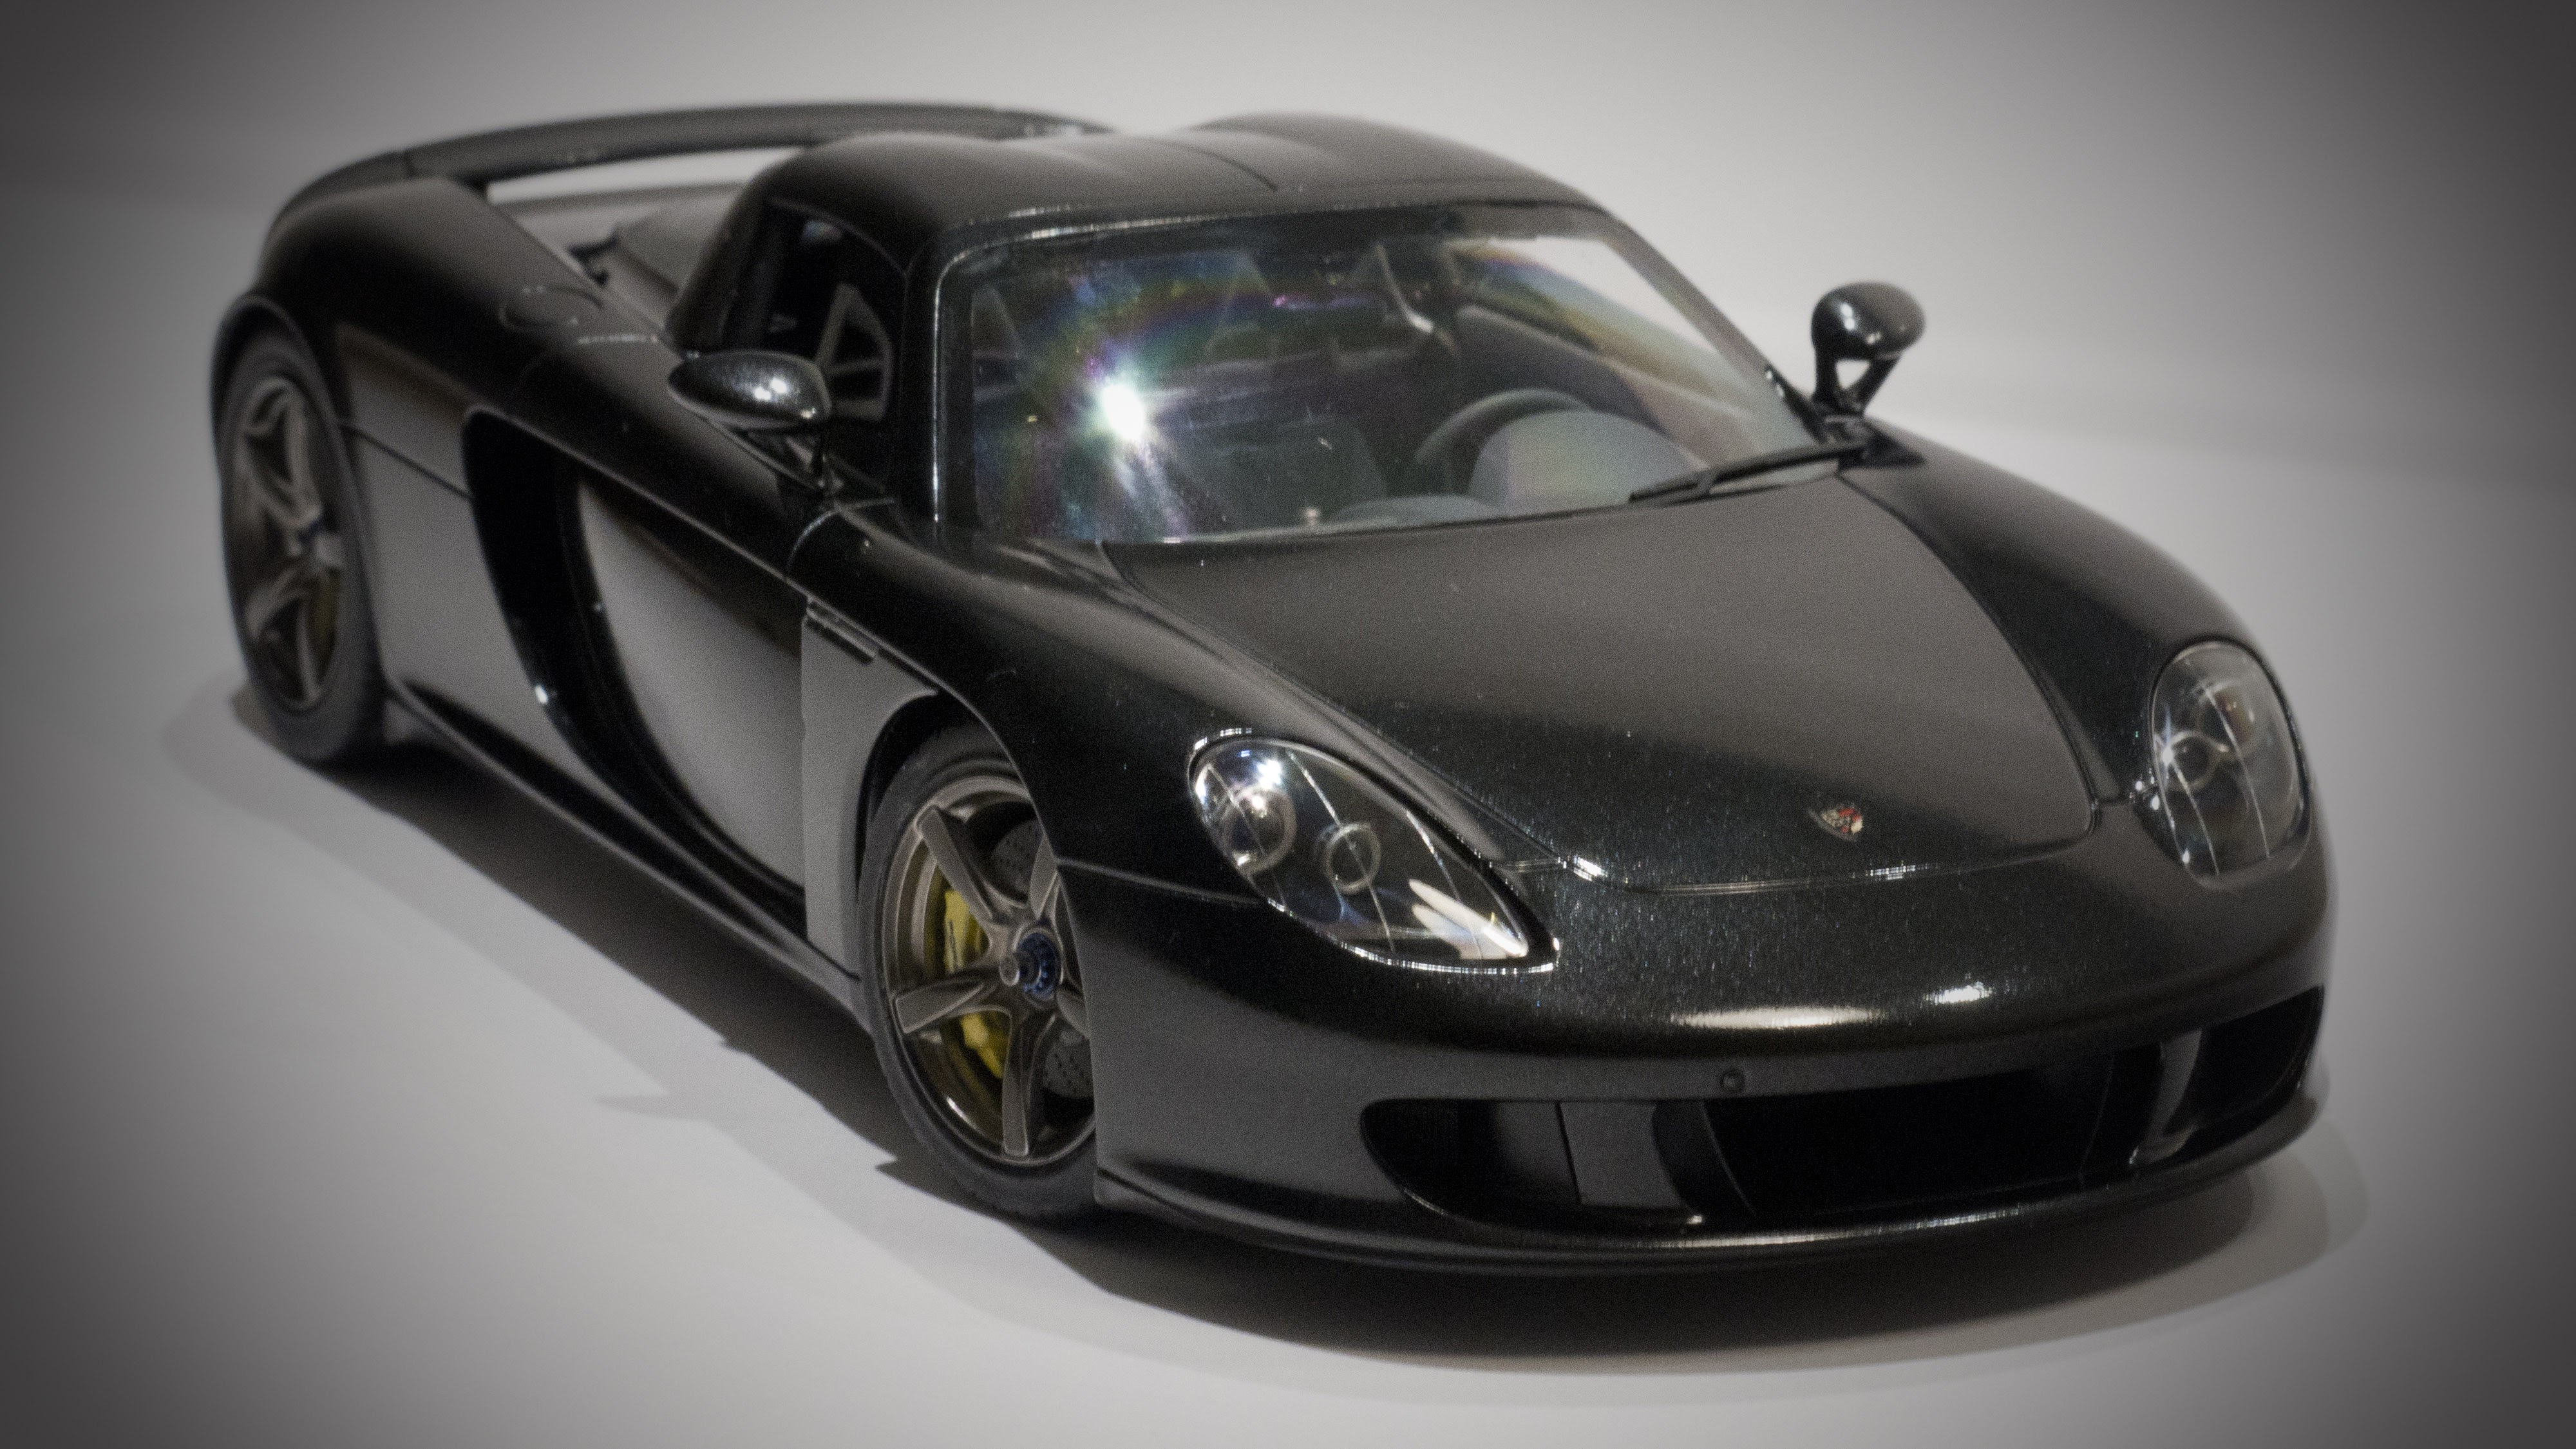
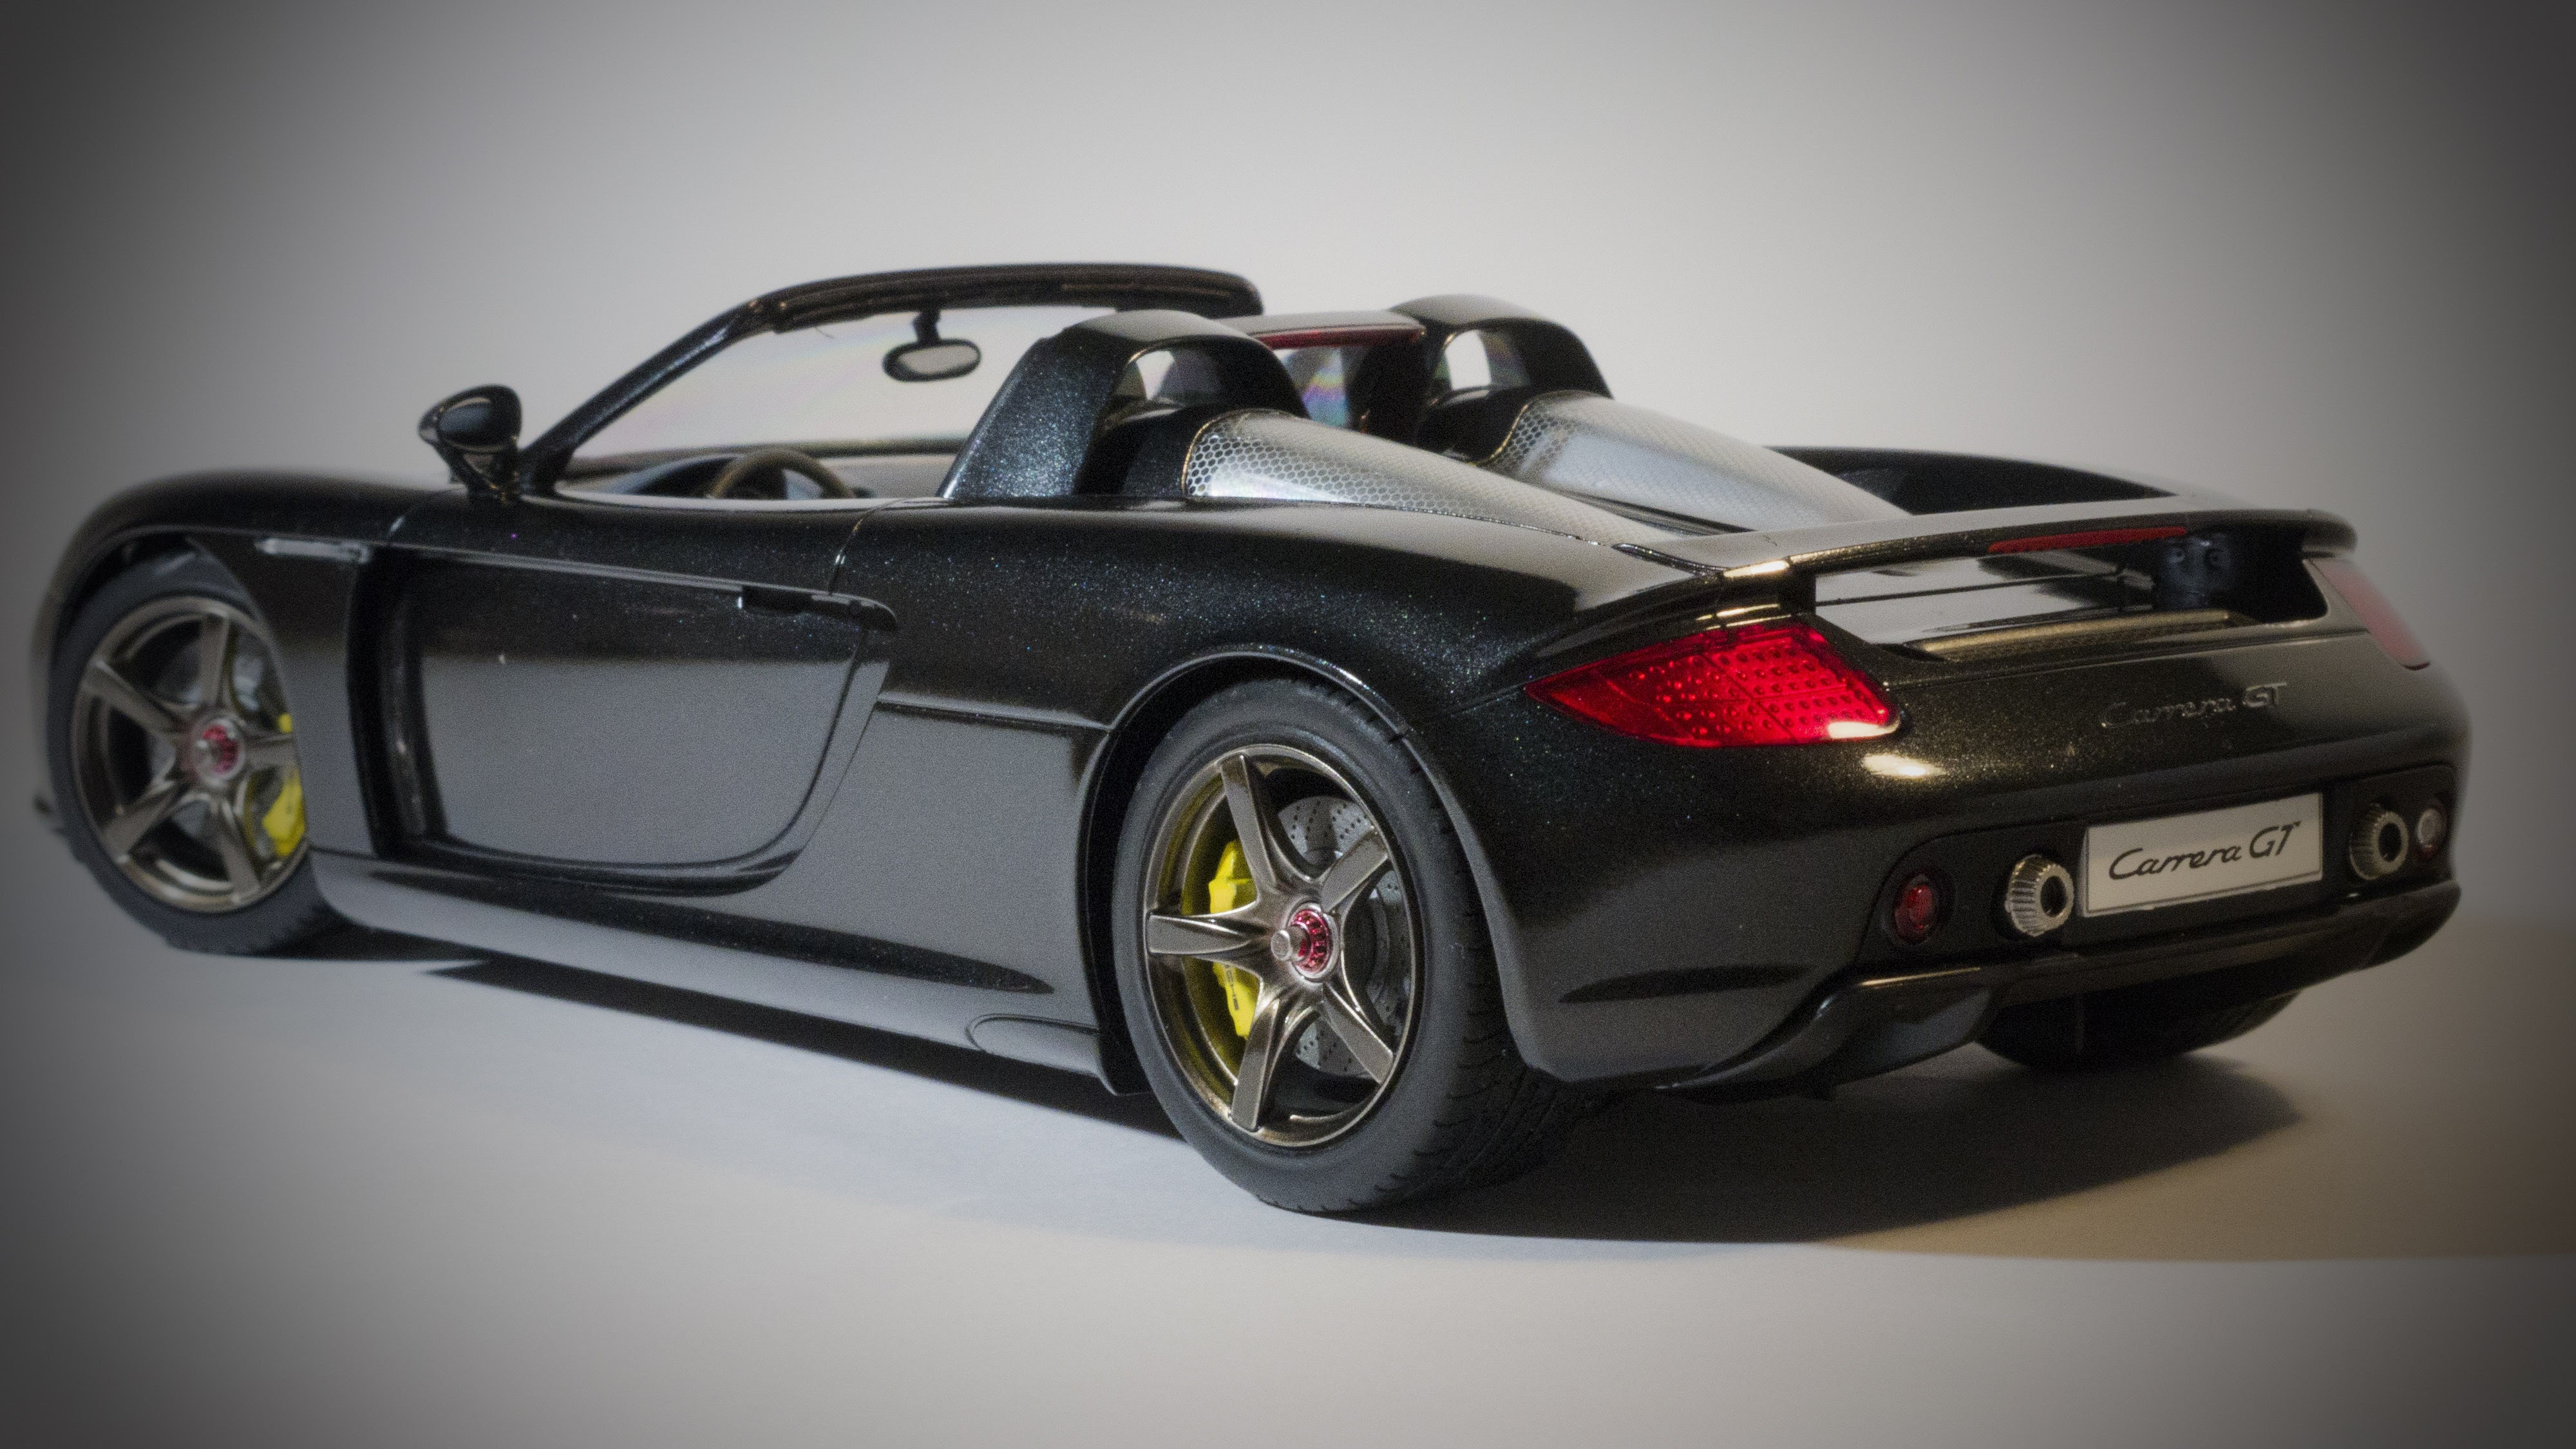
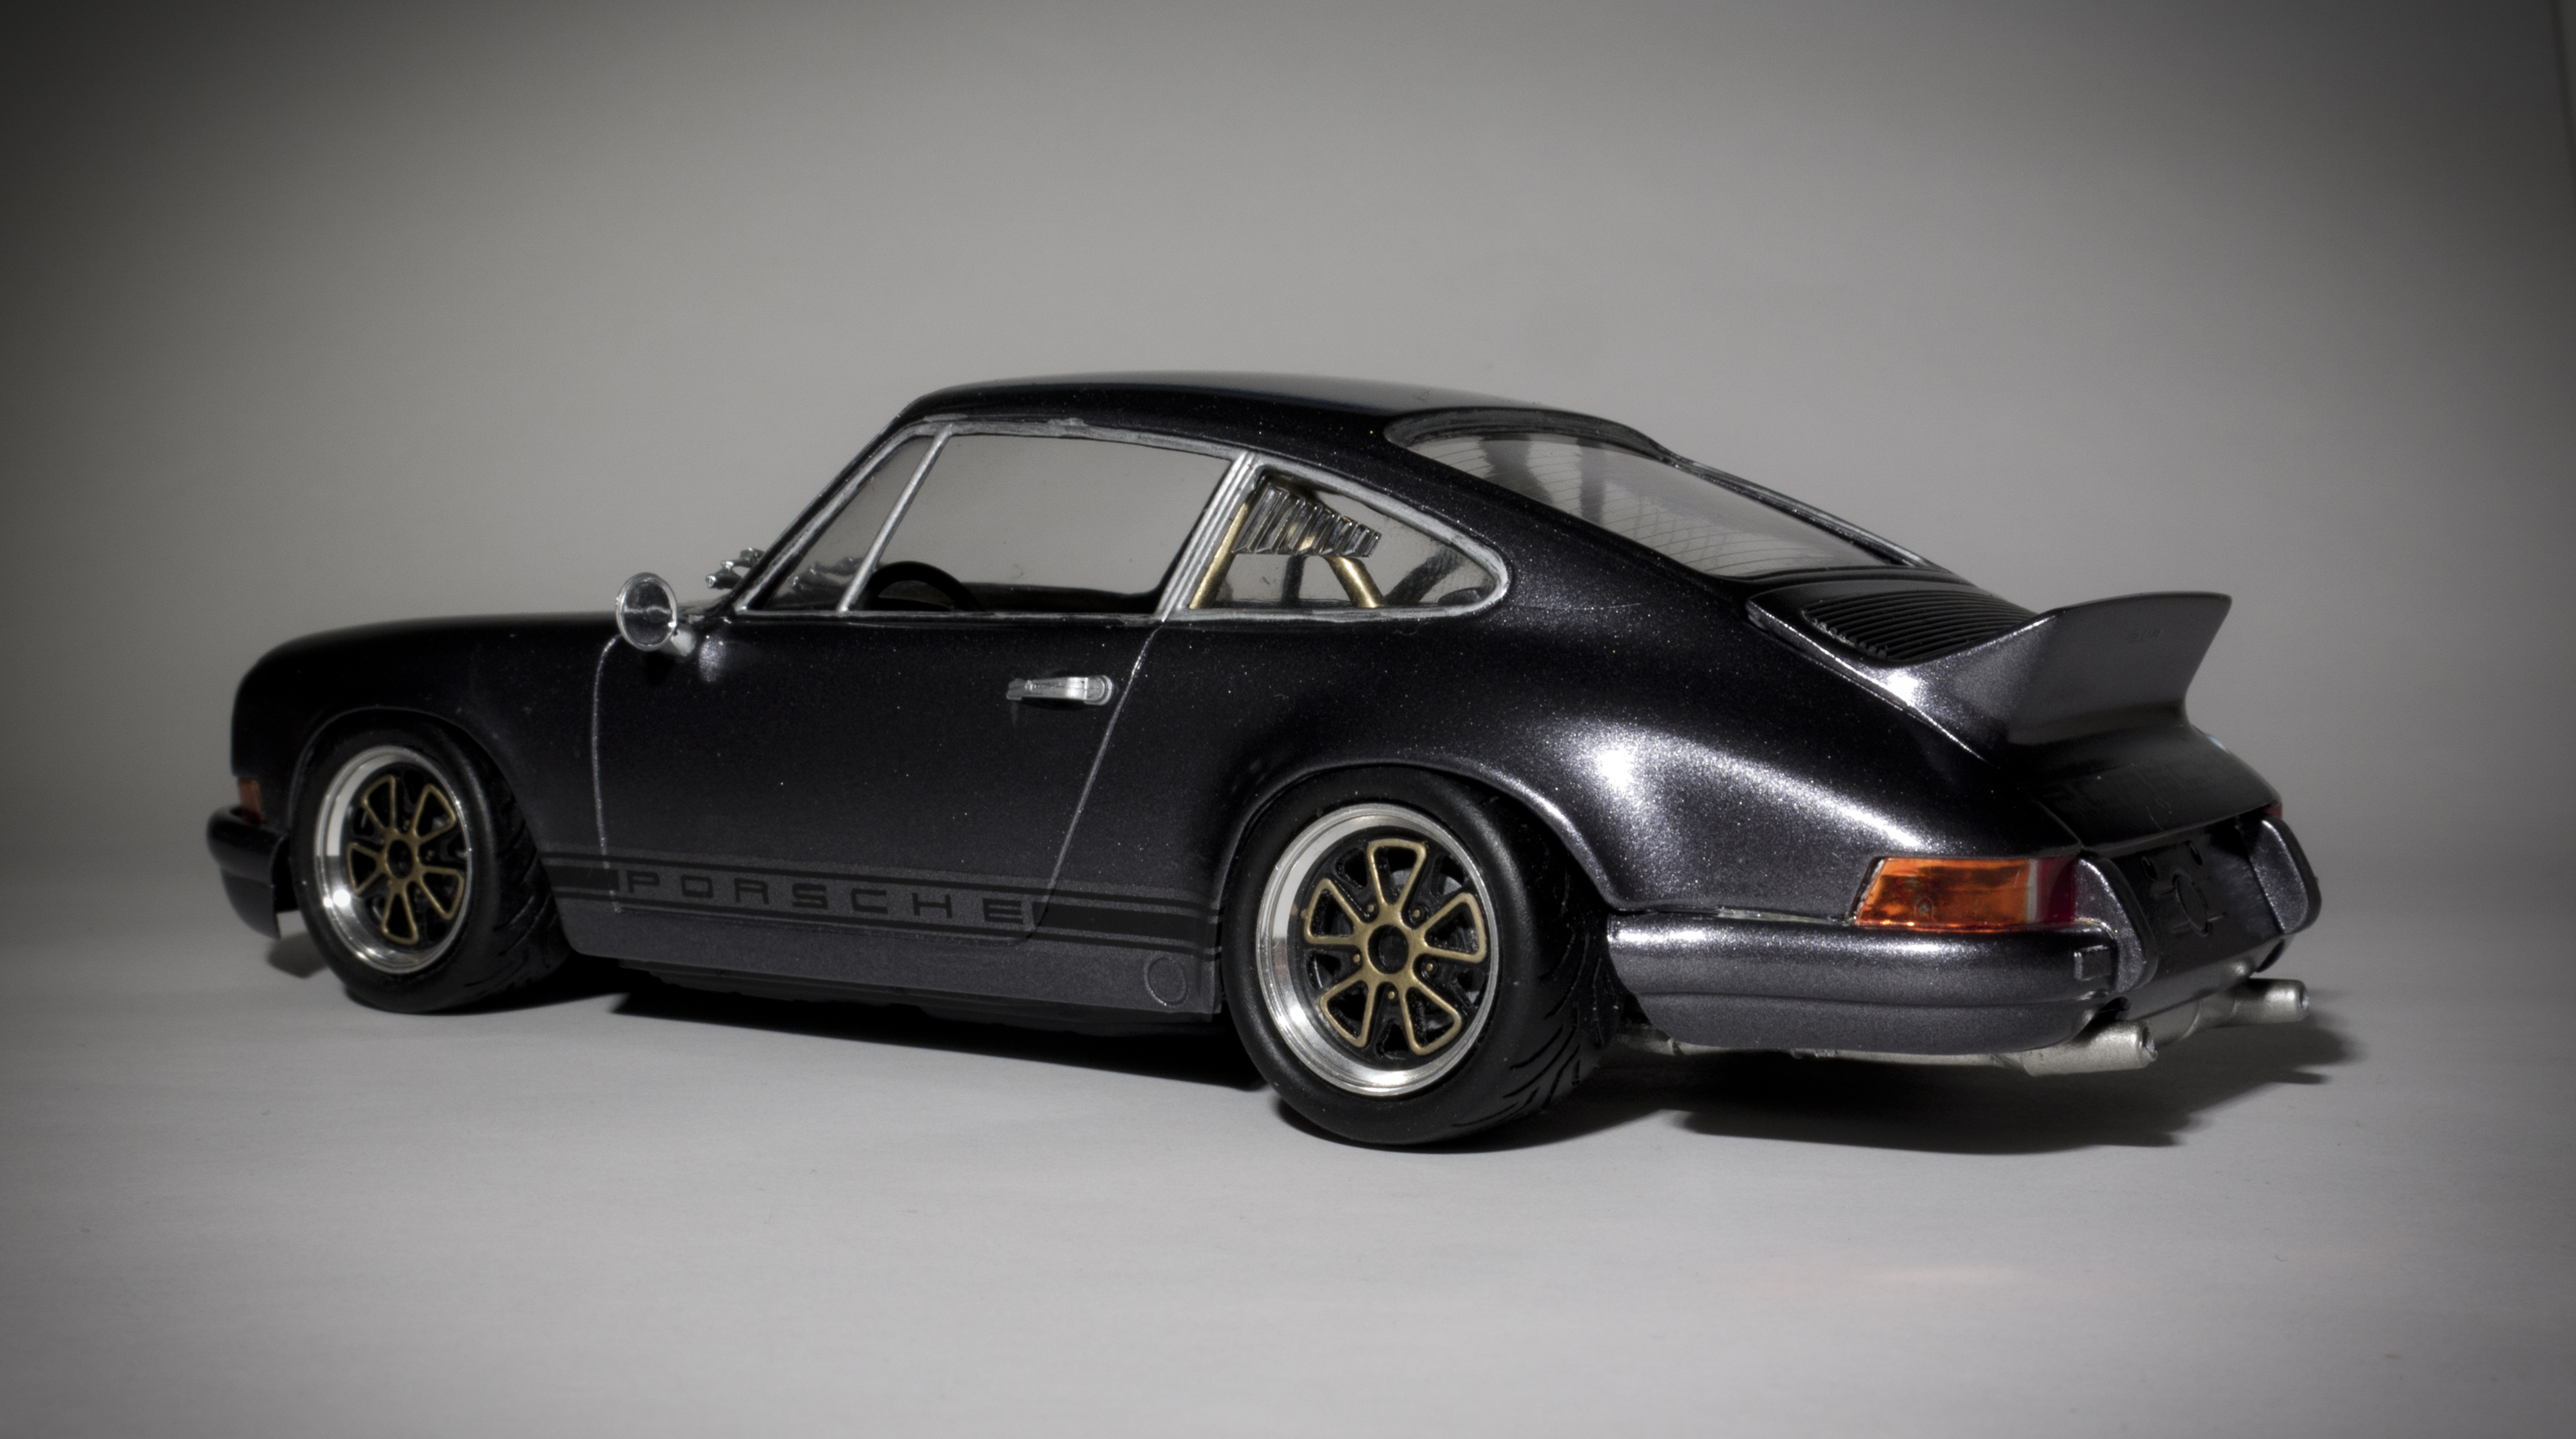
Hi All, I really got back into making models this year, after doing a few last year. I am really pleased with my progress, it always feels good to see how you progress over a year. This year also marked my first competition. I Got a 3rd place for my Carrera GT in the full detail section, and a commendation for my WRX STI Rally car in the curb side section. Below are some of my builds Competed in 2017. There were also a few others that i did this year, but didn't quite turn out as i had hoped. Thanks
-
Hello friends, here I bring you another German vehicle. The Panzer Kampfwagen IV Ausf.D made from the Tamiya house at 1/35 scale. The kit has included 3 figures which have been made included in the model. https://youtu.be/ab0IKGWWHsQ Greetings and I hope you like it.
-
Tamiya kit straight from the box. Fell together with very little input from me, Decals were a revelation, was expecting all sorts of problems and some considerable swearing but they went-on without a hitch. Please feel free to make any criticism, comment or ask any questions. Ian.
-
Hello, I just signed up to this forum recently and this is my first thread here and I'm happy to have found this place as it seems to be the last car modelling forum with a healthy amount of active users. I look forward to learning some tips and tricks from you guys and hopefully contributing something back. I've been working on this Supra for the past 2 weeks. I spotted this article, during the past Christmas Holidays, written about the car I fell in love with when I was around 12 years old. Aoshima has released multiple 'Top Secret' cars, but for some reason they have never done the original Top Secret Supra. I got the itch and had to jump back into the hobby and scour the internet for reference pictures. I think this is something you guys can relate with. The need to build a model of your favorite cars from your childhood. Here's 2 images of the real car: Start of the Journey (Supra body from the Tamiya kit) shaping the nose. Added 2 pillars cut, shaped, and filled with milliput A lot of styrene and milliput later, we have the basic shape. Since milliput takes forever to dry, I work on the hood. Hood ready for the vents. Or not, oops....... It's ok we can fix it with superglue and milliput After letting the hood dry, and a lot of filing and sanding to the body. (Clearly a lot more work ahead.) With that face in mind, I thought it's time to work on that lamp housing. I thought this method would work and it actually seemed fine, the only problem was the area was so small I couldn't sand it lol. Making body kits isn't really my thing, so this just a big giant learning process for me. Well, when you fail, try something else right? My second attempt involves the use of a stuffed condom. Yea buddy. Stuffed with milliput, get your head outta the gutter. Here's a pic checking fitment. Filed down. Drilled out, so I can make cuts and shape the inside. Got the basic shape, but needs a lot more work. Pretty annoying since it's so small. Throw on some primer, check for flaws. And yea, flaws everywhere. Here some pics of problem areas that needed / still need fixing Off center nose Shaping surfacing issues More shaping and surfacing issues Oh yea I forgot to show how I completed the front fenders: More sanding, filing, and primer this is the state the body is in now. Just minor surface issues now and I need to draw two panel lines. After fixing those I'll be on to making the side skirts. I'd be surprised if you read this far. Sorry if there's a lot of pictures but I kind of wanted to show as much of the steps as I could. Thanks for reading
-
Hello friends, on this occasion and for a long time with enough desire I present you the T34 / 76, a medium tank of Soviet manufacture. Made of the Tamiya brand at 1/35 scale. It's the only Russian vehicle I have and I hope it's the first of many. https://youtu.be/FjFHh2L_3rI Greetings and I hope you like it
-
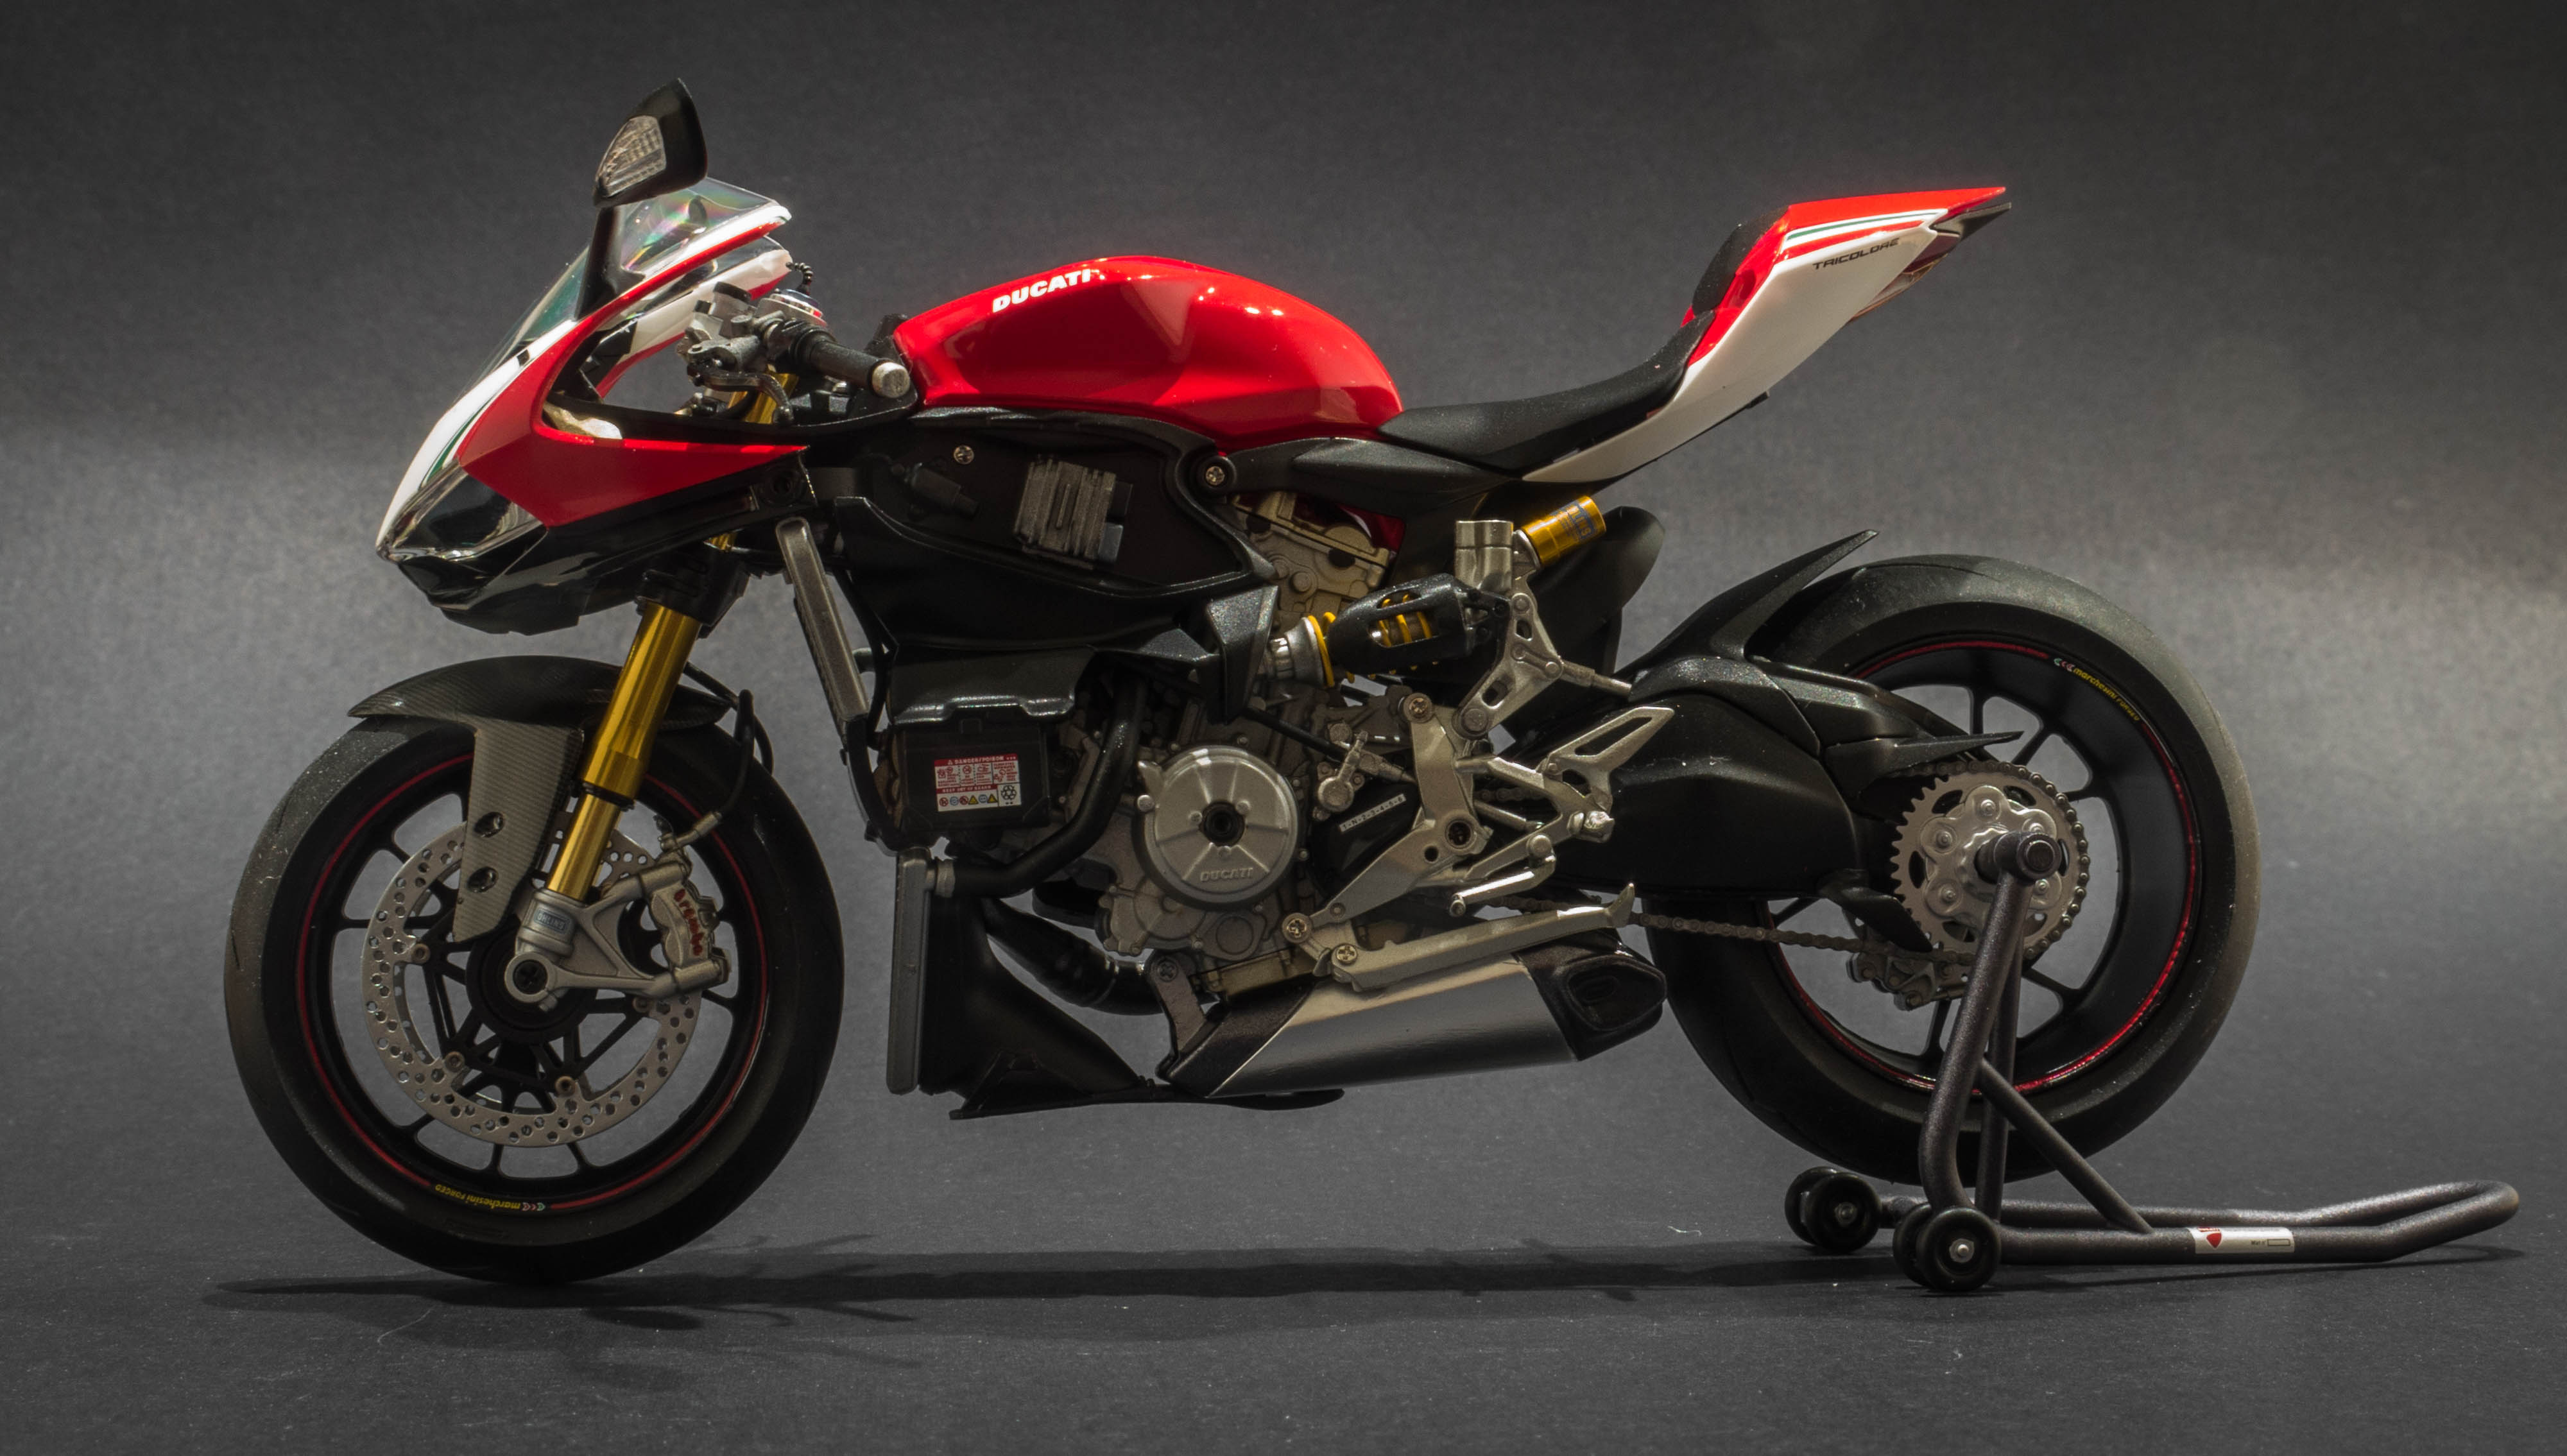
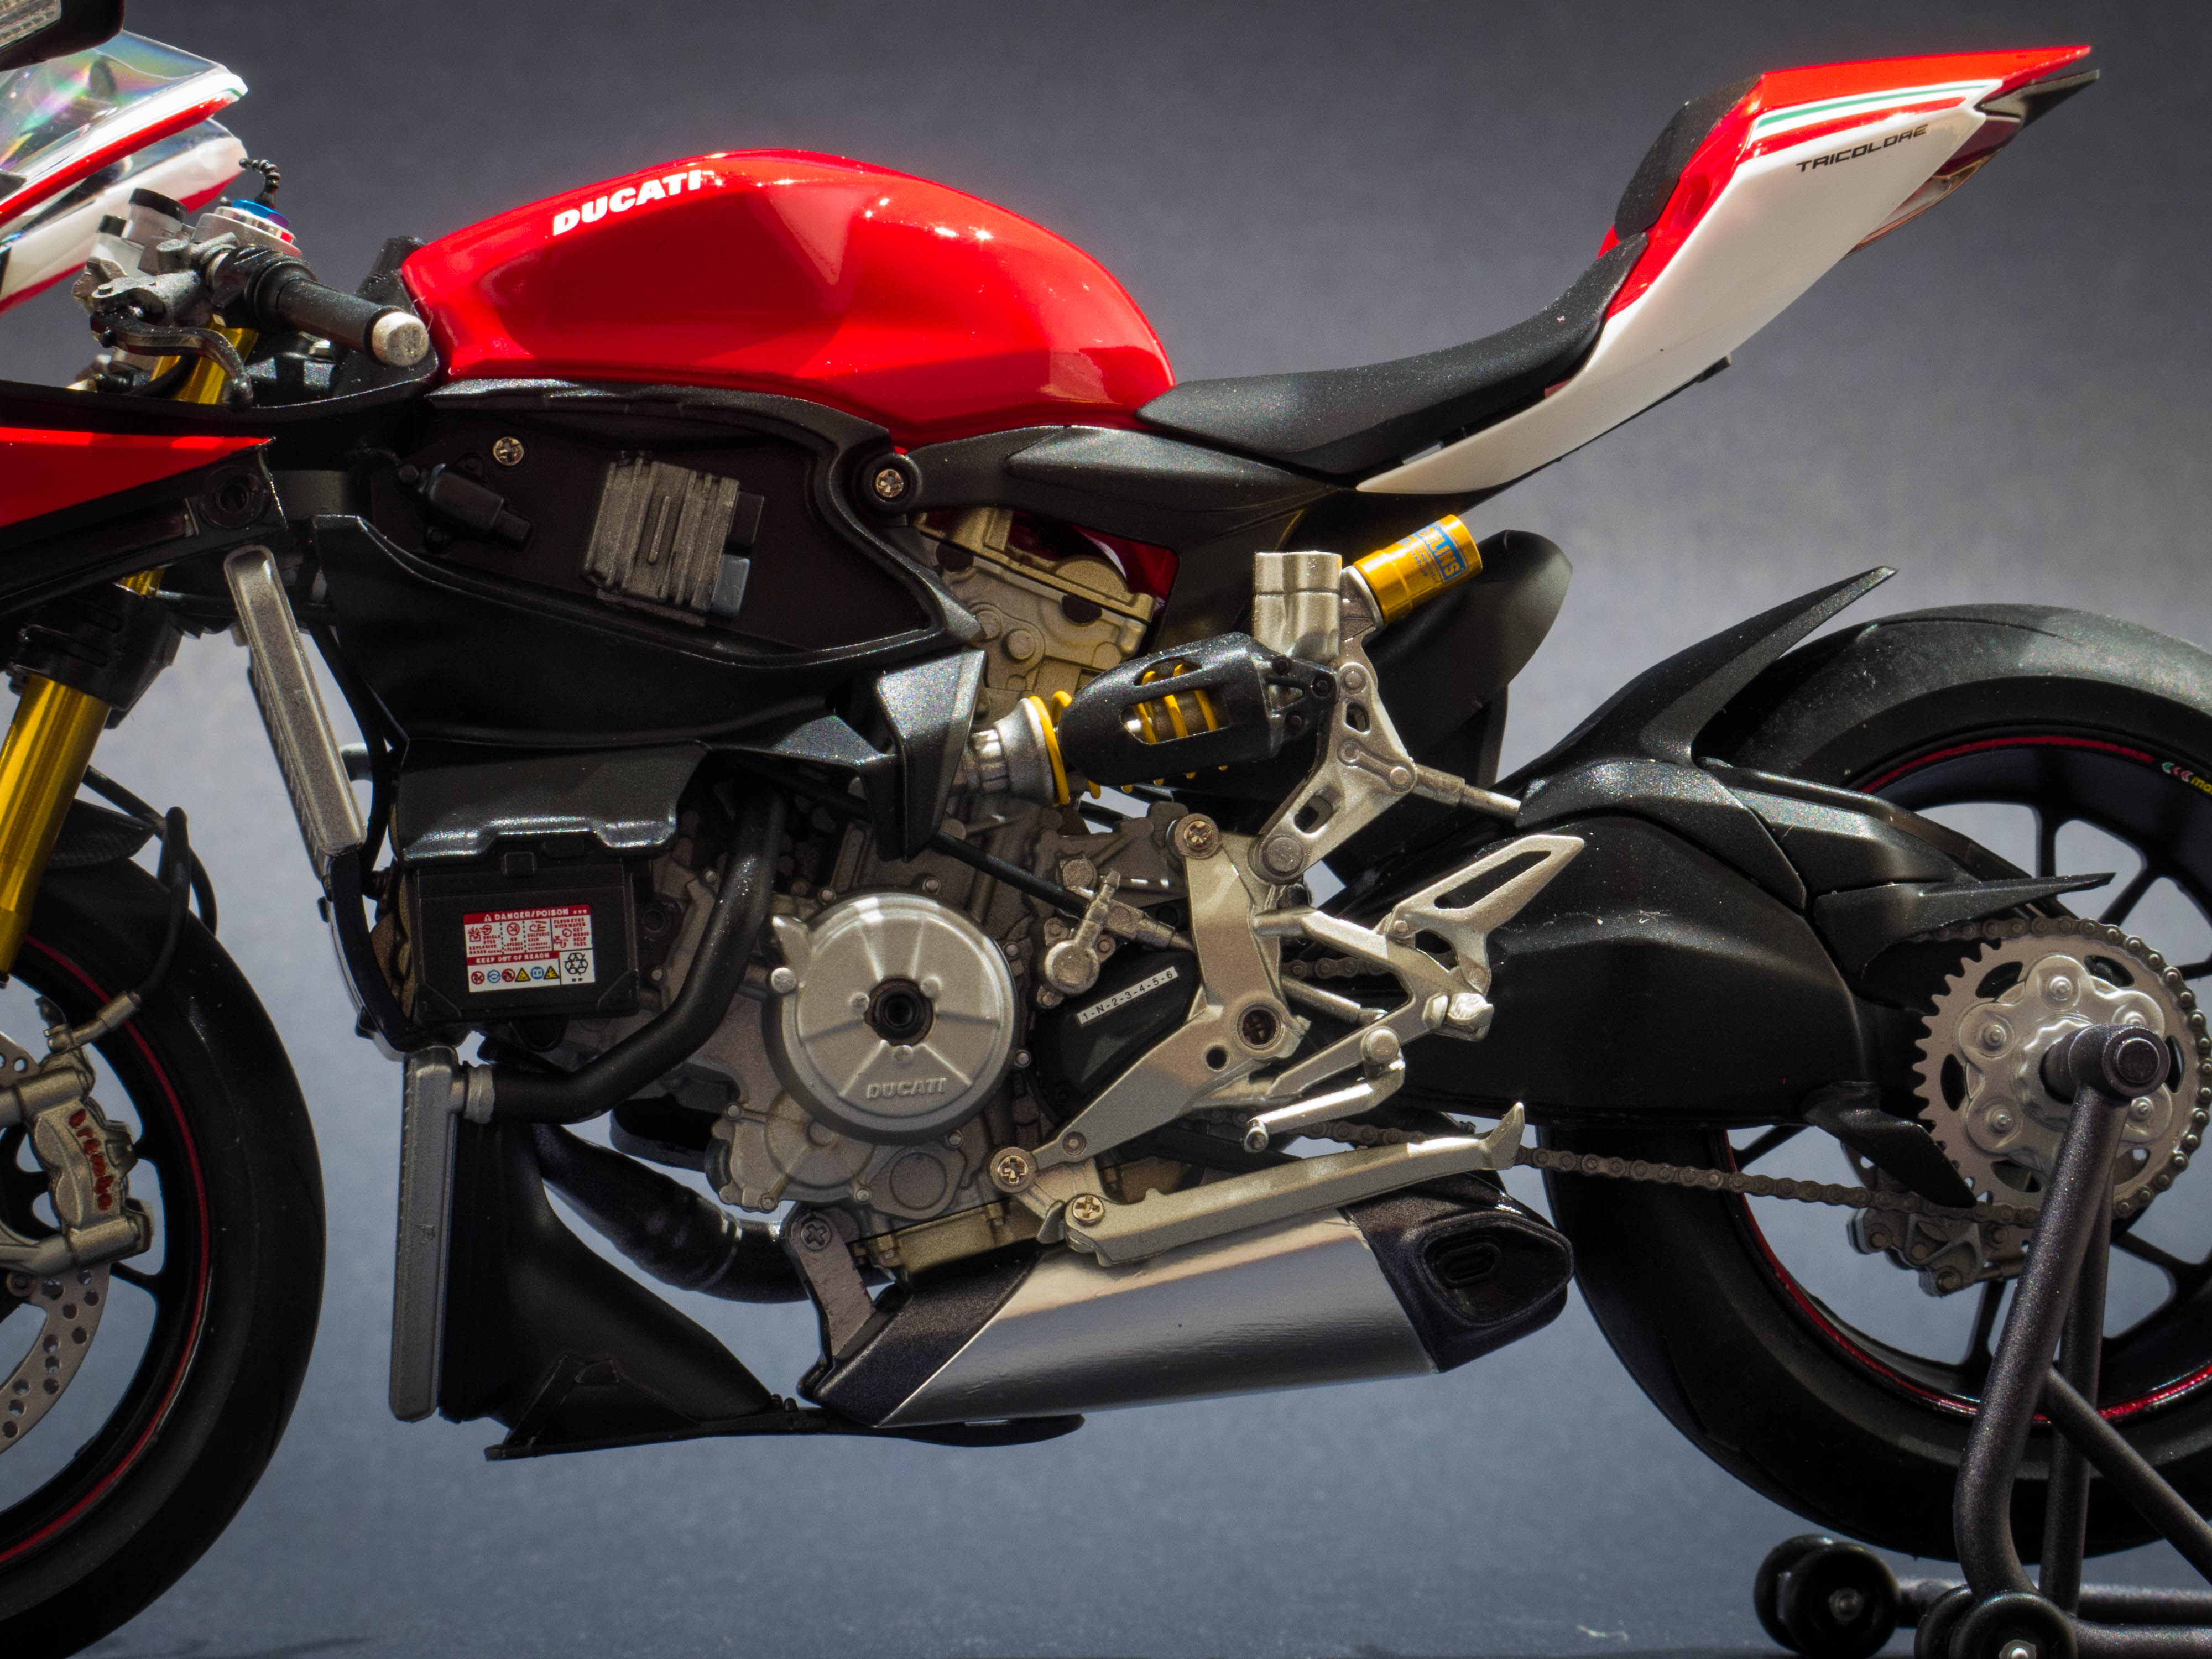
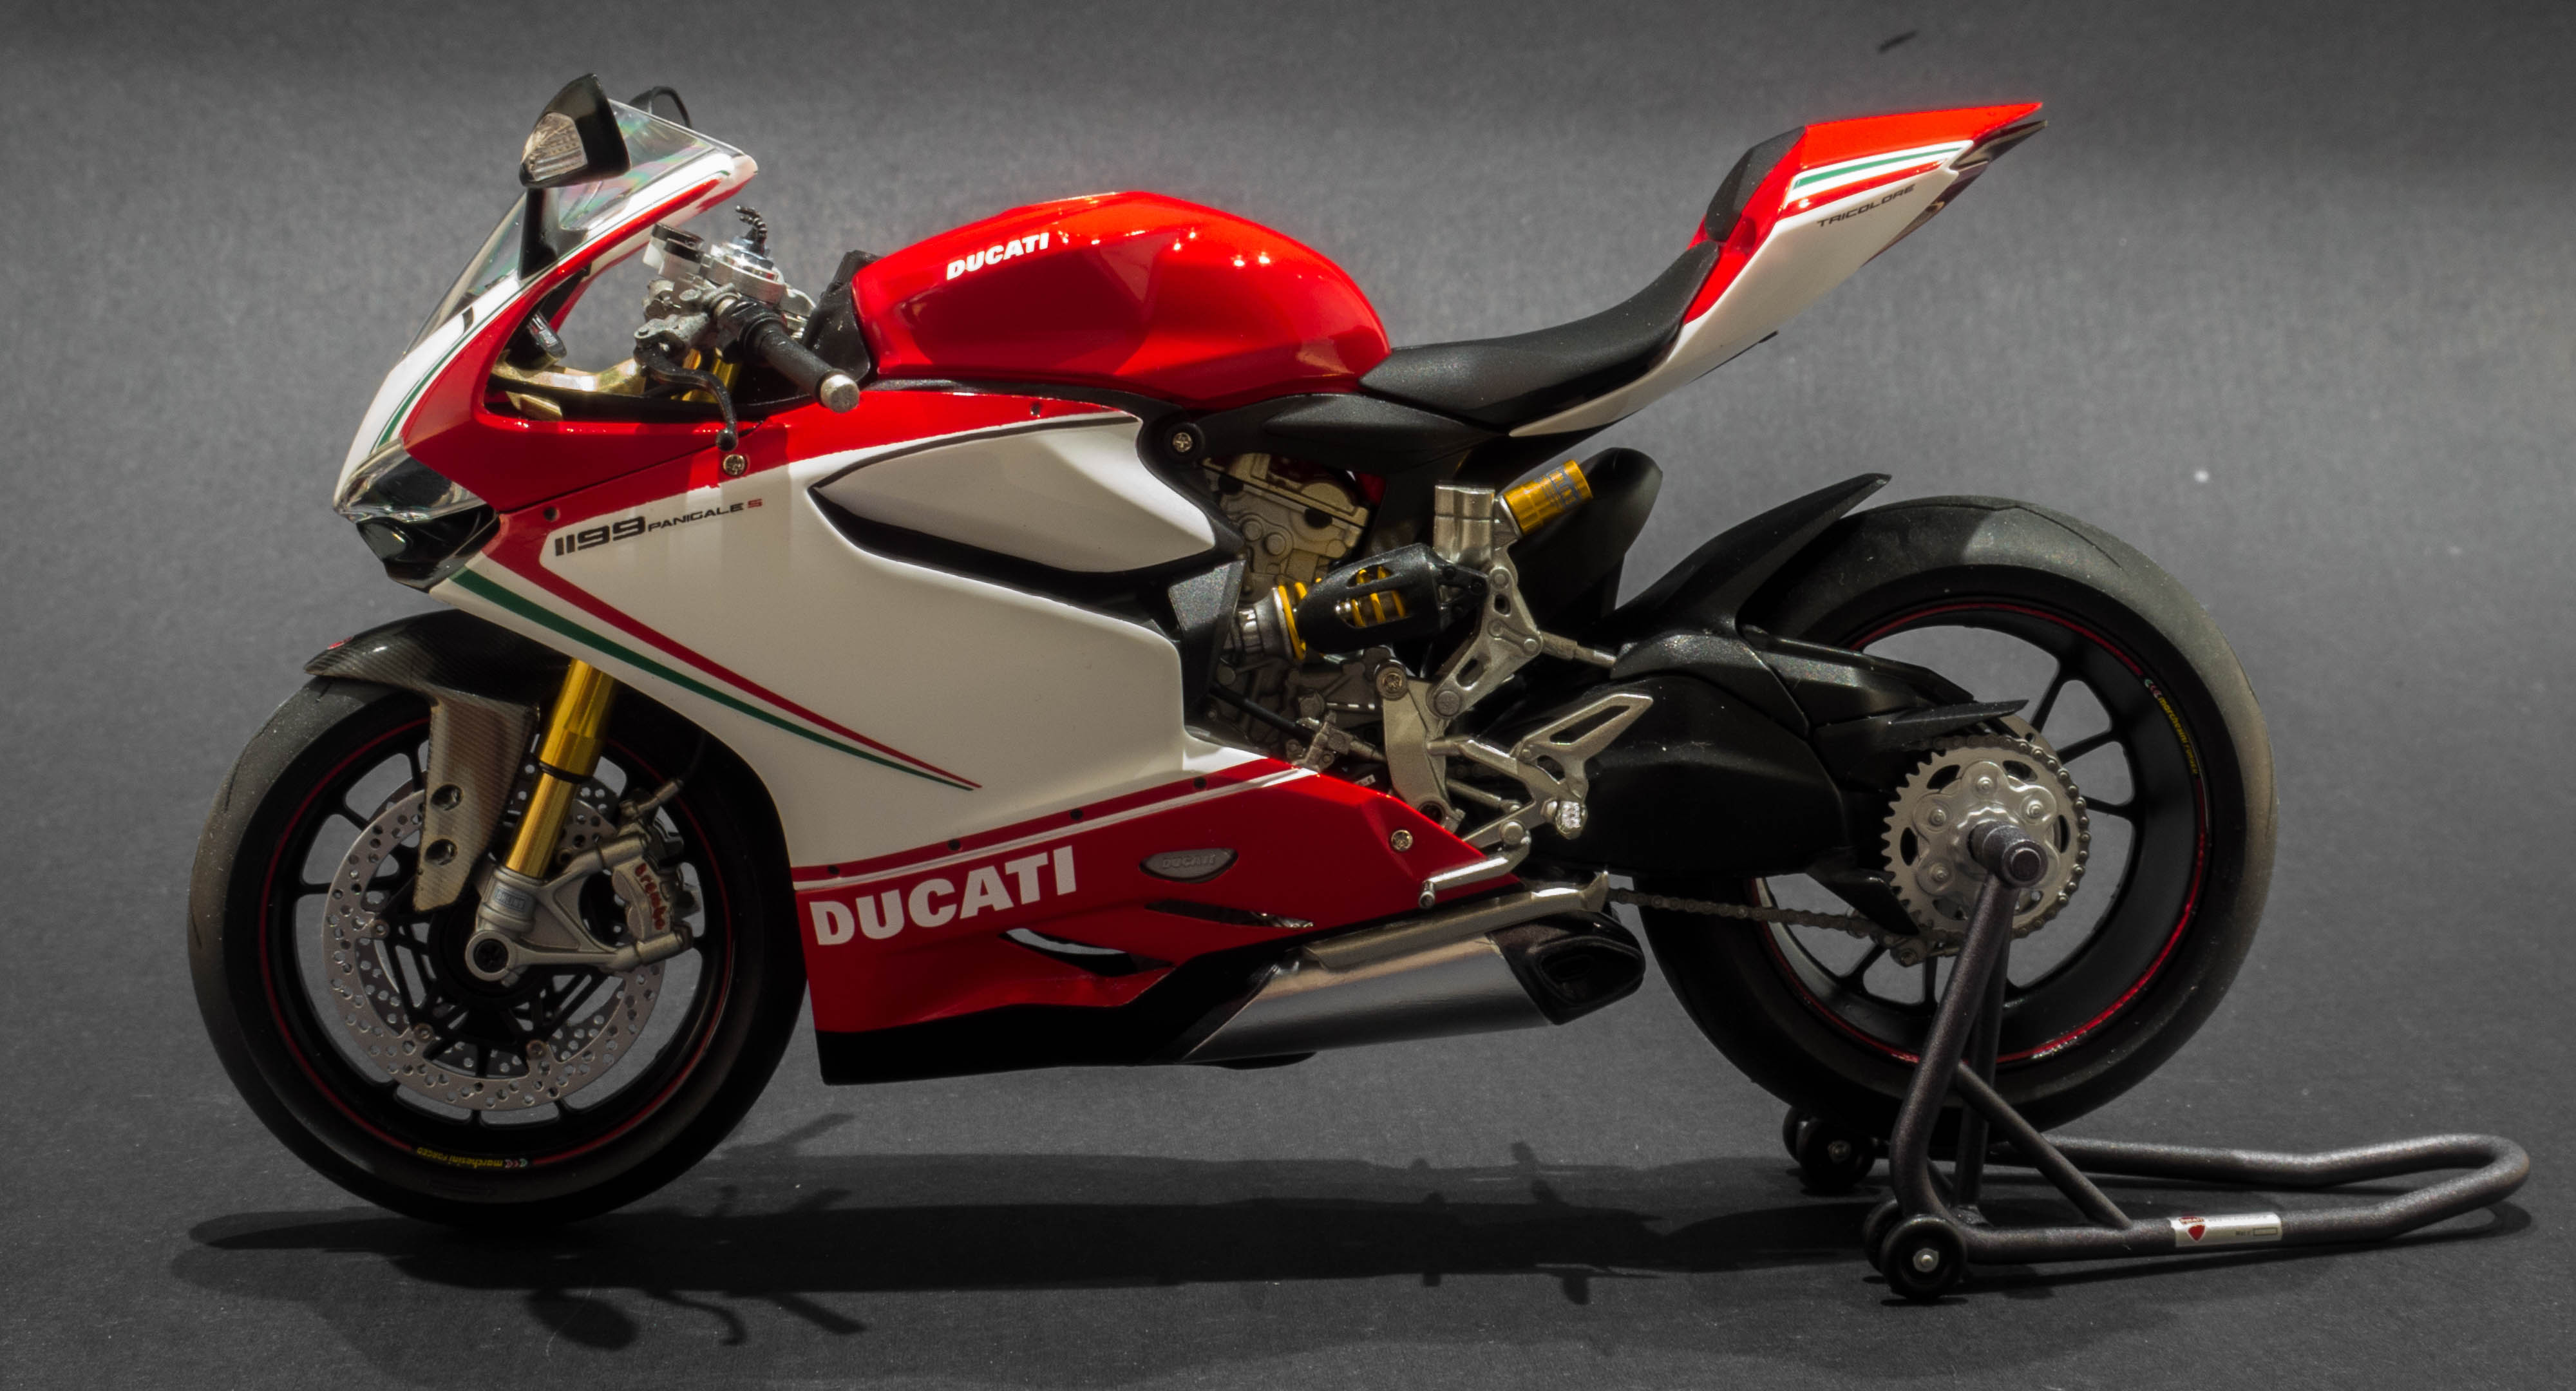
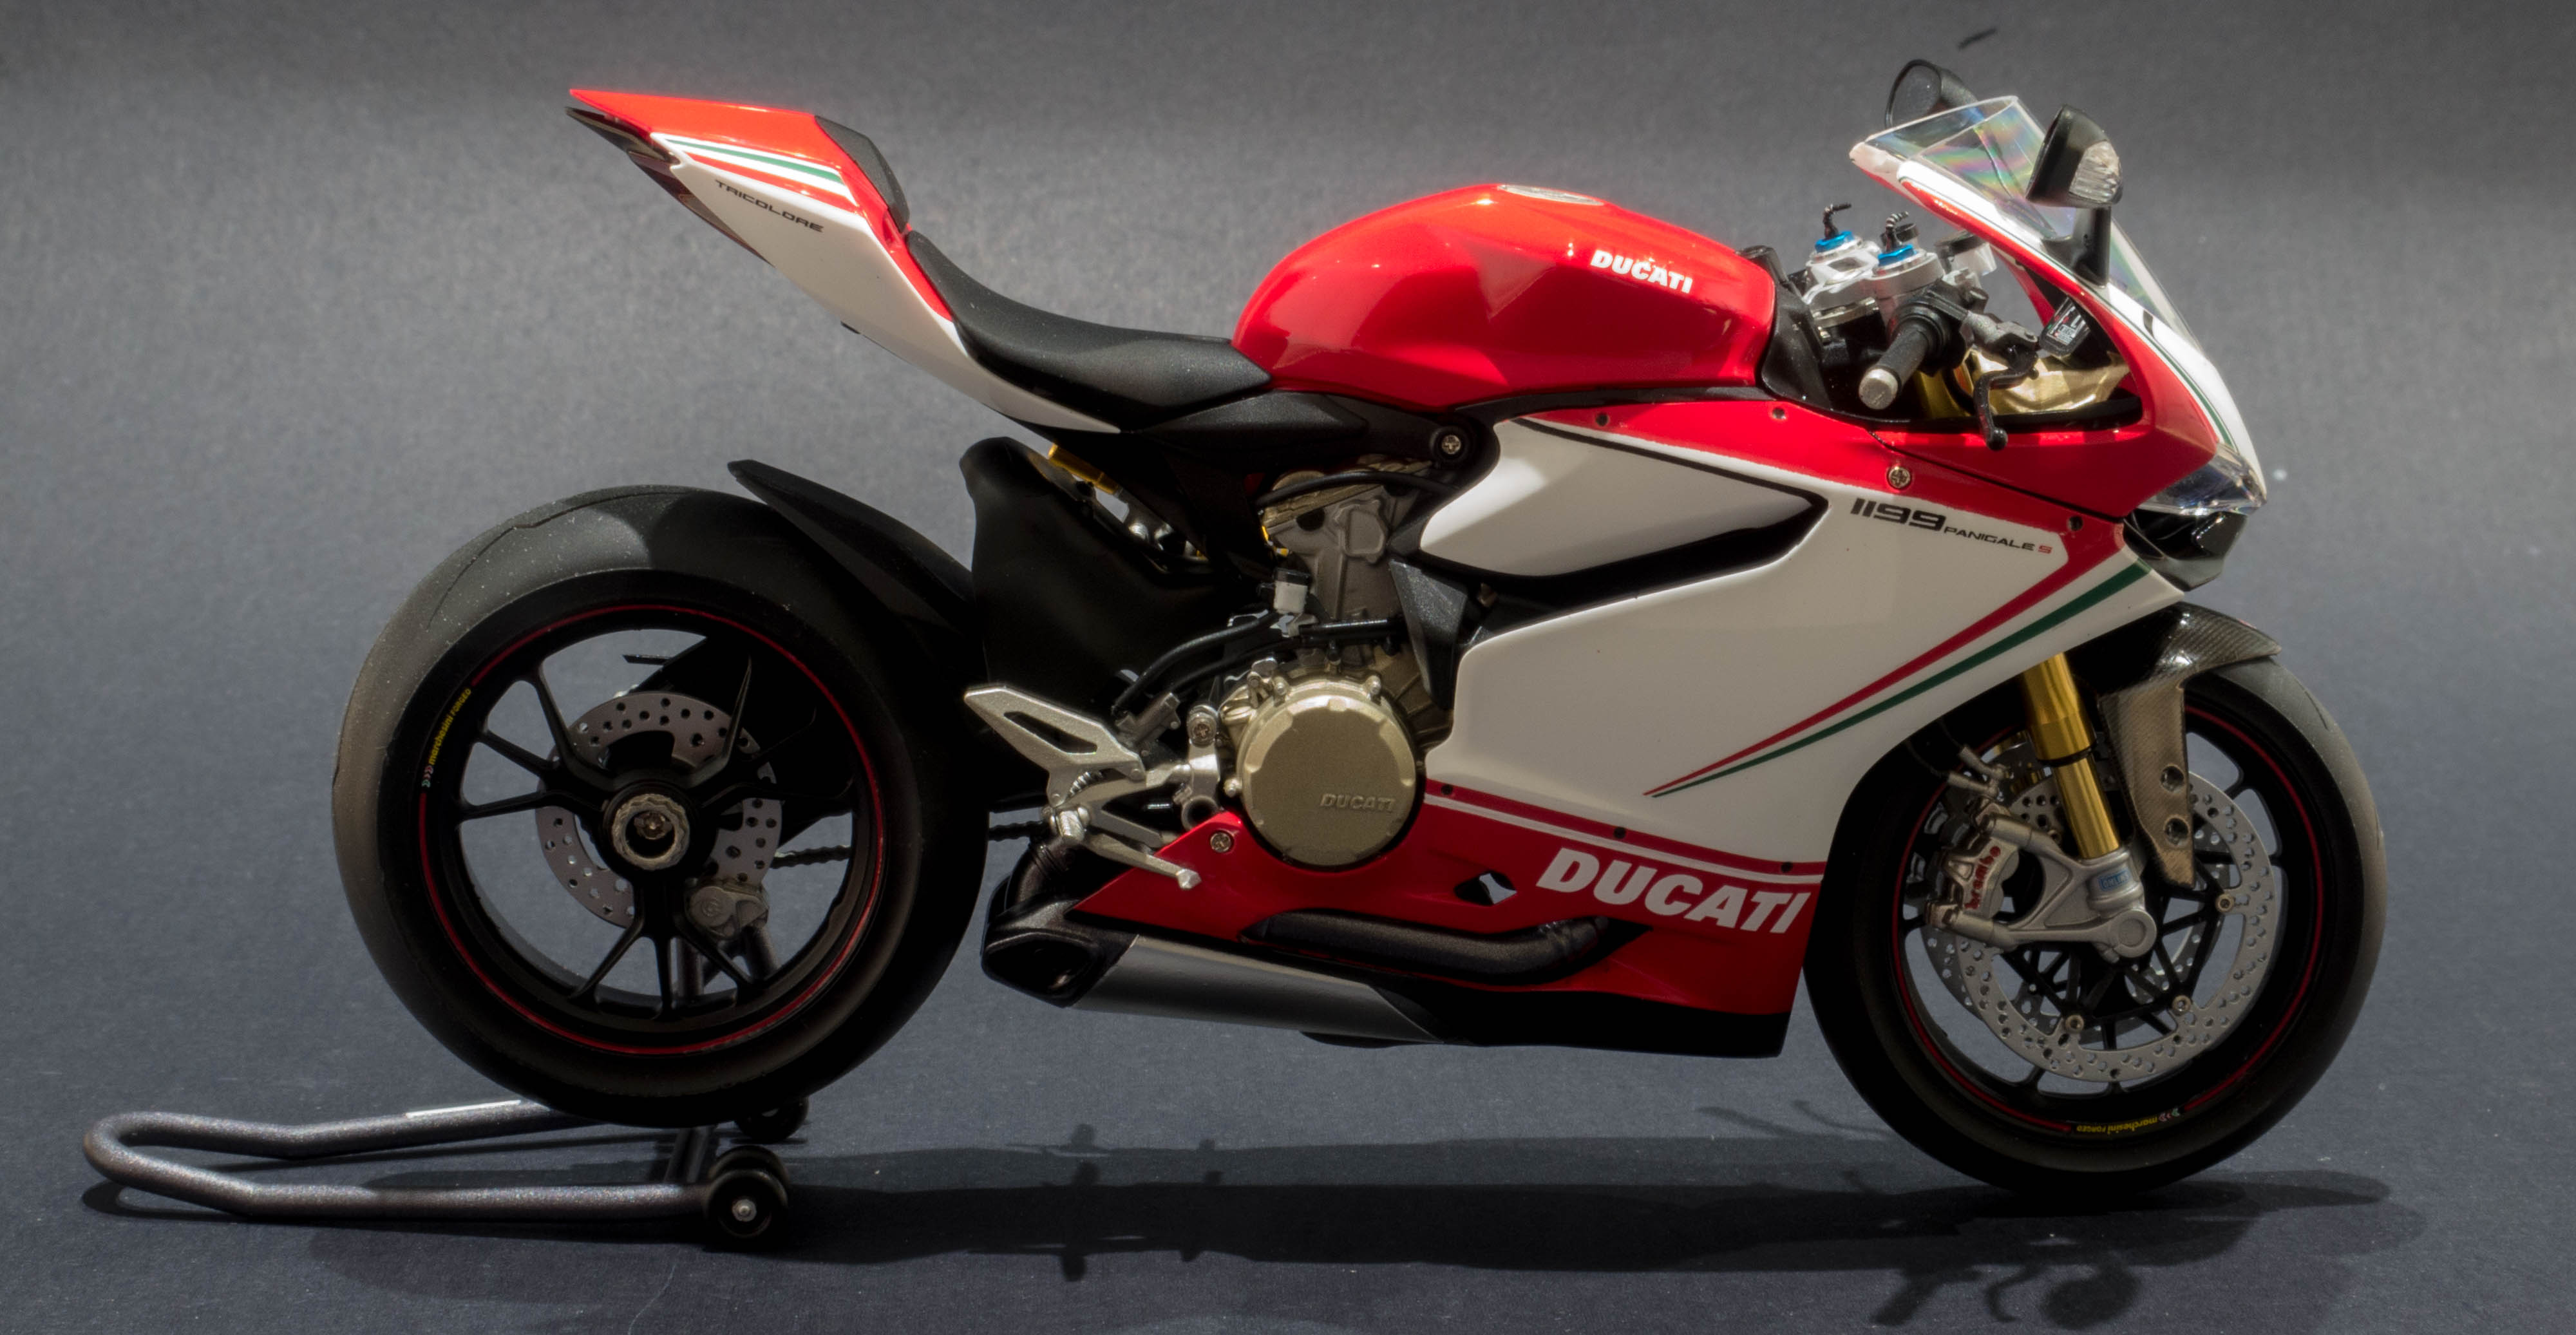
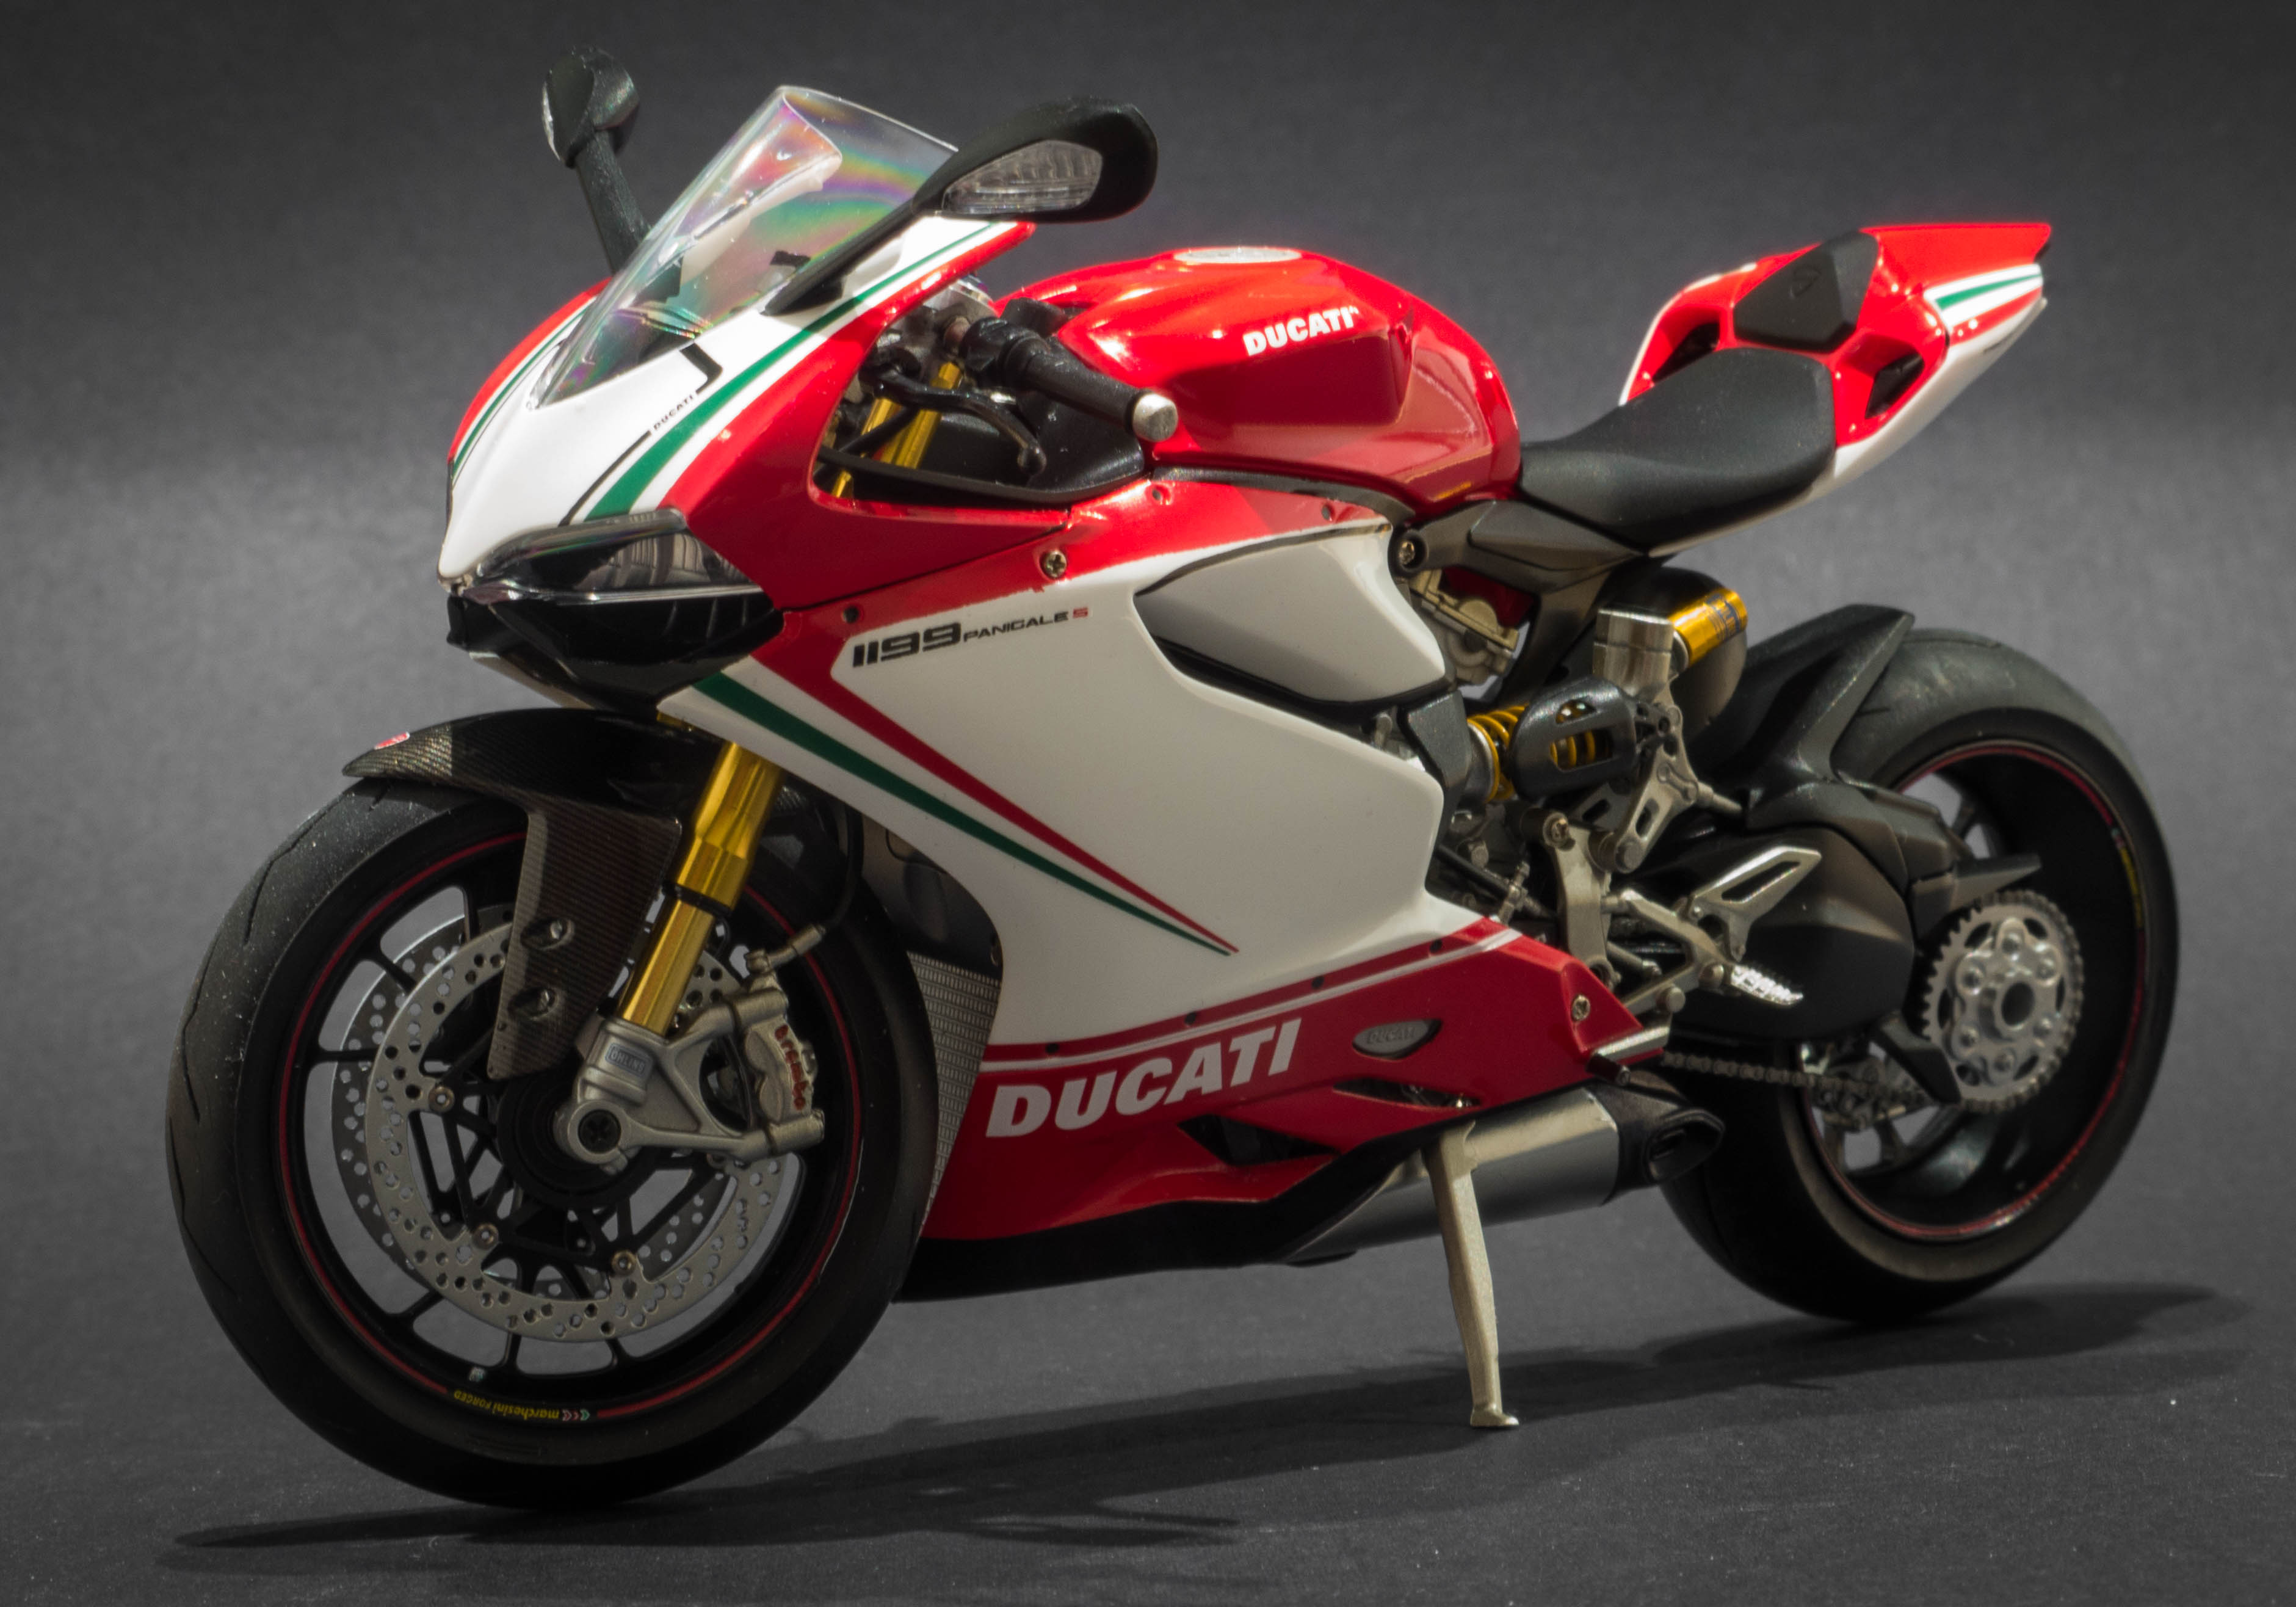
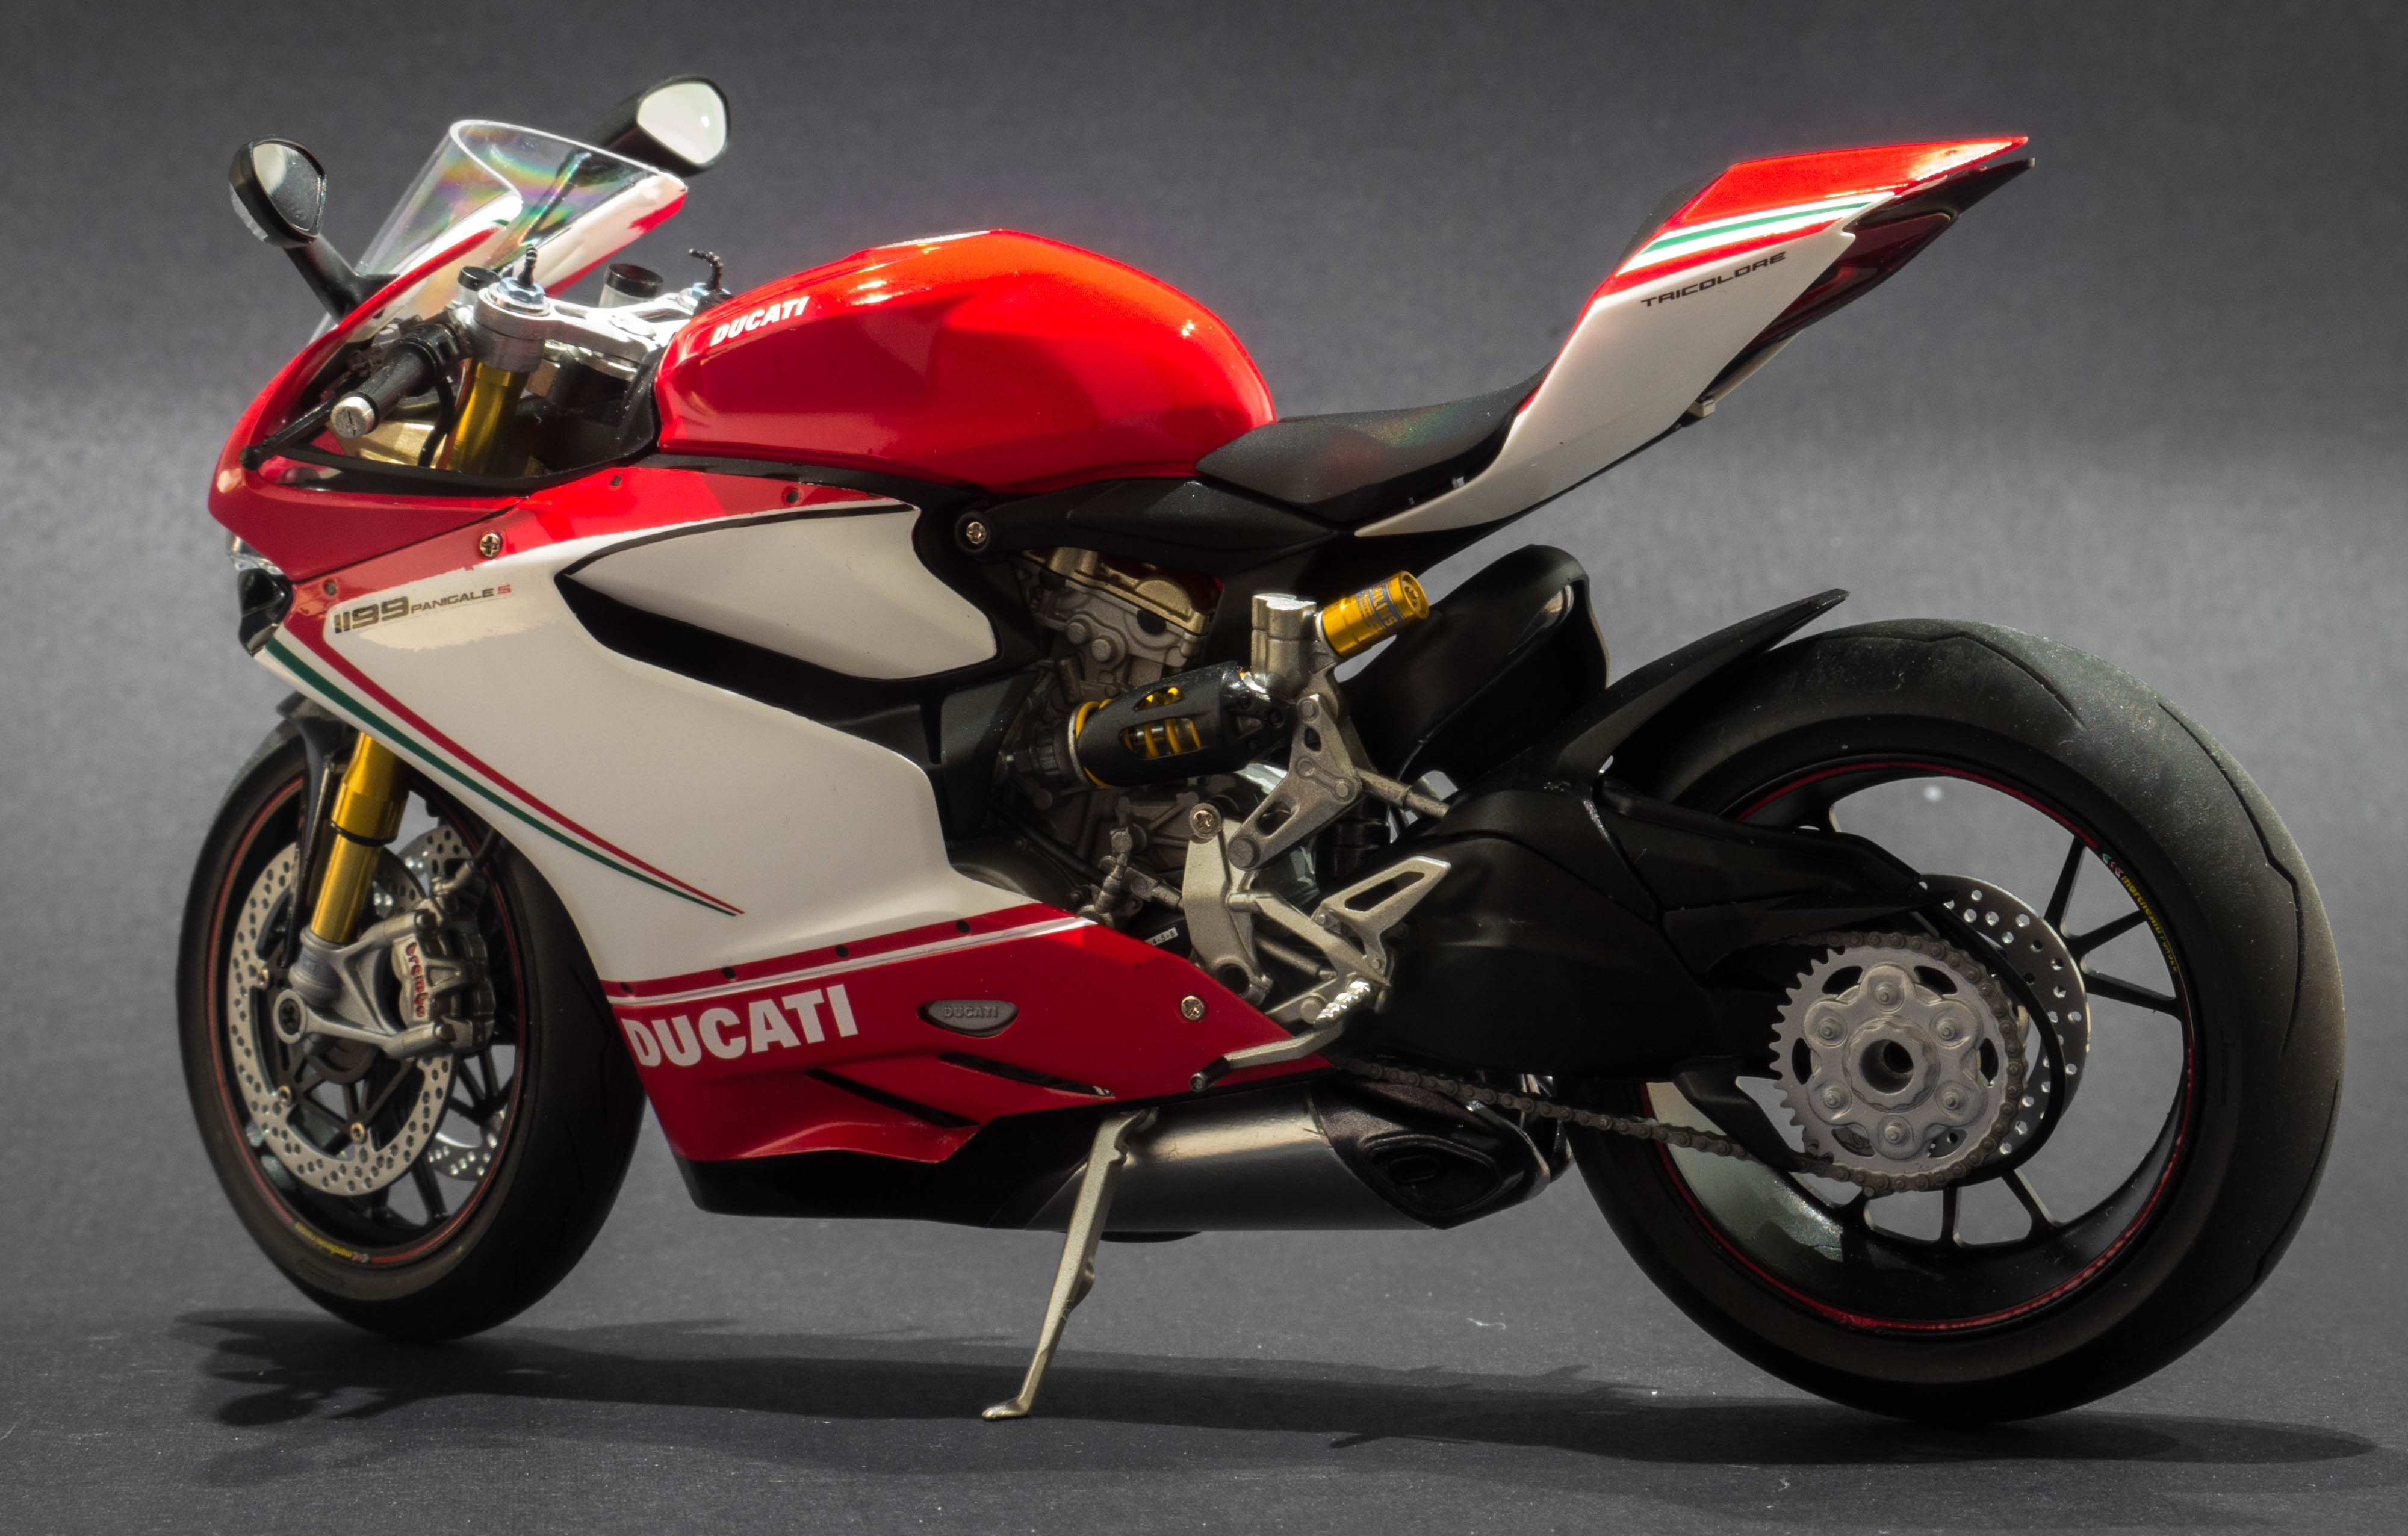
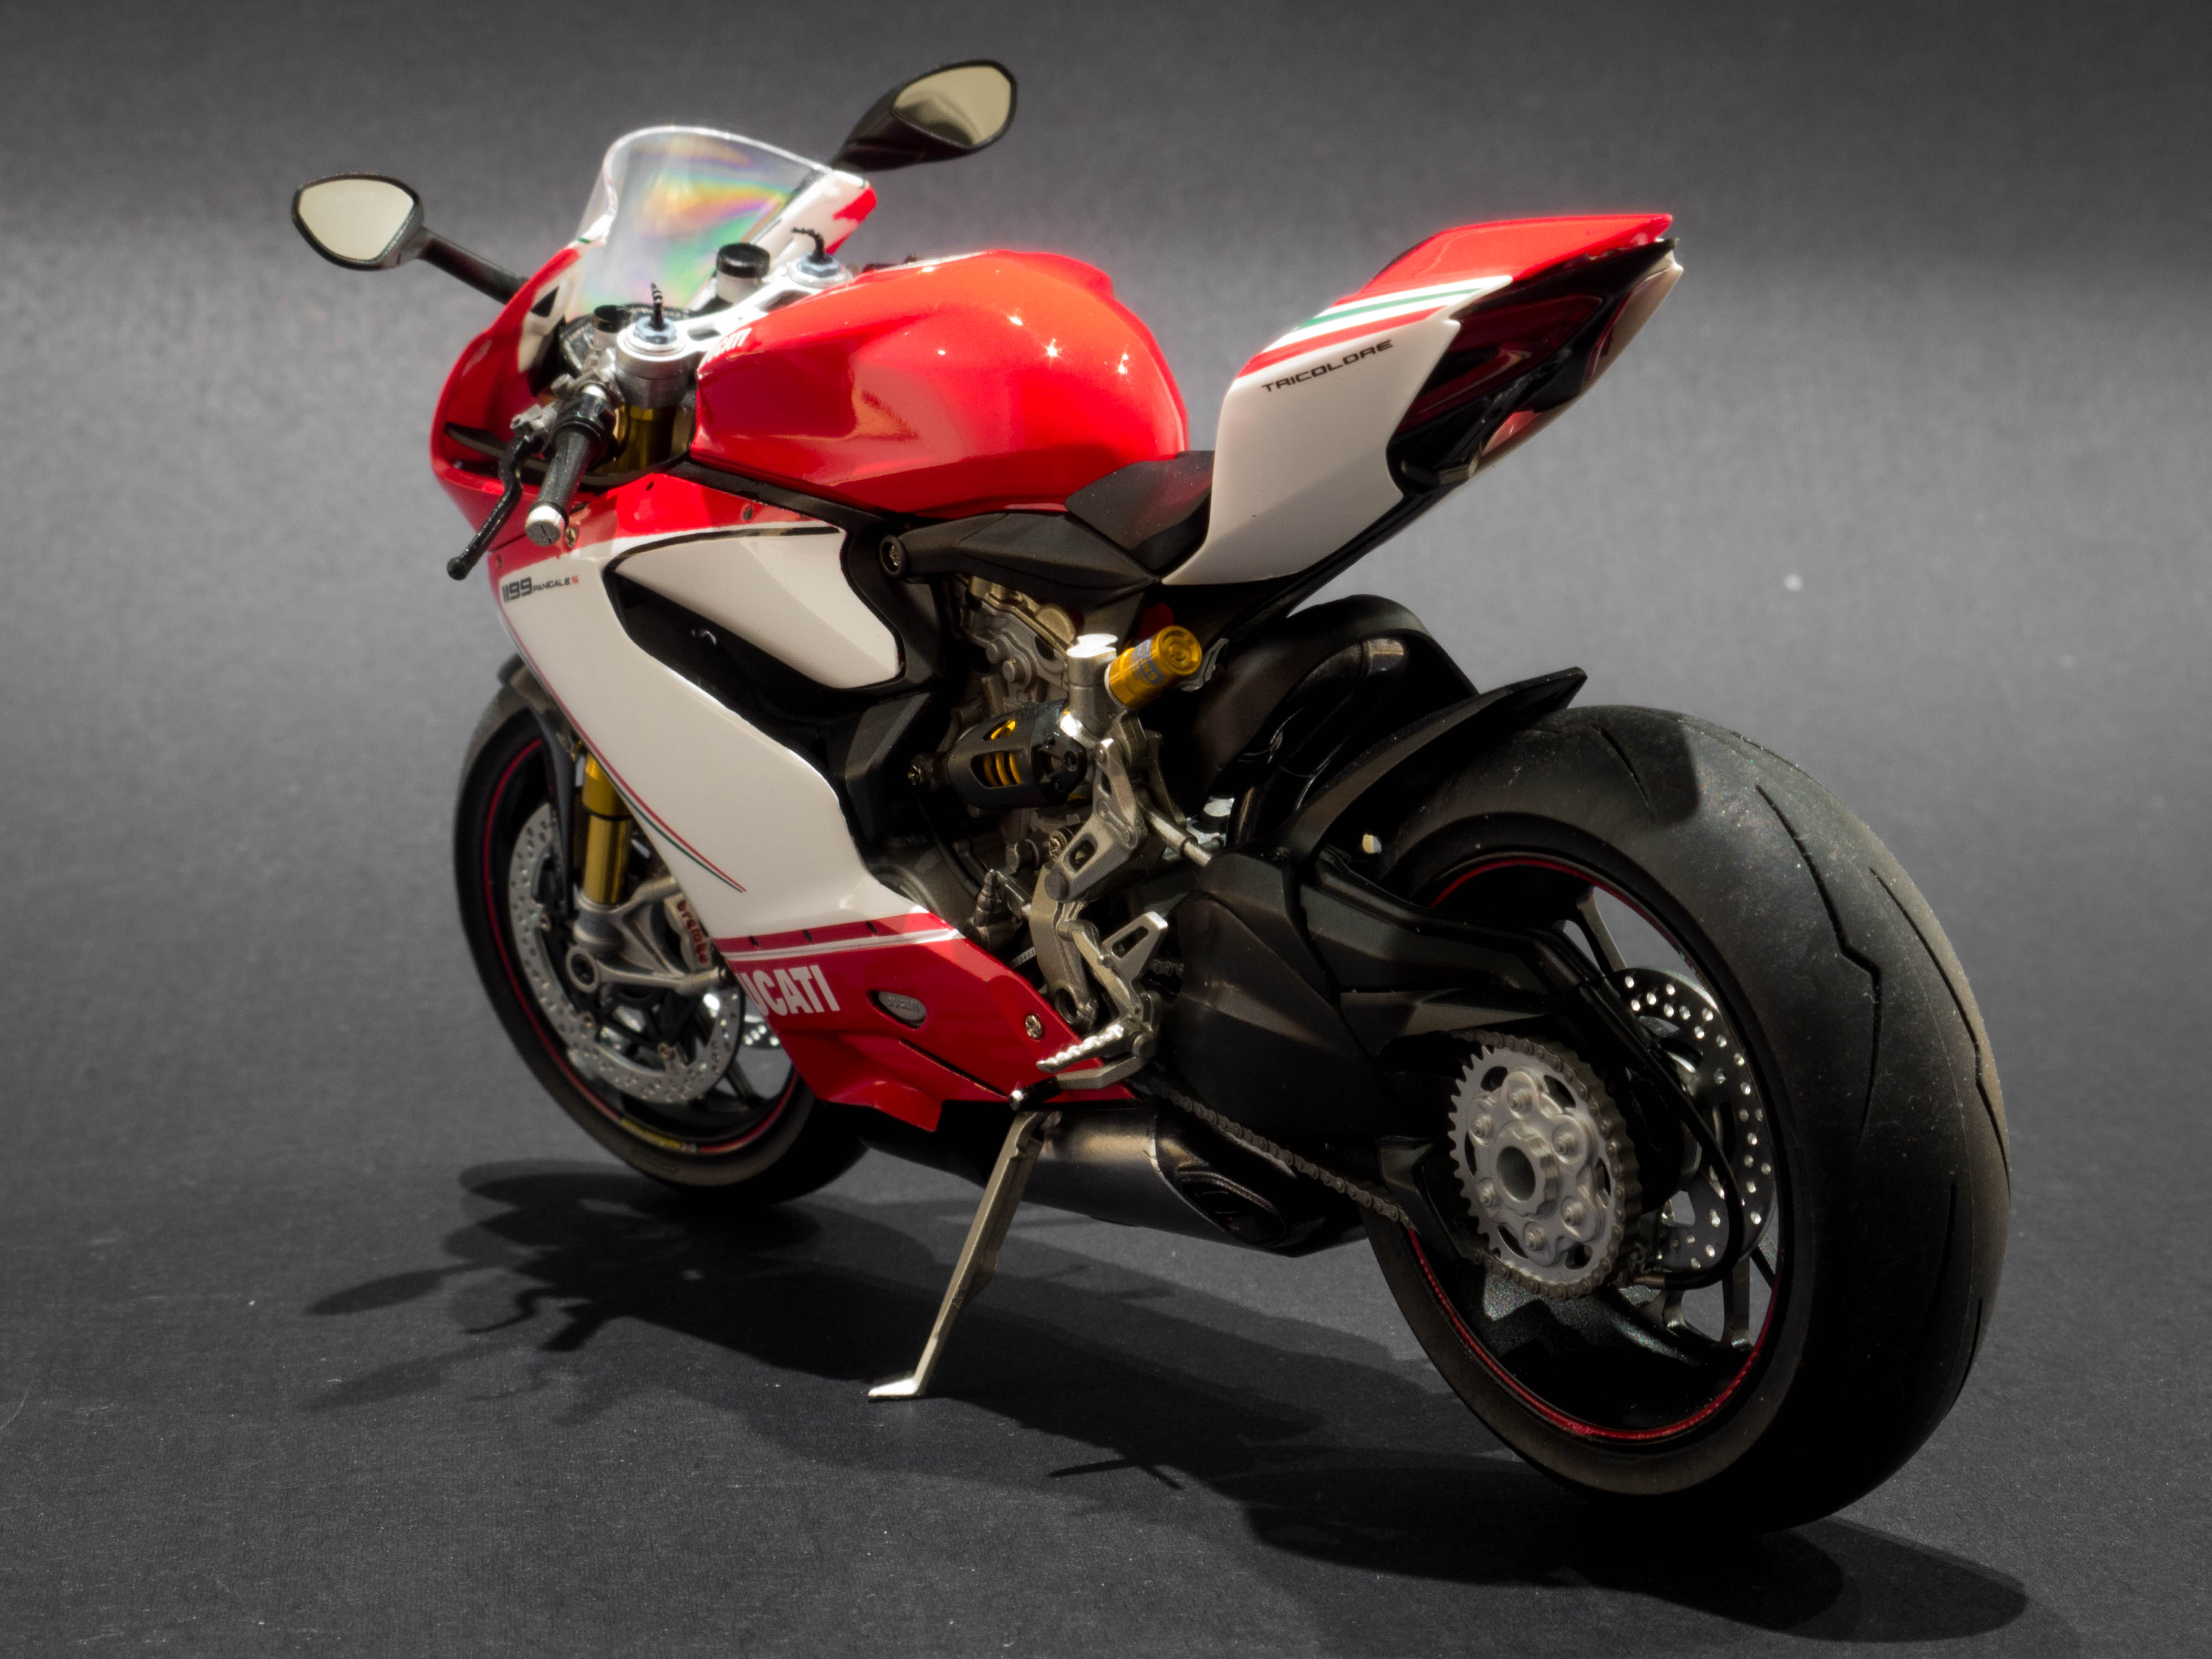
 Hi all, Here is my first ever attempt at a motor bike kit. The kit in question is tamiya's Ducati 1199 Tricolore in 1:12 scale. This is my favourite motorbike, I really like the design of it and how everything is packaged so neatly in the body. The kit was very easy to work with, very little modifications had to be made. In addition to the kit, i got the detail up set from tamiya which adds metal suspension forks, rear suspension oil resivoir and disc brake rivets. for the little bit extra cost, I highly recommend getting this, as the added detail is unreal. Anyway, enjoy the photos below. Thanks
-
Hello friends Here I bring you one of the best unions between sportsman and machine. The machine or rather the motorcycle is a Honda and the athlete definitely had to be Valentino Rossi. He dominated the 2002 season and achieved the 2002 and 2003 championship over the RC211V. This model manufactured from the Tamiya brand in 1/12 scale, one of my first models made. https://youtu.be/fJmtochZHr0 Greetings and I hope you like it
-
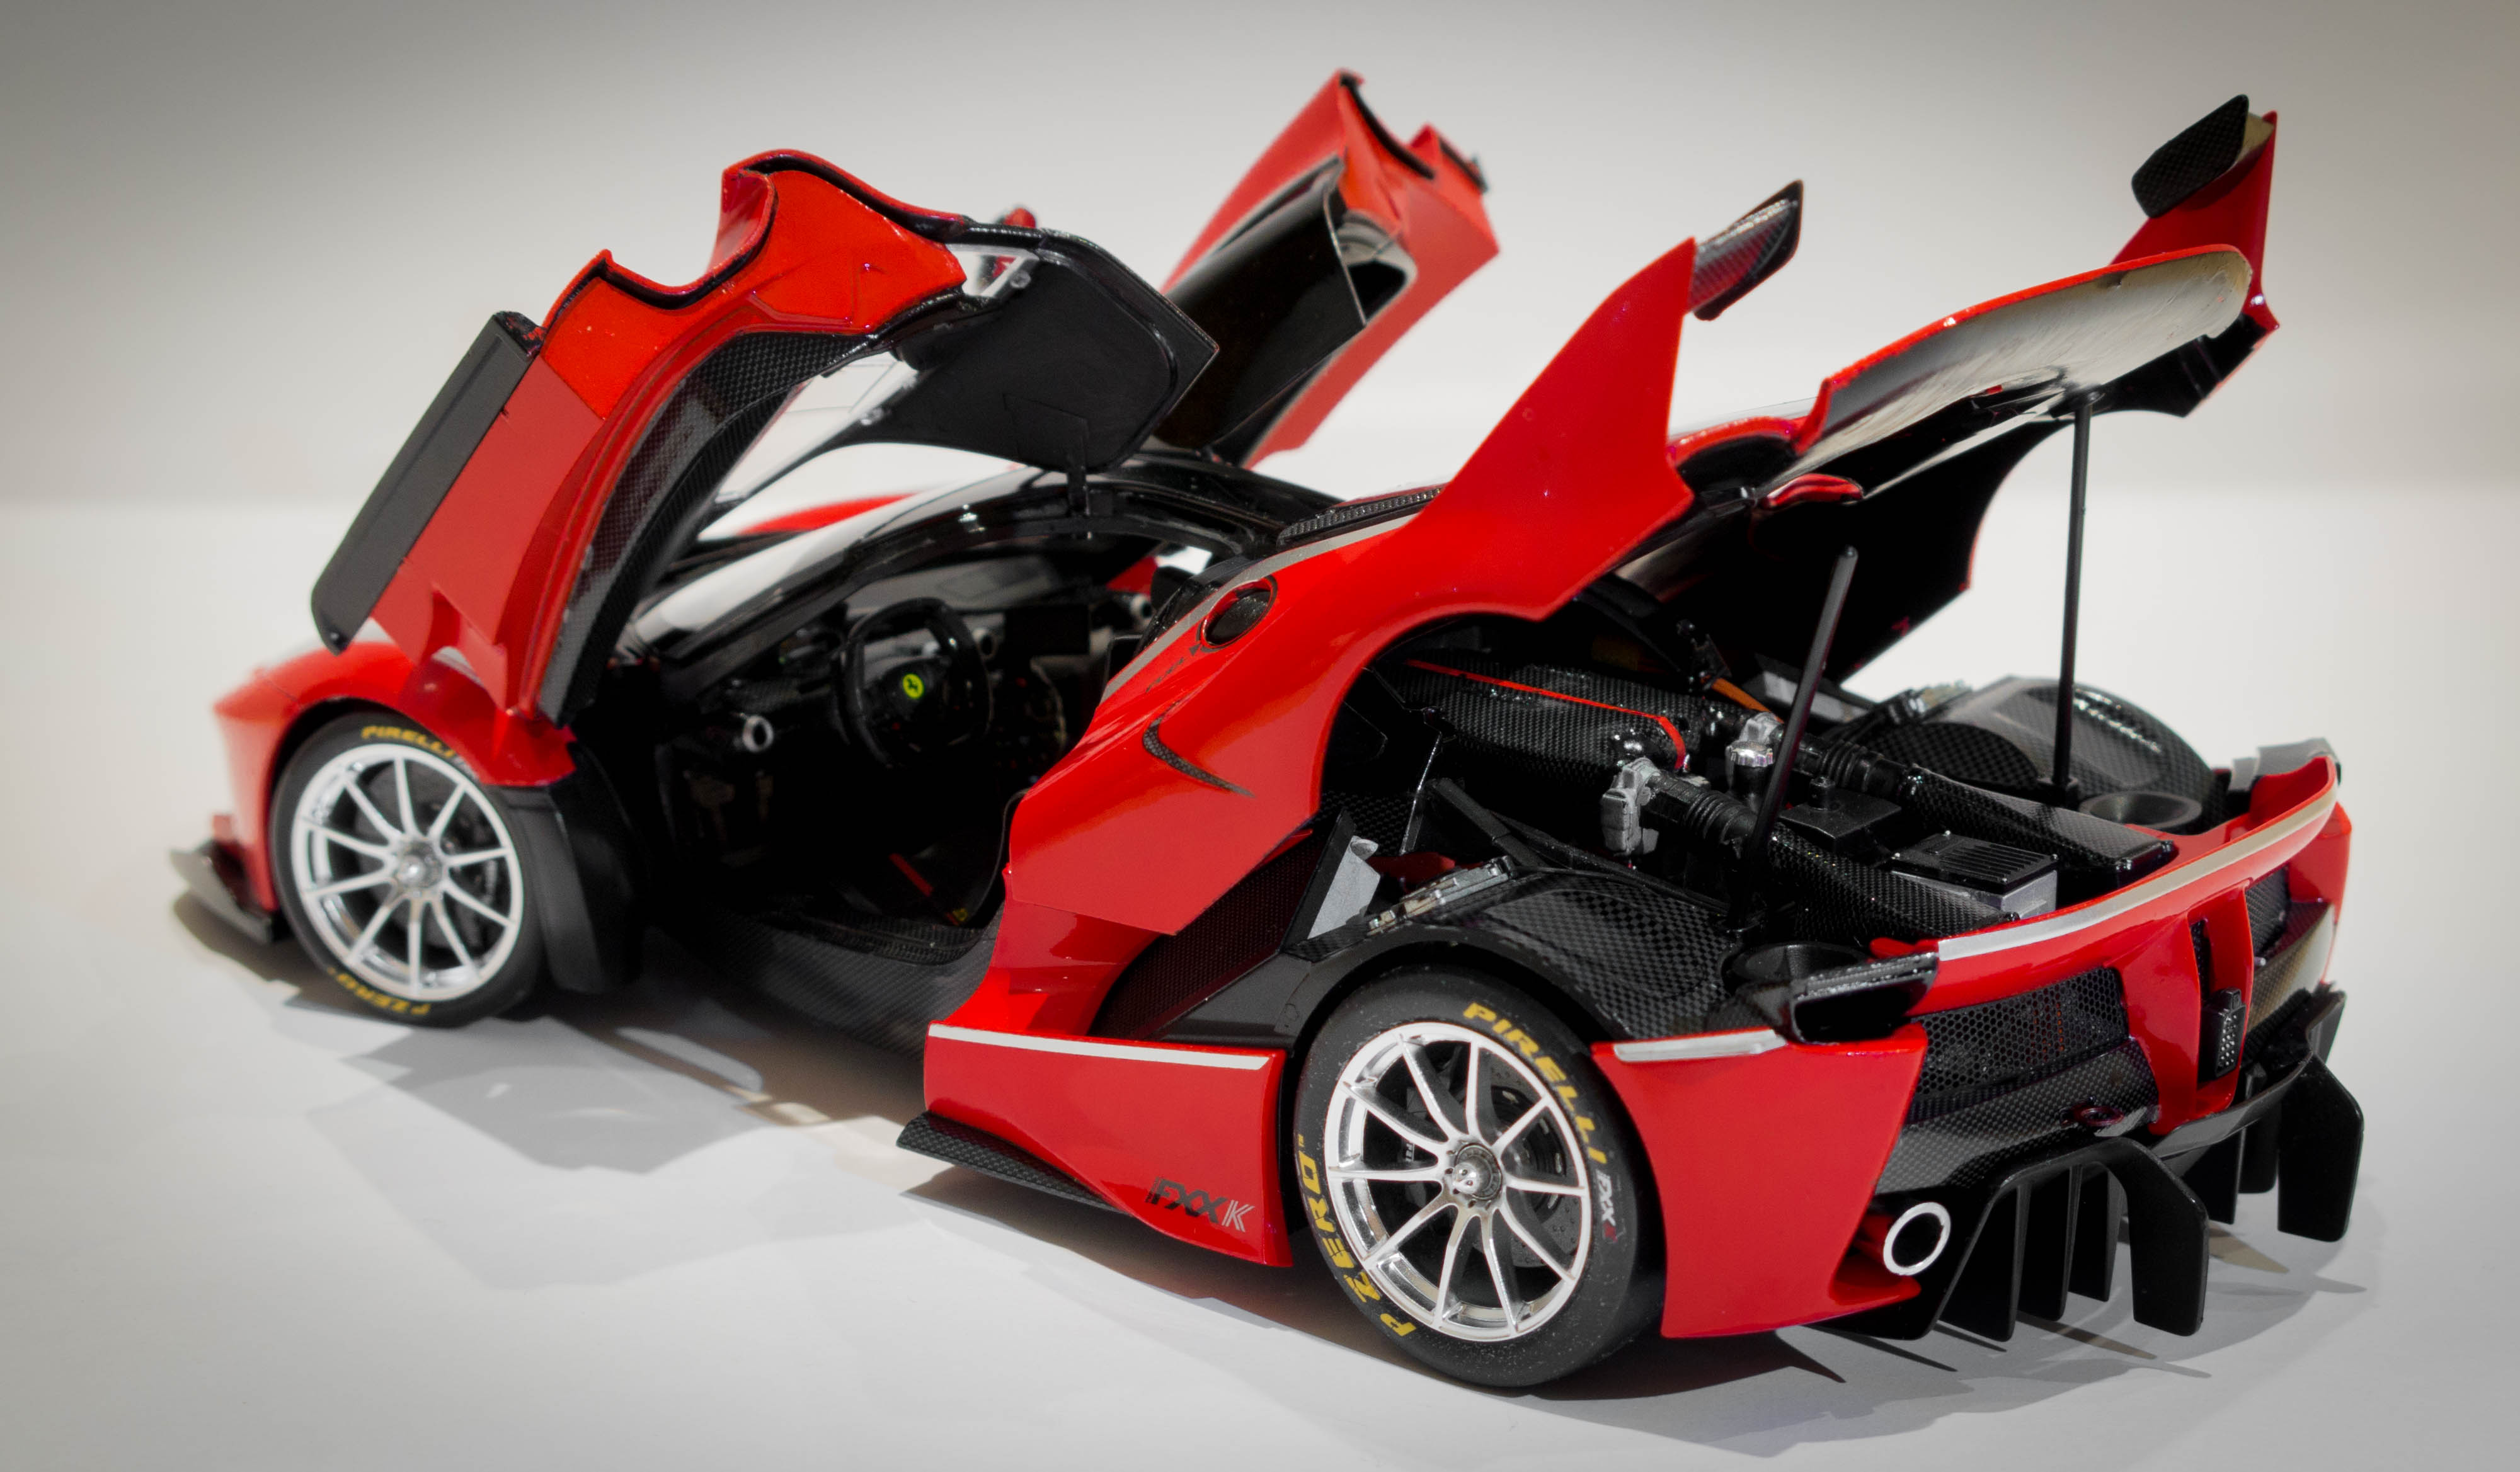
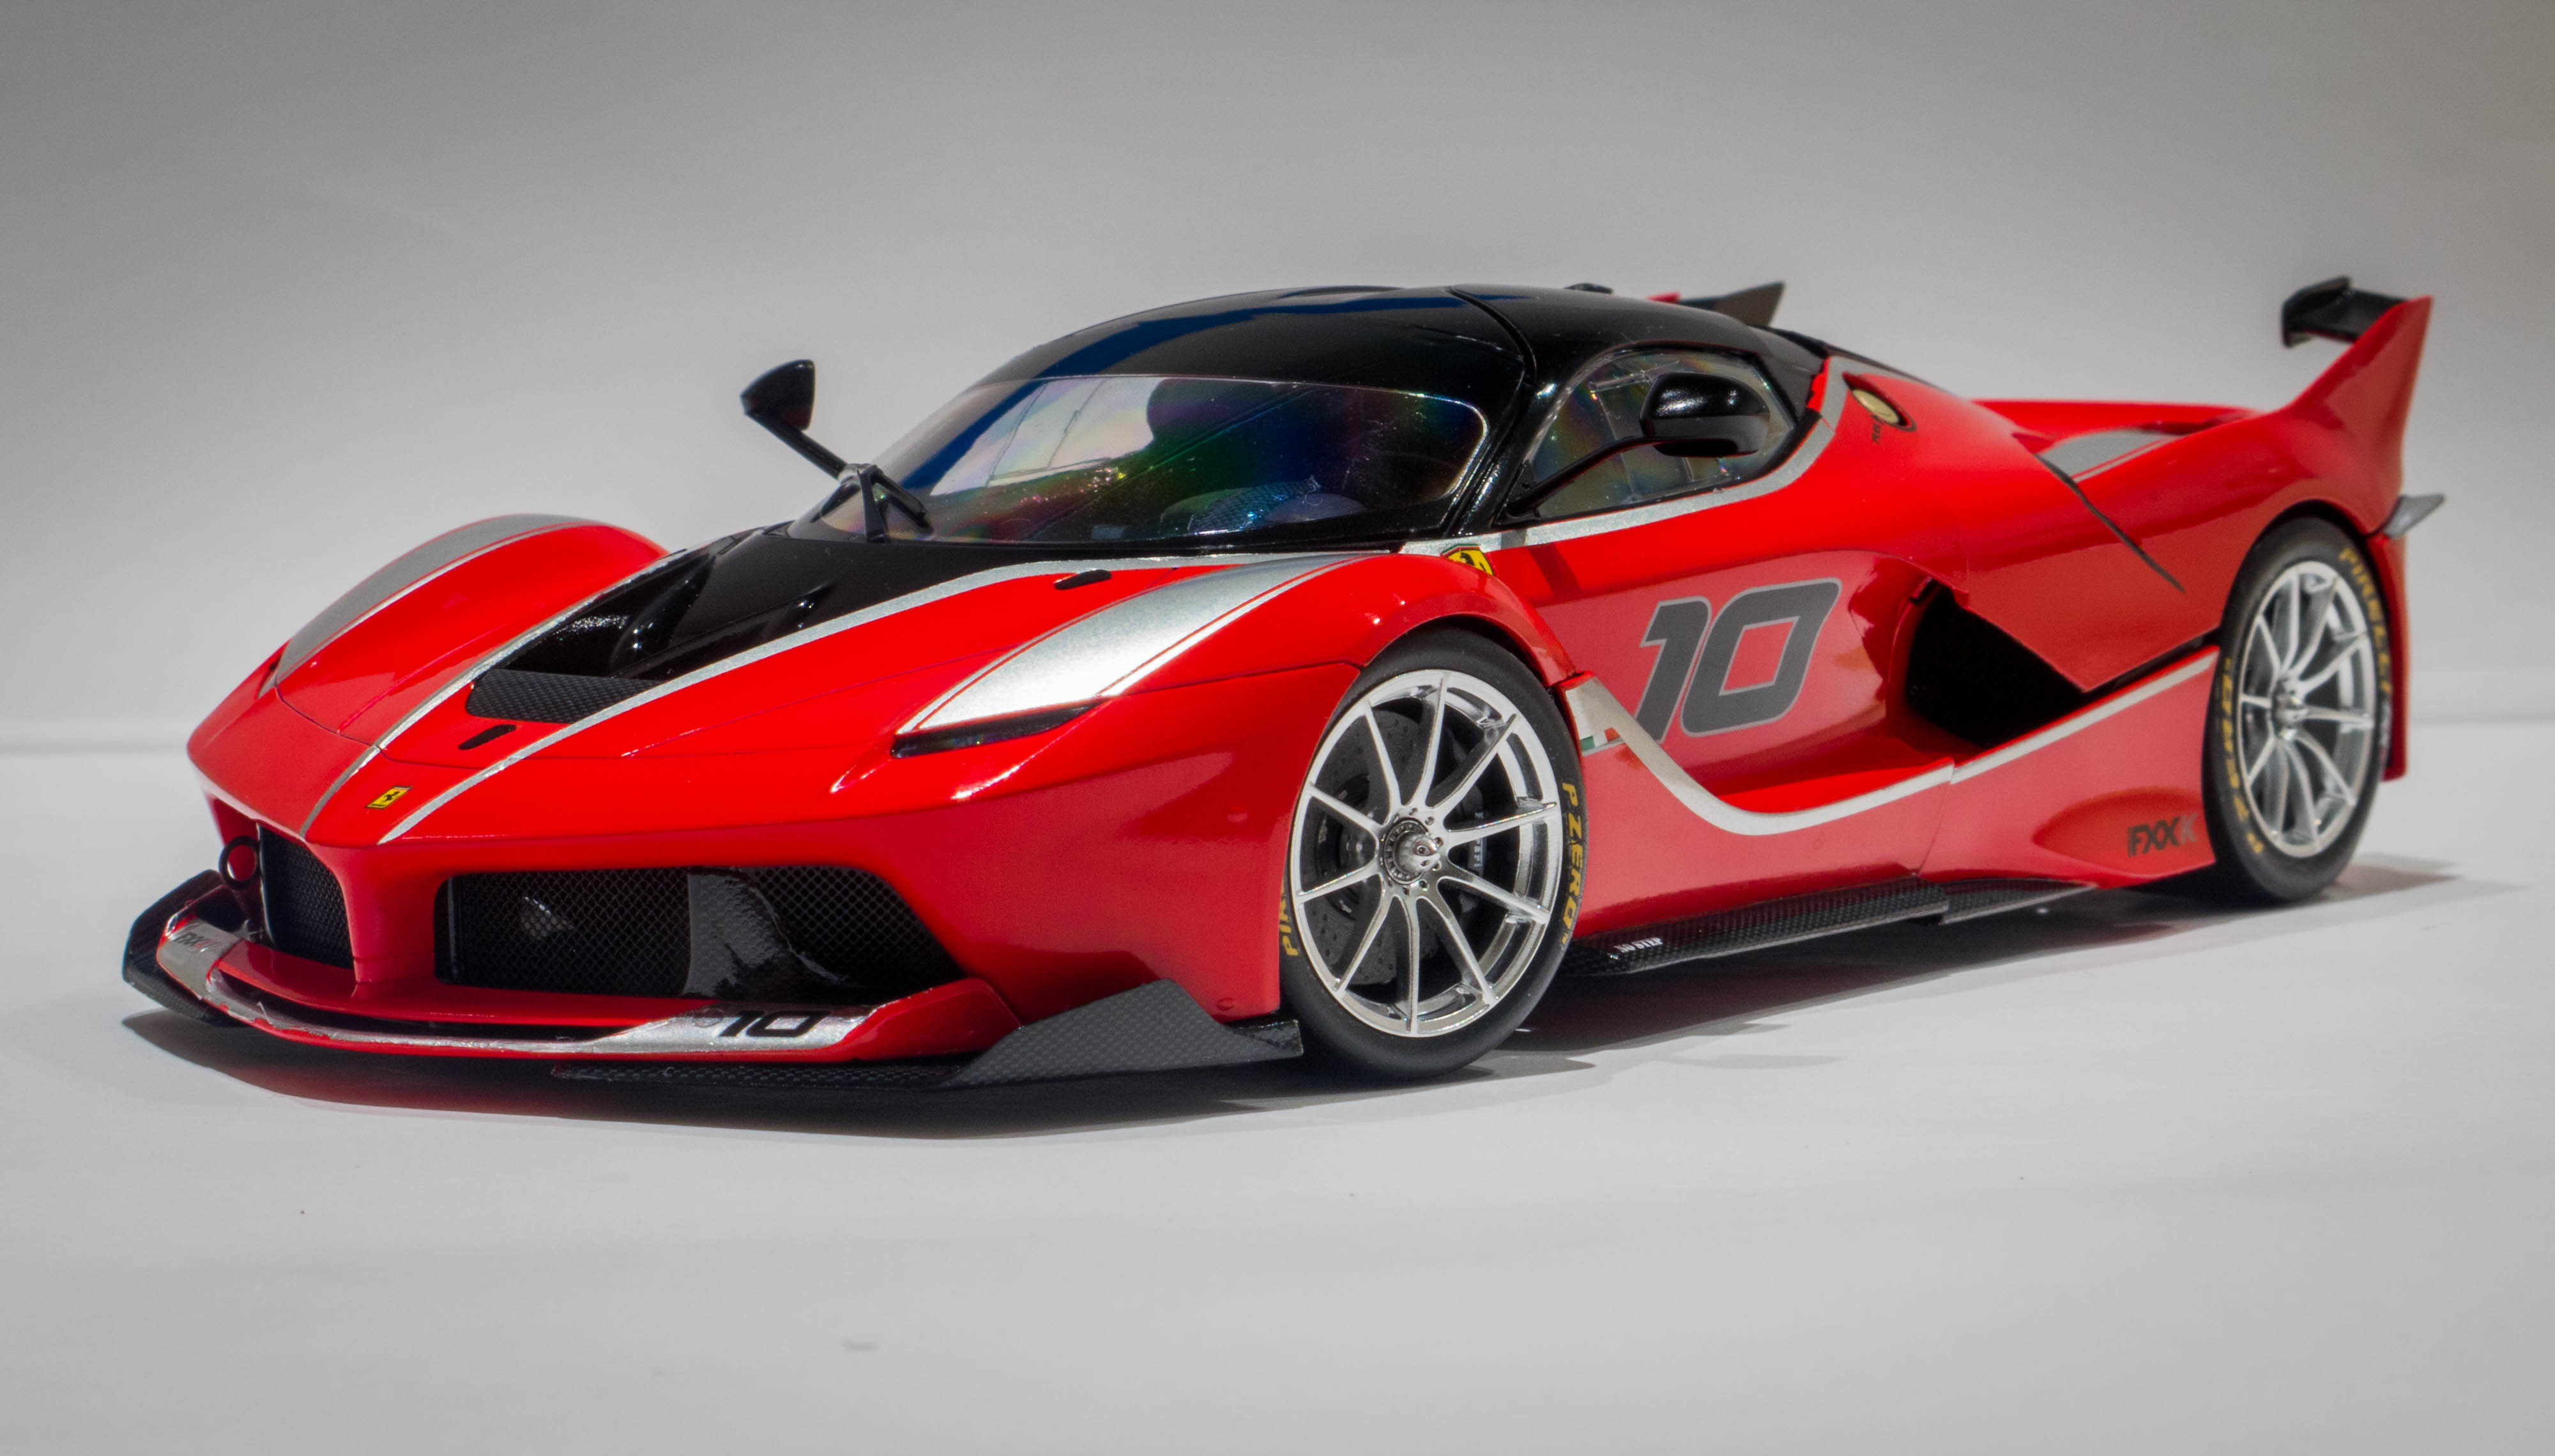
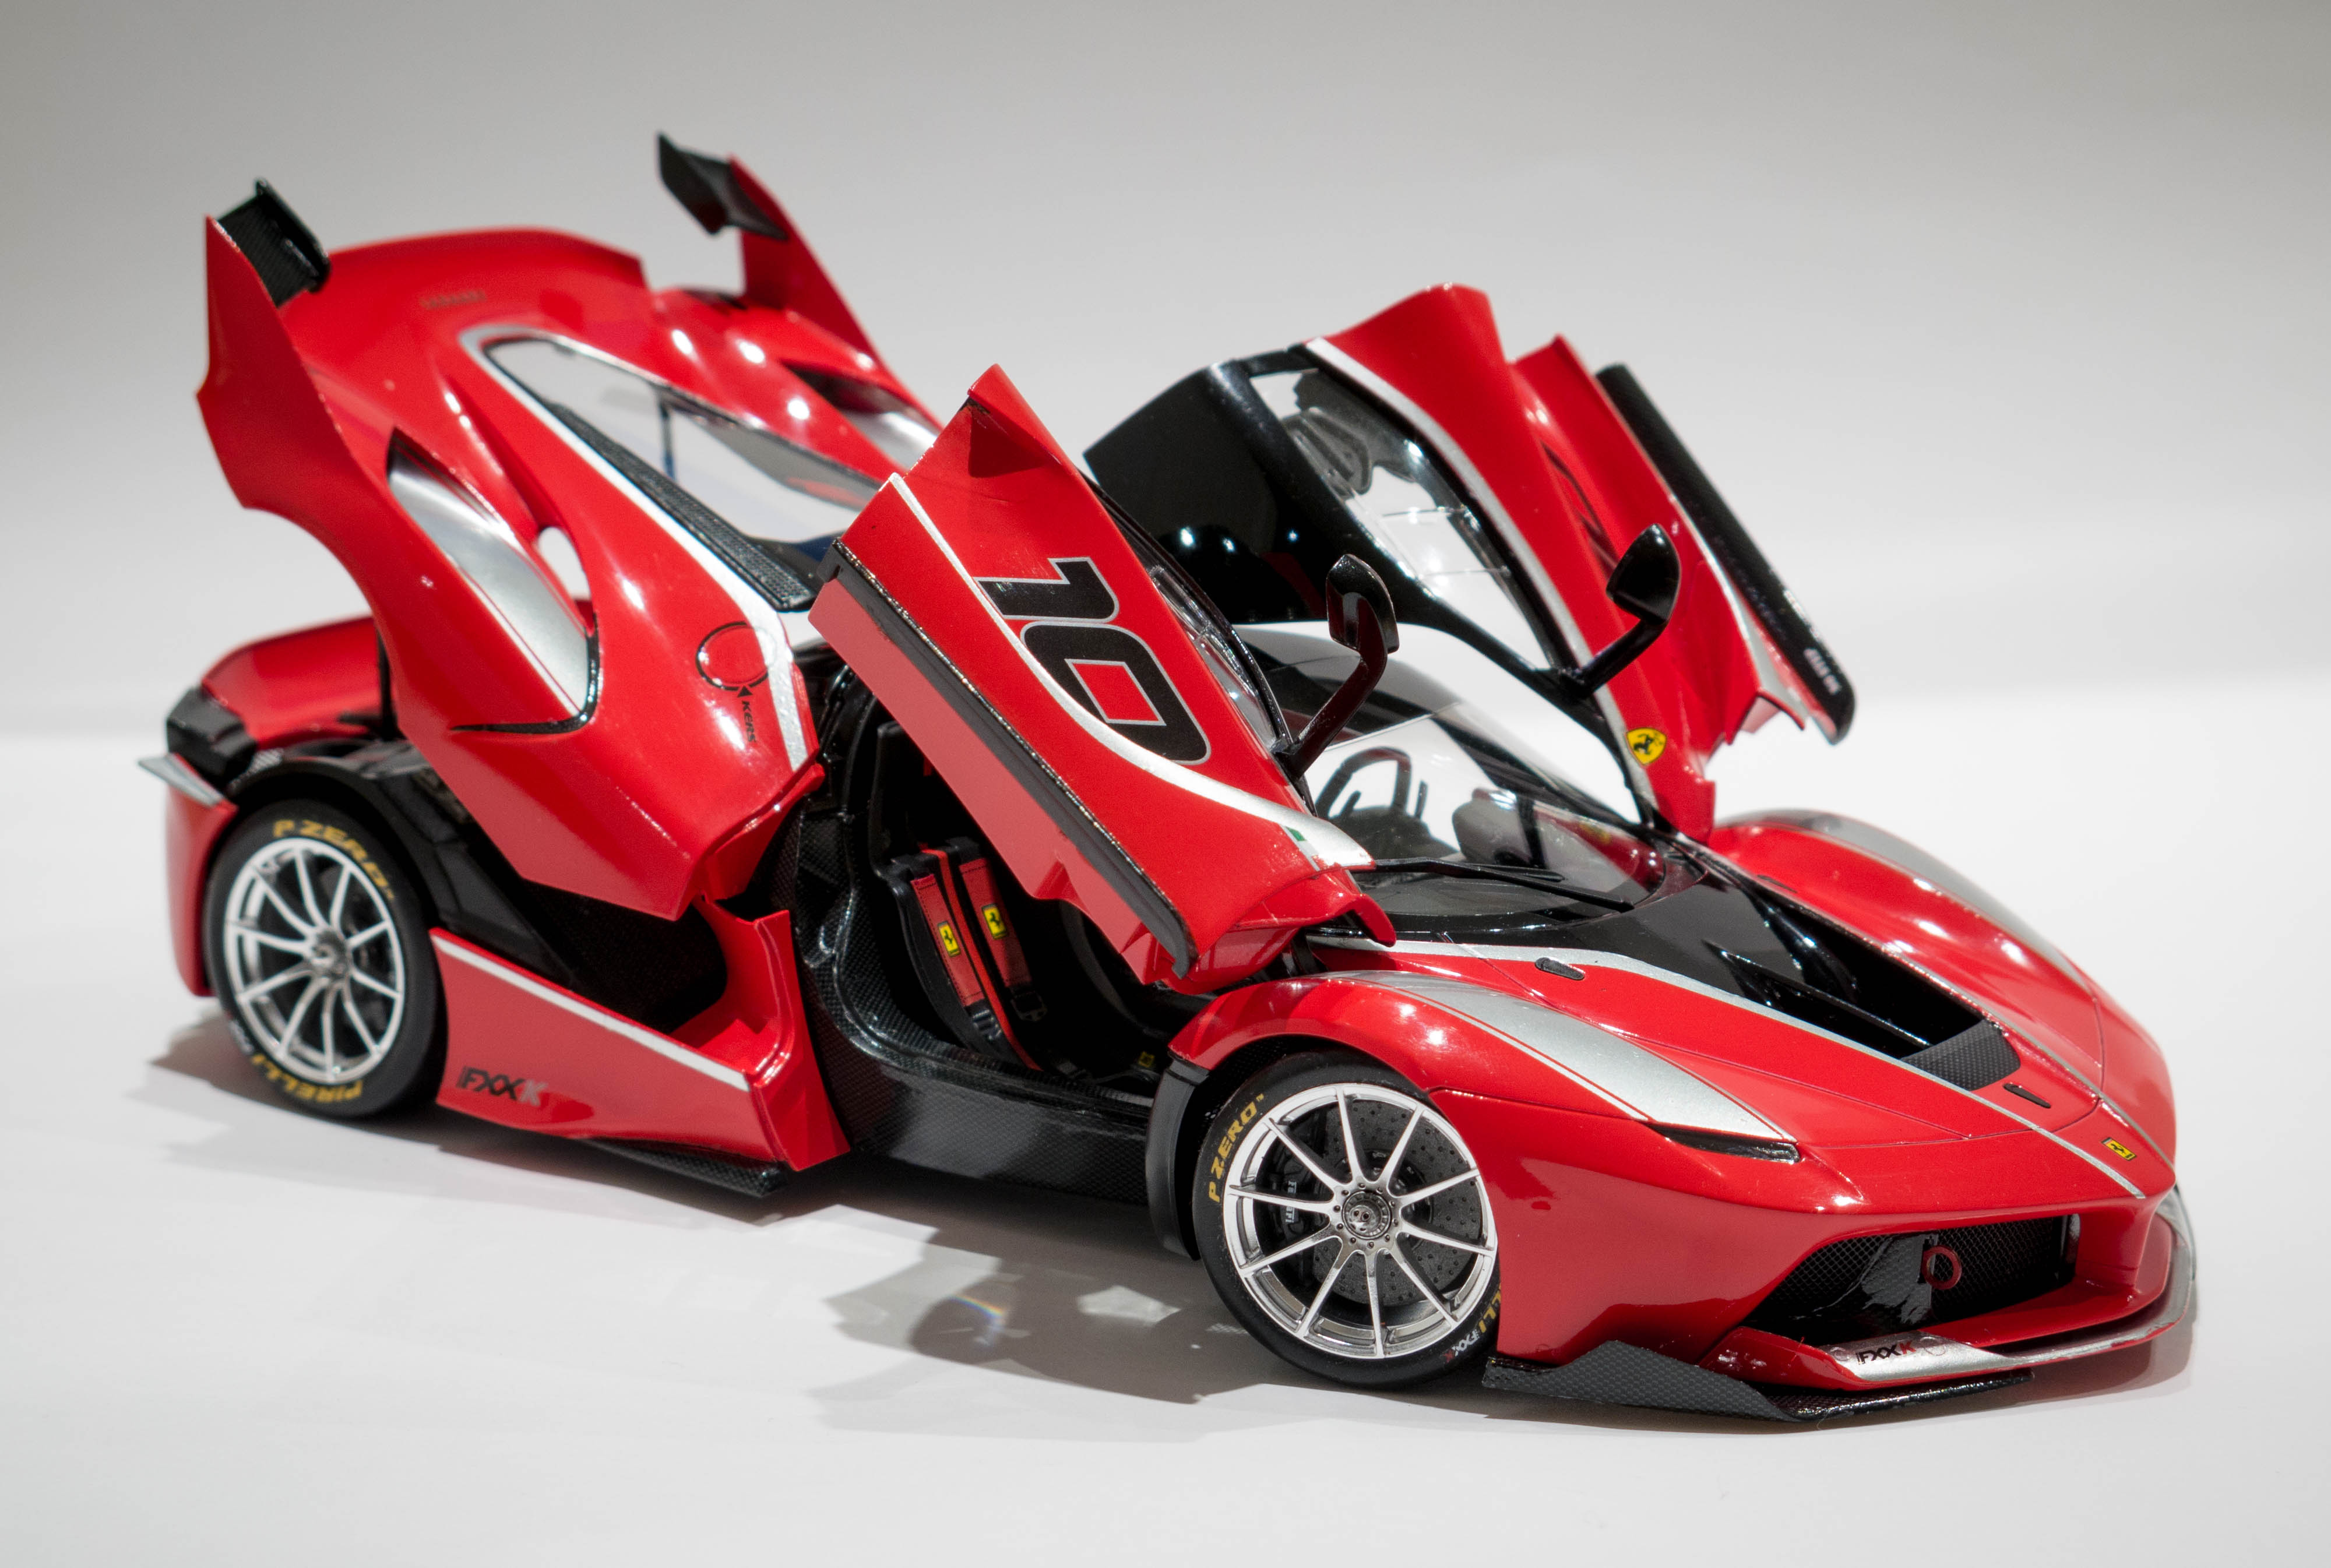
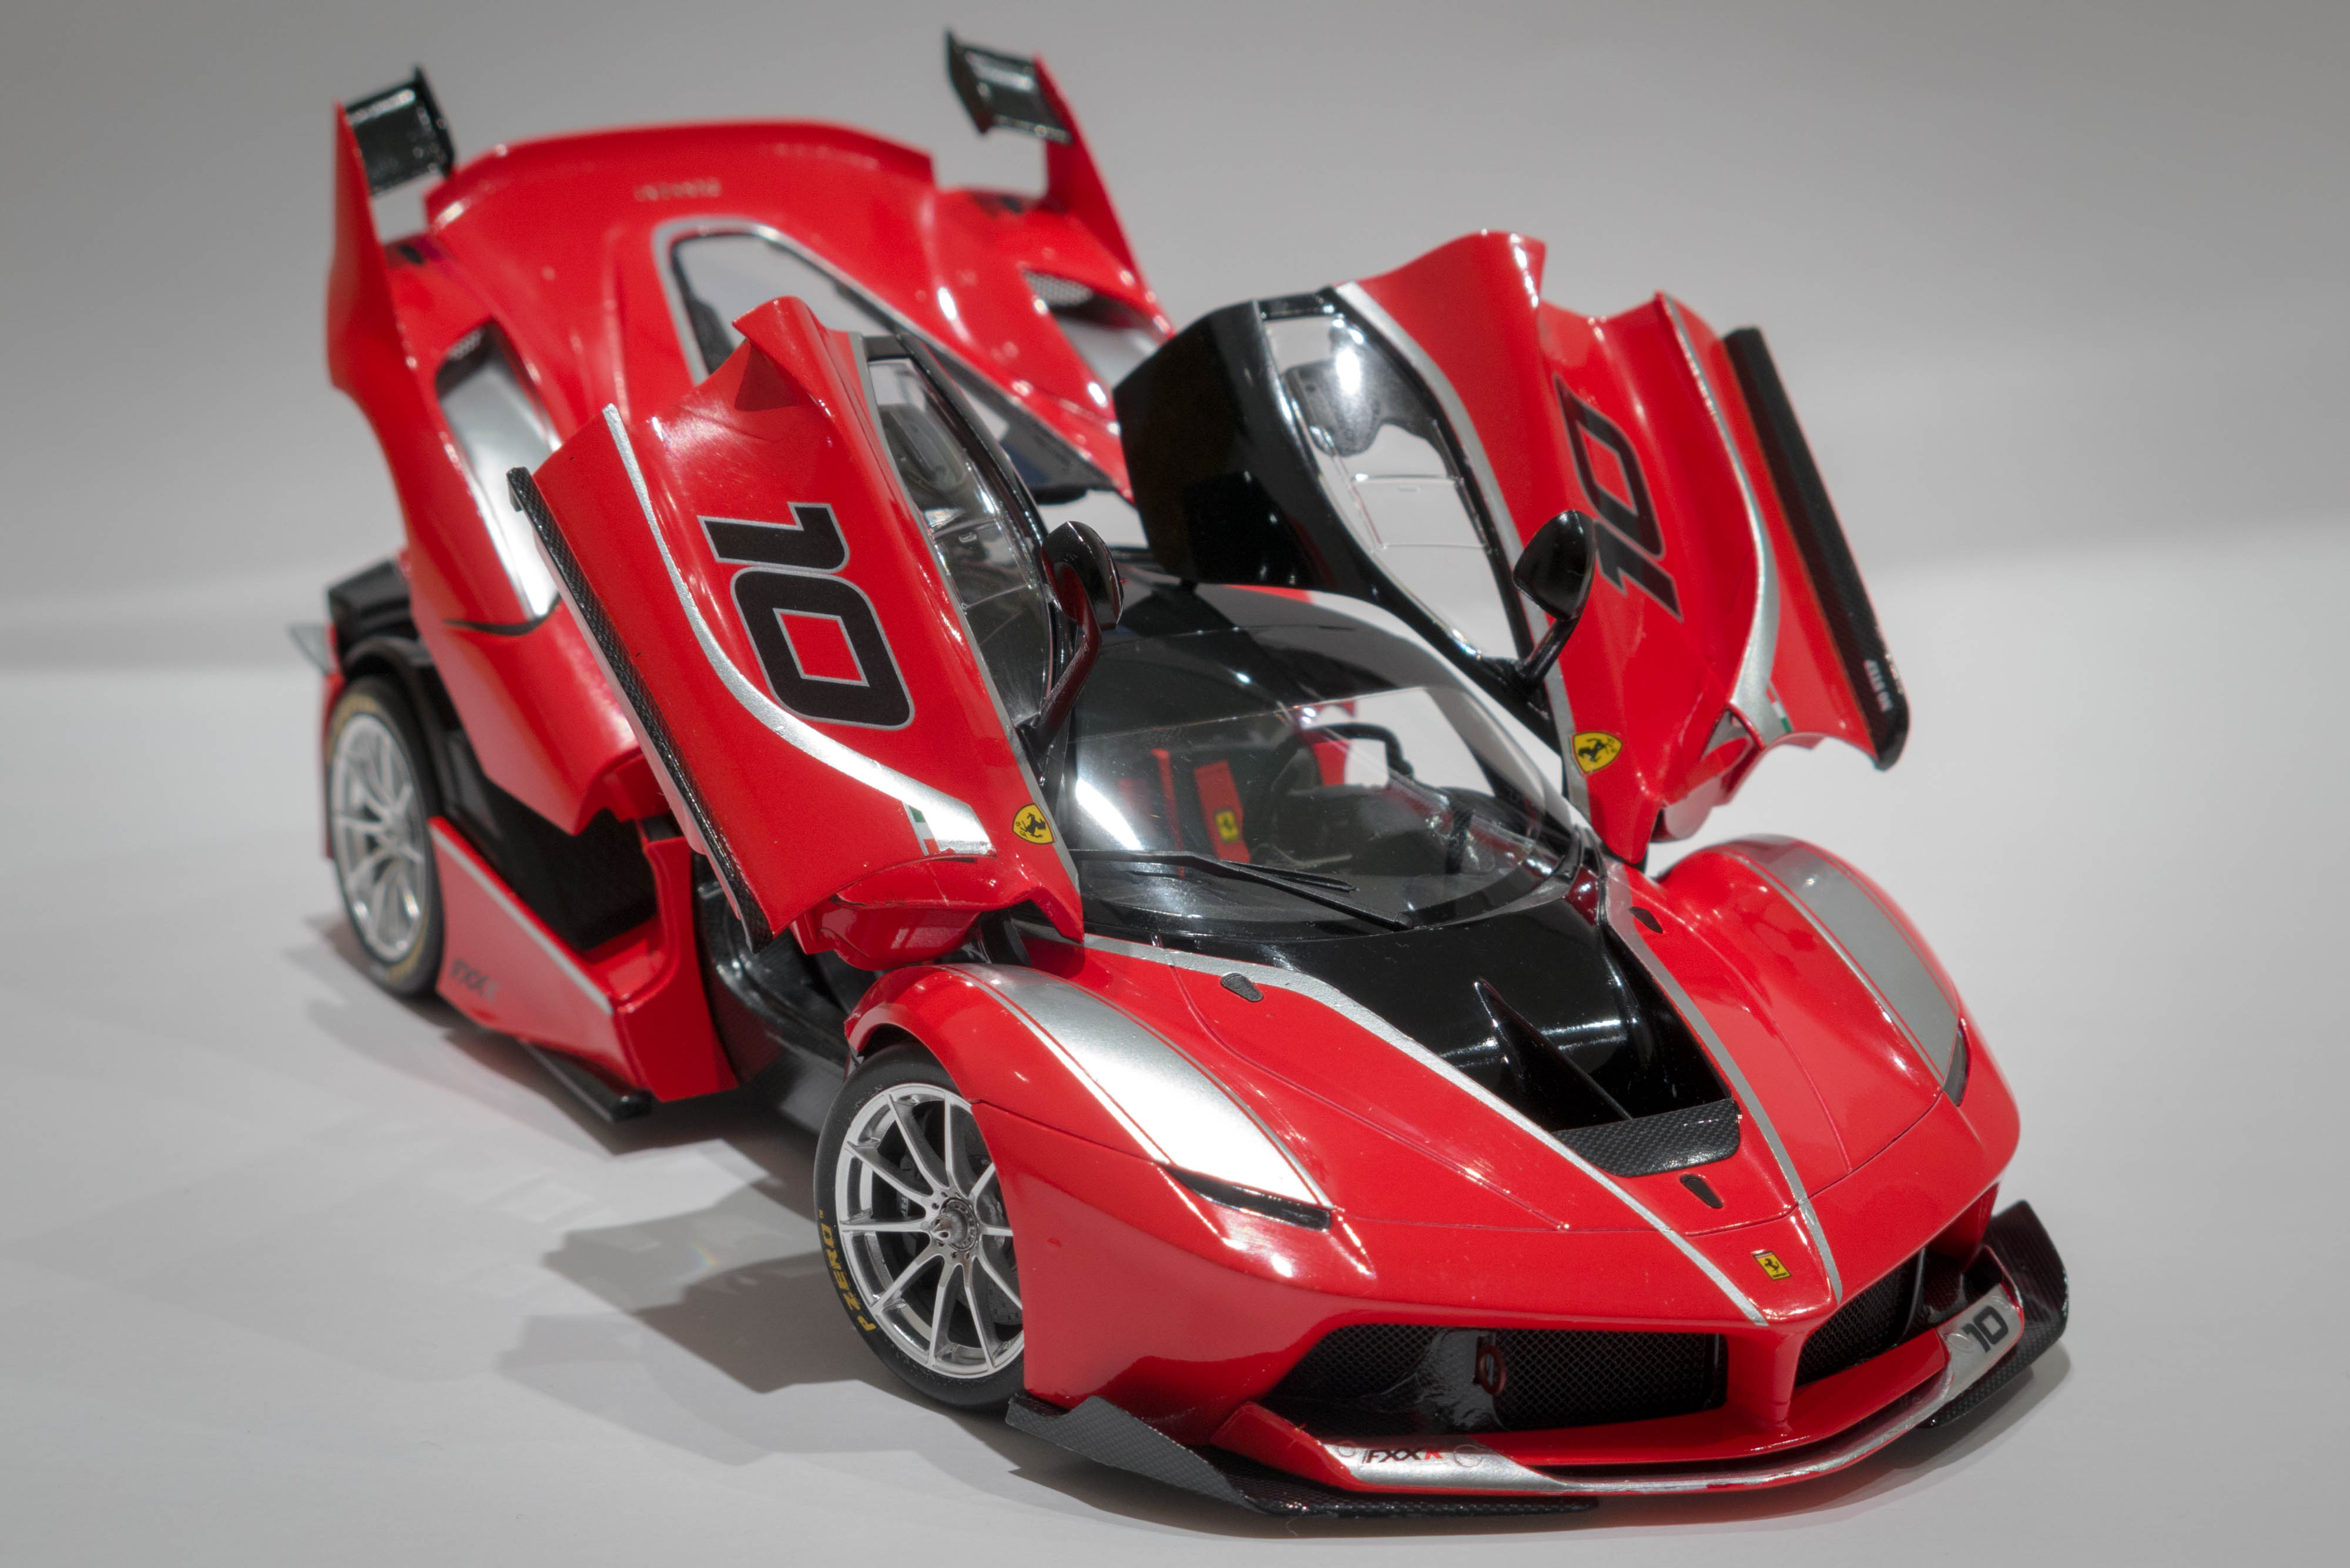
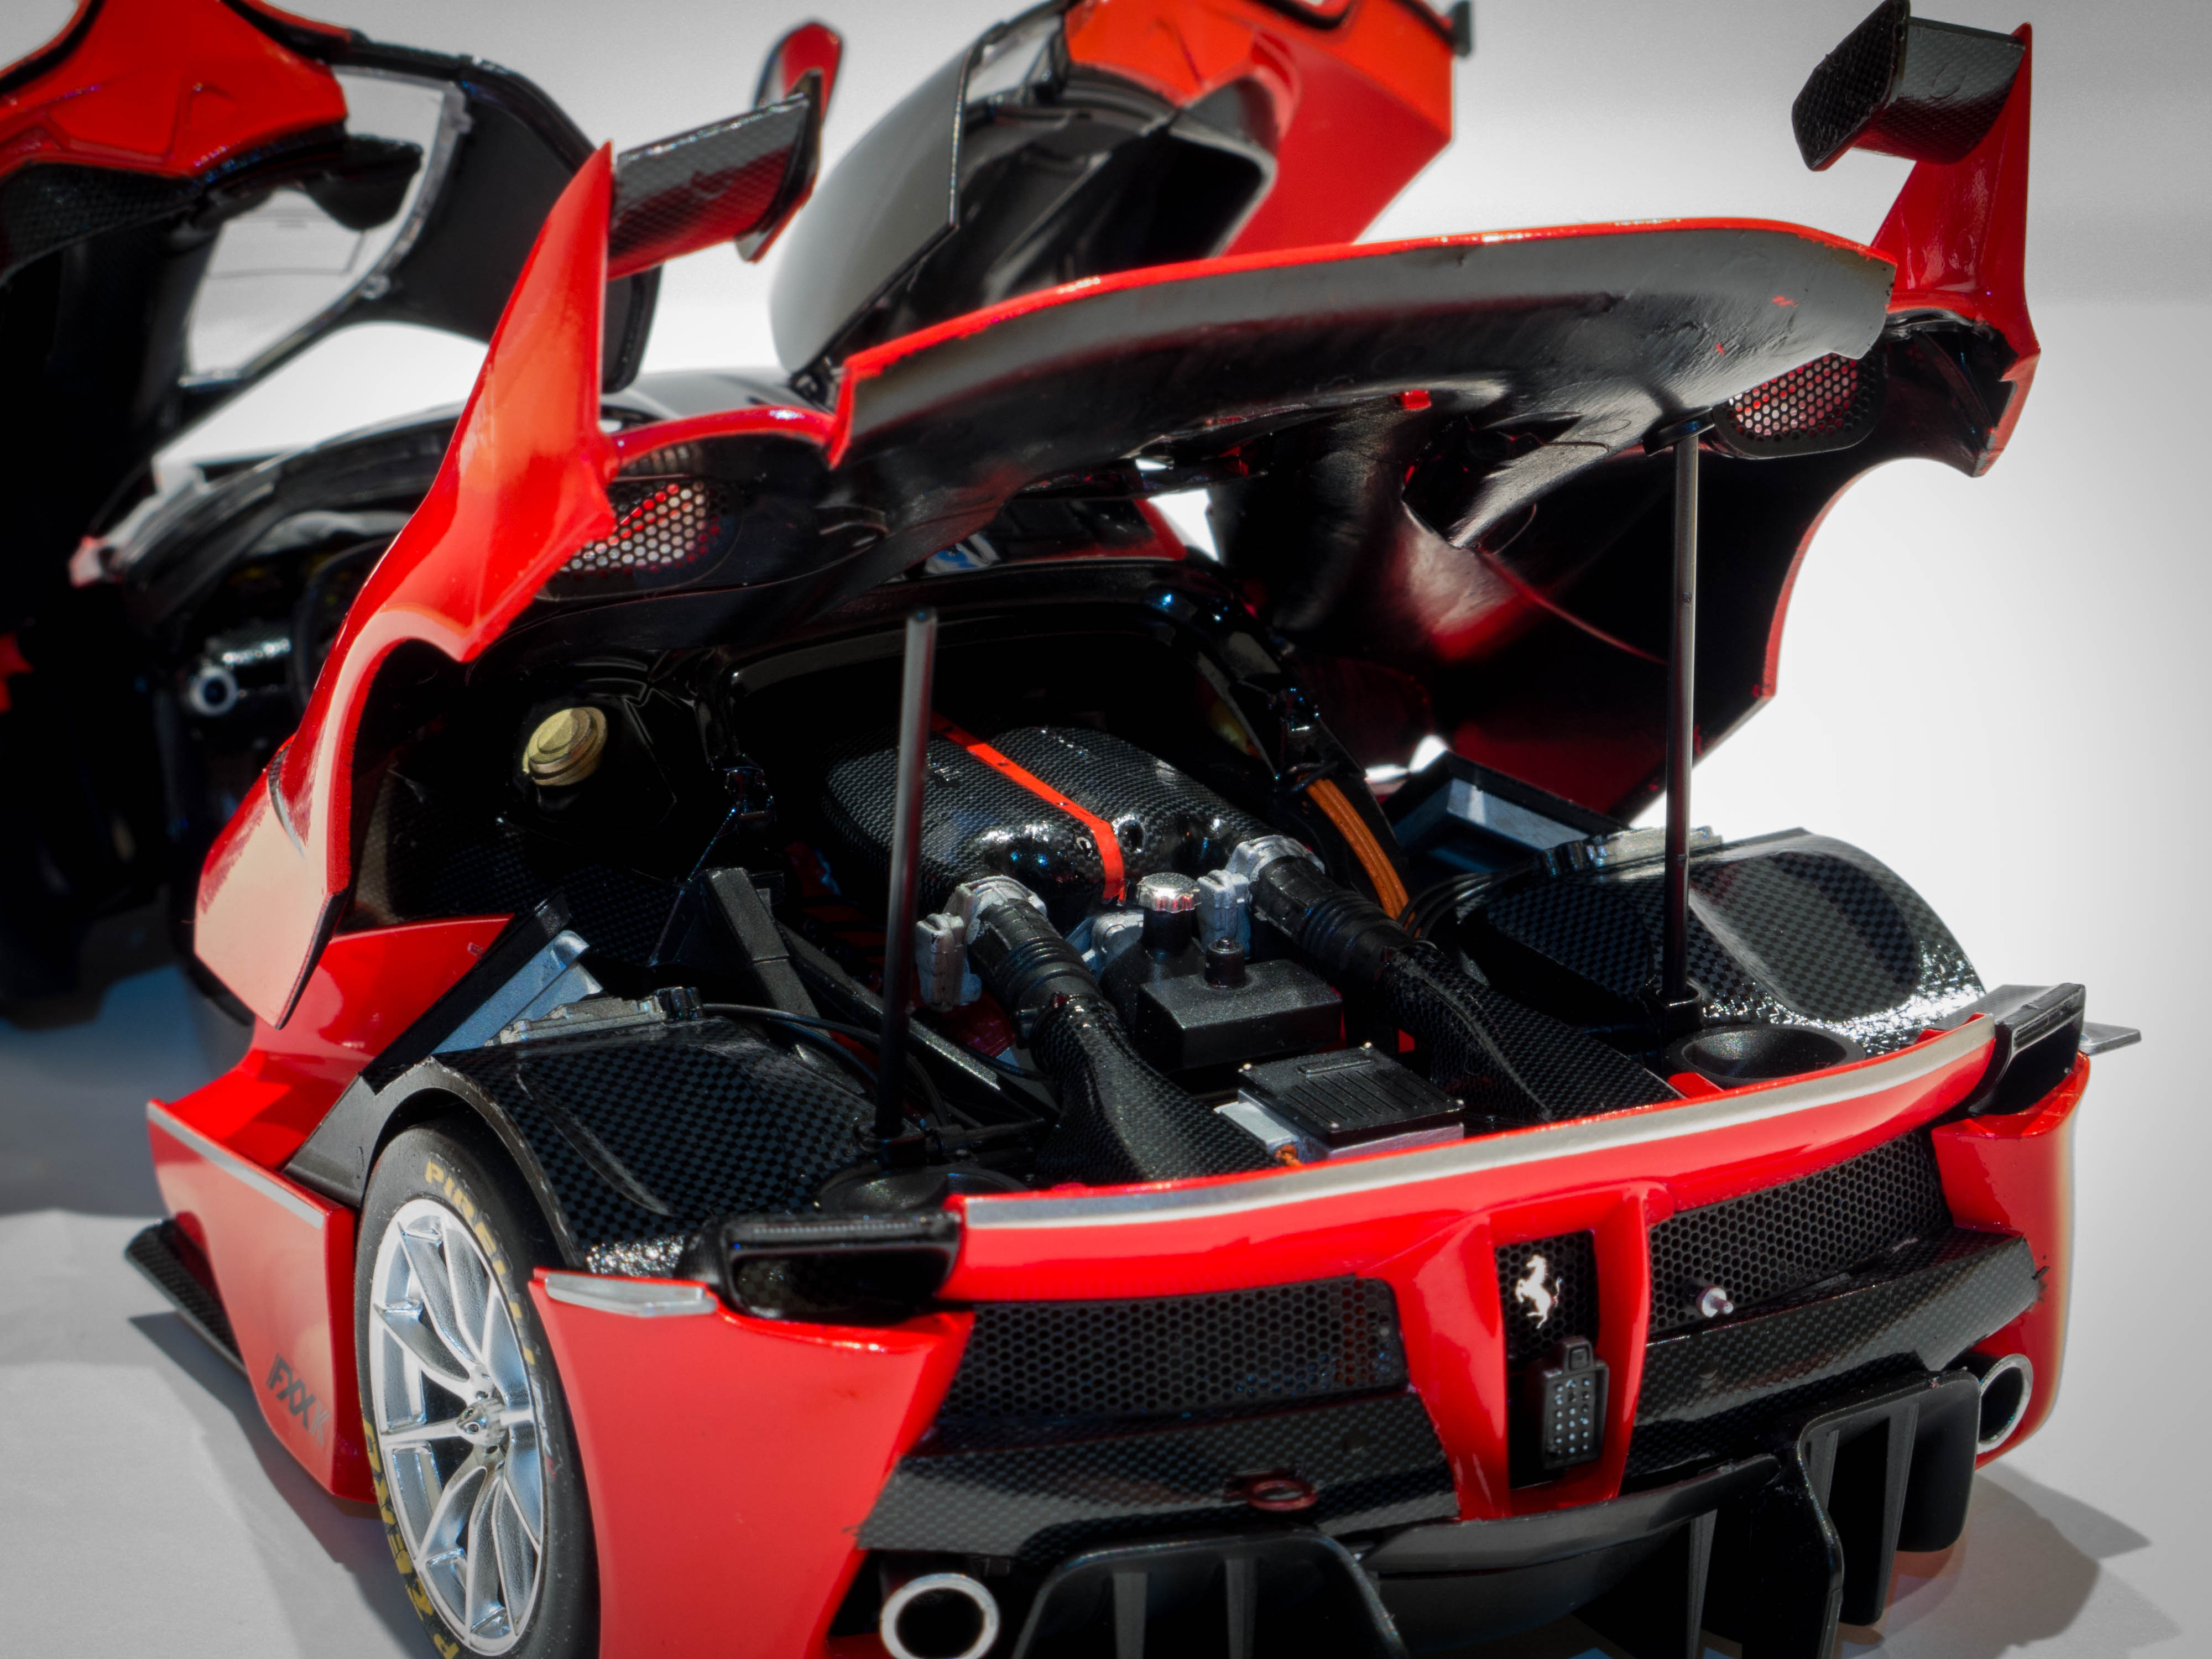
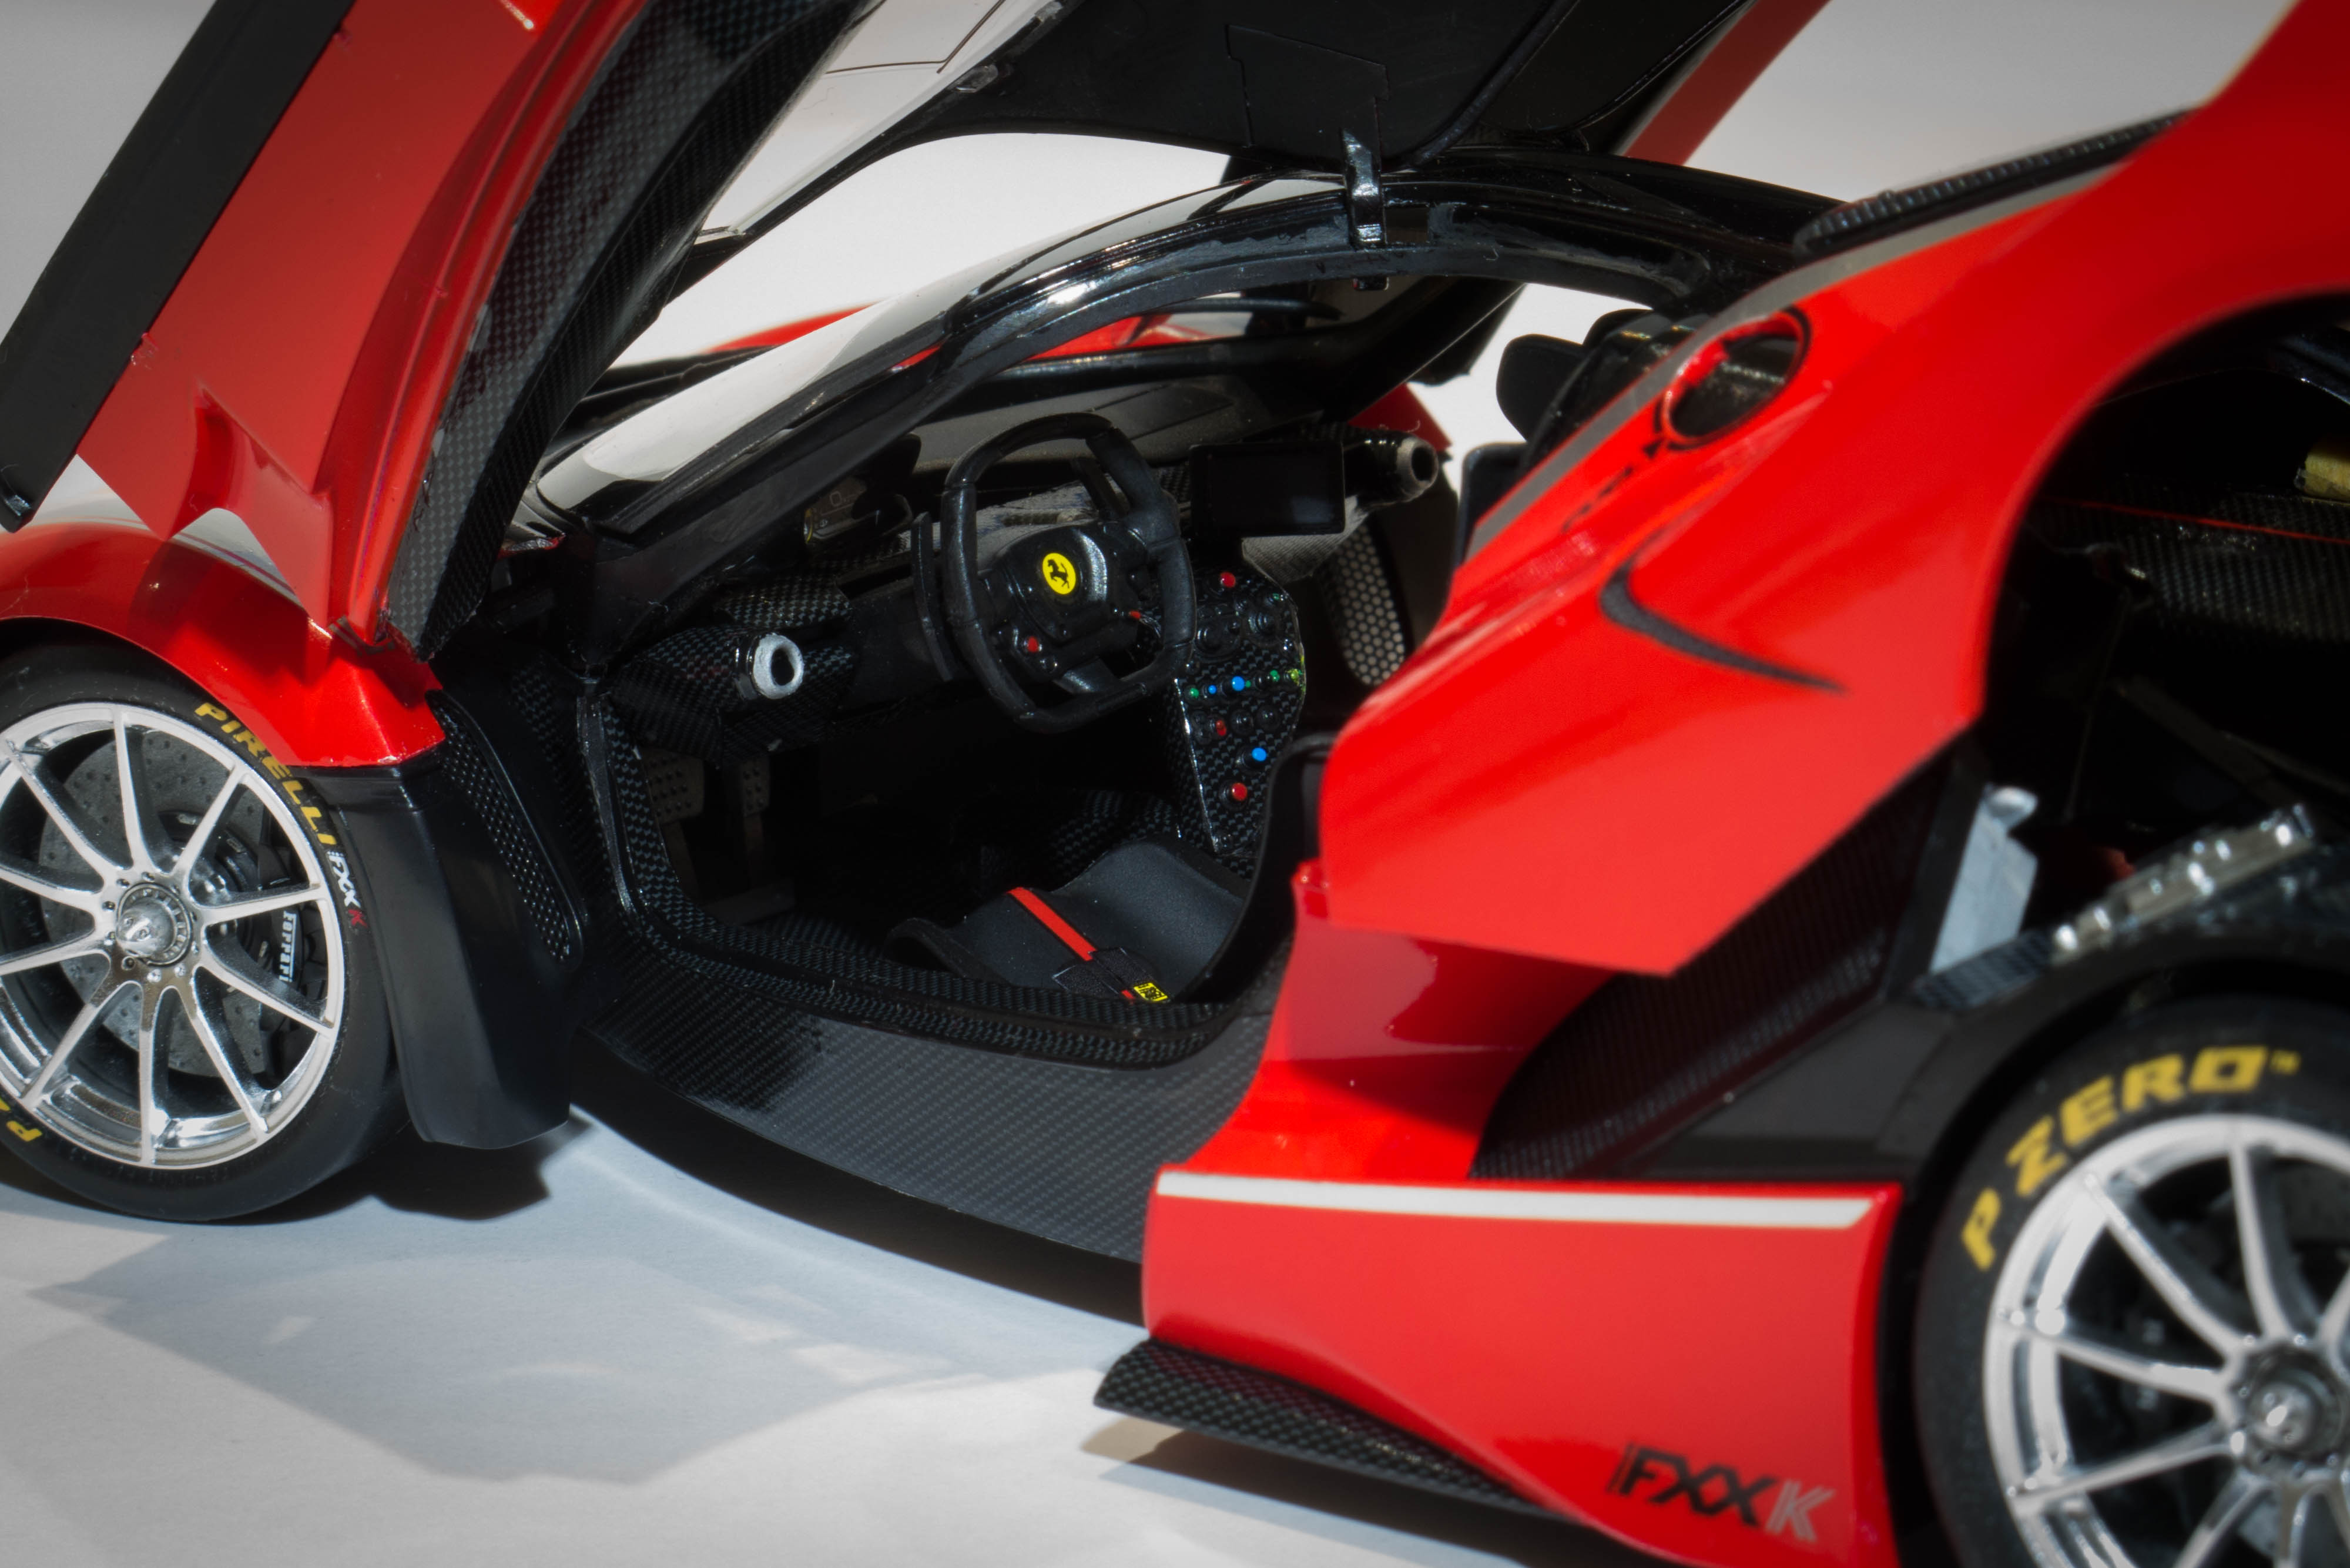
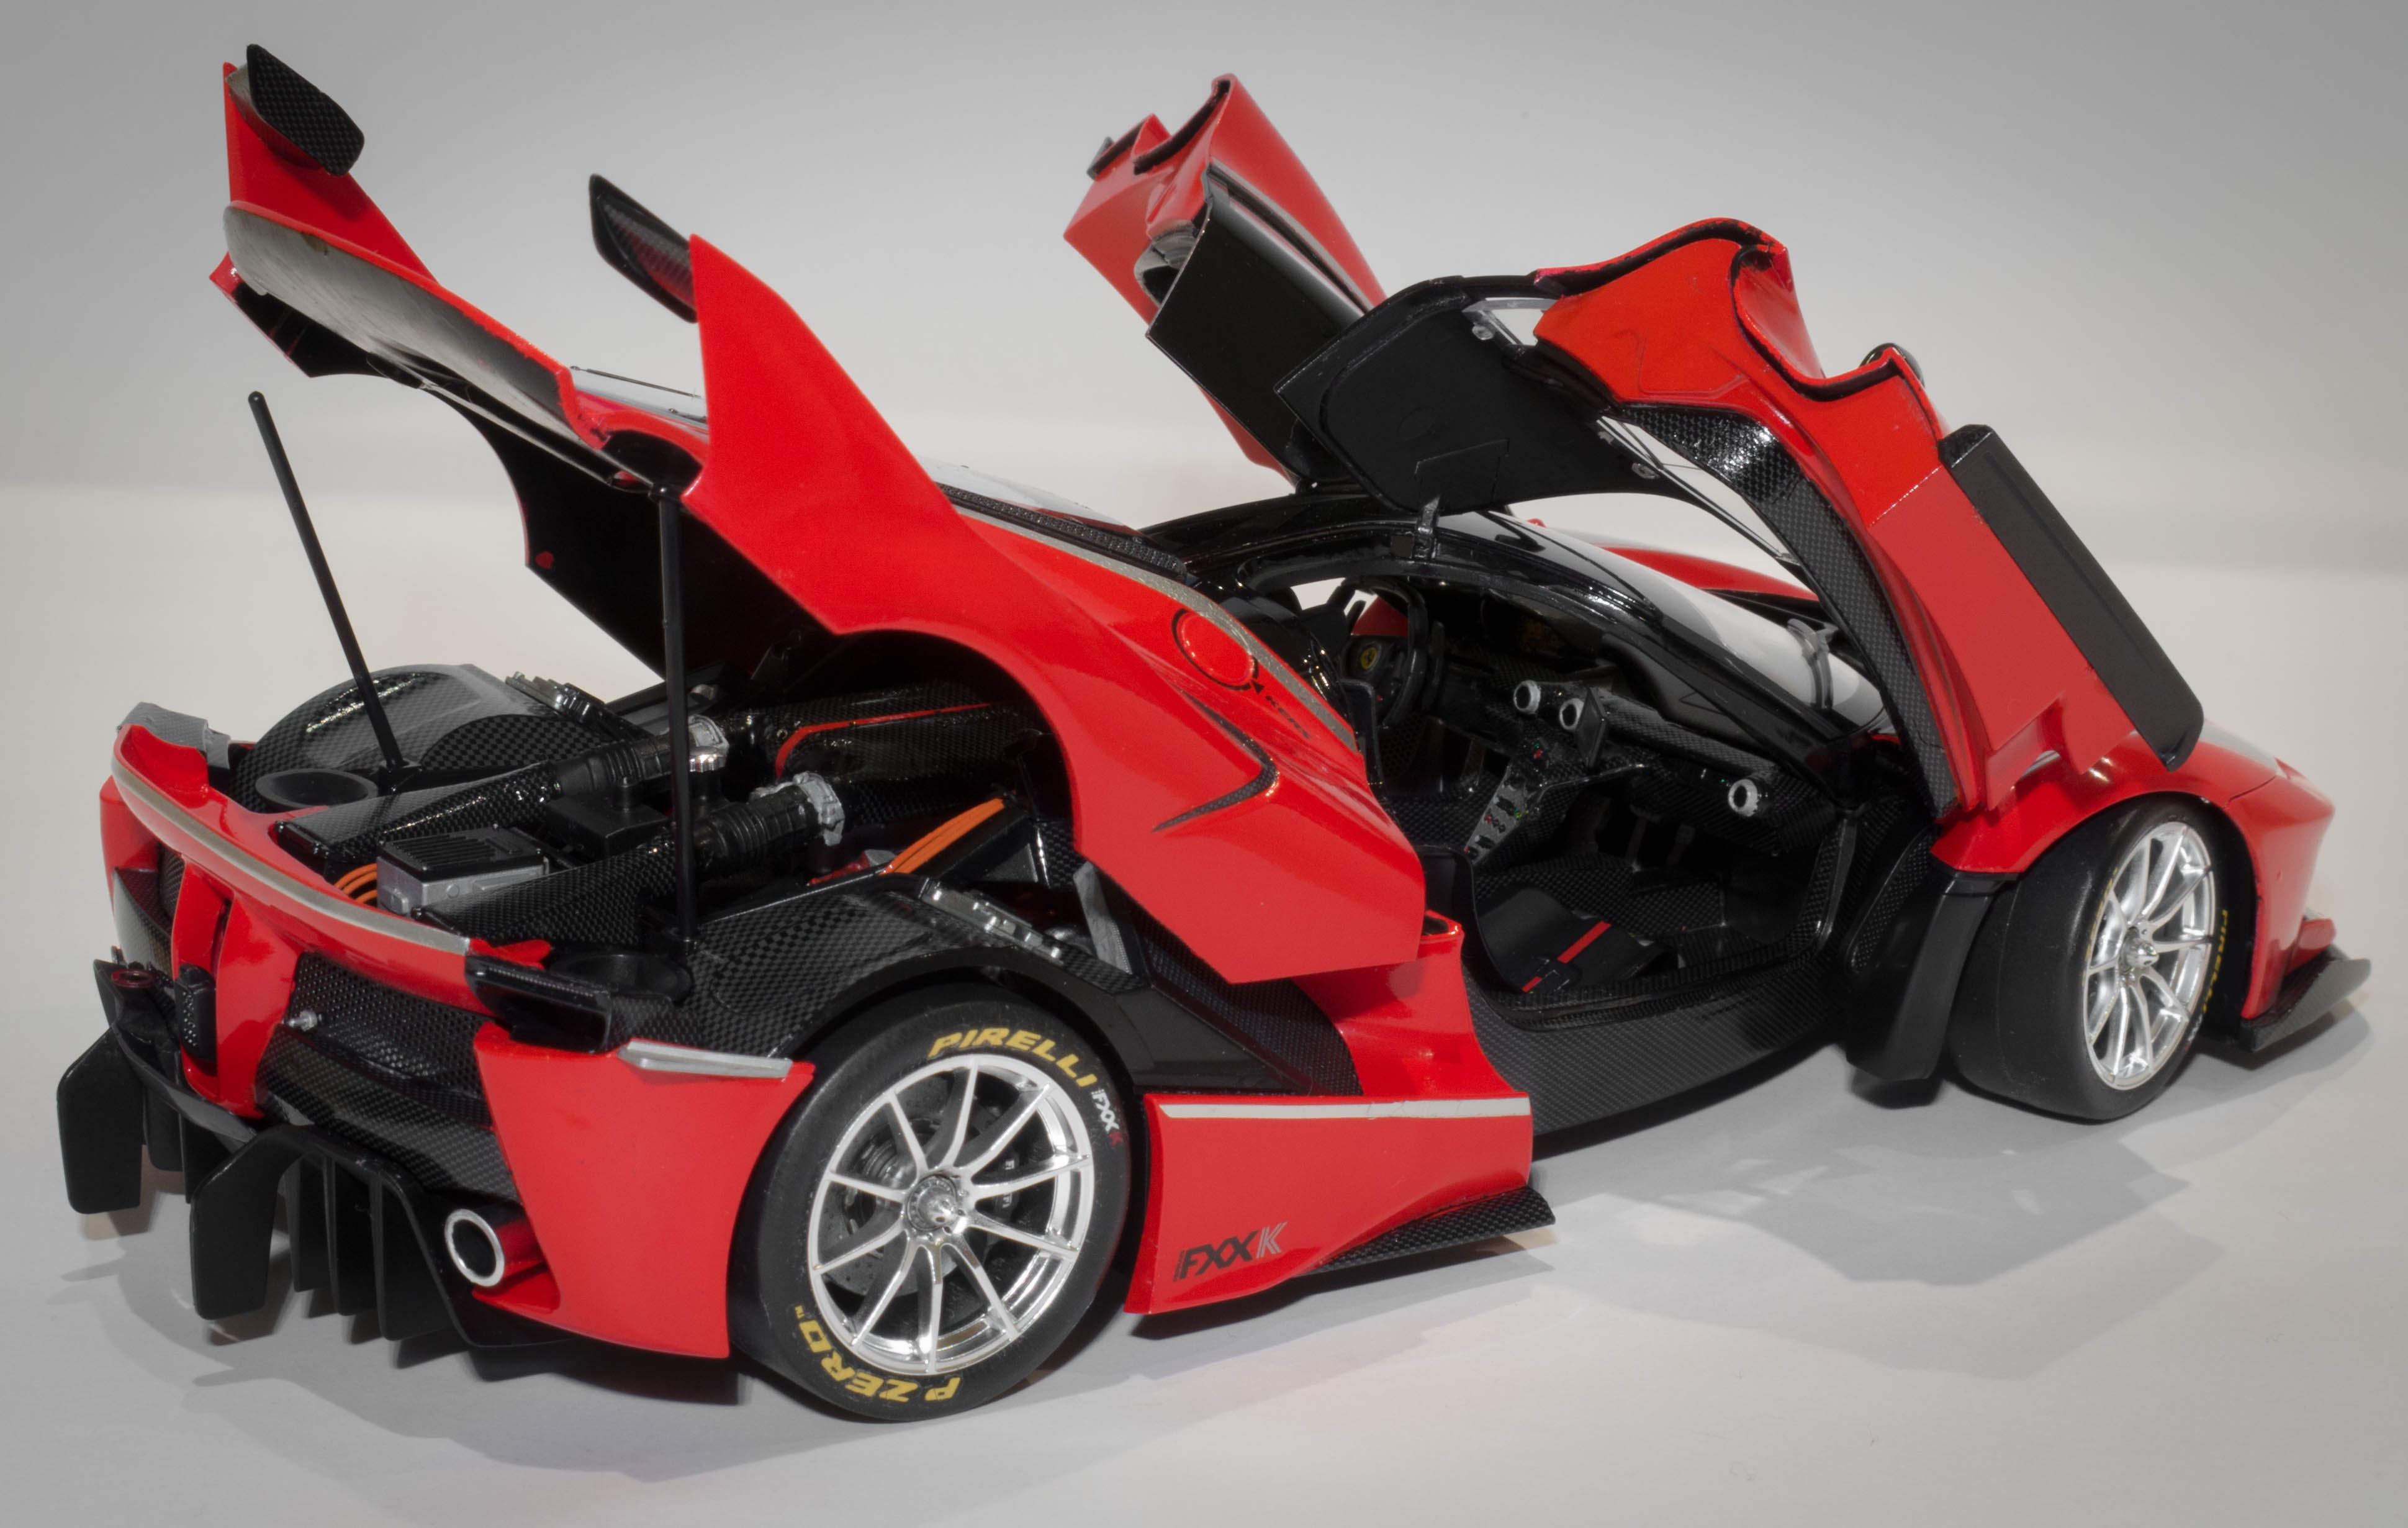
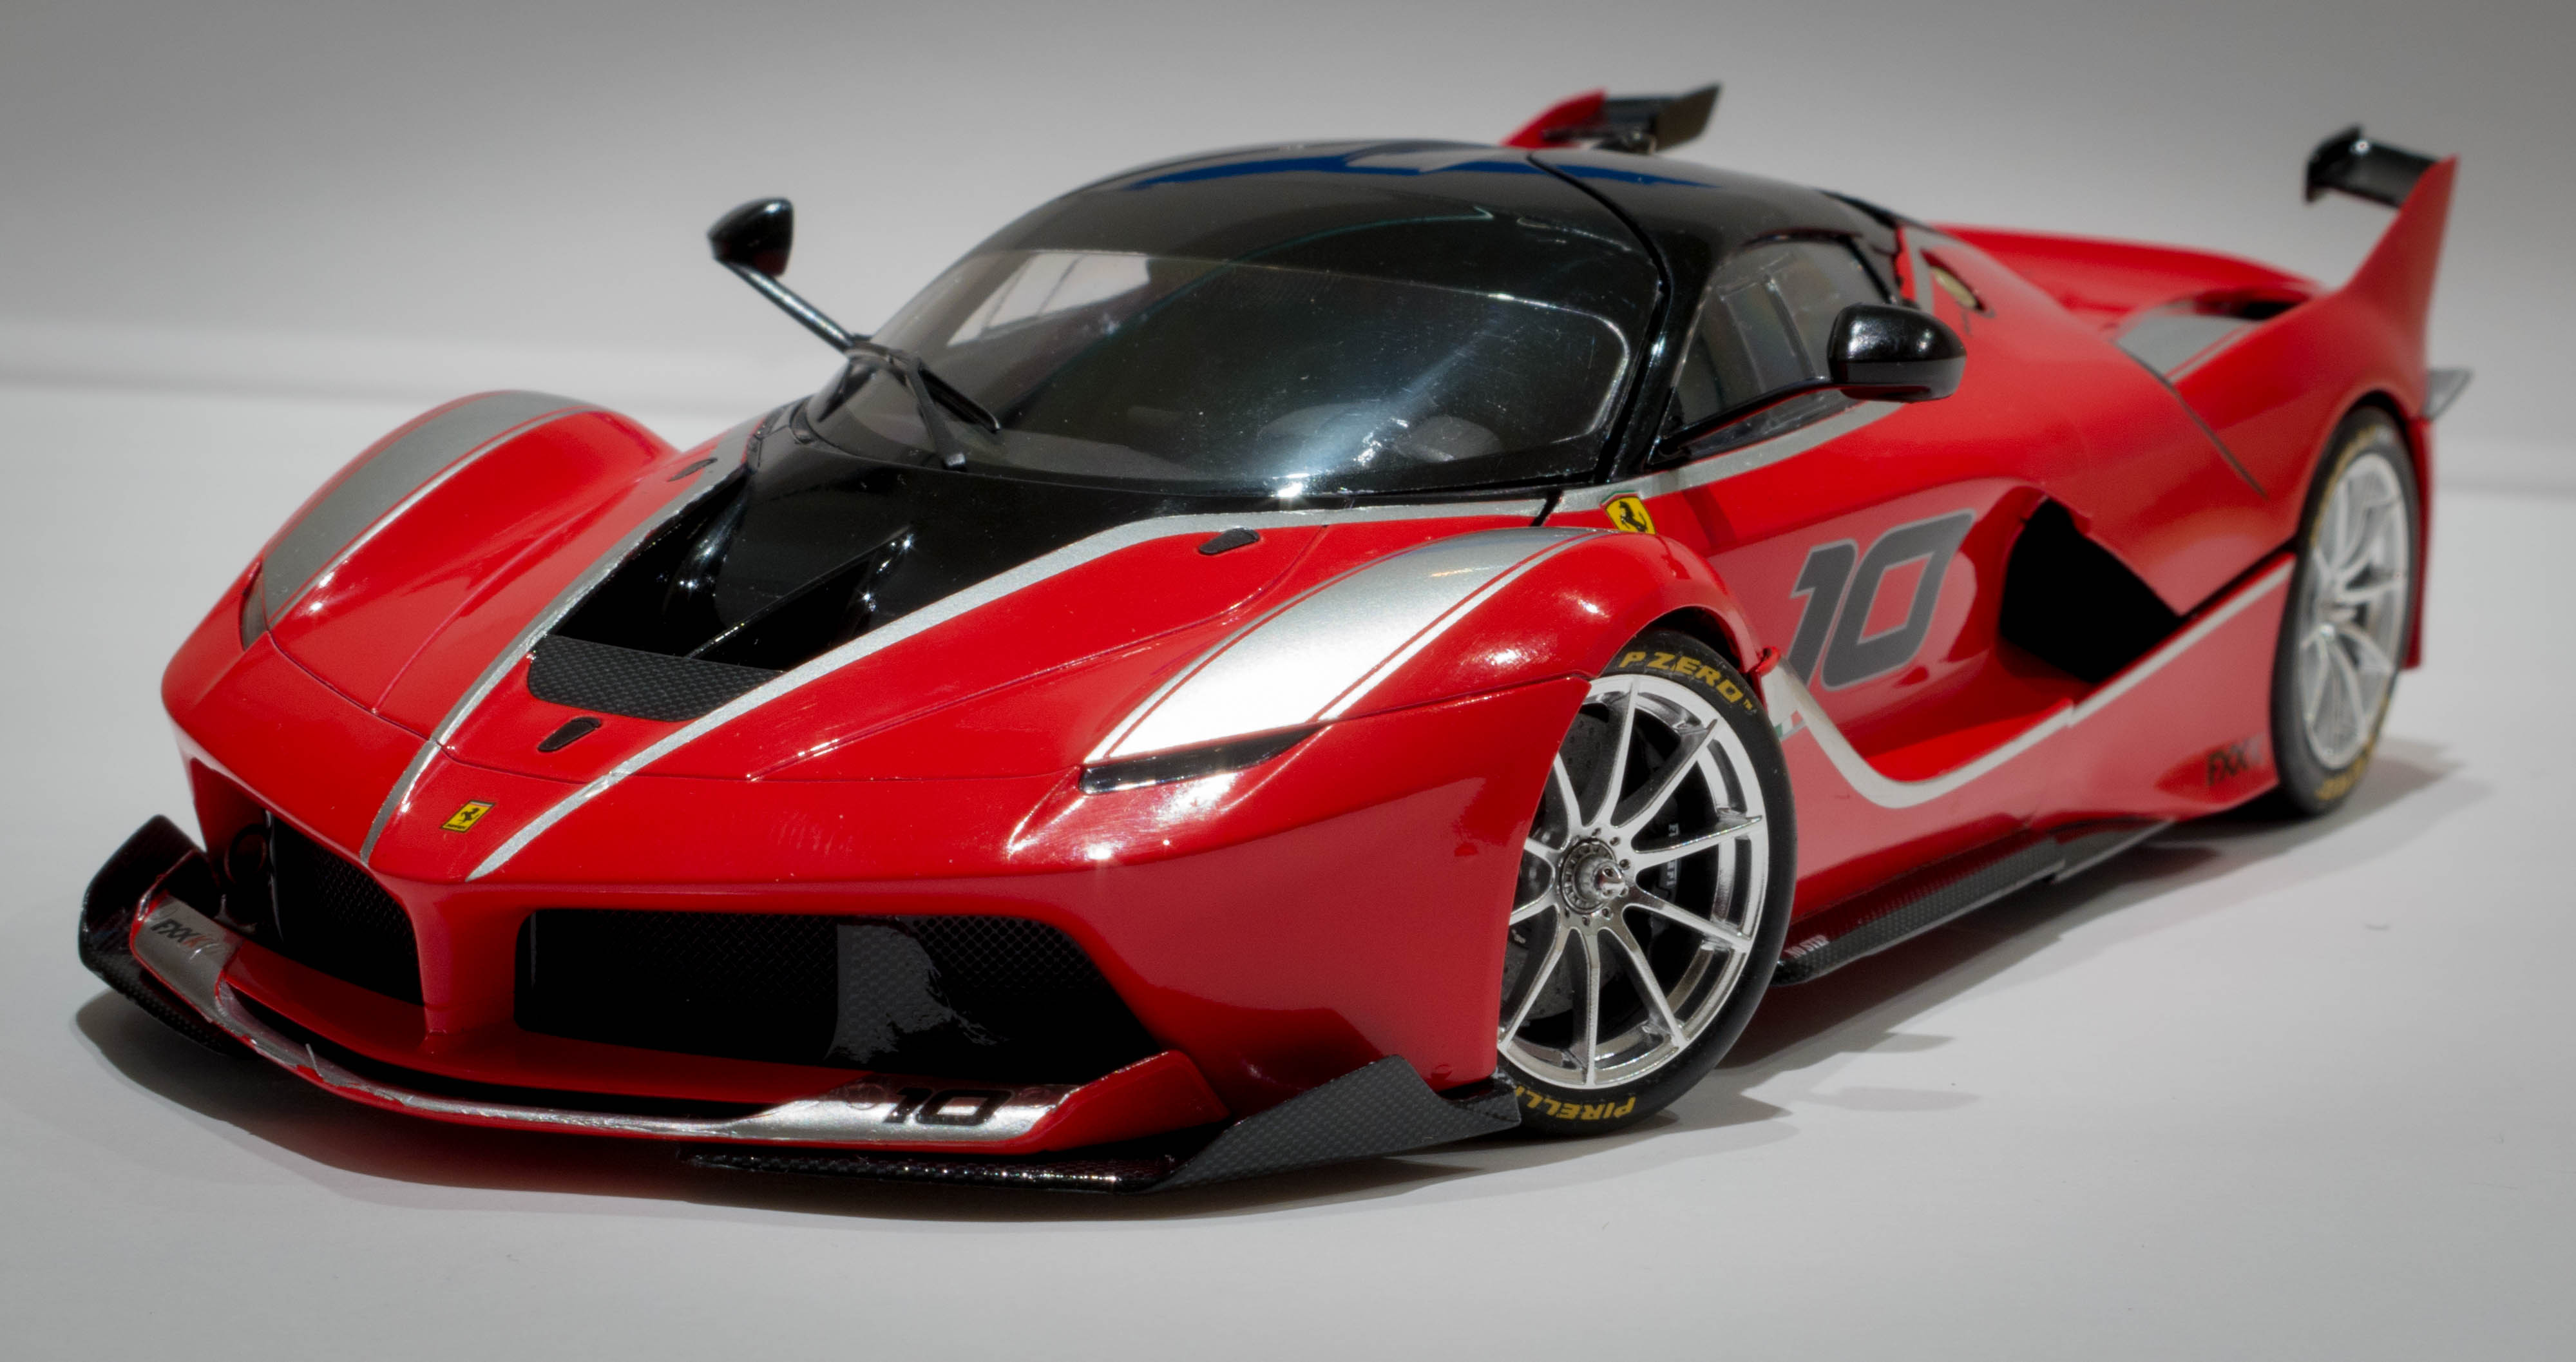
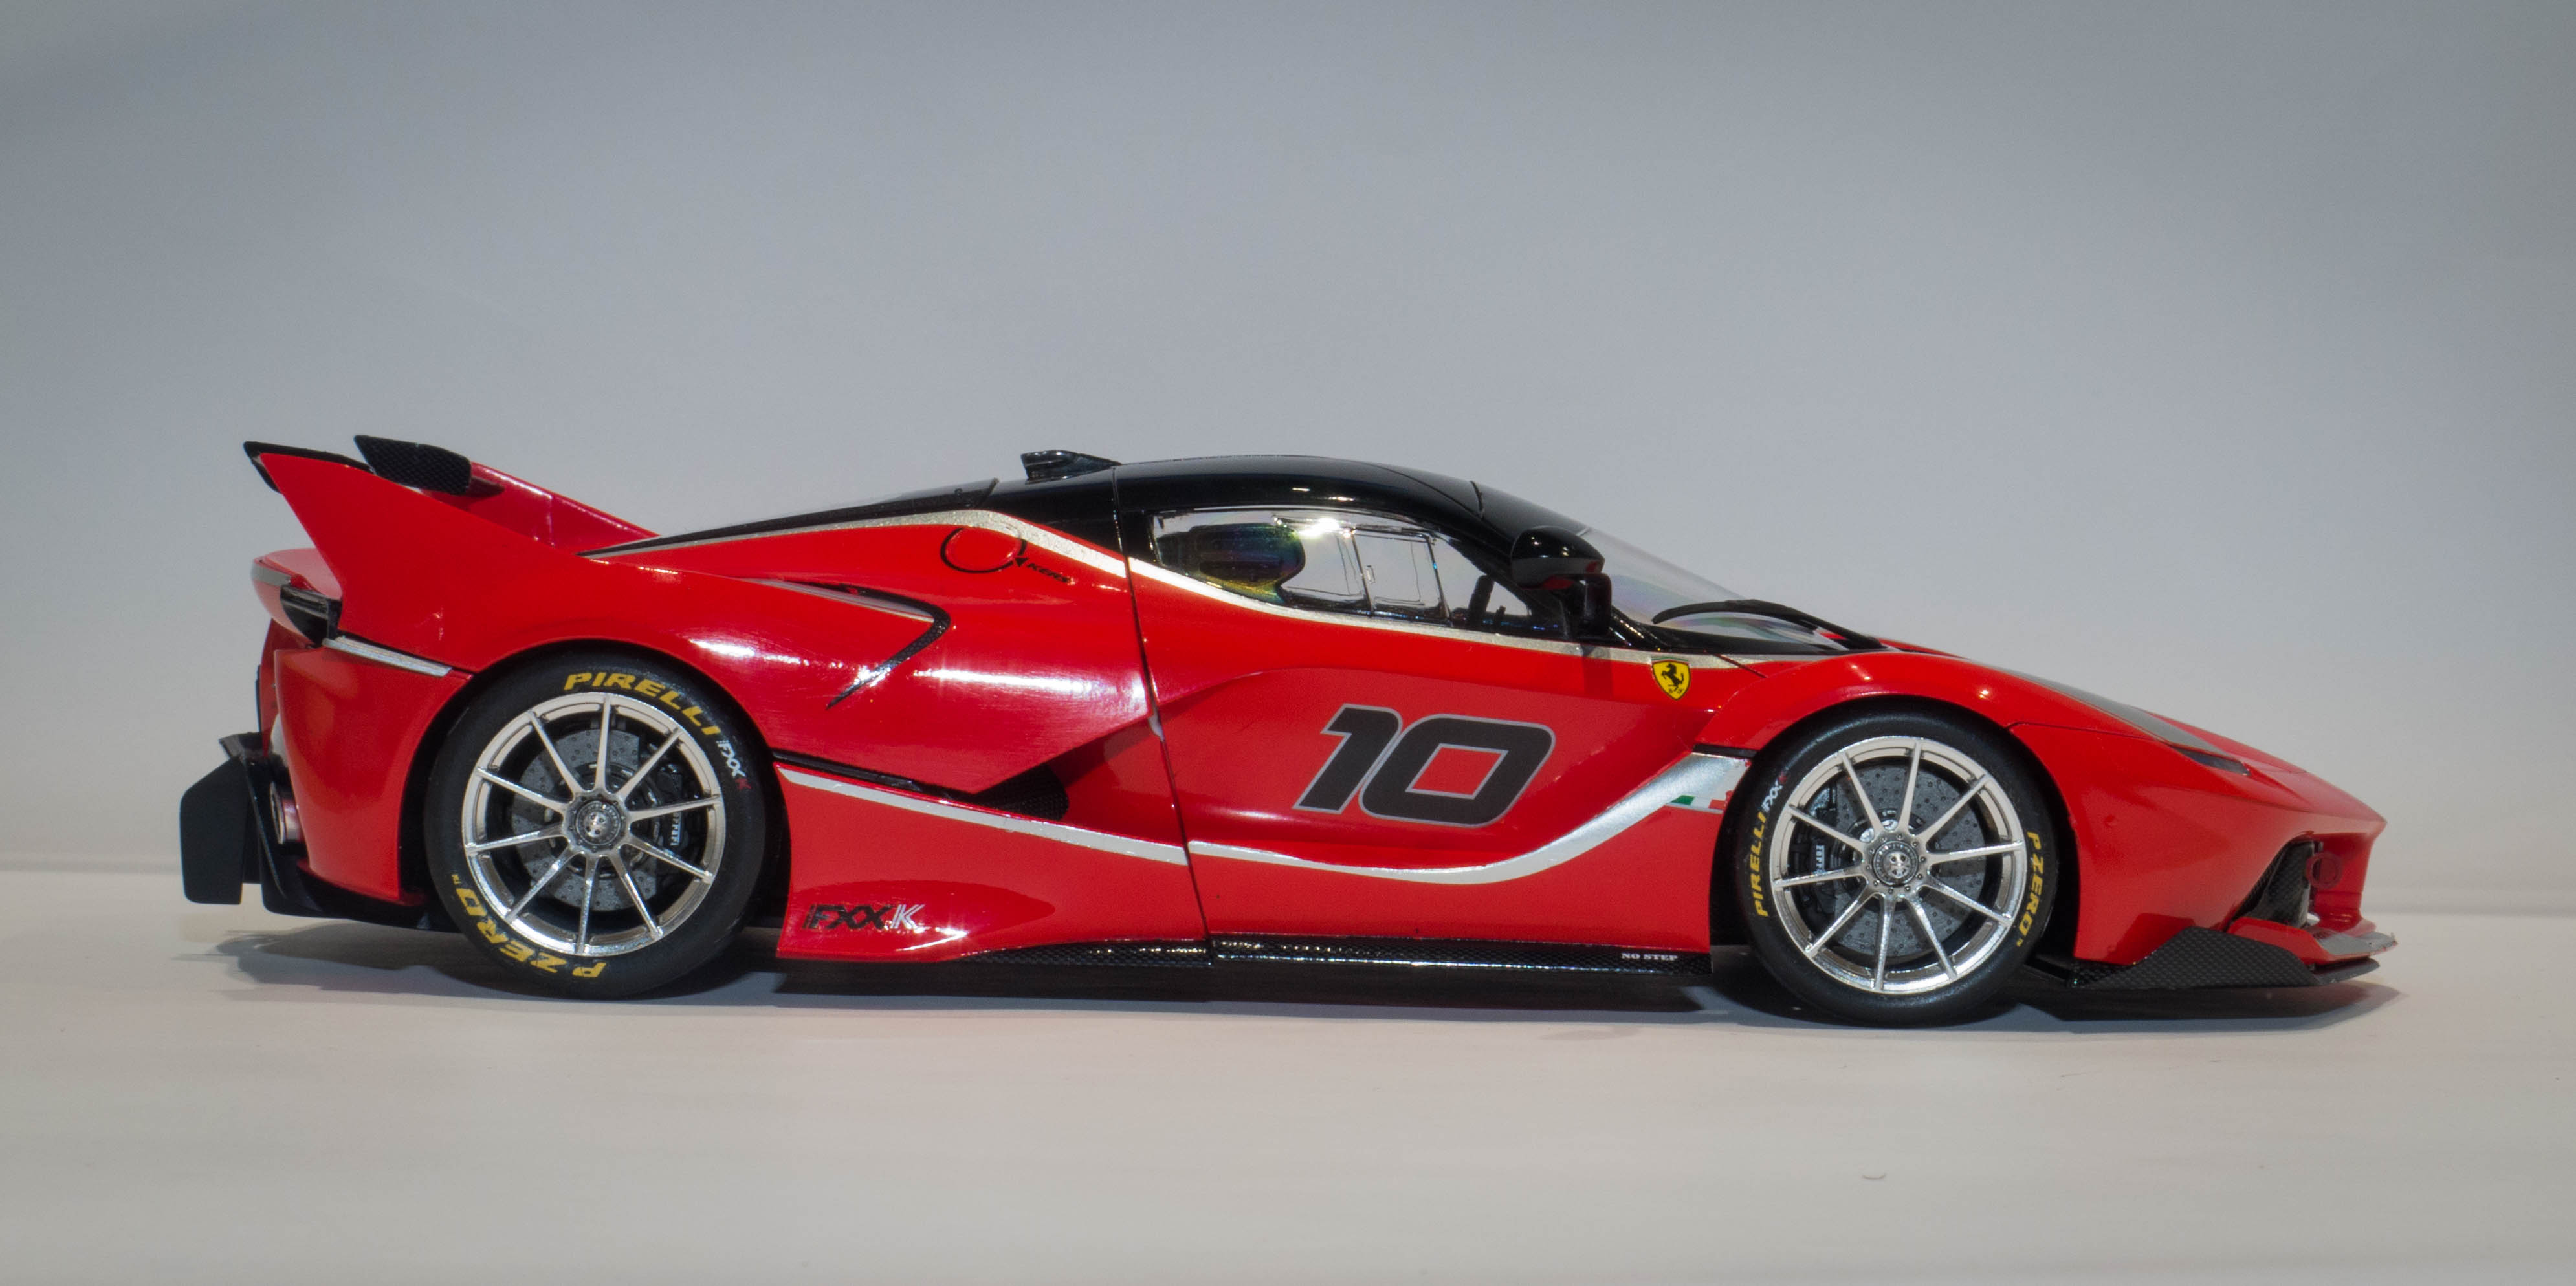
Hi All, This is my first post, but i have been making 1:24 car models for the last 10 years or so. I Finished the 1:24 Tamiya Ferrari FXXK a couple days ago, after spending around 6 weeks on it. In addition to the kit, i used the tamiya carbon decal detail set, and the photo etch detail set to complete the build I also experemented with hoses and cables in the engine bay. As always, Tamiya kits are always a pleasure to work with, with very little modification needed to get a great result. I am really pleased with the outcome. Any feedback welcomed Thanks
-
Second of my quick'n fun holiday builds. Take one (cheap) Tamiya 'Tom's Supra' kit; build it straight from the box; swap out the kit decals for the ones' that come with their 911 GT2 kit and, Ta daaaa.... Not everyones cup-of-tea, I know, but I had a shed-load of fun doing it over the last ten days or so, and isn't that really the point of the hobby ?. Feel free to ask any questions or post any outrage, it's all fine with me. Thanks for taking the time to look and/or comment. AFN Ian.
-
Hi All, I recently joined this forum to get ideas and inspiration for future builds. Generally i do 1:24 tamiya kits, as i find theyre standard details to be the best, but am also liking the variety of kits that Aoshima and fujimi are putting out. Thanks Nathan
-
Hello friends The Tiger I was the first tank to be equipped with an 88mm cannon which proved to be formidable on all battle fronts. I had to have it in my collection, from the Tamiya brand at 1/35 scale. https://youtu.be/dkT7Twk7v7s Greetings and I hope you like it
-
So the second holiday project has hit the bench: Tamiya's 'Toms' Supra GT, definitely not going to be finished in the kit-supplied Castrol colours: Tamiya's TS-8 'Italian Red' with AK Xtreme Metals' Polished Aluminium' and some hand painted matt black (first coat only in these photos). The insides are all AK Xtreme Metals' 'Dark Aluminium' but obviously only just started, the cage is glued together but not to the chassis in these pics. Bodyshell is TS-94 'Metallic Grey'. Two light coats and nowhere near shiny enough, so I'll brush on a coat of Klear/Future before decalling, then another afterward. Going to keep the final 'look' a surprise as long as I can, but hopefully y'all will get a kick from it. Not too many 'What If' cars around so nice to do something that little bit outta 'left field', eh ? More soon. Ian.
-
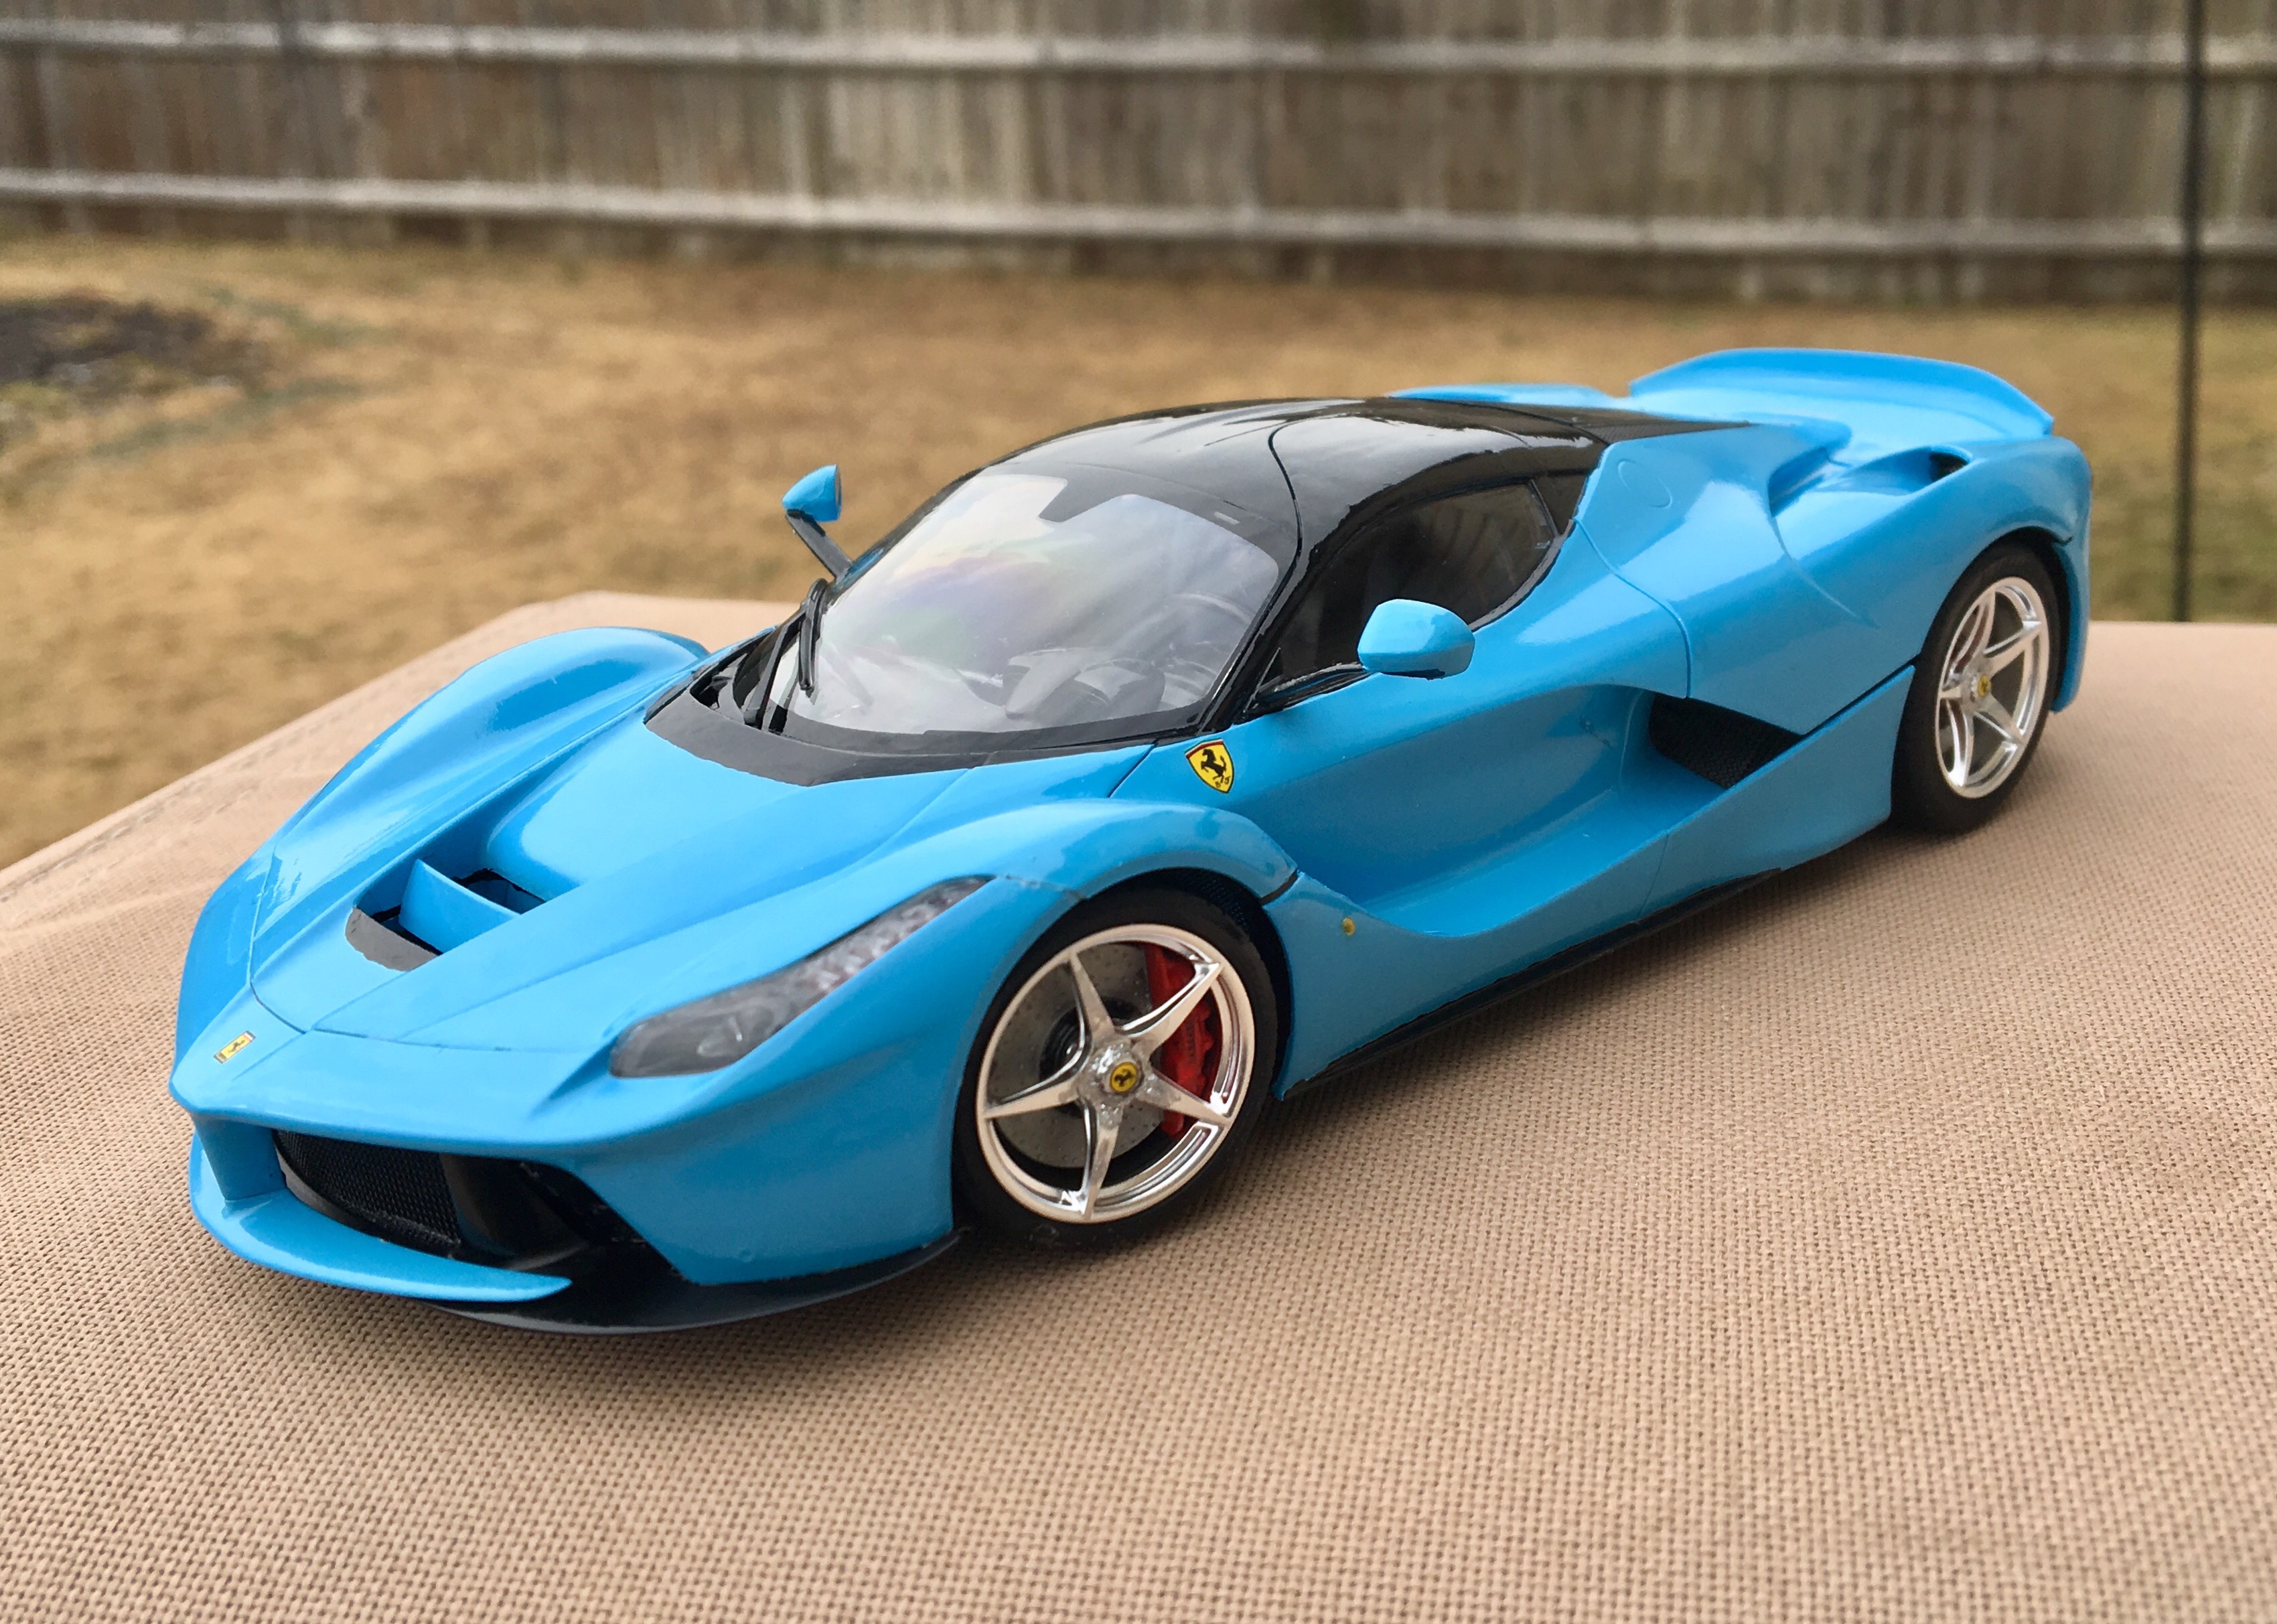
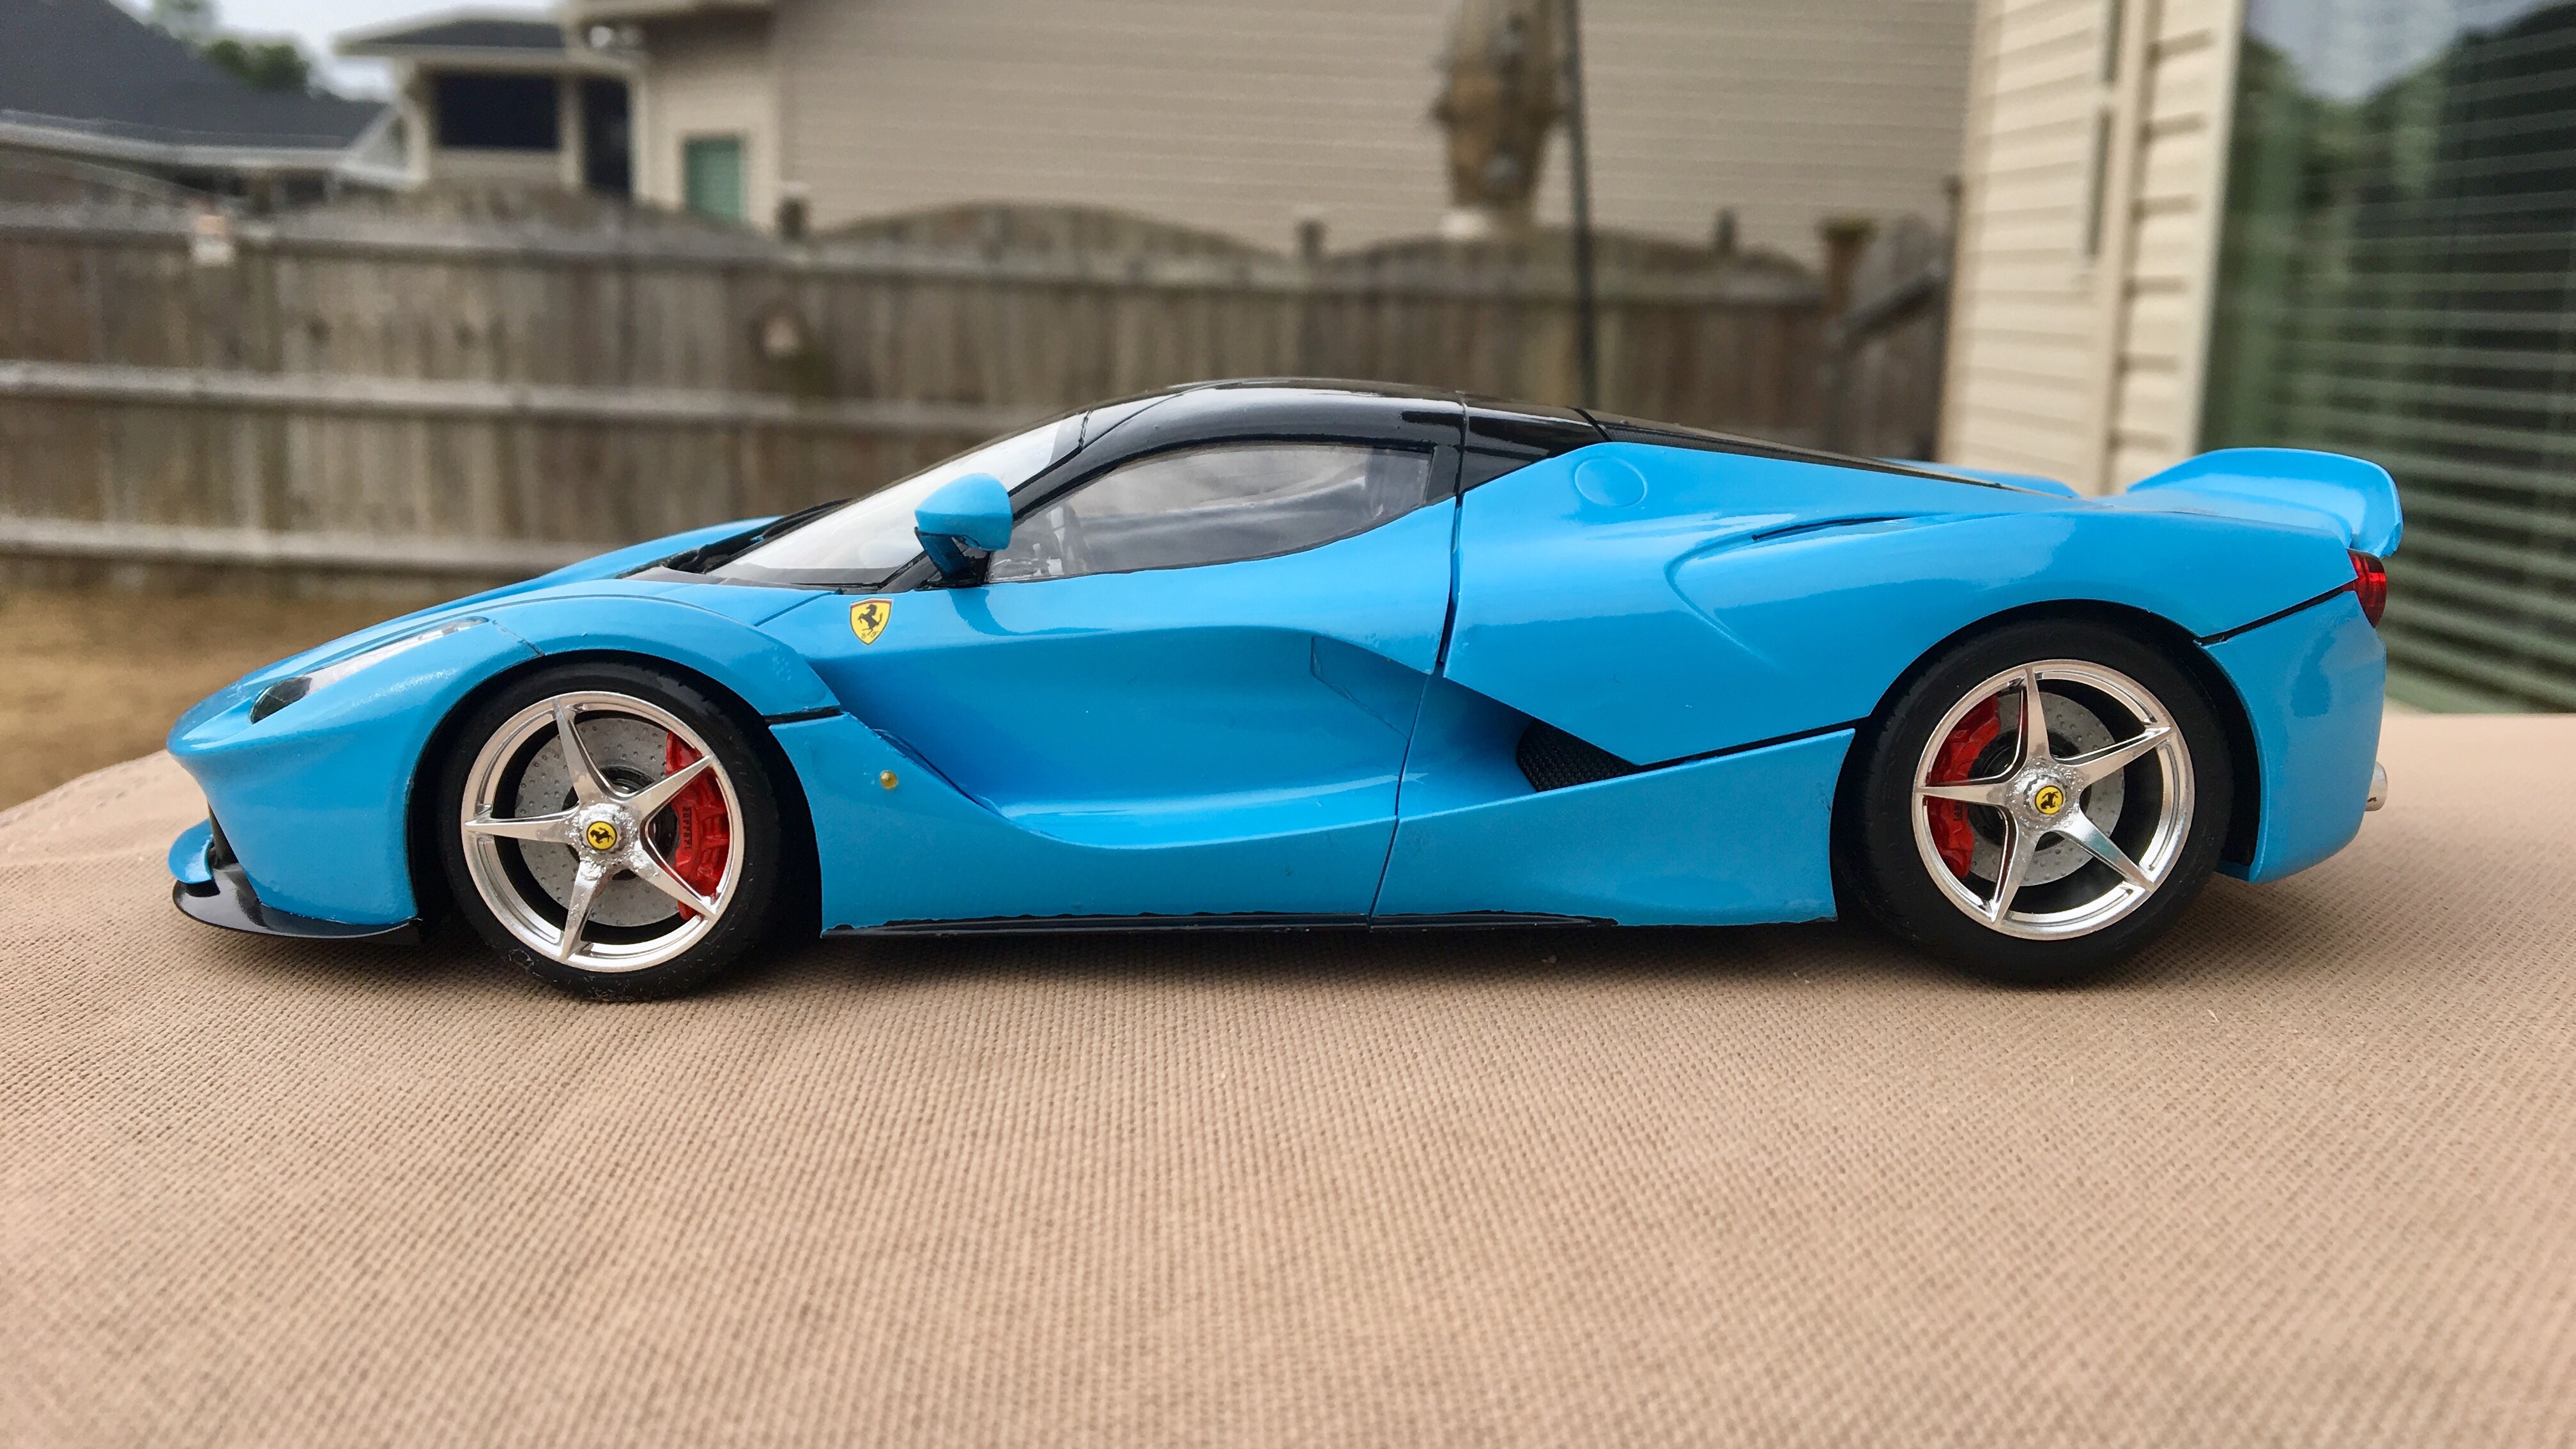
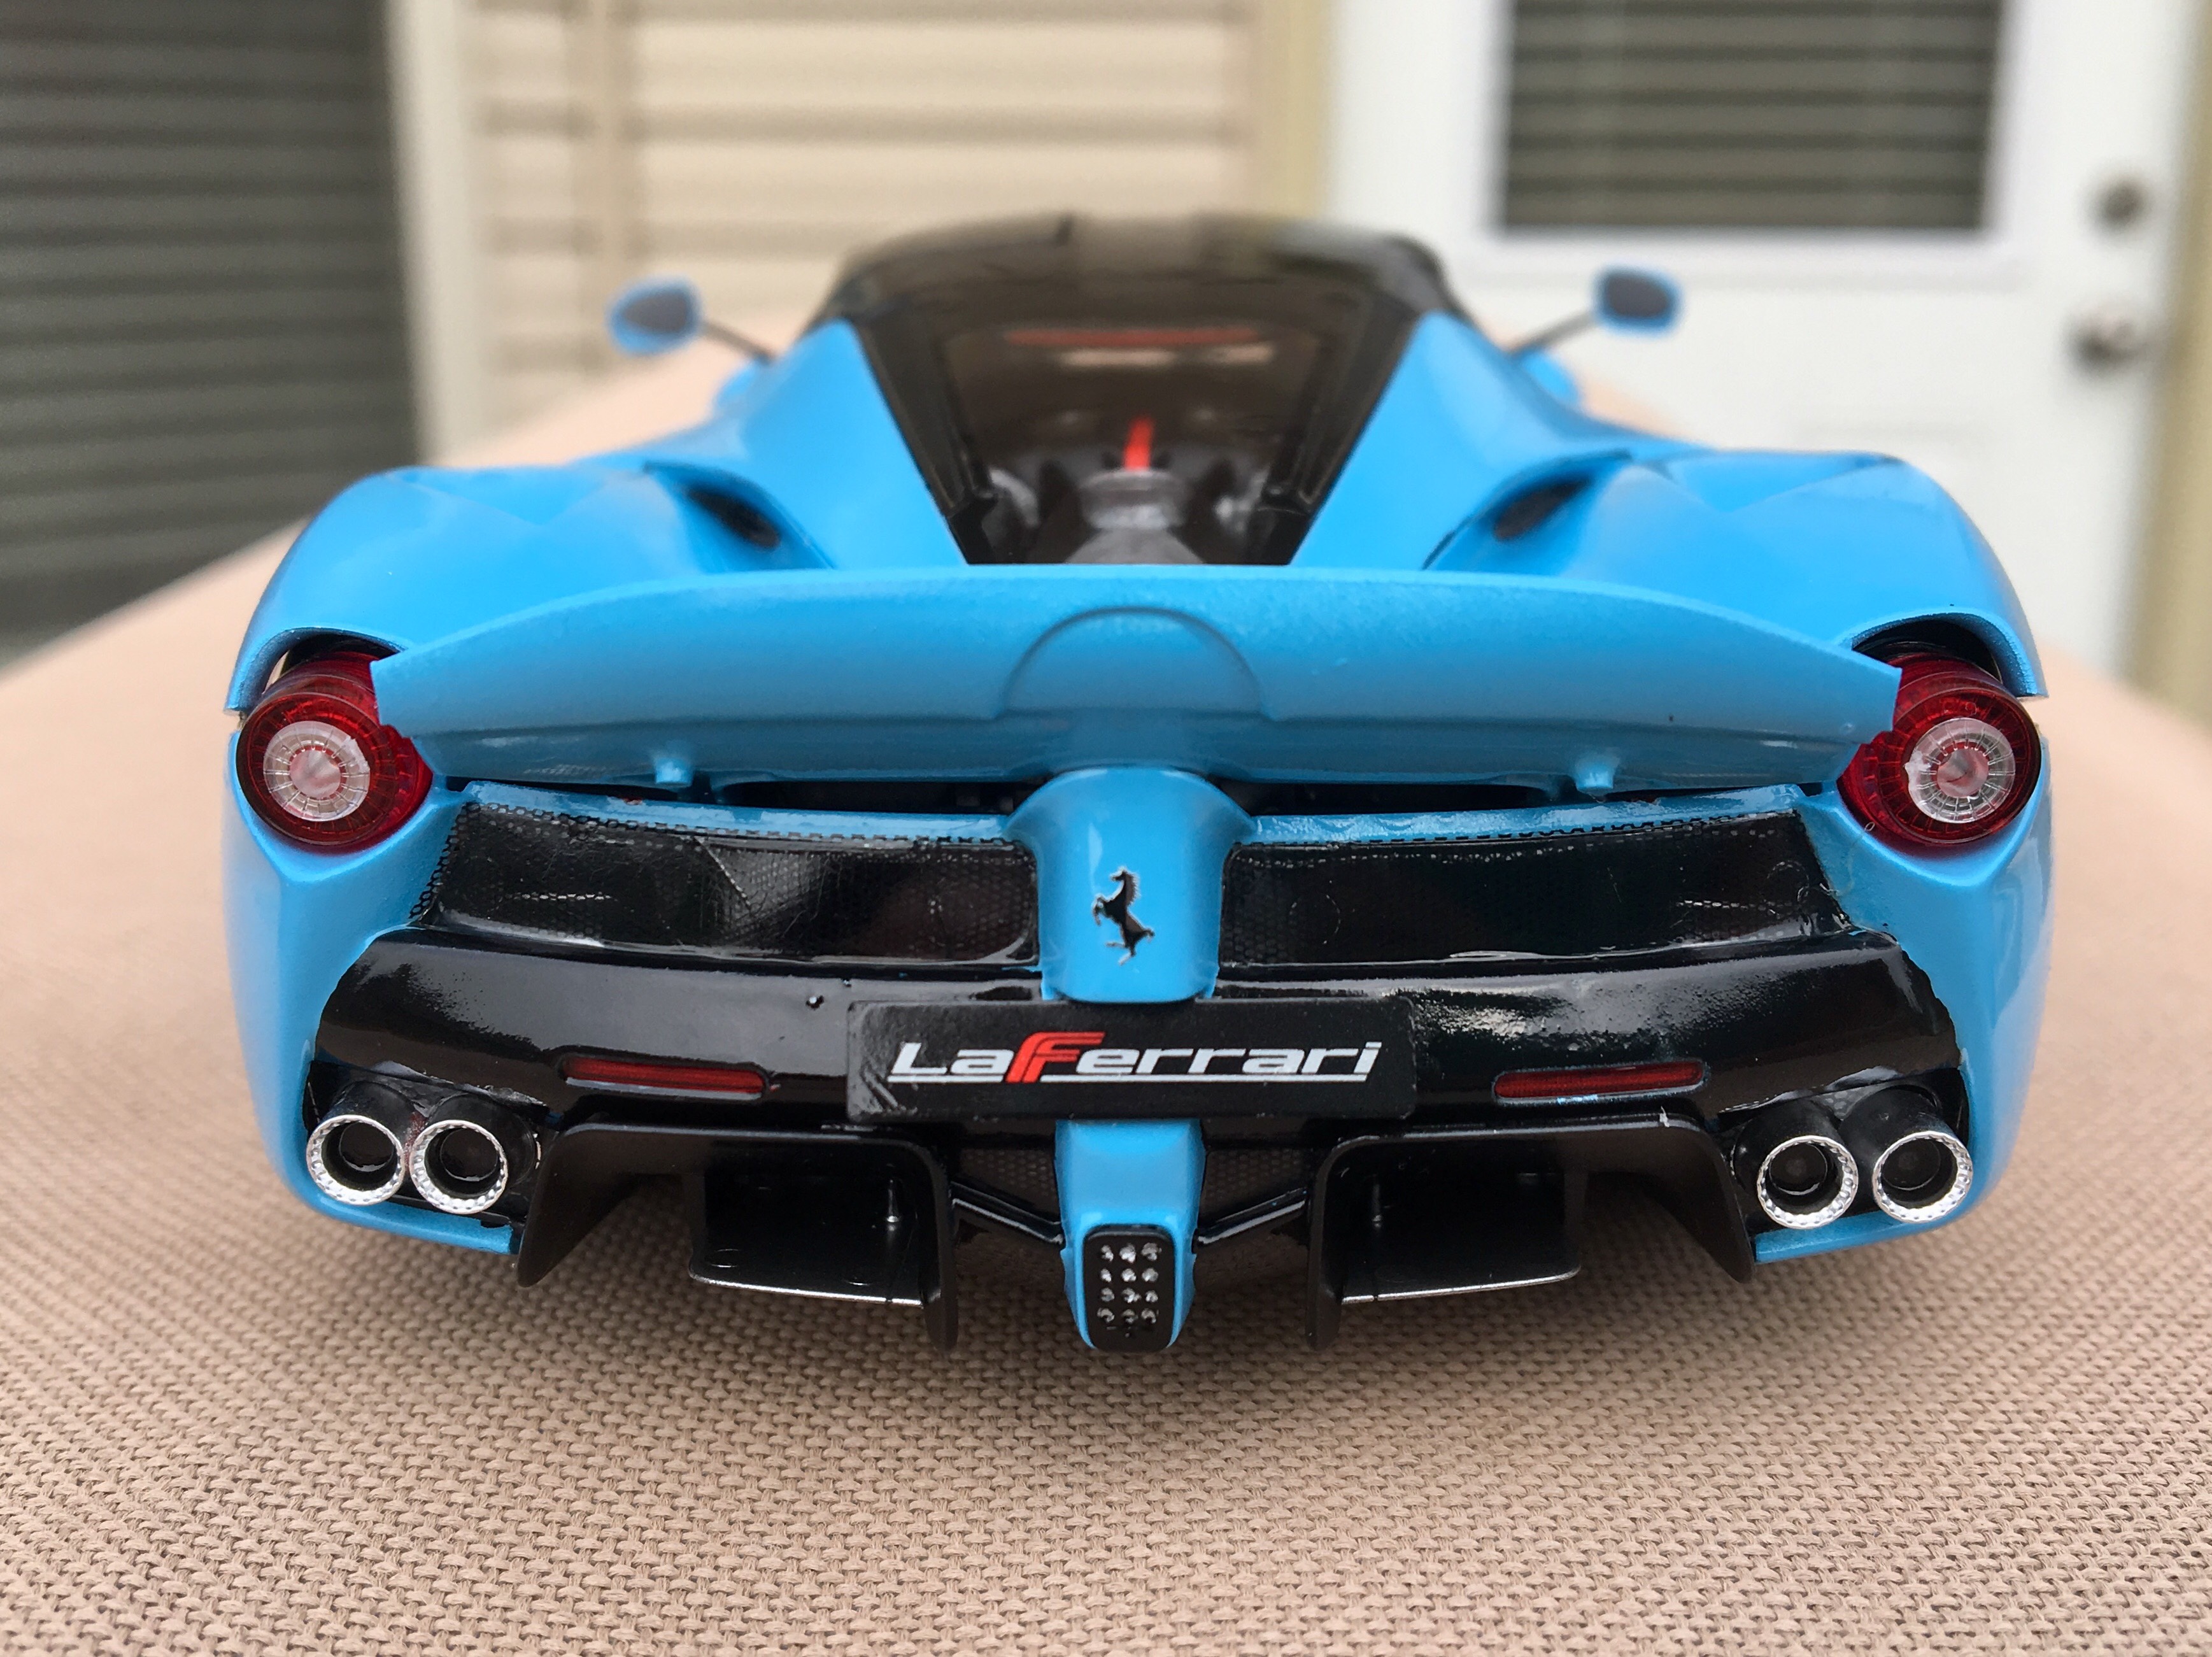
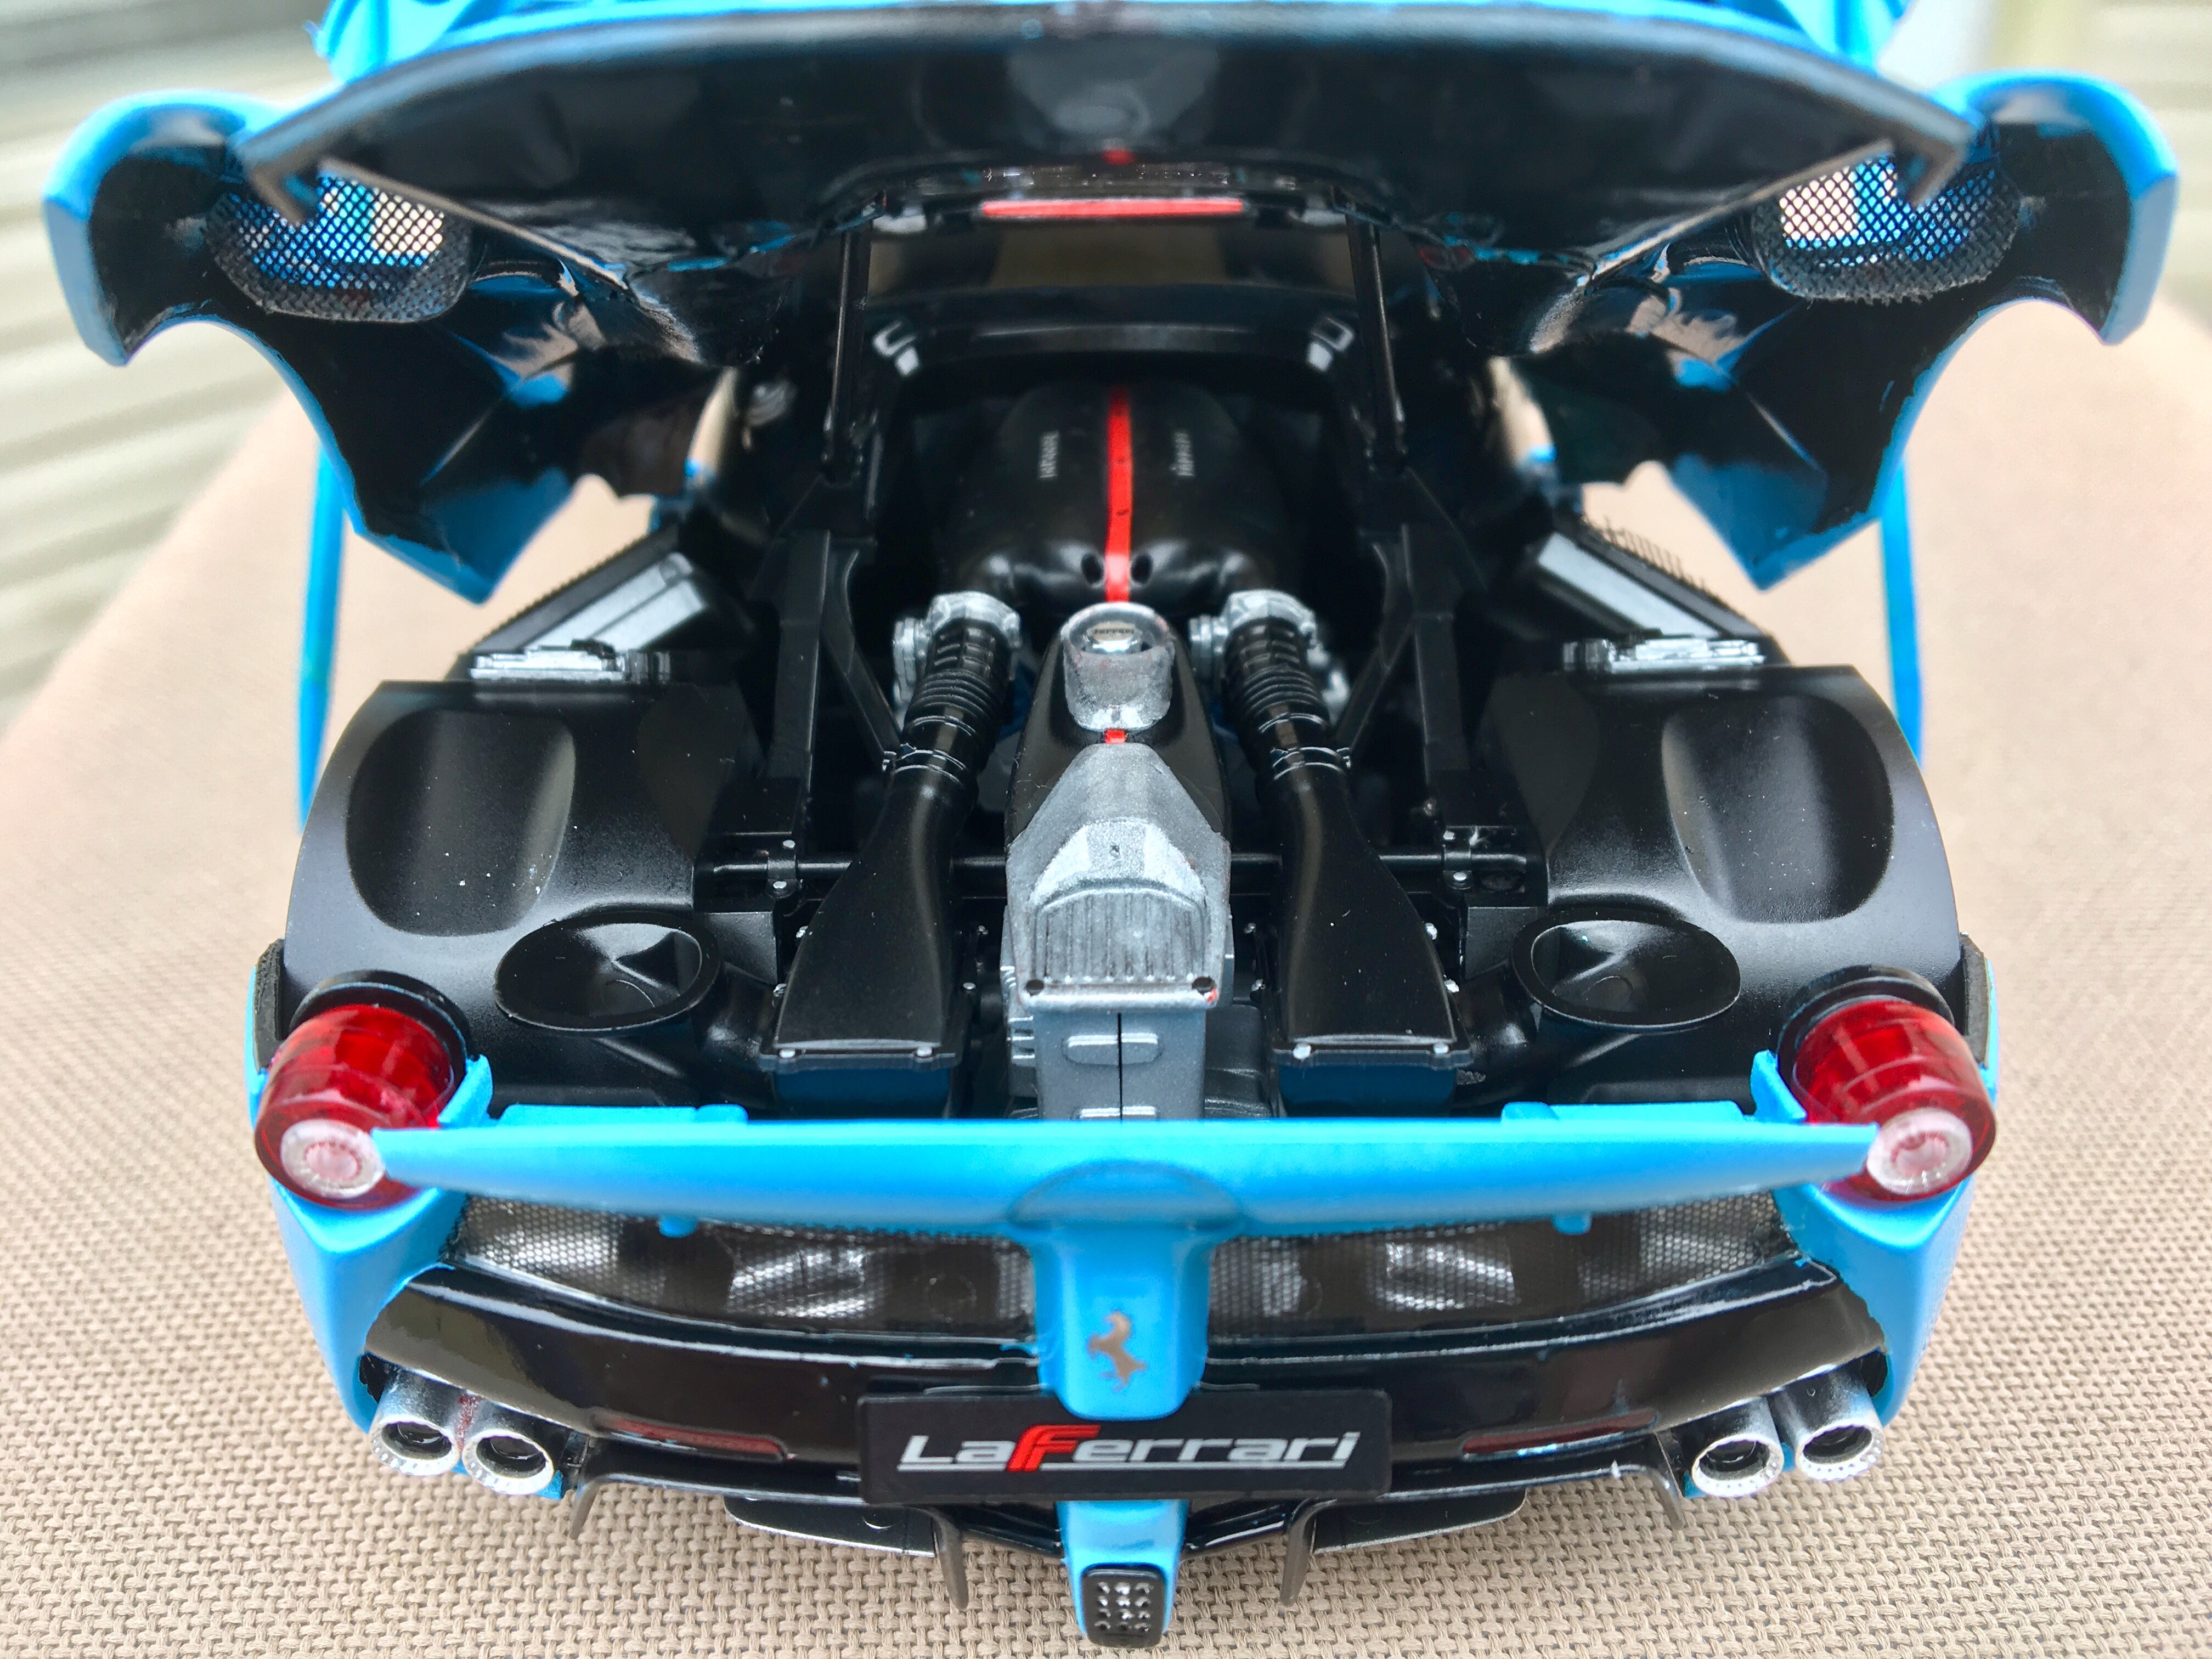
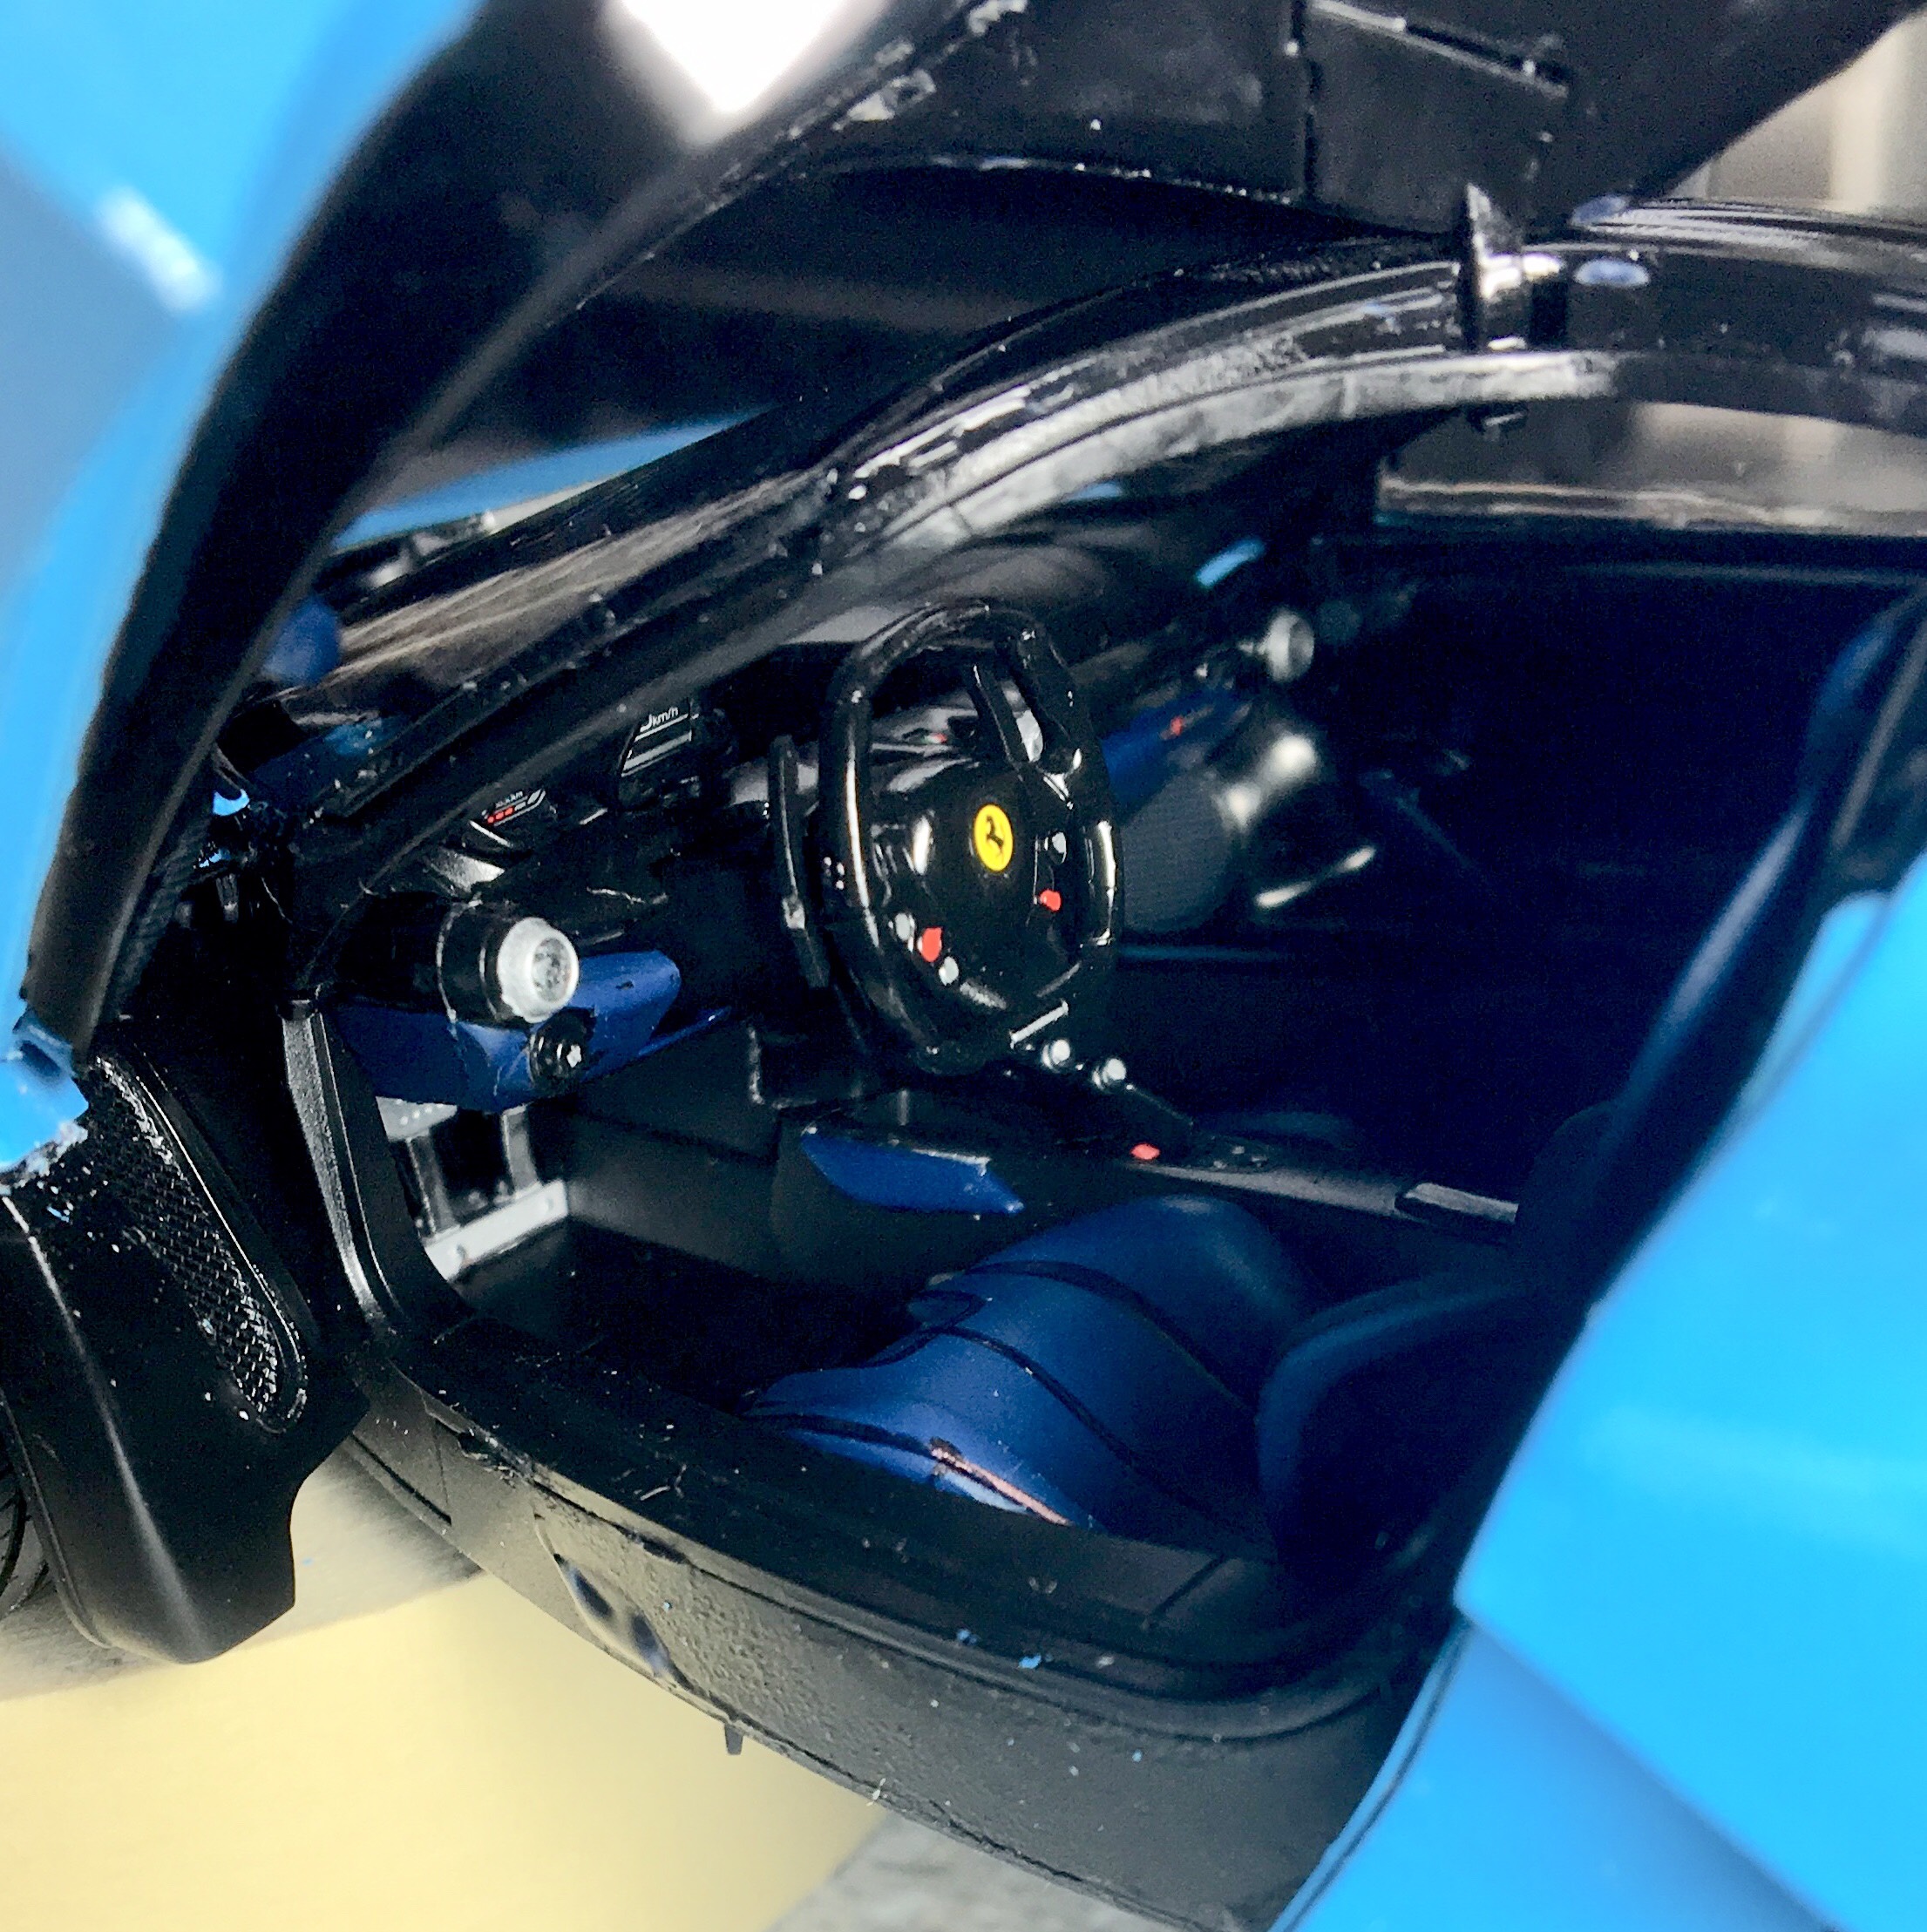
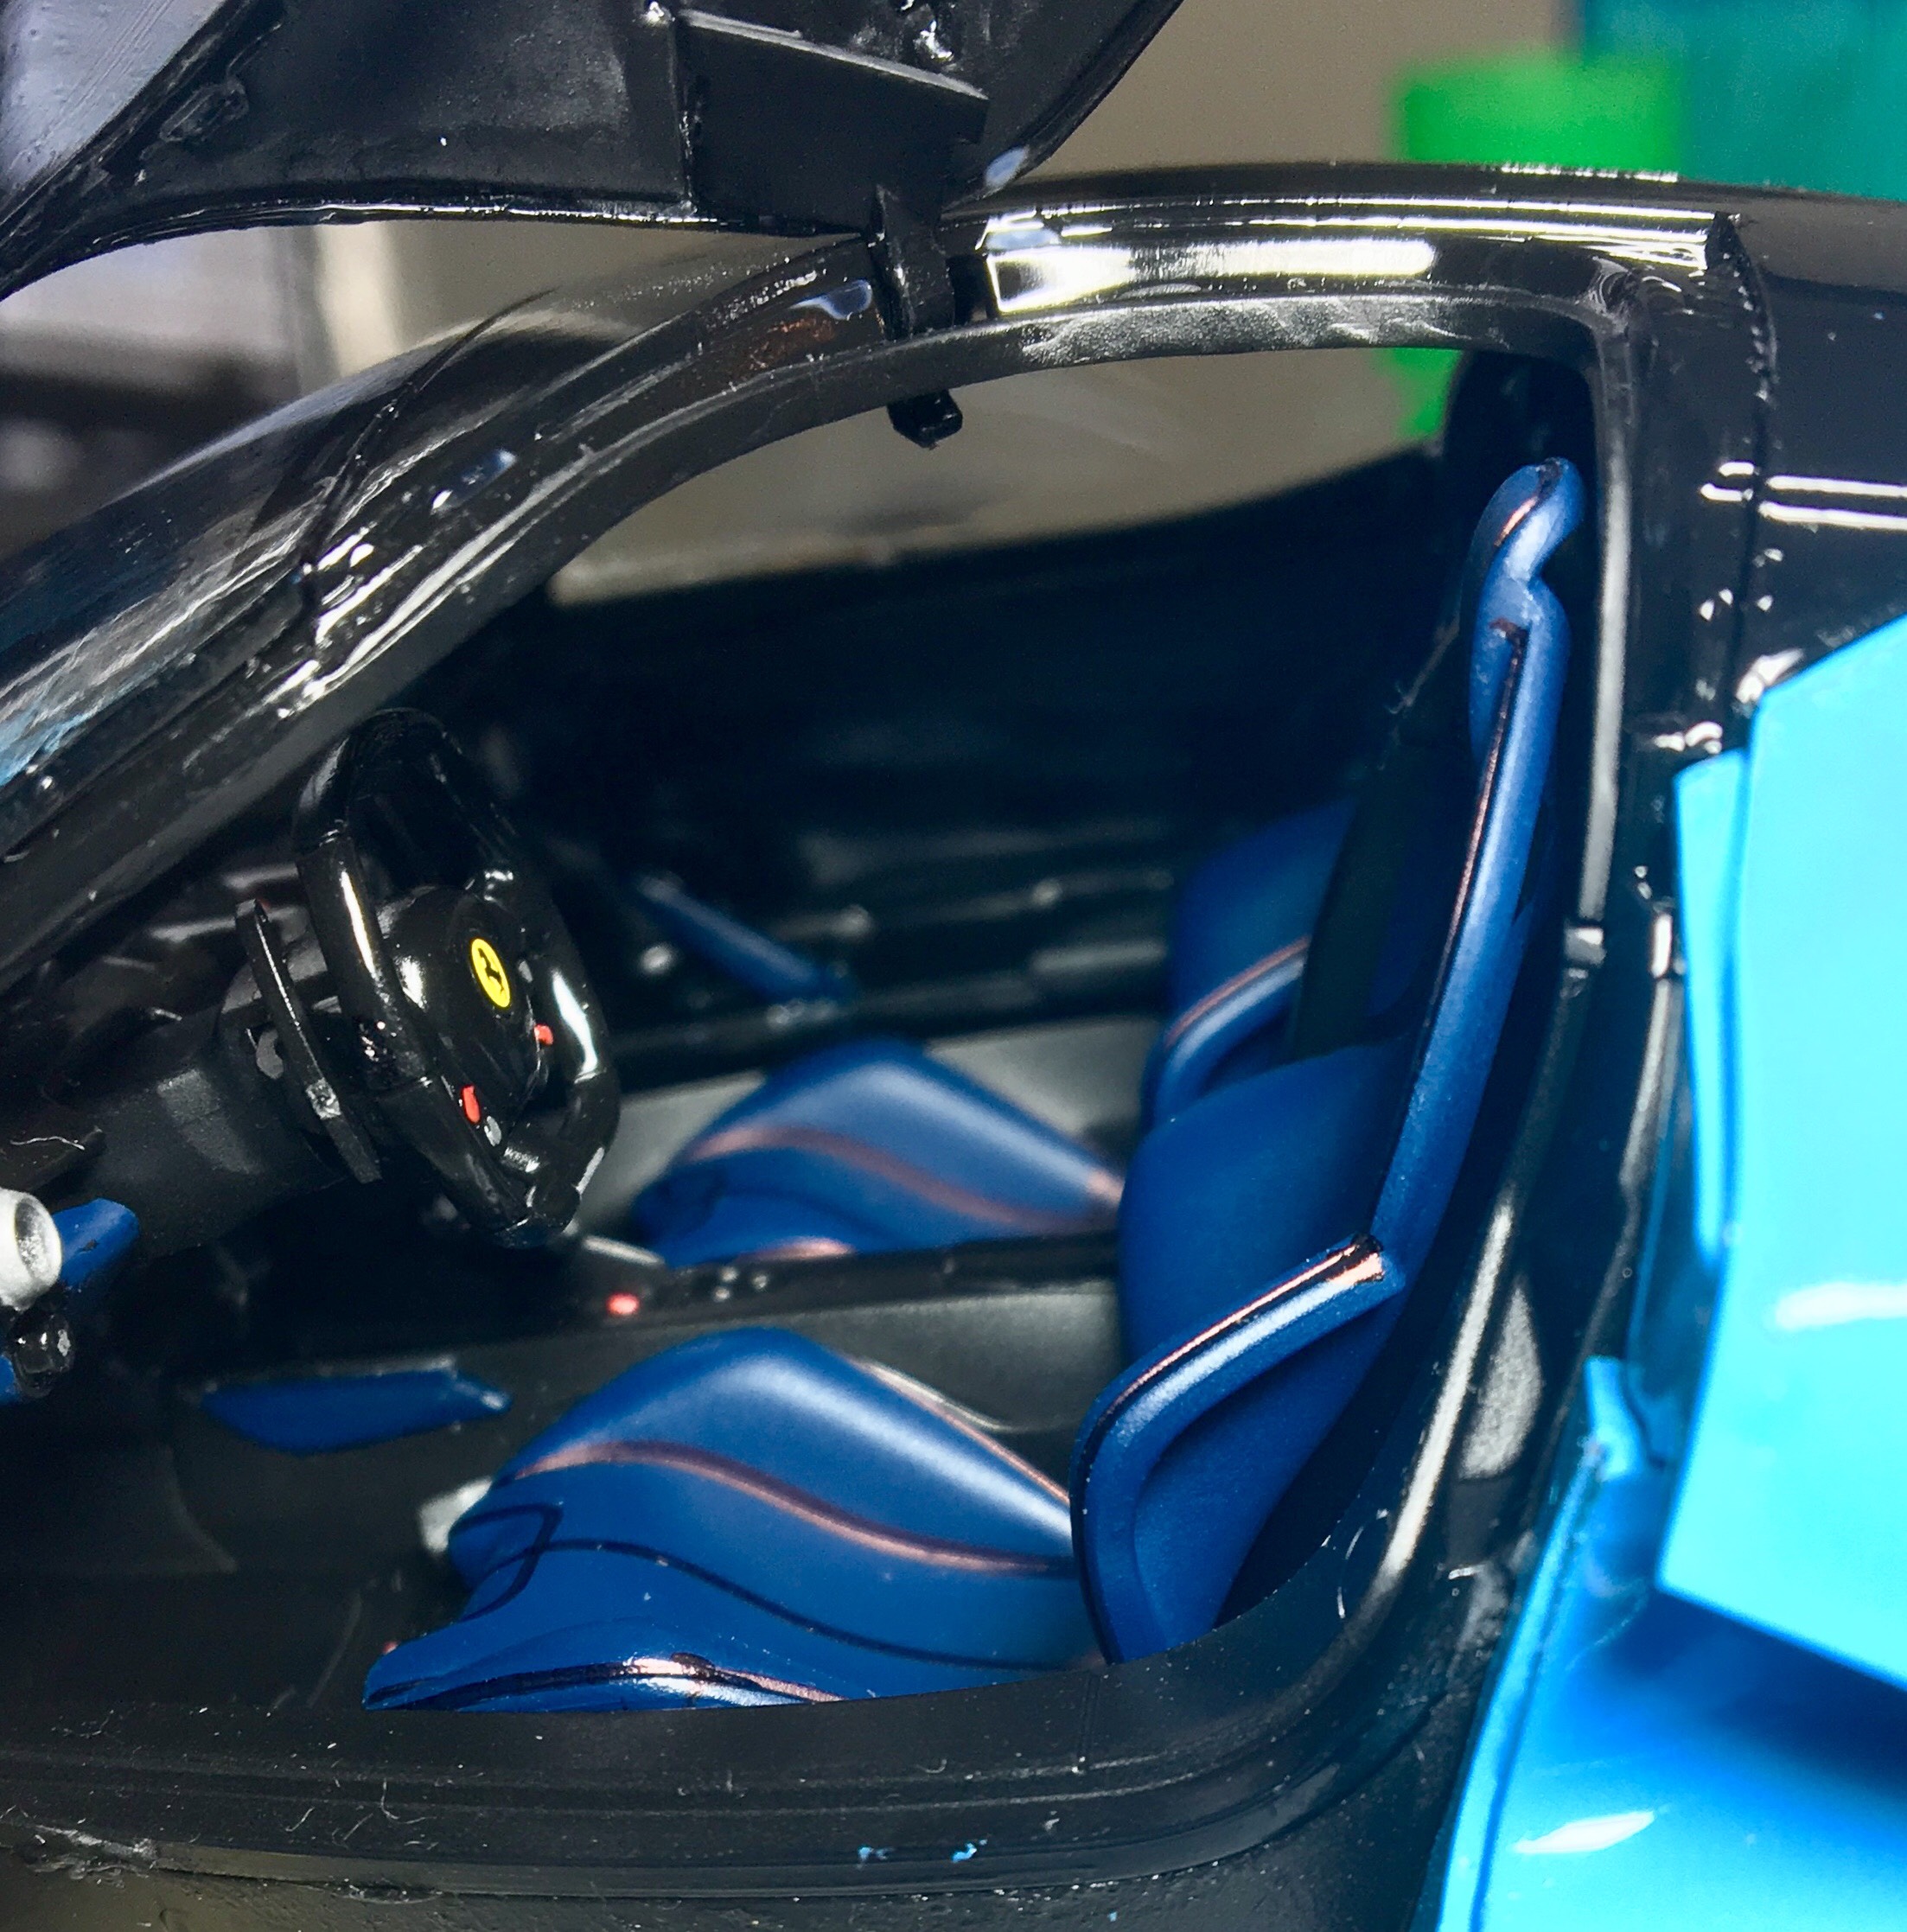
Just finished the Ferrari LaFerrari model kit made by Tamiya. I have pictures of the engine and assembly in the On The Workbench section at the link below.
-
 So i got this one in the mail today, and started immediately with it as it needs to be finished this Xmas to be a gift for my mother. Sprues: test fit the hood on it immediately, getting it ready to be painted. I'm thinking of getting it painted bordeaux red, as its an original color for this car, and mom love's red cars as im out of the country to get another car next week, nice period of time to let the body dry and get hard I'll keep this updated along the way with plenty (probably alot knowing me) of pictures for you all to see (and judge )