slusher Posted July 20, 2015 Posted July 20, 2015 I agree on the embossing powder, looks great.Yes it does.
rustybill1960 Posted July 21, 2015 Posted July 21, 2015 Looking real good Man! Thank You for sharing Later Russ
Atmobil Posted July 22, 2015 Author Posted July 22, 2015 After lots of sanding I thought the sidetrim was gone, felt nothing with my fingertip and did not see anything either but after primer it sure came back again
Atmobil Posted July 22, 2015 Author Posted July 22, 2015 After another round of sanding I thought I really had seen the last of the trim on the back but after a new layer of primer it was back again. Now the body has gone in the brakefluid bath and after that I will use filler and try to cover it over that way.
Atmobil Posted July 25, 2015 Author Posted July 25, 2015 Here is a few updatepics on how the project is coming along: The trunk/luggage compartment. I have glued the rear wall behind the rearseat inplace but the sidepanel is in the picture only put there to show how it is going to look. The exhaust is done and the rear axel with springs is in placeI think it looks strange with all being white under there and it is only my guess that it was this way on the moviecar. Engine is started. I painted the block with cylinderheads, intake and oilpan in the color I had that I think matches chevy engine red the closest. I think the movie car possibly could have had chrome valvecovers (despite not being able to see them in the film) so I will find some that will fit in my partsbox And here is the body in color!This is what the Rape Yellow looks like on the body, I think it looks quite right.
rustybill1960 Posted July 25, 2015 Posted July 25, 2015 Totally agree with You Gaute Fantastic subject too Love the work Your putting into this build Thank You for sharing Later Russ
Atmobil Posted July 30, 2015 Author Posted July 30, 2015 I have now mounted the sidepanels of the interior. I will redo the backseat as it did not turn out very well. I already have a batch of more Tuck'nRoll in the making.
Atmobil Posted July 30, 2015 Author Posted July 30, 2015 Thank you very much Well, I was thinking of doing more work on the engine and then remembered that there was a lot of small parts not having been painted yet so I spent some time on painting parts like the distributorcap, startermotor, fan, belts and pulleys and so on. But I did manage to put two parts on the engine aswell. I can't make out what valvecovers are on the enigne in the movie but since there is a lot of other chromebits on it I figured they have put chromevalvecovers on aswell. I found a couple that matched the size in my partsbox and glued them in place.
Atmobil Posted July 31, 2015 Author Posted July 31, 2015 I have just noticed something, take a look at this picture: Look at the pulley of the supercharger on the right. It does appear that there is no belt on that pulley!
DrKerry Posted July 31, 2015 Posted July 31, 2015 (edited) I'm thinking for movie purposes they just made it "look" the part and it wasn't functional??!! But your correct, there's no belt there!! Edited July 31, 2015 by DrKerry
Atmobil Posted July 31, 2015 Author Posted July 31, 2015 Yes, it is more and more evident that the performanceparts on the engine is fake movieprops so that is what I'm going to make aswell. The engine it self will be box stock but with the extra movieprop bits on top just like it looks like in the movie
Atmobil Posted August 2, 2015 Author Posted August 2, 2015 Thank you Here is another small update, I have started to modify the Paxton parts from AMT 57 Ford so that it will look like the setup in the movie. Modified part on the top left with what I have sawed off it at the bottom right and original AMT 57 Ford part on the top right. On the bottom left is the heaterfan box from the kit that I will modify to look like the "supercharger" in the movie.I have also built up most of the engine, will add plugwires later.
Dominik Posted August 3, 2015 Posted August 3, 2015 The color looks perfect! Like the interior also. good Job!funny thing with the belt...
Atmobil Posted August 12, 2015 Author Posted August 12, 2015 On Monday there was a meeting at out local modelling club and I used the time to install the plugwires. I have also found extra instruments to put on the dash, they are still not glued in place but in the picture you see how it will look. Not exactly like the film but close enough. I decided to polish the paint even when the movie car does not look all that shiny in the movie.
Atmobil Posted August 17, 2015 Author Posted August 17, 2015 Ok, I need soom hints and tips on how to replicate the flames on the moviecar. I have tried to make templates from the screengrabs but it is difficult to get it to a good enough resolution so that it can be printed out. Anyone got any tips on any other way of doing it? Maybe there is flames in another kit that looks similar enough?
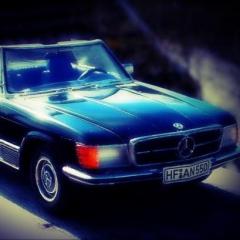
Atmobil Posted August 20, 2015 Author Posted August 20, 2015 The car is now sitting on its wheels for the first time.The clamps at the front are there too keep the body on the frame so I could see that it sits right. I have lowered it slightly in front by turning the spindles upside down and the front tires are smaller than the rear ones. The rear rims are also wider than the front ones. With the hubcaps that are going on it I think this will look good.
Stingray wes Posted August 21, 2015 Posted August 21, 2015 This is a great idea and you have nailed it. Keep up the great work.
Preacher141 Posted January 26 Posted January 26 I know this is old. I can't find any info on them. But, that dual coil holder on top of the engine has got to be a Niehoff Ignition bracket or cover
Recommended Posts
Create an account or sign in to comment
You need to be a member in order to leave a comment
Create an account
Sign up for a new account in our community. It's easy!
Register a new accountSign in
Already have an account? Sign in here.
Sign In Now