Petetrucker07 Posted May 11, 2015 Author Posted May 11, 2015 Thanks Tom and Gator. I used a dull exact blade and A LOT of patience. I'm lookin forward to seeing this done as well. I'm trying to take my time and do this right.
gatorincebu Posted May 11, 2015 Posted May 11, 2015 Clayton, You have so much time and effort and good work invested in this project . Please DO NOT get in a rush and muck it up!!! Be Well Gator
Petetrucker07 Posted May 11, 2015 Author Posted May 11, 2015 I'm really tryin. I'll be just fine though. The paint was the main thing frustrating me. Now that it's figured I can get goin on the interior. With the doors open now, I gotta do the flamed door panels, the sound system console, switch extensions and whatever else. I hope to get the frame painted next weekend.
slusher Posted May 11, 2015 Posted May 11, 2015 Nice work Clayton. I like how you did your paint testing, a great way to get rid of the guess work. Keep those progress pictures coming...
Tesla Posted May 11, 2015 Posted May 11, 2015 (edited) Real nice progress and I'm glad you have the paint colors worked out. Using the plastic spoons seems like a great idea! Edited May 11, 2015 by Tesla
kilrathy10 Posted May 11, 2015 Posted May 11, 2015 (edited) I'm really tryin. I'll be just fine though. The paint was the main thing frustrating me. Now that it's figured I can get goin on the interior. With the doors open now, I gotta do the flamed door panels, the sound system console, switch extensions and whatever else. I hope to get the frame painted next weekend.Hey, Bud....You might think about using the back of the blade, next time.....I was given this tip once a long time ago, and it worked out great for the only door I ever opened.....It carves away the plastic as opposed to separating it making a really smooth cut.....With several passes, it really worked well......I know hind sight is 20/20, but I know it works....Actually, I quoted the wrong passage, but that's what happens when you start getting old..... Edited May 11, 2015 by kilrathy10
Petetrucker07 Posted May 13, 2015 Author Posted May 13, 2015 I give that try on the next build I want opening doors. I hope to get the interior tub close to done this weekend and get the frame painted.
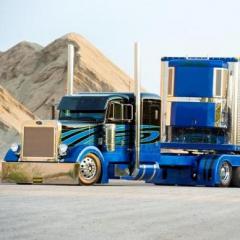
Petetrucker07 Posted May 16, 2015 Author Posted May 16, 2015 I picked up some supplies this week. I bought some .02 styrene, a strip of stainless and Milliput. I'm gonna give the interior a real effort. I'm gonna do the flamed door panels, floor and ceiling. Here are some more reference pics.
kilrathy10 Posted May 16, 2015 Posted May 16, 2015 Man, this is a serious looking truck.....What a project this is going to be....The 1:1 looks just too cool....The man has flames on his cooling fan for crying out loud....Awesome.....
Petetrucker07 Posted May 16, 2015 Author Posted May 16, 2015 Heres a pic of the inside of the hood. Here's a pic of the under side of the trailers, which I will eventually do someday.
kilrathy10 Posted May 16, 2015 Posted May 16, 2015 Oh, that is REDICULOUS !!!! Man, that looks good....Even the mud flaps are covered and aligned....Just too awesome....
slusher Posted May 16, 2015 Posted May 16, 2015 Beautiful 1;1 semi for inspiration. I would hate to detail that baby...
Petetrucker07 Posted May 16, 2015 Author Posted May 16, 2015 They shut that truck down for 2 weeks before every show. They then tear it down and clean.
Tesla Posted May 16, 2015 Posted May 16, 2015 They shut that truck down for 2 weeks before every show. They then tear it down and clean. There's so much detail on it, I can see why. They must not wear shoes when driving it.
Petetrucker07 Posted May 17, 2015 Author Posted May 17, 2015 (edited) There's so much detail on it, I can see why. They must not wear shoes when driving it. The truck does work, just not much as the driver is part owner. He spends time in the office and what not. Also they are always customizing this truck to keep it a bit different year to year. I'm guessin they have some nice floor mats to put down when it is working. Edited May 17, 2015 by Petetrucker07
Petetrucker07 Posted May 17, 2015 Author Posted May 17, 2015 I had many issues with the putty. I messed with it most of the afternoon and evening and couldn't get the results I was lookin for. I revisit the putty on another build. So I scratched up a set. I used .03 sheet for the main part of the panel. I used .01 for the flames. Glued the two pieces together then sanded the edges of the flames to round and smooth them out a bit. I still need to cut another piece of stainless for the top of the panel. I'm gonna use the process for the floor and hopefully the ceiling.
Tesla Posted May 17, 2015 Posted May 17, 2015 If you look close, the floor is an "insert". The truck does work, just not much as the driver is part owner. He spends time in the office and what not. Also they are always customizing this truck to keep it a bit different year to year. I was thinking about the "show" floor and didn't realize the pics had the insert. Thanks for pointing it out
Petetrucker07 Posted May 17, 2015 Author Posted May 17, 2015 I'm bouncing around a little. I started workin on the dash again.
Petetrucker07 Posted May 17, 2015 Author Posted May 17, 2015 I ran into a little snag. I got excited and cut the back window out too soon. I didn't have the doors hung to make sure the window lined up. So I took a piece of .06 styrene and filled in the mistake. Next weekend I'll cut the window out again, in the right spot.
Petetrucker07 Posted May 17, 2015 Author Posted May 17, 2015 Moving right along. I sprayed the door panels satin grey and put the strip of stainless on. The dash is fitted, so sprayed some paint on it. The frame is done so I sprayed some paint on it as well. I put the steps on and foiled the tank ends.
Petetrucker07 Posted May 17, 2015 Author Posted May 17, 2015 A little more work on the dash. Made switches from .01 wire.
kilrathy10 Posted May 19, 2015 Posted May 19, 2015 Good stuff, Man.....Gonna be something special....
tbill Posted May 19, 2015 Posted May 19, 2015 Looking good Clayton, you're a mad man, lol. This is gonna be a smoking rig when done!
cowboy rich Posted May 20, 2015 Posted May 20, 2015 Looks good to me, I like what you have going. Rich
Recommended Posts
Create an account or sign in to comment
You need to be a member in order to leave a comment
Create an account
Sign up for a new account in our community. It's easy!
Register a new accountSign in
Already have an account? Sign in here.
Sign In Now