Danno Posted June 12, 2015 Share Posted June 12, 2015 Excellent! Quote Link to comment Share on other sites More sharing options...
Helix Posted June 13, 2015 Share Posted June 13, 2015 Nicely done Pat Quote Link to comment Share on other sites More sharing options...
RatRod Posted June 13, 2015 Share Posted June 13, 2015 WOW, Wow, and wow!!! You totally went in a different direction with this one Pat, but what an awesome job!!! Great scale looking sanding marks!!! Quote Link to comment Share on other sites More sharing options...
spencer1984 Posted June 13, 2015 Share Posted June 13, 2015 Outstanding work, that metal finish looks great and I love the roof deco! Quote Link to comment Share on other sites More sharing options...
mikemopar70 Posted June 13, 2015 Share Posted June 13, 2015 What a nice idea, very cool model!! Quote Link to comment Share on other sites More sharing options...
Pat Minarick Posted June 13, 2015 Author Share Posted June 13, 2015 Wow Cool Effect .. looks so real. Thank you , Andre .Outstanding model. Very realistic Thanks Carl. Quote Link to comment Share on other sites More sharing options...
Pat Minarick Posted June 13, 2015 Author Share Posted June 13, 2015 (edited) Nice work. Thanks Bob. Edited June 13, 2015 by Pat Minarick Quote Link to comment Share on other sites More sharing options...
Pat Minarick Posted June 13, 2015 Author Share Posted June 13, 2015 nice job Thanks Cliff. Quote Link to comment Share on other sites More sharing options...
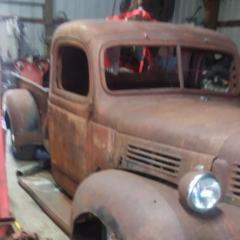
Pat Minarick Posted June 13, 2015 Author Share Posted June 13, 2015 Now that really is BARE METAL foil! I can't imagine how long it must have taken to foil the whole body! Amazing work! Sam Thanks Sam,it took a couple of days to finish up all the foil.I did use a whole sheet on it. If you really think about it, it took a lot less time than a shiny paint job. Quote Link to comment Share on other sites More sharing options...
Pat Minarick Posted June 13, 2015 Author Share Posted June 13, 2015 That's pretty cool Pat. What grit of sandpaper did you use? I can see many possible uses for this look. Thanks for sharing. Thanks Steve ,I think I used 400.Nicely done! Thanks Jeff. Quote Link to comment Share on other sites More sharing options...
BigTallDad Posted June 13, 2015 Share Posted June 13, 2015 That's an interesting approach! I'm not sure the shiny wheels go with the scuffed-up look... Quote Link to comment Share on other sites More sharing options...
lotno249 Posted June 13, 2015 Share Posted June 13, 2015 This is super perfect if you ask me. Love it. Just the kind of thing I like. DJ Quote Link to comment Share on other sites More sharing options...
MGL Posted June 14, 2015 Share Posted June 14, 2015 I like this more and more everytime I look at it. Quote Link to comment Share on other sites More sharing options...
Drake69 Posted June 14, 2015 Share Posted June 14, 2015 I know... and the flip front hood makes it even more awesome. Now I've got all new ideas on what to try this on. Quote Link to comment Share on other sites More sharing options...
Pat Minarick Posted June 14, 2015 Author Share Posted June 14, 2015 I'll be honest, the model isn't my cup of tea. But I really like that bare-steel effect- good to keep in mind for projects that might require it. Charlie Larkin Thanks Charlie, I hope you do try it sometime. as i wrote in your wip...this metal look is a w e s o m e ! outstanding work. Thanks again ,Dominik. Quote Link to comment Share on other sites More sharing options...
Pat Minarick Posted June 14, 2015 Author Share Posted June 14, 2015 The googly eyes are a great idea, and they worked well! I'm taking that. Thanks Milies,just don't paint them GREEN !Super neat! Never seen that done before! Thanks Albie. Quote Link to comment Share on other sites More sharing options...
Pat Minarick Posted June 14, 2015 Author Share Posted June 14, 2015 I love that metal effect, what a great idea you have come up with, it looks like real steel. The black roof looks great too, not sure about the skull, but it's your build,...... top job. Thanks Dale, I wasn't sure about the skull either ,but it needed something. Very cool idea , and it looks great ! Thanks Bob. Quote Link to comment Share on other sites More sharing options...
Pat Minarick Posted June 14, 2015 Author Share Posted June 14, 2015 Wow. I've been waiting for someone to try this. I did just a '34 Ford hood for the same efffect. I love the look of it, and would love to try it. I have some questions, if you don't mind? How many sheets did it take to cover the whole car? Did you do it in large panels or smaller strips? How well does the overlaps of foil pieces disappear and did the wash help that or hinder that? Was keeping large pieces of foil wrinkle free as you worked them, as frustrating as I imagine? What grit sandpaper did you use? Thanks Rob, I was wondering why I haven't seen someone try it before. I used a whole sheet on the car and the trim.I might try aluminum foil next time. I used a lot of big pieces,but it wastes a lot. If you rip the foil at the seams instead of cutting it, it doesn't show as much. The sanding really hides it and the wash helps too. When you put the big pieces on ,start in the middle and work your way out. I use the paper stemmed Q-tip and cut one end off to get into the tight corners. I used 400 grit paper and stainless steel metalizers for a dollar couple of tight corners. Quote Link to comment Share on other sites More sharing options...
Pat Minarick Posted June 14, 2015 Author Share Posted June 14, 2015 Wow - what a chore that must have been! But....well worth the effort - I like everything about it. Well done sir!! Thanks Mike. Very clever. Thank you, Jim. Quote Link to comment Share on other sites More sharing options...
Pat Minarick Posted June 14, 2015 Author Share Posted June 14, 2015 what type of BMF are you using? I can mostly only find chrome, matte aluminum, gold, and black chrome at hobby shops. I used BMF brand new improved chrome.What a cool effect. Nice idea. Thanks Ray. Quote Link to comment Share on other sites More sharing options...
Pat Minarick Posted June 14, 2015 Author Share Posted June 14, 2015 Looks cool! Thanks Chris. Very cool, even if it's not "perfect". Thanks John. Quote Link to comment Share on other sites More sharing options...
Pat Minarick Posted June 14, 2015 Author Share Posted June 14, 2015 That's a great effect Pat, I love the way it came out! Thank you, Mike. Quote Link to comment Share on other sites More sharing options...
Pat Minarick Posted June 14, 2015 Author Share Posted June 14, 2015 Very interesting and different and therefore very cool! I want to try something like this sometime. Thanks Snake. Quote Link to comment Share on other sites More sharing options...
Pat Minarick Posted June 14, 2015 Author Share Posted June 14, 2015 Brilliant [no pun intended] idea! Thanks Bob. Wow! I fuss when I BMF window trim! Excellent work! Thanks Allen. Quote Link to comment Share on other sites More sharing options...
Pat Minarick Posted June 14, 2015 Author Share Posted June 14, 2015 Excellent! Thanks Danno. Nicely done Pat Thanks Ray. Quote Link to comment Share on other sites More sharing options...
Recommended Posts
Join the conversation
You can post now and register later. If you have an account, sign in now to post with your account.
Note: Your post will require moderator approval before it will be visible.