Codi Posted January 23, 2017 Posted January 23, 2017 Fantastic Dave. I checked out your photo-bucket page and saw all of your updated pics. The pic of the entire car is really sweet. The black finish on the frame and the silver weld hi-lights at the joints is a nice touch too. I'm jealous. cheers, tim
Mooneyzs Posted January 23, 2017 Posted January 23, 2017 Dave... That Chassis is looking Killer with the paint on it and I absolutely love the welds on it . All of the little details to this build is just mind blowing!! Can you share how you did the welds??
mr68gts Posted January 24, 2017 Posted January 24, 2017 Dave, did you hollow out the scoop? If so, currious how you did it!As usual, beautiful work!
comp1839 Posted January 25, 2017 Author Posted January 25, 2017 (edited) john, thanks so much, kind sir! tim, thanks. i wanted to do the welds on the chassis with the weld decals from archer but, it would take alot of time i just don't have at present so, the chassis was painted tamiya gun metal. some flat black was airbrushed at the joints and willy nilly on the chassis. then i took silver paint and highlighted the joint. it's an attempt to make the chassis look like bare chromoly. it was something i think i've seen either clay or davey do in the past. dave, many thanks! love the willys by the way. hey chris, always glad to hear you like it!!! the process is above (although i don't think i did it much justice) paul, thanks and i did hollow out the throat of the scoop enough to put a foam/ carbon fibre scoop plug in it. i started with a 1/2" end mill and finished with the die grinder i use for porting cylinder heads. it's not perfect but, i planned on covering the hole. scott, thank you. scoop shot. side view mock up. rear 3/4 view. Edited July 16, 2017 by comp1839
Codi Posted January 25, 2017 Posted January 25, 2017 Model car porn there Dave. I hear Playboy is looking for some photogs. The pics do the car justice and I appreciate your sharing on how you painted the chassis and mimic'd the welds. Cheers Sir!
Red rocket 10 Posted January 26, 2017 Posted January 26, 2017 Dave you always find way to leave me speechless bro............... outstanding !
GoatGuy Posted January 28, 2017 Posted January 28, 2017 Those last mockup shots look great. I might have asked before, but how long will this beast be? Three feet?
builderboy123 Posted February 3, 2017 Posted February 3, 2017 Dave I am just trying to get into car modelling and i am wondering if you have any tips that could come in handy. I am 12 years old looking to build a pro mod 68 chevelle.Keep up the good work
Mooneyzs Posted February 3, 2017 Posted February 3, 2017 Dave... I just love seeing this on all 4's. man does it look Bad Ass and Fast just sitting there. One Steller build my friend. Keep up the great work
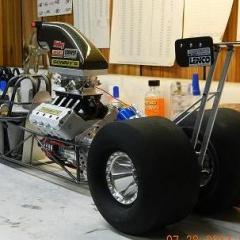
comp1839 Posted February 3, 2017 Author Posted February 3, 2017 (edited) sorry for the delay guys.dave, thanks!tim, there's nothing like a little model porn to stir the soul. no prob on the chassis stuff. you know i don't have any secrets.leonard, thanks buddy. i can say the same about your work.dave, glad you like the shot. the wheel base is 34.75" . when it goes on the shelf, it'll take up 43" of space........unless i put a wheelie bar on it.samuel, welcome aboard. i do have some tips.... 1) build what you love, love what you build. 2) don't be afraid to ask questions. 3) no matter how good you think it is.......there is always room for improvement.i hope you'll post your chevelle here in the drag section. i do happen to love pro mods. there are at LEAST a half a dozen guys on here who i know can give you some pointers. maybe they'll chime in with there support.chris, every time i do a mock up like this. i hate to break it down to do any more work to it. hehe.i will have some small updates this week end. Edited February 3, 2017 by comp1839
comp1839 Posted February 3, 2017 Author Posted February 3, 2017 (edited) i've been working on the steering and finished the rack. the steering shaft, the steering wheel and the quick disconnect for the wheel. fabbed and decaled the carbon fiber interior panels. i'm waiting for some parts to finish putting the panels on. and i did some wing support work. Edited July 16, 2017 by comp1839
builderboy123 Posted February 3, 2017 Posted February 3, 2017 The detail on this build completely blows me away. I half expect to see it start up and go for a run down the strip!I was wondering do you know where i could find a cheap scale motor for the chevelle i want to build? I dont have a lathe or many skills.Thanks, Sam
comp1839 Posted February 4, 2017 Author Posted February 4, 2017 i'm probably not your best source of info on 1/25 parts Sam. that being said, i'd recommend starting out with one of the pro sportsman or pro stock kits that are out there (at least if you're interested in carbs and nitrous). you can probably use one of those chassis too.
comp1839 Posted February 4, 2017 Author Posted February 4, 2017 (edited) i needed a cover for the clutch can openings so, i decided to make a pair of dies to form the aluminum into the shape i needed rather than try to machine them. if you want a better explanation just ask and i will give you the full tilt deal. short story...... made dies from some scrap i had laying around. pressed aluminum. cut out the basic shape of cover. Edited July 16, 2017 by comp1839
comp1839 Posted February 4, 2017 Author Posted February 4, 2017 (edited) this is the set up i will use to produce the bolt pattern in the can and then replicate it in the cover. any questions .......just ask. Edited July 16, 2017 by comp1839
Codi Posted February 4, 2017 Posted February 4, 2017 Thanks for sharing the inspection cover methodology. I see what you did there and it's beautiful in its simplicity. Need I add, the cover is the perfect shape. Now about that "gizmo" you have in the last pic, what the heck is that thing and how do you use it specifically? I'll give you a call to learn more about that bugger. Can't wait to see the result after you've completed it. All looks great Dave!!! cheers, tim
mr68gts Posted February 5, 2017 Posted February 5, 2017 (edited) Indexing head!Would love to watch it in use....hint hint... (video) lol. Ive never used one but Ive watched videos on them.So when you did your form, how much clearance did you give it for the aluminum?. Just the thickness of the aluminum sheet?Paul Edited February 5, 2017 by mr68gts
comp1839 Posted February 5, 2017 Author Posted February 5, 2017 (edited) joe, pics below. hope you like 'em. tim, thanks buddy. paul's correct. the tools are a spin index and a 3" chuck w/ internal jaws on a 5 c arbor. paul, it is a very versatile tool. the video would have to be pretty intense to show all of it's attributes. be happy to show you some time. i left .005"-.006" per side for clearance. the sheet is .040". the male die is 1.600 on the o.d., the female die is 1.690" on the i.d. i am by no means an expert at making pressing dies. they should have been steel. i didn't have any steel laying around so, i made do with what i had. i have a little knowledge from a friend of mine who was a tool and die maker ( he was also my mentor) he helped me make some dies for pressing the intake runners for my 1:1 intake manifolds. so, i'm probably more dangerous than anything, hehe. so, here are the results. i filed the edges around some of the corner bolt holes a little thin. i can live with it. all of the holes from the cover line up correctly to the bell housing. . Edited July 16, 2017 by comp1839
John Teresi Posted February 5, 2017 Posted February 5, 2017 Hi Dave.......sorry I missed your steering up-date.......glad I saw it......spectacular as always .......this has to be one of your best builds in my eyes.......looks so real and correct as always........you are the TOP DOG Brother.......when it comes to Dragsters.......and not to mention your 1:1 car.......you are magical Buddy.......your clutch can is Awesome too man.......love your work.......cant wait for the next up-date......your moving right along on this one
tyrone Posted February 5, 2017 Posted February 5, 2017 Just STUPENDOUS WORK !!!! running out of things to say... but you and several other builders here push, and inspire me to build better models ... Salute !!!
Davewilly Posted February 6, 2017 Posted February 6, 2017 Great update there Dave! Nice way to start a Monday morning before work!
Recommended Posts
Create an account or sign in to comment
You need to be a member in order to leave a comment
Create an account
Sign up for a new account in our community. It's easy!
Register a new accountSign in
Already have an account? Sign in here.
Sign In Now