Petetrucker07 Posted November 2, 2015 Posted November 2, 2015 Looks great. Nice touch with the Revell steers.
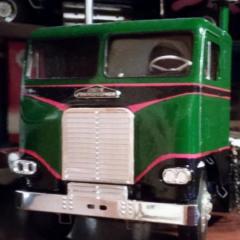
gino Posted November 2, 2015 Author Posted November 2, 2015 thanks clayton ! nice catch on the revell steers, they are always my first choice for my models. I think they look much better.this is an old model originally built in the early eighties, it has been redone several times. the paint scheme came from an original freightliner brochure I used to have.last year I finally figured out the high headlite deal and fixed it without repainting the whole cab. i gave it it's latest update changing the rear ends, rear wheels, and tires.i also blanked off the step well like it should be with some chrome acetate. I also discovered that rubber o rings cut to size look better than the black wire I used to use for the wheel openings.it still needs the grabhandles for the side of the cab but I forgot where I put them.
Petetrucker07 Posted November 2, 2015 Posted November 2, 2015 I switch out most of the rims on my builds with Moebius sets. I know on the the older late 60s, early 70s trucks they're a bit too modern, but still a nice lookin upgrade.
gino Posted November 2, 2015 Author Posted November 2, 2015 I agree, my latest freightliner (the one in my avatar) I used the moebius for the rears but wasn't happy with the fronts so I went back to the revell.
Tesla Posted November 2, 2015 Posted November 2, 2015 That's a sharp looking Freightliner...very nice build! The colors are remind me of Mayflower Moving & Storage.
gino Posted November 2, 2015 Author Posted November 2, 2015 You do some nice work for sure!why thank you sir ! but sometimes not as much as i'd like
gatorincebu Posted November 4, 2015 Posted November 4, 2015 Gino, Real fine looking bed bugger! Be well Gator
Goodwrench3 Posted November 5, 2015 Posted November 5, 2015 Very nice !What technique did you use to narrow up the front end so that the front tires fit properly inside the body ?Aftermarket front axle ? cut and section the kit axle ? remove the front brake drums ?Thanks!
Petetrucker07 Posted November 5, 2015 Posted November 5, 2015 I think the Revell wheels as something to do with it. I could be wrong.
Goodwrench3 Posted November 5, 2015 Posted November 5, 2015 I think the Revell wheels as something to do with it. I could be wrong.If that's true, then it would save me a bunch of work on mine that I'm working on.I'm dreading that part of the work -- getting the front wheels to tuck in under the cab correctly.
gino Posted November 5, 2015 Author Posted November 5, 2015 (edited) Very nice !What technique did you use to narrow up the front end so that the front tires fit properly inside the body ?Aftermarket front axle ? cut and section the kit axle ? remove the front brake drums ?Thanks! I cut and sectioned the axle . amt uses a bigger tire and wheel on the freightliner, so if using smaller (revell) pay attention to the blocks on the bottom of the front springs where the axle attaches.I usually end up shaving them down a bit to get the right sit. (I don't like a big gap between the wheel opening and the top of the tire) . test fit is a must.hope this helps. Edited November 5, 2015 by gino
Goodwrench3 Posted November 7, 2015 Posted November 7, 2015 I cut and sectioned the axle . amt uses a bigger tire and wheel on the freightliner, so if using smaller (revell) pay attention to the blocks on the bottom of the front springs where the axle attaches.I usually end up shaving them down a bit to get the right sit. (I don't like a big gap between the wheel opening and the top of the tire) . test fit is a must.hope this helps.Ah-- ok. RE: "cut and sectioned the axle . "Seems to be a common practice on this kit. So you basically cut out a section of the center of the front axle, and then glued the halves back together ?I've seen guys here say they "pin" it when they glue it back together, and others who just glue a strip of styrene to the back of the axle at the seam to strengthen it. Any details or photos you could share would be greatly appreciated as I will need to do this on mine soon.Thanks !
gino Posted November 7, 2015 Author Posted November 7, 2015 Ah-- ok. RE: "cut and sectioned the axle . " Seems to be a common practice on this kit. So you basically cut out a section of the center of the front axle, and then glued the halves back together ? I've seen guys here say they "pin" it when they glue it back together, and others who just glue a strip of styrene to the back of the axle at the seam to strengthen it. Any details or photos you could share would be greatly appreciated as I will need to do this on mine soon. Thanks ! I first cut the axle in half, then removed an even amount of material on both sides til I got the look I wanted , then glued them together. I then glued small pieces of styrene top and bottom front and back. I couldn't really get a good pic of this but you can see the middle and bottom pieces. hope this helps .
kilrathy10 Posted November 8, 2015 Posted November 8, 2015 (edited) That is a great looking FL....I'm digging that paint job.....Great job on the steps, and the o-ring is an awesome idea....I like those fuel tanks, too....Man, this thing looks good.... Edited November 8, 2015 by kilrathy10
gino Posted November 8, 2015 Author Posted November 8, 2015 thanks jt !the tanks came from the amt/ertl international 4200 conventional .
Recommended Posts
Create an account or sign in to comment
You need to be a member in order to leave a comment
Create an account
Sign up for a new account in our community. It's easy!
Register a new accountSign in
Already have an account? Sign in here.
Sign In Now