Randy D Posted March 1, 2016 Share Posted March 1, 2016 Hi Andy, First off, this is a wonderful build you have going here, great workmanship as always from your bench !!! Not your average 'Cuda' !! I did not see any details on how you painted the body? Would like to know how you achieved that primer/ peeling paint look. Thanks, Randy Quote Link to comment Share on other sites More sharing options...
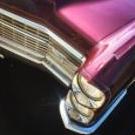
exesivefire Posted March 2, 2016 Author Share Posted March 2, 2016 Hi Andy, First off, this is a wonderful build you have going here, great workmanship as always from your bench !!! Not your average 'Cuda' !! I did not see any details on how you painted the body? Would like to know how you achieved that primer/ peeling paint look. Thanks, Randy thank you for the kind words! I did take some pictures along the way, not sure why I didn't post them here. I first started with a primed body and my arsinal of washes. I use various techniques using rust, black and earth tones , usually puddle it on the top parts and brush them down the sides. These washes dry pretty thin, so you can afford to be kind of heavy. I followed that with a coat of dullcote to seal it before the next step. I use water base paint for the next step so your techniques can vary, I did spray some hair spray in a cup and brushed it onto spots I knew I didn't want paint to stick (I don't think I needed to with this particular paint though) I then sprayed my color. then using a stiff artist shading brush, some water and my secret weapon (windex) I started the scary part. Start small and try to think of how the paint would really peel, I was careful to try and have the effect stop at panel lines to try and hide what it was I was actually doing. after that I did a bit more washing and shading, and sealed it all with a dullcote/clear mix Quote Link to comment Share on other sites More sharing options...
Davewilly Posted March 2, 2016 Share Posted March 2, 2016 (edited) looks pretty good and easy....which I am sure isn't....but thanks for sharing how you did it. Edited March 2, 2016 by Davewilly Quote Link to comment Share on other sites More sharing options...
crazyrichard Posted March 2, 2016 Share Posted March 2, 2016 awsome ! love all the grime and dirt !! ....looks stunning Quote Link to comment Share on other sites More sharing options...
freakshow12 Posted March 2, 2016 Share Posted March 2, 2016 That is just so cool. I LOVE IT. Keep going Quote Link to comment Share on other sites More sharing options...
Ken Gilkeson Posted March 3, 2016 Share Posted March 3, 2016 great start ;-)) Quote Link to comment Share on other sites More sharing options...
exesivefire Posted March 4, 2016 Author Share Posted March 4, 2016 Thank you! Quote Link to comment Share on other sites More sharing options...
62pyro Posted March 4, 2016 Share Posted March 4, 2016 Looks just right. Not too many people can make crappy paint look good.You've nailed it. Quote Link to comment Share on other sites More sharing options...
exesivefire Posted March 4, 2016 Author Share Posted March 4, 2016 Looks just right. Not too many people can make crappy paint look good.You've nailed it.thanks pat Quote Link to comment Share on other sites More sharing options...
JTalmage Posted March 4, 2016 Share Posted March 4, 2016 That is astonishing! Love it! can't wait for the next update! Quote Link to comment Share on other sites More sharing options...
Dogfish_7 Posted March 4, 2016 Share Posted March 4, 2016 (edited) Weathering looks great! Edited March 4, 2016 by Dogfish_7 Quote Link to comment Share on other sites More sharing options...
exesivefire Posted March 4, 2016 Author Share Posted March 4, 2016 Started on the engine, and hit a snag.. Had to modify the oil pan to clear the front axle. Quote Link to comment Share on other sites More sharing options...
Dogfish_7 Posted March 4, 2016 Share Posted March 4, 2016 No worries! Quote Link to comment Share on other sites More sharing options...
exesivefire Posted March 11, 2016 Author Share Posted March 11, 2016 Engine progress continues Quote Link to comment Share on other sites More sharing options...
DumpyDan Posted March 12, 2016 Share Posted March 12, 2016 This is so cool, love it Quote Link to comment Share on other sites More sharing options...
afx Posted March 12, 2016 Share Posted March 12, 2016 Great build Andy. Have you decide between the injector stacks or the scoop yet? Quote Link to comment Share on other sites More sharing options...
exesivefire Posted March 12, 2016 Author Share Posted March 12, 2016 Great build Andy. Have you decide between the injector stacks or the scoop yet? probably the scoop, I just couldn't get the stacks clean enough to be happy with it. Made the blower drove this morning while I was waiting on some odds and ends to dry. Quote Link to comment Share on other sites More sharing options...
afx Posted March 12, 2016 Share Posted March 12, 2016 I prefer the scoop myself. You're putting that lathe to good use. Quote Link to comment Share on other sites More sharing options...
crazyrichard Posted March 12, 2016 Share Posted March 12, 2016 looking gooood ! Quote Link to comment Share on other sites More sharing options...
62pyro Posted March 12, 2016 Share Posted March 12, 2016 Your machining just keeps getting better. Quote Link to comment Share on other sites More sharing options...
exesivefire Posted March 13, 2016 Author Share Posted March 13, 2016 Thank you guys! I'm on the home stretch now. Glad the scary bits are over. Quote Link to comment Share on other sites More sharing options...
exesivefire Posted March 13, 2016 Author Share Posted March 13, 2016 (edited) Should be finished up tomorrow if all goes well, need to paint the scoop (again) and make some sort of exhaust. Once I got everything all settled that blower belt is a little close to the radiator. But a piece of .020 fits between and that is like a half inch in 1:1... Close but... Edited March 13, 2016 by exesivefire Quote Link to comment Share on other sites More sharing options...
1930fordpickup Posted March 13, 2016 Share Posted March 13, 2016 You just need a Krusty The Clown plate for the front or maybe a figure. This is killer, as always from your bench. Quote Link to comment Share on other sites More sharing options...
exesivefire Posted March 13, 2016 Author Share Posted March 13, 2016 You just need a Krusty The Clown plate for the front or maybe a figure. This is killer, as always from your bench. close enough.... Ha Quote Link to comment Share on other sites More sharing options...
1930fordpickup Posted March 13, 2016 Share Posted March 13, 2016 Spot on. Quote Link to comment Share on other sites More sharing options...
Recommended Posts
Join the conversation
You can post now and register later. If you have an account, sign in now to post with your account.
Note: Your post will require moderator approval before it will be visible.