blackbeard Posted January 11, 2017 Posted January 11, 2017 Those new rear rims look great can,t wait to see them on your build
mr68gts Posted January 11, 2017 Author Posted January 11, 2017 And if I want to carry the nostalgic look to the front that would be around the same era for a no expense spared billet wheel. Not too sure on these though as it will hide much of the detail looking through the rim so I may just go spindle mount 5 spoke Americans instead.
blackbeard Posted January 11, 2017 Posted January 11, 2017 great looking rim I would go with a 5 spoke American rim to show more of the detail you are after
gasser59 Posted January 12, 2017 Posted January 12, 2017 That's the one. You sure do some great SW artwork. Are these going to be available in your ShapeWays store?
Mooneyzs Posted January 12, 2017 Posted January 12, 2017 Paul... I haven't been around here much lately and man you are doing some great work. Between drawing up your 4 Link set up to finish up that killer block and now the rims you are drawing up. You have that computer working over time. I just hope Sandy doesn't hate me for it . I can't wait to see how these things print for you. Looking forward to your next update.
comp1839 Posted January 14, 2017 Posted January 14, 2017 i love the beadlock conversion on the old bear paw, paul. it makes me all tingly. love the front too. great work. i know it's lot's of effort!!!!!
mr68gts Posted January 16, 2017 Author Posted January 16, 2017 That's the one. You sure do some great SW artwork. Are these going to be available in your ShapeWays store? Brad, Thank you sir, The spindle mount 5 spoke is available in the store but the kidney bean and the Bear Paw are not. I may make the Bear paw available after a bit but the Kidney Bean Halibrand needs more work. Paul... I haven't been around here much lately and man you are doing some great work. Between drawing up your 4 Link set up to finish up that killer block and now the rims you are drawing up. You have that computer working over time. I just hope Sandy doesn't hate me for it . I can't wait to see how these things print for you. Looking forward to your next update. Chris, Thank you! The computer is a bit mad at me but it'll get over it! Nah, she's good. Been doing most of the work at 3 am whilst she be sleeping! LOL. i love the beadlock conversion on the old bear paw, paul. it makes me all tingly. love the front too. great work. i know it's lot's of effort!!!!! Dave, Thank you! It's been a big effort and now the parts are starting to roll in! The first order of parts will be here Tuesday and I am ordering the rest of the 481x tonight along with a few other parts to hopefully get this thing up on wheels at least by GSL. small update.... I redid the clearance for the valve cover bolts so I can carbon fiber them instead of Alclad / Spaztix chrome without the decal pealing with installation of the T2M bolts. The bear paw and 5 spoke rims will be ordered at a later date (funds! Need mo funds! lol) Everything is transferable from rim to rim though so there won't be an issue! Off to relax for the evening!
Codi Posted January 16, 2017 Posted January 16, 2017 Somehow I missed the bottom of the prior page where you posted a pic of a "bead lock bear paw"...........so I went looking and lo' and behold............I gotta agree completely with Dave, that will look killer. When I met Dave to discuss wheels the Bear Paw was the one I decided to go with for the Bantam and Dave shared a bunch of help, insight & dimensions for it. Priceless. We even talked about how a set would look on his 37' Chevy. Just too trick if it could happen some how. Can't wait to see how your design turns out in 3D. I'm sure it will be awesome. Cheers!
Davewilly Posted January 16, 2017 Posted January 16, 2017 Man those rear wheels look killer! Thanks for sharing the cad pics I enjoy seeing the designs...Seeing Chris and yours really makes me want to get going on some Solidworks classes...
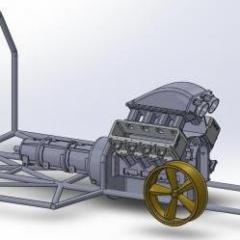
mr68gts Posted January 17, 2017 Author Posted January 17, 2017 Man those rear wheels look killer! Thanks for sharing the cad pics I enjoy seeing the designs...Seeing Chris and yours really makes me want to get going on some Solidworks classes... Thank you Dave. The cad files will soon be less since all the parts I need are either on their way or ordered so it will finally be time to start putting it back together the 2nd time! I think the only parts left are the floater hubs, all the calipers and the rear Penske shocks. I have a hat picked out that got done for someone else a while back if I do decide to go supercharged.Paul
mr68gts Posted January 24, 2017 Author Posted January 24, 2017 Magneto. The cap didn't print the pins so I will have to redo that but the rest of it came out good. Front brake parts. I haven't tried them on the rims yet but I will soon to see how they fit. Shouldn't be any problems since it has all been engineered on the computer! 4 Link parts. The rear end brackets have a little bow to them but I think I can straighten them out. I may see if I can have them photo etched though. I need to put together a file and try and get it all photo etched. There's a bunch of tabs and brackets I am going to need that would be better in photo etch than printed. Lower drive parts. The long stub is the support hub. Short one is the crank hub. Can't wait to see if I can put all this together once I get the block and remaining parts ordered up. Updated strut bodies set up for the machined spindles. Lets hope they are strong enough to support the model once completed!
mr68gts Posted January 24, 2017 Author Posted January 24, 2017 Here's the floater parts so far. The rotor will be machined along with the retaining ring for the rotor. I am thinking I will make the flange on the spindle separate from the "tube" so I can machine it also and use the printed flange to be able to replicate the model properly. I still need to do the drive flange and axle cover. It's 2 pieces in real life but I may make it one piece in the model. Haven't decided yet. Just depends on how crazy detailed I want to get with it. One part will look just like the 2 by the time I am done with it.
blackbeard Posted January 24, 2017 Posted January 24, 2017 those parts look killer great job on the 3-d cad work
mr68gts Posted January 24, 2017 Author Posted January 24, 2017 Trial fit of the brake rotor assembly to the front rims. The screws are going to be a pain in the you know what!
gasser59 Posted January 24, 2017 Posted January 24, 2017 Those really printed out nicely and the fit looks spot on. Yep, the screws always are.
Codi Posted January 24, 2017 Posted January 24, 2017 Yes Paul, they will be a pain but they sure do look nice. All of the parts. The 4 link brackets really stand out, you did an excellent job rendering them. I'm sure I won't be the only one on the forum looking forward to your updates if you can get them made in PE nickel. I'd order a few sets immediately.........bet you can't wait to get the engine now!! cheers, tim
mr68gts Posted January 25, 2017 Author Posted January 25, 2017 Thank you fellas! I dug out the aluminum plate I use for chassis tonight so here we go! I may see what brass I have on hand and do it up with a mix of brass and evergreen. This way I can use the strength of the brass as an advantage. It will only be the main rails, hoop and basic structure if I do go this route. Just going to have to ponder. We are so limited on supplies up here that it's hard to get anything without ordering even the basic necessities for model building. I even have to stock up on glues when we come down the mountain! Paints are a joke, so when I say see what brass I have on hand..... lolI've got to get back to digging up parts, see what I come up with in the next few days!Paul
blackbeard Posted January 25, 2017 Posted January 25, 2017 Sounds great will be watching this build closely
Mooneyzs Posted January 25, 2017 Posted January 25, 2017 Paul... you are crushing this build my friend. All of your CAD work is just awesome and seeing the 3D printed parts is inspiring me to get back in front of the computer and design more as well but I know I have a funny car that needs to get completed first... LOL. Sounds like you need to move to the Phoenix area..... well you know then you would be much closer to Supplies . I can't wait to see what you have in store to share with us next.
mr68gts Posted January 25, 2017 Author Posted January 25, 2017 Thanks Chris, So, fun time is over! Time to get serious and put it to plastic! I didn't order up the rest of the 481x yet but that will be tomorrow. (just ran out of time to combine files) New hoop with newly printed modular 4 link! Like I said, plan is to have it on wheels for GSL in rough form. Wish me luck! I'm going to need it lol. Paul
Davewilly Posted January 25, 2017 Posted January 25, 2017 Man those parts came out great! Cant wait to see when the engine comes in!
blackbeard Posted January 25, 2017 Posted January 25, 2017 great start the new 4 link brackets look great
mr68gts Posted January 25, 2017 Author Posted January 25, 2017 Got a little further with the chassis this morning! The basic rear structure is off the old chassis. There was nothing wrong with it and the shock tabs were in the correct spot so I just reused it without the bracing. The cross members have been relocated and now I can start adding in the floor bracing and rocker bars.
Recommended Posts
Create an account or sign in to comment
You need to be a member in order to leave a comment
Create an account
Sign up for a new account in our community. It's easy!
Register a new accountSign in
Already have an account? Sign in here.
Sign In Now