comp1839 Posted February 12, 2017 Posted February 12, 2017 i'll bet someone is ear to ear smiles!!!!!
mr68gts Posted February 12, 2017 Author Posted February 12, 2017 Randy, Thank you! Hope to see you in Salt Lake! Not making it to DSC. Have to work that weekend. Dave, I can't stop smiling! Lol. Your help has allowed me to get it finished up! There's still some things to finish up like the oil pump but I can at least get the basic long block put together for GSL so people can see it on display. I managed to sand out the issues in the block and get it painted it's final color. I used silver leaf from Tamiya in spray can as this is the closest I can come to a billet style finish. Heat tends to tarnish the metal in the real world a bit so it's a win win! I may go in and dirty it up once it is assembled to make it look like it's been ran. I also sprayed the base silver (same as the block) on the supercharger crank pulley so all it needs now is the "hard anodize" color on it. Still need to work on the cam cover/ fuel pump extension some more before I can assemble the short block for good. I've been also working on cleaning up the heads and oil pan to get them ready for assembly. The one head is done but still need to do the other one. I will have to machine some dowel pins to register the heads. I would also like to make some "copper" head gaskets for it. (thanks Chris for that little detail! Paul
Mooneyzs Posted February 13, 2017 Posted February 13, 2017 Paul... Engine is looking killer my friend and I think that paint is about the closest you will find to look like Billet Aluminum. Love the progress you are making with this one!
Nytrozilla Posted February 13, 2017 Posted February 13, 2017 Hey Paul, I think Chris is gonna' have to take the hit for everybody that does head gaskets from here on out.Kinda like the first guy to add valve stems to wheels. Now everybody is doing it.Loving the look and the progress my friend.
mr68gts Posted February 15, 2017 Author Posted February 15, 2017 Thank you guys! I am really pleased with it so far. I haven't been working on it the last few days though, or anything else for that matter........because I am looking for a mill! LOL.I actually pondered on it quite a bit and have decided to hold off on purchasing a dedicated milling machine as I would really like to find a bigger used Bridgeport or something of that size. (there are other things I am into besides modeling and I can always use a mill!)So, armed with that thinking I decided to purchase the mill parts to convert the Unimat into a lathe / mill setup. I've purchased the indexing table for it already and have bid on a mill post setup. One of the things that steered me this way is that this mill was gifted to me from a dear friend's wife after he passed. It's the perfect hobby lathe for smaller projects and I feel it's better to get even more use out of the machine than to sideline it for a new mill. The lathe is never going anywhere anyway and I will keep it operating as long as I can. With this I can now start making all the necessary bolt heads for this model and the WIlliams FW14B that has taken a back seat due to needing a small fortune in RB Motion bolts. (there's also a half assembled 1/12 935 Porsche that requires things machined such as Half shaft parts ect.) I also been looking at other accessories for it like a rotary table and stuff. Up side to this route is also the fact that I can purchase a few bits of tooling and be able to use it sooner rather than later.Paul
mr68gts Posted February 16, 2017 Author Posted February 16, 2017 Well, Managed to get back in the room for a bit and sit at the lathe. I machined the crank bolt and once the indexing attachment for the Unimat shows up with the mill post assembly I can mill the flats into it. Then I will have a machined crank bolt! Man, this stuff needs to show up now! lol
comp1839 Posted February 17, 2017 Posted February 17, 2017 hope you stuff shows up soon paul!!! the details are gonna make this thing!!!!!
mr68gts Posted February 21, 2017 Author Posted February 21, 2017 Dave, Thanks! The guy shipped out the mill post assembly this morning so I should have it in a couple days! There's so many things I can add to this now without having to have it 3d printed that it's going to take on a whole new level! I've been needing a mill for 10 years now and it's finally a reality. It may be the one I wanted but it's definitely the one I can use! Update! I managed to get the lower pulley in "hard anodize" color the other day. It really needed to be over black instead of silver to darken it up some but that's OK. The anodize fades some after a while of being in the elements and use so it will be fine! So I assembled the crank hub, degree wheel and the supercharger pulley for good! The crank stub, timing cover and seal retainer are also in for good. I can't install the crank drive till I finish up the cam cover however as it slips behind the drive pieces. The crank support hub has to wait until the crank bolt is in before I can install it. Hurry up mill! The engine assembly will actually be pretty quick as most of it is printed just waiting on paint and detailing. Paul
Mooneyzs Posted February 21, 2017 Posted February 21, 2017 Paul.... Looking good buddy!! Love seeing progress come together on this build. Also glad to.hear you are getting the Milling adapter, I can't wait to see what you make with it. So I just have to ask what color did you use over black for the hard anodize? Keep up the great work.
comp1839 Posted February 21, 2017 Posted February 21, 2017 love it paul !. hope the post man gets there soon. it'll be good to see more chips flyin' !
mr68gts Posted February 22, 2017 Author Posted February 22, 2017 Chris, it was actually over silver base because thats what I did on the triple clamp for my rc211v. Black would have darkened it I think. I mixed Tamiya acrylics to get the color. It was dark copper and gun metal mixed to get the desired color. Dave, I am seroliously impatient right now! Haha. I'll have it Friday supposedly but its only coming from Cali so I bet I have it Thursday. Oh the chips are gonna fly.....Lol
mr68gts Posted February 22, 2017 Author Posted February 22, 2017 I managed to make one head gasket. I will get the other one finished up and installed. I still need to finish sanding on the right side cylinder head before it's ready for paint. Then I need to make the head bolt assemblies for both cylinder heads. I need to stat machining the socket head cap screws that go into the font cover and get the cam gear cover installed also. (it's painted already) The black on the "head gasket" is just a shadow. I assure you it's a full gasket... Looks like I'm going to be spending some time on the lathe lol. I also decided I needed to get a bit more organized with all the parts laying around for this thing. Everything has been sitting in baggies and I've used these bead containers for all my RB Motion stuff. They work out well and are easy to use.
Mooneyzs Posted February 22, 2017 Posted February 22, 2017 Paul... Looking awesome my friend. I am loving what you are doing. I think I am starting to rub off on ya.... adding head gaskets an all . what material did you use. Were you able to find thin copper?? It's looking really nice with the gasket in place. and I like how you are organizing all of the parts. Looks awesome
mr68gts Posted February 24, 2017 Author Posted February 24, 2017 I managed to get the crank bolt done. So, I am starting to make all the head bolts for it now. Lots of work to make 18 head bolts but the detail will be well worth it in the long run. Then I will probably start on the 4 link rod tube adapters. (take a break from the engine for a bit lol)
Codi Posted February 24, 2017 Posted February 24, 2017 Whoa Paul, have you looked at R.B. for 1/12th scale bolts in particular? I know you have purchased from him and use his product per your earlier posts? You might also check out www.model-motorcars.com for possible scale hardware solutions. If I can think of anyone else that might be useful, I'll drop you a PM. Looking good too btw!!! cheers, tim
mr68gts Posted February 24, 2017 Author Posted February 24, 2017 Tim,I did not know they picked up the scale hardware line! That is awesome news. I was pretty disappointed when I heard of SH closing up. Now if someone would pick up the T2M line we would be set!Typically Id just use Roberts stuff and I have a stash of it but I thought I would try my hand at making all the hardware for this, the 935 and Williams FW14B that are also in the works. I don't mind making the hardware at this point but it will get old quick I can see lol. I'vI've actually had Robert make some custom parts for the 935.
comp1839 Posted February 24, 2017 Posted February 24, 2017 robert makes hex, socket and button heads that i'm aware of paul. nice work on the crank hub bolt. the hardware will make this baby POP!.
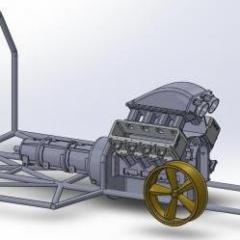
mr68gts Posted March 2, 2017 Author Posted March 2, 2017 Little bit of an update! The chassis is slowly going back together in the wee hours of the mornings before I go to work. (AKA 3 am lol) I've got the basic cage structure done and the J bars are back in! Glad I can engineer all this on the computer. There is literally none to extremely little room between the trans cross member and the Lenco section! And yet it still fits as it should! Before I know it, it will be on all fours for the first time ever. I may see about machining the strut bodies in brass instead of the 3d printed parts just for the strength. I am still worried about the weight and size of the model on some crucial components. Just have to see. And the engine is just a hair above 10 inches crank center line to ground as it should be. Pay no mind to the upright at the mid plate. It's just my reference point I am using to locate the engine for now till I bend up the mid plate hoop.
gasser59 Posted March 2, 2017 Posted March 2, 2017 This thing is sure going to be a beast. Love the progress you're making Paul. Keep after it.
Codi Posted March 2, 2017 Posted March 2, 2017 Nice mock-up Paul. Your efforts are really starting to show in the progress you're sharing. cheers, tim
Mooneyzs Posted March 3, 2017 Posted March 3, 2017 Paul... I am loving the mock up on this. It is looking Killer with the engine sitting in the chassis and having the body on. Such nice work!! Keep up the killer work, It is looking great!!
mecklm Posted March 3, 2017 Posted March 3, 2017 Paul, this is one of my favorite builds, in particular your use of Solidworks and Shapeways. I use both myself and have been working on printed parts for my 1:1 for the last six months. You mentioned doing metal parts for some of the items you need and I just wanted to share my experience, in case it might help you out. I've had three parts made with the "stainless steel" group of materials and the success has varied greatly depending on the part geometry. These materials are printed directly to metal and they weren't kidding when they cautioned about 5% or more variation in dimensions. For what I needed it turned out okay but only by drilling out screw holes and spending some time at the lathe getting larger holes bored round. The material is super hard so cobalt is the only way to go to machine it. Don't even think of tapping it.The precious metals range of materials prints in wax and uses the lost-wax casting process to go to metal. Accuracy and staying true to size are hugely better and using raw brass let's you do finish machining with conventional tools. Downside is the raw brass is triple the cost of the steel. Anyway, carry on with this awesome build and hit me up if you ever run into any snags with Solidworks. I'm always willing to help a brother out. Mike
mr68gts Posted March 3, 2017 Author Posted March 3, 2017 Mike, Thank you sir. Im very much a newb at the solidworks but I am a fast learner. I've enjoyed the journey thus far. I actually bought the solidworks training books to learn. With these books Ixve quite litterally taught myself the program and some help from Chris.Ther will be some updates on this in a week or so. Off for 6 days and taking care of a few things before shift starts again.The metal strut idea was actually me machining them. That is good to know about the metal printed parts though! I did not know that. That also explains the price of the precious metals. Chris and I were laughing one day about platinum parts on a model lol.Tim and Chris, thank you!
mecklm Posted March 3, 2017 Posted March 3, 2017 Yeah, I look at the platinum price every time I upload a file, just for a good laugh. My personal high would have been $73500. I can't imagine anyone taking a chance on a 3d print in platinum. Mike
Recommended Posts
Create an account or sign in to comment
You need to be a member in order to leave a comment
Create an account
Sign up for a new account in our community. It's easy!
Register a new accountSign in
Already have an account? Sign in here.
Sign In Now