SpreadAxle Posted June 26, 2017 Posted June 26, 2017 (edited) 10 years ago I built this truck, Hosted on Fotki However, the tractor has ended up in a very sad state. I am rebuilding the tractor and using the trailers for a different truck. Using the 1969 Autocar hood conversion from AITM, I will be converting this into an A64FT. Starting with the frame, I made some modifications. Front springs from a White Road Boss were used. The notched area at the front end of the rails was reshaped. The steering brackets molded to the frame have been cut off and are being repositioned. I used the Road Boss radiator with the Autocar kit fan shroud added. Hosted on Fotki The bumper comes with the hood. It's just laying in place for the photo. Hosted on Fotki Here is the hood mocked up with a fresh kit cab. Hosted on Fotki The very heavy duty Rockwell suspension from the Autocar Dump Truck kit has been replaced. A used GMC Astro rear suspension sits in its place since this will be an on-highway truck. Hosted on Fotki Here is the hood and cab in their first coats of primer with my own modifications to the hood shown. Hosted on Fotki I shaved off the molded headlights and will be adding a set from the spares box. Hosted on Fotki STS used to sell these metal wheels. The one on the left is sanded and polished.I'm using these with the Autocar kit drive wheels. Hosted on Fotki The overall plan for this one is that it will be a tractor with an NTA 370 Cummins engine, 5x4 main/auxiliary transmission setup and a Mercury sleeper. The paint job and the trailer are the only remaining debates going on right now, but I do have some ideas. I just have to pick one. Edited July 8, 2017 by SpreadAxle
Modeltruckbuilder Posted June 27, 2017 Posted June 27, 2017 (edited) - Edited December 26, 2017 by Modeltruckbuilder
DrKerry Posted June 27, 2017 Posted June 27, 2017 Looked good before and looking good as it starts a new life!!!!!!!! Can't wait to see more!!!!
RAT-T Posted June 30, 2017 Posted June 30, 2017 CAN'T SEE ANY PHOTOS, JUST SAYS 3RD PARTY HOSTING USAGE
Force Posted June 30, 2017 Posted June 30, 2017 Photobucket has stopped the linking service to forums and such unless you pay 40 bucks a month or 400 bucks a year.
SpreadAxle Posted July 8, 2017 Author Posted July 8, 2017 Axle-forward Autocars like this one had a narrow 18" battery box with a step. I narrowed the AutoCar kit battery box. The step is made using a step from a Revell AG Pete 359 and some plastic angle and other scrap plastic. I made a mold of my new battery box and cast some copies. The master is on the left. Hosted on Fotki
SpreadAxle Posted July 8, 2017 Author Posted July 8, 2017 I moved my photos and cancelled Photo Bucket.I'm on Fotki now so they should be visible. What Force said about Photo Bucket is true. They did it without warning.
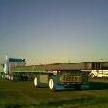
SpreadAxle Posted July 9, 2017 Author Posted July 9, 2017 The truck in the pic is basically what I'm going for.
DrKerry Posted July 9, 2017 Posted July 9, 2017 The truck in the pic is basically what I'm going for. nice nice nice!!!!!!!!
SpreadAxle Posted October 17, 2017 Author Posted October 17, 2017 I've been pretty busy but there has been some progress on this one. I made some modifications to the frame. A new rear cross member was fabricated. Hosted on Fotki.com The Cummins NTA-370 and the transmission from a Road boss kit. Hosted on Fotki.com On the 1:1, some versions had the air cleaner tube coming through the side of the hood while others have the air intake set up the same way as the Autocar kits. For the turbo charged Cummins, I have seen this version of the hood used, so I modified the hood and used the cowl plate from the Road Boss. Hosted on Fotki Thanks for looking and I will update again soon.
Jimfromok Posted October 22, 2017 Posted October 22, 2017 I used to have a buddy that hauled cattle with a 75 Autocar The whole truck was Oklahoma state university orange
SpreadAxle Posted November 4, 2017 Author Posted November 4, 2017 (edited) This truck isn't too far from being done, but there is still plenty of work to be done. The engine and transmission are installed and are being tied into the frame with air and fuel lines. Hosted on fotki[\url] The color of the frame is Testors Gloss Dark Blue #1211. Hosted on fotki[\url] The sleeper, fuel tanks and front bumper have all been painted Alclad Polished Aluminum. This was sprayed over a coat of Valspar High Gloss Black Lacquer. Overall, I am pleased with the results but it is my very first time using Alclad and there are things I did learn for next time. The tanks are resin items I bought years ago from SourKraut. They were sold as long Mack R tanks. However, If you look at the pic I posted, you will see the fuel tanks are basically identical to the Mack R kit's round fuel tanks. That's why I used these. The cab and hood are being painted and will be shown in the next day or two. Thanks for looking. If the text in this post looks like a "clickable" link, ignore that. I'm not sure why I'm seeing that. Edited November 4, 2017 by SpreadAxle
disabled modeler Posted November 6, 2017 Posted November 6, 2017 Nice rebuild progress..! I am a fan of the older trucks myself.
gatorincebu Posted November 8, 2017 Posted November 8, 2017 Looks good from here Ray !Looking forward to seeing thisone finished . be Well Gator
SpreadAxle Posted May 18, 2018 Author Posted May 18, 2018 We all have that project that every time you take a step forward, you have to take 2 or 3 steps backwards. For me, this is that project. My main problem is trying to hinge the hood. There are some other fit and body work issues I'm having, but this is what has stalled me the most(aside from work). I did take a few pix so I could share some progress. I have to repair a few things before I go further. I just hope I can leave the engine alone. Interior shot. Color is Tamiya XF-8.
DRIPTROIT 71 Posted May 18, 2018 Posted May 18, 2018 (edited) 31 minutes ago, SpreadAxle said: We all have that project that every time you take a step forward, you have to take 2 or 3 steps backwards. For me, this is that project. My main problem is trying to hinge the hood. There are some other fit and body work issues I'm having, but this is what has stalled me the most(aside from work). I often use doll house door hinges split in half so the hood can open 90 degrees and there's a closer fit to the bumper. I attach them with super glue and reinforce them with epoxy. This how it looks from the front. They are actually mounted to the bumper. 100_2247 by Brian Smith, on Flickr And the hood can open 90 degrees. 100_2245 by Brian Smith, on Flickr You can see them a bit better on this one: White 9000 6-71 Detroit by Brian Smith, on Flickr Edited May 18, 2018 by DRIPTROIT 71
SpreadAxle Posted May 19, 2018 Author Posted May 19, 2018 Your BRANCH truck shows that this the way to go with this. That swings the hood out nicely. Can you point me to who makes those hinges you used? Thanks for showing it. I love the engine details on both trucks.I think I will just cut the loops off of the front springs and go for it. I was trying to complicate it too much. If nothing else, I do have various sizes of brass tube that I could probably attach the same way you did the hinges. Thank you again, you just made my day. Now I can progress quite a bit with that solved. Well, then again, progress on this thing has been like having my truck stuck in the snow... I have to rock it back before I go forth.
DRIPTROIT 71 Posted May 19, 2018 Posted May 19, 2018 2 minutes ago, SpreadAxle said: Your BRANCH truck shows that this the way to go with this. That swings the hood out nicely. Can you point me to who makes those hinges you used? Thanks for showing it. I love the engine details on both trucks.I think I will just cut the loops off of the front springs and go for it. I was trying to complicate it too much. If nothing else, I do have various sizes of brass tube that I could probably attach the same way you did the hinges. Thank you again, you just made my day. Now I can progress quite a bit with that solved. Well, then again, progress on this thing has been like having my truck stuck in the snow... I have to rock it back before I go forth. The hinges are by Mayberry Street Miniatures. I picked them up at Hobby Lobby. I take one and cut it down the middle to make two. I have also made hinges out of brass tube as well. That is what I used to swing the fenders on my Highbinder. I hope this helps.
Recommended Posts
Create an account or sign in to comment
You need to be a member in order to leave a comment
Create an account
Sign up for a new account in our community. It's easy!
Register a new accountSign in
Already have an account? Sign in here.
Sign In Now