Greg Myers Posted November 16, 2017 Author Posted November 16, 2017 Thanks Bill, That helps understand how it works, gonna have to try it now.
Greg Myers Posted November 16, 2017 Author Posted November 16, 2017 Silly Putty maybe? You can reuse the putty plenty of times after. How much Silly Putty is represented in this photo ? One egg ? two ? More ?
Mike Chernecki Posted November 16, 2017 Posted November 16, 2017 I have never had luck masking with Silly Putty. Maybe they are not compatible with the lacquers and basecoats I use, but after spraying, the Silly Putty turns to sticky goo and I cannot get it off without ruining the part being painted.
PeeBee Posted November 16, 2017 Posted November 16, 2017 For space frames molded onto floor pans (commomn '60s practice), try this: Spray the frame rails, axles, etc., in your favorite shade of gloss or semi-gloss black (or whatever color). When it dries, brush paint the floor pan with whatever color you decide upon, flat black, red or grey primer, etc. It's much easier and faster to sidle up to the frame rails with a brush (and, even flow the paint along the rails) from the relatively flat surface of the floor pan than it is to paint the three small sides of the frame rails with a smallish detail brush, attempting to get a straight bead where the frame meets the floor pan. Especially if your using gloss paint on the frame, which tends to be less viscous than a flat paint, and requires more coaxing toward the edges, creating a wider margin for error. This will save on hours(?) (lots of mimutes?) of masking, too. If you need an authentic body-color overspray effect, then you would have to go back and mask a portion of the frame.I use this technique on my interiors as well; spray everything down with AlClad (or, now, with Molotow "chrome") and then go back and paint around, and up to, all of the "chrome" with the interior color. Often (most of the time) I will thin some of the interior color and flow it around the "chrome" details for a first pass, and then go back and nudge up to the details with a final, opaque coat of paint. This technique works well for picking out contrasting upholstery piping, too.Generally a good way of dealing with raised detail if you don't mind using a brush from time-to-time. PB.
Greg Myers Posted November 17, 2017 Author Posted November 17, 2017 another Silly Putty question, how do you get the sharp edges ?Also how long is it good for until the putty starts to "flow" away from the parts ?
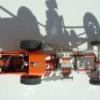
Ace-Garageguy Posted November 18, 2017 Posted November 18, 2017 (edited) For space frames molded onto floor pans (commomn '60s practice)... Just a word about terminology: that would be a ladder or perimeter frame, part of the body-on-frame type of vehicle construction. A "space frame" is made up of multiple tubes, or tube-section stampings, like this: Edited November 18, 2017 by Ace-Garageguy
IceMan Collections Posted November 18, 2017 Posted November 18, 2017 another Silly Putty question, how do you get the sharp edges ?Also how long is it good for until the putty starts to "flow" away from the parts ?I used maybe half an egg but I guess it depends on how big the area is that youre masking. I'm not sure what type of silly putty everyone is using or doing with it but this one didn't "ooze" anywhere. It was like soft clay. so in the sharp edges, I used a toothpick and a popsicle stick. I just pressed it around and shaped it where I needed to. This is not to be confused with the slimey stuff that's out there. I could roll this silly putty up into a ball and bounce it on my floor just like when I was younger.
Terminator-Fox Posted November 19, 2017 Posted November 19, 2017 I just carefully hand paint the frame. Liquid mask works pretty well too.
KENNEDYJR Posted November 21, 2017 Posted November 21, 2017 That's what I do, spray the whole thing a grey primer, then mask the pans and spray the frame black, then a bit of grime wash,.. Not exact, but I like it Cheers That looks great. I will give that a try myself.
Snake45 Posted November 21, 2017 Posted November 21, 2017 I just carefully hand paint the frame. This might be a good job for the big chisel-point "Professional" black Sharpie discussed in another thread--the one that seems to have black paint, not dark purple ink, in it.
Tom Geiger Posted November 21, 2017 Posted November 21, 2017 (edited) You might be surprised at how many of us just shoot the whole chassis in flat or semigloss black, call it "undercoating," and are done with it. (At least on less-than-"special" builds.) most of the 1960s Mopars I owned had a thick factory undercoat on them. It had a mottled surface to it, a brownish dirt like color. When a piece came off, the underside of it was black, so I believe it was a two part process. The cars that had it, had clean floor pans. Those that didn't rusted to pieces. I remember ten year old Valiants with no floors left. I've never seen this done properly on a model Edited November 21, 2017 by Tom Geiger
Recommended Posts
Create an account or sign in to comment
You need to be a member in order to leave a comment
Create an account
Sign up for a new account in our community. It's easy!
Register a new accountSign in
Already have an account? Sign in here.
Sign In Now