rbarlow1 Posted December 10, 2017 Posted December 10, 2017 (edited) HI all, I've been working on this version of my favorite exotic of all time for over a year now between other projects, slowly but surely, and thought I'd post some mediocre pics I've collected over the past few days. I'll take some body shots and post them later. It's been painted a non-traditional color - a dark pearl blue. Pics will take you right up to where I'm currently at. This is the first time I've gone all-out with the carbon fiber decals. The rear portion of the monocoque is notoriously difficult to get flat, but I've managed to ensure that the places where there are flaws are by and large going to be covered up by components. The wheel tubs were also a bear, but I've finally managed to finish them. CF decals are scale motorsport, as are the photoetch components (other than the hose clamps - they're detail master I believe). Edited January 15, 2018 by rbarlow1
iamsuperdan Posted December 10, 2017 Posted December 10, 2017 You've nailed the interior! Looks great!
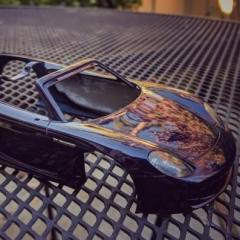
rbarlow1 Posted December 10, 2017 Author Posted December 10, 2017 Some body shots. Paint is duplicolor, primer base and clear, shot through an airbrush.
landman Posted December 10, 2017 Posted December 10, 2017 16 hours ago, iamsuperdan said: You've nailed the interior! Looks great! I'll say....and the paint too.
Funkychiken Posted December 11, 2017 Posted December 11, 2017 If that paint finish is pre polish, then I'm amazed! Perfect finish. Great interior too
superbike-shaun Posted December 11, 2017 Posted December 11, 2017 Wow,,,,starting w the dash! The soft interior bits, (the brown color) finally,the pearl blue,nice shiney,and flat,,,,,awesome!
tmathew1us Posted December 12, 2017 Posted December 12, 2017 Beautiful work so far. Very nice work on the carbon fibre - too bad so much of it will be hidden by the body! Nice to see a Carrera GT in a color other than silver, too!
rbarlow1 Posted December 12, 2017 Author Posted December 12, 2017 Thanks guys, much appreciated. A bit more progress tonight. Assembled the doors and painted the RB Motion shocks, excited to get them put together and installed.
FabbricaP Posted December 12, 2017 Posted December 12, 2017 Looking very nice! A shame those great details get hidden away
dino246gt Posted December 14, 2017 Posted December 14, 2017 Wow, that's looking cool, love that interior!
Mixalz Posted December 15, 2017 Posted December 15, 2017 Out of curiosity what did you paint the shocks with? I ended up repainting mine due to chipping during assembly. So I preassembled what was possible.
rbarlow1 Posted December 18, 2017 Author Posted December 18, 2017 Brief update: Started working on putting together the rear shock system using photoetch and RBMotion parts. Coming together slowly, it's taken some thought to figure out how to get it all in place since it needs to attach in three places at once, and fit, and I'd like it to move if possible. The photoetch for the rear springs was broken on the tree. Probably my fault somewhere along the line. I'm robbing the parts from the front to use in the rear since they won't be seen anyways. That means the shape of the heim joint linkage thing is slightly incorrect, but I'm not too concerned about it. Should have it all installed by Tuesday, and then it's time to drop the body on top and start the final stages of assembly. Mixal: I've just used tamiya acrylic clear red on the shocks. A bit rubbed off while assembling, but I just touched it up through the springs with a tiny brush and it looks good as new.
rbarlow1 Posted December 21, 2017 Author Posted December 21, 2017 (edited) Some progress pics. Shock assembly has been installed, so has the windshield. Body is now mounted on the frame. Pretty excited about how things are looking so far. Edited December 21, 2017 by rbarlow1
Kemszi Posted December 21, 2017 Posted December 21, 2017 very nice build! the shock absorbers are awesome
beeRS Posted December 23, 2017 Posted December 23, 2017 Very nice build. Are you going to use the kit parts for the engine cover mesh?
IJ001 Posted December 26, 2017 Posted December 26, 2017 Beautiful paintwork/finish. Really suits the car. Ian.
rbarlow1 Posted January 15, 2018 Author Posted January 15, 2018 (edited) Got around to doing some new work the past week after spending the previous little while redoing the shocks more cleanly. Started work on the rear engine hatch, first molding the hexagonal mesh for it, then finishing the underside, then installing. Along the way, the mesh slipped through the hold and chipped the paint finish on the top quite badly, so I ended up stripping and repainting it. Then painting and carbon fibering the "inside", and today installing the mesh. Once installed, the lid is so tight, I don't see how I'm going to be able to get it to open and close without damaging the delicate hinge mechanism, so I'm considering removing the hinges altogether and just removing the hood when I want to display the internals. We'll see what happens. Just about finished: time for wheels, then rear windshield, and finally the baseplate under the car, and I'll be done. I've taken some more not the greatest photos and attached them here. I'll take some nice properly staged ones for "under glass". Edited January 15, 2018 by rbarlow1
BVC500 Posted January 15, 2018 Posted January 15, 2018 Looks awesome! Can you tell me what parts you ordered from RBMotion for the rear shocks?
rbarlow1 Posted January 15, 2018 Author Posted January 15, 2018 6 minutes ago, BVC500 said: Looks awesome! Can you tell me what parts you ordered from RBMotion for the rear shocks? Thanks! They're these ones: http://www.rbmotion.com/index.php?route=product/product&path=60_59&product_id=52
Cien1986 Posted January 15, 2018 Posted January 15, 2018 Your work is remarkable... Perfect in every aspect... I have one too in the box.... but 1/12 scale... Will try to tinkering abit later on
Mixalz Posted January 15, 2018 Posted January 15, 2018 1 hour ago, Cien1986 said: Your work is remarkable... Perfect in every aspect... I have one too in the box.... but 1/12 scale... Will try to tinkering abit later on Oh man I was sooo tempted to buy the 1:12 but you can buy so many 1:24 for that price!!! Maybe if I get a pay rise
BVC500 Posted January 15, 2018 Posted January 15, 2018 9 hours ago, rbarlow1 said: Thanks! They're these ones: http://www.rbmotion.com/index.php?route=product/product&path=60_59&product_id=52 Thanks!
Recommended Posts
Create an account or sign in to comment
You need to be a member in order to leave a comment
Create an account
Sign up for a new account in our community. It's easy!
Register a new accountSign in
Already have an account? Sign in here.
Sign In Now