bisc63 Posted March 18, 2020 Posted March 18, 2020 Very cool, and there's something here that is really visually interesting, especially the underside. Nice work!
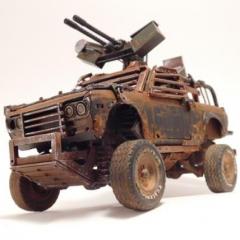
Daxman Posted April 4, 2020 Author Posted April 4, 2020 Thanks guys! Your comments are always welcome and appreciated. I made a few changes. I'm pleased with the results so far. I removed the tail lights and added flaps with linkage. Placed the new tail lights on the end of the side fins. Looks much better. I added individual fins to the grill. The other two gizmos are some kind of flight control from the undercarriage. If you refer to the earlier pictures, I had heat plating bolted to the bottom half of the doors. I figured this area would need some protection. The plates were too large and appeared to be an afterthought. I decided to cut a relief that followed the same lines as the front fender reliefs. I attached the one end and left a 3/16" gap at the hinged side of the door. I cut 4 pieces of styrene at a very sharp angle to fill the voids. I'm really happy with this addition. Gives it a more finished look. Just a cool shot from above. Thanks again! Dax Here you can see
Daxman Posted May 13, 2020 Author Posted May 13, 2020 My 51 Bel Air jet car is almost done. A couple more rounds of weathering are needed. I'd like to add a few streaks of rust and grime down the sides. I also will add soot to the lower door panels. I will probably add the final details this week. The door handles, side mirrors, antennae and glass. I was trying out different colors for the tail lights. I'll probably stick with red for the final.
David G. Posted May 13, 2020 Posted May 13, 2020 I love the way you handled the lower door area. It just looks like it belongs. Your weathering effects are also very convincing. Of course, everything else is great too. David G.
Daxman Posted May 16, 2020 Author Posted May 16, 2020 On 5/13/2020 at 7:34 AM, David G. said: I love the way you handled the lower door area. It just looks like it belongs. Your weathering effects are also very convincing. Of course, everything else is great too. David G. Thanks David! Yes, I'm glad that I did this modification. The trim line running down the middle of the doors gave me a perfect section for pulling this off. Looks much better than the metal plate I was going to use in the first photos.
Recommended Posts
Create an account or sign in to comment
You need to be a member in order to leave a comment
Create an account
Sign up for a new account in our community. It's easy!
Register a new accountSign in
Already have an account? Sign in here.
Sign In Now