GoForItPainting Posted July 14, 2022 Posted July 14, 2022 (edited) This is the other Ford I'm making now, alongside the 32'. This one looks easier so I'll start with this one. I am still in the research phase, but I will have some questions. Edited July 14, 2022 by GoForItPainting
Zippi Posted July 14, 2022 Posted July 14, 2022 That's a nice kit. Working on mine now. Going in the direction of a Street Rod.
espo Posted July 14, 2022 Posted July 14, 2022 Nice kit. If you're thinking of a warmed-over flathead, the Arden heads from the '50 Ford pickup will work also. 1
Zippi Posted July 21, 2022 Posted July 21, 2022 What's the latest on your 37? Do you have a vision on how your going to build it?
GoForItPainting Posted July 21, 2022 Author Posted July 21, 2022 I haven't started yet, but both Ford concepts are ready. I would like to make YT videos of each of them. Photos will be posted here. I may make the surfboard out of balsa wood.
Zippi Posted July 21, 2022 Posted July 21, 2022 46 minutes ago, GoForItPainting said: I haven't started yet, but both Ford concepts are ready. I would like to make YT videos of each of them. Photos will be posted here. I may make the surfboard out of balsa wood. Nice. Cant wait to see this one start coming together.
GoForItPainting Posted July 22, 2022 Author Posted July 22, 2022 I'm at step 14 and today I want to assemble it ready for painting. I also made a video in the process. This is my first Revell car but after the Tamiya it is a little less fun. - The Tamiya VW Beetle 66' fitted like Lego. The material was less flexible, but the hood didn't fit perfectly there either. I am making the "B" version from the Ford and the fit between the cabin and the hood is very loose. - The frames are not marked with letters, several parts that fit together were on separate frames. One piece of the engine is on the chrome frame and the rest on white. (I searched for a long time until I realized that I should also search there) - The parts fit very close to the frame. The cutter is difficult to fit there, but there are things that would be damaged even with a blade. It is most disturbing for round parts. These are the first experiences. It's great to practice and learn even if the hood is stuck because of the gap. 1
GoForItPainting Posted July 22, 2022 Author Posted July 22, 2022 I just have to build the wheels and the interior and tomorrow I can paint it. - I will upholster the seats. - The tailgate might be magnetized with 1x1 mm diameter magnets. - I really like the dual exhaust tips and lights on the "A" version, so I might modify it with those.
slusher Posted July 24, 2022 Posted July 24, 2022 On 7/22/2022 at 12:03 PM, GoForItPainting said: I'm at step 14 and today I want to assemble it ready for painting. I also made a video in the process. This is my first Revell car but after the Tamiya it is a little less fun. - The Tamiya VW Beetle 66' fitted like Lego. The material was less flexible, but the hood didn't fit perfectly there either. I am making the "B" version from the Ford and the fit between the cabin and the hood is very loose. - The frames are not marked with letters, several parts that fit together were on separate frames. One piece of the engine is on the chrome frame and the rest on white. (I searched for a long time until I realized that I should also search there) - The parts fit very close to the frame. The cutter is difficult to fit there, but there are things that would be damaged even with a blade. It is most disturbing for round parts. These are the first experiences. It's great to practice and learn even if the hood is stuck because of the gap. Looks very nice!
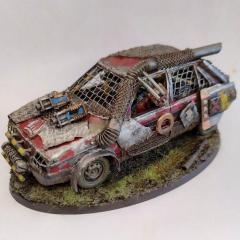
GoForItPainting Posted November 19, 2022 Author Posted November 19, 2022 Scrapyard base kit to this Ford's diorama:
GoForItPainting Posted January 22, 2023 Author Posted January 22, 2023 This is how I will make the puddles on this diorama.
GoForItPainting Posted March 24, 2023 Author Posted March 24, 2023 I haven't done this project in months so I came up with this to motivate me and motivate others to finish the model they started earlier. 2023 Half-Built Group Build - Community Builds - Model Cars Magazine Forum
GoForItPainting Posted June 14, 2023 Author Posted June 14, 2023 I've found the colours of the truck, so I'm going to continue painting it.
Recommended Posts
Create an account or sign in to comment
You need to be a member in order to leave a comment
Create an account
Sign up for a new account in our community. It's easy!
Register a new accountSign in
Already have an account? Sign in here.
Sign In Now