Mike C. Posted August 18, 2022 Share Posted August 18, 2022 Today I figured it was time to drag out of the archives, the original, vintage Boondocker Blazer I bought off of ebay years ago. I don't even remember how long ago I painted it but I'm pretty sure it was with high temp engine paint (hugger orange). Today I will attempt to do something I have been putting off for years now. The daunting decals. I have 3 sheets to choose from. Including the vintage originals. I think I'll go with the newer ones that a member of this board generously sent me. I'm very good at screwing these decals up. I've already done so with 3 of the side window ones. I don't know why these decals seemed so easy when I was a kid. Quote Link to comment Share on other sites More sharing options...
Mike C. Posted August 18, 2022 Author Share Posted August 18, 2022 In an attempt to make this build easier, I'll be doing the black one at the same time. 2 birds with one stone type of thing. I've already lived the orange one to except the Fireball tires. I'm hoping I can ge away with the stock suspension on the black one. I might go with the smaller Desert Dogs. The wheels are the extras from the Deserter kit. Quote Link to comment Share on other sites More sharing options...
stavanzer Posted August 18, 2022 Share Posted August 18, 2022 Looks Good! Good Luck with the decals! Quote Link to comment Share on other sites More sharing options...
Mike C. Posted August 18, 2022 Author Share Posted August 18, 2022 Thank you, Alan, Now I'm going to go back and look at some videos on YouTube as sort of a refresher course and hopefully pick up some new tips. Quote Link to comment Share on other sites More sharing options...
Mike C. Posted August 20, 2022 Author Share Posted August 20, 2022 Well I managed to get this far. I barely got the first side window on without ruining that one to (almost lost 1 of the last two I had) the next one was equally stressful. I have six more to go, all on the body and hood. I didn't expect this to be so nerve racking. I at lease have to walk away and take a break for a while. I'm using the micro set only. I can't remember why I didn't get the micro sol at the same time. I guess I though it was for doing stuffing model airplane rivets and stuff like that. Quote Link to comment Share on other sites More sharing options...
Mike C. Posted August 20, 2022 Author Share Posted August 20, 2022 I'm trying to press on. I got the hood decals on without my head exploding. This is really stressful. Quote Link to comment Share on other sites More sharing options...
Mike C. Posted August 20, 2022 Author Share Posted August 20, 2022 I really should order some of that Micro Sol and do the body decals at a later date. I am just having trouble getting the decals to lay flat. Even on a completely flat surface. Any tips? Quote Link to comment Share on other sites More sharing options...
Mike C. Posted August 20, 2022 Author Share Posted August 20, 2022 I think I dodged a bullet on the hood. That's probably as good as I'm gonna get it. I'm a little apprehensive for the body. Maybe I'll wait until I get the Micro Sol before I carry on with the body decals. Quote Link to comment Share on other sites More sharing options...
NOBLNG Posted August 23, 2022 Share Posted August 23, 2022 Nice work so far Mike. I hope the rest of the decals settle down nicely. They look real good against that background color.👍 Quote Link to comment Share on other sites More sharing options...
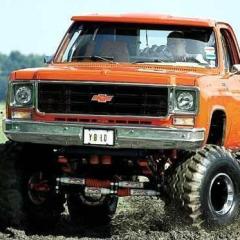
Mike C. Posted August 23, 2022 Author Share Posted August 23, 2022 2 hours ago, NOBLNG said: Nice work so far Mike. I hope the rest of the decals settle down nicely. They look real good against that background color.👍 Thanks Greg. I'm going to wait and order some of that Micro Sol and see if that will help. I took my inspiration from all the years I loved the look of the Hugger Orange on so many Chevy trucks and cars and this Googled photo sealed it up for me. Quote Link to comment Share on other sites More sharing options...
Mike C. Posted September 5, 2022 Author Share Posted September 5, 2022 (edited) Well I got 2 more decals on and believe me, it wasno walk in the park. In the process, I completely destroyed 2 of the passenger's side, rear decals. The vintage one started to split wile it was still in the water. Now I'm down to one more before I give up on these decals all together. Now I have both the micro set and the micro sol. So far zero help withe these. I can't figure out how this was such an easy task when I was a kid. These 2 decals aged me like 10 years in the last 20 minutes. 😖 Edited September 5, 2022 by Mike C. Quote Link to comment Share on other sites More sharing options...
Mike C. Posted September 5, 2022 Author Share Posted September 5, 2022 Thats enough insanity for one day. I gotta walk away for a bit before I go any further. 1 Quote Link to comment Share on other sites More sharing options...
Mike C. Posted September 7, 2022 Author Share Posted September 7, 2022 I finally got the last 2 side decals on. The nightmare is finally over with. They didn't go on as perfectly as I would have liked but it is what it is. They really have to get up to date with technology with these decals. I hear that the Revell decals are supposed to be good and my next 2 or 3 models are Revell so I'll loose a little less sleep l suppose. I applied the micro sol, so the decals should settle in a little while they are drying. Quote Link to comment Share on other sites More sharing options...
Mike C. Posted September 7, 2022 Author Share Posted September 7, 2022 Quote Link to comment Share on other sites More sharing options...
Mike C. Posted September 8, 2022 Author Share Posted September 8, 2022 Getting closer. Quote Link to comment Share on other sites More sharing options...
Mike C. Posted September 8, 2022 Author Share Posted September 8, 2022 I'll let that dry a few more days while the weather gets a little less humid around here, then I'll clearcoat the whole thing. Quote Link to comment Share on other sites More sharing options...
NOBLNG Posted September 8, 2022 Share Posted September 8, 2022 It looks great Mike!👍 Quote Link to comment Share on other sites More sharing options...
Mike C. Posted September 9, 2022 Author Share Posted September 9, 2022 13 hours ago, NOBLNG said: It looks great Mike!👍 Thank you, Greg, it's kind of a twenty-footer now. I'm hoping I can touch up the flaws before I clearcoat the whole thing. Quote Link to comment Share on other sites More sharing options...
Recommended Posts
Join the conversation
You can post now and register later. If you have an account, sign in now to post with your account.
Note: Your post will require moderator approval before it will be visible.