Donny Posted August 9 Author Posted August 9 Just found Tamiya TS85 Ferrari Red, think that would look pretty special, if I can get it on right.
Donny Posted August 9 Author Posted August 9 Can I use polycarbonate sprays on the exterior of a model?
Cool Hand Posted August 9 Posted August 9 1 hour ago, Donny said: I was thinking a deep red, maroonish color Traditional style hot rod. The Maroon would look great Tamiya TS-11 Maroon is a nice colour. An example of that colour I applied to a 69 Camaro 1 hour ago, Donny said: Just found Tamiya TS85 Ferrari Red, think that would look pretty special, if I can get it on right. The street rod style, like the kit box art. The Red on 40 Ford will look good. 57 minutes ago, Donny said: Can I use polycarbonate sprays on the exterior of a model? Use the Tamiya TS spray cans, they are specifically formulated to use on kit styrene. And are much more user friendly 3
Donny Posted August 9 Author Posted August 9 9 hours ago, Cool Hand said: Traditional style hot rod. The Maroon would look great Tamiya TS-11 Maroon is a nice colour. An example of that colour I applied to a 69 Camaro The street rod style, like the kit box art. The Red on 40 Ford will look good. Use the Tamiya TS spray cans, they are specifically formulated to use on kit styrene. And are much more user friendly Really like that red, I can feel a change of mind coming up. It's sort of a orange red, I really like that, thanks. I ordered the TS85, but that can be for another day if I change my mind.................mmmmm. What code is that red?
Donny Posted August 9 Author Posted August 9 10 hours ago, Cool Hand said: Traditional style hot rod. The Maroon would look great Tamiya TS-11 Maroon is a nice colour. An example of that colour I applied to a 69 Camaro The street rod style, like the kit box art. The Red on 40 Ford will look good. Use the Tamiya TS spray cans, they are specifically formulated to use on kit styrene. And are much more user friendly Been on different sites on the 'net, cannot find that color, can you give me the TS please.
Cool Hand Posted August 10 Posted August 10 (edited) 3 hours ago, Donny said: What code is that red? 3 hours ago, Donny said: cannot find that color, can you give me the TS please. Closest would probably be Tamiya TS-49 bright red. And TS-46 light sand would look good for the interior seats and inner door panels, and carpet XF-59 desert yellow. Edited August 10 by Cool Hand
Donny Posted August 10 Author Posted August 10 33 minutes ago, Cool Hand said: Closest would probably be Tamiya TS-49 bright red. And TS-46 light sand would look good for the interior seats and inner door panels, and carpet XF-59 desert yellow. Yep, I looked at that earlier, and TS31 bright orange, hard to decide which is best. It's hard to tell with the samples on the websites, they give you two different colors, with the TS31, the color sample on the rattle can lid is closer than the sample they show. I think I'll get them both and do the spoon test and see which one I like/closest and go with that. With the trim, semi-gloss or flat? One more question and I'll get out of your face, painting small parts, fuel pumps, distributors, that sort of thing. I've used Tamiya satin, semi-gloss, etc, can't continue to do because of the fumes, even on those little bottles that are solvent based. I tried water-based acrylics that don't work so well, so do I have to primer them first, bit hard, because of a paint build up destroying the detail. How do you get around that? Airbrushing would use a hell of a lot of paint. Thanks for your patience mate, if you can help me here, I'll leave you alone until the next build. 🙄😂
Cool Hand Posted August 10 Posted August 10 Yeah try find pictures of models painted the colour you are looking for, as that will give you a better idea of how it looks. Most of the TS paint tones a pretty close to the cap/lid, it just might be a shade darker or lighter. 3 hours ago, Donny said: One more question and I'll get out of your face, painting small parts, fuel pumps, distributors, that sort of thing. I've used Tamiya satin, semi-gloss, etc, can't continue to do because of the fumes, even on those little bottles that are solvent based. I tried water-based acrylics that don't work so well, so do I have to primer them first, bit hard, because of a paint build up destroying the detail. How do you get around that? Airbrushing would use a hell of a lot of paint. Thanks for your patience mate, if you can help me here, I'll leave you alone until the next build. 🙄😂 Yeah unfortunately the hobby paints will have strong fumes. Water based acrylics will work for certain applications, But the Lacquer and alcohol based acrylics will give the best results. With your condition it would be best to always wear a mask/respirator when applying paint even when using the spray booth or using spray cans outdoors. If you do small batches at a time it will be less overwhelming. For smaller parts I airbrush surfacer/primer, that way there is more control over the amount of primer being applied. And then airbrush the paint colours. Generally use less paint with the airbrush, as it provides more control with the coverage. Some parts would only require a couple drops of paint and thinner, flush the airbrush and move onto the next colour. Its okay, we will try help where we can. It will take you a couple builds to become familiar with the materials and processes. 2
Donny Posted August 10 Author Posted August 10 (edited) 12 minutes ago, Cool Hand said: Yeah try find pictures of models painted the colour you are looking for, as that will give you a better idea of how it looks. Most of the TS paint tones a pretty close to the cap/lid, it just might be a shade darker or lighter. Yeah unfortunately the hobby paints will have strong fumes. Water based acrylics will work for certain applications, But the Lacquer and alcohol based acrylics will give the best results. With your condition it would be best to always wear a mask/respirator when applying paint even when using the spray booth or using spray cans outdoors. If you do small batches at a time it will be less overwhelming. For smaller parts I airbrush surfacer/primer, that way there is more control over the amount of primer being applied. And then airbrush the paint colours. Generally use less paint with the airbrush, as it provides more control with the coverage. Some parts would only require a couple drops of paint and thinner, flush the airbrush and move onto the next colour. Its okay, we will try help where we can. It will take you a couple builds to become familiar with the materials and processes. Thanks mate, sorry to be a pain, you have better things to do than helping me. Yeah I have a mask, but just bought a better one, and I just bought a fan that I hope will blow a lot of the fumes away. With all that maybe my situation might improve. Edited August 10 by Donny 1
stitchdup Posted August 10 Posted August 10 2 hours ago, Donny said: Thanks mate, sorry to be a pain, you have better things to do than helping me. Yeah I have a mask, but just bought a better one, and I just bought a fan that I hope will blow a lot of the fumes away. With all that maybe my situation might improve. the warhammer/citadel type paints are low fumes 1
Donny Posted August 10 Author Posted August 10 49 minutes ago, stitchdup said: the warhammer/citadel type paints are low fumes Thanks Les, appreciate your help as you personally know the situation.
Donny Posted August 14 Author Posted August 14 Okay guys, this is where I'm at. First color, know it's not very good, but my first shot. Where do I go from here, polish, w&d, not sure of the next right move. Not sure if it's good enough to proceed, so need your help/advice. I have Mothers polish I can use when necessary. Thanks Don Don 2
Donny Posted August 14 Author Posted August 14 1 hour ago, Donny said: Okay guys, this is where I'm at. First color, know it's not very good, but my first shot. Where do I go from here, polish, w&d, not sure of the next right move. Not sure if it's good enough to proceed, so need your help/advice. I have Mothers polish I can use when necessary. Thanks Don Don I meant to add, it actually looks better real than in those pics
TopherMcGinnis Posted August 14 Posted August 14 It looks good to me. Your next step will depend on what you are wanting. If you want a super slick and a mirror like finish, you may want to wet sand the surface up to 12000 and polish. I'd park it on my shelf as is. 2
Bainford Posted August 14 Posted August 14 Yup, it's looking pretty good, and as Topher says, how far you wish to carry the finish depends entirely on what you wish to accomplish. At this stage of your development, I would just focus on getting a decent coat of paint laid down (which you appear to have), and getting it cleanly built. Full-on cutting & polishing the paint is a tedious exercise requiring experience to get it right. A lot of paint jobs can get ruined in the accumulation of those skills. Don't worry about that stuff for now. You can give the body a quick rub with the Mother's polish if you wish, but even then, I would paint a junk body or something and practice on that in order to assess how quickly the polish removes paint. If you do give it a rub, avoid edges and high spots on the body, as some polishes will remove paint from these areas faster than you may expect. The colour looks great. I think you are on to a good looking build here. Focus on getting it together cleanly and you will have a successful build for the shelf. Getting to that point will be satisfying, and success breeds confidence. Also, especially when starting out, it is way too easy in this hobby to get bogged down with a project, which creates frustration, and it ends up back in the box. It's double easy to do when many of your peers (the forum members) have been at this for more decades than they care to recall, and have spent much time over the years experimenting with alternate products, processes, and techniques. Keep it simple at first. Remember, every build is merely practice for the next one. 3
espo Posted August 14 Posted August 14 The finish looks pretty nice in the photos. Depending on how smooth the paint surface is, maybe even try some polishing with Tamiya polishing compound or some comparable product. Micro Fiber towel or a baby diaper, preferable empty, as an applicator and polishing.
Donny Posted August 14 Author Posted August 14 2 hours ago, Bainford said: Yup, it's looking pretty good, and as Topher says, how far you wish to carry the finish depends entirely on what you wish to accomplish. At this stage of your development, I would just focus on getting a decent coat of paint laid down (which you appear to have), and getting it cleanly built. Full-on cutting & polishing the paint is a tedious exercise requiring experience to get it right. A lot of paint jobs can get ruined in the accumulation of those skills. Don't worry about that stuff for now. You can give the body a quick rub with the Mother's polish if you wish, but even then, I would paint a junk body or something and practice on that in order to assess how quickly the polish removes paint. If you do give it a rub, avoid edges and high spots on the body, as some polishes will remove paint from these areas faster than you may expect. The colour looks great. I think you are on to a good looking build here. Focus on getting it together cleanly and you will have a successful build for the shelf. Getting to that point will be satisfying, and success breeds confidence. Also, especially when starting out, it is way too easy in this hobby to get bogged down with a project, which creates frustration, and it ends up back in the box. It's double easy to do when many of your peers (the forum members) have been at this for more decades than they care to recall, and have spent much time over the years experimenting with alternate products, processes, and techniques. Keep it simple at first. Remember, every build is merely practice for the next one. Thank you for your comments and advice Trevor, I am pretty happy (with the paint), how it has turned out for my first one, and I will leave it as such. I don't want to try for a better finish and mess it up. So on with build/finish. Don 1
Donny Posted August 14 Author Posted August 14 1 hour ago, espo said: The finish looks pretty nice in the photos. Depending on how smooth the paint surface is, maybe even try some polishing with Tamiya polishing compound or some comparable product. Micro Fiber towel or a baby diaper, preferable empty, as an applicator and polishing. Thanks David, the paint is pretty smooth, feels nice. A couple of spots I noticed a tiny bit of crazing, but not enough to worry about, and it would be extremely difficult to fix them, so leave well alone I think. Don
Donny Posted August 14 Author Posted August 14 9 hours ago, TopherMcGinnis said: It looks good to me. Your next step will depend on what you are wanting. If you want a super slick and a mirror like finish, you may want to wet sand the surface up to 12000 and polish. I'd park it on my shelf as is. Thank you mate, think I'll leave the 12000 until the next build with a bit more experience. Don
Donny Posted August 21 Author Posted August 21 Morning guys, I am nearing the end of the initial journey, still a little bit to go, a few more days should see it completed. So far, It's not too bad, but not as good as I hoped. Anyway onward and upward as they say. The construction side was quite good, I didn't run into too many problems, but the paint, different story, that's a real skill, and I need a LOT of practice. I've included a few pics, and if you are wondering about the last two, the container with the car in it, is just what I do to preserve them as I build, keep the dust and hair off them, or as much as possible, as I have a problem - first pic. LOL They are Ragdolls, my wife's cats that she bred for about fifteen years - and as you can see, real "fur" balls and they shed, and if you know anything about cats, they go everywhere. Sorry pics are side on, I loaded the wrong file
stitchdup Posted August 22 Posted August 22 9 hours ago, Donny said: Morning guys, I am nearing the end of the initial journey, still a little bit to go, a few more days should see it completed. So far, It's not too bad, but not as good as I hoped. Anyway onward and upward as they say. The construction side was quite good, I didn't run into too many problems, but the paint, different story, that's a real skill, and I need a LOT of practice. I've included a few pics, and if you are wondering about the last two, the container with the car in it, is just what I do to preserve them as I build, keep the dust and hair off them, or as much as possible, as I have a problem - first pic. LOL They are Ragdolls, my wife's cats that she bred for about fifteen years - and as you can see, real "fur" balls and they shed, and if you know anything about cats, they go everywhere. Sorry pics are side on, I loaded the wrong file appologies Donny, i rotated your pics and now theres a gap for some reason. 1
Donny Posted August 22 Author Posted August 22 All good Les, thanks for doing that. They are bloody awful, look like they are painted with a brush - badly. I'm not going to post anymore pics until it's finished, and I can do it properly. My MIL got rushed to hospital this morning, and our house is in a bit of turmoil. Hence the scrappy post. Those cats cause me a heap of drama - hair wise, which is why, in between working on my models, I put them in those airtight containers. Don
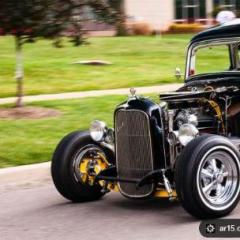
stitchdup Posted August 22 Posted August 22 3 minutes ago, Donny said: All good Les, thanks for doing that. They are bloody awful, look like they are painted with a brush - badly. I'm not going to post anymore pics until it's finished, and I can do it properly. My MIL got rushed to hospital this morning, and our house is in a bit of turmoil. Hence the scrappy post. Those cats cause me a heap of drama - hair wise, which is why, in between working on my models, I put them in those airtight containers. Don No worries mate. I hope the MIL is ok. We all look at our models and sometimes only see what we did wrong, and I'm as guilty of it as anybody else. What we need to do is look for the parts we are happy with more often. For example, when i look at this one all i see are the flaws (and they are many including poor paint) 2
Donny Posted August 22 Author Posted August 22 11 hours ago, stitchdup said: No worries mate. I hope the MIL is ok. We all look at our models and sometimes only see what we did wrong, and I'm as guilty of it as anybody else. What we need to do is look for the parts we are happy with more often. For example, when i look at this one all i see are the flaws (and they are many including poor paint) Thanks mate. Not looking good for mum. But full diagnosis not in yet. Early report is she has a cancerous mass, but how bad we don't know. Don 1
meechum68 Posted August 22 Posted August 22 I love the look, and the color is spot on for that look. 1
Recommended Posts
Create an account or sign in to comment
You need to be a member in order to leave a comment
Create an account
Sign up for a new account in our community. It's easy!
Register a new accountSign in
Already have an account? Sign in here.
Sign In Now