Donny Posted August 23 Author Posted August 23 Okay, I think I worked out where I went wrong, well one of the places. I painted the body and then painted the rear guards. Two problems there - the paint didn't match and I had trouble fitting the guards. As one of you guys said a post, the instructions are NOT always right. So instead of fitting the rear guards at step 8, I should have fitted them earlier before paint. At the start I said I wanted to paint the body and let it dry, whilst i went on and got the rest of it together, well some of it. Problem was, I didn't fully understand the process, and what I had to change to make that work - out of practice. The front is okay, the rear not so good as you saw. So tonight I hit the w&d and the filler. The LH rear guard has a gap at the join, I'll fill that and sand, prep the other "mistakes", and hopefully tomorrow add some paint. I learned a lot from my stupidity, and hopefully not make the same mistakes again next time. I have some nice kits to build, and don't want to stuff them up too. All suggestions and comments welcome, feel free to add. Next up, I have a AMT Chrysler Imperial Hardtop to build, which is low on the construction side, not having an engine or heaps of suspension stuff, so I'm thinking this will be a good project for me to concentrate on basically assembly and paint. I hope. In hindsight, this might have been a better kit to restart with. Thanks for reading this rant. 🙄 Don
stitchdup Posted August 23 Posted August 23 7 minutes ago, Donny said: Okay, I think I worked out where I went wrong, well one of the places. I painted the body and then painted the rear guards. Two problems there - the paint didn't match and I had trouble fitting the guards. As one of you guys said a post, the instructions are NOT always right. So instead of fitting the rear guards at step 8, I should have fitted them earlier before paint. At the start I said I wanted to paint the body and let it dry, whilst i went on and got the rest of it together, well some of it. Problem was, I didn't fully understand the process, and what I had to change to make that work - out of practice. The front is okay, the rear not so good as you saw. So tonight I hit the w&d and the filler. The LH rear guard has a gap at the join, I'll fill that and sand, prep the other "mistakes", and hopefully tomorrow add some paint. I learned a lot from my stupidity, and hopefully not make the same mistakes again next time. I have some nice kits to build, and don't want to stuff them up too. All suggestions and comments welcome, feel free to add. Next up, I have a AMT Chrysler Imperial Hardtop to build, which is low on the construction side, not having an engine or heaps of suspension stuff, so I'm thinking this will be a good project for me to concentrate on basically assembly and paint. I hope. In hindsight, this might have been a better kit to restart with. Thanks for reading this rant. 🙄 Don Don, for an early build it looks good. Paint is one of the harder parts of modelling and it takes practise. You might just need to clean paint from the joining surfaces to get a better fit. i've had parts look way off just from paint thickness but after a little cleaning they fitted great. And the kit you started with is a great kit, but like all kits they have finnicky bits. Honestly, you came to the right place for your questions and didn't just bulder through it. You did it right and now its practise. I think your being too hard on yourself 2
johnyrotten Posted August 23 Posted August 23 It's looking good, Don. Don't let a bump in the road get you discouraged. It's all part of the learning curve, you gotta smash a few grapes to make wine. The biggest "eye opener" I learned was this: these kit's were originally toys for kids, the instructions reflect that. We all see ourselves as craftsman on various levels, and the build sequence and techniques will change to suit that.👍👍 1
Ulf Posted August 23 Posted August 23 Nice build that I follow as I have one started on the shelf. Incredibly nice cats, we are aiming for one or two Ragdolls in the future. 1
bobthehobbyguy Posted August 23 Posted August 23 Nice work. You will learn something from each build and you will get better at it. As you have done when something doesn't go right figure out what happen so you can avoid that issue in the future. 1
Donny Posted August 23 Author Posted August 23 10 hours ago, stitchdup said: Don, for an early build it looks good. Paint is one of the harder parts of modelling and it takes practise. You might just need to clean paint from the joining surfaces to get a better fit. i've had parts look way off just from paint thickness but after a little cleaning they fitted great. And the kit you started with is a great kit, but like all kits they have finnicky bits. Honestly, you came to the right place for your questions and didn't just bulder through it. You did it right and now its practise. I think your being too hard on yourself Thanks Les. There has been a bit of a distraction with the MIL thing that hasn't helped. I did clean the paint away from the joins, as they need to be very clean, there is not a lot of area for the guards to fix to.
Donny Posted August 23 Author Posted August 23 9 hours ago, johnyrotten said: It's looking good, Don. Don't let a bump in the road get you discouraged. It's all part of the learning curve, you gotta smash a few grapes to make wine. The biggest "eye opener" I learned was this: these kit's were originally toys for kids, the instructions reflect that. We all see ourselves as craftsman on various levels, and the build sequence and techniques will change to suit that.👍👍 Thanks John, I'll keep that in mind, thanks for the encouragement. Don 1
Donny Posted August 23 Author Posted August 23 9 hours ago, Ulf said: Nice build that I follow as I have one started on the shelf. Incredibly nice cats, we are aiming for one or two Ragdolls in the future. Ragdolls and model car building are not a good mix Ulf, good luck. Don
Donny Posted August 23 Author Posted August 23 7 hours ago, bobthehobbyguy said: Nice work. You will learn something from each build and you will get better at it. As you have done when something doesn't go right figure out what happen so you can avoid that issue in the future. G'day Bob. Thank you, sometimes it's one step forward two steps back, as they say, and I'm learning that slow is the way to go. Glueing can be unforgivable. Don
bobthehobbyguy Posted August 24 Posted August 24 Here is a link for building an AMT 1950 convertible. Some great tips for making sure everything thing fits before painting. 2
Donny Posted August 24 Author Posted August 24 6 hours ago, bobthehobbyguy said: Here is a link for building an AMT 1950 convertible. Some great tips for making sure everything thing fits before painting. Thanks Bob. I have this kit, not quite ready to build it, but will save this for later. You been reading minds again? 😁 Don
Donny Posted August 25 Author Posted August 25 I watched that vid today Bob, really interesting for me. That the first one I've been able to watch from box to completion. That guy is excellent with his process. I learned quite a few things I didn't know, so again thank you for putting me onto that. Don 1
bobthehobbyguy Posted August 25 Posted August 25 Glad I could help. Another good website. Here is another great site. The late Donn Yost series of fundamental Fridays is also another great source for beginners. Tons of great info in the series. 2
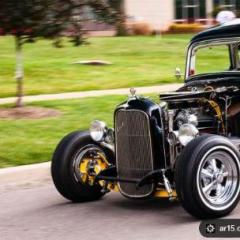
Donny Posted September 4 Author Posted September 4 Well it's done. Here it is, warts and all. It's the best I could manage after about 60 years of no model car building. Yes, I know there are a LOT of mistakes, but I'm trying to get it all together again. Hopefully the next one will be better, I'm learning as I go, but know there are a lot of mistakes ahead. I have plenty of kits to build and use to improve on. 5
johnyrotten Posted September 4 Posted September 4 That looks great Don. A couple bumps in the road but you persevered and got her finished. Each kit is practice for the next one,looking forward to your next build. 1
Donny Posted September 4 Author Posted September 4 30 minutes ago, johnyrotten said: That looks great Don. A couple bumps in the road but you persevered and got her finished. Each kit is practice for the next one,looking forward to your next build. Thanks John, couple of things I still have to do - the hood hinges are one, that's tomorrow and I think that's it. thanks for the encouragement. 1
STU111 Posted September 4 Posted September 4 G’day Don, looks like a very tidy 40 Ford to me. If there are mistakes, they aren’t immediately obvious in the pics. We are our own worst critics, but seriously, she looks pretty good to me. Mate, keep building and posting on the forum, this site is a wealth of information and help if you need it. I feel that my builds have improved significantly since I became involved on the forum. Cheers, Stuart.👍🏻 1
Donny Posted September 4 Author Posted September 4 1 hour ago, Ulf said: It turned out great, very inspiring. Thank you Ulf.
Donny Posted September 4 Author Posted September 4 1 hour ago, STU111 said: G’day Don, looks like a very tidy 40 Ford to me. If there are mistakes, they aren’t immediately obvious in the pics. We are our own worst critics, but seriously, she looks pretty good to me. Mate, keep building and posting on the forum, this site is a wealth of information and help if you need it. I feel that my builds have improved significantly since I became involved on the forum. Cheers, Stuart.👍🏻 Thanks Stuart, yep, the guys here have given me heaps of advice, can't thank them enough.
Donny Posted September 7 Author Posted September 7 Tidied up a few missing bits today, no pics worth posting, save to say, the trainer is finished. Next up the Chrysler Imperial - I think. 🙄 Don 1
Recommended Posts
Create an account or sign in to comment
You need to be a member in order to leave a comment
Create an account
Sign up for a new account in our community. It's easy!
Register a new accountSign in
Already have an account? Sign in here.
Sign In Now