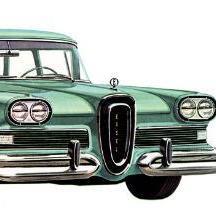
ChainsawMike Posted Monday at 04:06 PM Posted Monday at 04:06 PM The kit that has probably had the most mixed reviews I've ever seen, lots of the complaints about it are true, fitment issues, warped plastic, so much flash that you melt it all down and cast an entirely new car . The kit was terrible and not that many parts. the only complaints I have are the windshields had little excess so that I can glue it into the body without the glue staining some of the windshield. The engine needed some tinkering so it would fit under the firewall, my hood wasnt even and just didn't fit correctly, the rear bumper wouldnt fit evenly. Since there was some issues with parts on the outside, I decided to take a chance and try weathering and rust for the first time ever. I think weathering and the rust effects came out very nicely for my first attempt at it. 6
dphipps Posted Monday at 11:28 PM Posted Monday at 11:28 PM Looks good! I recently built this one as well and as you said, it's not the best. I had to do a pile of cleanup and the back window had to be just right or it fell through. I really like '57s though and this one is about $20 here so I'll probably hoard a few 1
Dragonhawk1066 Posted Monday at 11:31 PM Posted Monday at 11:31 PM The weathering looks pretty good! 1
johnyrotten Posted Monday at 11:31 PM Posted Monday at 11:31 PM Nice work, looks fresh from the barn with the weathering. 1
Sledsel Posted Tuesday at 10:41 AM Posted Tuesday at 10:41 AM Looks really good. I do not get it, I have never had an issue with this kit 1
Horrorshow Posted Tuesday at 05:01 PM Posted Tuesday at 05:01 PM Very nice, care to share some of your weathering techniques? I’m currently working on a ‘55 that will require weathering. 1
ChainsawMike Posted Tuesday at 10:00 PM Author Posted Tuesday at 10:00 PM 4 hours ago, Horrorshow said: Very nice, care to share some of your weathering techniques? I’m currently working on a ‘55 that will require weathering. I used q tips dipped in a bottle of tamiya panel liner and rubbed it along the body in a down motion (Like if rain had came down on it and dripped) then I wiped the wash off the body after half a minute or so and repeated it multiple times. and then for the rust I used a hobby knife and some sprue cutters to make kind of a rotted metal by the fenders. and after it looks messed up enough I used a bottle of rust colored enamel and dry brushed multiple layers near that area for a rust effect. after my brush of that color was kind of dry, I rubbed it along areas and stippled it along the body for a subtle rust tone on the paintjob. keep in mind that I did this on the base plastic color of the body since it was molded in blue, so I'm yet to try this on a body painted with a rattle can or airbrush. I don't think My method would work too well for a glossy, smooth paint job as the body was molded in kind of a matte blue. My instructions here aint the best but it gives an idea of what I did. Hope it works out for you!
ChainsawMike Posted Tuesday at 10:01 PM Author Posted Tuesday at 10:01 PM 11 hours ago, Sledsel said: Looks really good. I do not get it, I have never had an issue with this kit I hear lots of things about this kit, some say its an amazing kit, no issues at all. Some say its awful, terrible flash, warping, and just awful fit, and some are in between like me, not too bad but not the greatest quality.
ChainsawMike Posted Tuesday at 10:04 PM Author Posted Tuesday at 10:04 PM 11 hours ago, Sledsel said: Looks really good. I do not get it, I have never had an issue with this kit I hate when kits have smaller and very precise windshields. dunno how to word what I'm trying to say here. but I enjoy when kits have the glass either in one big piece that you can easily glue to the ceiling of the interior, or when they have like holes that fit into small kind of nubs in the roof of the interior to fit even better, like the 59 Chrysler kit or 63 Chevy II station wagon.
XYHARRY Posted yesterday at 10:13 AM Posted yesterday at 10:13 AM I think you might be a natural at weathering. A convincing job for your first attempt. Really well done Mike. 1
Recommended Posts
Create an account or sign in to comment
You need to be a member in order to leave a comment
Create an account
Sign up for a new account in our community. It's easy!
Register a new accountSign in
Already have an account? Sign in here.
Sign In Now