Custom Hearse Posted November 13, 2009 Share Posted November 13, 2009 I'm wanting to use dry transfers on a model, and I was wondering if they can be painted over with Testor's Model Master lacquer gloss coat? Thanks for any help you can give me! Quote Link to comment Share on other sites More sharing options...
Eshaver Posted November 13, 2009 Share Posted November 13, 2009 Yes , hold the can back at least 24 ins for a couple of LIGHT COATS FIRST !!!!!!!!!!!!!! Ed Shaver Quote Link to comment Share on other sites More sharing options...
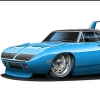
TimKustom Posted November 13, 2009 Share Posted November 13, 2009 I use and make a lot of custom made dry transfers. I would not recommend lacquer over them. I've seen the "ink" run off them leaving the base behind. Testors Gloss enamel (takes longer to dry) is a much safer bet. I've had good results with Testors acrylics also. Custom made dry transfer were used on this Charger. Quote Link to comment Share on other sites More sharing options...
Eshaver Posted November 14, 2009 Share Posted November 14, 2009 Tim , I like the car , it looks like a " Factory Experimental " . Ed Shaver Quote Link to comment Share on other sites More sharing options...
Nova-ss Posted November 15, 2009 Share Posted November 15, 2009 I use and make a lot of custom made dry transfers. I would not recommend lacquer over them. I've seen the "ink" run off them leaving the base behind. Testors Gloss enamel (takes longer to dry) is a much safer bet. I've had good results with Testors acrylics also. Custom made dry transfer were used on this Charger. hi,great looking car....my question is how do you made dry transfer or can you make any dry transfer I may want.Thanks,Chris Quote Link to comment Share on other sites More sharing options...
Jon Cole Posted November 15, 2009 Share Posted November 15, 2009 I agree... another request for a write-up about dry transfers! Man that car looks great! Quote Link to comment Share on other sites More sharing options...
TimKustom Posted November 16, 2009 Share Posted November 16, 2009 Thanks for the nice comments on the model. Dry transfers: The tutorial you might not want to hear about: SAE ran an article many years ago written by Pat Covert. I use the same people he used, Litho Plate and Negative in Birmingham, Alabama and they produce excellent products. I’ve used this company for over 10 years to produce many sets of transfers for models and real cars (custom gauge faces). Pro’s: You can make them any color including white, fluorescents and many metallics. Sometimes even foils can be done. Con’s They are very expensive. Be prepared to spend at least $75 a color. Don’t expect them to “rub them down†over complex curves (read on to see how to fix that). They will only be as good as your artwork. I create all my art in Adobe Illustrator. Other “drawing†programs can offer good results, but since AI works so well, that’s all I know. As far as applying them: I rub them down to decal paper. Then trim, apply to model. This will allow you to get them on complex curves. As stated in my post above, they don’t like lacquer topcoats. I’ve ruined a set of multicolor transfers for a 1:1 project learning this. I only spray enamel or acrylic over them now. Testor’s Dull coat can be used if sprayed VERY VERY LIGHT and THIN. I found this place that makes them. http://www.colorvu.com/ Upload a file for a quote, but be prepared to be sticker shocked. A few more examples of where I used them: Sorry for the big pic, it's all I have at the moment. This Camaro has a double pin stripe for the "Sport Appearance Package" running above the character line. The top of the pinstripe is .003 of an inch and came out beautifully. Need to get a closup of it. This is a replica of my mother's first car. Tires for the above Charger. I wanted Goodyear "Greenstreaks" HTH Quote Link to comment Share on other sites More sharing options...
Harry P. Posted November 16, 2009 Share Posted November 16, 2009 So you create the art, then send it out to have the transfers made, then rub them down onto decal paper, then apply the "dry transfer decal" to the model. Why not just make a decal in the first place and skip the whole hassle and expense of first creating a dry transfer??? I don't see any point in going first to dry transfer, then applying it to decal paper, when you could have made a decal in the first place for a tiny fraction of the cost! Quote Link to comment Share on other sites More sharing options...
Zoom Zoom Posted November 16, 2009 Share Posted November 16, 2009 So you create the art, then send it out to have the transfers made, then rub them down onto decal paper, then apply the "dry transfer decal" to the model. Why not just make a decal in the first place and skip the whole hassle and expense of first creating a dry transfer??? I don't see any point in going first to dry transfer, then applying it to decal paper, when you could have made a decal in the first place for a tiny fraction of the cost! Harry, getting a custom decal with a white backing (or any white) is going to cost more than doing it via dry transfers, unless the builder has access to an ALPS printer. For one-off stuff, not production runs, it's just a different story and there's no easy/cheap way around it. I've been admiring Tim's & Pat's work up close & in person for decades, and I can vouch for the method Tim is showing because it works. There is a company that sells a kit that you can make your own dry transfers including colors that you won't get with common printers unless you own an ALPS or better. It works okay, and you can make decals from it. You have to have some equipment like a heat gun & a heat sealer, and you use foil sheets for the various colors. It's not a great replacement for an ALPS, but it is useful in its own way (I've tried it, w/a bit of trial & error you can get some good graphics, but don't expect them to be as crisp as from an ALPS). You can buy a new ALPS from New Zealand, but they're pretty expensive, and they're fragile & difficult to get repaired. Make your own custom dry transfers If nothing else, with this system you can make a white background suitable for layering your custom decals over (including ink-jet). A common problem with all hobby-level decal printers (color laser & inkjet) is a lack of dense pigment; the pigments are translucent, fine for applying over white or light colors, but not over dark colors. ALPS printers print a base of white under many colors, and also can print metallics/foils. Dry transfers have been used for custom graphics for many years, though like film it's becoming a lot less prevalent due to better consumer printers and a lot of graphics shops having expensive printers that will print white (but they are far too expensive for hobby-level users to buy). Quote Link to comment Share on other sites More sharing options...
Switchback Posted November 16, 2009 Share Posted November 16, 2009 I bought the Pulsar kit. I spent hours trying to figure it out and even spent time on the phone with the company. I did everything as they described and the end result was horrible. I wouldn't recommend that kit. I returned mine for a refund. Quote Link to comment Share on other sites More sharing options...
Recommended Posts
Join the conversation
You can post now and register later. If you have an account, sign in now to post with your account.
Note: Your post will require moderator approval before it will be visible.