Jeff Sauber Posted January 18, 2010 Posted January 18, 2010 (edited) well, I have gotten back to this little project today and have been putting together some interior ideas. Here where it stands as of this afternoon. I cut some templates and inserts for the custom door panels, and the dash will under go a make-over as well..More to come. Edited February 24, 2010 by J. Sauber
Jon Cole Posted January 18, 2010 Posted January 18, 2010 Jay, I'm sure this will look killer! Always great detail.
Jeff Sauber Posted January 18, 2010 Author Posted January 18, 2010 Jay, I'm sure this will look killer! Always great detail. Thanks, I'm hoping to get it all wrapped up in time for the NNL east or Mid atlantic NNL.....[which ever one I can try and make it to]. Most of the main work is done, I just have to get the interior work moving along and fill a couple of imperfections in the body...I'll be posting updates here often, since this is a good project to document during it's buildup sessions.
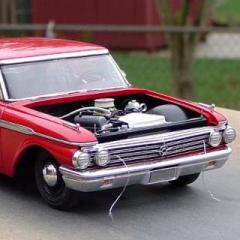
rustybill1960 Posted January 19, 2010 Posted January 19, 2010 Dude how did you do the louvers in the hood? or is a resin piece? thanks for sharing it looks killer wicked later man
Corvette.Jeff Posted January 19, 2010 Posted January 19, 2010 its about time you got to this one! Looking forward to this build.
crazyjim Posted January 19, 2010 Posted January 19, 2010 Whoa. I'm going to be keeping an eye on this build.
Jeff Sauber Posted January 19, 2010 Author Posted January 19, 2010 (edited) Dude how did you do the louvers in the hood? or is a resin piece? thanks for sharing it looks killer wicked later man The louvers are actually N-scale stairs from plastruct. Basically, you just lay down and [lightly tack in place] strips of the stairs in a grouping of your choosing and carefully trace out the width and length that you want onto the hood..You can then begin to CAREFULLY scribe out the hood material to open up the slots that the stairs will fit down into. Try to trim as close as possible in order to cut down on the gaps between the "stairs" and hood slots, otherwise you'll just end up having to fill the extra voids with your favorite body putty or the like.....hope this helps. Edited January 19, 2010 by J. Sauber
Raydee Posted January 19, 2010 Posted January 19, 2010 The louvers are actually N-scale stairs from plastruct. Basically, you just lay down and [lightly tack in place] strips of the stairs in a grouping of your choosing and carefully trace out the width and length that you want onto the hood..You can then begin to CAREFULLY scribe out the hood material to open up the slots that the stairs will fit down into. Try to trim as close as possible in order to cut down on the gaps between the "stairs" and hood slots, otherwise you'll just end up having to fill the extra voids with your favorite body putty or the like.....hope this helps. Cool! That is ingenious. Do you have any close ups of the top of the hood?
Jeff Sauber Posted January 19, 2010 Author Posted January 19, 2010 Cool! That is ingenious. Do you have any close ups of the top of the hood? Lyle Willits actually the founding father of this technique, but as you can see, I was eager to give it try. I'll try and get some up close shots of the hood work later today or tonight...It's a very cool technique that works quite well. I may take it a little further and add small strips of half round rod to simulate the "raised area" of each louver, or I may just keep it with the smooth, flush, look......I could go either way.
Space Cowboy Posted January 19, 2010 Posted January 19, 2010 A very impressive job so far. Nice chop and a great idea on the hood.
gilsdropshop1 Posted January 19, 2010 Posted January 19, 2010 this one is looking sweet keep them pics coming.
Jeff Sauber Posted January 20, 2010 Author Posted January 20, 2010 Got a little body work done today.....Still have to smooth out a bunch of stuff and make a few more adjustments, but it's looking a bit better.....Here's tonights work.
Foxer Posted January 21, 2010 Posted January 21, 2010 That has just a beautiful flow to the body. The fender line carried into the rear pan is especially nice.
Sixties Sam Posted January 21, 2010 Posted January 21, 2010 That is cool! I'm eager to see it finished! Sam
rustybill1960 Posted January 22, 2010 Posted January 22, 2010 "J", are those plastic steps or brass? separate piece or from a kit? it is a very ingenious idea will be watching the build thanks for sharing later man
Harry P. Posted January 22, 2010 Posted January 22, 2010 "J", are those plastic steps or brass? separate piece or from a kit? Well, since he said they were N scale stairs from PLAStruct... I'm gonna guess plastic...
weasel Posted January 22, 2010 Posted January 22, 2010 now Harry, ya know we don't READ all the posts!!! sometimes we just gotta ask!! lololl
stangman Posted January 22, 2010 Posted January 22, 2010 The louvers look great. Would have never thought of using N scale stuff for a 1/25 car.
tuffone20 Posted January 22, 2010 Posted January 22, 2010 That is one sweet Mercury your building!! I really like how it sets and it has that old school look to it. Can't wait to see it in some paint and all done, might have to give that louver trick a try some time. Keep the photos coming dude..
Dr. Cranky Posted January 22, 2010 Posted January 22, 2010 Love it, J. What a great looking model! Can't wait to see it fully dressed.
Mooneyzs Posted February 25, 2010 Posted February 25, 2010 This is looking great. Love the scratch build door panels. You work amazes me.
BKIN10SECS Posted February 25, 2010 Posted February 25, 2010 Love the metal strips on the grill insert.....those little things you do just always put it over the top.....
crazyjim Posted February 25, 2010 Posted February 25, 2010 Any closer shots of the interior panels? They look terrific.
Recommended Posts
Create an account or sign in to comment
You need to be a member in order to leave a comment
Create an account
Sign up for a new account in our community. It's easy!
Register a new accountSign in
Already have an account? Sign in here.
Sign In Now