Old Albion Posted July 25, 2010 Posted July 25, 2010 (edited) I started this project about 3 or 4 months ago when I put the frame together and did one or two other minor things. I then left it alone to concentrate on finishing my Autocar. Now this is complete I have some time on my hands and was starting to get withdrawl symptoms from building. So I decided to get the WF out again and have a more determined effort to complete the build. The WF COE has always been a favourite of mine. I drew inspiration for the build from the great examples in various guises that we have seen on the forum since the re-launch of the kit a year or so back. In particular the orange and yellow one built by Tim recently also the blue and white centipede tractor. http://www.timstrucks.com/gallery12.htm http://www.timstrucks.com/gallery2.htm Hanks truck pictures is as always a great source of information and found this extremely usefull. I was interested in Tim's comments about the headlights being to high on the model. I never noticed this before and explains why the cab always looked a little odd at times compared to the real thing. Anyways I have decided what i want to build and have made good progress this far. The single headlights and the round fenders with the stirrup steps I find a particular interesting feature and gives the truck an older look to it, which was exactly what I wanted. I have not seen many WF COE heavy haulers so I thought I would build one. The colours will be (Hopefully) Orange wheels, frame and bottom half of cab blue and the top of the cab orange. As for decals the ones in the kit are excellant probably some of the best I have seen. At this stage I'm not sure whether to use them or maybe ask Jerry (http://www.modeltruckin.com/) to make some for me. A few specifications on the truck: 12V71 Detroit Diesel from Sourkrauts. Power Assist Steering scratch built. Extended heavy duty frame from KFS. Spoked Wheels from KFS. Pusher Axle from Sourkrauts. Rockwell Heavy Duty 6 rod springs and axles from Auslowe. http://public.fotki.com/oldalbion/white-freightliner-/ Many Thanks for looking. Dave Edited July 25, 2010 by Old Albion
Kostas Parchas Posted July 25, 2010 Posted July 25, 2010 Nice project, you 're of to a good start! Kostas.
SpreadAxle Posted July 25, 2010 Posted July 25, 2010 Nice job on converting the headlights and getting their height right. This will be a cool truck.
Old Albion Posted July 27, 2010 Author Posted July 27, 2010 Thanks for the kind words. They are appreciated. Well I've made good progress these last few days. The Freightshaker is virtually complete ready for the painting stage. There are still a few little jobs to be done on the cab but I should be putting some paint on within the next few days. I just thought I would make a few comments on the kit now that I have experienced building it. The first is the kit front axle and wheels are to wide and don't sit under the cab. If you check on any photo's you will see the wheels sit under the fenders. This I think is important if you want the truck to look right and in the correct proportions. I have seen on a few AMT kits the front wheels and axles are to wide for the hood or cab. The problem is that you don't realise until you build the cab or hood that you have a problem. I get around this problem by building the cab or hood first. Then the frame and the front axle. You can see straight away if you will need to make adjustments or not. The front axle on mine is a metal one from KFS. The cab with its three sections is a pain in the nethers!! There is some very fine detail in the three sections. Detail that you may well loose if you put the thing together. This kit is not for the feint hearted. If you can accept the fact that you may well loose important detail to put it together and you are prepared to have a go at restoring that detail afterwards the rest of the truck is straight forward. Never the less What a great model kit. I have really enjoyed putting this one together so far. Latest progress. http://public.fotki.com/oldalbion/white-freightliner-/001.html Thanks for looking Dave
Kostas Parchas Posted July 28, 2010 Posted July 28, 2010 Dave, thanks you for sharing the tip about the front axle! you build looks already impresive. Kostas.
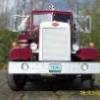
Old Albion Posted August 3, 2010 Author Posted August 3, 2010 (edited) I made some more progress on the truck. All parts are now painted ready for assembly. I am quite pleased with the outcome. Especially since the paint is from rattle cans. The first time I have attempted to paint a model with them. http://public.fotki.com/oldalbion/white-freightliner-/cab-and-engine-pain.html Thanks for looking Dave Edited August 3, 2010 by Old Albion
Jim B Posted August 3, 2010 Posted August 3, 2010 Looks really nice. Is that blue & orange? I like the combination.
Old Albion Posted August 3, 2010 Author Posted August 3, 2010 Jim, Thanks! Yes it is blue and orange. They seem to work together well. Dave
Tony Bryan Posted August 5, 2010 Posted August 5, 2010 Dave Nothing better than a tri drive,and this is really coming along, I like what you have done so far, Yes the cabs are a small problem, I am replacing all the rivets on mine, with scale hardware rivets, there is about 400, and a real pain to do but they do look better Now, are you going to be building a trailer for it?
codie27 Posted August 5, 2010 Posted August 5, 2010 I started this project about 3 or 4 months ago when I put the frame together and did one or two other minor things. I then left it alone to concentrate on finishing my Autocar. Now this is complete I have some time on my hands and was starting to get withdrawl symptoms from building. So I decided to get the WF out again and have a more determined effort to complete the build. The WF COE has always been a favourite of mine. I drew inspiration for the build from the great examples in various guises that we have seen on the forum since the re-launch of the kit a year or so back. In particular the orange and yellow one built by Tim recently also the blue and white centipede tractor. http://www.timstruck...m/gallery12.htm http://www.timstrucks.com/gallery2.htm Hanks truck pictures is as always a great source of information and found this extremely usefull. I was interested in Tim's comments about the headlights being to high on the model. I never noticed this before and explains why the cab always looked a little odd at times compared to the real thing. Anyways I have decided what i want to build and have made good progress this far. The single headlights and the round fenders with the stirrup steps I find a particular interesting feature and gives the truck an older look to it, which was exactly what I wanted. I have not seen many WF COE heavy haulers so I thought I would build one. The colours will be (Hopefully) Orange wheels, frame and bottom half of cab blue and the top of the cab orange. As for decals the ones in the kit are excellant probably some of the best I have seen. At this stage I'm not sure whether to use them or maybe ask Jerry (http://www.modeltruckin.com/) to make some for me. A few specifications on the truck: 12V71 Detroit Diesel from Sourkrauts. Power Assist Steering scratch built. Extended heavy duty frame from KFS. Spoked Wheels from KFS. Pusher Axle from Sourkrauts. Rockwell Heavy Duty 6 rod springs and axles from Auslowe. http://public.fotki....-freightliner-/ Many Thanks for looking. Dave Very tough looking truck.Is that cab the re release AMT kit?
Old Albion Posted August 5, 2010 Author Posted August 5, 2010 Thanks for the comments folks. Tony, Yes I will be building a trailer for it. Very possibly a Rogers Low Boy. Codie, Yes the base kit is the AMT White Freightliner with suitable modifications. I found some great single round head lights and some great little round spot mirrors for the truck. A while ago when I was planning the build I stumbled upon the Tamiya Mini Cooper kit in 1/24 scale. I bought a kit and found that the lights and mirrors were just what I wanted. The only problem that I have now is the quality of the Tamiya kits is excellent and I'm not to keen on taking parts from the kit. So what I might do is make a drawing of the headlights in the kit and get some turned on the lathe. Dave
Old Albion Posted October 2, 2010 Author Posted October 2, 2010 (edited) The WF is now finished. I had a disaster with the clear coat on the cab. I applied all the decals and then clear coated. The finish went hazey white. I found out later that it was because the atmospheric conditions was to humid and the paint and cab were to cold. This prevented the water in the acrylic from evaporating causing the problem. You can imaging how pi**ed off I was. I made the decision to strip the paint of the cab. What a nightmare! No mater what I tried I could not shift the clear coat. I went to a local store and found some stuff that eventually cleared all the clearcoat, paint and decals of. Once this was done the repaint was pretty straight forward. But I picked a good dry warm day with low humidity. The rattle can was placed in some warm water to help it flow and evaporate the water when spraying. The result was better than the first time. This time around I have not clear coated the cab. I didn't want to temp providence. Anyway the finished truck looks Ok. You see in my photo's in my Fotke albumn that it has a drop deck trailer. This trailer I made some years ago and normally goes with my Pete 380. I just coupled it to the WF for effect. http://public.fotki.com/oldalbion/white-freightliner-/7.html Thanks for looking Dave Edited October 2, 2010 by Old Albion
DRG Posted October 2, 2010 Posted October 2, 2010 Looks good, nice build. I have thought about building trucks as the parts are bigger but then again that wouldn't help as I have zero knowledge about trucks.
freightshaker Posted October 2, 2010 Posted October 2, 2010 Really sharp. Thats a nicely built workhorse with a big old slobbering detroit in it.. I like it. Alot.
Paul B Posted October 2, 2010 Posted October 2, 2010 Dave that turned out fantastic. The color combination and your modifications to the cab give it an "old iron" look.
Old Albion Posted October 3, 2010 Author Posted October 3, 2010 Thank You everyone for the compliments. It makes building all the more worth while when you know that other people have got some pleasure out of what you have built. I have a soft spot for the older trucks "old iron" is a great way to describe them. This was the look that I was after. My work bench is now clear and looks rather baron. Next up the 1693, hopefully have it done by the end of the year. Thanks again for the kind words. Dave
Old Albion Posted October 3, 2010 Author Posted October 3, 2010 Ray, Thanks for the comments and also Thanks for the information about the photo etch parts for the WF. I ordered 3 sets and they arrived about a week ago. I had already made my own mesh grill so I decided to stick with this. The new photo etch parts would be used on another build sometime in the future. When i opened the packages up I was amazed at the amount of detail in these kits. There is everything from fuel tank straps, dashboard details (clocks gauges etc), to under cab structural members. There are also many combinations so you will get a lot of parts left over for other builds. This is without doubt one of the best detail kits I have seen. I also got the GMC Astro kit although this is just the grill assembly. The kits are available from: www.modelltrucksandparts.at Product number CTM-004 for the GMC and CTM-005 for the WF. Dave
Recommended Posts
Create an account or sign in to comment
You need to be a member in order to leave a comment
Create an account
Sign up for a new account in our community. It's easy!
Register a new accountSign in
Already have an account? Sign in here.
Sign In Now