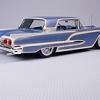
John Goschke Posted January 10, 2011 Share Posted January 10, 2011 (edited) Been working on this T-bird for the "Battle of the 'Birds" on the TraK forum. AMT annual kit with Modelhaus repro '58 bumpers, '59 Dodge wheelcovers. Lowered, nosed, decked, ugly mufflers replaced with polished aluminum tailpipe extensions. Here's where I'm at now. Bunch of little body details. Mainly reshaping the windshield posts and vent window frames to more closely reflect the character of the 1/1. Worked to give more overhang at the front over the windshield and on the sides over the vent windows, and also drop the lower vent frame down so that it's flush with the top of the door. This required cutting out the vent frames, reshaping them by trimming here and adding there, then gluing them back in. It's not 100% accurate but worked well enough, giving a nice "shadow line" below the drip rail over the vent window and windshield post. Also added a strip of styrene around the side window opening to represent weather stripping. More pix here.... http://public.fotki....59-thunderbird/ Edited February 20, 2012 by John Goschke Quote Link to comment Share on other sites More sharing options...
John Goschke Posted January 10, 2011 Author Share Posted January 10, 2011 Also plugged those fender ornaments slots with trimmed, fitted and shaped pieces of styrene. Shaved off the wipers for later replacement with scratch pieces and scribed the cowl/fender panel lines. And shaved off the moldlines on the hood or visor over the headlights... Moving to rear, scribed in the panel line around the fender cap and added a little styrene to start tightening the gap between the body and bumper. Quote Link to comment Share on other sites More sharing options...
Krazy Rick Posted January 10, 2011 Share Posted January 10, 2011 Good looking project John, the Plating looks a bit ruff on the rear bumper though....is that from Modelhaus? Quote Link to comment Share on other sites More sharing options...
John Goschke Posted January 10, 2011 Author Share Posted January 10, 2011 Good looking project John, the Plating looks a bit ruff on the rear bumper though....is that from Modelhaus? Thanks. Yeah, Rick, that bumper's from Modelhaus. It does have some orange-peel apparently, however everything looks a "bit ruff" when you use the macro lens. It's not nearly as objectionable in normal viewing conditions. Quote Link to comment Share on other sites More sharing options...
John Goschke Posted January 20, 2011 Author Share Posted January 20, 2011 As the Lady said to the Sailor, "How do you like my headlights?"... Drilled out to accept lens from Hasegawa '66 Wildcat(!) backed up with some BMF. Detailed wheelcovers. Cowl drilled to receive new wipers. Some work with a fresh #11 blade yields a much thinner horn ring. Quote Link to comment Share on other sites More sharing options...
Ron Hamilton Posted January 20, 2011 Share Posted January 20, 2011 John, I appreciate the excellent work you are putting into your restoration. I have an original '60 T-Bird Convertible that I want to restore. It has a thick spray-bomb job on it that I have to strip before I start on it. Quote Link to comment Share on other sites More sharing options...
Draggon Posted January 20, 2011 Share Posted January 20, 2011 Wow those headlight are looking great! Just like the rest of it! Quote Link to comment Share on other sites More sharing options...
John Goschke Posted January 30, 2011 Author Share Posted January 30, 2011 Opened up the hood scoop using a Dremel with a small round cutting burr, working from both sides. Cleaned up the opening with knife, file, 400 and 600 grit. Then made new mesh for it using a piece out of the grill from a Monogram '58 T-bird. Came out pretty good... Quote Link to comment Share on other sites More sharing options...
John Goschke Posted August 2, 2011 Author Share Posted August 2, 2011 Finally, more work on the 'Bird! Shift and turn signal levers. Hole in console repaired using similar section from Monogram '58 T-bird kit. Scratch windshield wipers added... Interior door handles courtesy of Revell '59 Ford Skyliner... Quote Link to comment Share on other sites More sharing options...
Dr. Cranky Posted August 2, 2011 Share Posted August 2, 2011 Looking forward to how this one is going to turn out. Quote Link to comment Share on other sites More sharing options...
Draggon Posted August 2, 2011 Share Posted August 2, 2011 You do some amazing work John! Quote Link to comment Share on other sites More sharing options...
Termite Posted August 13, 2011 Share Posted August 13, 2011 Looking good John, a little upgraded trim would go well. I have chrome metal door handles and T-Bird emblems sitting here in a bag interested? Quote Link to comment Share on other sites More sharing options...
John Goschke Posted December 4, 2011 Author Share Posted December 4, 2011 (edited) Masking Tape Madness! OK, finally forced to stop thinking and talking about doing this, yesterday I actually sat down to start taping out the T-bird for the second color, Tamiya Pearl Blue, on the panels, closely following Larry Watson's layout for his '58 'Bird. Started taping at 11am, and except for a couple short breaks, finished taping at 8pm. Thanks to my wife for kindly doing the grocery run by herself in the afternoon! My previous practice would've dictated painting the blue first because I find it easier to get a smooth finish over a large area with Tamiya's aerosol cans than my Thandler-Chandler Model A airbrush, however, a spoon test revealed that spraying the pearl white outlines over the blue would not have the desired opacity. Oh well... I started outlining the panels with thin (1/32" or less) strips of black photographic tape by laying a long strip out on my glass surface plate and cutting the strips with a #11 against a steel rule. For the tight curves in the corners the thin strips allow me to carefully press the tape down with my fingernail to work out wrinkles as it's gently pulled and stretched around the curve. After the panels were outlined (by about 6:00) I filled in with wider strips of photo tape and cut strips and bits of wide yellow Tamiya tape. Early this morning I shot the color and the last two shots were taken minutes after all the tape came off. It's not as smooth as I'd like, but fortunately the edges are pretty clean and it appears to be more or less even. Edited December 5, 2011 by John Goschke Quote Link to comment Share on other sites More sharing options...
Erik Smith Posted December 4, 2011 Share Posted December 4, 2011 (edited) Wow. Exquisite taping job. That is a lot of work - tedious work. It looks stunning already. Photographic tape? I'll have to look that up. Nice work on the little details too - I love seeing work done that doesn't get all the attention but really makes a model stand out. Whenever I see a T-Bird from this era, I am reminded of one around town - it is lowered and rusty and never clean and a the guy who drives it sits and smokes cigarettes in it at the gas station where he works (nice sentence structure). I actually kind of like the color combo (white, black, yellow) of the masked model. Edited December 4, 2011 by Erik Smith Quote Link to comment Share on other sites More sharing options...
Greg Pugh Posted December 4, 2011 Share Posted December 4, 2011 That looks awesome John!! Quote Link to comment Share on other sites More sharing options...
W-409 Posted December 5, 2011 Share Posted December 5, 2011 Love that kind of paintjobs! I wish, I could do something like that too. Maybe I must try some day. Cool looking paint and really interesting project. I haven't seen '58-'60 Thunderbirds too often on the bench. Quote Link to comment Share on other sites More sharing options...
Sticks Posted December 5, 2011 Share Posted December 5, 2011 Very nice paint work. I like those colours. Quote Link to comment Share on other sites More sharing options...
John Goschke Posted December 5, 2011 Author Share Posted December 5, 2011 Thanks guys! Awhile back I added some color to the grill and taillight surrounds. The plan calls for some gold scallops on the body. Quote Link to comment Share on other sites More sharing options...
High octane Posted December 5, 2011 Share Posted December 5, 2011 Wow, that Watson style paint job looks awesome! Quote Link to comment Share on other sites More sharing options...
John Goschke Posted January 9, 2012 Author Share Posted January 9, 2012 MORE Masking Tape Madness! Without a practical method for doing in 1/25th scale, a .125" pin stripe outline on the panels as Larry Watson would have done, the T-bird still needed a third color, so the plan called for another panel border with a few thin scallops. The gold will harmonize with the color on the grill and taillight surrounds and hopefully gives an additional visual "hook" that isn't too busy. ...I think next model I finish is going to be a single color! Quote Link to comment Share on other sites More sharing options...
Greg Pugh Posted January 9, 2012 Share Posted January 9, 2012 Wow John. That looks fantastic!! Quote Link to comment Share on other sites More sharing options...
Gluhead Posted January 9, 2012 Share Posted January 9, 2012 Just spotted this on the HAMB and thought "SWEET!" You guys who can pull off the Watsons and lace etc in scale amaze me. Difficult enough just to get nail the look from a design standpoint, let alone execute it in scale. Big thumbs up. Excellent work on the mods as well. You have a great eye for which battles are worth picking. Quote Link to comment Share on other sites More sharing options...
Dr. Cranky Posted January 9, 2012 Share Posted January 9, 2012 Classy and beautiful. Incredible results, and yes tedious but the eye candy factor just rose by 500%. Can't wait to see it done. Quote Link to comment Share on other sites More sharing options...
Erik Smith Posted January 9, 2012 Share Posted January 9, 2012 Beautiful. Quote Link to comment Share on other sites More sharing options...
mrm Posted January 9, 2012 Share Posted January 9, 2012 Fantastic. I love paintjobs like this. I have done quite a bit of model painting and masking , but never tried something like this. Maybe because I never built any models of this type. But the more a look at projects like this one, the closer I get to buying this sort of kit just to try laying some paint. Thank you for the great pictures and explanations. Quote Link to comment Share on other sites More sharing options...
Recommended Posts
Join the conversation
You can post now and register later. If you have an account, sign in now to post with your account.
Note: Your post will require moderator approval before it will be visible.