Guest Posted September 9, 2011 Posted September 9, 2011 One of the best,if not the best looking Challengers I've seen yet! Definitely a model to be proud of! Excellent work! I need to give up Pepsi and start drinking me some Dr Pepper!
shucky Posted September 9, 2011 Posted September 9, 2011 Steve, you really did an impressive job on this one. The details are outstanding. Probably my favorite Challenger I've seen built so far. I keep looking but cant find anything I do not like about it. Very kool build and cant wait to see what you come up with next. Thanks for sharing.
High octane Posted September 9, 2011 Posted September 9, 2011 What an EXCELLENT build you've got there, congrats on a job VERY well done!
aksarben Posted September 9, 2011 Author Posted September 9, 2011 is the prop shaft scratch built ? if so how/what did you do it ? cheers prop shaft? if you mean drive shaft, then sort of. It is alluminum rod with u-joints from a Revell 69 Camaro kit. what he said!!!!.........what did you use for the ally plating in the engine bay? rich I used sheets of aluminum cut from a can of Dr Pepper. I glued them to precut pieces of stock plastic for rigidity. Steve
aksarben Posted September 9, 2011 Author Posted September 9, 2011 Wow really nice job you did you did this model justice for sure. I was wondering what did you use to hold the lines to the chassic. Also did you scratchbuild the electric fuel pump if so what you use to make it. John Pol The fuel and air lines were secured to the chassis with small strips of aluminum from pop cans as well. I built the fuel pump from stock plastic along with photo etched bolt heads. .......I am speechless!!! How did you or where did you get the gauges? Great Job once again! The gauges were printed out on my home printer on glossy photo paper, then glued into sections of polished aluminum rod. Thanks to everyone for your great feedback, it's nice to hear what other builders think of this project. Steve
sjordan2 Posted September 9, 2011 Posted September 9, 2011 Incredible detail and jaw-dropping craftsmanship. As someone who works mostly with 1/16 and 1/12 kits, I am constantly amazed at how you and our other colleagues can turn out work like this at such a small scale.
gilsdropshop1 Posted September 12, 2011 Posted September 12, 2011 (edited) THIS IS ONE BAD RIDE LOVE IT!!!!!!!!!!!!!!!!! Edited September 21, 2011 by Harry P. swearing
Skydime Posted September 12, 2011 Posted September 12, 2011 I remember the flat white Challenger. I somehow knew that this would be another great build.
David@MinidreamsInc. Posted September 13, 2011 Posted September 13, 2011 WOW ! this thing is very nice ! Hands down with out question this is a SHOW STOPPER !
Cesar Bossolani Posted September 14, 2011 Posted September 14, 2011 Really impressive job!!! Cheers! Cesar
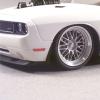
Tony T Posted September 15, 2011 Posted September 15, 2011 Great looking build. There is a ton of great details here. There were two things that caught my eye...the gap in the rear spoiler uprights at the trunk and the steering wheel is too low and close to the seat. (The driver could never get behind the wheel) I love how you fit the rear bumper and the gaps are fantastic. The overall package is well thought out and well done. Bravo!
aksarben Posted September 16, 2011 Author Posted September 16, 2011 Thanks all for the great comments. And thanks to Tony for pointing out certain issues, I'll have to convert that steering stalk to a tilt wheel... Steve
Jeff Johnston Posted September 17, 2011 Posted September 17, 2011 THUD... LOL. That's sick dude....very nice.
Ry4ns302 Posted September 20, 2011 Posted September 20, 2011 This is maybe the 5th time I've looked at this thread. I can't keep quite anymore, I have to give respect where it is due. I havn't been on here for long (or been building for long) but I do believe this is my favorite model build so far! How will you ever top this?
Cesar Bossolani Posted September 21, 2011 Posted September 21, 2011 (edited) Steve could you post some doors hinges pics, please? I was impressed and couldn't found on you website. Thanks Cesar Edited September 24, 2011 by Cesar Bossolani
phatfender Posted September 23, 2011 Posted September 23, 2011 Great looking Challenger. Nice color choice and real nice suspension. Terrific detail overall.
Recommended Posts
Create an account or sign in to comment
You need to be a member in order to leave a comment
Create an account
Sign up for a new account in our community. It's easy!
Register a new accountSign in
Already have an account? Sign in here.
Sign In Now