stulee11 Posted October 18, 2011 Posted October 18, 2011 (edited) hi again peps i am in need of some help i am starting a new kit "will upload pics tomorrow of it " but i need some help as i would like to try to detail it a little so could anyone please give me some advise on how to wire a "426 hemi " please and the easyist way of a first timer trying to run brake lines on a "67 dodge charger" oh and another thing could someone please tell me the mix ratio of humbrol enamel paint for airbrushing thanks again stu Edited October 18, 2011 by stulee11
Jantrix Posted October 18, 2011 Posted October 18, 2011 (edited) Okay, my advice to you is start slowly when it comes to detailing. Start with spark plug wiring and maybe some battery cables. Try 30 gauge wrapping wire from Radio Shack or get a pre-made/wired distributor from a company like Parts By Parks. A Google search will easily find a website that sells their stuff. I wouldn't worry about firing order because 99% of people who see your model won't know what it is anyway. Find some good pics as reference. I'm no expert at airbrushing, but I've read the rule of thumb on thinning is to the consistency of milk. Edited October 18, 2011 by Jantrix
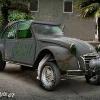
stulee11 Posted October 19, 2011 Author Posted October 19, 2011 (edited) these are the pics of the new kit i am going to build hope you all like and any advise welcome "rob" were would i run the battery wires to once put on the battery ???? Edited October 19, 2011 by stulee11
Dr. Cranky Posted October 19, 2011 Posted October 19, 2011 I say sometimes the best bet is to stay box stock with a build and then add a few subtle details, build up as you go . . . it will be totally satisfying and rewarding.
torinobradley Posted October 19, 2011 Posted October 19, 2011 It's best to do a search and find pictures of the actual car your building to route the cables and wires correctly. In my book, research is the first step to building any model. Okay, second beyond grocking it a hundred times or so... Don't forget to get rid of every mold seam that isn't supposed to be there. Only cast parts on the real car will have a seam and most of those don't show anyway. A stock exhaust manifold might be the only place on the model where a mold seam is correct... Clean building should win over details any day.
Rich Ghia Posted October 20, 2011 Posted October 20, 2011 (edited) "rob" were would i run the battery wires to once put on the battery ???? Not an easy answer. Positive goes to starter motor, alternator & fuse box. Negative is attached to the car frame. Edited October 20, 2011 by Rich Ghia
W-409 Posted October 20, 2011 Posted October 20, 2011 Here's a bit help with the ignition wires for 426 Hemi. I'll install this engine to '67 Charger. It's not in original condition, but wires run same way don't matter if it was original or not. This isn't.
stulee11 Posted October 20, 2011 Author Posted October 20, 2011 thanks everyone for the tips and help i will be starting it in the next few days hopefuly if my boys will let me lol will upload pics as and wen thanks again
Jantrix Posted October 20, 2011 Posted October 20, 2011 (edited) Not an easy answer. Positive goes to starter motor, alternator & fuse box. Negative is attached to the car frame. Most modelers will run the positive to just the starter. If you have great reference pics you might try the alternator too. Also the 66/67 Chargers are my very favorite muscle car so I'll be paying attention to your build. This is an exceptional kit as far as accuracy and fitment. You should have no issues. Edited October 20, 2011 by Jantrix
stulee11 Posted October 20, 2011 Author Posted October 20, 2011 (edited) thanks but just for ppls info this is only my 4th build lol so if its a little scetchy or wrong i will apologise in advance lol but as i upload pics any comments will be thankfuly recieved and all comments will help me along with this build and what does everyone think to the car being a nice bright pink ???? Edited October 20, 2011 by stulee11
Jantrix Posted October 21, 2011 Posted October 21, 2011 and what does everyone think to the car being a nice bright pink ???? <-------see avatar
W-409 Posted October 21, 2011 Posted October 21, 2011 and what does everyone think to the car being a nice bright pink ???? Well, the best color is what builder likes, but I'd never paint it pink. It just don't fit to '67 Charger.
Guest Sickfish Posted October 21, 2011 Posted October 21, 2011 G'day champ! Great subject Can't go wrong with a Mopar, especially this kit. It's one of Revell's best Mopar kits to date! As well as the tips most of the guys have already given, to detail-up your '67, there's also BMF ( Bare Metal Foil ) if you're up for it? Warranted if you haven't used it before this might not be the kit/car to ideally start practicing on, because the 66/67 Charger's have a bucketload of chrome trim on them, but if you have, or want to, use it, BMF will certainly add to a better displayed stock Charger It IS a much better choice then trying to mask-off the chrome trim & trying to paint it all ... But then again I'm no stranger to BMF Cheers & good luck with your Mopar mate! Cliffo
stulee11 Posted October 21, 2011 Author Posted October 21, 2011 thanks m8 i do wanna start to use BMF but 1 i havent used it before and 2 everywhere i look on the net there is only a handful of places to get it in the uk and to get it shipped over from the states is twice as much then buying the stuff lol so for now i will just mask it and paint it till i can get the funds to get some shipped over but thanks again everyone for your input it has been all took on board and i will start it soon so i will post pics as i go
Guest Sickfish Posted October 21, 2011 Posted October 21, 2011 Stulee another idea, other than going to all that masking/painting for the chrome trim, would be to get a Silver/chrome marker pen, from your local art-supply store for a few bucks.. Stulee another idea, other than going to all that masking/painting for the chrome trim, would be to get a Silver/chrome marker pen, from your local art-supply store for a few bucks.. Cheers Cliffo
robertw Posted October 21, 2011 Posted October 21, 2011 thanks m8 i do wanna start to use BMF but 1 i havent used it before and 2 everywhere i look on the net there is only a handful of places to get it in the uk and to get it shipped over from the states is twice as much then buying the stuff lol so for now i will just mask it and paint it till i can get the funds to get some shipped over but thanks again everyone for your input it has been all took on board and i will start it soon so i will post pics as i go As an alternate to BMF try the shiny silver duct tape. This is the newer style tape that is used to seal joints in home hot air duct pipes, as opposed to the old cloth backed grey duct tape. Look for the cheapest roll you can find, ie Made in China, because it tends to be thinner then better quality tapes. While they are not as thin as BMF this stuff will work if you can't find the real BMF. You'll also find it stickier and tougher then the real stuff so expect to go through a few #11 blades when cutting it. And the best part it's cheap and a roll will last for years. rob
Evil Appetite Posted October 21, 2011 Posted October 21, 2011 here are some nice references for wiring, plumbing and anything else you may need http://www.modelcarsmag.com/forums/index.php?showtopic=43977&hl=%2Bengine+%2Breference&fromsearch=1
stulee11 Posted October 22, 2011 Author Posted October 22, 2011 this is the body and firewall with one coat of colour just the bonnet to do then for more coats on them all
Guest Sickfish Posted October 22, 2011 Posted October 22, 2011 Lookin' good there Stu! Did you manage to get a good mix ( paint/thinner) ratio? You mentioned you're using Humbrol, enamel, right? Make sure you give it a real good gassing out time, anywhere up to at least a week... ( after all coats are down ) Cheers Cliffo!
stulee11 Posted October 22, 2011 Author Posted October 22, 2011 i was going to use humbrol but i went for a old can of radiant red car spray i had laying about lol
stulee11 Posted October 22, 2011 Author Posted October 22, 2011 hi peps can someone please help me in how to scratch build a distributer as i have tried to but it doesn't look to good as you can see in the pic in comparison to the original one it just looks to big i would buy a pre wired one but i just dont have the funds right now so any help or even images on how to do it would much appreciated .
W-409 Posted October 23, 2011 Posted October 23, 2011 I usually go with the distributor from the kit. I paint it normally, and then I drill nine holes, one for each ignition wire, and one for the coil. Or other way, drill one bigger hole on the center of that distributor, and stick all of the wires there. I've tried to scratchbuilt distributor once, and it turned out ok. Try building it from the left over sprue.... If you want, I can post little "how to" like how I did mine...
stulee11 Posted October 23, 2011 Author Posted October 23, 2011 thats what i tried to do is use the original one and drill the holes in it but it didnt work out for me lol
Psychographic Posted October 23, 2011 Posted October 23, 2011 Try using a smaller diameter tubing for the cap/body of the distributor and use a round jewelers file to open the hole in the center to fit your plug wires.
stulee11 Posted October 23, 2011 Author Posted October 23, 2011 good news everyone i managed to sort out the distributor cap out i will upload pics as soon as i can get my pc working and i am trying to install some fuel lines from the carbs to the fuel pump
Recommended Posts
Create an account or sign in to comment
You need to be a member in order to leave a comment
Create an account
Sign up for a new account in our community. It's easy!
Register a new accountSign in
Already have an account? Sign in here.
Sign In Now