Six-Fo Posted December 9, 2011 Share Posted December 9, 2011 Okay, I'm currently working on the Revell's 64 Impala and I was thinking about making the suspension work, but I'm kinda out of ideas how to do it for front suspension. The kit has separate frame and upper/lower A-arms. Well thats where my main problem is, springs and other stuff should be piece of cake but I'm struggling how to join the A-arms to the frame that arms could move up and down + no losing in detail + some strenght to handle the movement and not break every time. I figured it kinda hard to make them exactly like 1:1 chevy A-arms work in such a small scale. Anyone has ever done something like that? Would like some reference pictures. Quote Link to comment Share on other sites More sharing options...
Greg Pugh Posted December 9, 2011 Share Posted December 9, 2011 I've never done it but couldn't a person just make the control arms "hinge" at the frame just like a 1:1? Quote Link to comment Share on other sites More sharing options...
Six-Fo Posted December 10, 2011 Author Share Posted December 10, 2011 I was just wondering if someone has done something like that, maybe I'll get some good ideas. But I guess I have to improvise. Quote Link to comment Share on other sites More sharing options...
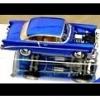
MrObsessive Posted December 11, 2011 Share Posted December 11, 2011 I've done working front suspensions on several models...........basically what I did was to get a shop manual on that particular car and scale it down to what would be suitable for 1/25th scale. Here are a few pics of what I did.........it'll be hard to go into detail in this format of how I did it simply because it will change from car to car. I don't have any in progress pics of doing the suspension on some, as these were built before I got a digicam.................... Those that have seen these in person can vouch for the fact they they do work per the real car...........even the Daytona has working torsion bars that twist. As I mentioned, a shop manual of the car you're working on might be the best way to go as you can get an idea where to make your pivot points------and to simplify things down without it looking too gimmicky. Hope this helps! Anymore questions ask away............I'll try to help as best I can, but the memory's a little hazy now of step by step procedures as it's been years now since I've done a fully working suspension. Quote Link to comment Share on other sites More sharing options...
Six-Fo Posted December 11, 2011 Author Share Posted December 11, 2011 (edited) Wow thanks thats exactly what I was looking for! One question: how did you attatch the hinges to the frame, they seem to be so tiny that need quite a structure to be .... uhm.... (excuse my english, not my home language)......strong enough that wont come off after few movements? Especially the first two pictures, they're similar to the 64 impala Edited December 11, 2011 by Six-Fo Quote Link to comment Share on other sites More sharing options...
MrObsessive Posted December 11, 2011 Share Posted December 11, 2011 If I can remember correctly, I used styrene rod drilled through for an .020 metal rod to go through, sliced it to scale, liquid glued it------ and then let it dry on the frame thoroughly, then put a very small dab of super glue surrounding the joint. Ten years later I can still flex the suspension and the frame works just as well as the day I built it. Quote Link to comment Share on other sites More sharing options...
MrObsessive Posted December 11, 2011 Share Posted December 11, 2011 (edited) I should have added that the first two pics are of a '58 Chevy, which is very similar (if not exact for a model) to the '64 you want to work on. Edited December 11, 2011 by MrObsessive Quote Link to comment Share on other sites More sharing options...
Harry P. Posted December 11, 2011 Share Posted December 11, 2011 What's up with all those holes in the chassis??? Quote Link to comment Share on other sites More sharing options...
MrObsessive Posted December 11, 2011 Share Posted December 11, 2011 Dunno Harry.............perhaps drain holes per Mopar? Quote Link to comment Share on other sites More sharing options...
Harry P. Posted December 11, 2011 Share Posted December 11, 2011 Drain holes under the transmission tailshaft??? Quote Link to comment Share on other sites More sharing options...
george 53 Posted December 11, 2011 Share Posted December 11, 2011 Harry, those are alignment pin guides. They help hold the pieces in the jig as they're welded up to complete the whole assembly. Quote Link to comment Share on other sites More sharing options...
roadhawg Posted December 11, 2011 Share Posted December 11, 2011 The ones directly under the transmission tailshaft are bolt holes........on the real one, there's bolts in there that fasten to the transmission mount. Quote Link to comment Share on other sites More sharing options...
MrObsessive Posted December 11, 2011 Share Posted December 11, 2011 (edited) Yeah, I had a restoration book when I built that Daytona (in 2000! ) the bolt holes were there as well as the alignment holes...........I just tried to duplicate it as best I could. I learned something new as I didn't know that's how Mopar (and probably others) did the unibodied chassis---------makes sense though! Edited December 11, 2011 by MrObsessive Quote Link to comment Share on other sites More sharing options...
Dr. Cranky Posted December 11, 2011 Share Posted December 11, 2011 Pretty impressive work, but then you would not expect any less from Mr. Obsessive! Quote Link to comment Share on other sites More sharing options...
Six-Fo Posted December 11, 2011 Author Share Posted December 11, 2011 If I can remember correctly, I used styrene rod drilled through for an .020 metal rod to go through, sliced it to scale, liquid glued it------ and then let it dry on the frame thoroughly, then put a very small dab of super glue surrounding the joint. Ten years later I can still flex the suspension and the frame works just as well as the day I built it. Thank you very much for the advice! I'll see what I can do. Quote Link to comment Share on other sites More sharing options...
62rebel Posted December 11, 2011 Share Posted December 11, 2011 the problem with a working suspension other than complexity and durability is establishing a zero point for the model to stand at; springs have to be carefully chosen or hand-wound to suit the weight of the model and the level desired, or a hidden bumpstop to maintain proper height installed. Quote Link to comment Share on other sites More sharing options...
Six-Fo Posted December 12, 2011 Author Share Posted December 12, 2011 the problem with a working suspension other than complexity and durability is establishing a zero point for the model to stand at; springs have to be carefully chosen or hand-wound to suit the weight of the model and the level desired, or a hidden bumpstop to maintain proper height installed. That wouldnt be a problem for me since I'm gonna use it on a lowrider build . I'll make the system tight enough so I can raise the car up and down manually and the tightness of some components will handle the body weight. Quote Link to comment Share on other sites More sharing options...
MrObsessive Posted December 12, 2011 Share Posted December 12, 2011 One thing about working suspensions, is there (at least for me) was a LOT of trial and error to get it to look and function properly. You're doing a lowrider as you mentioned, and you have some leeway in which you can bypass certain functionality and appearance. In my case, since I build pretty much replica stock............It has to look and appear pretty much just like you would see it on the street. So just a fair warning------I hope you're a patient person as this can test your patience to the highest degree! Quote Link to comment Share on other sites More sharing options...
sak Posted December 12, 2011 Share Posted December 12, 2011 Mr. Obsessive that suspension looks top shelf. One question however. If you make the control arms adjustable, did you not have to build also some form of adjustable ball joints? Quote Link to comment Share on other sites More sharing options...
MrObsessive Posted December 13, 2011 Share Posted December 13, 2011 Mr. Obsessive that suspension looks top shelf. One question however. If you make the control arms adjustable, did you not have to build also some form of adjustable ball joints? No, not really. The suspension doesn't really need to flex all that much to work unlike a 1:1........not to mention there's just not that much weight on the suspension as it is. We're talking about a few ounces perhaps relatively speaking? Thanks for the compliment! Quote Link to comment Share on other sites More sharing options...
Six-Fo Posted December 19, 2011 Author Share Posted December 19, 2011 One thing about working suspensions, is there (at least for me) was a LOT of trial and error to get it to look and function properly. You're doing a lowrider as you mentioned, and you have some leeway in which you can bypass certain functionality and appearance. In my case, since I build pretty much replica stock............It has to look and appear pretty much just like you would see it on the street. So just a fair warning------I hope you're a patient person as this can test your patience to the highest degree! Yeah I've been building model kits for a while and now I'm kinda busy person(university) so i took my favorite kit and I thought I would make it as awesome as possible. I also told myself that the goal is not to get it finished in certain time, the goal will be ultimate detail and clean work(for my standards) so maybe it takes 5 years to complete this kit Quote Link to comment Share on other sites More sharing options...
Recommended Posts
Join the conversation
You can post now and register later. If you have an account, sign in now to post with your account.
Note: Your post will require moderator approval before it will be visible.