jmpsebring Posted March 30, 2012 Author Posted March 30, 2012 Casesforcollectibles.com is the site. Acrylic boxes is the catagory. I have purchased approx 10 cases and have had zero issues with anything. Make sure it's under 6' though.....that's their limit. Shipping is not cheap, but it's 100% first class packing. you might find a cheaper case from plastic, but these acrylic cases are built to very high standards without getting into the cost of wood furniture bases. This big 19x10x8" case was approx $84. You could easily go smaller. I'm making this 8*' tall for the Transporter wall.
Romell R Posted March 30, 2012 Posted March 30, 2012 Thanks im gonna look into getting one made for the Daytona
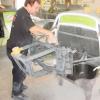
jmpsebring Posted March 30, 2012 Author Posted March 30, 2012 One of my fave parts! The firewall has been covered with .010 sheet plastic. It's barely tacked in place with some superglue. If I can't remove it, I'm......in deep trouble.. I plan on cutting layer #2 but I wonder how hard it will be to get all of the lines 'perfect' or even close..? So at the last second I decided to frame everything in strips instead of cutting panles with holes. I think it was far faster in the long run. I was going to need putty anyway.
jmpsebring Posted March 30, 2012 Author Posted March 30, 2012 I placed a little ball of APOXIE clay(very much like extra fine white milliput) into the sharp angles. Took a large brass roller and kept it wet while smoothing, removing extra clay. Once it was flat and even with the top layer strips, I used a thinned out piece of tubing to 'stab' or take a bite of the puttied joint, ensuring the leftover was a perfect radius that I could repeat over and over on the other corners. Once finished, I used a q-tip to clean the area, and will set this aside overnight.
pharr7226 Posted March 31, 2012 Posted March 31, 2012 Awesome firewall. I love the use of the tube for the uniform corners.
Mooneyzs Posted March 31, 2012 Posted March 31, 2012 Jack... Great work on the firewall man. You are sure making great progress on it.
jmpsebring Posted March 31, 2012 Author Posted March 31, 2012 First coat of primer shows the flaws, but overall it's clean, crisp and pretty even. I liked the result. Plus with some debonder, I was able to pop the part off the chassis. More x-bracing and more tabs added. Seems like I've slowed way down, but some of this stuff takes much longer to produce. Still less than two weeks.
Red rocket 10 Posted April 1, 2012 Posted April 1, 2012 Wow , this build is outstanding , keep up the beautiful work! Leonard
jmpsebring Posted April 1, 2012 Author Posted April 1, 2012 Thank You and thanks to anyone who has had a kind word to say. You can get so wrapped up building..trying to just get the next part built that you forget to take the time to thank those who took the time....
thumper86 Posted April 1, 2012 Posted April 1, 2012 Man thats some beautiful craftsmanship right there !
Mooneyzs Posted April 1, 2012 Posted April 1, 2012 (edited) Jack... that fire wall looks great man. Awesome work on it. what size styrene did you use? Edited April 1, 2012 by Mooneyzs
jmpsebring Posted April 1, 2012 Author Posted April 1, 2012 thanks guys, I'm using .015 sheet to wallpaper the firewall and .020x1/8" strip for the framing.
DirtModeler Posted April 2, 2012 Posted April 2, 2012 That thing looks great! You're going to convince me to buy a sandblasting setup now after looking at your build. i'm kinda lazy and i'd much rather sandblast the chassis after soldering. Keep it coming, I love how this is progressing.
jmpsebring Posted April 2, 2012 Author Posted April 2, 2012 be aware this is not the mini sandblast tool. I happen to have a friend thats got a bead blaster(full size) in his shop. The reason I keep lightly blasting the frame is because it's great fun! Plus it's just amazing how clean and how smooth it makes everything. The mini one might work better or be worthless. I have no idea. BTW, the Dirtmodeler parts have saved dozens of hours. A great product. This was a lucky time for me to get in to promods.
gasser59 Posted April 3, 2012 Posted April 3, 2012 This is off the charts Jack. I know all you guys are conspiring together to get the rest of us to move to 1/16th scale and this build is very convincing.
jmpsebring Posted April 4, 2012 Author Posted April 4, 2012 That pesky job has been getting in the way. Good thing I get paid..otherwise....... I'm running into a few minor problems with this funnycar body. It's not long enough in front. But the nose will be off and it's still going to be a nice model. Also decided to cut up the body. No real reason not to since it will also be without doors. Also started on my back wall and base. More photos soon. I need to study some more tonight. (One needs to be smarter than their students) Thanks for the comments..I too was inspired. By the talent here and the talent of those that make it possible. Dirtmodeler, RBMotion, Slixx, Flashpoint, Compresins, Micronitro, Proline, TDR....for starters. Wish I had a small "thanks to" black decal with there names. It would be a nice way to pay tribute to those that made this era of dragcars possible.
Mooneyzs Posted April 4, 2012 Posted April 4, 2012 Jack... That is looking great bud. Nice work, it is coming along great!! I Like the jack stands you have it sitting on.
eviltwincustoms Posted April 4, 2012 Posted April 4, 2012 Looks good, you are clipping right along on this project. I am confused, which isn't very hard to do these days with me. So are you saying your front clip of the chassis is to short or the actual resin body/front clip is now to short? Because I thought you said you had the wheelbase set at 115", so the body shouldn't be too short based on the measurement of the wheelbase you set up....
Recommended Posts
Create an account or sign in to comment
You need to be a member in order to leave a comment
Create an account
Sign up for a new account in our community. It's easy!
Register a new accountSign in
Already have an account? Sign in here.
Sign In Now