
eviltwincustoms
-
Posts
903 -
Joined
-
Last visited
Content Type
Profiles
Forums
Events
Gallery
Everything posted by eviltwincustoms
-
1/16 Scale Army Vega Funny Car - Finished 10/14/2018
eviltwincustoms replied to Mooneyzs's topic in WIP: Drag Racing Models
Probably less with setting the gap but more importantly indexing the plugs so they all set towards the correct valve once seated into the head. LOL So Chris you need to add little washers on each plug. Great work bud, keep plunging away with your project so I can see some more updates! -
Man Bill.... That makes you almost as old as dirt! J/K!
-
Bill those look pretty cool. Are you running any negative offset to give room for your rear end and disc brakes? Looks like you will need to do some body work and open up those wheel wells for those big boys! Nice work!
-
Joe, if you have already cleared your tubs and the polyurethane has hardened on top, the decals are not coming off with Hot Water. That is like a hard candy coating that will only come off with a lacquer thinner or some sort of solvent. I have never tried it and not sure if it will work, but since it is a much smaller part then 1/10th scale.. that I use to work with. Try the Purple Power, based on another RC Car forum I use to be on all the time... They are saying it will not affect your CA Glue at all, so they shouldn't fall apart on you. So you should be safe, I can't say for sure as I have never tried it.
-
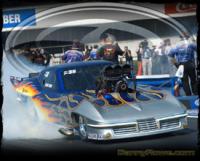
That pic of the red car is Mike Coopers 63 Pontiac Tempest. I actually talked to he and his wife a couple years back when he was just getting into the pro mod scene at the Super Chevy in Topeka Kansas. He was doing some test runs nice car and a hole s### load of money in that carbon fiber body.
-
57 chevy pro mod w.i.p (updates 11/11/12)
eviltwincustoms replied to tyrone's topic in WIP: Drag Racing Models
Dayaaaammmmmnnnn that is just frikin amazing work Tyrone. Even in the picture it looks as smooth as a baby's butt. I am sure the pic doesn't even do it justice of how it really looks in person. Outstanding work buddy! -
Bill I Would have thought you would have milled out each chassis rail and mill each cross member from aluminum. I am thinking you should cut the doors and trunk lid open and mold them from the same aluminum you used on your hood. Instead of the Boyd Alumicoupe, I am thinking the Bill Davis AlumaCuda!
-
Your clutch can came out great, much better the second time with the rounded edge. Looks like you are coming right a long with using your lathe. I may have missed it, did you decide to hollow it our as well? The Air shifter pods look great on the tranny. Keep them updates coming.. Makes me want to get cracking on mine again!
-
Bill let's see the progress pics of the brass chassis! Wess showed me your start.
-
Bill...don't I wish that was an option! In Colorado Springs this week, come home for the weekend. Then turn around and fly out to the Philippines for 2 1/2 weeks. October is not a good month for me to do anything. Joe, i will see if I can post some of my pics off of my Tablet to Photobucket and get them uploaded here for ya to take a look.
-
Thanks Guys for the interest! Unfortunately the rest of the year for me, I will have to put my stuff on the Back Burner for now. Joe/Chris, I haven't forgotten about this project. Just have been extremely busy with Work (traveling) and doing some side work things. Been working on another Chassis and based on the way it is going together I may have to push this one to the side and start over. I think that if I do start over, I am going to stretch out the body to the proper 115" wheelbase and build a new chassis. LOL I broke down and spent my hard earned money on some new tools, and must say buying the attachments and the cutting bits has been my nemesis! Because I would start a project and find that I didn't have the attachment or cutting bit needed. Then would have to wait.... such a pain in the neck! Since early August. I broke down and purchased a Sherline Lathe and a nice Grizzly shop mill. So I have been working on multiple projects for my car ranging from new wheels to rear end parts. Thanks to "VintageDragfan - Bill" and another KC Slammer member, I have all the great support to really push my talents hopefully to that next level.
-
57 chevy pro mod w.i.p (updates 11/11/12)
eviltwincustoms replied to tyrone's topic in WIP: Drag Racing Models
The blue and white isn't a tri five original color. I know you have done many in black. My suggestion would be to go with that aqua/teal color and white like an original 57. IMHO The blue just doesn't fit the classic car well. -
1-8 scale 69 camaro pro mod (mike hill's car)
eviltwincustoms replied to comp1839's topic in WIP: Drag Racing Models
Dave I hope you didn't mind me prying into your personal business. I just saw the post in the other thread and thought others here would really like to see what you were working feverishly to acquire. Again, I appreciate you sharing with us and can't wait to hear more some day. -
This is going to be a great build. The 69 camaro is one of my favorite body styles as well. Those are some nice rims Jim did up for you as well and look right at home in the tires.
-
Outstanding work Rom... By chance would you be willing to to share the Site you used for reference to weave the seat belt buckles correctly?
-
Thanks Brian for the information, that is an easy conversion to make the proper adjustments for the 1/16 build. On another thread h am reading the 1/16 Pete is actually 1/18th scale... So it looks like I need to do some scaling to verify if that is correct.
-
'66 Mustang Pro Modified (Updated 10/16/2013)
eviltwincustoms replied to W-409's topic in WIP: Drag Racing Models
Niko looks like a fun little project you got going their. So are you sticking with the Pro Mod theme and extending the wheelbase as well? Lbuddy like you have pretty much everything needed to get you started. Hit up our buddy Tyrone for tips on converting your chassis and you will be set! -
Very interesting information on the differences between the 359 and 379. Planning to build a 379 with a 303" wb and trying to find out how much longer I need to stretch the hood on the 1/16 to make it a long hood. Anyone know what one would need to stretch it in 1/24 or 1/25th? I can then convert for my larger project. Thanks, Brian, any plans of getting a Tut up on how to rework the hood on one of these soon?
-
1-8 scale 69 camaro pro mod (mike hill's car)
eviltwincustoms replied to comp1839's topic in WIP: Drag Racing Models
Thanks Dave for the insight. That is an amazing car. It will be cool to see it transform into something more streetable. -
1-8 scale 69 camaro pro mod (mike hill's car)
eviltwincustoms replied to comp1839's topic in WIP: Drag Racing Models
Sweet that is good to hear. I would really like to hear more about your 1:1 project. So the original owner wouldn't go for throwing in the 900+ cubic inch Pat Musi motor with the deal huh? I will have to keep an eye out for possible updates on your major project. -
1-8 scale 69 camaro pro mod (mike hill's car)
eviltwincustoms replied to comp1839's topic in WIP: Drag Racing Models
Hope everything is okay with you and your family. Now if it is to work on your new 1:1 project you posted... I think that would be where I would pour my time into something you and your wife could enjoy. -
You have to wait until I have had the chance to meet up with him. Living just a hour or so away, I haven't had the opportunity to spend time with Bill to have him show me the ropes just yet. I'm afraid if to many people do this Bill will start charging for lessons!
-
1-8 scale 69 camaro pro mod (mike hill's car)
eviltwincustoms replied to comp1839's topic in WIP: Drag Racing Models
I had to take a second look. Just a quick glance it looked like a real block sitting their waiting to go into a build. If you had that block mounted to a block stand it could easily pass as being a 1:1. -
John I have been lurking in on your build and have to say you my man... have a daunting task if you plan on wrapping this project up in your usual Build time frames. Question, what is that on your Roots blower toward the back on each side? Is that the injection ports for the NOS?
-
Super Gas Cobra.....Complete, 11/24/2012
eviltwincustoms replied to 1320wayne's topic in WIP: Drag Racing Models
Wayne, I have to say this one has been coming along nicely. I like how you have worked in the chassis, looks like it was meant for the car! Can't wait to see what you have planned for the paint scheme.